
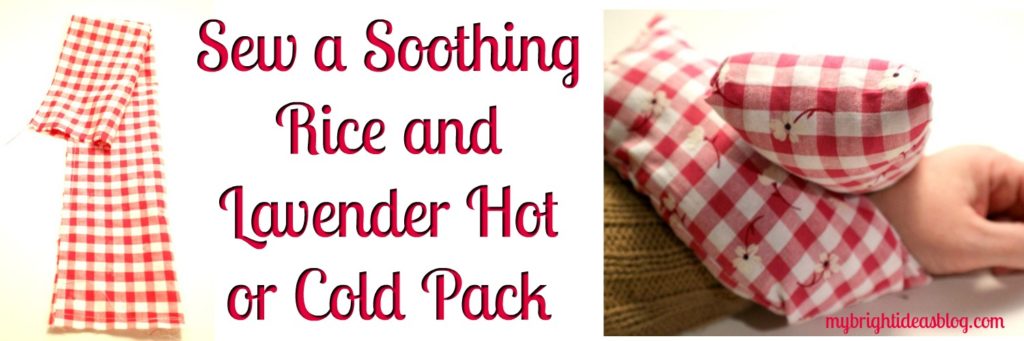
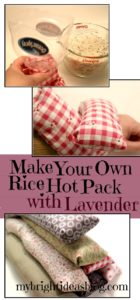
Microwavable Rice and Lavender Hot or Cold Pad
Need to soothe aches and pain, bumps and bruises? Nothing brings comfort like a microwave rice hot pack! Add a hint of lavender to your hot pad for a calming effect.
If you are sporty with muscle aches or have bickering children that make a certain shoulder muscle tense you need a cloth bag of rice that you can microwave. Everyone needs a few of these in the house. Keep one in the freezer for when you need a cold one (great if a doozy of a headache is coming on) and another ready to go for the microwave when you need a hot one. Even if there are no muscle pains at the moment if you are feeling sick or can’t seem to shake off a chill its wonderful that in 3 minutes in the microwave you have a soothing warm compress…and don’t get me started about cramps….
You will need:
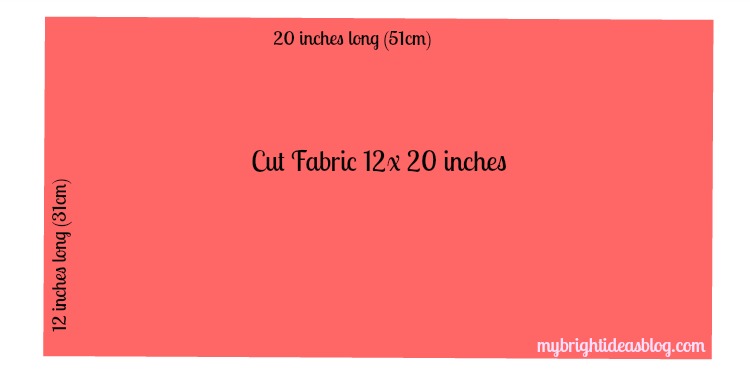
- A piece of cotton 12 x 20 inches (rather than buy new why not upcycle an old pillowcase or piece of clothing you don’t want-or something from the sewing scrap basket)
- Sewing machine
- Needle and thread
- Funnel or juice bottle turned into a funnel
- 3 lb bag of uncooked long grain rice
- 3 tablespoons of dried lavender (this is optional-if you are sensitive to smells start with 1tbsp-it should be subtle and soothing) you can buy lavender from the bulk store or health food store

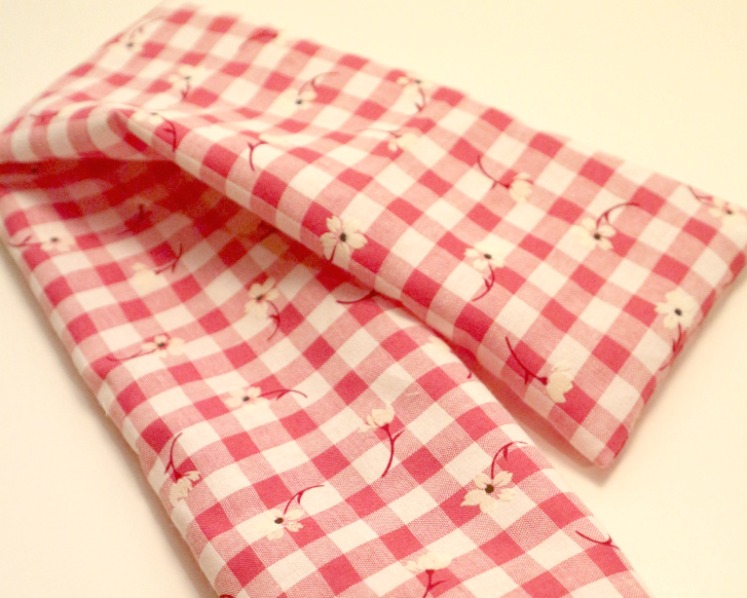
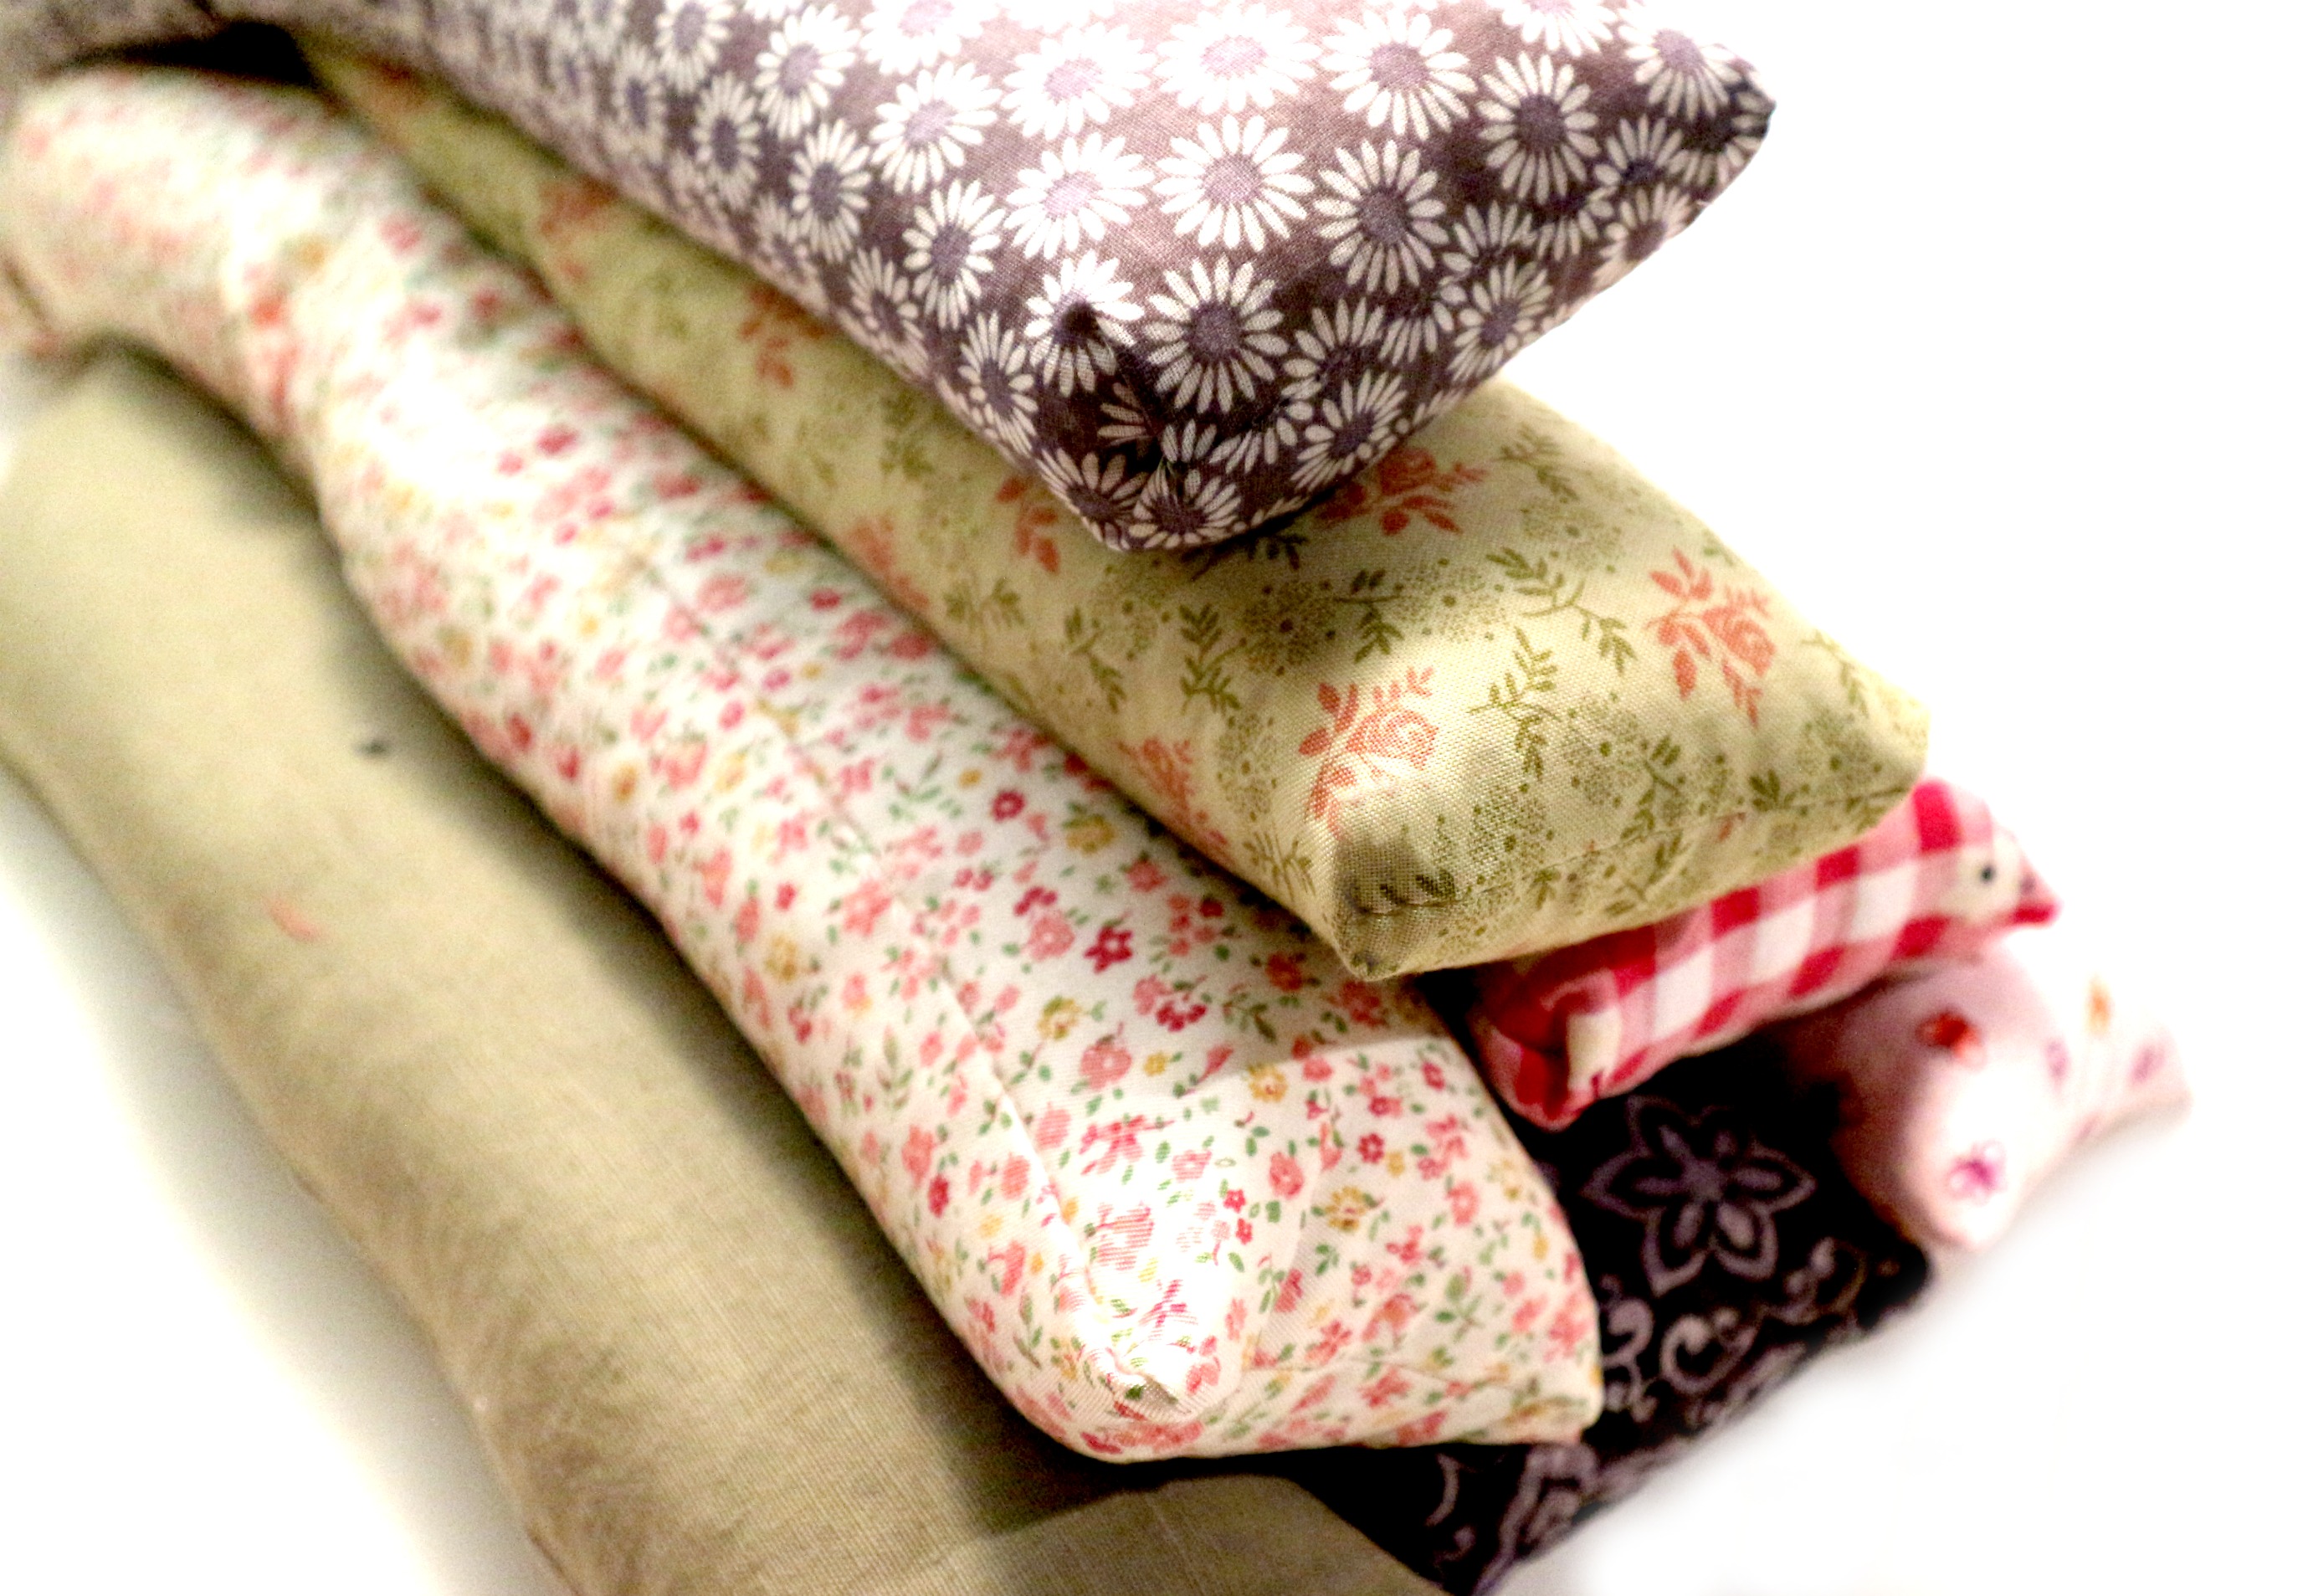
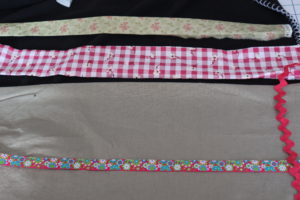
Choose a calming fabric in 100% cotton. You only need 12 inches x 20 inches (30 cm by 51 cm) so its a great way to use up a scrap remnant from another sewing project.

I love this soothing pattern. Just looking at it calms my headache.
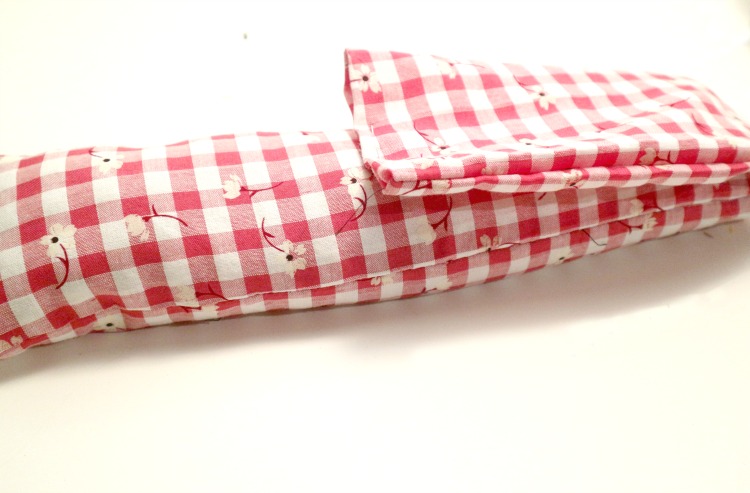
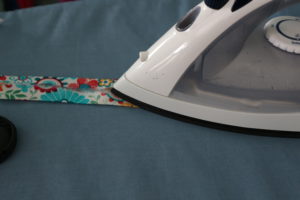
Cut the fabric to size and iron flat.
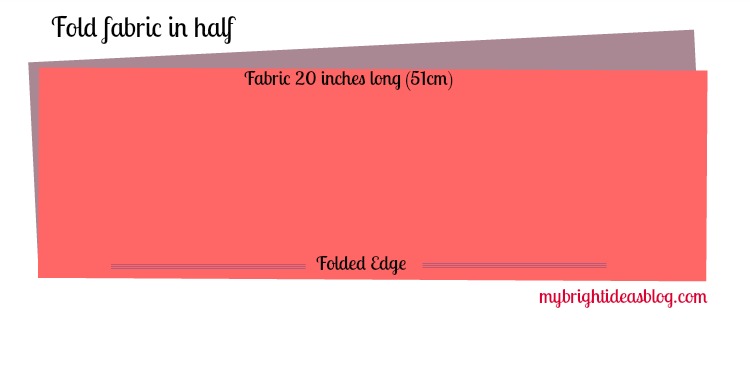
Fold in half.
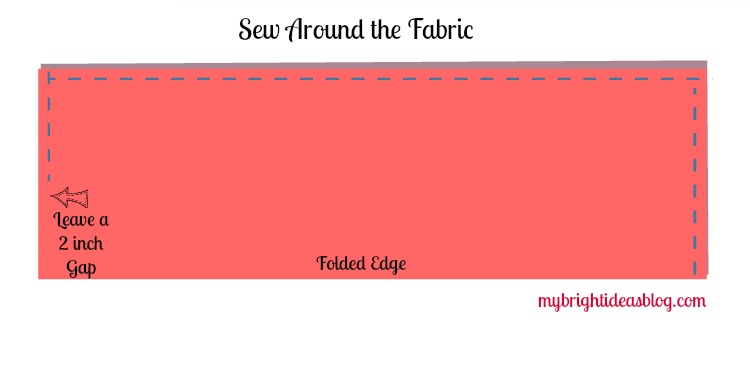 Sew around the edge.
Sew around the fabric leaving a 2 inch opening.
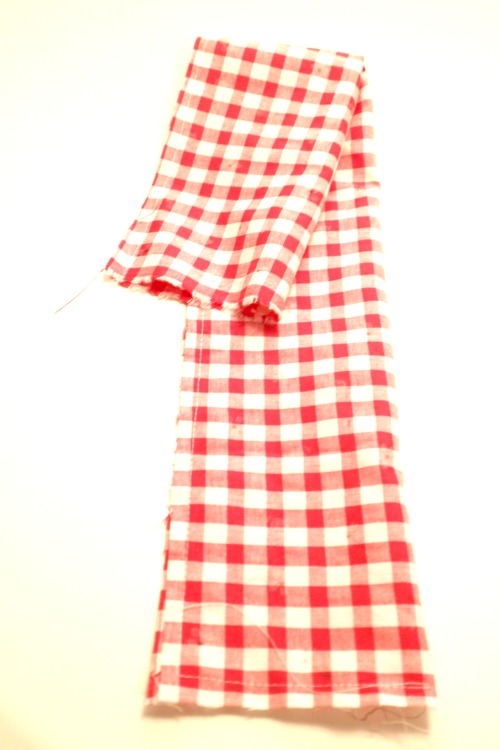
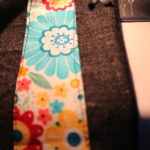
Turn the fabric inside out.
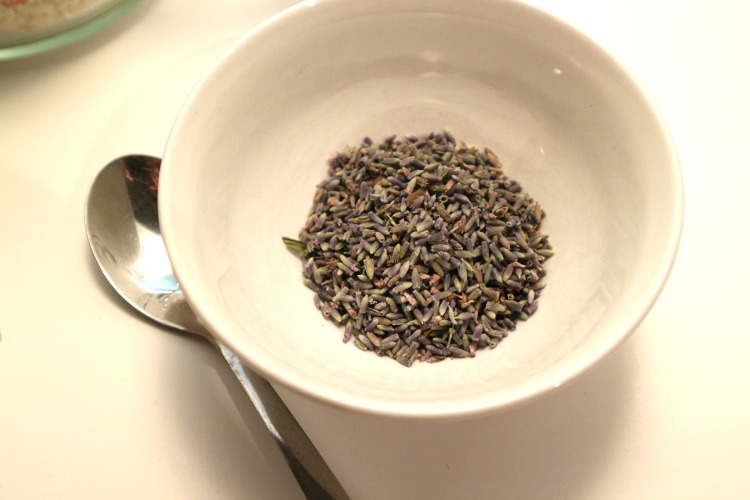
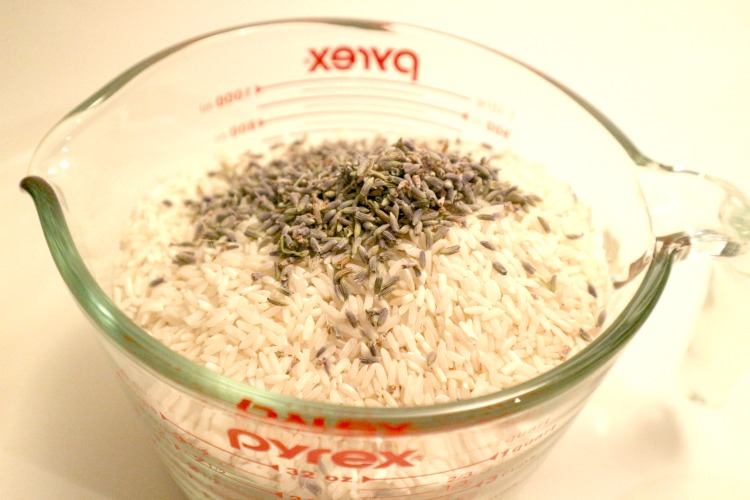
In a large bowl, combine 3 cups of rice and 3 tablespoons of lavender buds. Lavender is completely optional. I found that the lavender was very strong smelling when heated, so I decreased it to 1 tablespoon.
I picked up lavender at the health food store.
Using a funnel fill the bag with the rice and lavender mixture. Fill to approximately ¾ full.
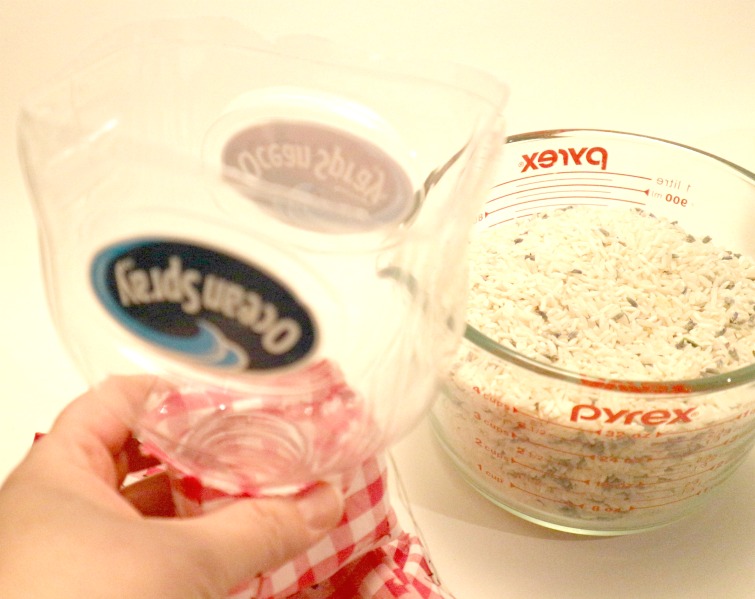
I didn’t have a funnel with a wide enough neck so I pulled a big juice jug from the recycling bin and cut off the bottom half. It’s the perfect funnel for this project.
You don’t want it jammed full because its going to be wrapped around your neck or across your forehead so you need some flexibility. Leave 1/4 of the tube empty. Pin the end securely.
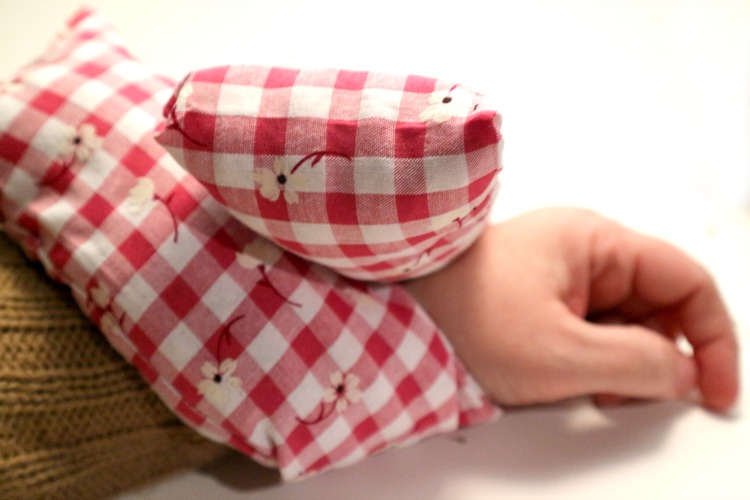
Try it out! How is the flexibility? See how comfortable it is with the current amount of rice. Add more or remove some to make it more to your liking.
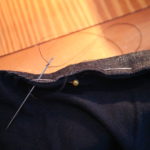
If you are happy with it….Tuck the unfinished ends in and hand stitch it closed.
Hot Pack Instructions- To make it a hot pack just microwave for approximately 2 minutes depending on your microwave. It may need another 30 seconds but test it to see what is right for you. My sized rice pack and microwave seem to be perfect at 3 mins. Be careful not to make it too hot for skin. It should be lovely and soothing. (Not for children-Use at your own risk)
Cold Pack-Place the rice pack in a ziplock bag and put in the freezer. Amazing for headaches or bumps and bruises.
Mini Packs and Pocket Warmers-To make pocket warmers cut a piece of fabric 3 x 5 inches (or old lost sock) to be approx. 5 inches long. Follow the instructions above. For microwaving heat for 30 seconds to start and test out the perfect length of time for your hand warmers.
I always store my rice packs in a ziplock bag to keep the dust off. Do not microwave it in the plastic bag.
Remember to make a spare one for your desk at work and make a few extras to take to friends with the flu with some chicken soup. Ohhh, you’re such a good friend…

…


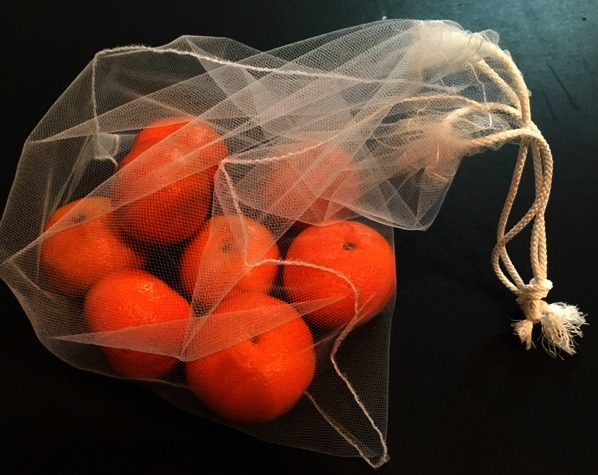
Sew Your Own Shopping Bags for Produce Fruit and Vegetabes – Very Easy!
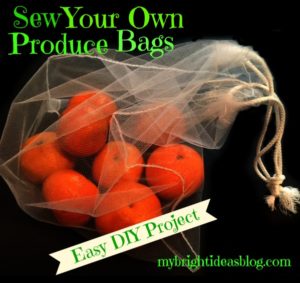 Using reusable shopping bags has been the trend for years now when carrying your groceries home. But have you noticed that some stores are encouraging you to bring cloth bags for the produce too? I have seen this trend at my local bulk store.
Of course, if you ‘ve been going to the farmers market, cloth produce bags makes so much sense. They often have the container of plums set out and then toss them into a plastic bag for you. They don’t even weigh it. Now that I have made these bags, I want to go the extra distance to the Saturday farmers market!
Fabrics you could use for this project include… cotton, curtain sheers, tulle, sheer nylon….consider though that if your going to a store that will be weighing your produce the heavier the fabric the more you will be paying each shopping trip. Choose lightweight!
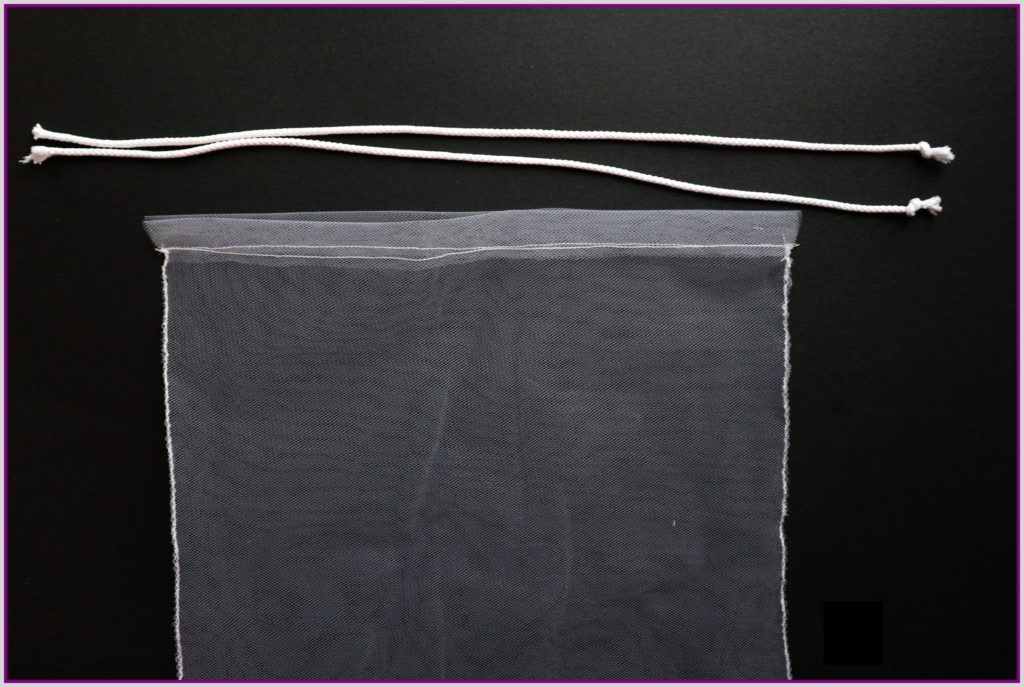
On my first trip to the fabric store I was shocked at the cost of nylon….$20 /meter?!? Youch! So I purchased a meter of tulle (wedding veil and tutu sheer fabric) costing a low, low $1.99 per meter. This seemed sensible so I could make them without thinking about how costly any errors will be. I do plan to make them in a few fabrics though including nylon so I can see how different materials hold up with wear and tear. For today’s project I’ll stick with 1 metre (or 1 yard) of toule and 2 meters (or yards) of thin white cording. You could also use ribbon. This is enough to make 4 or 5 bags depending on the size you choose to make.
The first step is to decide on your bag size preference. Grab your ruler and eyeball what these sizes would look like.
6×9, 8×10, 10×13, 12×18, 18×24
Add an inch for the fold over for the string or ribbon to go through. I want to try a bunch of options…. but for this post I will keep it simple. This one in the photo ended up being 11 inches by 12.5 when finished. I’m not very picky about the sizes-as long as it is big enough to fit 6 apples I’m happy.
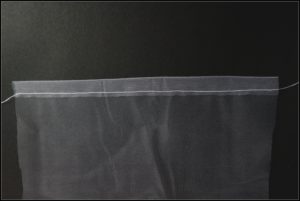 Fold the top edge over 1/2 inch and sew across. This will form the drawstring casing to tie the bag up.
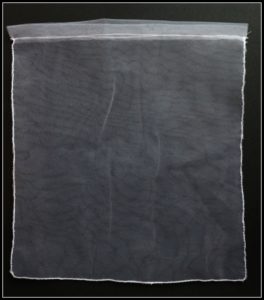
Pin the fabric together-this is slippery stuff- and sew around the sides and bottom. Start and finish sewing just under the casing to the bottom of the bag. I used a straight stitch, then trimmed it fairly close to the stitch and then sew around again with a zig zag stitch to tuck the ends in. If you are using nylon or sheer curtains they will fray if you don’t zigzag.
Attach a safety pin to the end of your ribbon or string and pull through. Tie a knot at the ends.
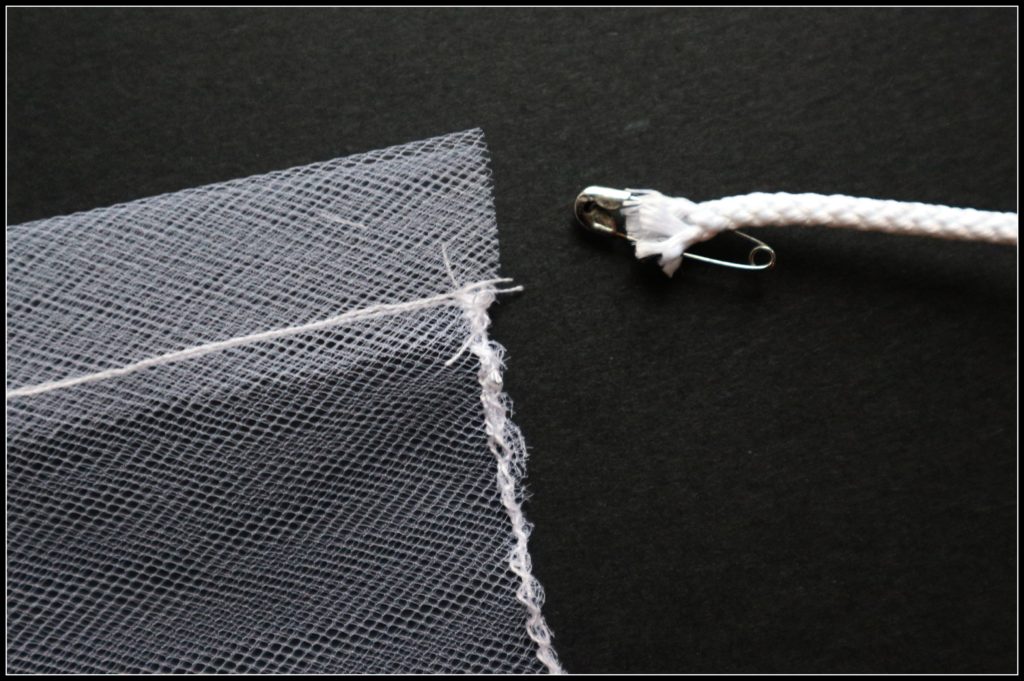
Attach a safety pin to the end of your ribbon or string and pull through. Tie a knot at the ends.


Build a Shelf Behind the Couch
 A shelf behind the couch supported by just a few pieces of wood makes a great place to put nic nacs. Just a couple of boards, screws, and painted black.
I was visiting a friend and her beautiful new baby-with the most perfect nose I’ve ever seen-and spotted something that I meant to ask her about but forgot to come back to it because she was in the middle of a hilarious story of all the mishaps at a wedding she had attended this past summer. I can’t get into to the details but lets just say romantic barn weddings do have their fire hazards. It was a close call but the hobby farm was safe and all was well.
Anyway, I left wondering what was it behind her couch that allowed her to put picture frames and nic nacs behind the couch? Was it like a British style radiator cover -like a box? Was it a shelf screwed into the wall? Next visit I will ask, but in the meantime I was getting supplies to remake my closet into a pantry when I thought lets see if we can’t invent a shelf that would go behind my couch so I have a place for a few pretty things too.
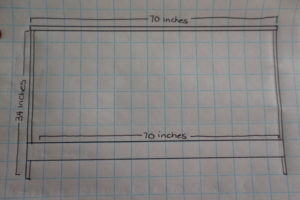
So I measured the height of the couch (34 inches) and the width (70 inches). I got 4 boards 1x6x6 (that will be 72 inches long so I cut off the extra 2 inches on 3 of the boards) the 4th board I cut into 2 pieces 34 inches long.e and 2 more boards the same length as stabilizers to the very skinny shelf. I predrilled holes into the top and put 2 screws on each end. Lay the structure on the floor and put in the first stabilizer wood across. Measure approximately 7 inches from the bottom…. 2 screws on each end should do it. Then gently flip it over so you can do the same on the other side.
If you are happy with how it looks then you can decide how to finish it. I have quite a bit of black in this room so I put on black paint but you could also put a stain and clear coat on it to match wood you have. The smoother the top the easier to dust so you should sand it smooth and wipe off the dust before painting.
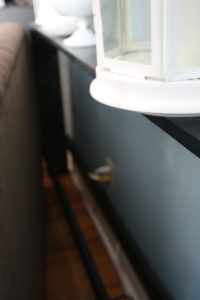
I felt like the room was so much cozier with my little shelf. Its a little room…in a little house, so we don’t have much space for pretty things. I like that this is also a space that a certain naughty puppy can’t grab things to chew on…unlike the coffee table. Also if your wee babe is starting to crawl and putting things in her mouth.
This project literally takes 15 mins to build if you have the pieces cut by the hardware store….only 5 mins more if you are cutting the wood yourself. An hour for the entire project plus remember to go back and do a second coat of paint. It’s that easy!
p.s. This won’t work if you have a recliner couch. Sorry.

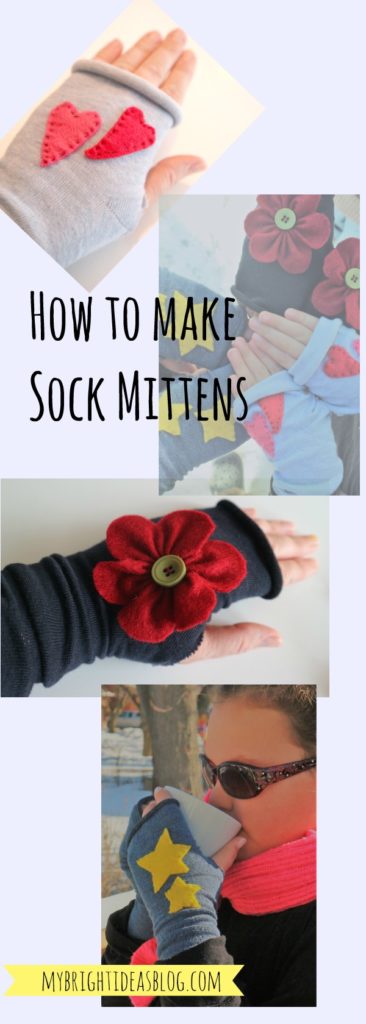
Fingerless Mittens from Socks? Super fun!


Have you noticed the weather is getting chilly again and your little fingers are getting cold. But where are last years mittens??? Don’t ask me….I have a drawer with 10 single mittens and gloves that I just can’t figure out where the partners have gone to.
Not to worry! It is so easy to make fingerless gloves/mittens from a pair of socks! Find yourself a clean pair of old socks that you can upcycle….or treat yourself to a new pair of socks.
You will need….
- socks
- scissors
- needle
- thread
- felt scraps
Start by resting your hand on the sock and seeing where your thumb will be and the length of your fingers compared to the end of the socks. Mark a little “o” where the thumb hole will be near the bend in the sock.
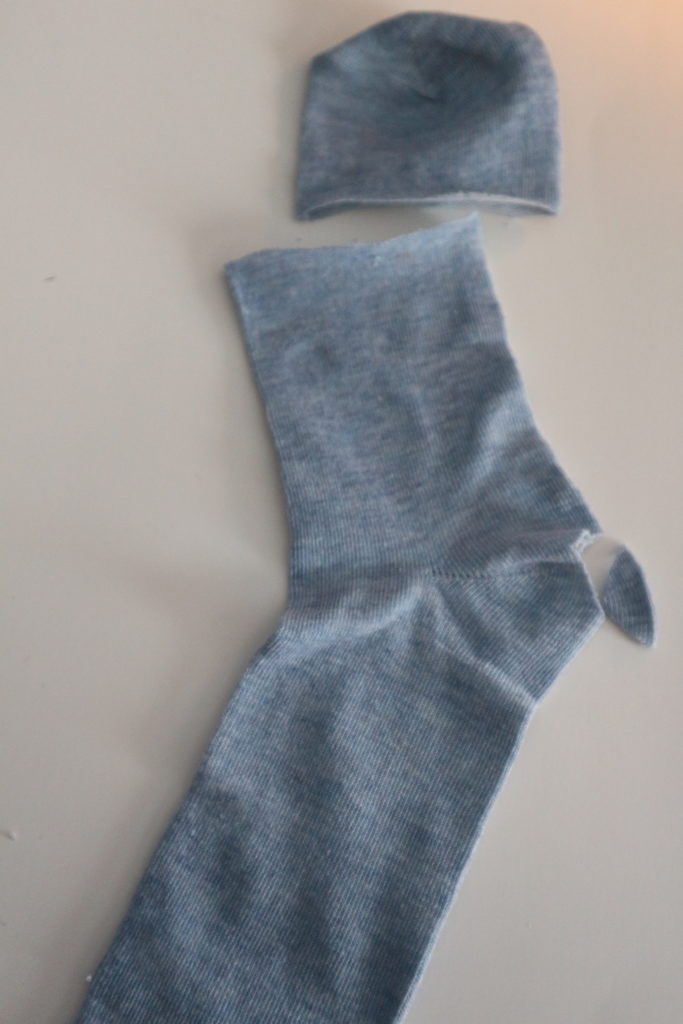
Cut a small hole at the bend in the sock heel for the thumb and across the top for the fingers.
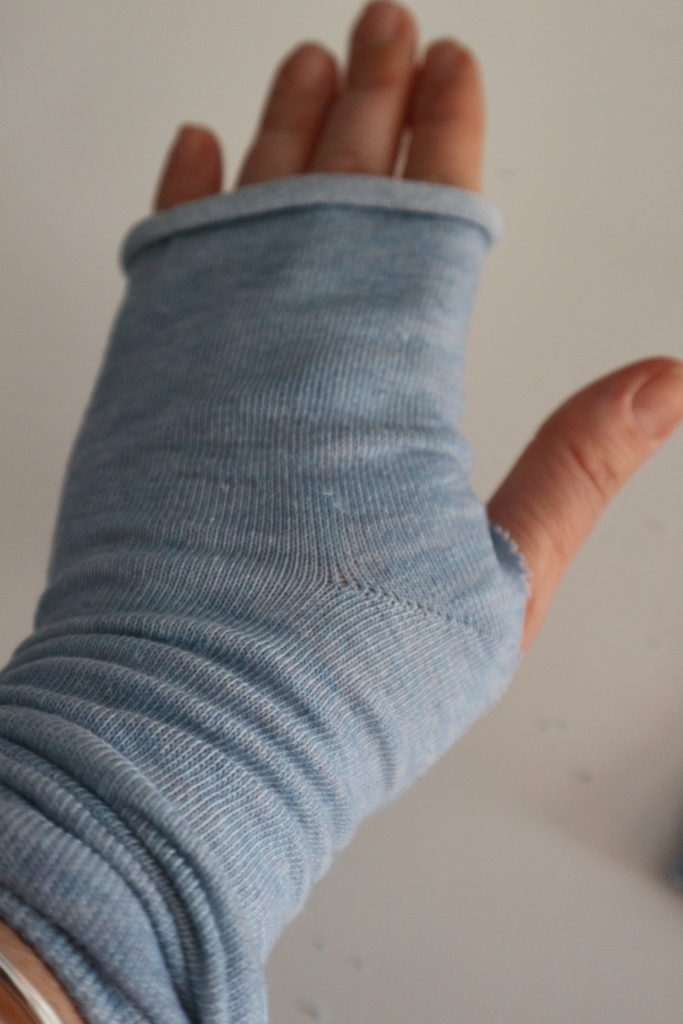
Try the sock on your hand and see if you thumb fits comfortably. If it’s too small make it a bit bigger.
The lovely thing about socks. is they are stretchy and comfy. Having your finger tips free means you can type a text, count change for the parking metre and blow your nose without taking off your mitts. Gross…. I know but cold and flu season will be here soon!
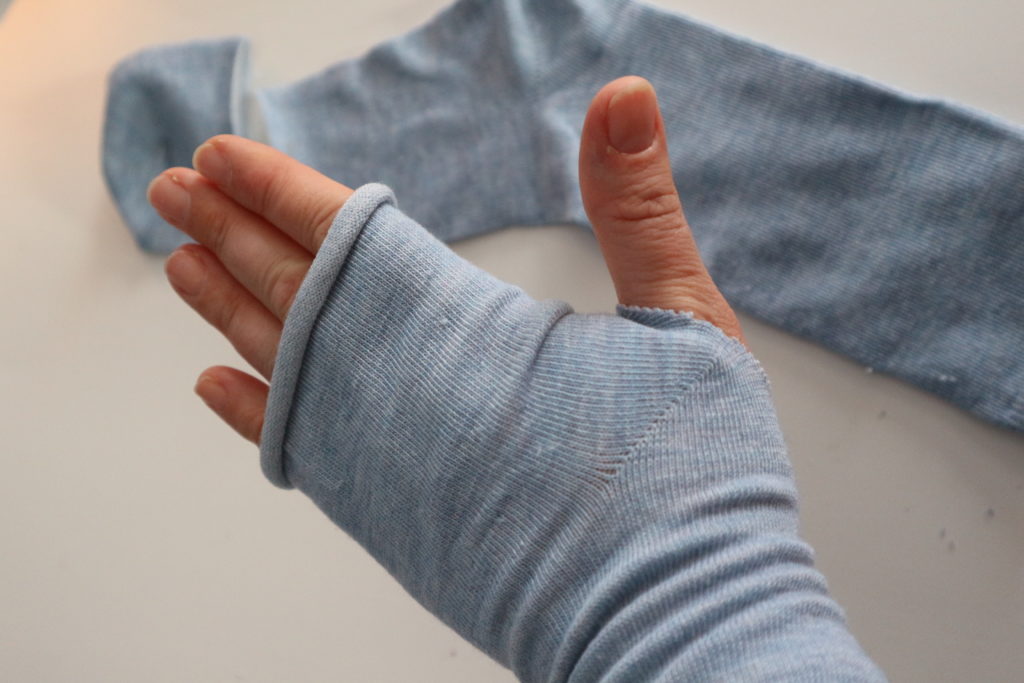
Hemming isn’t necessary, because it is knit fabric, so let it roll a bit. So literally, that is all you do to make the fingerless mitten or glove.
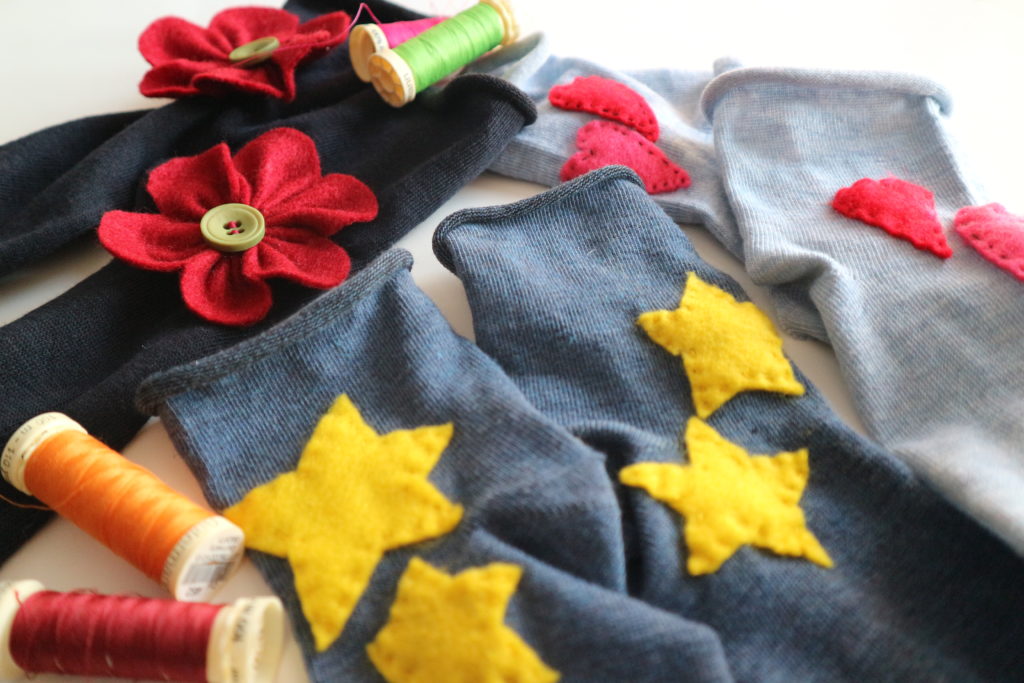
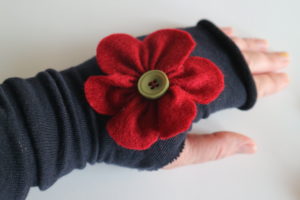
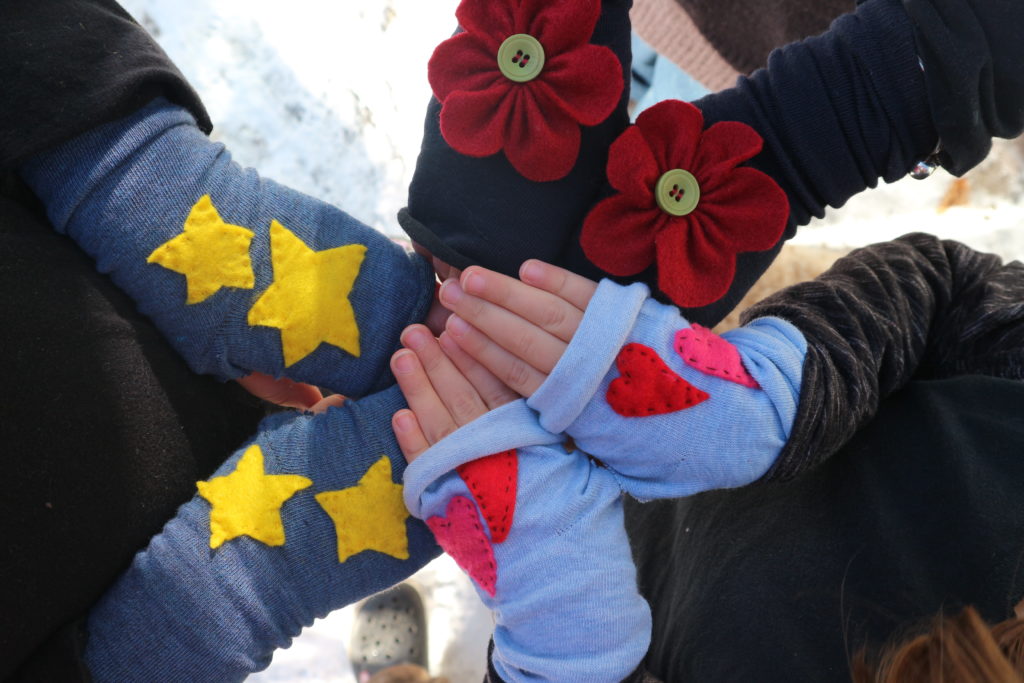
Now choose a little something to be the applique on the front of each hand.
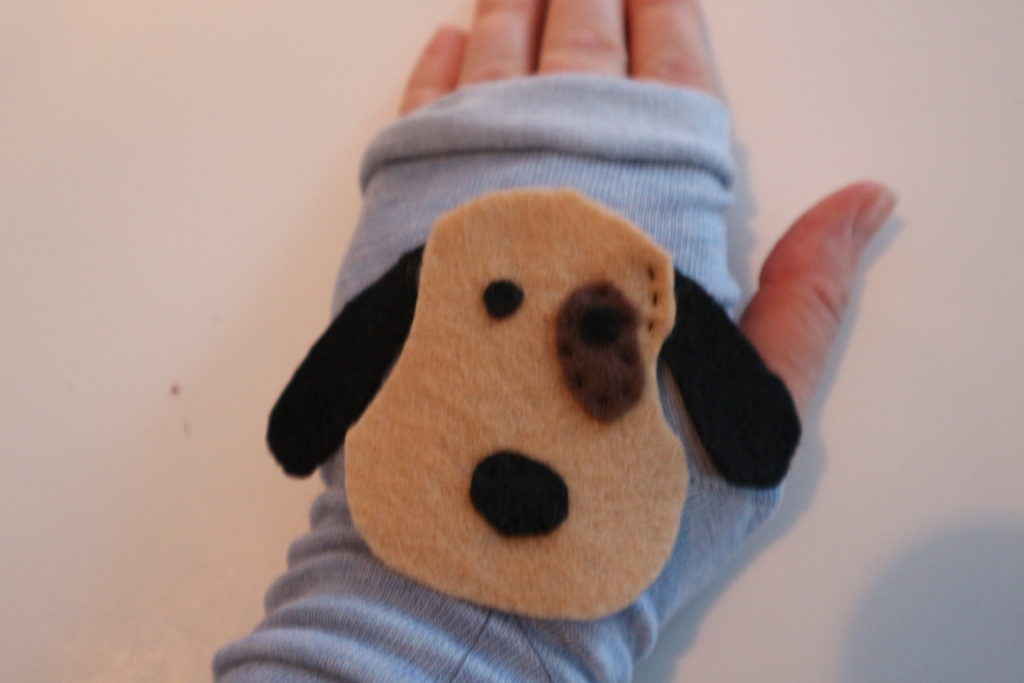
I tried this handsome dog but he was too big.
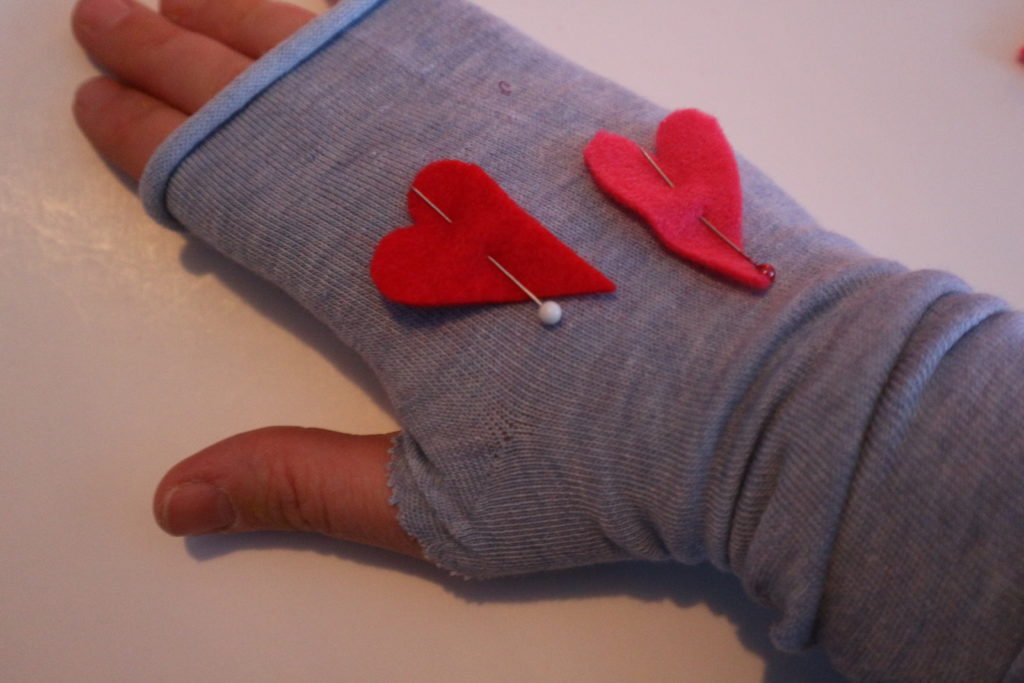
Decide where you want to put the applique and pin it in place.
A quick running stitch is all you need to attach the heart to the mitten.
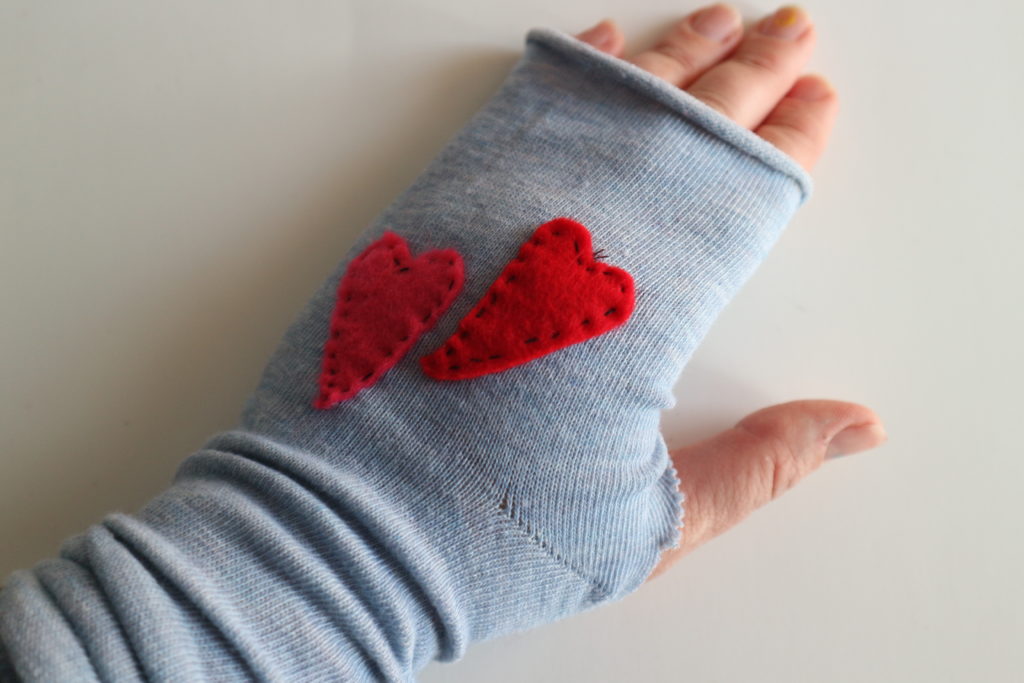
There, now the mitten applique is in place. You are done!

Easy to add a flower with a button.
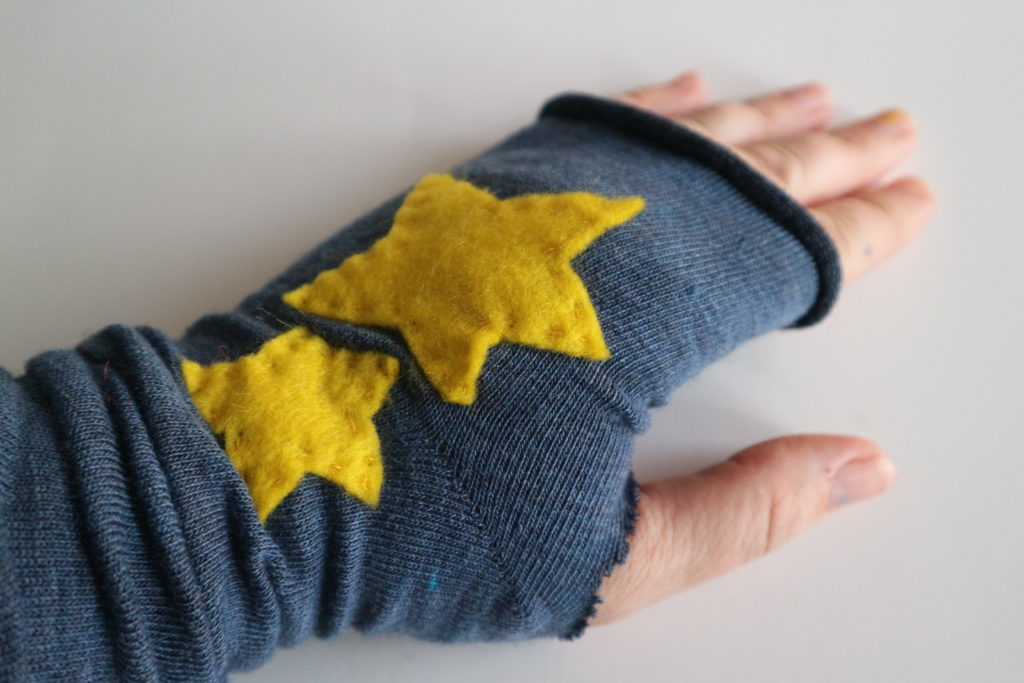
Stars are easy too.
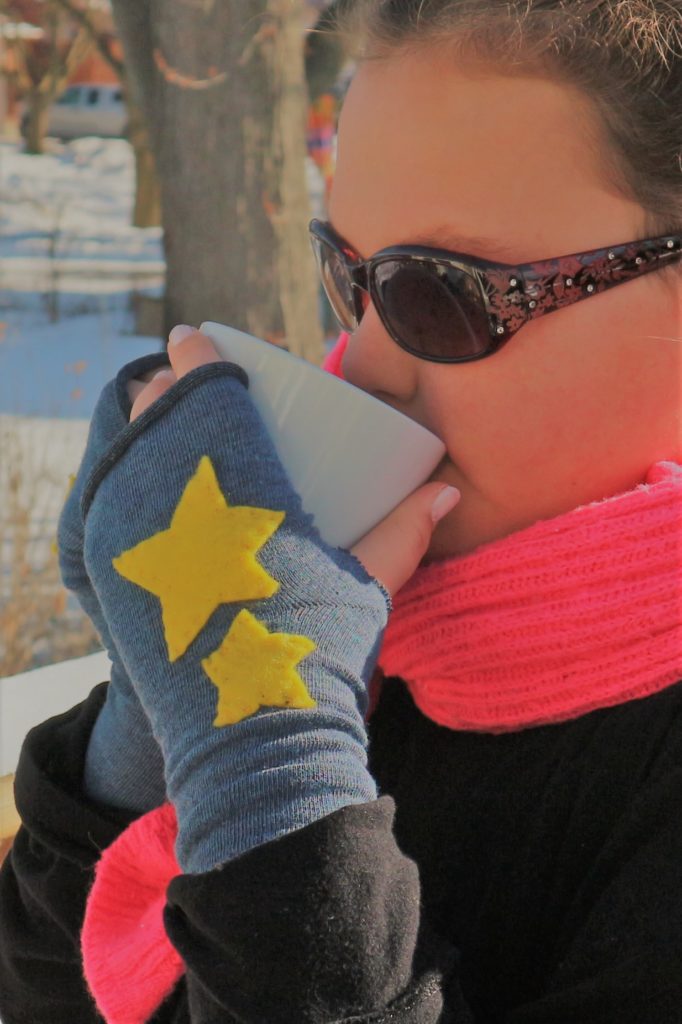
Brrr. That was a cold day! Hmmm…hot chocolate!
Sew a Super Easy to Make Felt Crown – Add to your dress up clothes!
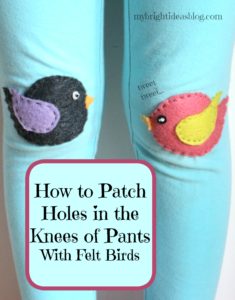
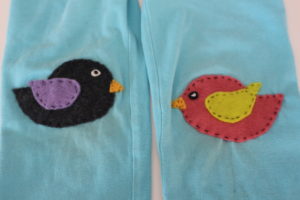
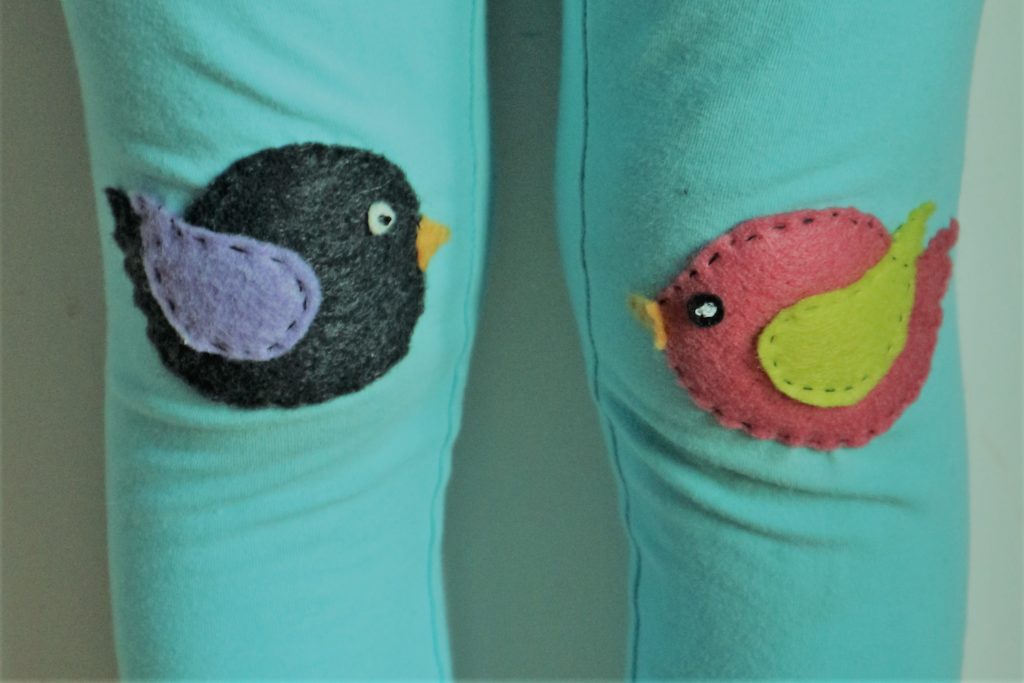
Felt Knee Patch – Little birds Cover Holes in Pants
 These are way cuter than the big rectangle patches I had to patch up the holes in my pants when I was a kid. Trust me! In my frugal family, growing up with 4 sisters, holes were mended, socks were darned…things were not thrown out if they got a hole they were put in the mending basket-next to the sewing machine. Every item of clothing was in the process of being a hand-me-down and would be again as soon as we had outgrown it.
I love felt! Its so easy to create an applique just for fun but if your kiddo has a hole in her pants its a fast way to patch it up. Choose a shape and colour and sew it on. Yellow stars, red hearts are classic but if you want to get more complicated then do so. Layers of flowers tempted me on this project but then I remembered she might be in gym class on her hands and knees and be wishing I didn’t put little beads on it.
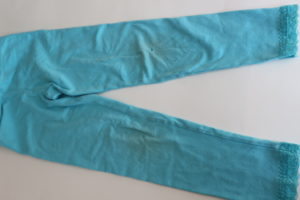
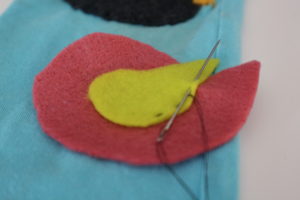
So I chose a simple bird for these leggings. There was only a hole in one knee but I thought they should match. One looked lonely.
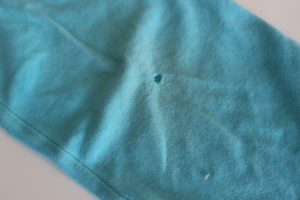
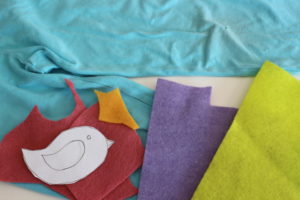
I drew a very easy bird on paper so I could cut out the pattern easily. It looks like a big paisley with a small paisley for a wing and a triangle beak. Normally a little bead would make a great little eye for the bird but I was thinking of her crawling on her knees and that could hurt so I just cut a little circle and used a knot in the thread to make it look like an eye.
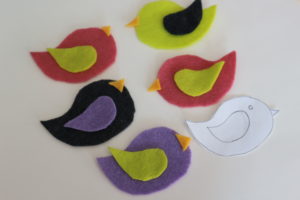
As soon as I had Miss M put the freshly mended pants on she noticed there was still a hole on her bum. Hmm….I hadn’t noticed that…good thing I made extra birds… This would look really cute on the back pocket of some jeans!
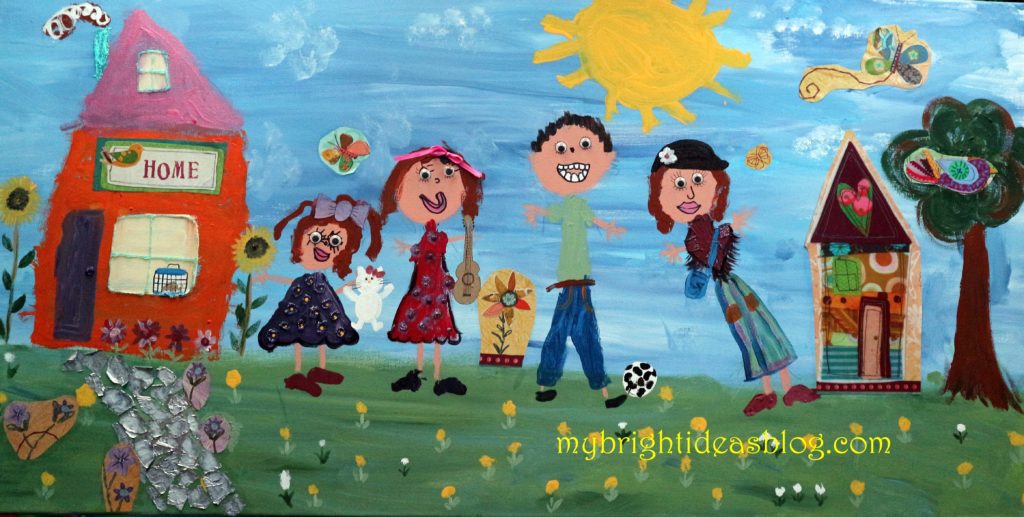
Family Self Portrait Painting by Everyone – So original!
Family Self-Portrait Painting – The whole family made together!

Years ago I had this calendar that had really nice pictures in it of fabric birds and butterflies. I thought the photos were so nice that I would cut them out for card making or something….I just didn’t know what.
One day I came across the file folder and clippings and a light bulb came on! Maybe I could use it on mixed up painting/collage of sorts, and it would decorate our play area. I got a big white canvas…..dimensions 20 inches by 39 inches but you could make this much smaller…an 8 x 10 maybe…using sharpies instead of paint brushes…
First, I started out by drawing the circles for the heads and then had each family member decide how to draw their face and hair and body. After Miss M…quite an artist and then only 3 years old….after she drew my body for me quite sideways I had a bit of correcting to do.
Mommy was going through a bit of a hippy fashion stage so we painted me in a poncho and typical clothes I though I was pretty hip. Daddy likes soccer, the color green and hates dandelions which I actually like…so that is why the we have yellow dots on the ground. Tee Hee!
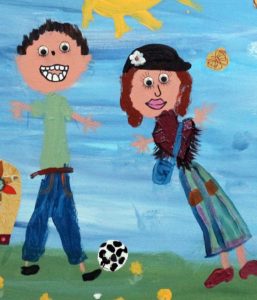
Miss B was taking classical guitar at the time so we painted that in and Miss M’s favorite stuffy…Hello kitty! Also we had a hamster named Happy Homer so he is in the window of our house. M loves sunflowers and I like crafts made out of tin-foil (so shiny!) so I put that in the path.
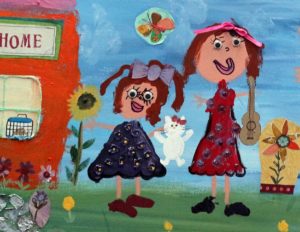
I actually could have added all sorts of things from the craft cupboard to make this even more interesting but I think the family lost interest. Cotton ball clouds, gold glitter glue on the sun….the pink roof could you sunflower seeds for texture…

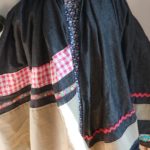
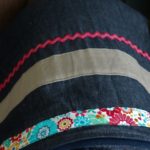
Kit&Caboodle Blanket Using Scraps
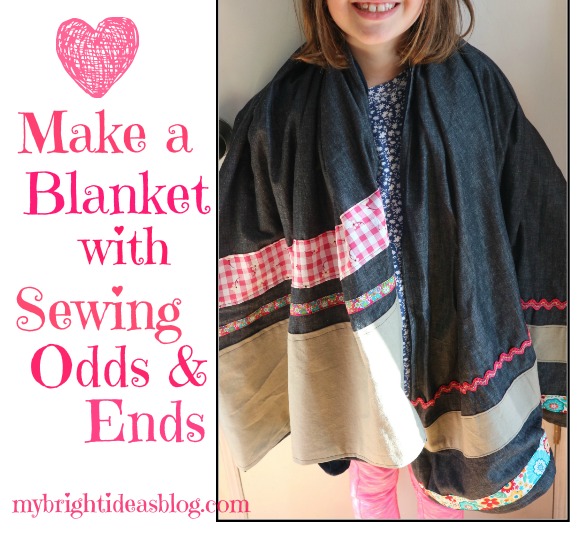
Use up your scraps of fabrics that you’ve collected from other projects-make a blanket! I feel like I have spent a lot recently on craft supplies and fabric so I want to challenge myself to make things out of the scraps I have laying around from old projects.
I found a cheap fleece blanket in the laundry room which inspired me to jazz it up a bit. After trying to add some trim to it I decided I didn’t have the patience for that but I liked my idea of using up scraps for a blanket….so I found a few yards of fabric in a cotton that looked like blue denim. Nice!
My blanket is 45 inches (115 cms) wide which is the standard fabric width. You could aim for pieces of fabric 2 yards long (72 inches or 183 cms long) but this is a project for using up what you have so make it whatever size you fancy.
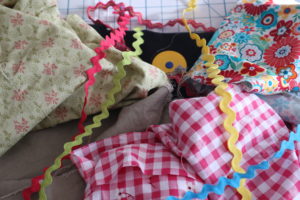
I thought I could arrange the trim and extra pieces of fabric as trim on the bottom of the short ends. I laid it out to get an idea of what it might look like.
Then I ironed any unfinished hems of the fabrics so it would look like a wide trim. After I arranged it how I like it and I pin everything in place.
After sewing each trim in place I went in search of a backing for this blanket to add weight and cover up the back. I found some blue jersey (t-shirt fabric) that was almost the right size of the blanket. I trimmed off any excess fabric from the jersey to be the right size and pinned it to the project with right sides together. Sewing all the way around leaving a gap big enough to fit my hand into. Reach in and pull the fabric right side out.

Just a few steps left now…I need to hand sew the gap that was left. Then sew it all the way around again so that the edge stayed flat.
I think this would make a great road trip blanket…or picnic blanket but since its January and we are up to our hips in snow…we’ll use it for now as a snuggle up on the couch blanket.

The final size of the blanket was 45 inches wide (115 cms) and 63 inches long (160 cms). If it was 2 full yards it would be 72 inches long so this was leftover.
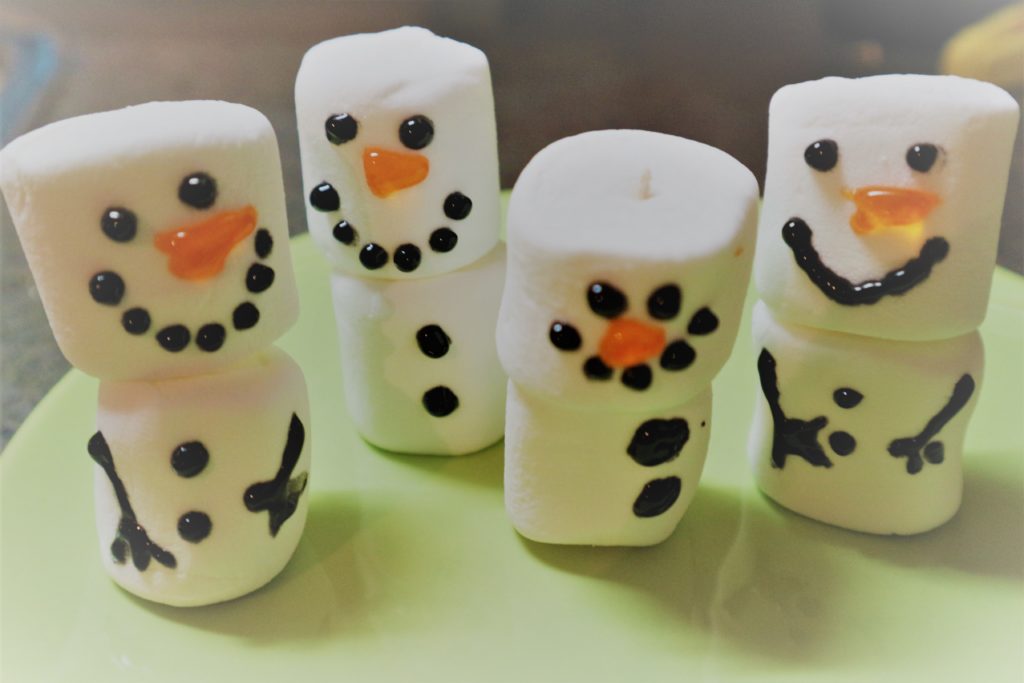
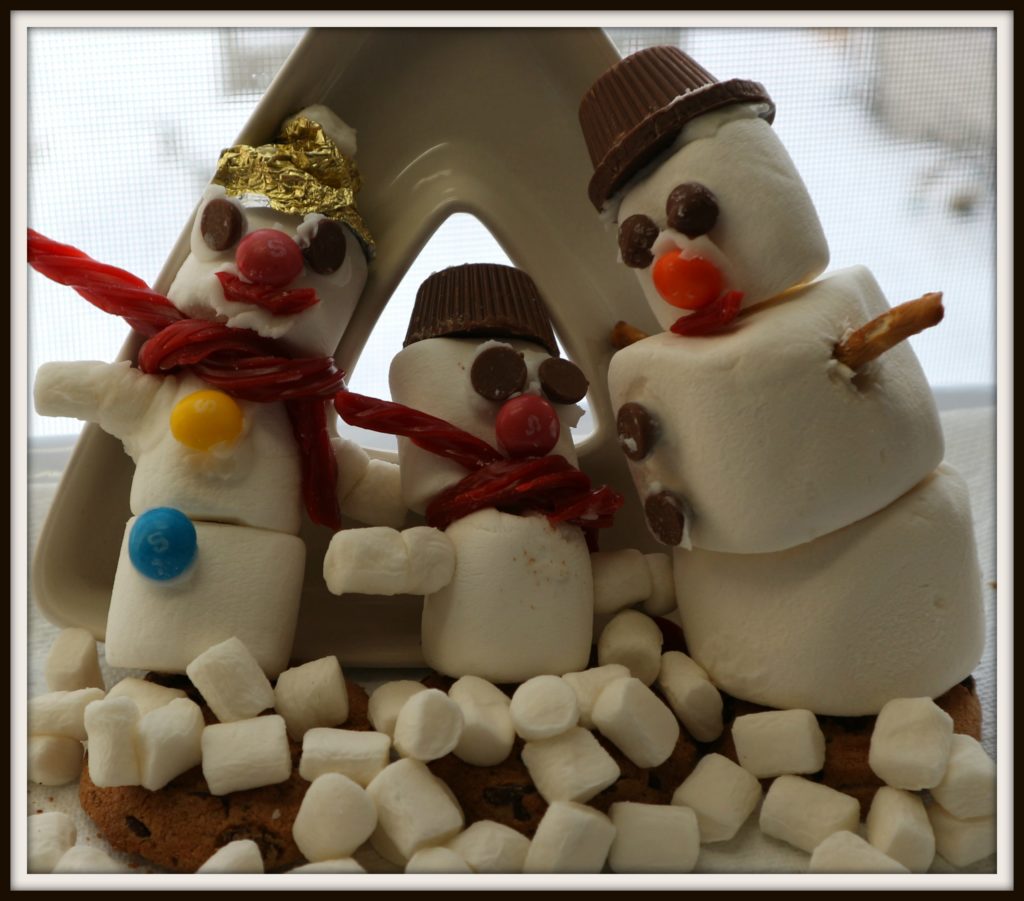
Marshmallow Snowman Edible Winter Craft Project
What a fun winter project to do with the kids! Snowmen made out of marshmallows!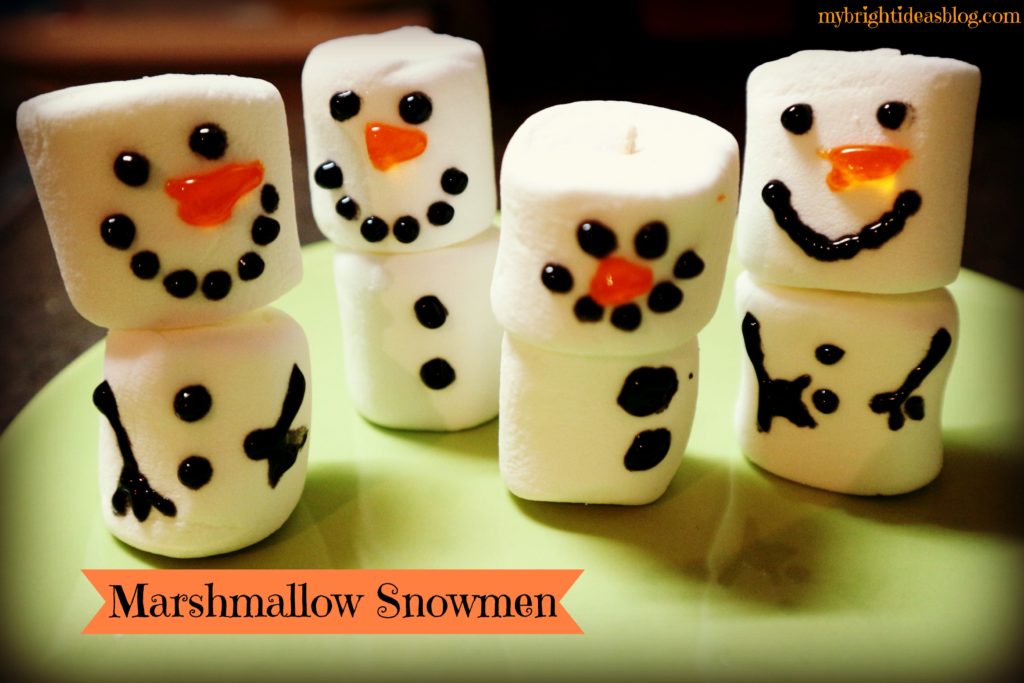 What a fun winter project to do with the kids! Snowmen made out of marshmallows!
This post should probably be divided into 2 sections. The tidy marshmallow family made with toothpicks and icing gel. Or part 2 the crazy looking marshmallow family that was tipping over because of all the candy stuck to them. Much like a making a gingerbread house the second family though a bit ugly was very fun and creative to make….and nibble on.
Marshmallow Snowman Part 1
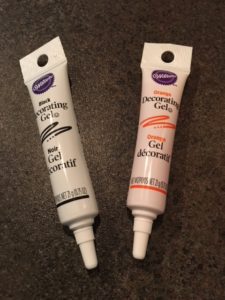
For this you just need marshmallows, toothpicks and Wilton’s decorating Gel in black and orange.
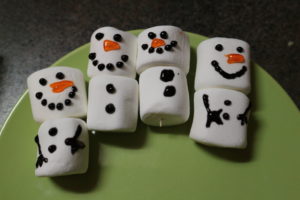
This is so easy! Just use toothpicks to connect the marshmallows. Draw on dots for the eyes, mouth and buttons, draw on stick arms (optional) and use the orange for the carrot nose.
It takes a few hours for the gel to set so try not to move them right away.
Marshmallow Snowman – Part 2
This time it was much more of an adventure – trying different things to see what would work.
I happen to have 3 sizes of marshmallows in the house-which never normally happen since I only buy one bag of them once a year at camping time for roasting on the campfire and s’mores. But we just made 2 batches of rice crispy squares for a class goodbye party for my daughter’s teacher.
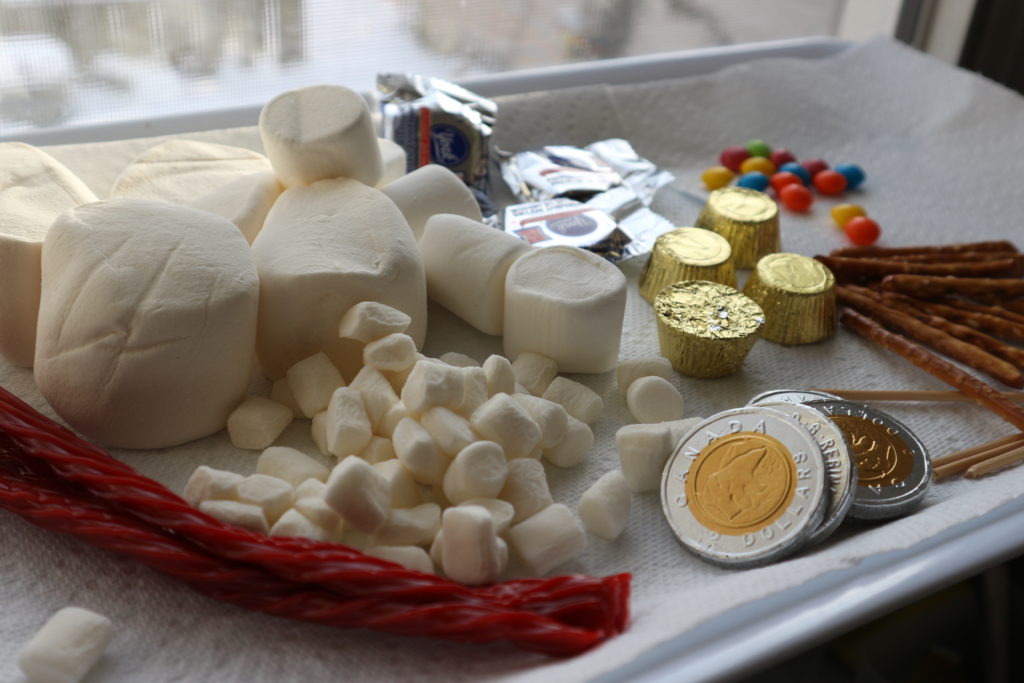
So gather up the supplies, marshmallows, skittles, pretzel arms, gold coins/pepperment patties etc. for hat, toothpicks to hold the body together, licorice and chocolate chips. I walked through the local bulk supply store and looked for things you would use for gingerbread house-like their icing for gluing buttons on.

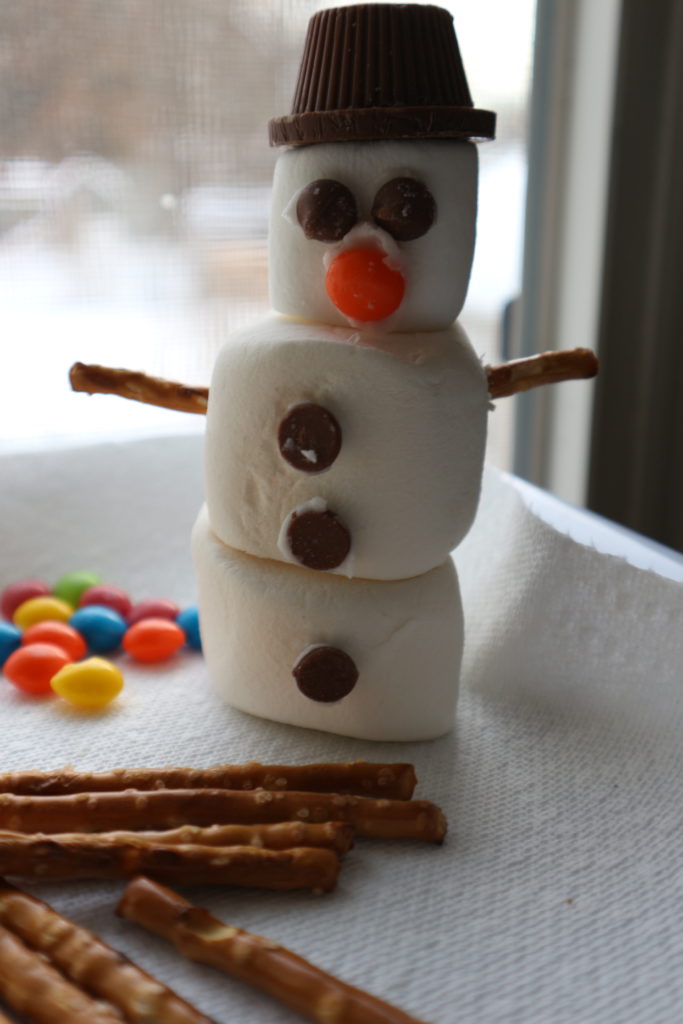
The chocolate hat made this guy very top heavy. For the gal on the left I ate a chocolate cup and turned the foil into her hat. Eating the snacks along the way is a bit of a problem when you only bought a few of this and a few of that. Tee hee….

Other snowy projects to try….
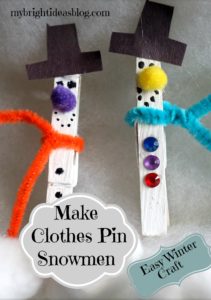
Clothes Pin Snowman – Make Easy Kids Craft
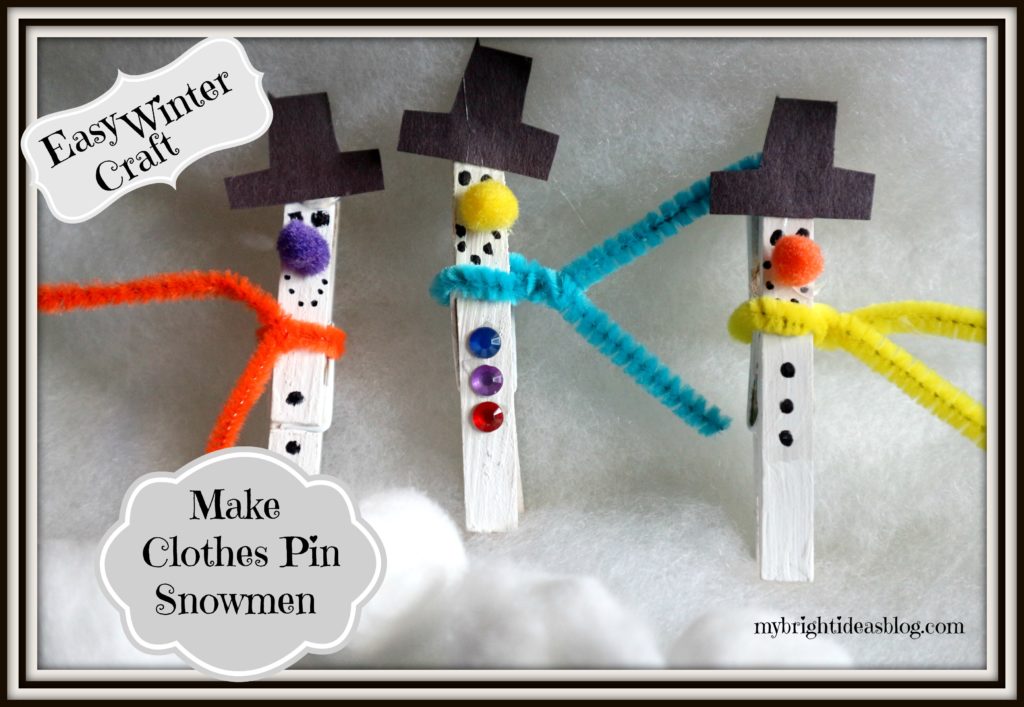
It’s the adorable pompom nose that really got me wanting to make this quick and easy children’s craft. Paint a clothes pin white and start building a snowman.
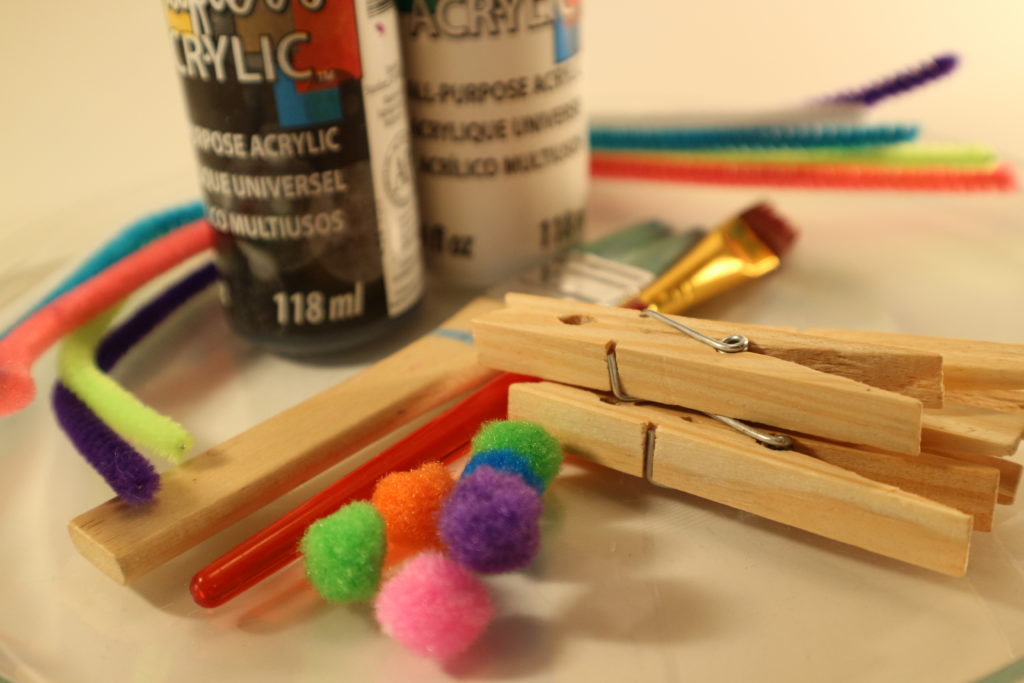
Gather up your usual basket of crafts. You’ll need pipe cleaners or a bit of yarn for the scarves. Clothes pegs, paint brushes, white paint, a black sharpie and little scraps of black paper or felt for the hat.
Paint your clothes pegs white and wait at least an hour for drying time.
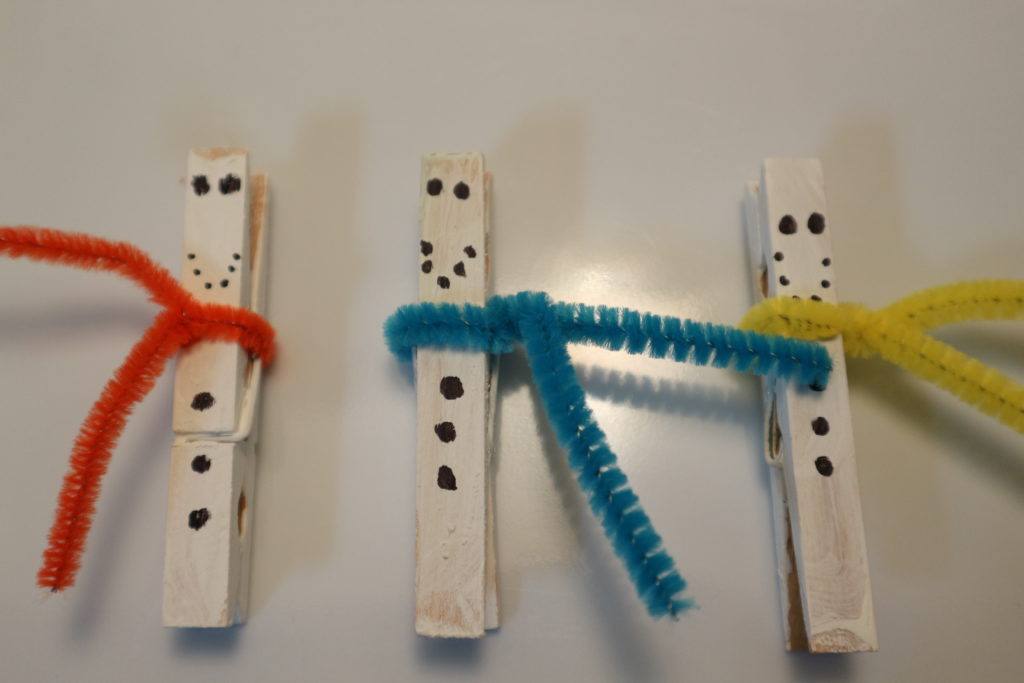
Cut off a bit of yarn or half of a pipe cleaner and tie your snowmen a cozy scarf. Take your black marker and make his coal eyes , mouth and buttons.
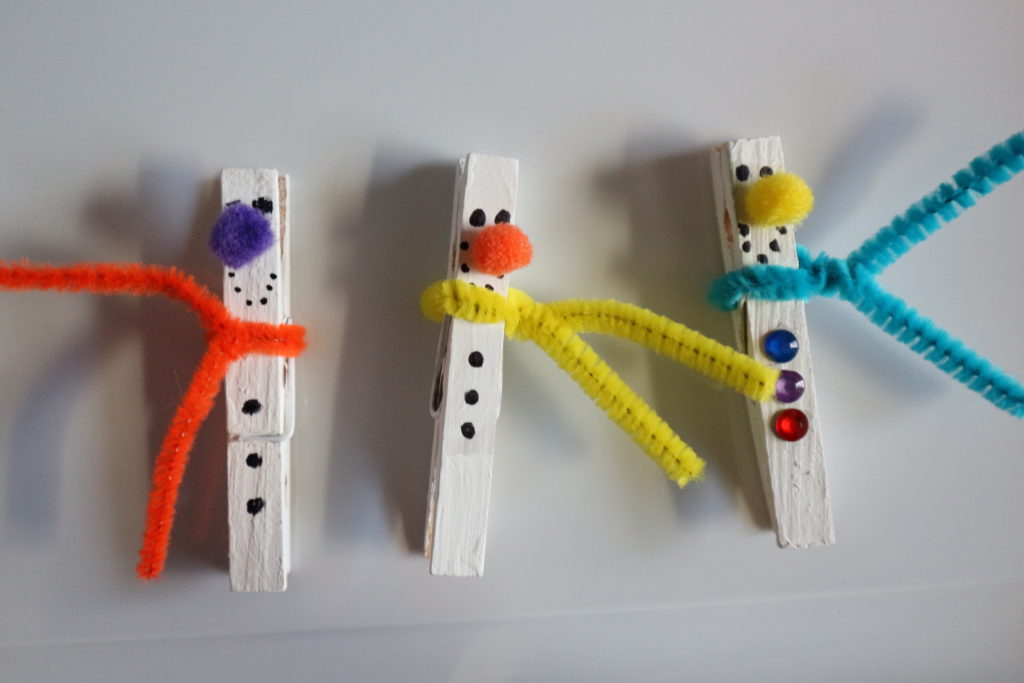
Take your black marker and make his coal eyes , mouth and buttons. One of my snow men felt he wanted to dress it up a bit and put on some small rhinestones. Glue on the pompom noses. I thought originally that they should be orange noses for a carrot but my craft kit only had one orange one left.
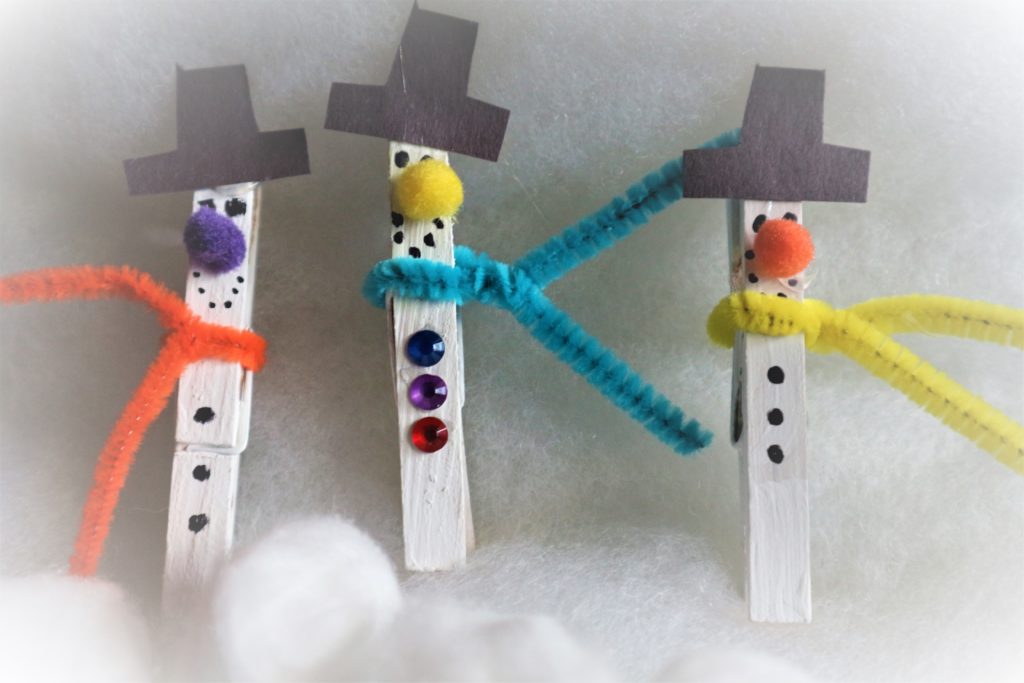
Finally I put on some little hats to finish off the outfit. Super cute kiddie craft!
Make a Felt Pizza Toy in minutes – No sew
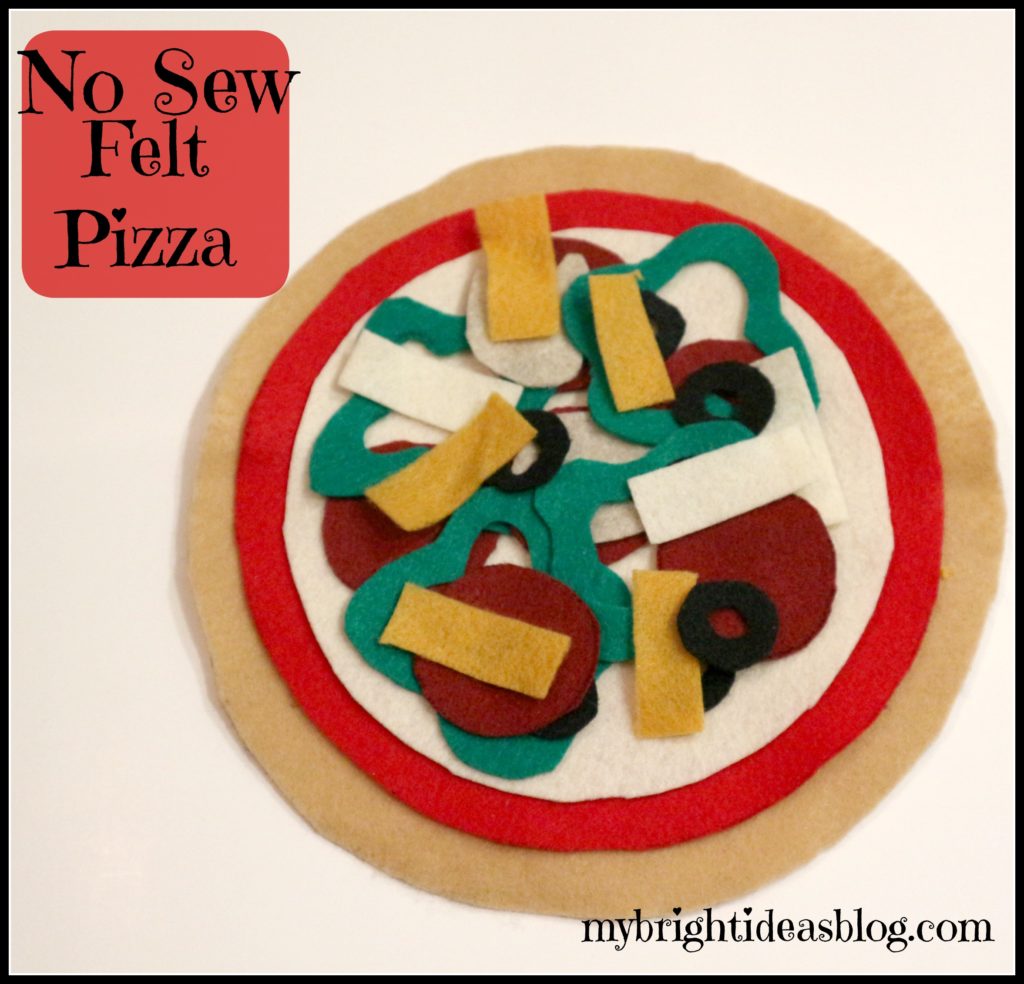 How to make an easy, no-sew felt pizza! It’s super easy and fun to make with very little skill needed. Since kids are always trying to imitate parents in the kitchen this will be a hit!
You will need felt in the following colours:
- 1 tan/light brown for the crust
- 1 red for pizza sauce
- 1 white/cream for mozzarella cheese
- dark red for pepperoni
- green for peppers
- grey for mushrooms
- pink for ham
- black for olives
- yellow for pineapple
- orange for extra cheese
- PLUS – bowls and plates to trace for big circles
- marker
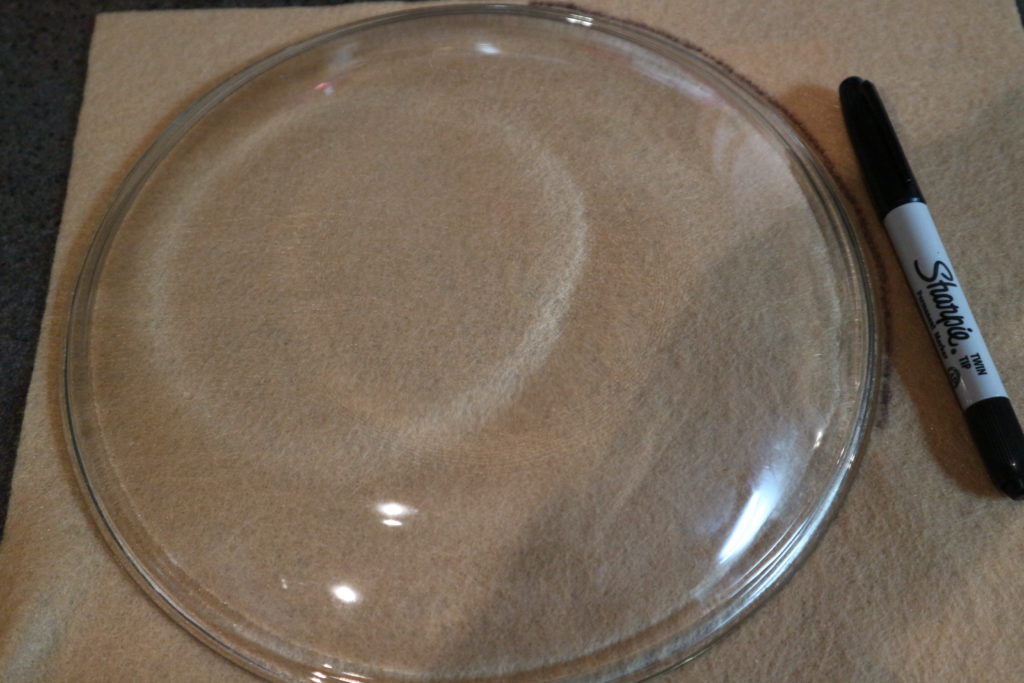
Cream Felt-Pizza Crust: Trace a large bowl or plate for your crust.
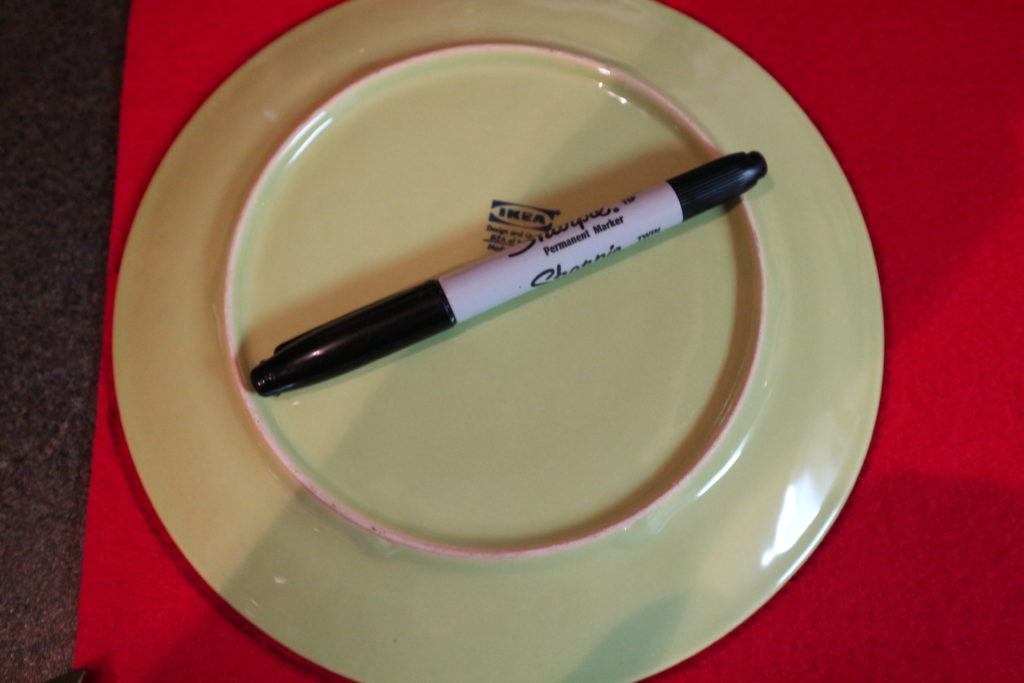
Bright Red Felt-Pizza Sauce: Using a plate or bowl slightly smaller than the last one, cut a slightly smaller circle.
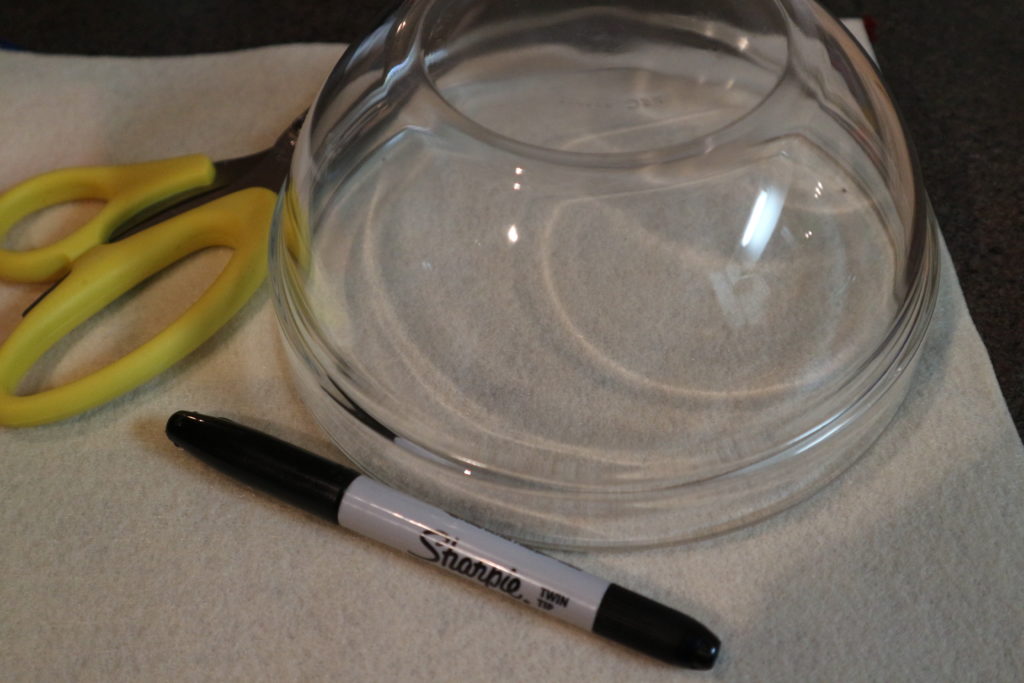
White Felt-Mozzerella Cheese: Cut the cheese…tee hee…out of a piece of white felt. Trace a slightly smaller plate or bowl than the piece of pizza sauce red felt.
Dark Red Felt-Pepperoni: Cut 6 circles tracing something small like a vitamin bottle.
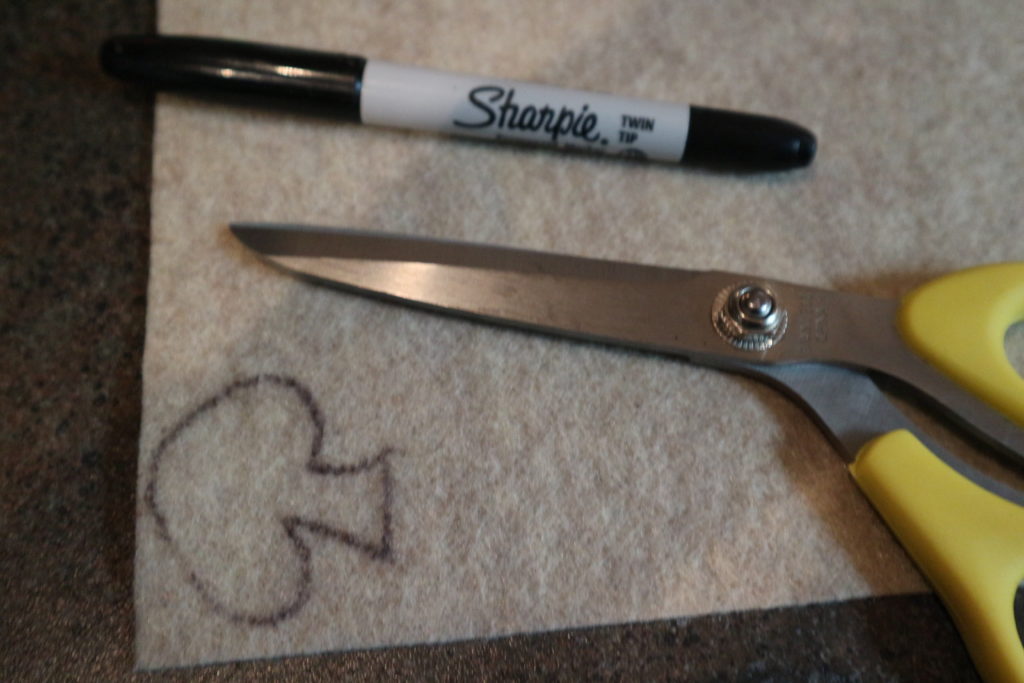
Grey/Beige Felt-Mushrooms: Draw a mushroom shape and cut it out. Cut 5 mushrooms.
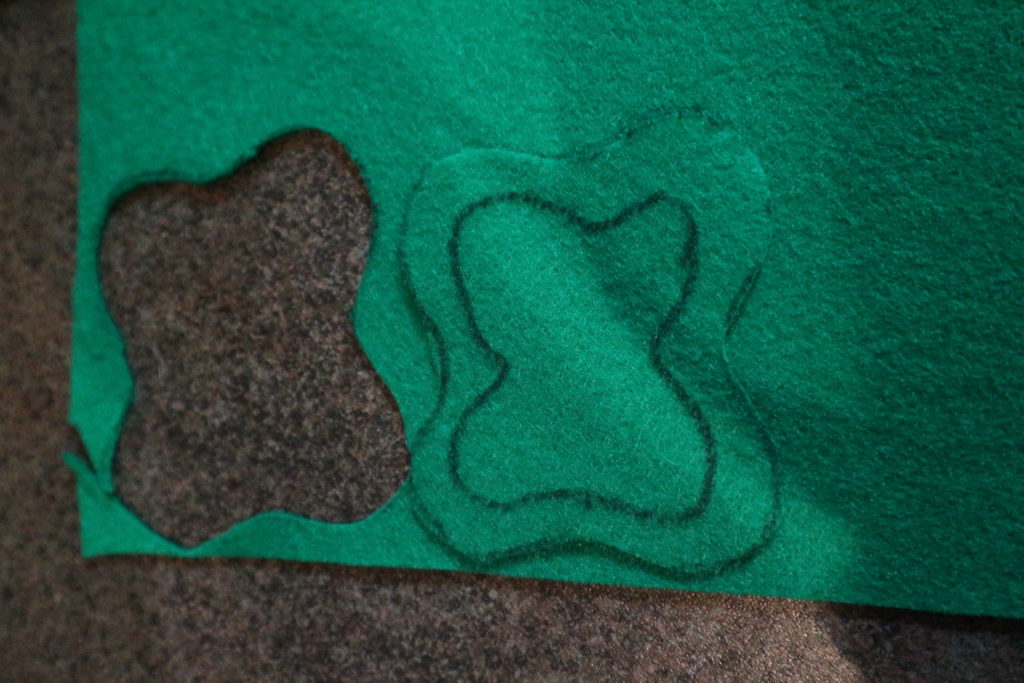
Green Felt-Peppers – It looks like a wiggly square, then outline it again and cut it out. Cut 4 peppers.
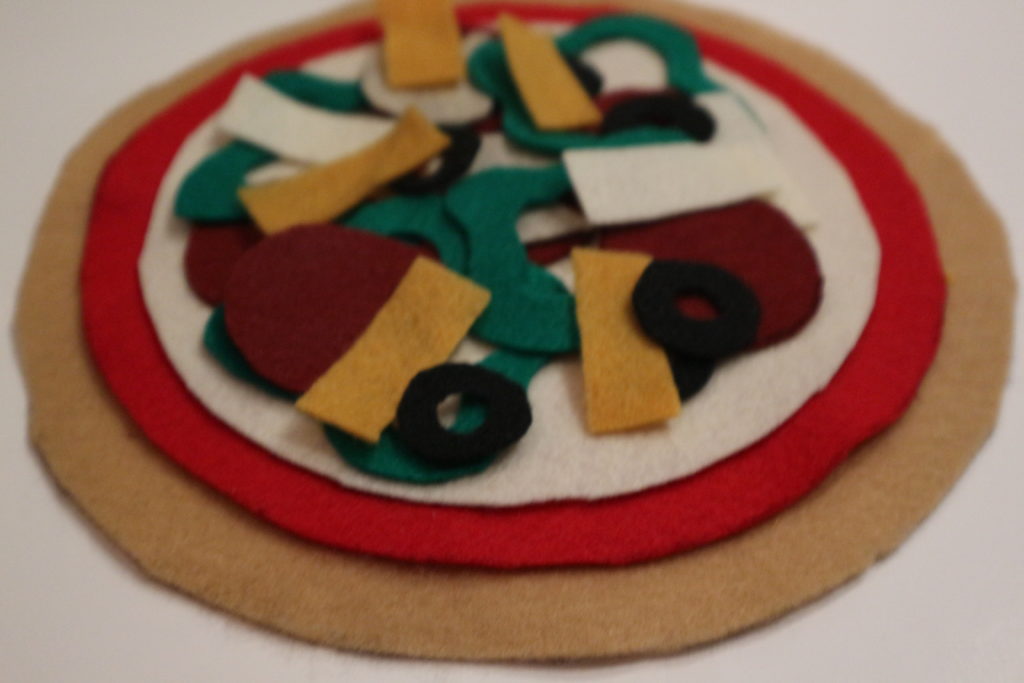
The rest of the toppings are up to you….
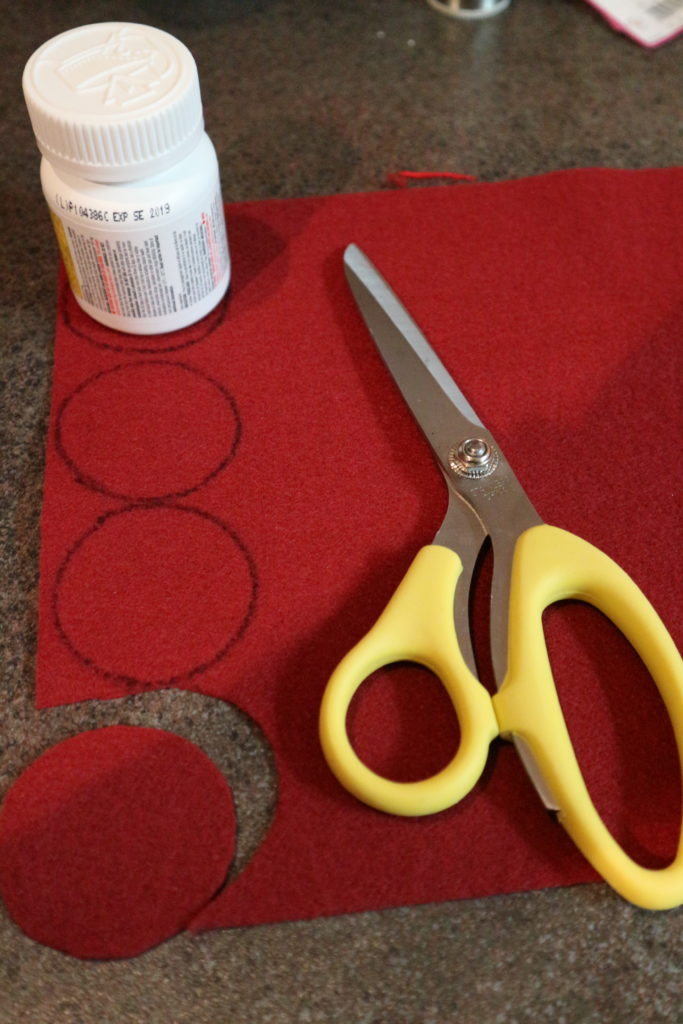
Black Felt-Olives: Cut a small circle and trace it a second time. Cut 8 olives.
Orange and White Felt-Grated Cheese: Cut long rectangles for some shredded cheese on top. Cut 6 of each.
Pink Felt Squares-Ham: Cut into squares-6 pink ham squares will be enough.
Orange/Yellow-Pineapple: This begins a great debate about whether you should have pineapple on a pizza. I’m for it! Hawaiian Pizza is my favorite. If you feel the same cut 6 pineapple pieces.
Store your pizza pieces in a large ziplock bag.