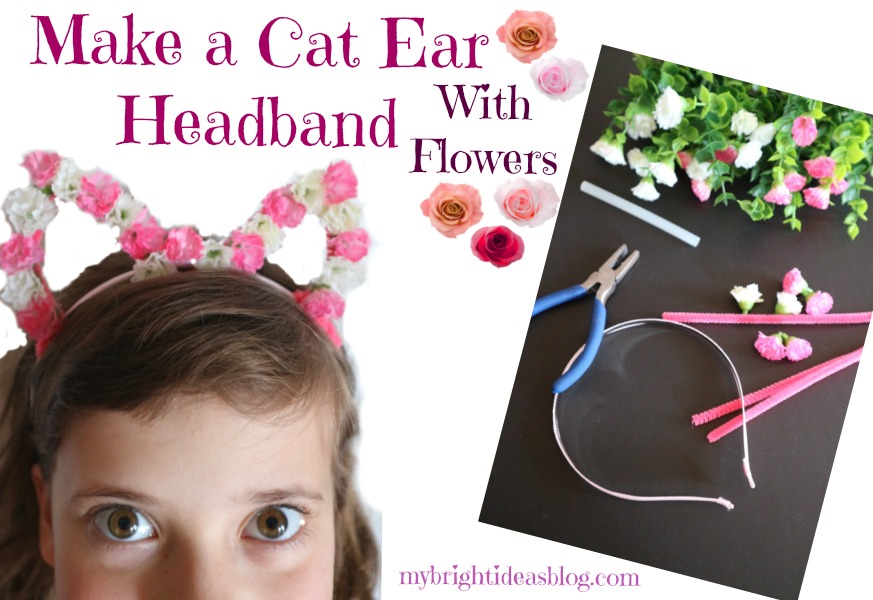
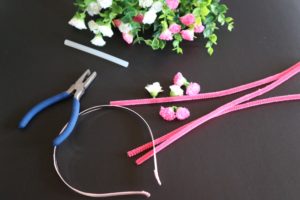
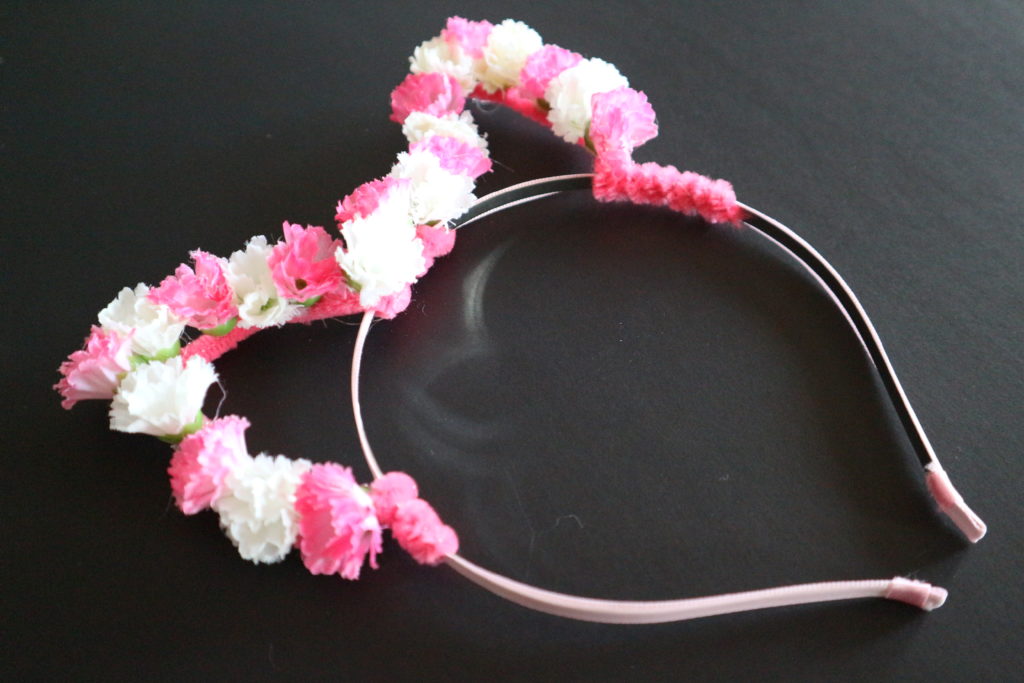
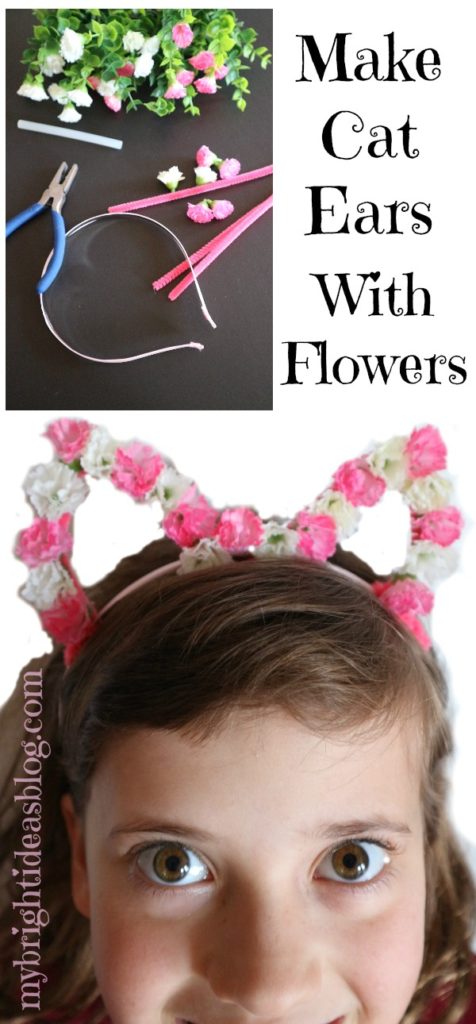
My kids tell me that cat ear hairbands are what everyone is wearing to school. So make one that is springy with flowers and pipe-cleaners. You will need:
Artificial plants with small flowers, a plain hairband, 2 matching pipe-cleaners, hot glue gun and scissors.
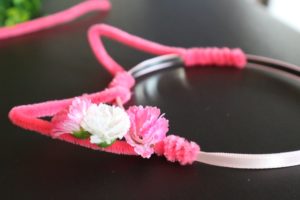
Use one pipe-cleaner to make each cat ear, wrap the wire tightly then use plyers to pinch it tight so it doesn’t poke you in the head.
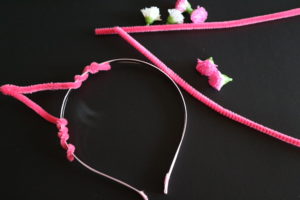

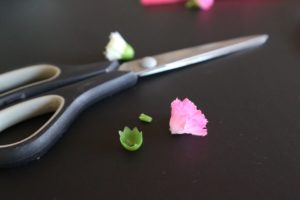
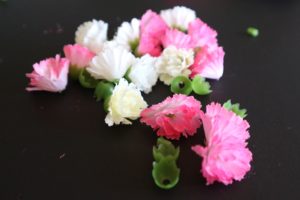
Pop the flowers off the stems and trim off the little green nub. This will make the flower sit flat when you glue it on but it will also make the flower fall apart a bit so put a dot of glue on the flower and attach the green plastic end back on. Then glue the flower into place.
Remember to pull all the glue strings off from the hot glue gun. I always miss some! This would make a fun project for a girls playdate or visit to grandma’s. Have fun!
….

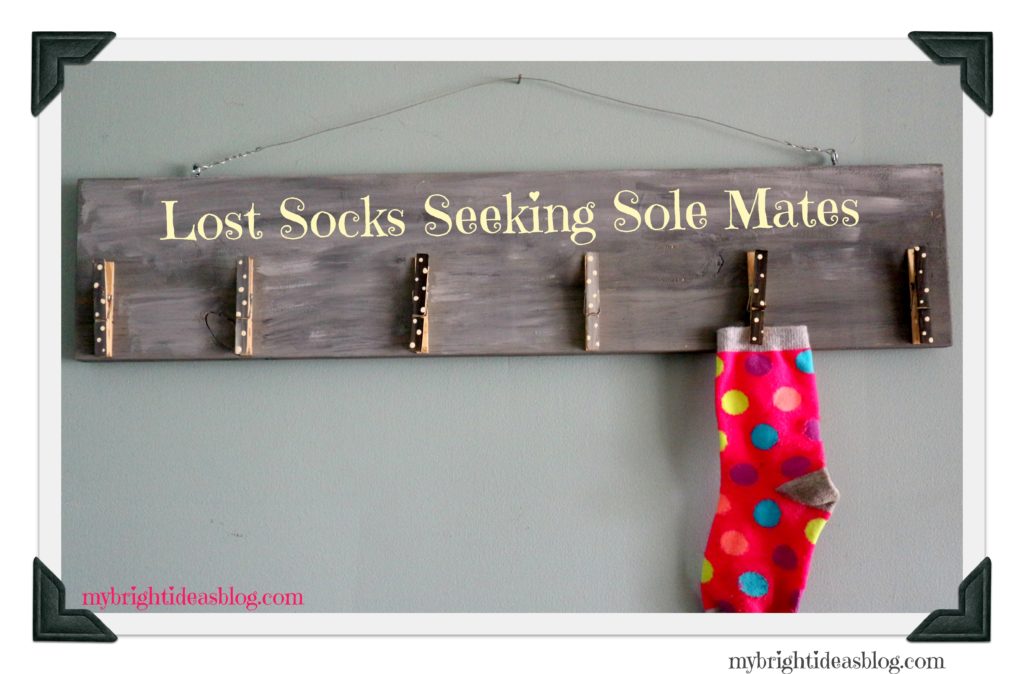
Lost Sock Seeking Sole Mate-Laundry Room Sign
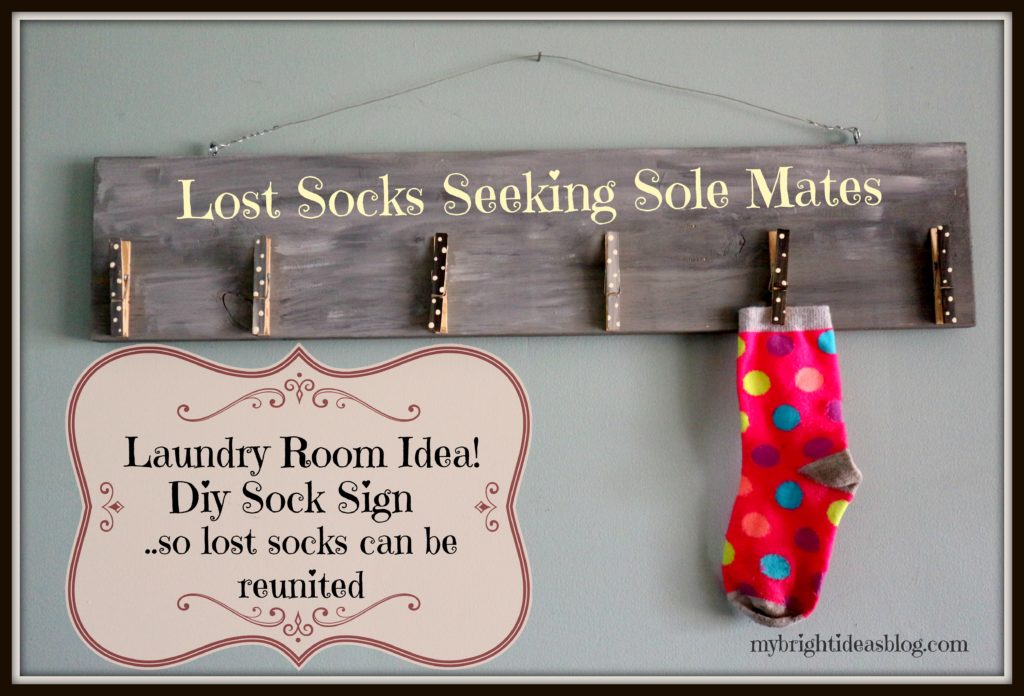
I saw this idea on pinterest and immediately went in search of a left over scrap of wood. I found this 1×6 partial board that happened to be 26 inches long. Perfect no need to cut any pieces because my saw is in the garage and there is a ton of snow in the driveway. More wood diy projects to come when spring arrives in Canada.
So here we are with a cute idea for a laundry room sign to help lost socks make their way back to their mate.
You will need:
A scrap of wood, sand paper, paint or stain, a stencil for the letters, clothes pins, paint brushes, glue, hooks and wire.
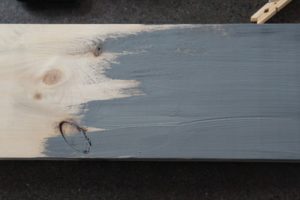

Before you get started smooth the front of the board with fine sand paper. This will make the writing a lot easier. Find some sort of paint or stain to start the back ground of the sign. I had my regular craft paint already out and just mixed the white and black and make a nice gray. I liked how streaky it turned out. Once this is dry test out where you would like to put the clothes pins. Be sure to write the message on the board before you glue the clothes pins on. You could use a letter stencil or free hand.
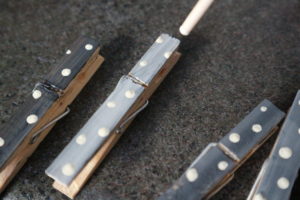
I painted the clothes pins gray and black and then put white polka-dots on them. I love painting polka-dots by using the tip of the paintbrush and dipping it in the paint.

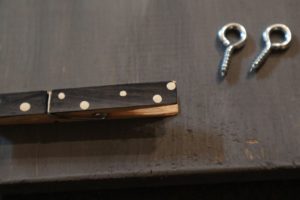
This was my first time using E6000 glue. It is slow to dry compared to my usual hot glue gun but so far its proving to be strong. I left it over night to be sure it was dry. In the tool box I found a little frame kit with wire and these screw in hooks. It was very easy to screw it into the soft wood. Then put the wire through the eye of the hook and wrap it around. That was all there was to it. I had everything for this lying around the house. If you don’t have the hook and wire you could also use picture frame hooks nailed into the back. Instead of wire you could use twine or ribbon.
You could write Lost Sock Seeking Sole Mate or Lost Socks in Search of Sole Mates. However, I was making up one to put on the craft sale table at my work and I wrote Lost Socks Seeking Soul Mates. I’m not sure how hard it will be to fix it since I wrote it in black paint. It will be hard to cover up. Grrrr. It’s not a funny play on words if you spell the pun wrong. Whoops-a-daisy!

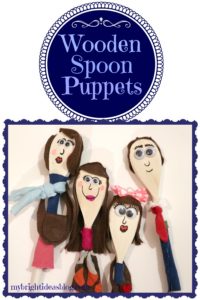
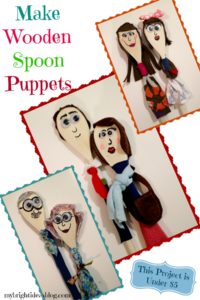
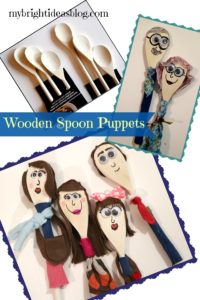
Wooden Spoon Puppets! Easy Fast Fun Inexpensive!
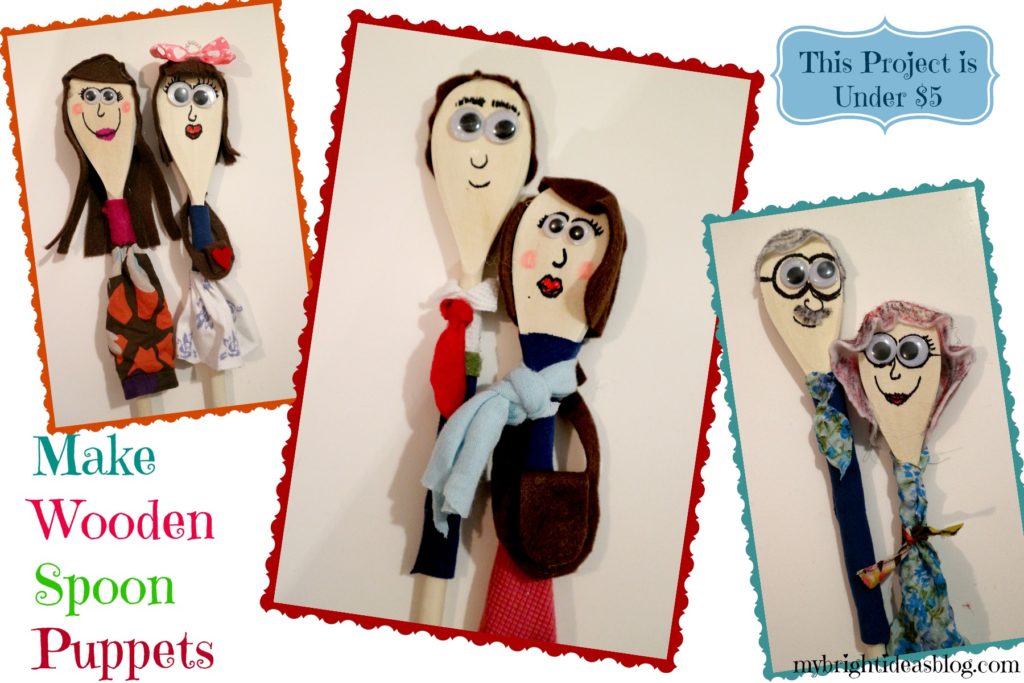
I was researching some puppet theatres to make and came across the easiest puppet idea ever! All you need is some wooden spoons, a sharpie, scraps of fabric, googly eyes and your hot glue gun.
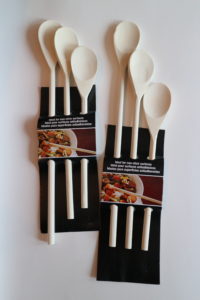 The wooden spoons I used were 3/ $1.50 making this an inexpensive craft. The shape of the spoon makes a perfect head shape. Some spoons have wide handles too that would be great for drawing on the clothing but these cheap and cheerful spoons were very skinny.
First I added googly eyes and then I drew on the rest of their faces. The hair was a bit tricky. I used pieces of felt for it although you could use yarn or sewing trims.
Clothes are pretty easy just cover up the spoon with a scrap of fabric and hot glue it in place. Its actually easier than you might think to make a shirt and tie.
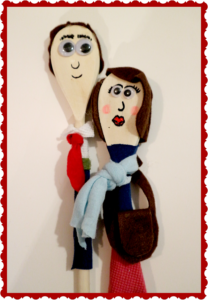
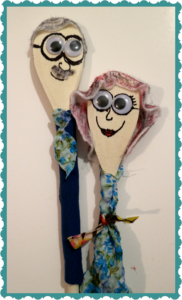
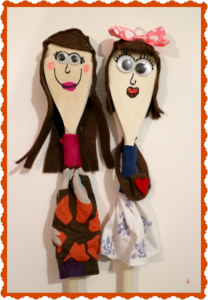
This is the sort of craft that will actually stick around a long time after you make it. You have made an actual toy. I was thinking this is the sort of thing you could take on a camping trip instead of Barbie’s or dolls with all the little bits and pieces that you might lose.

..
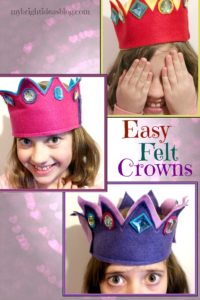
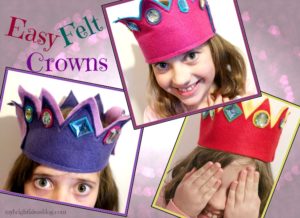
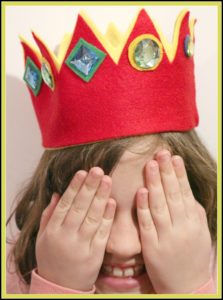
Sew a Super Easy to Make Felt Crown – Add to your dress up clothes!
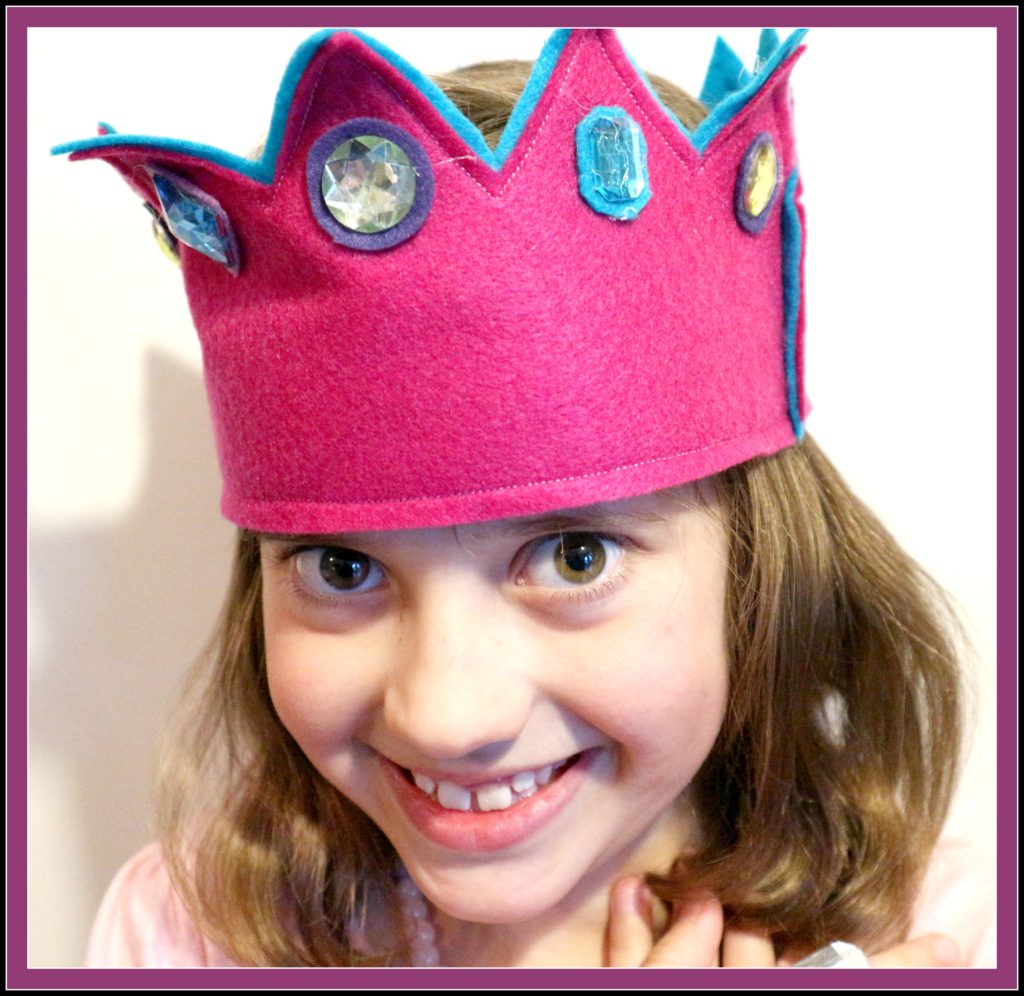
How to Make an Easy Felt Crown!
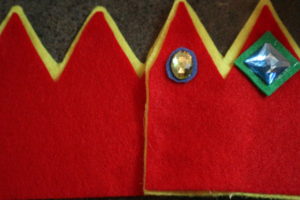
I went to Dollar Tree this time to get a few time things and got these vibrant colours of pink, 2 shades of purple and turquoise. They charged $1.25 which is a lot more than Michael’s $.59 each. But I was there and the colours were so appealing….A piece of craft felt can cost $.50-1.25 depending on where you are buying it. For each crown you will only need 2 rectangles of felt-I used different bright colors. You will need some gems, scraps of felt and your hot glue gun, This time we are going to use the sewing machine.
If you would like to use do this project without sewing follow this link….http://mybrightideasblog.com/make-no-sew-felt-crown/
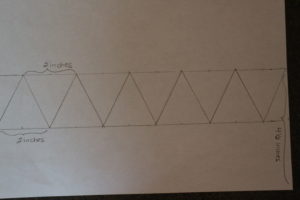

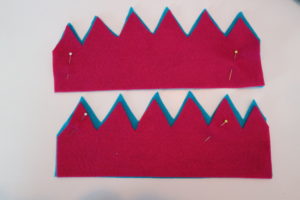
Make a template using an 8 1/2 by 11 standard piece of paper. Measure 4 1/2 inches from the bottom and draw a line. Draw another line 2 inches below that. Put a mark every inch along both lines. Then using your ruler create a zig zag. This measurement should make it possible to do this twice on a felt rectangle that measures 9′ x 11 1/2″. To make sure you don’t cut into the other half you could cut the felt in half lengthwise before you cut the zig zag, If your felt isn’t as wide as mine just shorten the bottom portion of the template…it doesn’t need to be that thick. Do the same with the second color that you have. This extra layer will stiffen the project so it can support the gems. It also makes it really pop with the extra color.
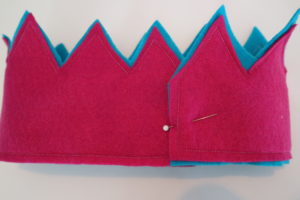
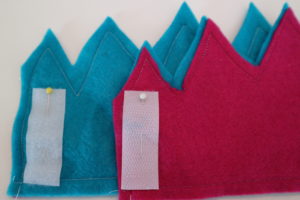
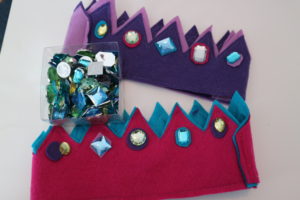
Next overlap the two colors a bit and pin them together. Sew all the way around the bottom, side, zig zag and other side. Overlap one side to the other and sew a seam to connect them. The other seam will be open so pin Velcro strips so the size is adjustable and easy to get on and off. If you don’t have Velcro you could just fit the crown to the child’s head and sew that seam too. Cut pieces of felt out of scraps to place under the gems. Using the hot glue gun, glue the felt to the crown and the gem on top.I only put gems on the front of the crown, but you could put them all the way around. You could also add a strip of ribbon or gold trim around the bottom to decorate it further.
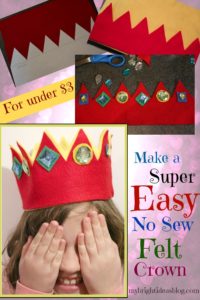
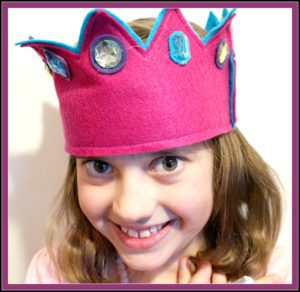
How to Make a No Sew Felt Crown for under $3
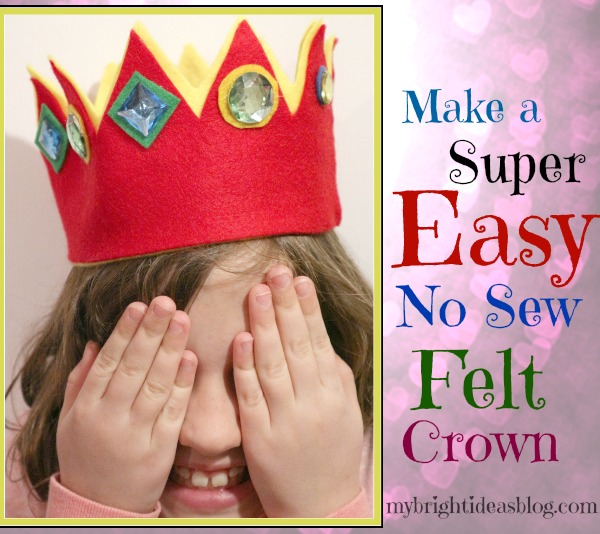
Today we are making a “no sew” felt crown. I tried to be mindful of the cost and simplicity of this project in case you need to make 10 of these for a children’s princess party.
Here is what you need:
A piece of craft felt can cost $.50-1.25 depending on where you are buying it. For each crown you will only need 2 rectangles of felt-I used different bright colors. You will need some gems, scraps of felt and your hot glue gun.
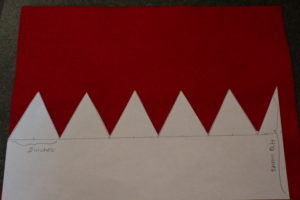
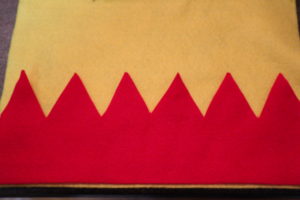
Make a template using a 8 1/2 by 11 standard piece of paper. Measure 4 1/2 inches from the bottom and draw a line. Draw another line 2 inches below that. Put a mark every inch along both lines. Then using your ruler create a zig zag. This measurement should make it possible to do this twice on a felt rectangle that measures 9′ x 11 1/2″. To make sure you don’t cut into the other half you could cut the felt in half lengthwise before you cut the zig zag, If your felt isn’t as wide as mine just shorten the bottom portion of the template. Do the same with the second color that you have. This extra layer will stiffen the project so it can support the gems. It also makes it really pop with the extra color.
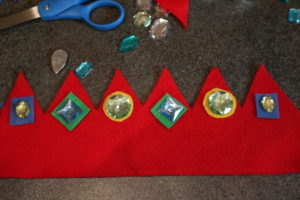
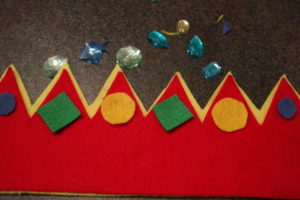
Now comes the fun part! Sort out how you would like to place your gems. Cut pieces of felt out of scraps to place under the gems. Using the hot glue gun, glue the layers together. Then glue on the felt circles and triangles into place, and followed by the gems. This is when I borrowed my daughter’s head for a sizing. Overlap the edges and glue in place. I only put gems on the front of the crown, if you were going to put them all around its important to not have glue gems on the part that is going to be under this over lap. So if I were going to put gems all around I would only put it on the 4 middle zig zags for the back part of the crown.
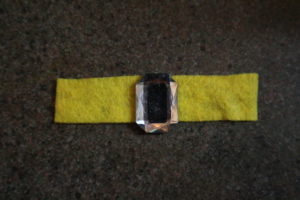

While you have the felt and gems out and the hot glue gun is still hot…you might as well make a ring and bracelet too.
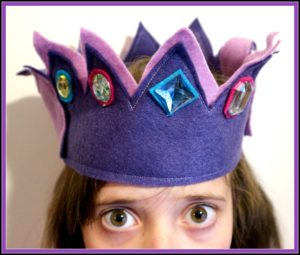
…Here is a link to another post with identical looking crowns but using the sewing machine to sew the felt together and add a Velcro closure.http://mybrightideasblog.com/sew-a-super-easy-to-make-felt-crown/
Laundry Room Hack – Use Dry Erase Markers on the Washing Machine
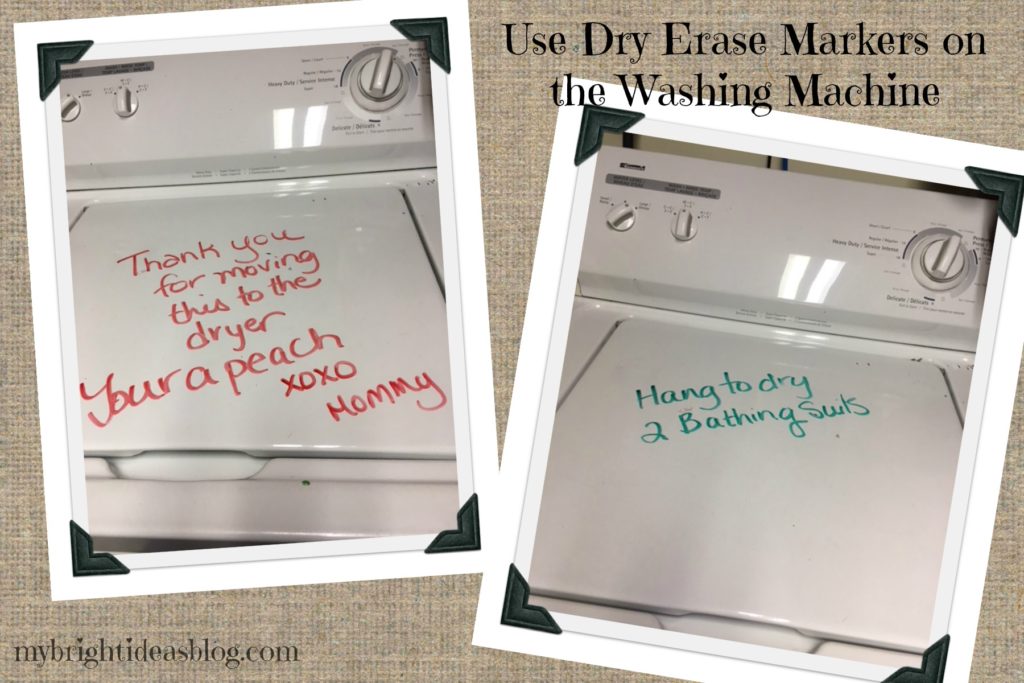
Using Dry Erase Markers in the Laundry Room!
All of my bright ideas aren’t turning into much to show you this week. So I am writing this one in 15 minutes or less!
Leave a message to your family or to yourself on the washer. This way you won’t forget that you have items that shouldn’t be dried.
If your washer isn’t white or it’s too new and gorgeous to use as a message board just have a dry erase board above the washer or have one you can set nearby as a reminder to yourself.
Have a super day!
Sewing Diy- Extend the Length of a Short Top with Lace
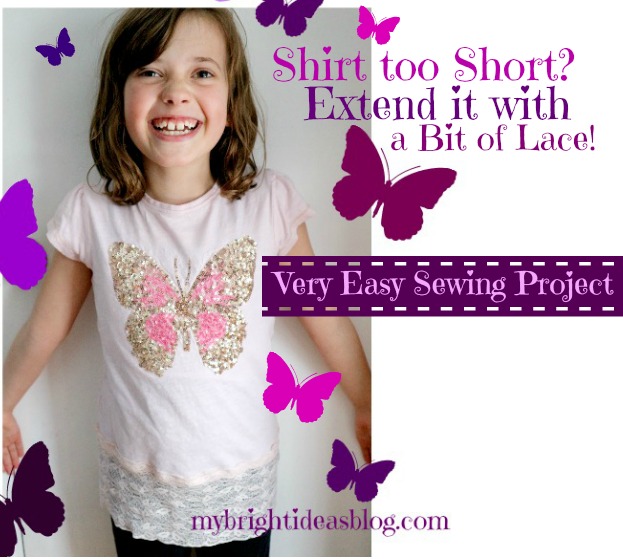
Have you got a great shirt that has gotten too small and you aren’t ready to say good-bye to it? Adding a bit of lace to the bottom is so easy and will make all the difference on how much longer it will work for you. Great for growing girls….also helpful for adults…I have a 100% cotton tank top that is going to have a similar extension as it now is a crop top…just from regular laundering it shrunk inches!
For this project you will need:
An awesome shirt you want to save
A piece of stretchy lace that will be as wide as the top
Sewing machine, thread, tape measure etc etc
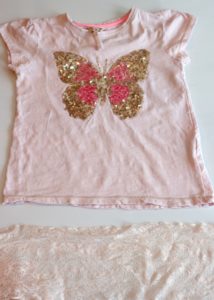
Iron the t-shirt and the lace before you start. This lovely, shimmery, sequin butterfly top is 14 inches wide (36 cms) along the bottom seam when laying flat. So the lace would need to be 28 inches (73 cms) wide plus one extra inch (2.5 cms) for a seam allowance. Check to make sure this will be a good match in width.
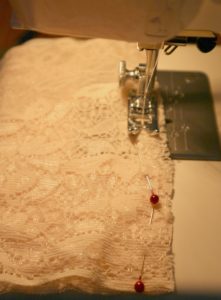 Fold the lace in half and sew the edges together. Turn it inside out.
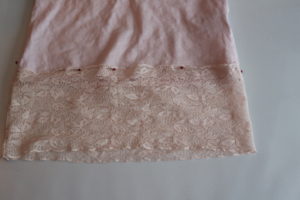
Lay the lace on the bottom of the t-shirt and decide if you would like to sew it on top of the bottom edge or underneath. My lace has a nice look to the top so it didn’t need to be hidden. Lay the lace down flat and put a pin on each end…this will help you to line up the pin to the side seams.
I pinned the lace on top of it all around the top. After I took this photo I decided that the t-shirt would be on the left of the sewing machine so all the pins needed to be turned around. Since the t-shirt and the lace have some stretch you can pull and stretch it a bit if things aren’t lining up well. After you sewed all the way around you are done. Try it on. Can you believe that only took you 10 minutes!?!? Well done!
We love this sequin butterfly top enough that we would probably cut the butterfly off and sew it onto another shirt when its just too small.


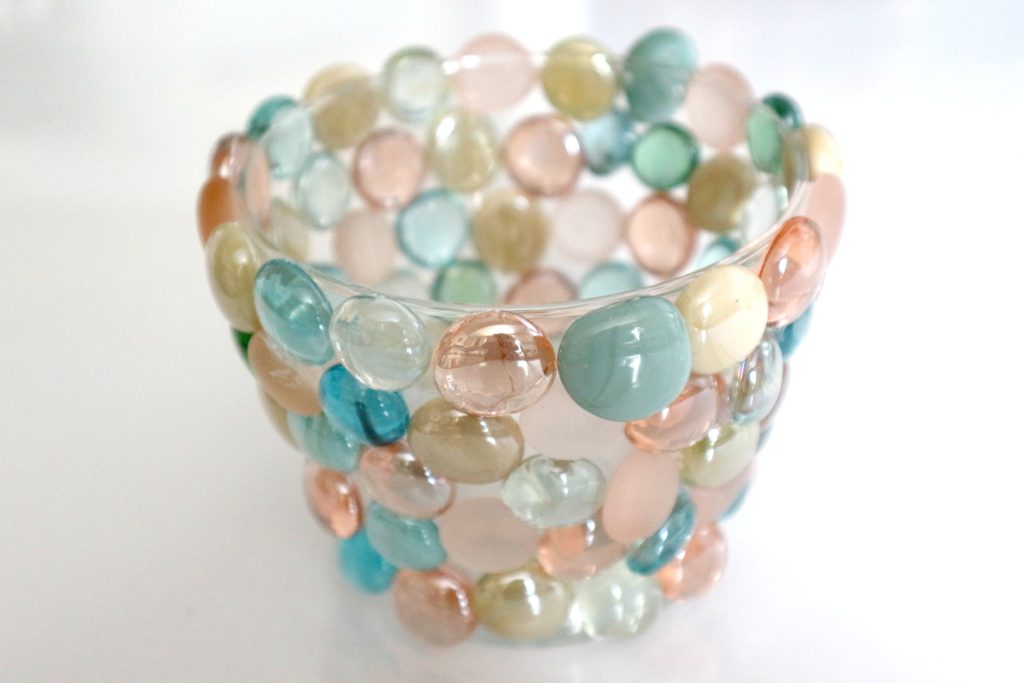
Jazz up a Vase or Candle Holder with Glass Gems and Hot Glue!
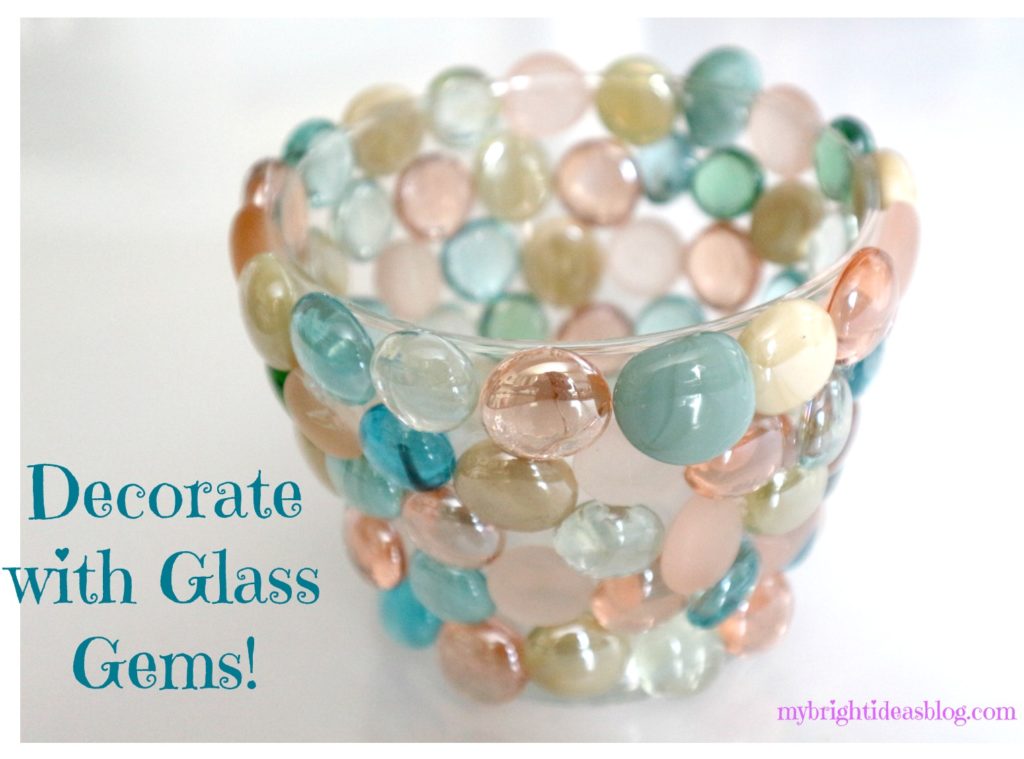
When I saw this bag of glass gems at Michael’s craft store I had to get it even though I didn’t know what project to use it for yet. The beads had pearl and pink and turquoise….so pretty!
The vase is small either for short cut flowers or its a candle holder…I’m not sure. One bag of gems was enough to cover this vase…candle holder…for simplicity lets call it a vase.
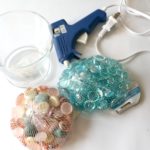
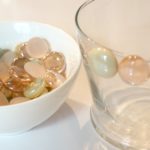

It doesn’t really require instructions its so easy. Alternate the gems for variety. Try to save some smaller ones so you can fit them into the small spots. I found the ones on the bottom wanted to pop off because the edge is a little rounded. So another glue might be better for a curvy vase. Or just put it in a place that won’t tempt your children to touch it.
…

100th Day of School Celebration-Glue Buttons on a shirt for a Gumball Machine
It looks like next Monday will be the 100th school day for 2018! Where has the time gone?!?!
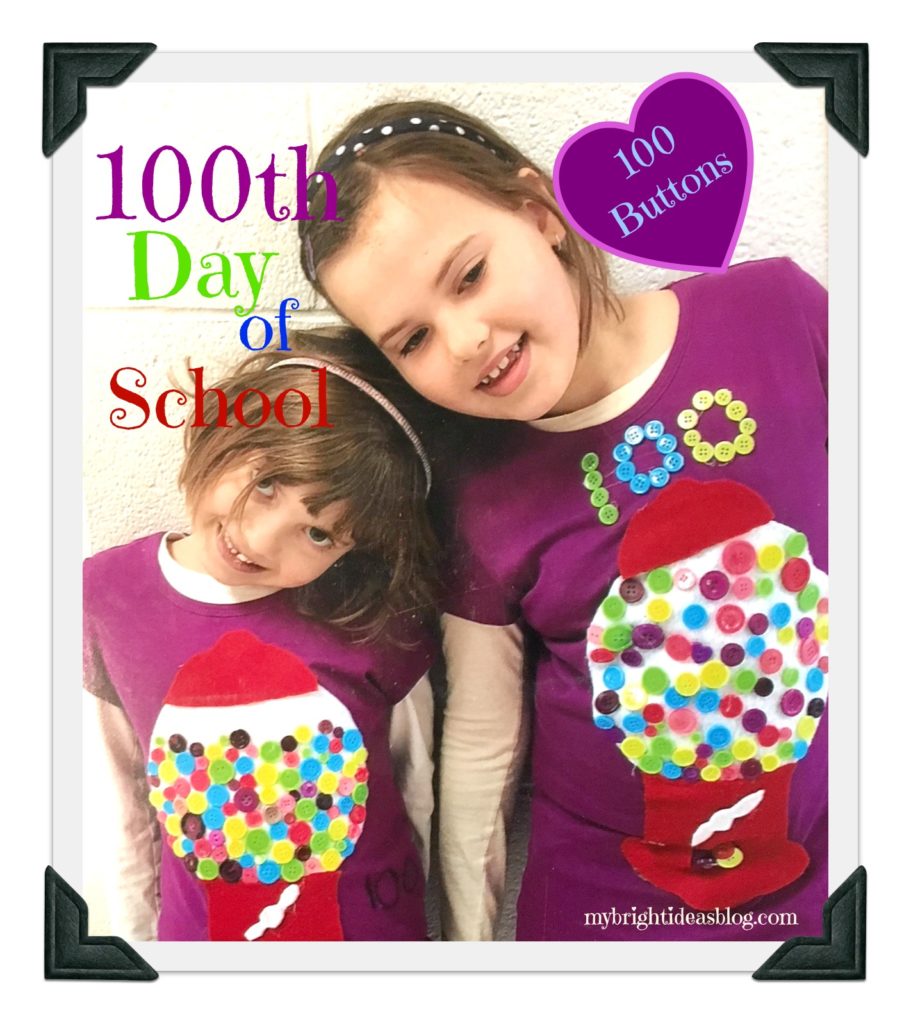
Once a year the school has a nice way to spice up a dreary February by celebrating the 100th day of school. Its a great excuse for extra math too as they find all sorts of ways to come up with the number 100. Teachers from Kindergarten to Grade 2 seem to get into it the most with assignments for parents to help their children glue 100 cheerios to a page or 100 googly eyes to a t-shirt. What we did for the girls a few years ago was put 100 buttons on a t-shirt looking like gum balls in a gumball machine.
Simply take a piece of in-expensive white felt and cut a circle (trace a plate). Take a piece of red felt and cut out the bottom and top of the gum ball machines. We didn’t realize the date had snuck up and with one night to do this I hot glued everything in place. I could have sewed on the felt and buttons but that would have taken some time but made them more wearable. We put it on plain purple t-shirts from the craft store….purple is always a great choice and the bright colours pop! Their teachers were really delighted by the effort we put into making t-shirts for the theme.
COST
The cost to make this…$5 t-shirts….$2 felt…..$4 for buttons in 4 colors from the dollarstore which was enough for both girls tops. So less than $20 for both girls. You could cut the cost in half if you use t-shirts that you already have. Use one that they are just about to outgrow anyway! The photo was taken by the teachers and emailed to me-how sweet!

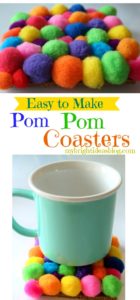
Easy Pom Pom and Cork Coasters
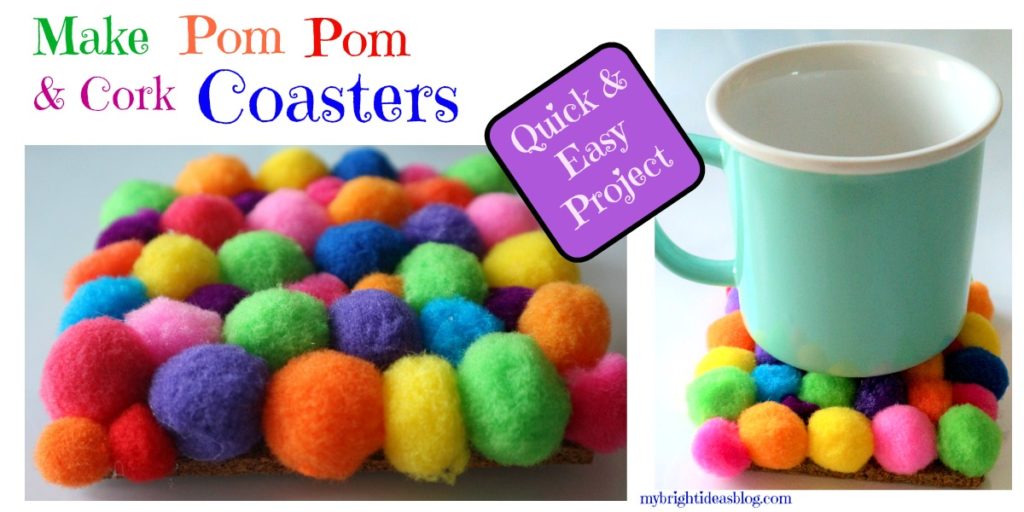
This project is bright and cheery and ridiculously easy to make! All the supplies can be purchased at a Dollar Store so its super inexpensive too!
You will need:
- cork
- bright pompoms (plan for 40 per coaster)
- ruler
- scissors
- hot glue gun
- hot glue sticks
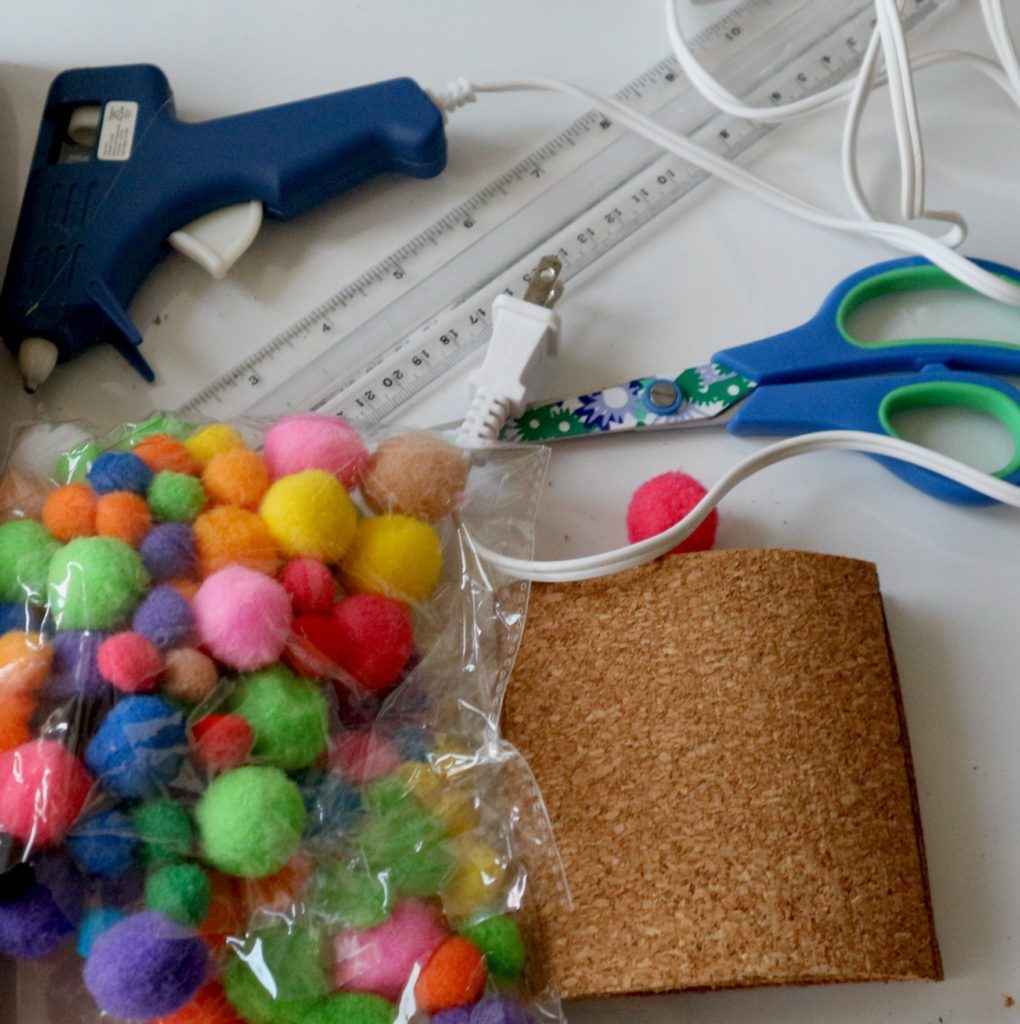
Gather your supplies!
Initially I used a roll of cork but its too light and curvy (you can see in the photo above that it doesn’t lie flat) so use the 12 inch by 12 inch cork square tiles and cut it to the size you like. I cut mine to 4 inches by 4 inches.
![]()
Attach the Pompoms with hot glue. Watch your fingers kids!
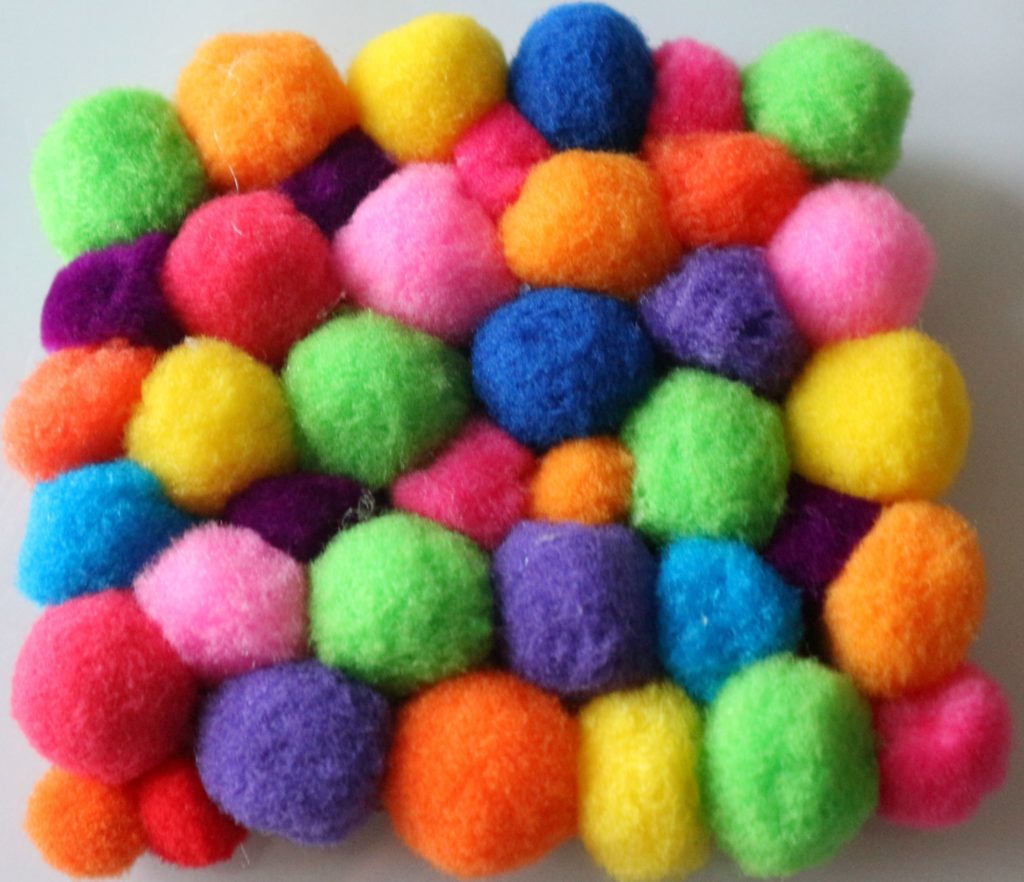
My coaster took nearly 40 pompoms and didn’t have enough the same size. You want them to be fairly consistent so your cup of coffee isn’t tippy on the coaster. Fill in any gaps with smaller ones so you can’t see the cork.
….
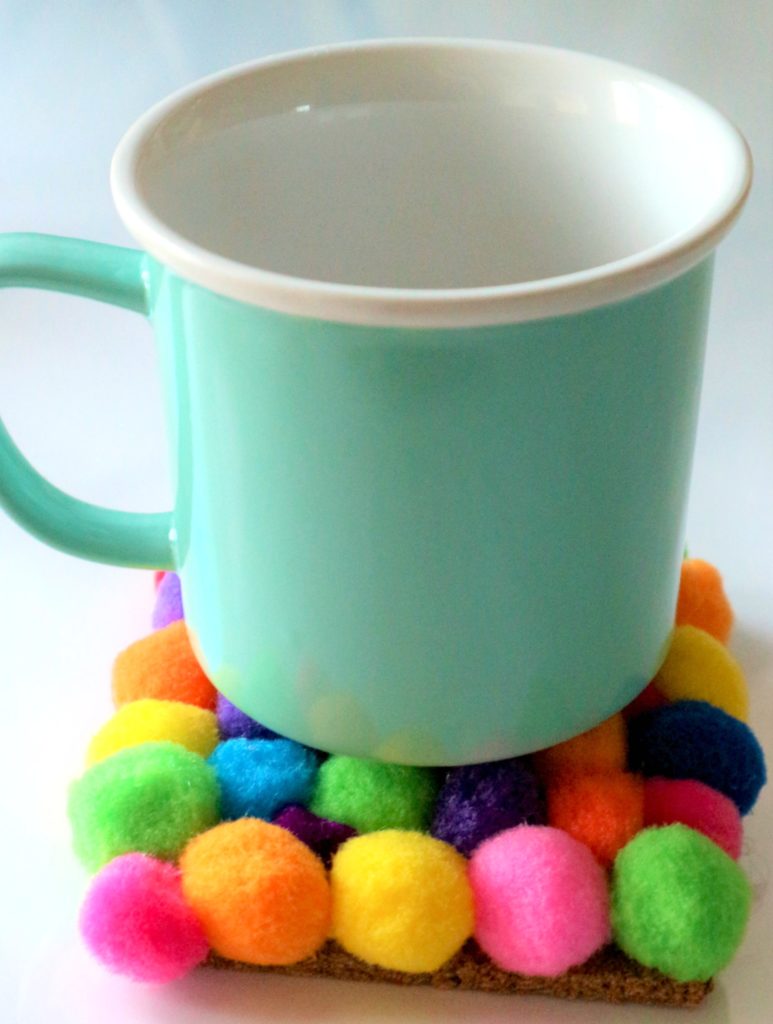
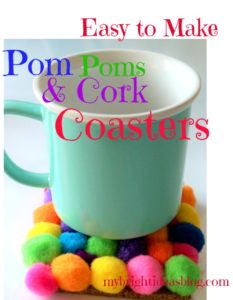
The colors are quite cheery on this grey February morning! It makes me smile every time I look at it!
This would make a great gift for your 10 year old to make and give. I hope you have had fun with color and this very jolly craft!
Remember to pin it on Pinterest or share it with your social media networks.
….