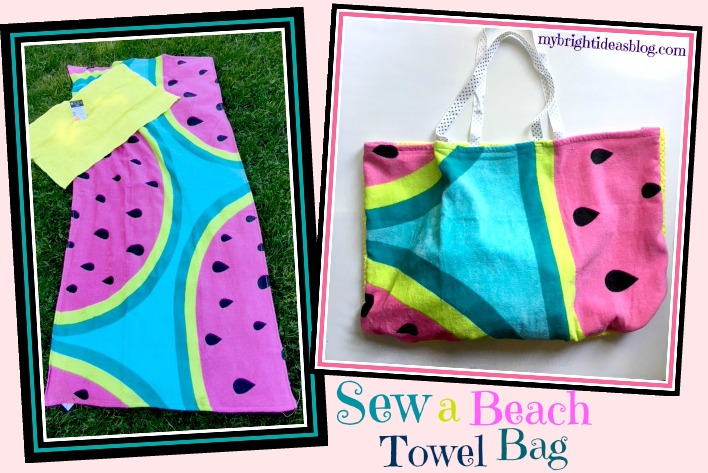
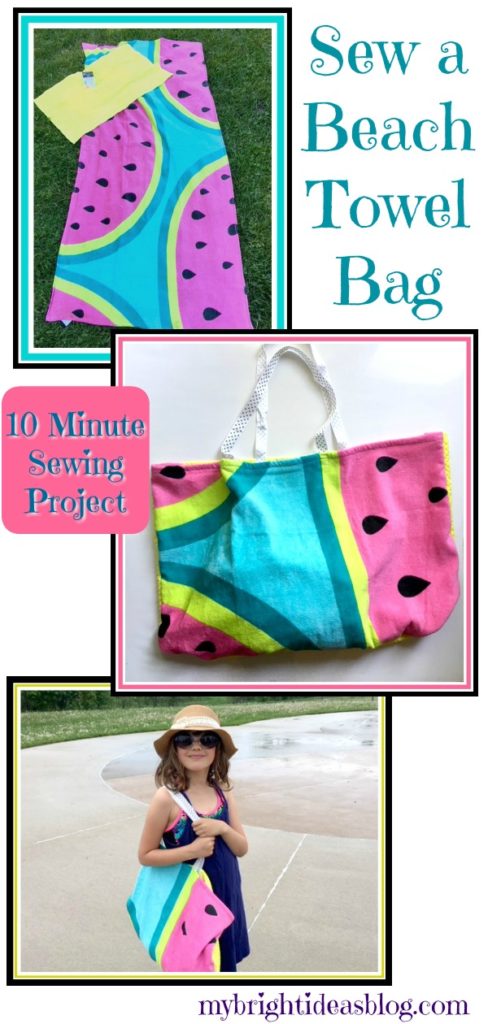
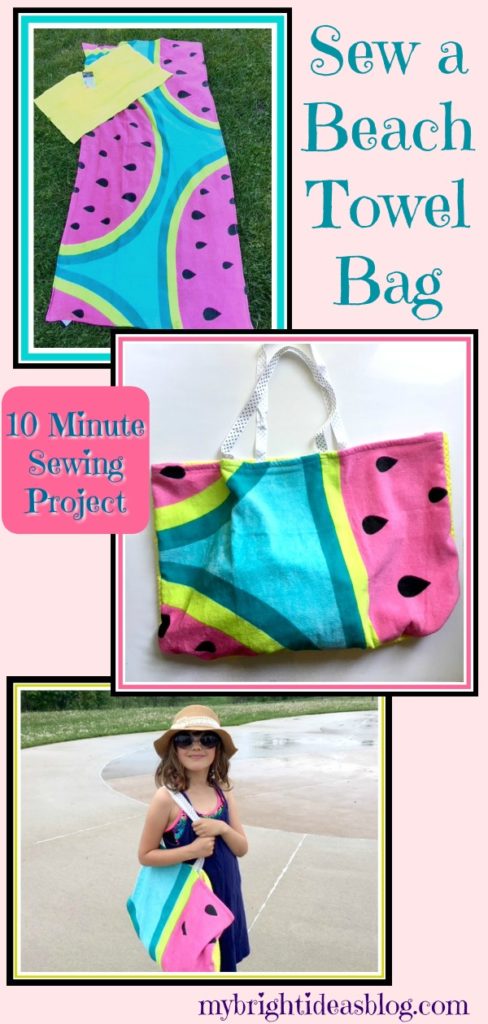
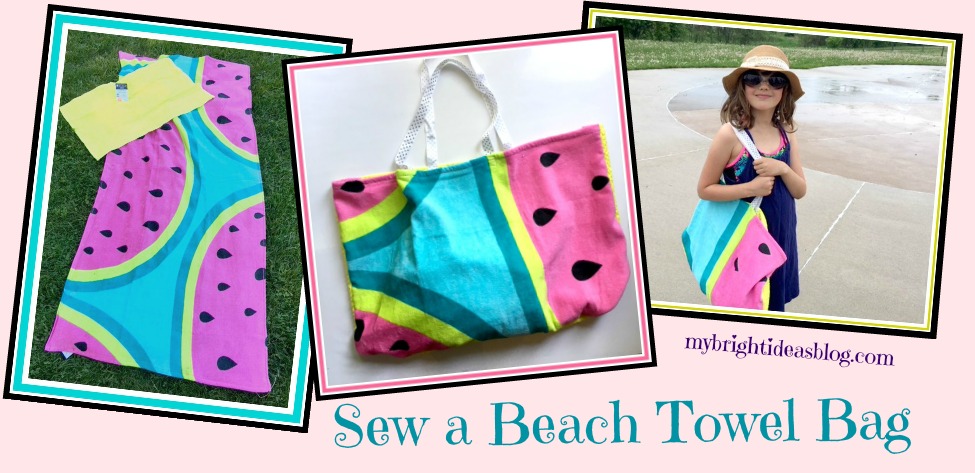
The weather is hot and trips to the beach or swimming pool or splash pad are about to become a nearly daily part of our keeping cool routine. So why not turn your big beach towel into your beach bag! Its such an easy project too. If you have a sewing machine you could have this sewn up in 10 minutes.
You will need:
- a beach towel
- a hand towel
- 4 feet length of ribbon/strapping/cord/shoe lace
- basic sewing materials (sewing machine, thread, pins, scissors)
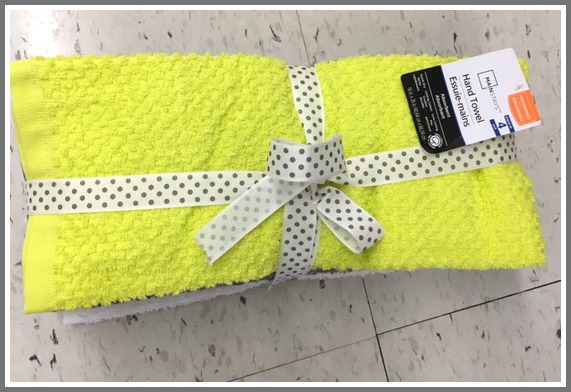
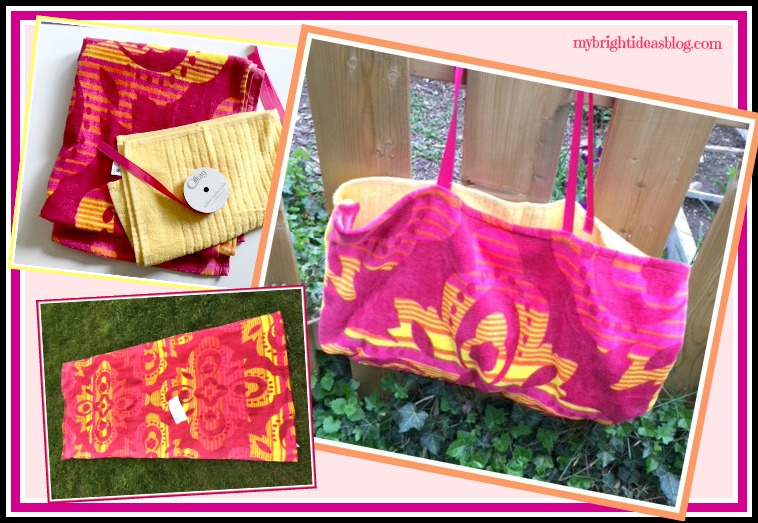
This vibrant beach towel is from Walmart for $8.00.
Happy Childhood Memory Moment…
When I was a youngster my grandma took me and 2 of my sisters and 2 of my cousins on a camping trip. What was she thinking taking 5 girls aged around 10 to 13 year old, on a trip like this. At a family gathering when they announced the trip was being planned, they produced beach towels and toiletries bags for each of us. My towel had hot air balloons on it and she had sewn in a bit of fabric and written my name on it. As much as I loved that trip-I cherished my bag and towel all my own. Sigh…I love my grandma memories…someday I should tell you about when we made horseradish for my big sister’s wedding reception….hilarious!
Back to the project at hand….
So this week I pick up two lovely bright beach towels for my girls. I also spotted some hand towels and bought those too-just simply because our hand towels keep disappearing.
So I’m unloading the newly purchased summertime items. Beach towels, hand towels with a nice ribbon on it, sunscreen, bug spray…and I think, wait a second! Drop everything and get out the sewing machine! LOL
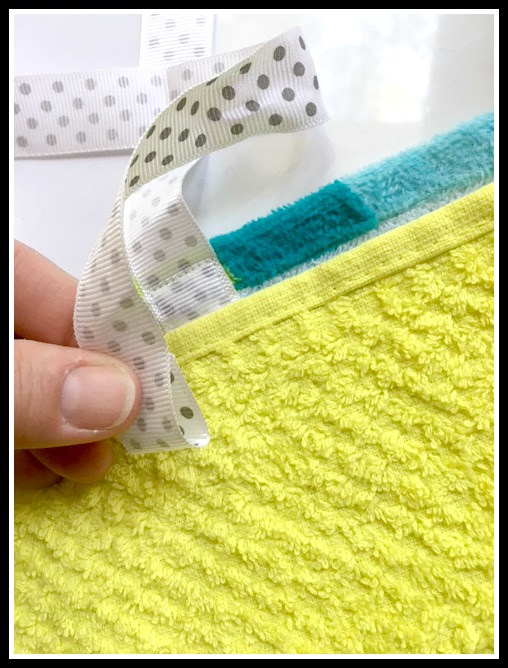
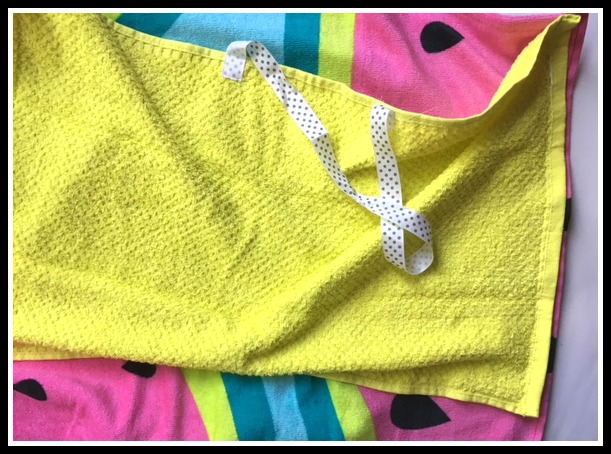
First of all we need to see if that gorgeous yellow hand towel will fit width wise on my beach towel. Take two bag handles from it…yes we can!
So with a big and little towel and the ribbon ready here is what you do…..
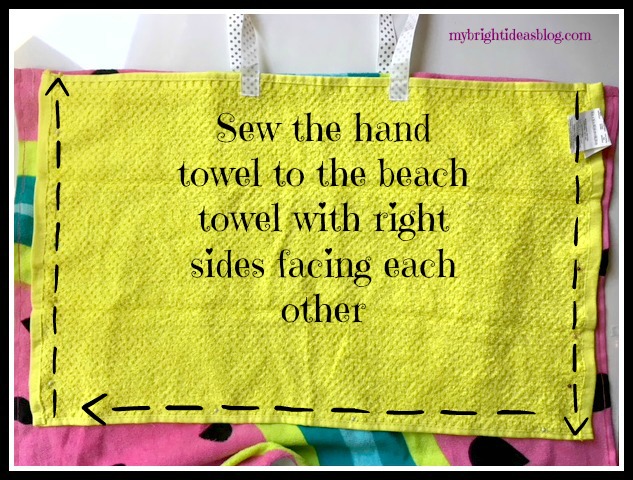
Place the hand towel on top of the beach towel right sides facing each other.
Cut the strapping materials into two pieces 2 feet long each (24 inches or 60 cms). Look around to see what you have…shoe laces, webbing, braded trims.
Starting with the beach towel fold in half and mark the middle with a pin. Make a semi-circle with the straps and pin them to the towel.
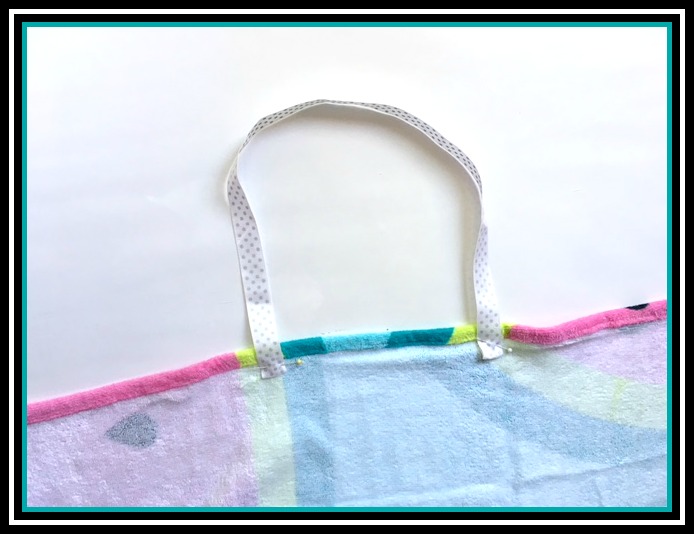
Since my ribbon has the print on only one side I made sure this was showing on the good side of the towel. Also I tucked the ribbon ends under so they look finished and secure when sewn.
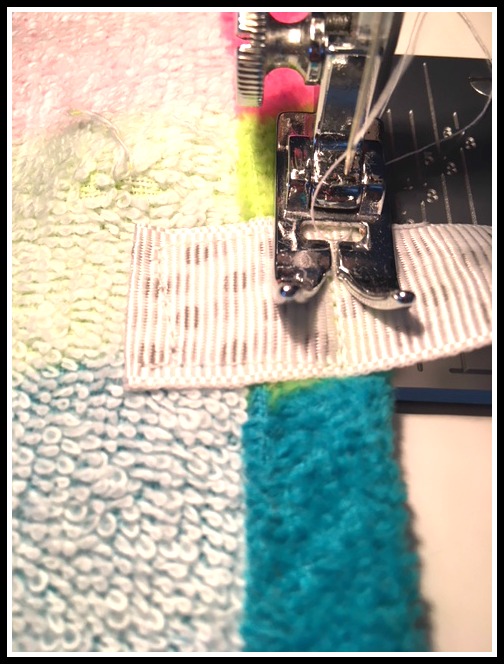
Next lay the hand towel on top of the beach towel and match up the location of the handles on the beach towel. Pin in place. I left the tag on the hand towel to remind me which side was my good side and which was the back. I did cut it off later. As you can see the towels don’t match up exactly the same width-one was 1/2 inch wider on both sides. It doesn’t matter!
Tuck the ends over so there won’t be fraying from the ribbon or strapping materials.
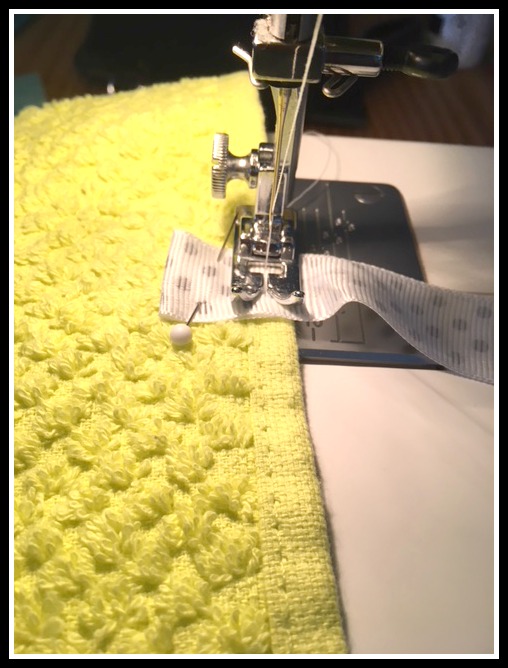
Sew it in place. I usually go around in a square for my stitching on straps to bags. If this was my own bag I would likely put on proper tote bag webbing straps and use a square of fabric or a face cloth to add a pocket or two. That is because I carry everything but the kitchen sink. I would also consider putting a hidden pocket somewhere on it to hide my keys and cell phone.
But since these towel bags are for the kids, the ribbon handles I used will be fine.
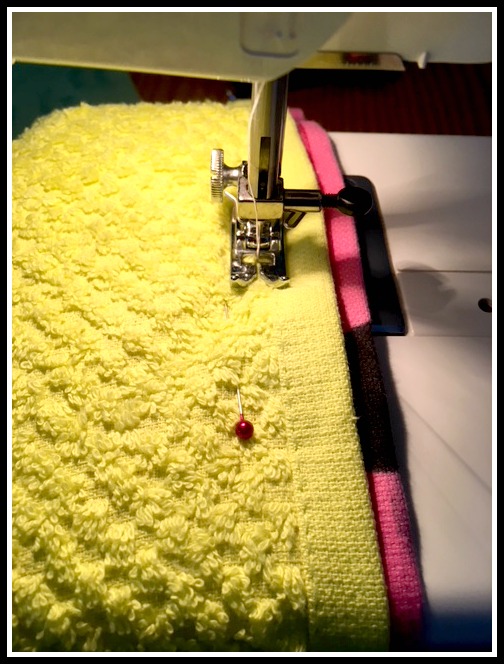
Next we will put the hand towel on the beach towel and pin them in place-Right sides facing in!
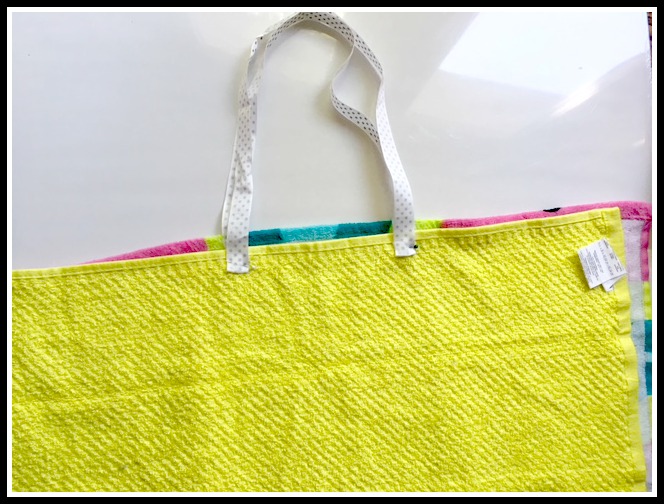
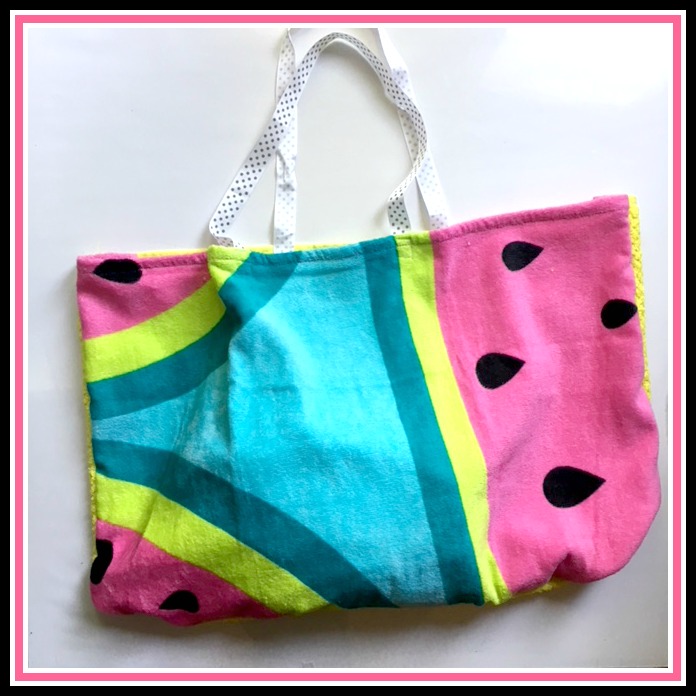
Sew down the side of the hand towel, then turn to sew the length and up to the top. See photo below. Now you have a bag!
Now you have a bag!
It might look wrong at first. I made 2 of these and at this point I think…uh oh did I do this right? But alas it is fine. Just turn the whole thing inside out and put the tail of the beach towel inside the bag. Add your sunscreen, hat, water bottle, snacks and goggles and off you go!
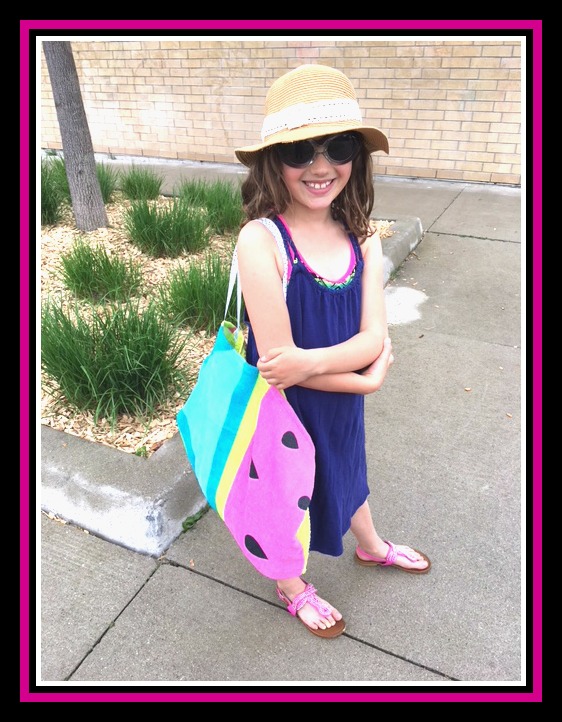
Here is a picture of the second bag. It’s going to be hot day and sunny day here. Perfect beach day!

…
Make Healthy Lunches – Mason Jar Salads
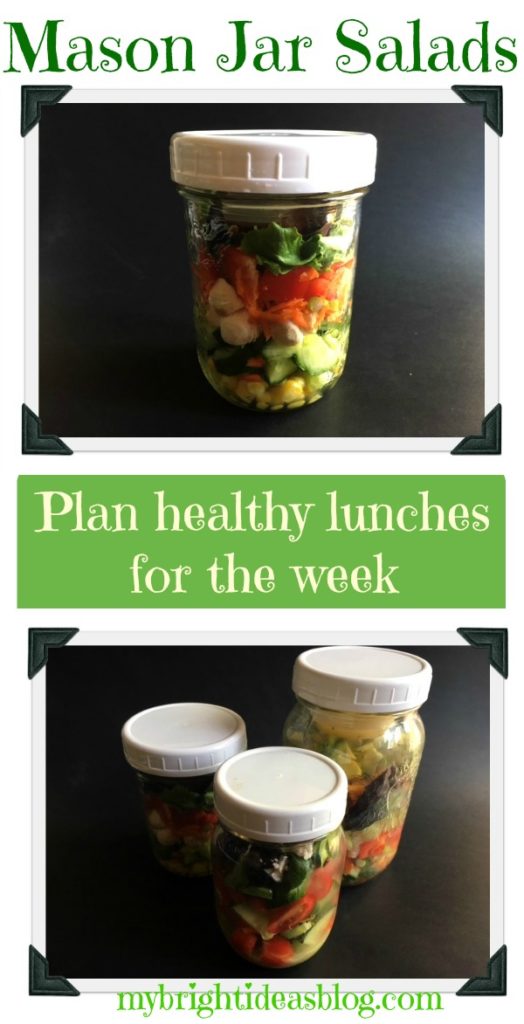
 Its Sunday and that means its time to have a quick inventory of what we have for this weeks lunches. This past week I gave the mason jar salad idea a try and I loved that it was ready to grab and go. If you are making one salad you might as well chop up the ingredients all at once and put it into 5 jars to be prepared.
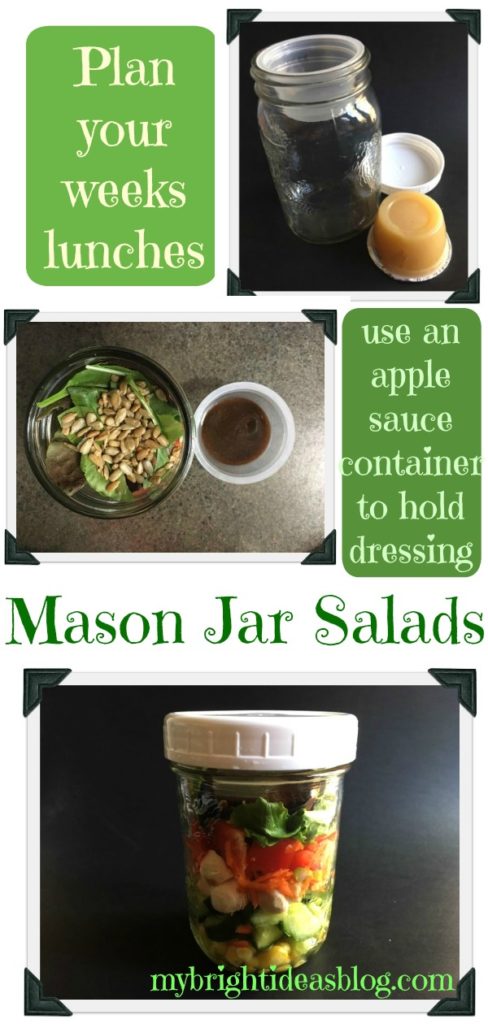
Start with clean mason jars. I experimented with wide jars and narrow to see what I prefer. Also different lid options are available. In the past we have taken juices in mason jars and found the metal ring lids to be a pain to fumble around with when you are on the go. The white lids are easy to find where ever you purchase mason jars.
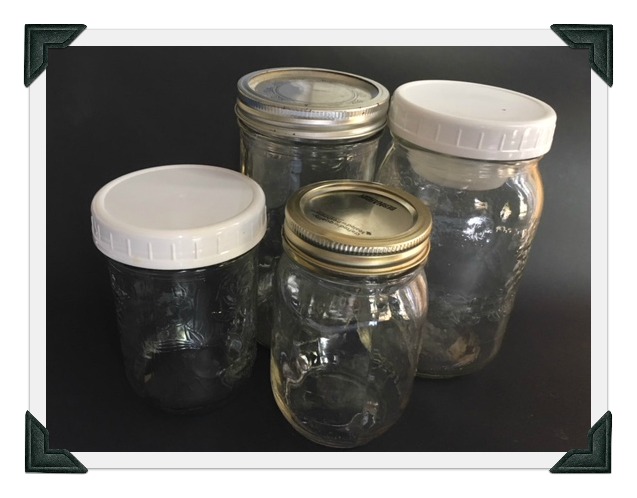 I noticed that the wide mouth jars fit an apple sauce container perfectly in the neck. This way you could put the salad dressing in separately or you could bring croutons without them getting soggy. How cool is that!
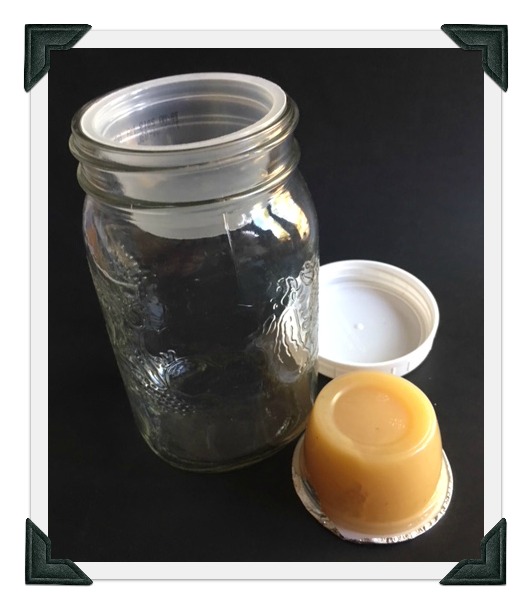 Alrighty, lets see what salad fixings we have in the fridge and get the cutting board and favourite knife. There is so many variations to this that you could make a different salad every day.
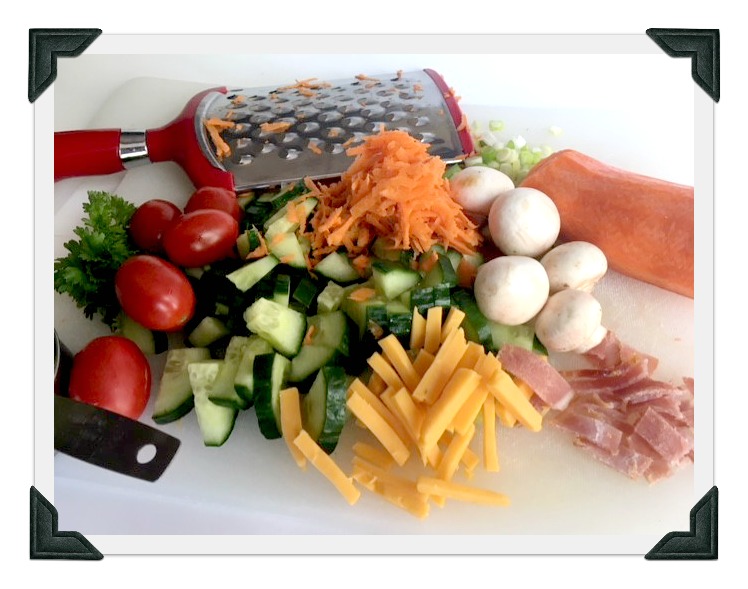 Here are my favorites…
Now we add the layers of salad to the jars. If you don’t happen to have an apple sauce container for your salad dressing, you simply put the dressing in the bottom of the jar.
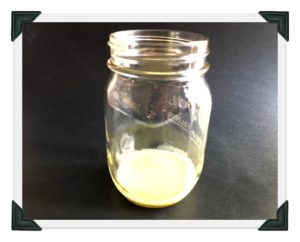
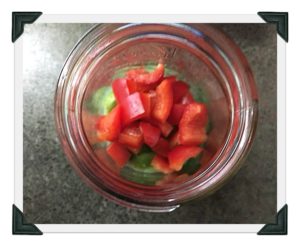

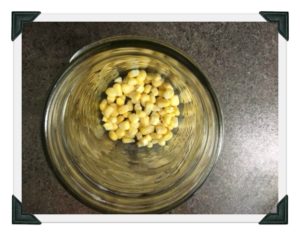
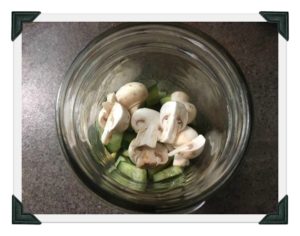
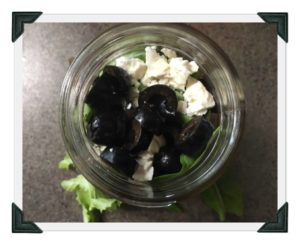
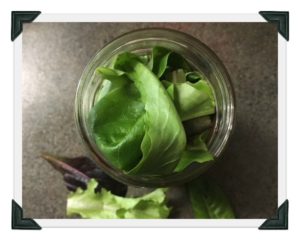
Put the heavier items on the bottom like peppers and cucumbers. Lighter things on top.

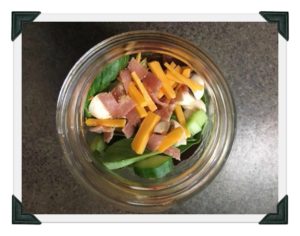
Anything that would be your toppings normally would go close to the top. Olives, cheese, nuts and seeds. Lettuce goes fairly close to the top and stays very fresh and crisp. Also the idea of having the salad dressing on the bottom is so that when you pour it out into a bowl in the staff lunch room the dressing is drizzled on at the end. However, I would skip the bowl (and the staff room) and consider just shaking it before you eat it and eat it out of the jar. Saves dirtying a dish and talk about fast food!
I love mason jars, I love not having to chop up a salad every day of the week. I would definitely recommend making your lunches ahead on Sunday so you can avoid the temptation to run for a burger drive thru at lunch. Grab your mason jar salad and go find a patch of grass to sit on. Kick off your shoes and really take a moment to relax and enjoy your lunch.
Have a great week!
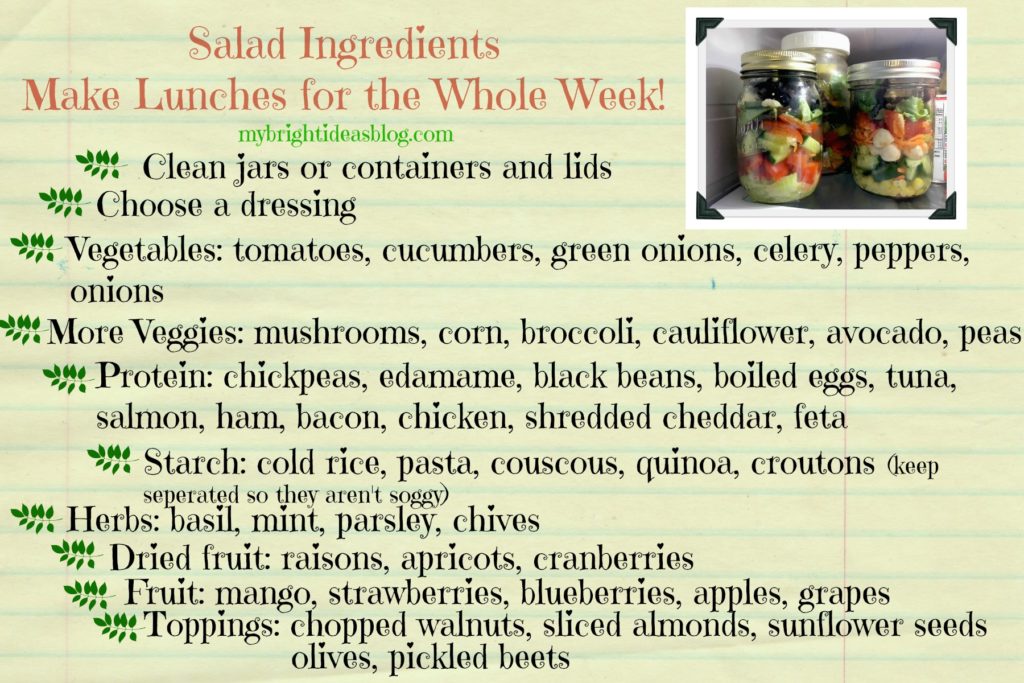
- Choose a dressing
- Vegetables: tomatoes, cucumbers, green onions, celery, peppers, onions, carrots
- More Veggies: mushrooms, corn, broccoli, cauliflower, avocado, peas
- Protein: chickpeas, black beans, edamame, boiled eggs, tuna, salmon, ham, bacon, chicken, shredded cheddar, feta
- Starch: cold rice, pasta, couscous, quinoa, croutons (keep separated)
- Herbs: basil, mint, parsley, chives
- Dried Fruit: raisons, apricots, cranberries
- Fruit: mango, strawberries, blueberries, apples, grapes
- Toppings: chopped walnuts, sliced almonds, sunflower seeds, olives, pickled beets
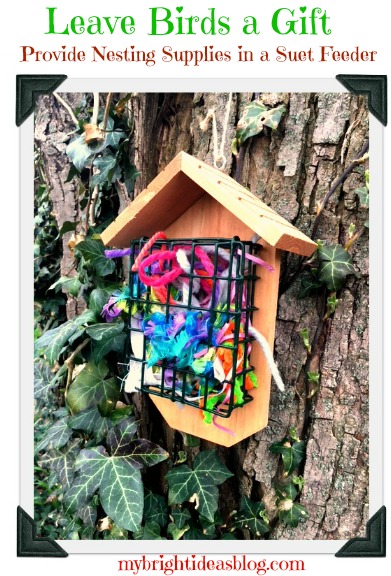
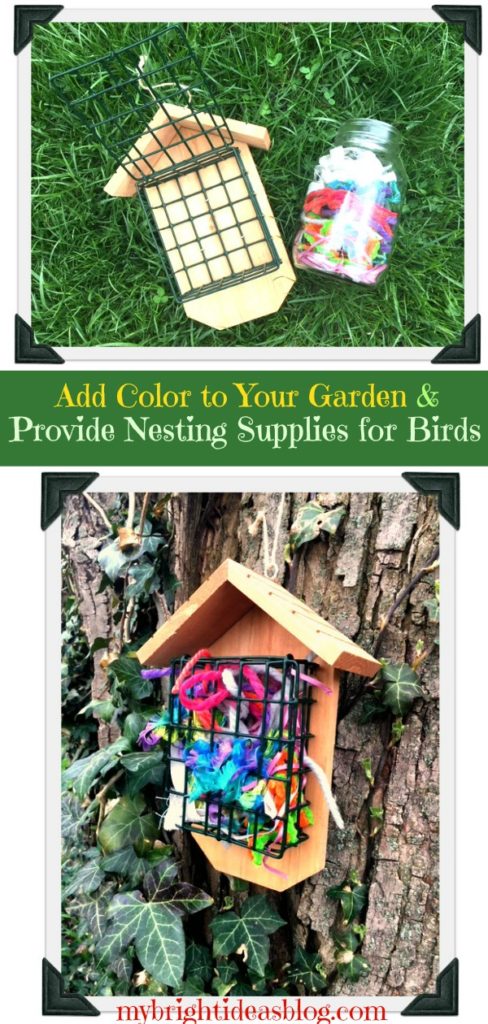
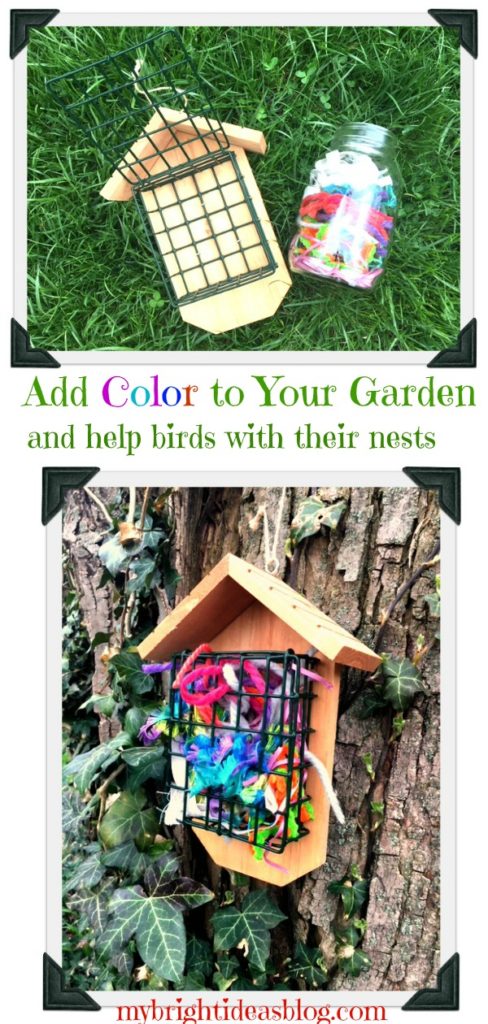
Add Color to the Garden and Provide Yarn for Bird’s Nests
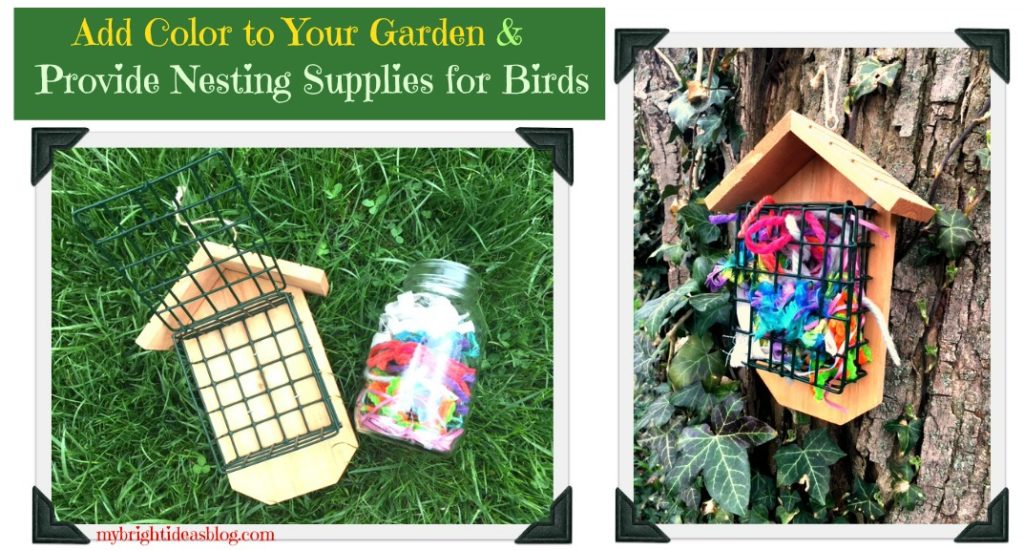
Suet Bird Feeder – For Bird Nest Supplies
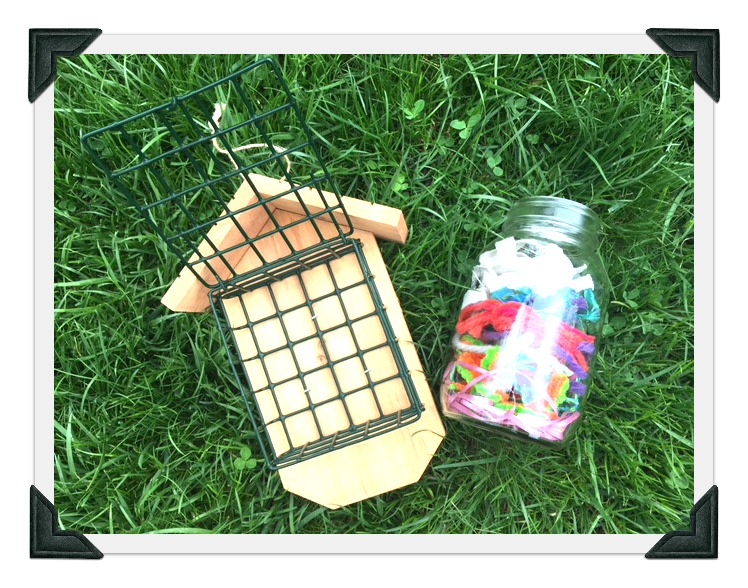
Looking to add a splash of color to your backyard? Wondering what to do with ends of yarn and fabric? Want to help out the lovely birds who wake you up with their sweet melody? Get a suet bird feeder from your dollar store…or maybe you already have one in your garden shed.
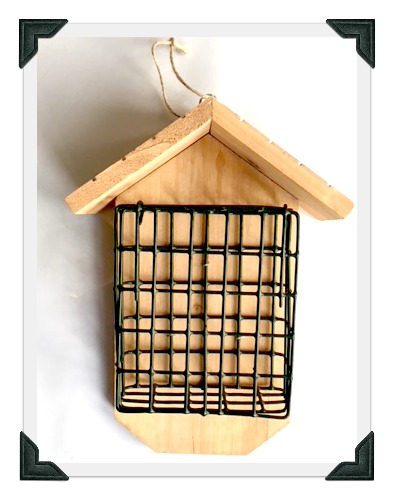
In case you aren’t familiar with this product here is a photo. A bird feeder suet cake is a square of bird seed in animal fat. It’s appealing to the home owner (no clean up) and to the birds (yummy food). The cage below is what you pop a suet cake into. We aren’t feeding the birds today though. Today we are using the suet cage to leave pretty supplies for their nests.
This is also a great way to give a purpose to bits of supplies too small for use in other projects. You could use bits of yarn or strips of fabric cut into 1/2 inch widths and 4 to 6 inches long. I suppose natural fibres would be best…cotton and wool …. Birds are in nature after all.
Years ago we had a lovely dog named Bronte that shed a lot. When we would brush her, my hubby would clean the dog hair out of the brush and put it in my shrubs. This seemed bizarre to me-after it rained there were gobs of soggy dog hair dangling in the bushes. Gross.
Apparently, he was doing this to help the birds build their nests. I guess it’s warm and soft – it could have some appeal, for a bird. It hadn’t really occurred to me that birds would need help making their nests since they have been doing this job on their own since their beginning…but wouldn’t it be cool to find a nest that had some of your yarn or ribbon or fabric in it?
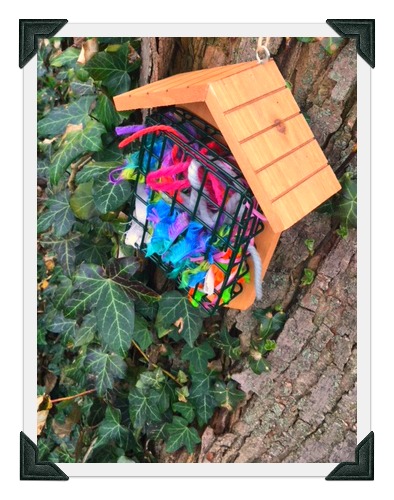 Can birds feel happy that they have found a splash of color for their nests? I love to bring home new cushions or wall hangings. Even if birds don’t get the same joy from re-decorating, I’m sure they will sing you a song of thanks for your bright and thoughtful gift. Tweet Tweet….Chirp Chirp.
Enjoy your day and have a wonderful weekend!
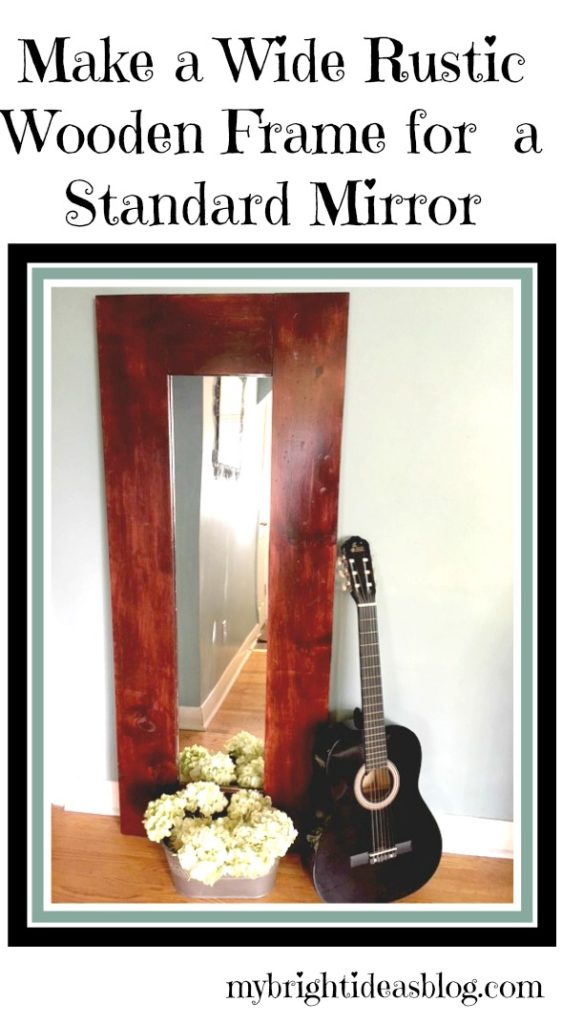
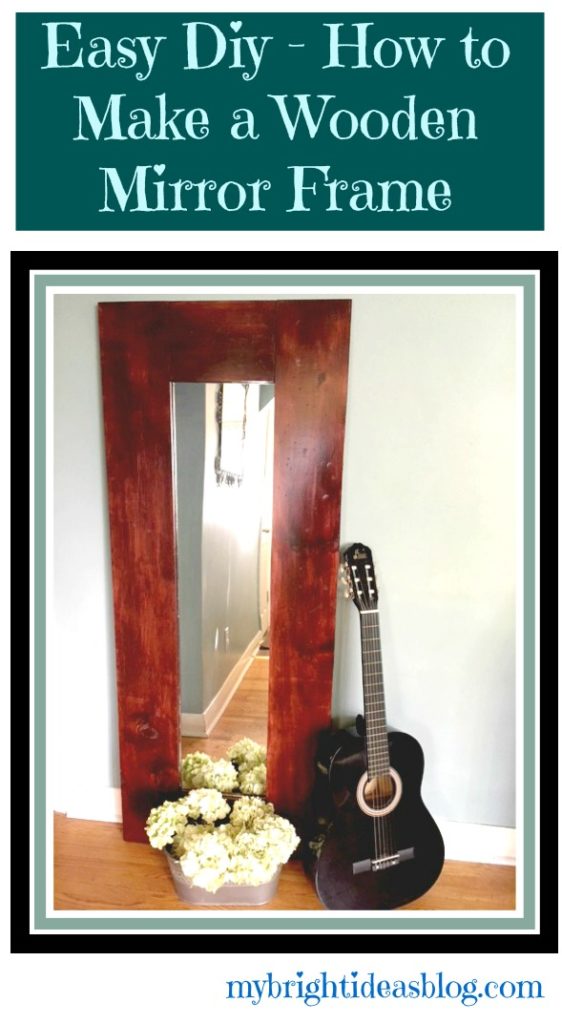
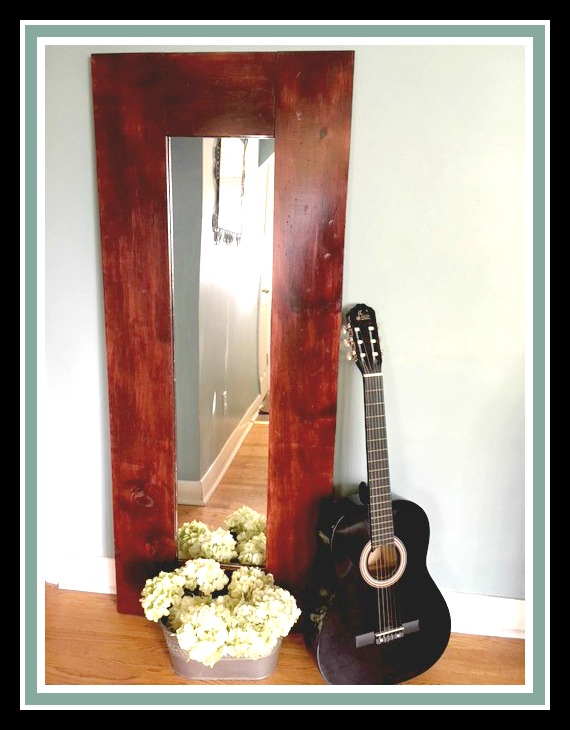
DIY Make a Wide Wood Frame for an Inexpensive Mirror
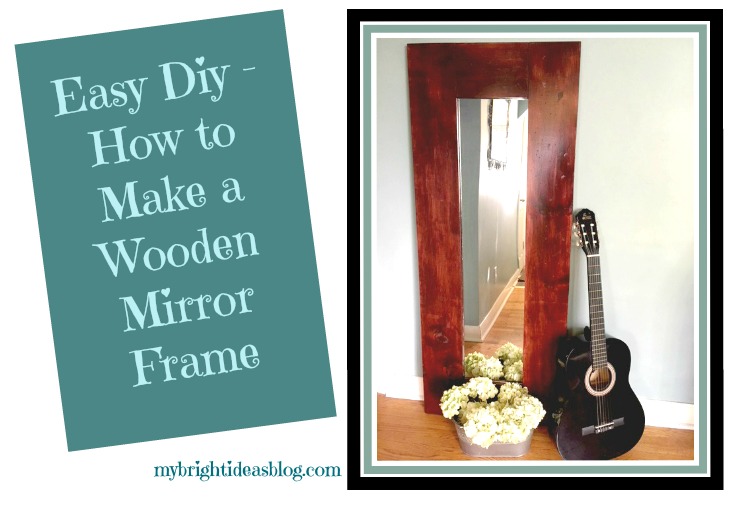
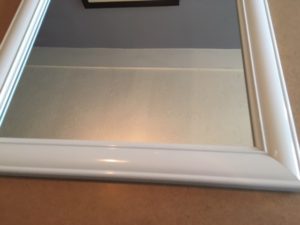
This week I got it into my head to take a cheap mirror and make it really substantial with a wood frame. Recently, I replaced all the doors to the bedrooms and closets and that was where most of our mirrors were. Hanging on the backs of doors. Now the doors are so new and lovely I can’t bear to attach anything to them. So I’m heading out the door not knowing if my skirt is stuck in the back of my tights…or any other possible wardrobe mistake is happening.
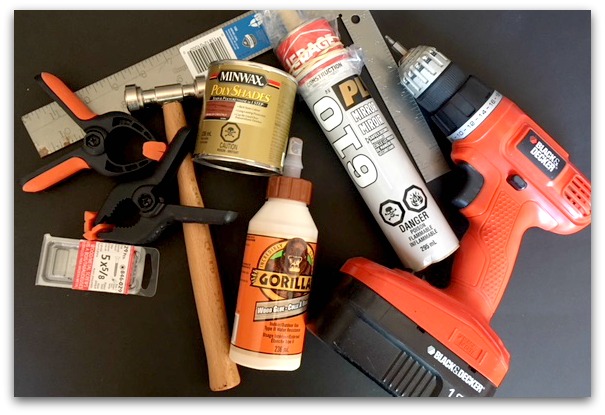
For this project you need:
- one 1/4 x 48 x 96 backboard cut down to size $21.40 (mine was 25 x 61 – but measure your mirror and pine pieces first) I had this cut done at Home Depot
- inexpensive pine boards (I needed 2 boards 1x8x6 $7.97 each) choose straight boards
- a mirror $13.99 – mine was 13×49 but when you take it out of the plastic frame it was 10 1/2 x 46 1/2
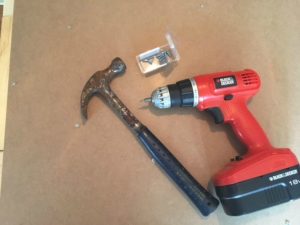
- exacto knife
- tools to bang up the wood if you want it distressed…hammer, saw, big nail
- stain and brush (mini wax polishade $11.97,this is an “all- in-one” stain and polyurethane so you brush it on)
- Wood Glue $5.27
- Clamps (at least 10)
- Screws $2.97 (5 x 5/8)
- Mirror Caulking $6.97 (LePage 610 Mirror) and Caulking Gun
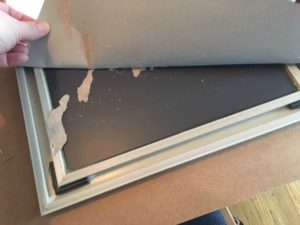
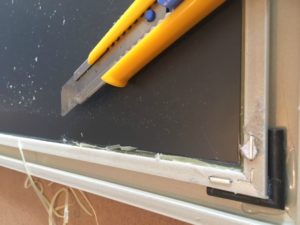
Carefully Dismantle the Mirror
The very first step before you cut your wood is buy the mirror. If you just follow my sizing for wood cuts you may have a different size mirror and have to recut or get new wood. Remove it from the frame by turning it over and tear off the paper on the back. Take an exacto knife and cut away all of the glue on the edges. The mirror is actually a lot thinner and delicate than you might think-so don’t assume it will pop out. It will break easily. I found I needed to slice the along the edge of the plastic frame and then turn the knife and cut at a different angle. This required a lot more time and patience than I expected.

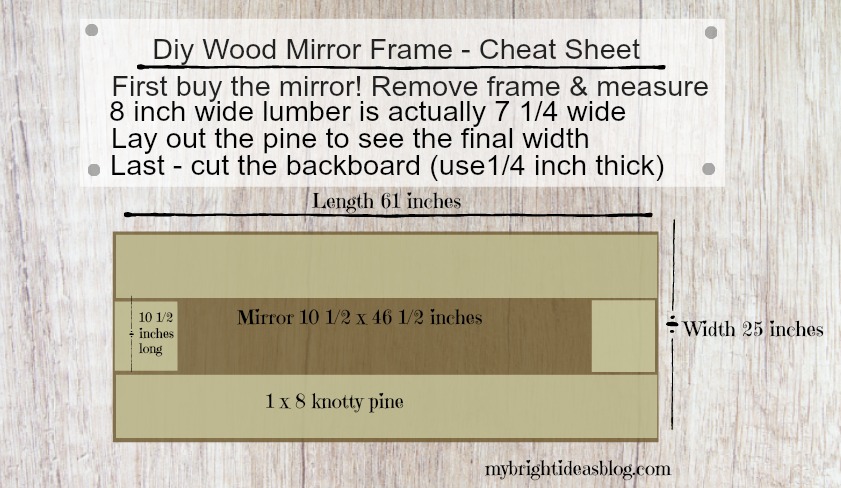
Very carefully lay the mirror on your surface and measure. I wanted to use a wide wood-you can go wider or narrower just adjust the size of your backboard. You may be able to find the right wood in the lumber area near the fence building supplies this will be less expensive. I went with the wood in the furniture building section because of the sizes available.
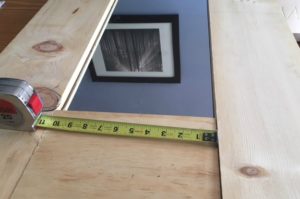
My mirror is 10 1/2 inches by 46 1/2 inches wide.
The pine boards were 1 x 8 x 6. But you must remember that they aren’t truly 8 inches wide. Its more like 7 1/4. That is why you need to lay things out measure to determine the needed width of the backboard. A bit too small is okay but it can’t be bigger than your finished project. That would look kind-a dumb.
The finished size of my mirror and pine is 25 inches by 61 inches so that is the size I need to cut the backboard. I had Home Depot cut this one because I don’t have a table saw and it will fit in the car easier!
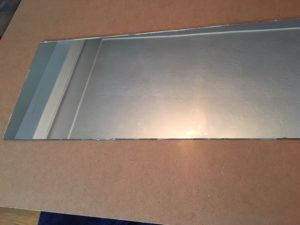
Place the mirror on the backboard and then see if your pine is exactly how you want it. My side pieces were 61 inches long and the cross pieces were 10 1/2 inches. Everything looking good? Now trace the mirror with a pencil on the backboard. Remove the mirror…carefully…and put it in a safe place. I put mine behind a cabinet. Since we put on 2 coats of the finish it could take 24-48 hours. Keep the kids away from that mirror.
Distressing the Wood-Optional
If you are wanting to make the wood look rustic this is when to do it. It feels a bit wrong ruining nice wood-like your keying a car. I used a hammer with several screw on attachments to bang in several different kinds of marks and also I dragged it across the wood to make a few lines. You could use a regular hammer, counter sinker and saw to make these markings.
Putting it all together
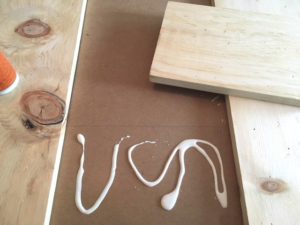
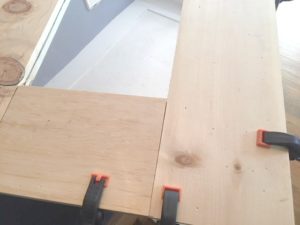
Now that the wood is nicely banged up lets put it altogether. Use the wood glue and put the 4 wood pieces where they belong on the back board. Clamp in place quickly-the glue makes the pine slip around. At this point I got out the mirror again. Do I need to say carefully again? I hate broken glass with kids and dogs in the house. I’m a worrier! I thought before everything was set I would double check that the mirror fit in. It did! Now get it back to its safe place behind the cabinet.
Put in a few screws into the bottom to keep the boards in place. This is awkward since you need to come from below with your project pulled a little off the table. The majority of screws went in after the glue had dried and I could flip it over.
Finishing Steps
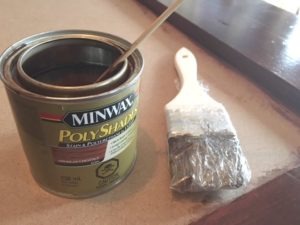
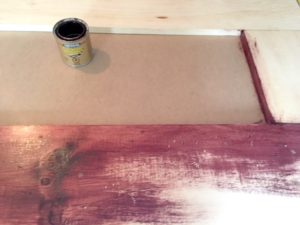
In this project I used Miniwax PolyShades “Stain and Polyurethane in One” with a paint brush. I originally chose a shade too red and sanded it down a bit and added American Chestnut for my second coat. If you have a stain only product, use a rag and not a paint brush.
Stir this product a lot. You can feel that the polyurethane part of the mixture separates and sinks to the bottom. Stir it mid project a few times just to be sure.
This called for a very thin coat, wait 8 hours, rub surface with steel wool, wipe off fine dust, apply another very thin coat until you have the desired color. So there is a bit of waiting involved on this project. I wrapped my paintbrush in plastic wrap between coats so it didn’t harden.
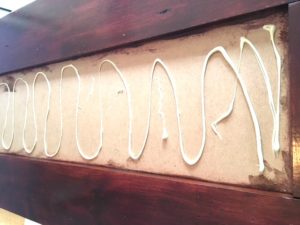
The final step is to glue in the mirror! Almost done! I used LePage 610 PL Mirror Adhesive. It doesn’t say on the package how long you need to wait for the glue to dry. The instructions say the first 10 minutes is key if you need to reposition the mirror. Don’t move it after 10 minutes. It should be a perfect fit. I applied the adhesive to the backboard and then placed the mirror on top. I gently applied even pressure to push the mirror into the glue. The website actually says that it is cured in 48 hours. Not realizing this until later I moved mine after only 3 hours because I needed the table it was on.
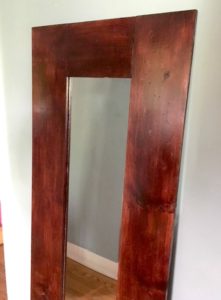
Mirrors are recommended to make a small room appear larger. That is great for our little house but mostly we just need it to make sure our clothes are on straight. The finished product is a bit heavy but could be attached to a wall to raise it up.
The cost of this project depends on if you have some basic supplies already. Home Depot will make all the cuts for free if you need it.
I purchased the pine and backboard, mirror, screws and mirror calking so the project cost approx. $65. I have enough backboard left over to make another one using an old mirror- this time I might just paint the frame black or white and put it in a bedroom. The only thing I would need to purchase for the second one is the pine boards for another $16. The best part is that their were no worrying about mitred corners. This project takes a bit of time but its pretty easy!
Let me know if I am missing any details. I’m happy to hear feedback if you have questions!
…
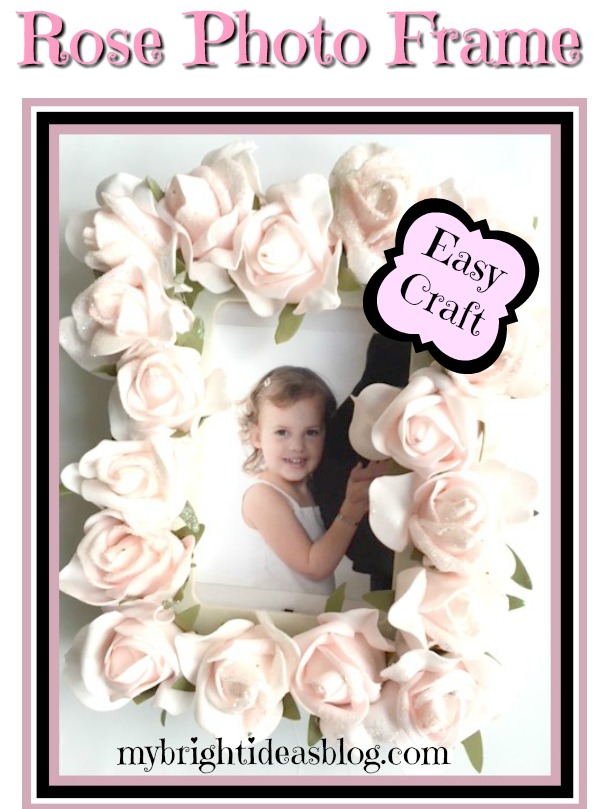
Make a Lovely Rose Picture Frame!

Hello there crafty darlings! Is it wedding season or baby season in your circle of friends? If you are looking for a lovely gift idea…I have just what you need! An easy craft that just requires a few dollars at the craft or dollar store and your trusty hot glue gun. Plug in the glue gun and lets get started!
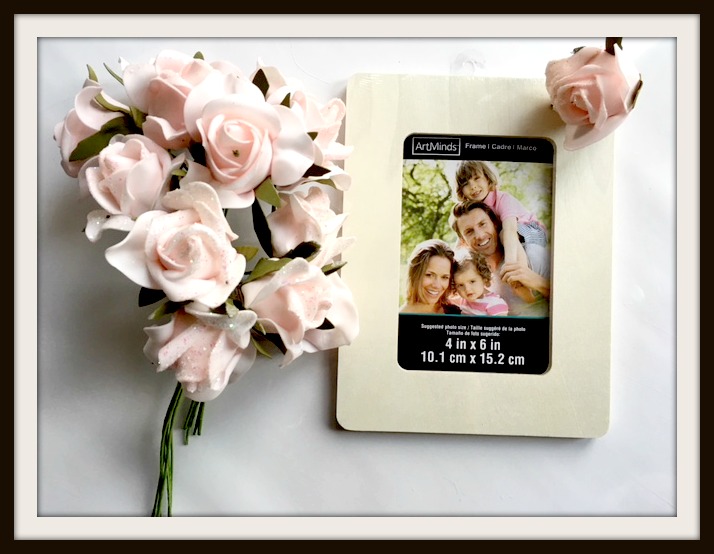
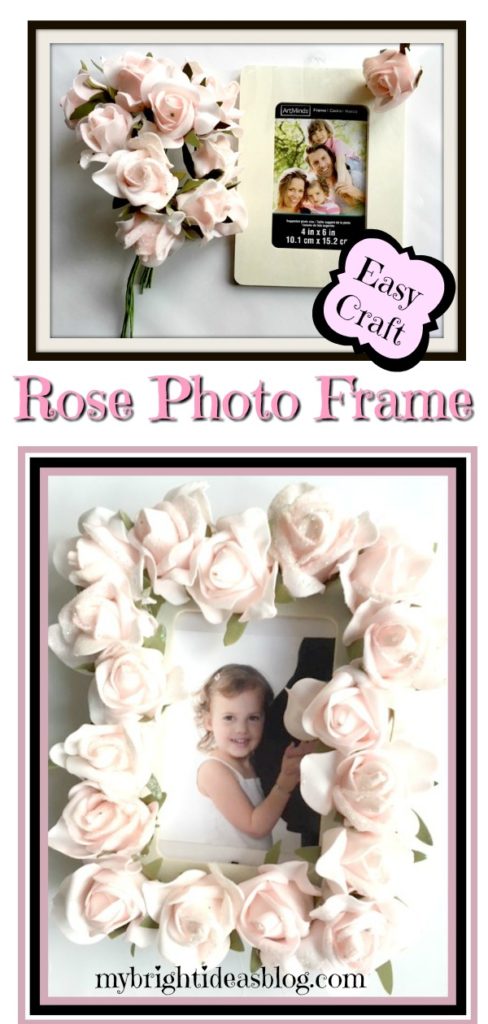
This project needs just 4 things.
- Roses ($3.75 Dollarama 3 bunches at $1.25 each)
- 4x 6 Wooden Picture Frame ($2.00 Michaels)
- Hot Glue Gun
- Wire Cutters
I discovered some pretty dainty pink roses at my dollarstore. Each bunch had 6 flowers and I used 18 flowers for this project.
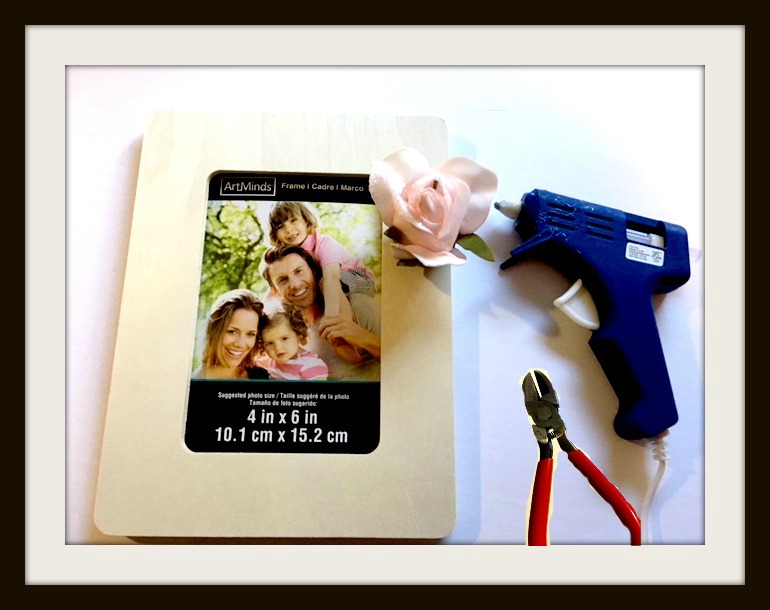
The first step is to trim the stem with wire cutters/pliers and bend the wire stem to the side. This style of flower sits very flat on the photo frame making it easy to glue. Wow this project is so easy!
I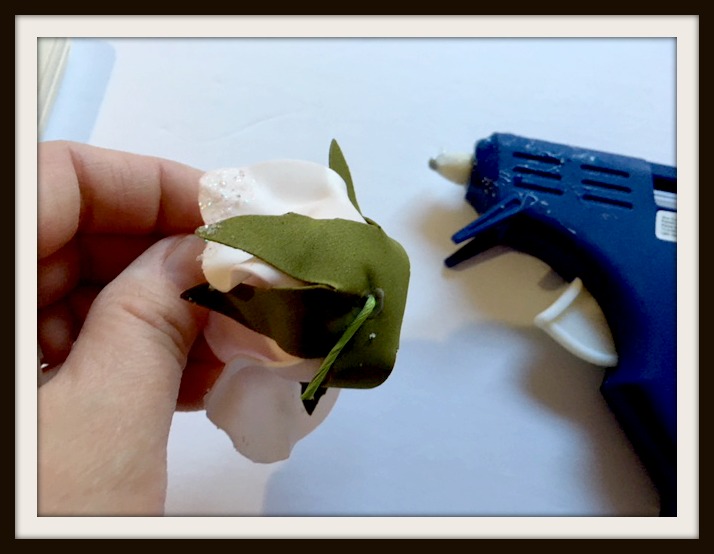
Next lay out your flowers and see how snuggly you want them to fit. Begin gluing the flowers on.
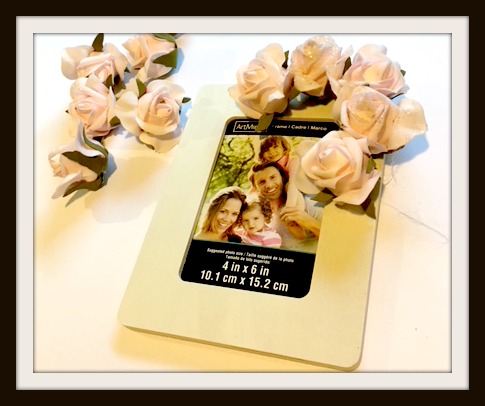
Now pause to admire the beauty and simplicity of this gift. Will you put a photo of the happy couple in the picture frame or their wedding invitation? Or will you put the birth announcement or leave it empty for the expecting parents? Or did you see my last post about putting gift cards or cash in photo frames to add to your thoughtful prezzie. http://mybrightideasblog.com/give-a-money-gift-in-a-picture-frame/
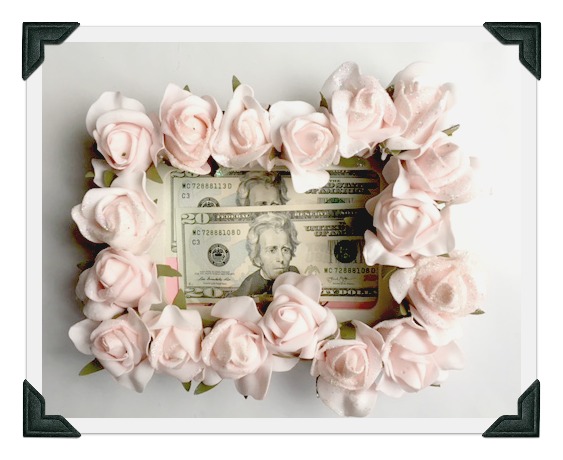
Voila! This project is done in 5 minutes and off you go to the baby shower with your gorgeous homemade picture frame.
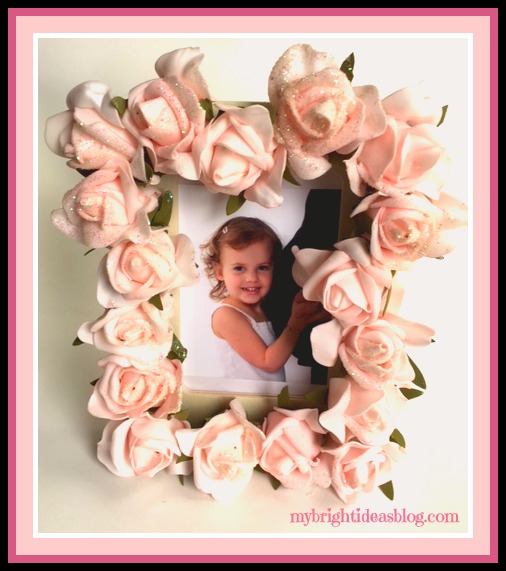
Did you see the tummy sticking out in the photo above? That is my belly growing my second daughter. In the end I’ve decided to give the rose photo frame to Miss B to put in her bedroom. She often remembers the happy times when she was an only child. LOL! This is a nice keepsake to remind her that she was very excited to be a big sister. This kiddo was soooo bald as a baby-not a stitch of hair but here she is a nearly 3 years old and it started to come in beautifully! It’s now 8 year later and her hair is long and luscious! Golly doesn’t time fly!
Wherever you are-I hope you have a super day! Thanks for stopping by!

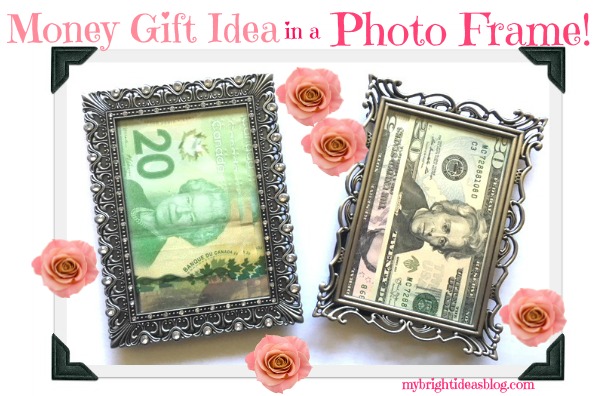
Give a Money Gift in a Picture Frame
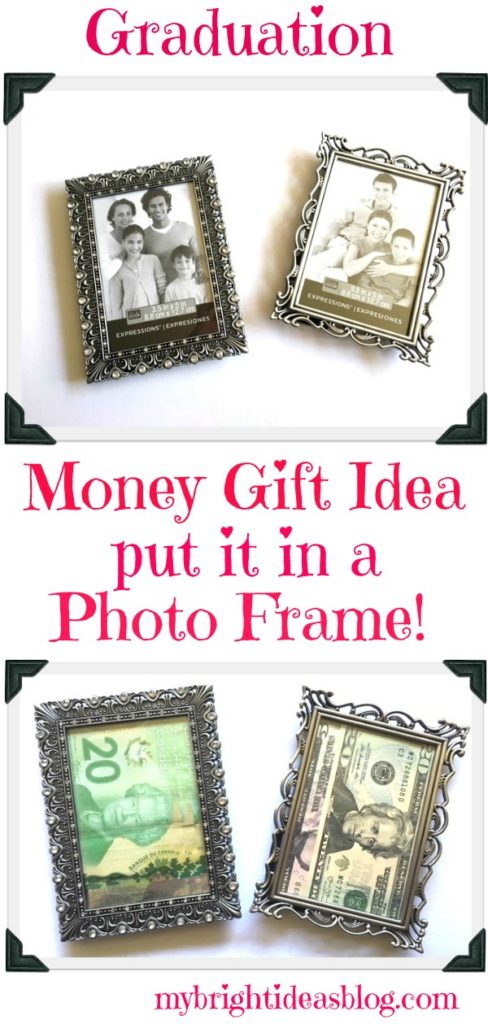
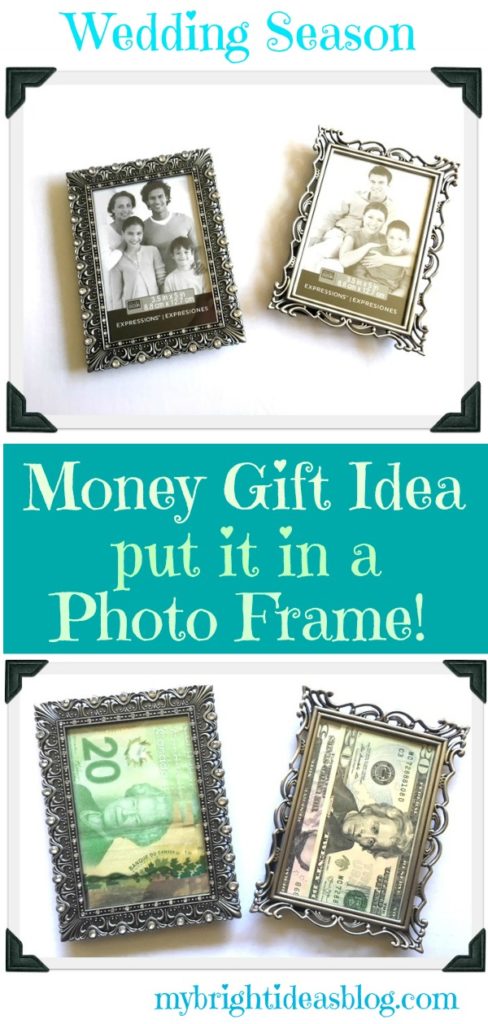
 Its May and that means it’s wedding and graduation season. Have you been torn when you want to give a gift but can’t decide whether to give cash or a gift alone. Sometimes handing an envelope doesn’t seem like enough or a cute little gift doesn’t feel like its enough.
I like the idea of giving something a bit more memorable. If your budget is tight giving a picture frame with a photo of a special memory together is a nice idea. But if you can, cash is always appreciated.
Years ago, we would travel abroad to see my in-laws and while there, we would visit with family friends. There was the sweetest little old couple-they were so warm and lovely-they knew my hubby and his family his entire life. They aren’t alive now but not forgotten. During the visit, the dear old gentleman would corner my hubby and slip him some cash and say “take your girl out for an ice cream”. I can’t remember how much he gave but it was probably enough for 10 ice cream dates.
Meanwhile, his wife, would shuffle over to catch me and slip me some “lemonade money”. I don’t know if they realized they were both giving us cash gifts at the same time or not. Recently a young couple we are good friends with-were about to leave on a trip to Israel and we gave them a gift of shekels. It wasn’t very much but they were really touched not just for the extra spending money but also that we took the time to exchange the money into the right currency.
Of course, the card read….”take your girl out for an ice cream”.
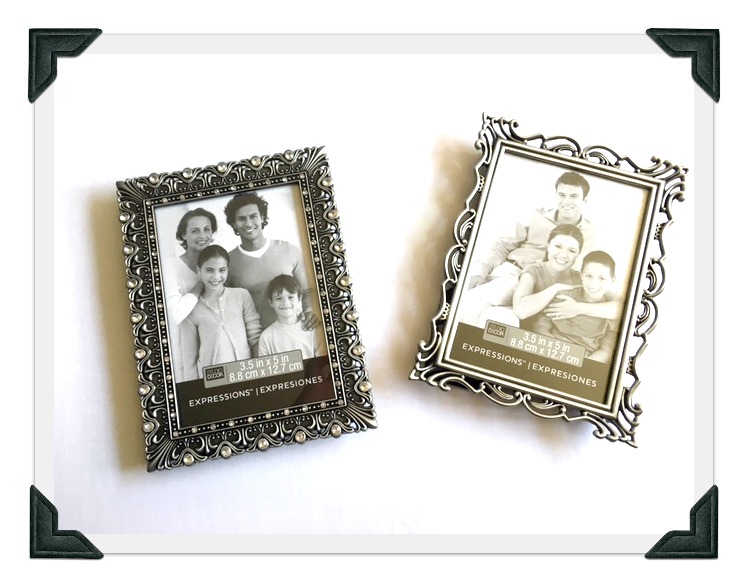
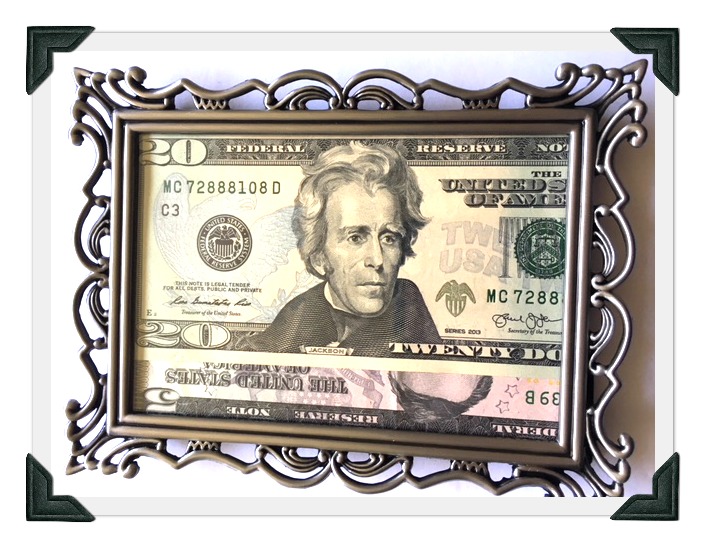
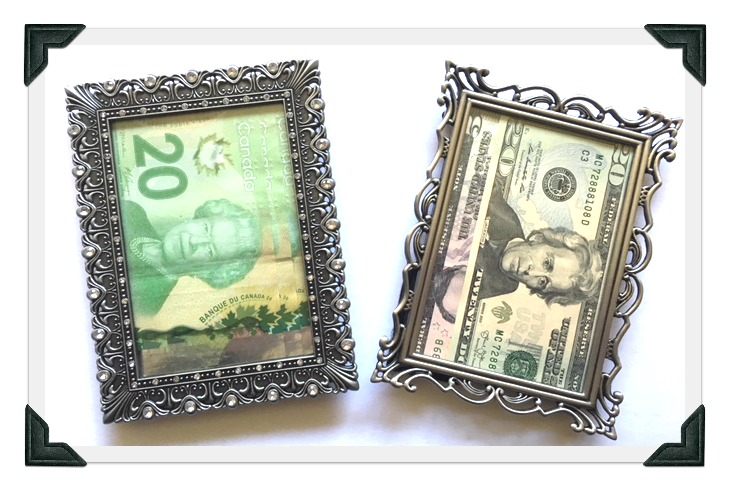
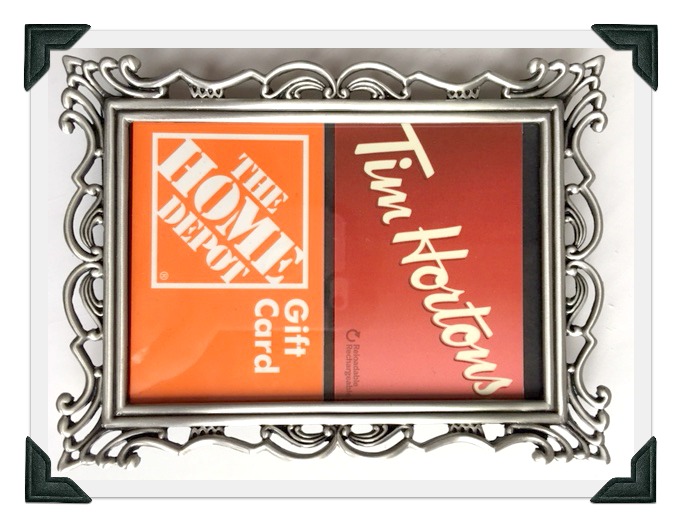
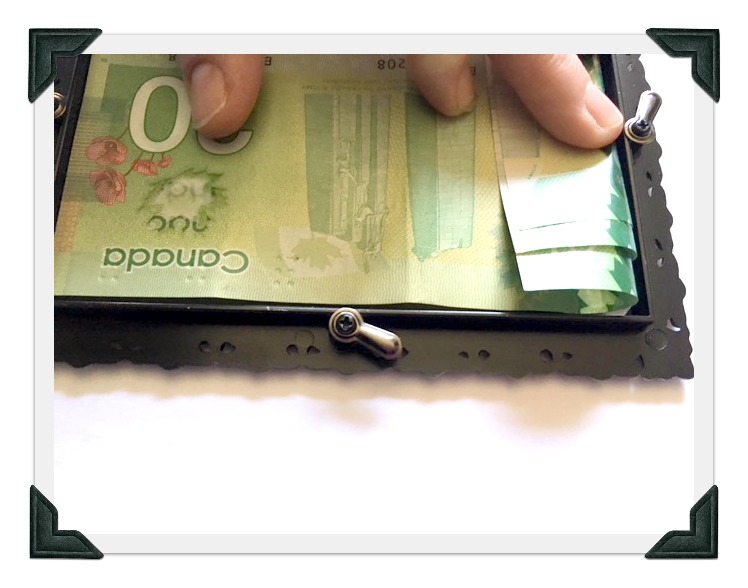 For these two metal frames I purchased 3 1/2 x 5 from Michaels. Home decorating stores have beautiful pearl frames if you want it to be really elegant. Just open the back and put the cash in so it fills the entire area. You will need to fold it over a bit. If you get a 4 x 6 frame you won’t need to fold the money.
 I like this frame for a graduation gift for a guy or someone who is just starting out in their own place.
This photo frame would be great for baby shower gift or a wedding present. Its just a $2 wooden frame with flowers hot glued onto it. I’ll show you how I did that later.
 Have you gotten a surprise cash gift of generosity from someone you didn’t expect it?
Gift cards are increasingly popular. How about a home depot gift card for someone who has just purchased their first home…or pizza gift cards for moving day. Two gift cards fit perfectly into the 3 1/2 x 5 frames!
 Whatever you choose to do to show someone you care… demonstrate the generosity you’ve been shown and teach the next generation to be thoughtful and big hearted givers too.
…

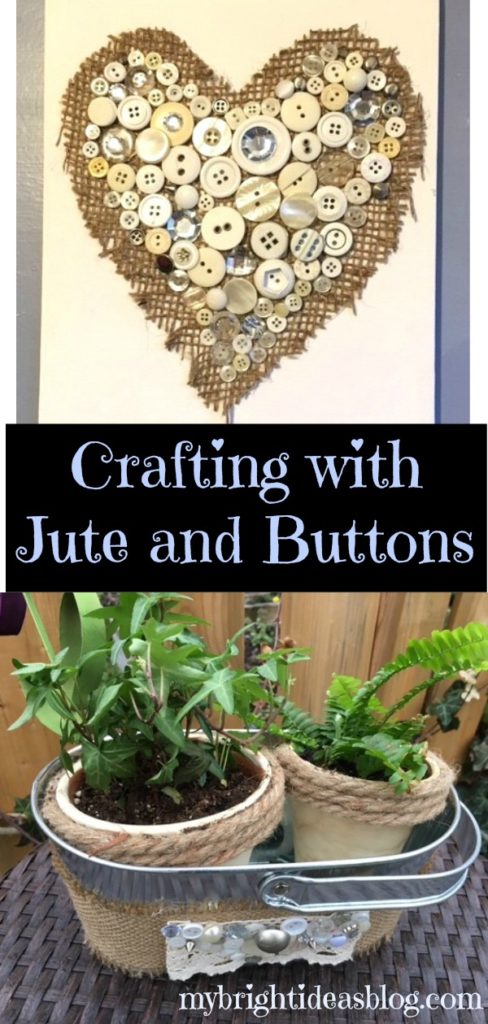
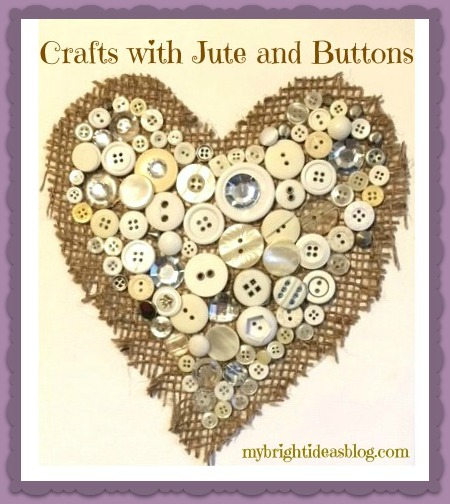
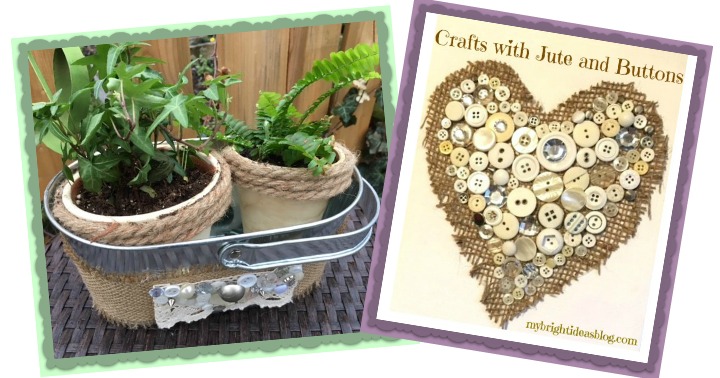
Crafts Using Burlap and Buttons – Easy Project that Looks Great!
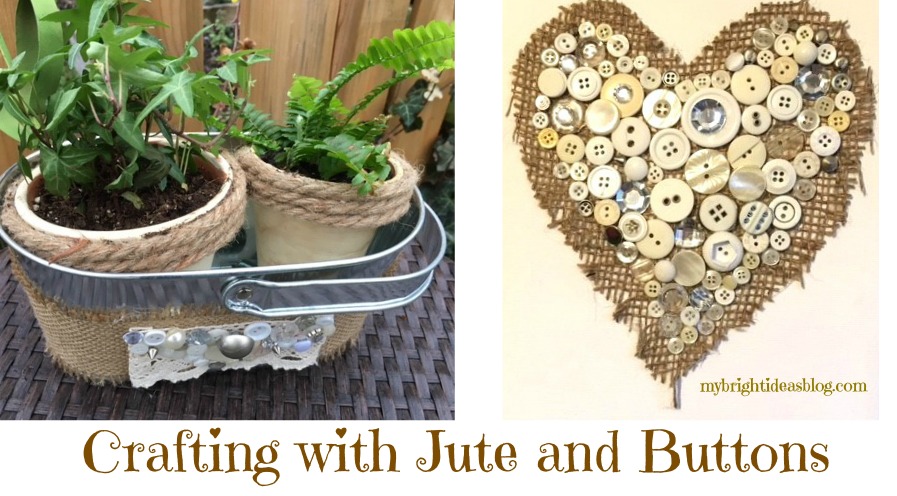
Is it a new trend that burlap and jute are in so many crafts? Maybe this has been around a while and I’m just noticing it. The crafts on Pinterest with both jute/burlap and buttons are really catching my eye. So I thought it was high time to get on this button-burlap-jute wave! :o)
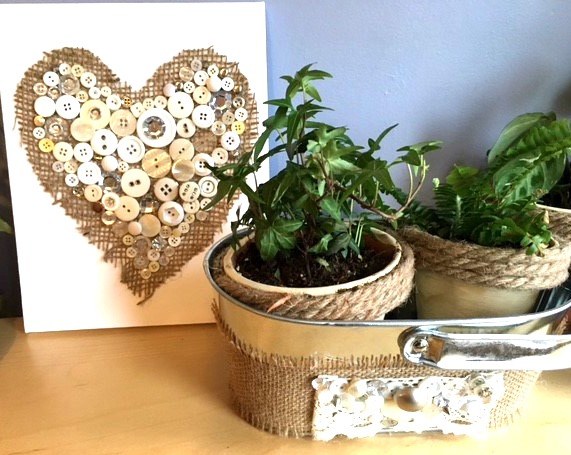
Project #1 – Jute and Button Wall Art
You will need: Burlap/Jute, Mixed Buttons, 8×10 Canvas, Hot Glue Gun or White Glue and Paper
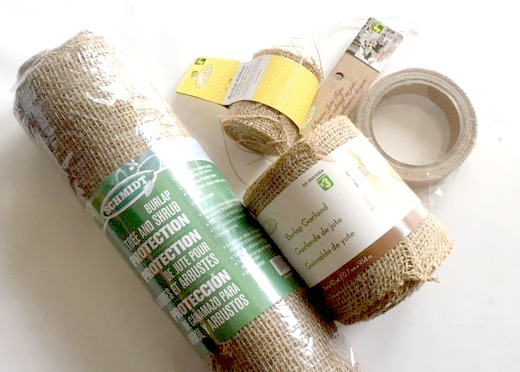 The local Dollar Store had several options…in both the garden area and the craft sections. For this project I cut up the big burlap bag that you would cover your shrubs with for the winter. There is still plenty of fabric left over I could still use it in the garden or other crafts.
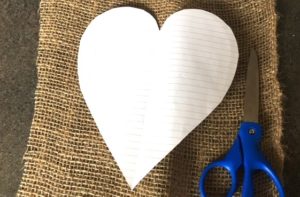
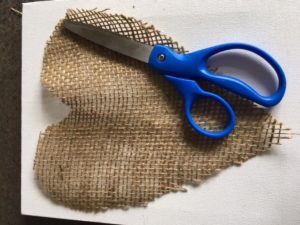
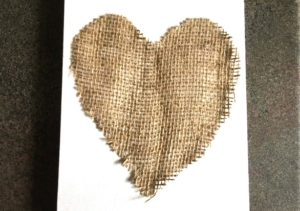
I cut a heart shape on paper first and then used it as a template for cutting out the burlap. Then I put a few dabs of hot glue on the 8×10 canvas to flatten the burlap into place.
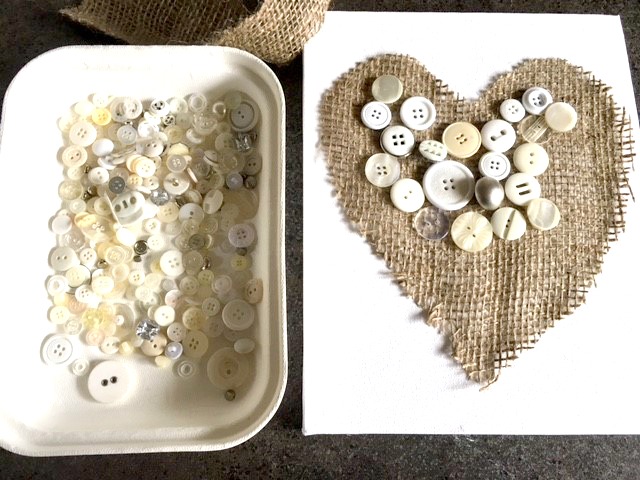
The buttons I used were all cream color or silver. They came as a bag of buttons from my Dollar Store for $1.50. There are some nice Pinterest posts with examples of art made with colorful mixture of buttons-I might try a colorful one next time. Start by gluing the biggest buttons in the centre and work outwards with the smallest buttons.
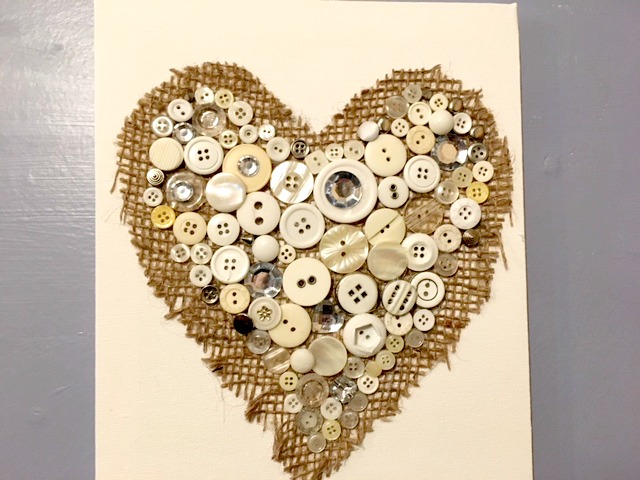 Watch your fingers while you glue the buttons on! Using the hot glue gun might be a bad idea for the small buttons. I like the speed of hot glue drying but since the project lies flat you could easily use regular white glue and spare your fingertips.
Project #2 – Jute Wrapped Tin Flower Pot
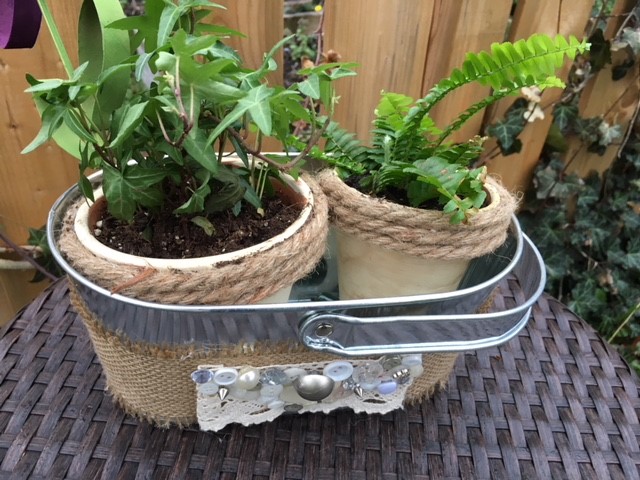 For this project you will need: Jute Ribbon 3 inches wide, a bit of lace, mixed buttons, flower pot (mine is a tin bucket style) and hot glue gun.
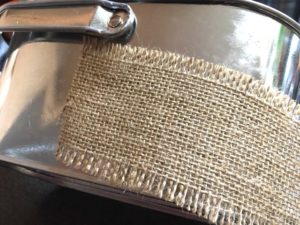
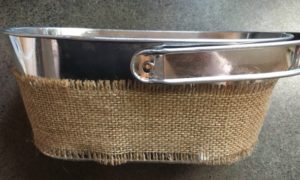
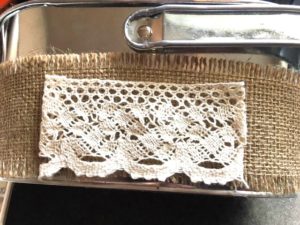
Using the hot glue gun attach the jute with a dab of hot glue on the back of the aluminum tin. Wrap it around the container and glue it flat. Mine puckered at the bottom so I pulled the jute snuggly and added more glue to secure it flat. I had a few inches of lace that was glued to the front of the container.
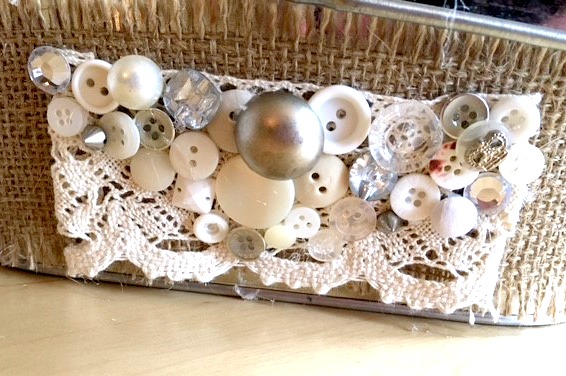 Then add on the buttons.
 I really like how these turned out and I think I might have some follow up projects with more glue and buttons. I would love to get a few bags of vintage buttons from a thrift store and mix it with broken jewelry to make a more sophisticated eclectic bit of art. On my to-do list are button bracelets and hairbands for the kids. I’ll let you know how that turns out later!
Have a super day!
….