![]()
I really, really, really love scarves! Over the last 15 years I have accumulated quite the collection. I’ve dreamt about scarves being on sale and me carrying bags of $5 scarves and pashminas out of the store. Sometimes, I even wear a scarf in the heat of the summer.
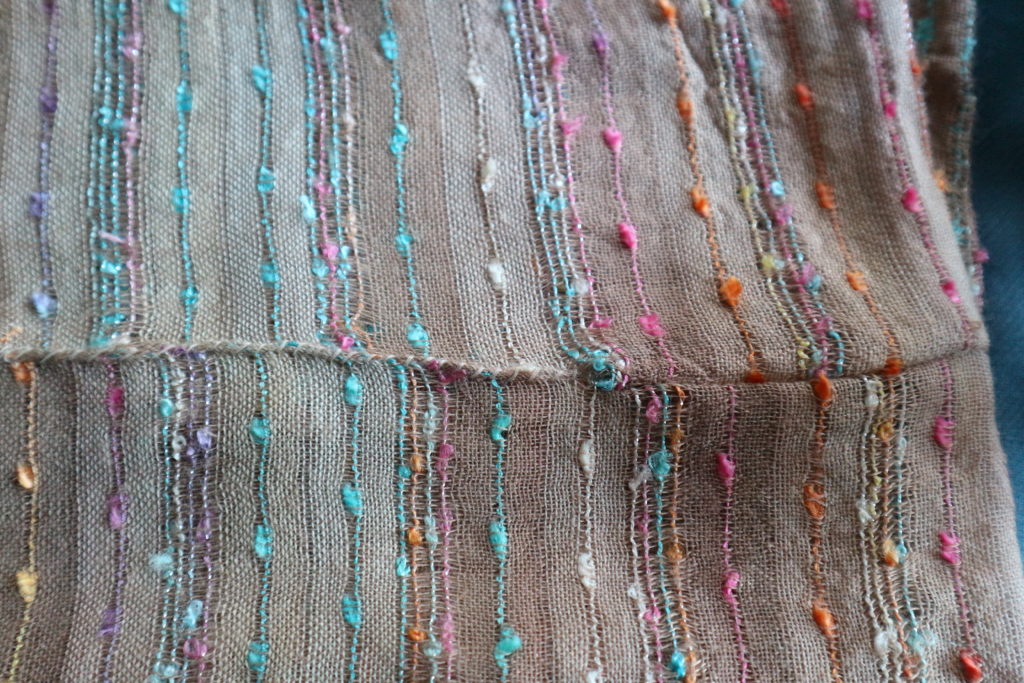
This tutorial is how to make an infinity scarf out of a pashmina or regular scarf. I will also give you some details if you are just using new fabric.
You will need:
- an old scarf/pashmina or piece of fabric (20″ or wider x 80″ approx.)
- scissors
- pins
- needle and thread
- sewing machine (optional)
- iron (especially if your scarf has been neglected for a while and crumpled like mine)
Do you like to upcycle?
You can make an infinity scarf out of old clothes, bed sheets, a soft blanket or scarves or new fresh fabric.
Iron and Measure
Start by ironing the creases out of the fabric/scarf.
If you are using new fabric for this project use a piece that measures at least 18 x 70 inches (45cms x 177cms).
My scarf was 26 x 69 inches (66 cms x 175 cms). It was even shorter after I trimmed off the fringe and I think its a great length-finished its 66 inches long. I prefer it to be extra wide too.
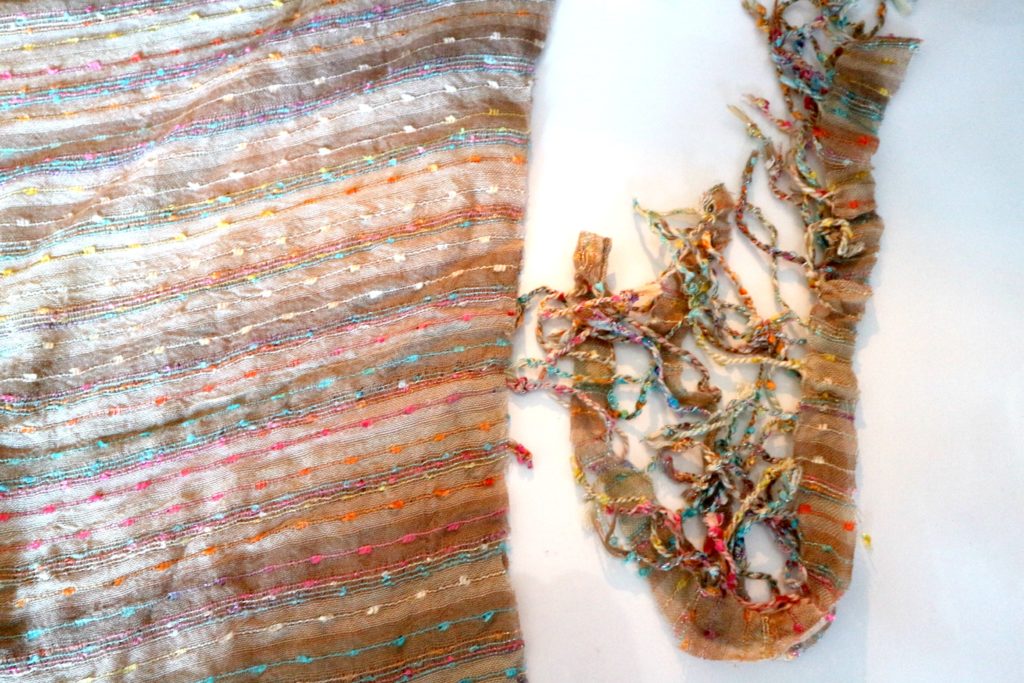
Trim off the tassel bit on the end if your scarf/pashmina had trim.
Fold the fabric in half lengthwise with the good side facing inward.
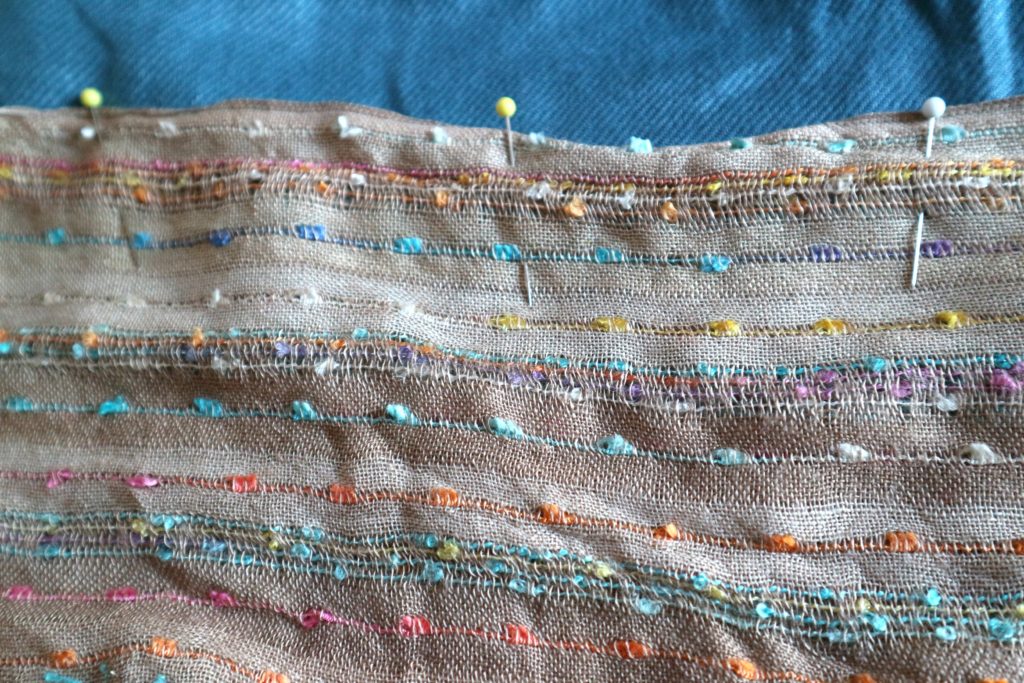
Pin the fabric along the edge of the long side.
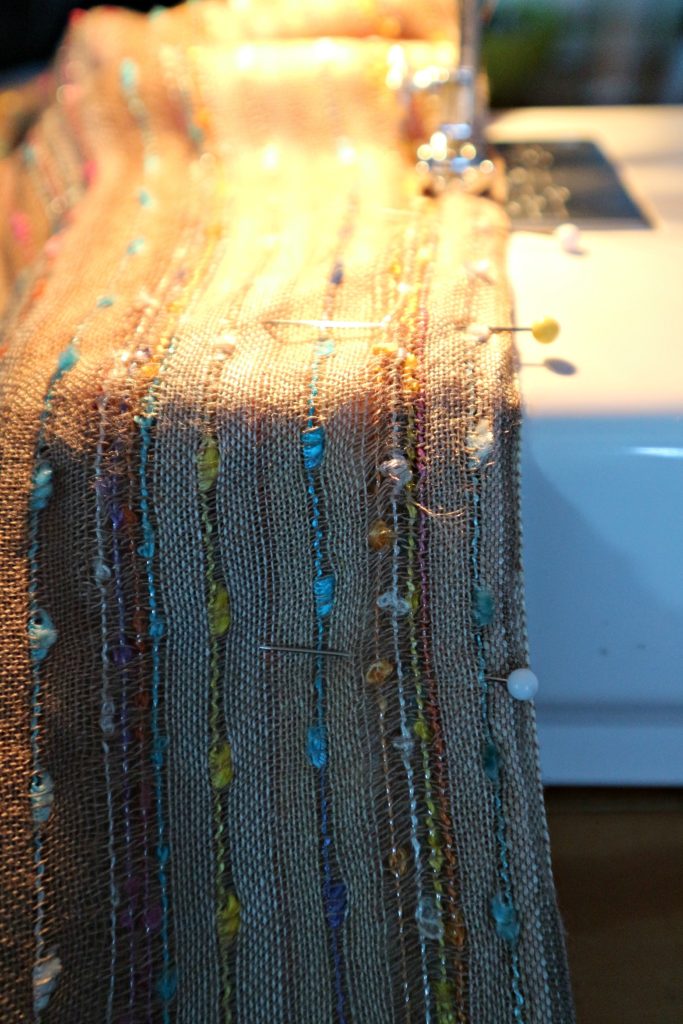
Sew the length of the long side.
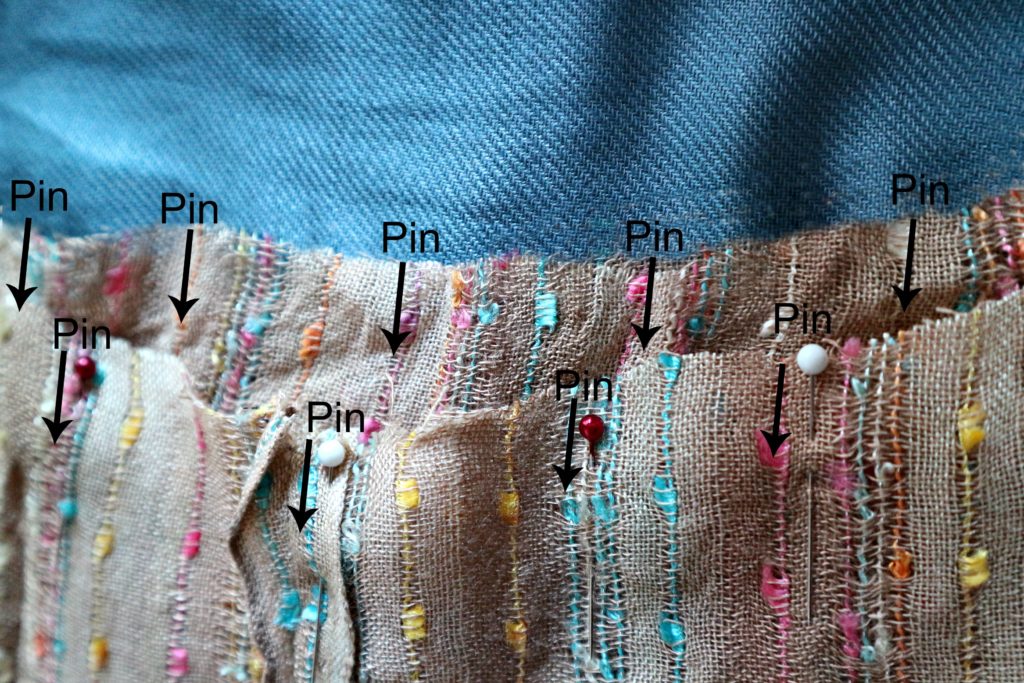
Pull one end of the tube through to meet the other end and match up the seams. Next, pin the ends together to make the tube into a circle. Be sure to only pin through two layers.

Sew around the top, but don’t sew it closed. Leave a gap of a few inches to pull the scarf through.
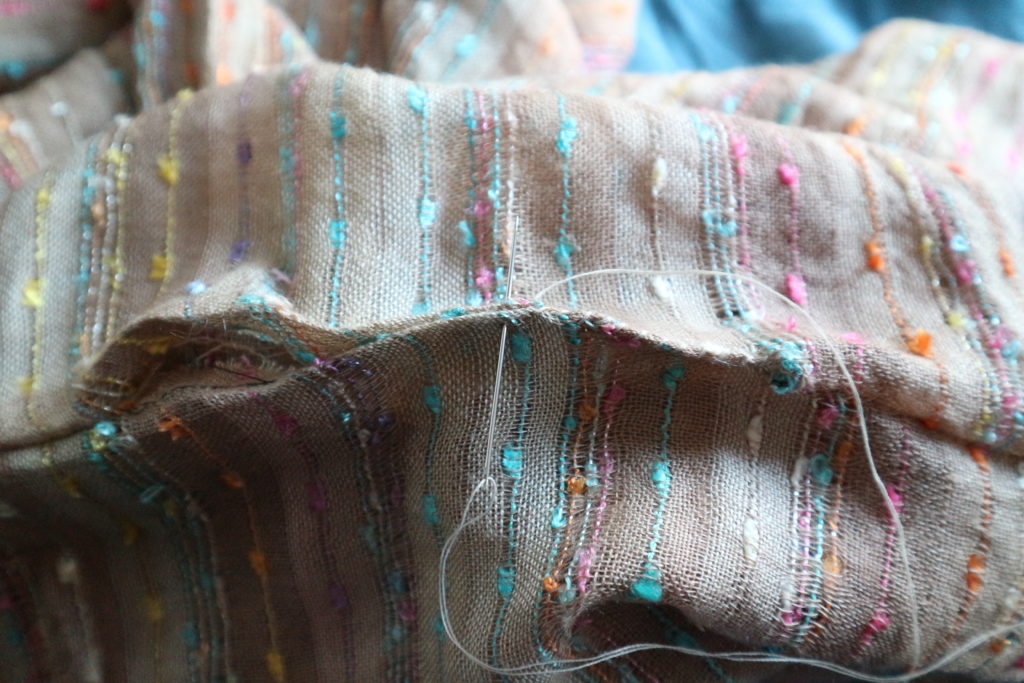
After you pull the scarf through that small gap, get your needle and thread and hand sew the gap closed.
Now its ready to wear. Get the dog leash and take your dog out for a walk. Show your gorgeous new scarf upcycle to your neighbourhood!
I really enjoyed reinventing my scarf! Thanks for reading this post, feel free to comment if you need more detail!

Have you seen this post from last winter?! I made a similar scarf but with a zipper pocket to hide your cell phone or passport. Great idea for travelling!
How to Make an Easy Infinity Scarf with Zipper Hidden Pocket

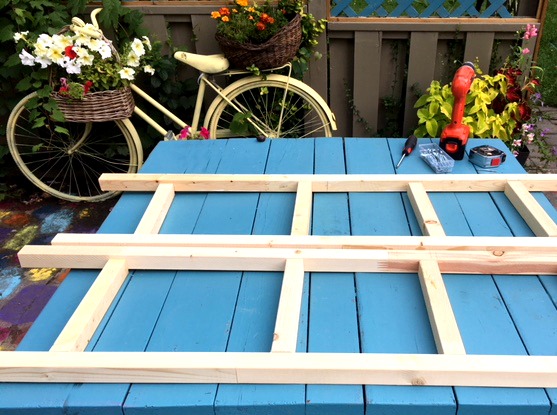
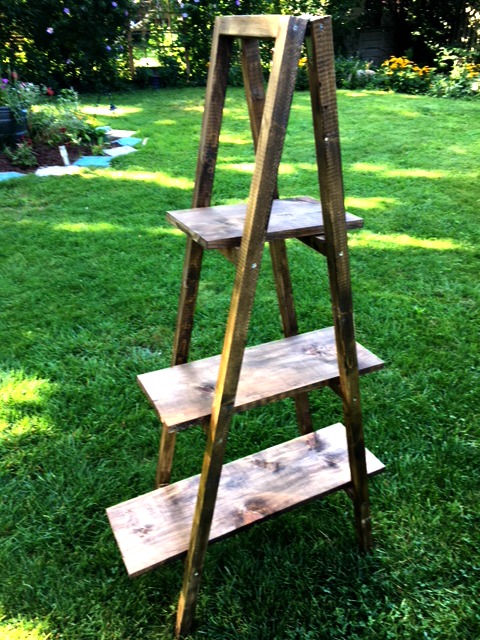
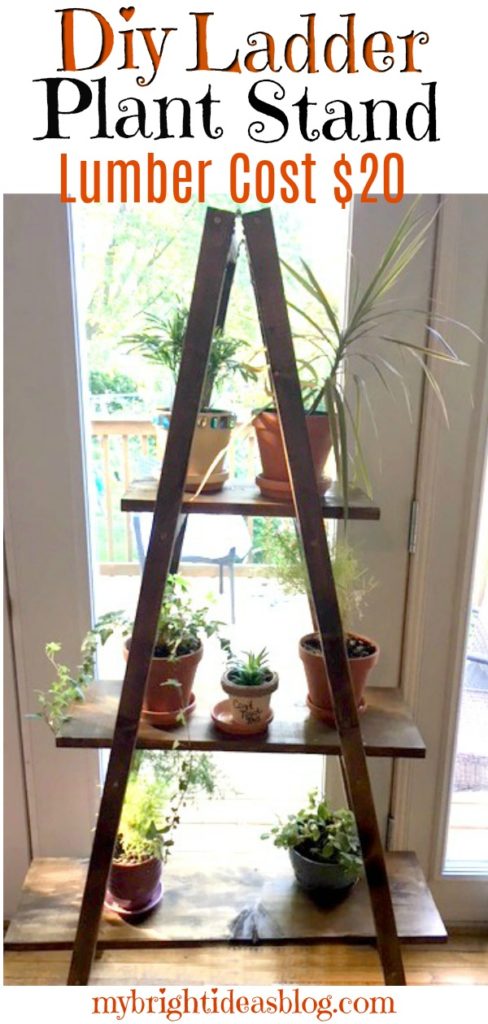
Make a Ladder Plant Stand – Easy DIY – Only $20 for Lumber
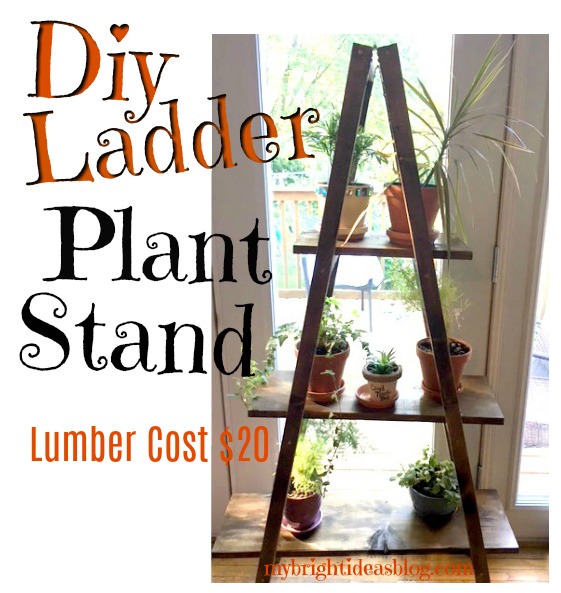 How to make an amazing plant stand on a small budget.
Help! I’m becoming a crazy plant person! My collection of plants has been growing in the last 6 months and then the plants are growing bigger…so its getting a little overwhelming…they are on the kitchen counters, bookcases and dangling from window hooks. The back of the house by the deck gets the sunshine so they are all in the same area.
After spotting the ladder-style plant shelves made out of antique ladder…..I thought the ladder shelf would be the right solution for this nutty plant buying lady.
This photo from https://abeautifulmess.com/2013/02/nesting-ladder-display-makeover.html is what got me thinking about it. I love that they painted it mustard yellow!
Rather than go in search for a old ladder I went right to the lumber store to make my own. Just a few weeks back I made a blanket ladder and its virtually the same thing-add a hinge at the top and some cross boards across.
You can change your plant stand size to be taller or shorter and add another shelf if you prefer. My plant stand is 60 inches tall and at the widest shelf, 32 inches wide. As you can see it has 3 shelves.
You will need:
- 1 – 1x9x8 Board (this might be 1x10x8 but actually is 9 inches wide)
- 4 – 2x2x8 Boards
- 2 Hinges
- Sand Paper
- Tape Measure
- Pencil
- Square
- Drill/Screwdriver
- Mitre Saw (or get them to cut the pieces at the store)
- Stain (Miniwax Jacobean)
- Varnish (Clear Coat)
- Rag and Paintbrush
- Rubber Gloves
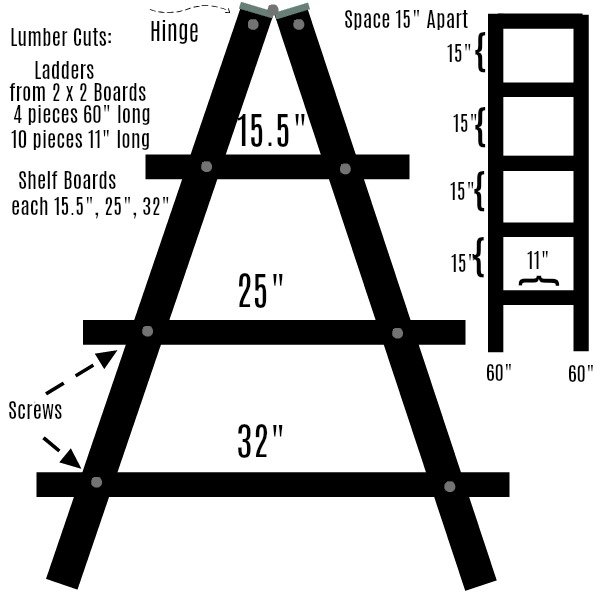
Cut Lumber
Cut the 2 x 2 boards:
- 4 pieces 60 inches (177 cms) long
- 8 pieces 11 inches (28 cms) long
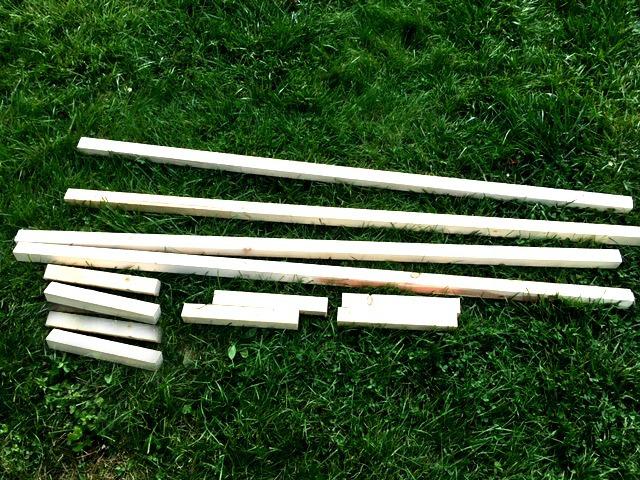
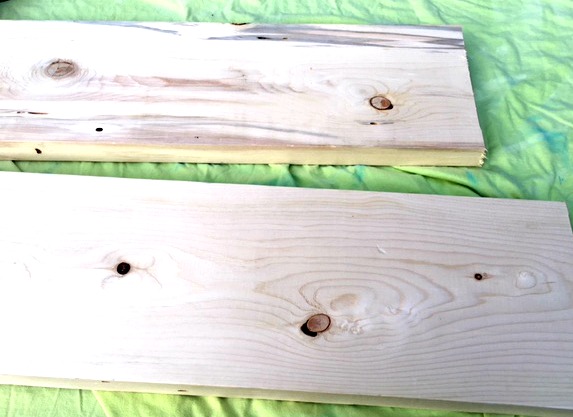
Next cut the 1 x 9 x 8 (or 1x10x8). This board was cut into 3 different lengths.
- Top – 15.5 (40 cm)Middle – 25 (64 cm)Bottom – 32 (82 cm)
Sand any rough areas after the wood is cut. If you like the distressed look you could rough the boards up by hitting it with your hammer. Scratching with the side of a screw etc. I like the rough look with this dark wood stain but I don’t want slivers. So I just sanded the ends.
A sensible person might have put the stain on now before putting it all together. However, I wasn’t feeling sensible and wanted to see if this would turn out how I imagined it. So I put it all together first and stained it at the end.
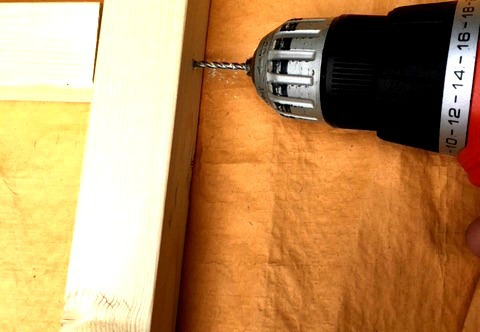
Lay out the pieces in place. Pre-drill where the screws will go. Using the 2 1/2 inch screws to attach the rungs into the sides. I put the first cross board right at the top. The next one was 15 inches below the first. The next one was 15 inches below and so on.
Now the 2 ladders are done. Lets move onto the hinges.
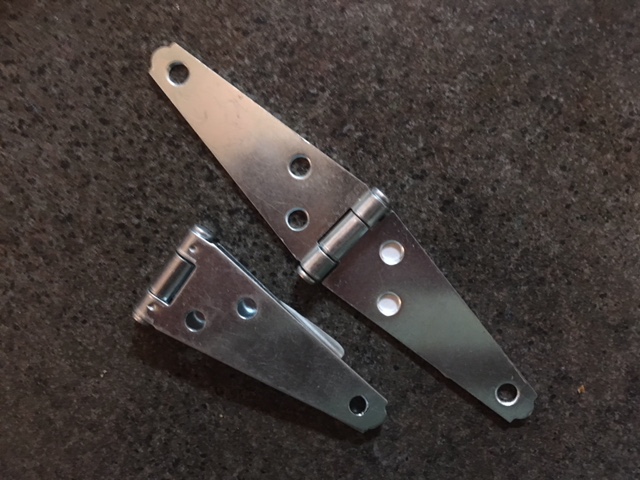
I chose these hinges because they are long and skinny rather than wide and short like the hinges on a cupboard.
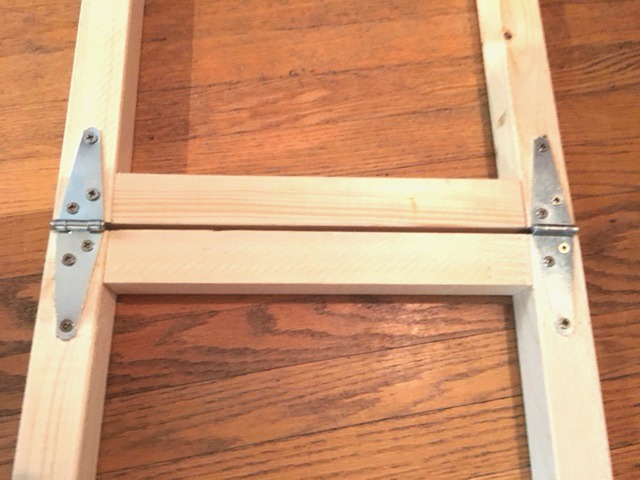
Lay the ladders head to head on a very flat surface. Set the hinges on top and screw them into the wood.
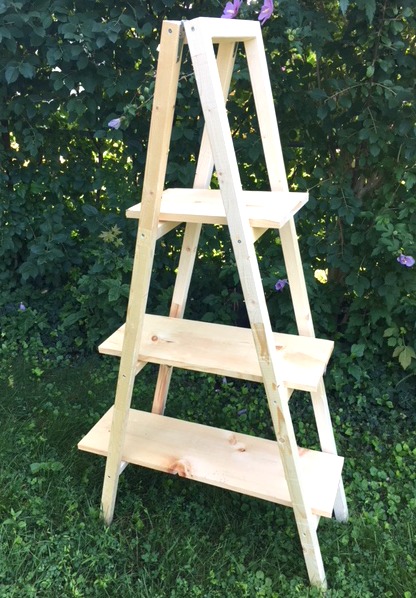
Now I could set it up and make sure I was happy with it before going to the finishing steps.
Yup, I’m Very Happy!!!! 🙂
Stain and Protect the Wood
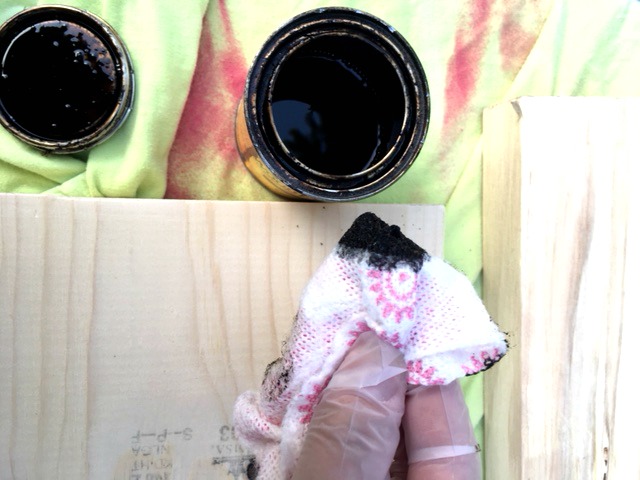
Almost done! Next we stain the wood. I used Miniwax “Jacobean” for a dark wood finish. I love this stain!
Wearing gloves, dip your rag into the stain.
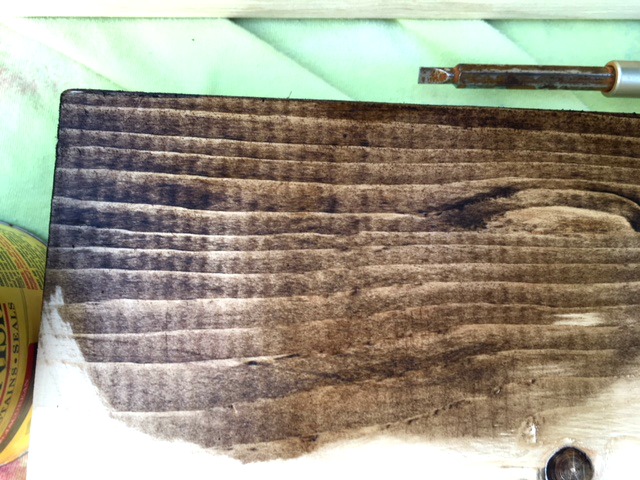
Rub the stain onto the wood. Now is when you will wish that you did this step earlier before the ladder was put together. There is lots of corners to do if its already put together so it adds time and work. Look at it from every angle so you don’t miss any sides.
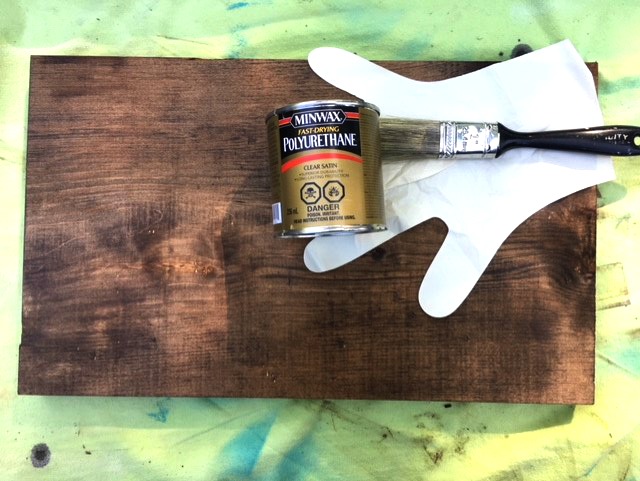
The final step is to put a clear coat. Since water could be spilling on the boards putting a clear coat of polyurethane is recommended. If you plan to put the shelf outdoors for a few months of the year you may want to put on a few coats.
I stained and allowed it to dry overnight. The next day I put on the clear coat and allow to dry over night.
It’s hard to be patient for the drying time when the rest came together so super fast!
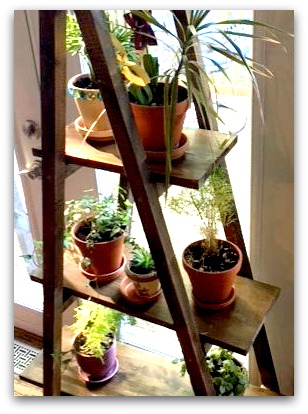
Now the happy moment has arrived to bring it inside and add the plants.
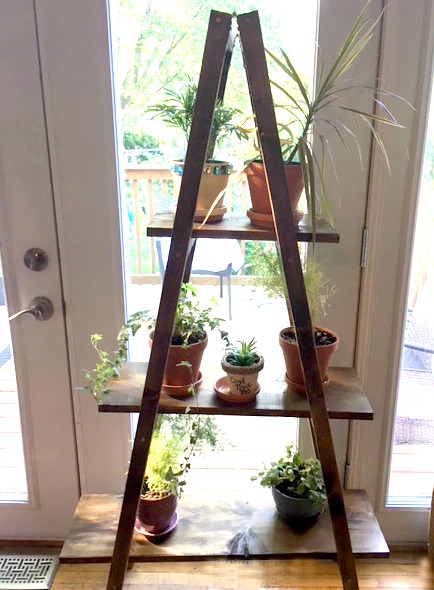
TA DA! Having all my plants together is going to make it so much easier to remember to water them all!
This project is so simple and easy to make and inexpensive. If you have a toddler at home you may want to keep an eye on them around a project like this. The shelves are just resting on the ladder rungs. To make it more secure you could put an L shaped bracket under each shelf. Its a ladder shape but no climbing on it kids!
Don’t Forget to Pin or Share this Post!
Previous Posts You Might Be Interest In…..
Plant Puns on Painted Potted Flower Pots – Adorable Gift Idea to Make Them Smile!

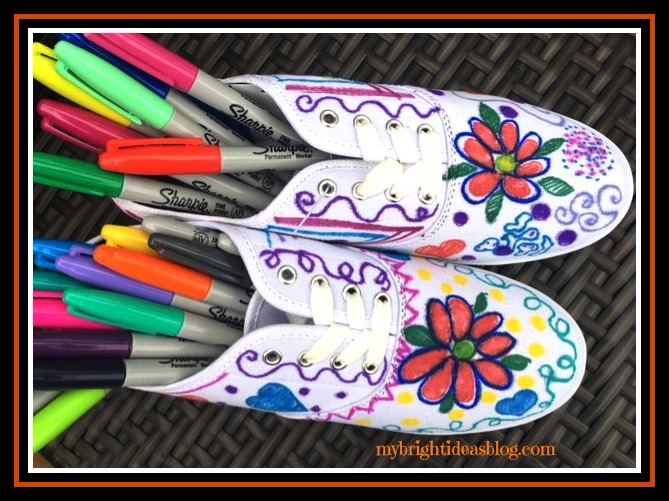
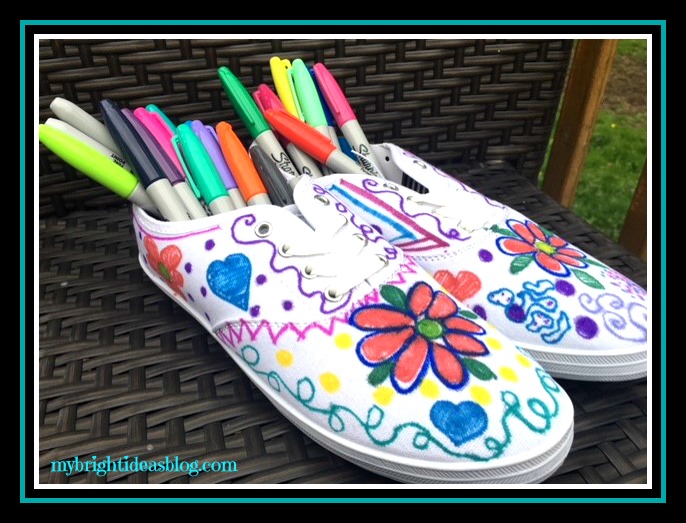
Design your canvas running shoes with a Sharpie Tie Dye Effect

It’s back to school time! Why not send the kids back to school with some personalized canvas running shoes!
You will need:
- Permanent Markers (like Sharpies)
- Canvas Runners
- Rubbing alcohol
- Medicine dropper (if you don’t have one you can use a straw with your finger on the end)
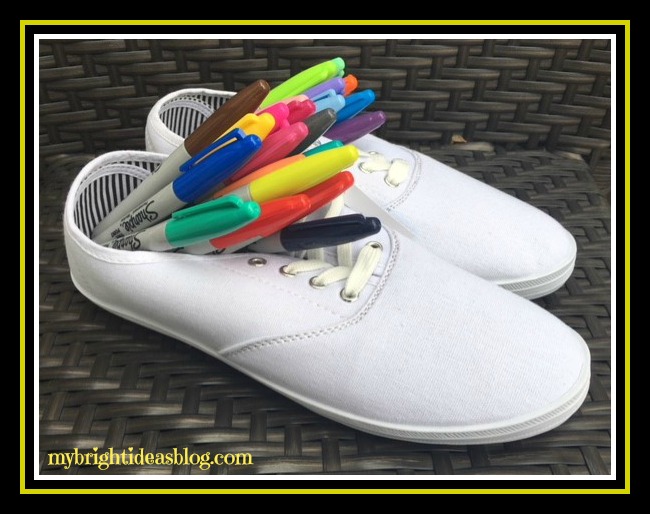
These white canvas shoes came from Michael’s craft store. I am pretty sure that you can pick them up at Walmart and maybe even a dollar store. These are likely going to cost $5-7. The price gives you an idea of the quality of the shoes….these will look cute but have no arch support or cushion so not recommended for gym class or hiking across the country. Cheap and cheerful!
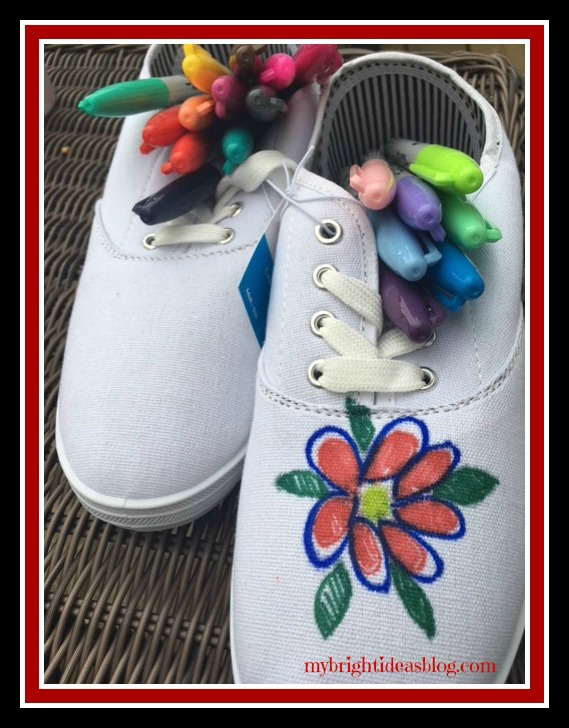
Next begin your design work. I like flowers and squiggles what does your kiddo like? Maybe a message written on the shoe. A+ or “Don’t Give Up” something that will make them smile through the day.

Very subtly I put “I love School”…tee hee… positive subliminal messaging.
Open the Windows or Go Outside!
When you’re happy with your design its time for the stinky part. Open the windows! Or better yet, go outside in the fresh air. The rubbing alcohol fumes will give you and your family a headache. We don’t want a cranky family….
Begin with just a drop or two to see how the color begins to bleed, blend and soften. Here you can see the difference between one shoe that is done and one that is not.
If you don’t have a medicine dropper just use a straw. Dip it into the rubbing alcohol and then put your finger on the end to capture a few drops. Drop onto the canvas to begin the process.
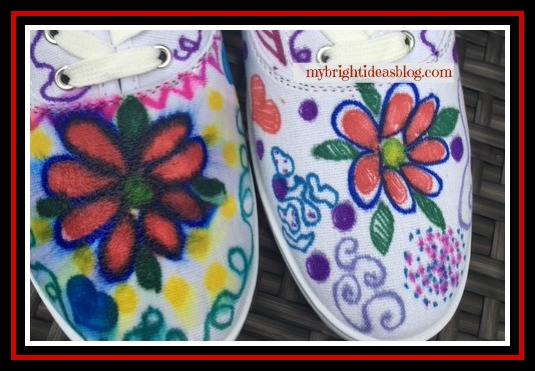
See the difference? Watching the design change is the best part of this project.

The more rubbing alcohol you use the more it will bleed so just use a bit on areas with a lot of color. Dark colors may end up being much bolder than the lighter ones. Once you start the bleeding process you can’t undo it….so this is why a medicine dropper is recommended. I put way too much on the front blue flower, so its much darker than I planned. As the French say….C’est la vie! Oh well, such is life…and crafts.
You might like the sharpie drawings “as is” and not even want to add rubbing alcohol. That’s cool too. It’s wearable art.

This is my second or third time with sharpies and rubbing alcohol. I will include a link to the t-shirts at the bottom of this post. I love the vibrant colors and funky designs. It looks bright even as the colors were blurred together. This would be very cool on a cotton throw pillow cover or curtains made from cotton or drop cloths.
This is a pretty cool way for kids to express themselves and show off their art work everyday on their feet.


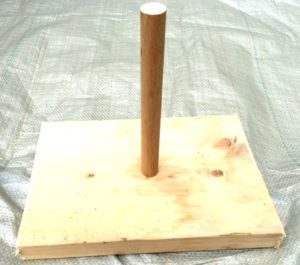
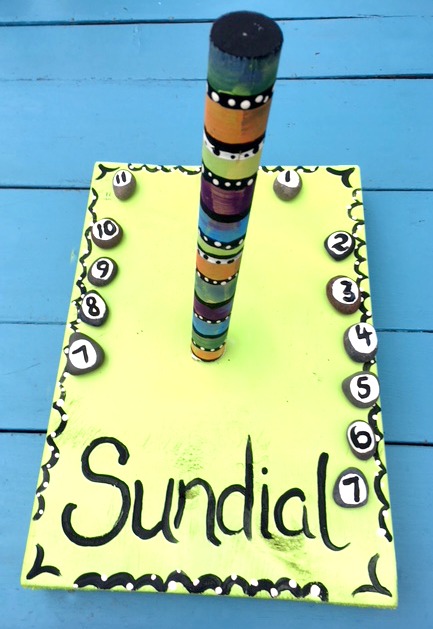
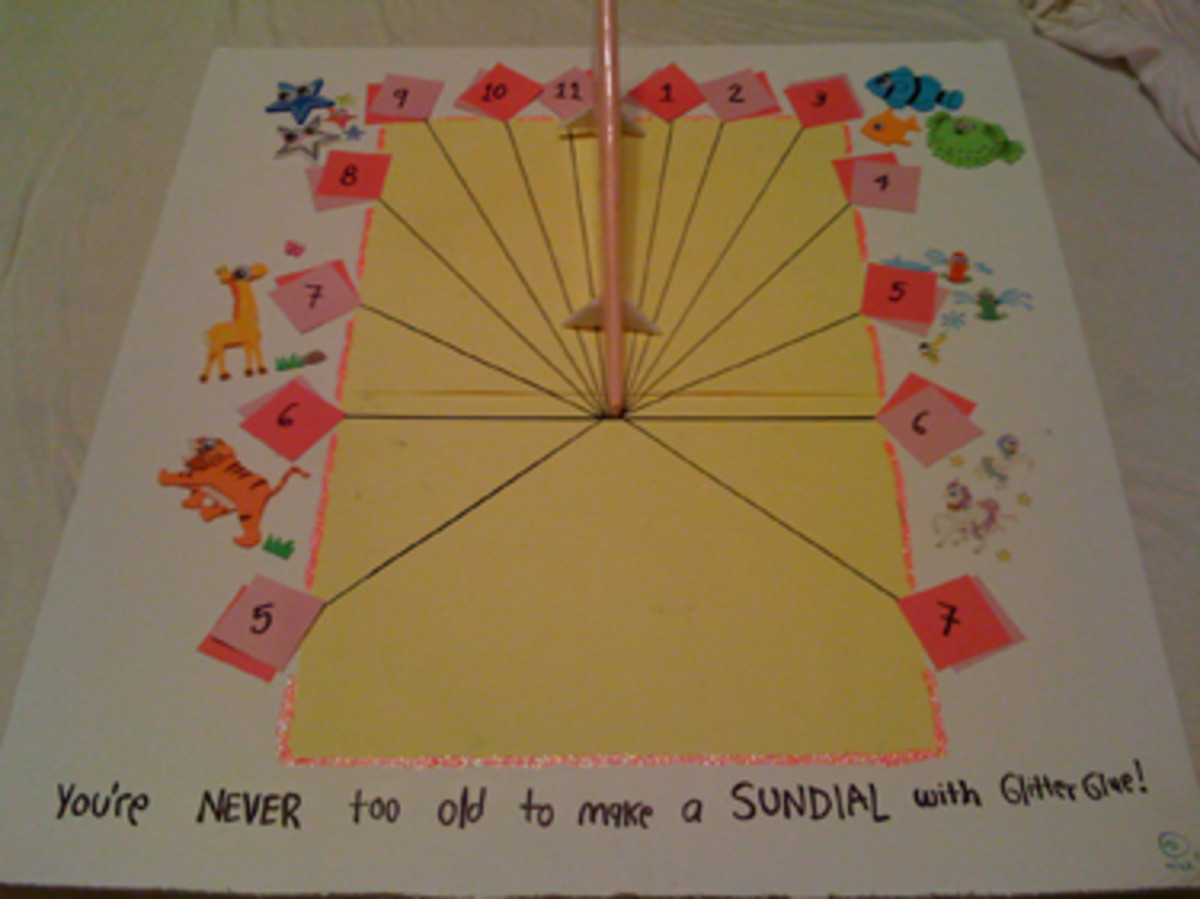
How to Make a Sundial
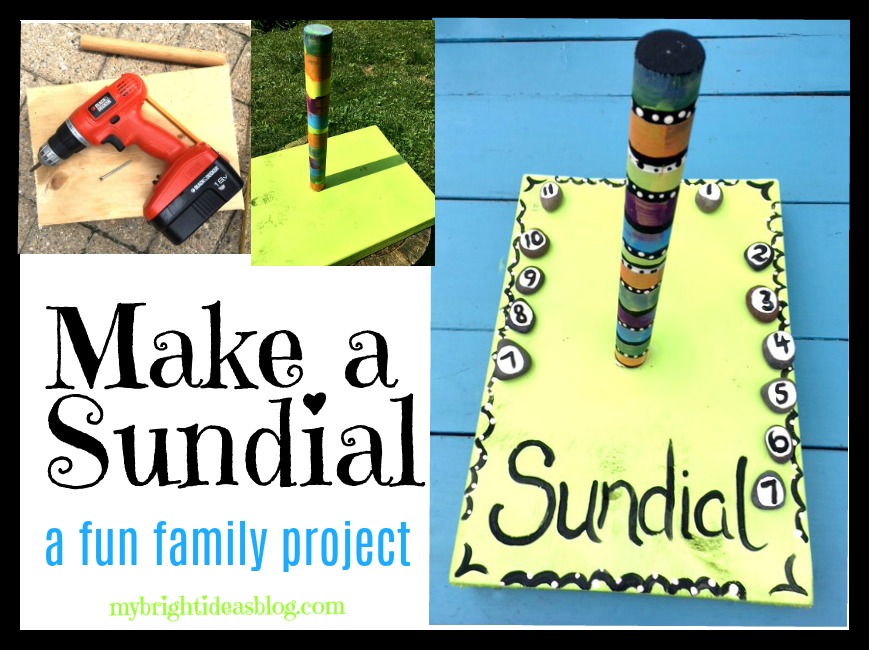
Are you looking for an outdoor family nature project? Here is a cool idea for a sunny day. Make a SUNDIAL.
A sundial is a device that uses the position of the sun to cast a shadow to tell the time. As the sun moves across the sky the shadow moves. According to Wikipedia the oldest sundial found by archeologists is dated around 1500 BCE. https://en.wikipedia.org/wiki/Sundial
When I started my project it was very cloudy so it got more decoration than I intended. It was going to be bare wood with a light clear coat. Our weather was cloudy and rainy for several days so I had to postpone it repeatedly. Grrr.
Technically you could make a quick sundial using a stick in the ground. Or you could use paper and a pencil stuck in playdough to make a sundial in a pinch. But if you want to make one like mine, here is the scoop.
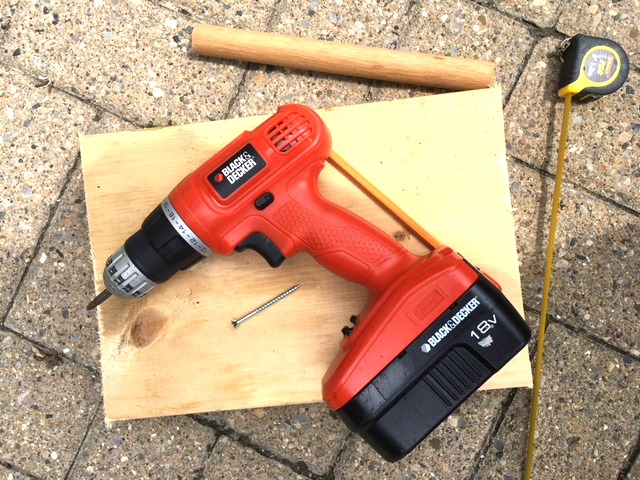
You will need:
- a scrap of wood (mine was 9 x 13 inches)
- dowel (mine was 10 inches)
- drill
- tape measure or ruler
- 12 rocks or gems
- 1 screw 2 1/2 inches long
- hot glue gun or other glue (optional)
- watch or clock with an alarm
- pencil
- spray paint or varnish
- craft paints and brush
Cut the wood to a size you choose. I would have preferred a 12 x12 square but I had this scrap 9 x 13 left over so we used it. I also had this dowel that was a leftover and already 10 inches long.
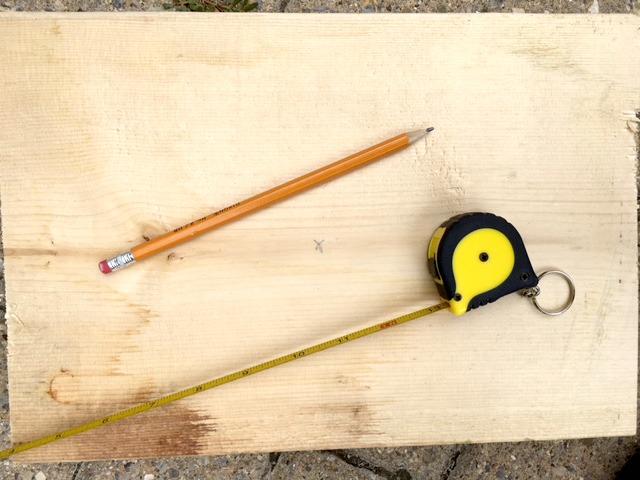
Measure and mark the centre of your board.
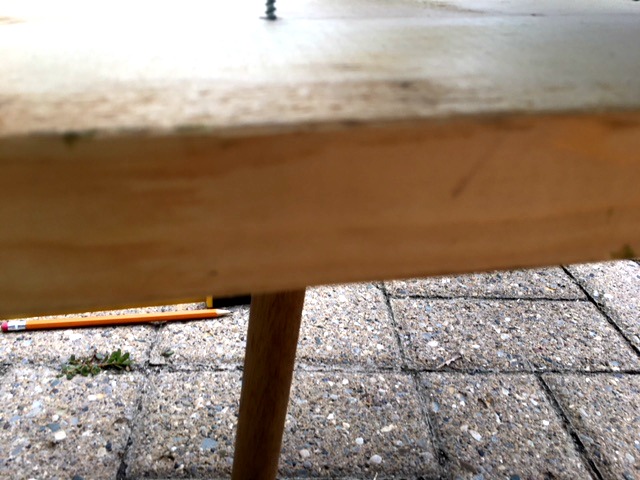
Screw the dowel into the centre of the wood. This was hard to take a photo of. Put the dowel on the ground, place the block of wood on top. Ensure the x marking the centre on the wood is right over top of the dowel. Drill the screw through both pieces.
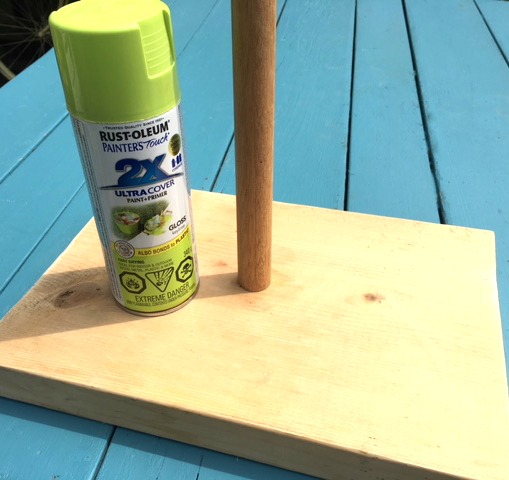
We could see the clouds coming, so we decided to start the time markings the next day and for now paint the sundial to help it last longer outdoors. If you have a partial can of spray paint or wood protector…this project won’t take much.
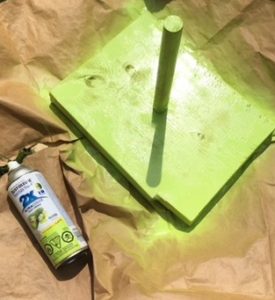

Spray the board and allow to dry. Tip over to paint the bottom and allow the bottom side to dry.
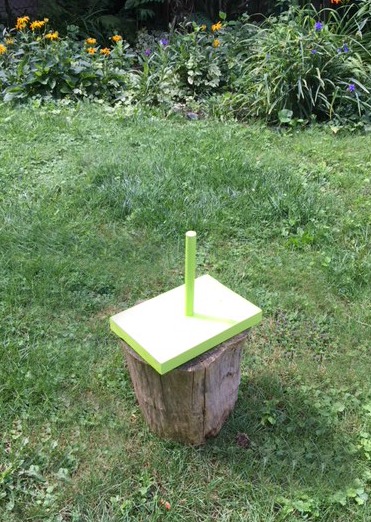
Once it is dry you can decide where you will have the most sun in your day. You could raise it up with bricks or a tree stump. We have a lot of shade in our backyard which normally we appreciate. But for this project it made things difficult.
Now seeing the giant rain clouds moving in. We decided to post pone and begin again tomorrow. In the meantime, we could jazz it up a bit.
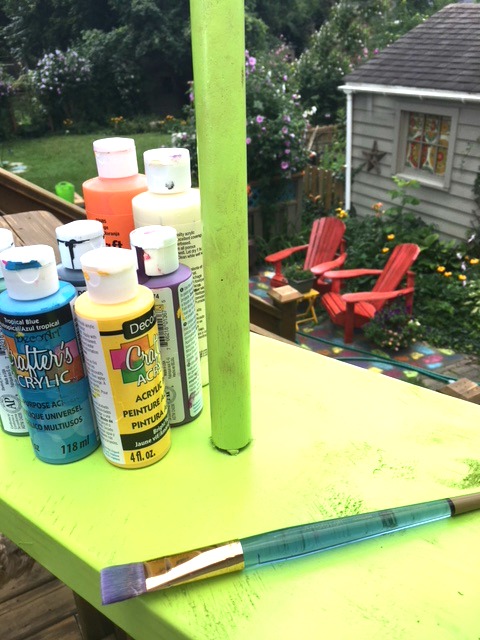
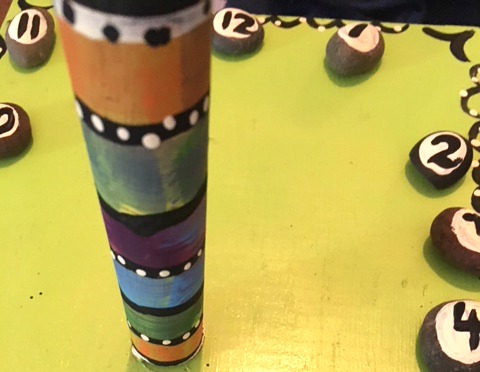
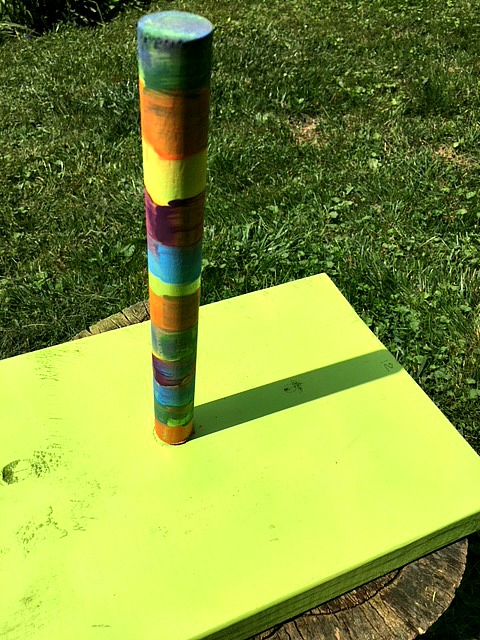
Using craft paint we put wide stripes on the dowel part of the sundial.
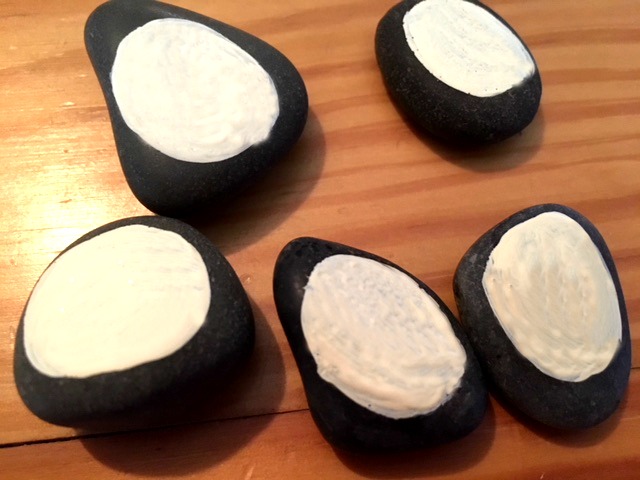
We had a package of dollar store polished rocks so we painted a white circle on each one. This will be our pretty markers for hours. Print the numbers: 7, 8, 9, 10, 11, 12, 1, 2, 3, 4, 5, 6, 7.
A SUNNY DAY FINALLY ARRIVES
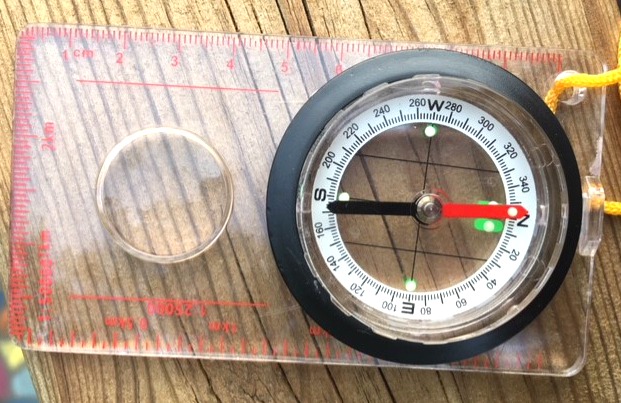
We did follow some of rules for making a sundial. Such as the pole needs to tilt slightly to the north. Use a compass to determine the north pole. I twisted the dowel to loosen it and put a tiny rock in that space to tilt it. If you are in the southern hemisphere you will need to use the compass to find the south pole and tilt the dowel to the south.
Just before noon put your sundial in a sunny place. The shadow of the dowel will be your first mark to write in the number “12”. I wanted that to be right at the top like a regular clock.
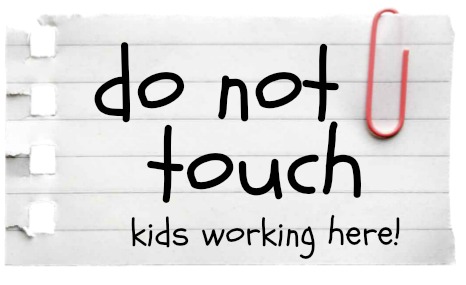
This is going to take more than one day to complete so make sure that no one moves it. Maybe add a note that says “do not touch” so it doesn’t move.
Next, set the alarm for 1’oclock and come back to write on the number where the shadow hits for 1pm. Write “1”. Set the alarm for 2pm and then 3pm and continue to repeat every hour until the sun sets.
After sundown, set the alarm for 7am so you can begin recording the morning time marks.
If you are going to leave your sundial outside and you haven’t already painted or varnished the sundial you should do that next to water proof it. A clear coat on the rocks is a good idea too. You don’t want the paint to shift off the stones. That can happen on polished stones.
After the times are all marked, you might want to secure the rocks so they don’t get carried away. You can use a hot glue gun (fast and easy) or E6000 glue (slow, stinky but stronger).
Our finished project does not look like a clock like other sundials. Maybe it was moved. If your kids are older you might want to do more research and see how the impact of the tilt of the earth’s access. It’s August now, will the shadows still line up in September? This project has the potential to be quite educational. Telling time, shadows, the earths axis, the solar system, using a compass,
This picture is linked to a nice pencil and paper sundial blog.
Children who spend time outdoors are more likely to be happier, healthier, problems solvers and more creative. Check out this blog post about a paper sundial. https://hubpages.com/education/Reconnecting-Children-With–Nature

https://otherwiseeducating.blogspot.com.au/2010/12/sundial.html

https://www.kcedventures.com/blog/how-to-make-a-sundial-for-kids
Here are some other posts of my projects you might enjoy!
Nature Craft – Perfect for Earth Day Activity – Clay Imprints with Plants and Flowers
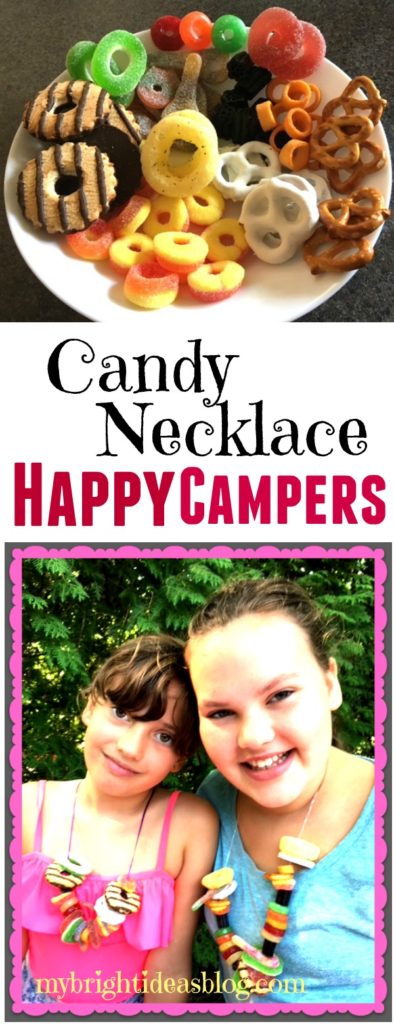
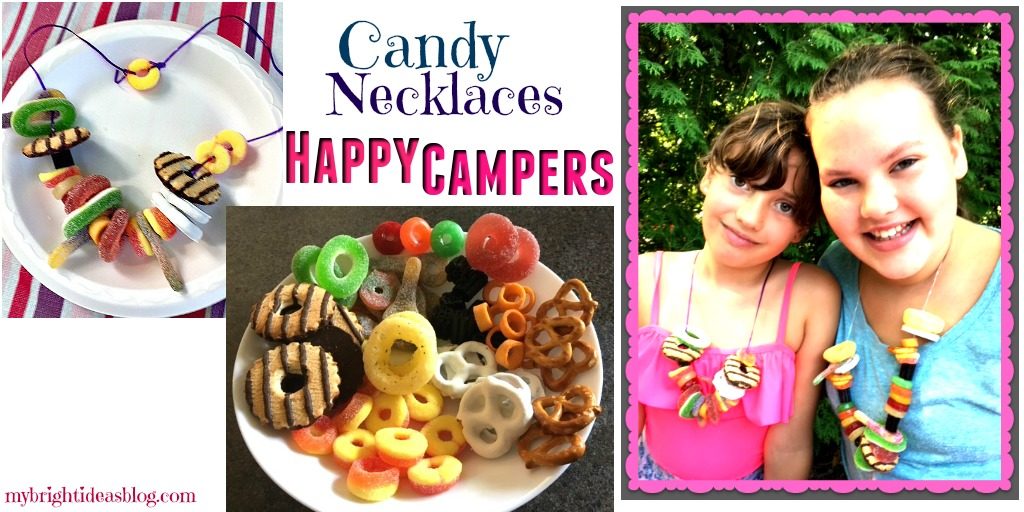
Make a Candy Necklace = Happy Campers!
Have you got some grumpy kids today? A lull in the summer getting them bored? Looking to jazz up a camping trip…Here is how to turn that frown upside down. Candy!
This is a true tale of 2 girls and a mom on a camping trip……. the kids were all “mom…what is taking so long…I thought you said we were going to the beach…..” whine, whine, etc, etc.
Daddy had to stay home and work so it was just me and my girls, and lets face it they are not very helpful. So after-breakfast clean up was taking a bit of time.
So when I said, “Who wants to help me with a blog post?” They immediately perked up! They knew there was a bag of candy bags from the bulk store that they were not allowed to touch.
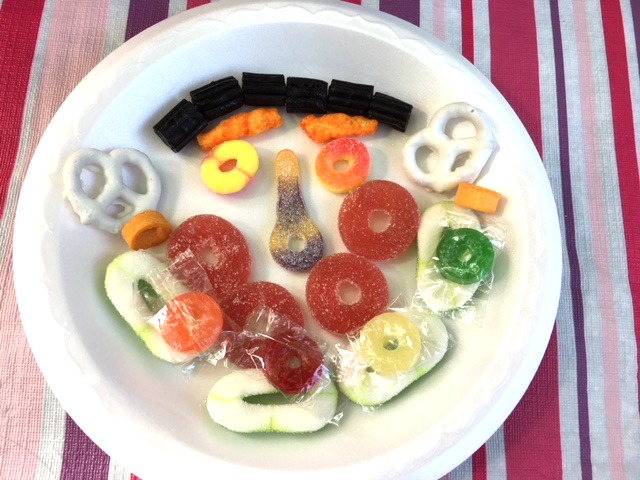
All the treats for this project have holes in the middle so there is no need for mom to poke it with a sewing needle.
Here is what you need:
- treats with a hole in the middle
- cotton string or something to put the treats on (plastic lace was easiest)
- scissors
Shopping for Treats
The first step, is to hit the bulk store and purchase any cookies, candies or cereal or candy that has a hole in it. I’ve got 2 kids so I bought 5 or 6 of each item-assuming that they will eat or break a few in the jewelry making process. I had lots of little baggies with just a few items in each.
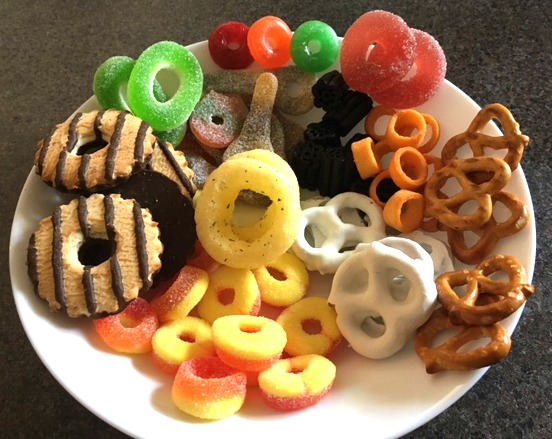
I picked all of these tidbits from our local Bulk Barn. Licorice, cookies, pretzels, sour keys, sour cream hoops, life savers, etc.
Choosing a String
Next you will need something to string your candy beads onto. You can use yarn or fine elastic or string or thread or plastic lace. We found that the easiest for the kids is the plastic lace. This is a rigid plastic that is often woven into bracelets. I picked up a variety of colours in a package from the craft section of the dollar store.
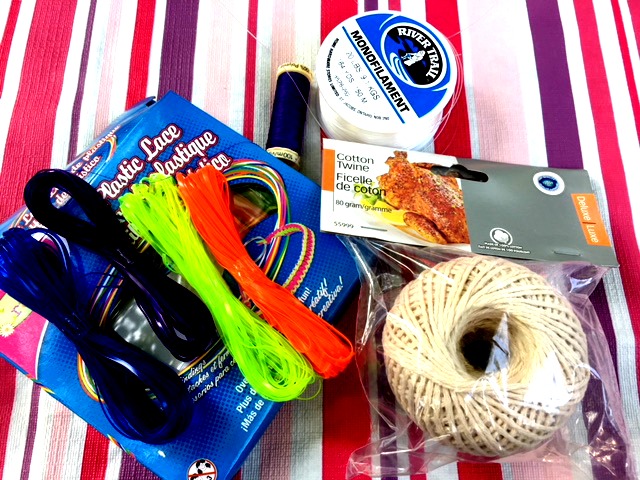
I like the idea of the cotton used in preparing turkey dinners, because you know it is intended for food handling. These will be your in the kids mouth after all. But it is a bit more frustrating for the kids to use. It unravels a bit so you need to twist it with your fingers or trim the ends a few times.
Now measure the length of string you’ll need. Make it long enough so your child can just pull it over their head when they want it off. If on second thought, you don’t want them to have access to quite so much candy-make it into a bracelet instead.
A Word Of Caution
This craft is meant for older kids rather than young toddlers. Please watch your child for choking and strangulation hazards. Be safe and have fun!
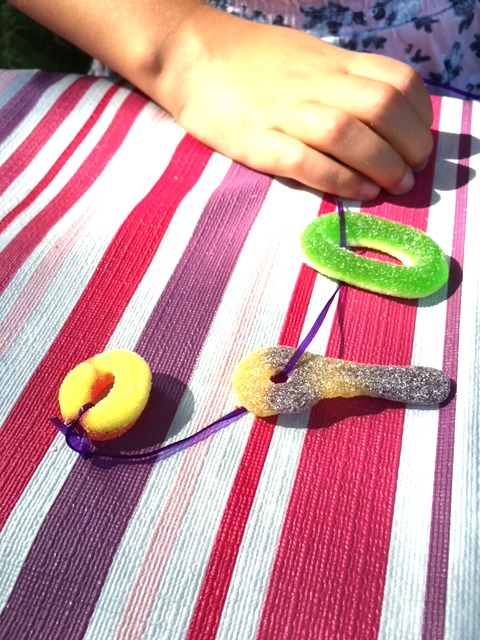
I didn’t think of this, the girls came up with the idea to tie the first candy as an anchor so the treats would not just fall off the other end as they string more treats on.
While you have them settled into this project its a fine time to give them a little speech about how thoroughly they should brush their teeth later. Or how you would like to increase their household chores…Groan….
Why not? It’s not like they are going to storm off….they have a candy craft in their hands…they have to listen!
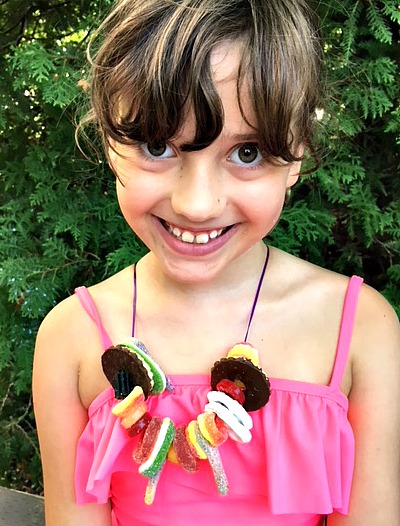
Keep on stringing on the treats and when you are happy with it, tie a knot. Now try on your delicious necklace or bracelet.

That is enough candy to last a week long camping trip. Do not eat all of it at once or your belly will hurt!
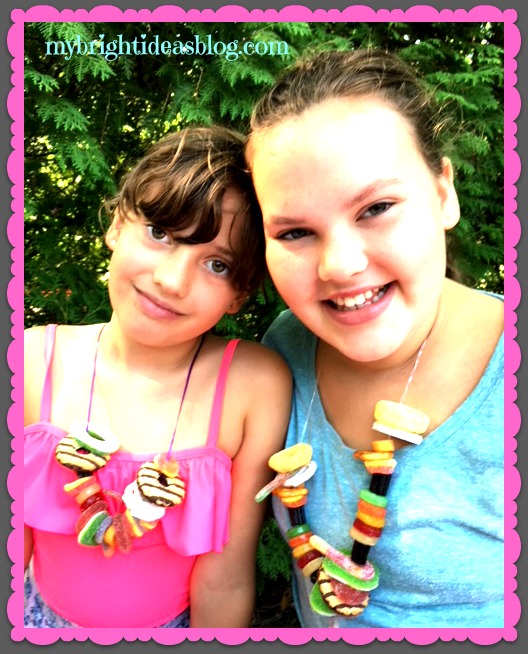
Now they are happy campers!
Besides camping trips, this is a great idea for a kids party, before a road trip or to pull out on movie night!
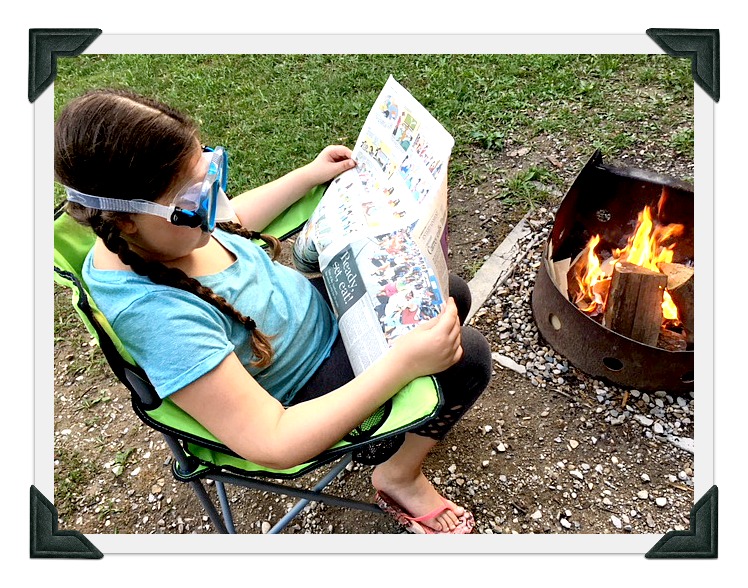 Don’t you hate it when your campfire gets smoke in your eyes? Not my girls! They grabbed their swimming goggles! Smart! Carry on reading the comics with happy eyes…
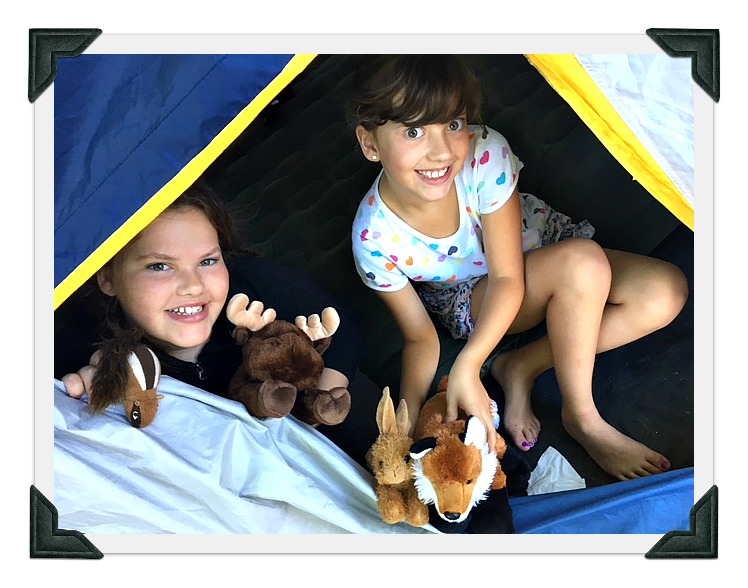 Miss B and Miss M made new acquaintances with some friends in the forest. A chipmunk, a moose a bunny and a fox. Are we the only family who needs a back pack full of stuffed animals on a camping trip?
Have a great summer and get out camping!
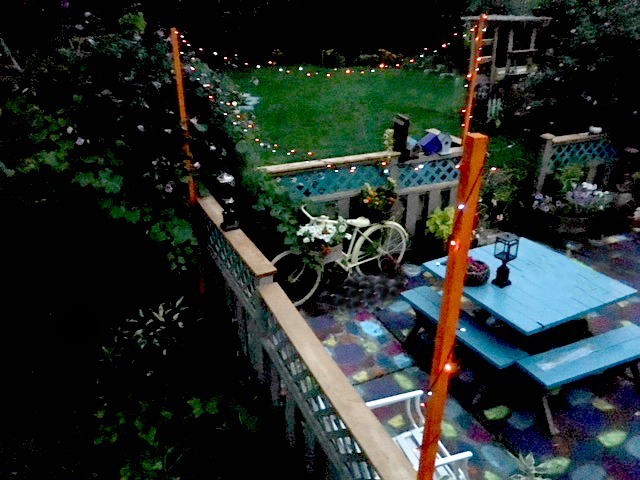
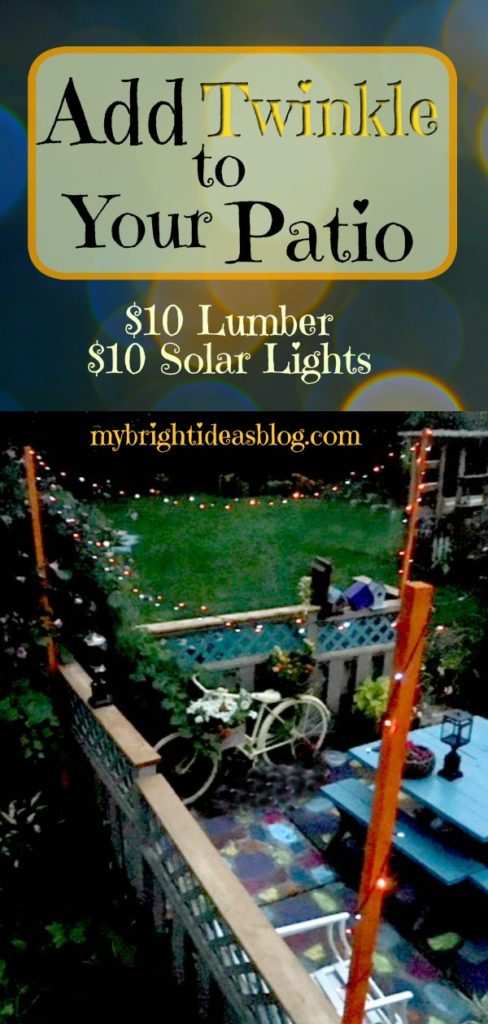
Add Twinkle to Your Patio with a String of Solar Lights
$20 Solar Twinkle Light Project – No Tools Needed
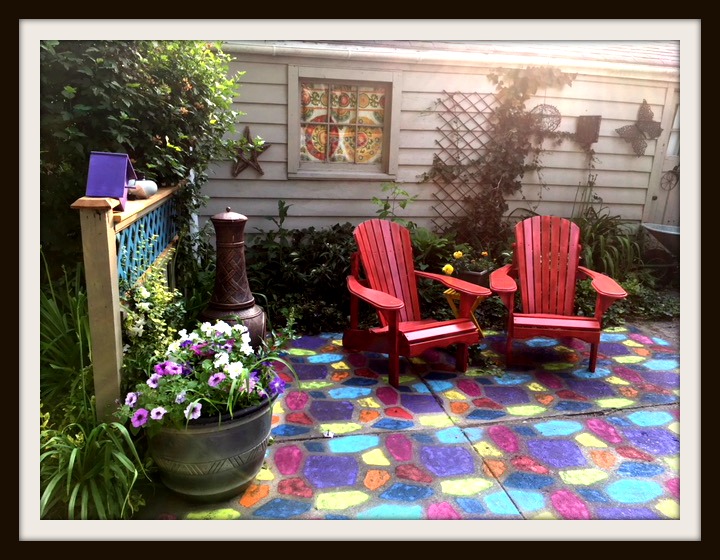
Usually by this time of the summer I have had enough of the heat and let the weeds take over and the vegetable garden dry up. But this year has been different! This year I have been adding colour to the backyard patio. I have painted the old picnic table and parts of the fence turquoise, the white Muskoka chairs are now red, an old bike is now yellow with plants attached and the entire patio a multi color design.
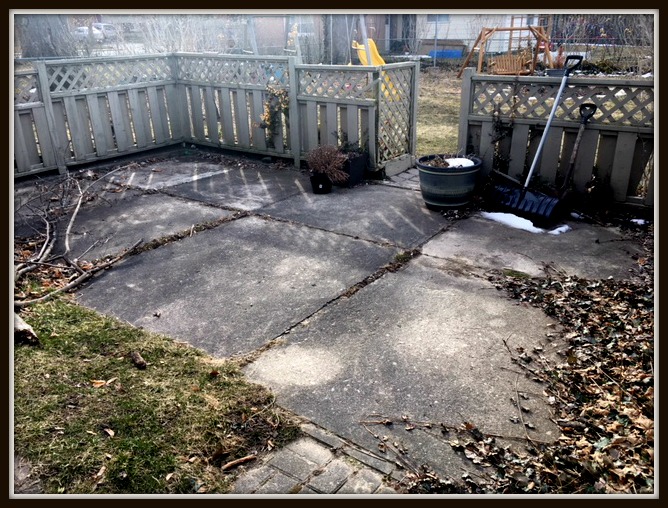
This is what it looked like as the final bit of winter melted away. So dismal! In the summer our garden is lush and private but everything is bare naked in the winter. Grey and bleak….
We have a lattice privacy fence around the patio area that needed a bit of repair and some paint touch ups battered by the winter. This is the going to be the support for the 2×2 pieces of lumber.
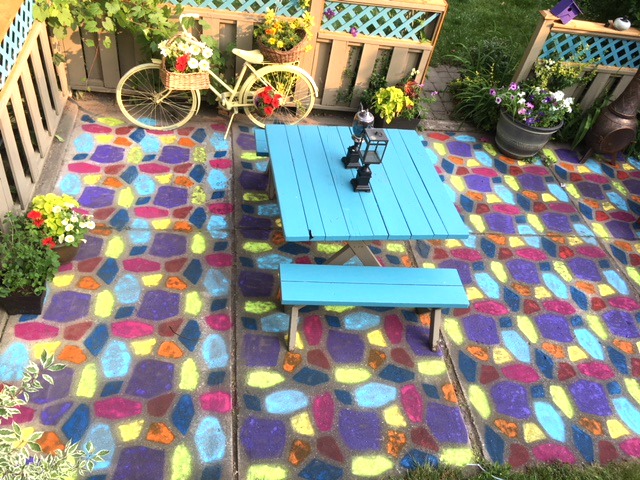
Below is a pic of the other half of the patio and garage area after I finished painting the patio.
Have a look at the painted patio blog post from July.
So the next logical step for this backyard makeover is to add some twinkle lights. Being the frugal person that I am-I must brag that I did this project for $20!
First stop – the hardware store….
 You will need:
- 2×2 lumber (3 for $2.70 each)
- string of solar power lights (sale $9.99)
- left over deck stain or spray paint (it costs $6.99 usually but I had this left over from the patio project)
- zip ties (dollar store)
- cup hooks (dollar store)
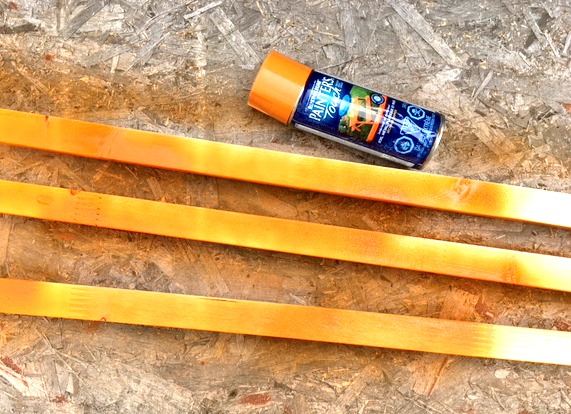
Step 1 Spray Paint The Boards
The great news is we use the full pieces so no power tools are needed. Just choose a paint color and get started.
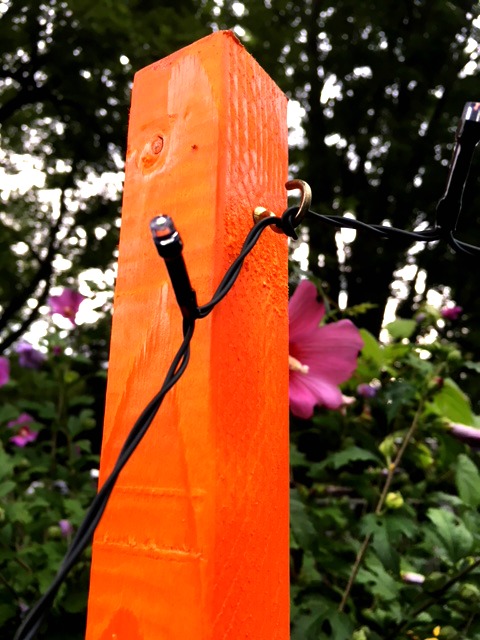
I wanted to make a splash of color so I chose to use my bright orange. I could have used a dark green or left over deck stain or fence paint if I was feeling subtle. But I wasn’t….
Spray the 3 2×2 boards on two sides then allow to dry before flipping them over and doing the other two sides.
Step 2 Add The Hooks
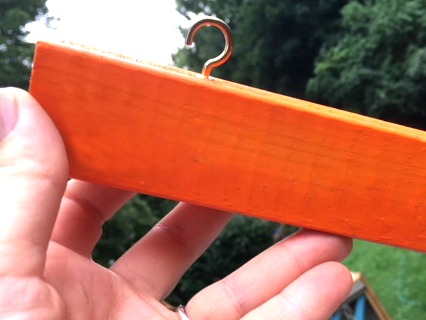
I used mug hooks because you simply screw it into the wood. The hook is twisted into the wood a few inches from the top.
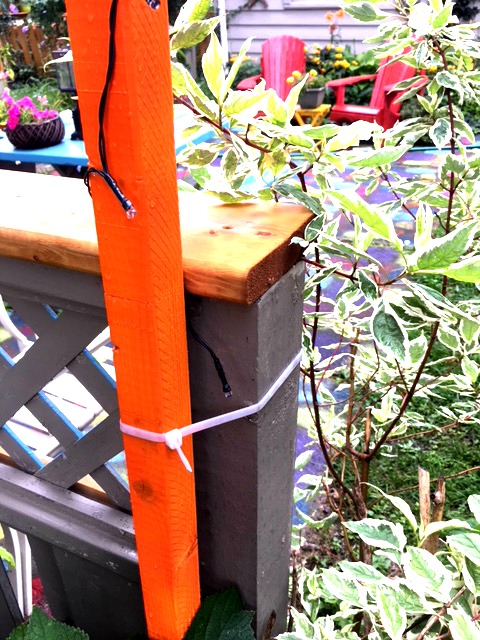
Step 3 Tie The Supports To The Fence
Securing the 2×2 to the fence was easy with zip ties. When we are putting everything away before the snow comes these zip ties will be cut off and my orange light supports will be put away in the garage.
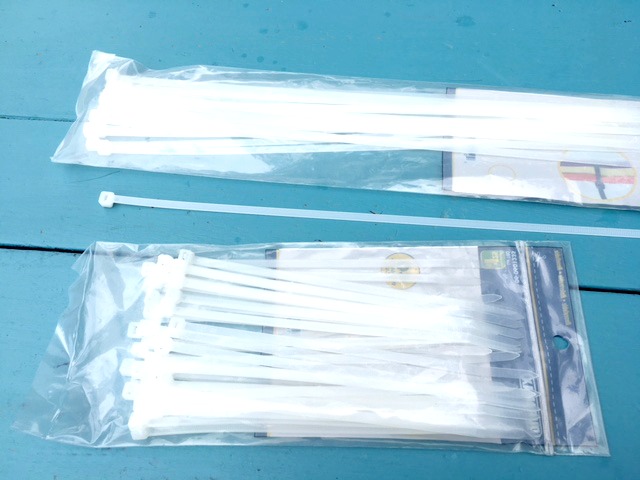
The dollar store or hardware stores have these for super cheep I used the 14 inch zip ties.
If you don’t have a handy fence or deck to secure the wood to, you can find others who have put them in cement in a bucket to create a portable pole. Some use 2×2’s or 2×4’s and even 4×4’s.
Check out this link to a tutorial using barrels and concrete and then turning it into a planter. Its great if you have no walls, deck or fence to secure it to. https://www.diynetwork.com/how-to/outdoors/patios-and-decks/how-to-make-planter-posts-for-string-lights

Step 4 Adding The Lights
It’s August, so now is the perfect time to find clearance solar powered lights. Lets give a shout out to solar lights! What a wonderful invention this solar power is. No extension cords to plug it in. No batteries. Just leave the little solar panel out facing the sky.
![]()
Turn the light on so it has a chance to charge up with solar energy before sunset. F means flashing, S means static so the lights will be still.
Wrap the solar light cord around the 2×2 support. At the top wrap it around the hook a few times. Next drape it over to the next support. We simply wrapped it around that hook and over to the third hook. Finally wrap it down the third pole and its done.
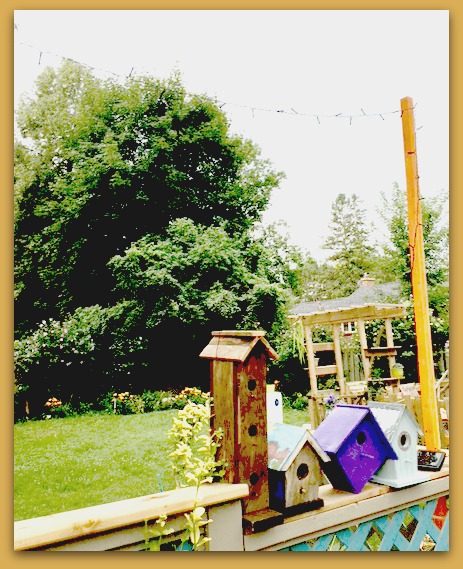
Next to the bird houses you can see the solar power part. I need to think of how to put it more out of sight since it does need the sunlight to charge it for after the sun sets.
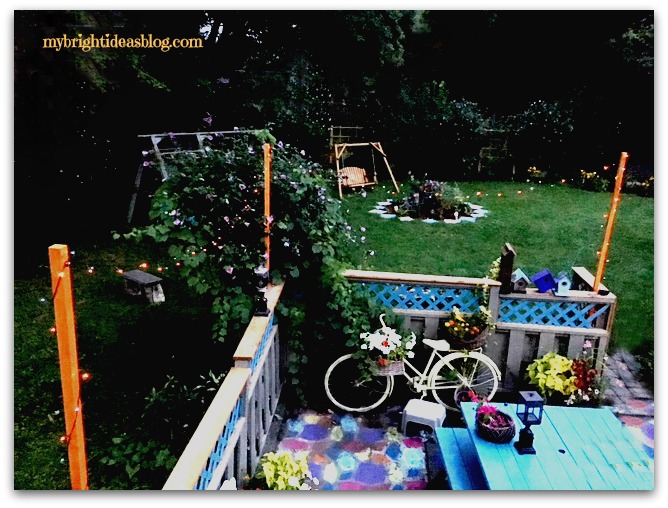 As the sun begins to set, I can see they are lighting up perfectly. Twinkle lights are such a simple pleasure!
Now I feel like calling some friends to come over for a root beer float and having a little party under the lights!
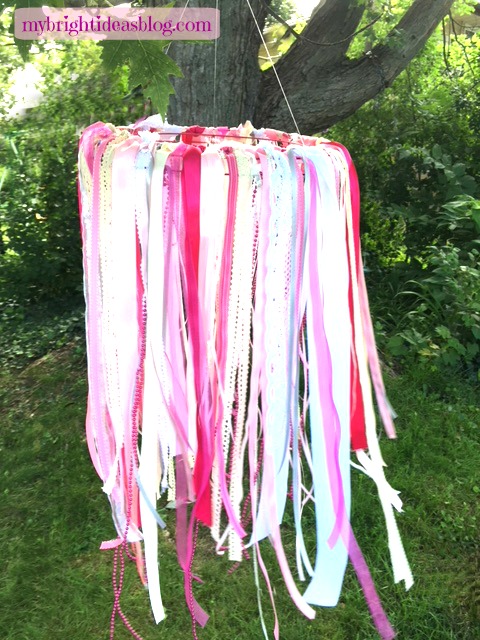
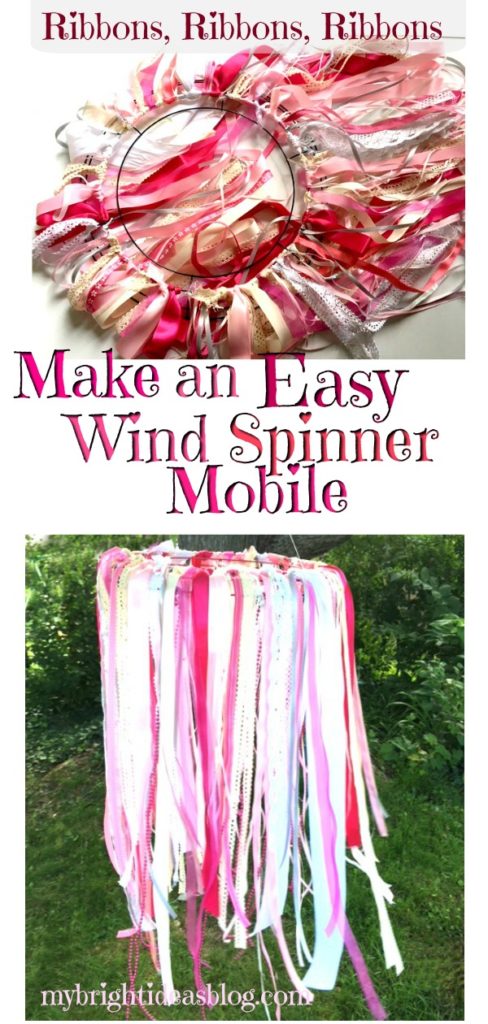
Make a Ribbon Mobile – Windsock
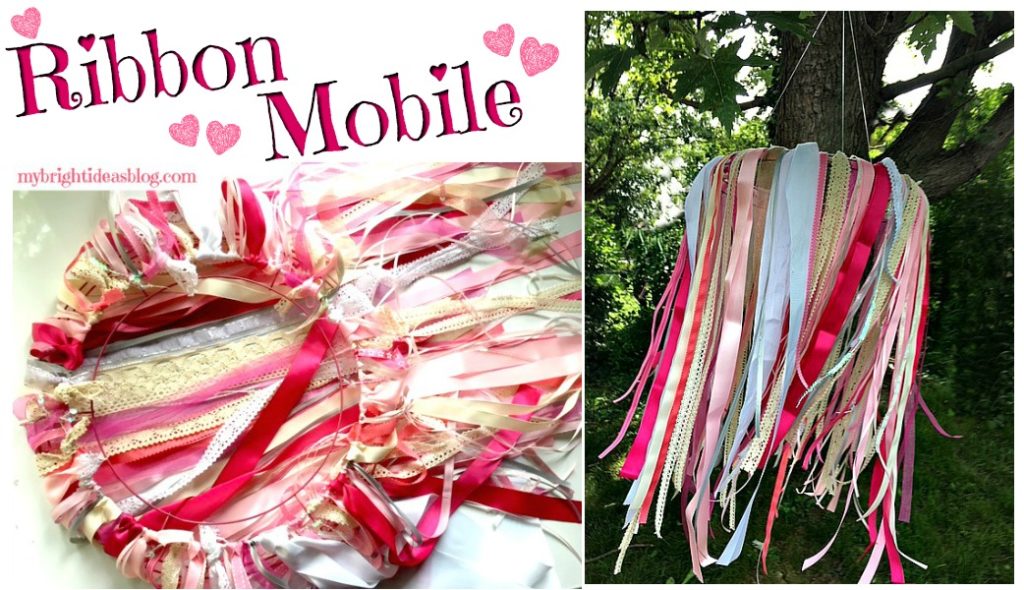 The other day I came across a ribbon party mobile on a porch and I loved! It was bright colors and looked so easy! So off I went to get supplies for my own.
New word of the day: Windsock
If you put these outside it might be called a windsock, so you can tell when its windy. Like they have at the airport to tell wind direction and speed. I did not know this word until I went looking on Pinterest to see how others had made them and that is what they called it. Isn’t that a fun fact!
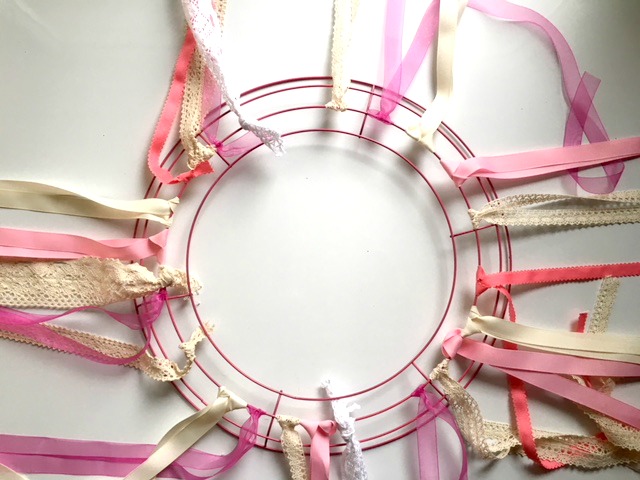
This could survive the summer outdoors because it is made out of a metal wreath-as opposed to the smaller ones that people do with an embroidery hoop. However, the embroidery hoop would be good for an indoor mobile and it’s smaller so you would need less ribbon.
This is my version of it!
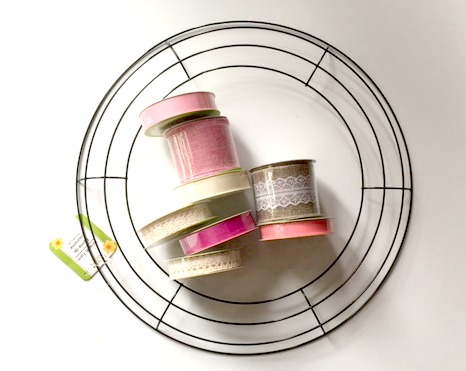
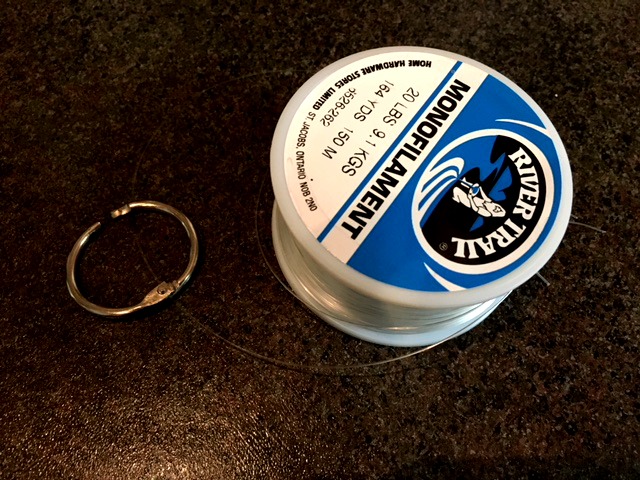
You will need:
- wire wreath (Dollar Tree $1.25)
- spray paint (optional)
- ribbon (variety of widths and textures) you need a lot!
- iron (if your ribbons have creases)
- scissors
- tape measure
- binder clip
- fishing line
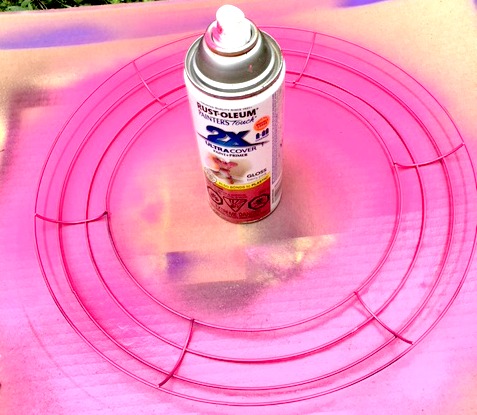
Start out by spray painting the wire wreath. This is optional but I did originally leave mine black and it was nagging at me that I should have painted it white or pink to blend in. It doesn’t take much paint a quick spray on one side. Wait an hour and flip it over and paint the other side.
Bric a Brac and Haberdashery!
Here are 2 more definitions to make this a super educational tutorial:
Bric a Brac: Noun
-
miscellaneous objects and ornaments of little value.
- synonyms: ornaments, knickknacks, trinkets, baubles, bits and pieces, bits and bobs, odds and ends
- small items used in sewing, such as buttons, zippers, and thread; notions.
- a shop or a department within a larger store that sells items used in sewing.
More to the point – Ribbon
You will need a lot of ribbon! It would be great if you have a craft outlet store or a source for cheep ribbon with a lot of yards on the spool. You should plan to spend at least $25 on this. Wider ribbon will fill up the space quickly but the skinny ribbon is nice intermingled. It’s a great way to use up old scraps too. Lace, ribbon, ric rac, sequin strips, cheap lengths of beads. Variety is the key!
Start by cutting the ribbon into lengths between 20 and 24 inches or 50 cm to 60 cm. I like the ribbons to be staggered in lengths. Do not use ribbon with wire in it.
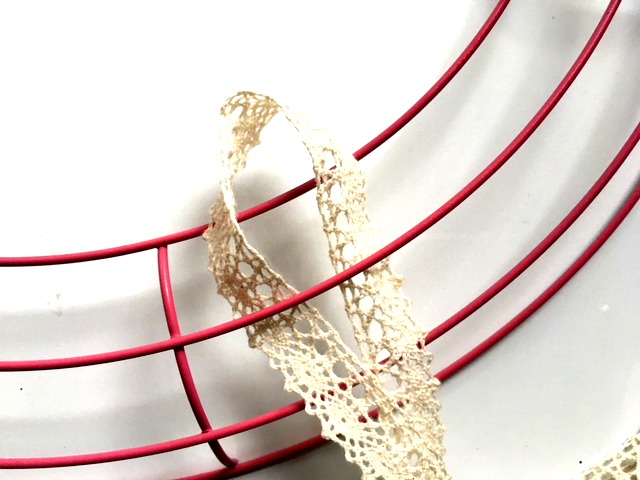 Slide the ribbon through the wire wreath.

Pull the ribbon through the loop to form a gentle knot.

Spread the ribbon around the wreath and then add another color. If it’s too short to tie the gentle knot you can put a single strand on the wreath by just knotting it.
Ribbons, Ribbons, Ribbons!
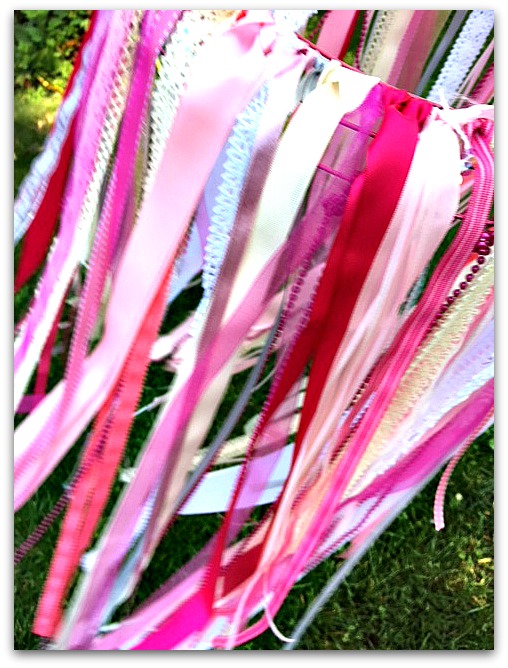
At this point I ran out of my new ribbon and it looks really sparse. So I head down to my sewing area and dig out all my old ribbons and lace and cut up any gray, silver, white, cream and any shade of pink in any width of ribbon.
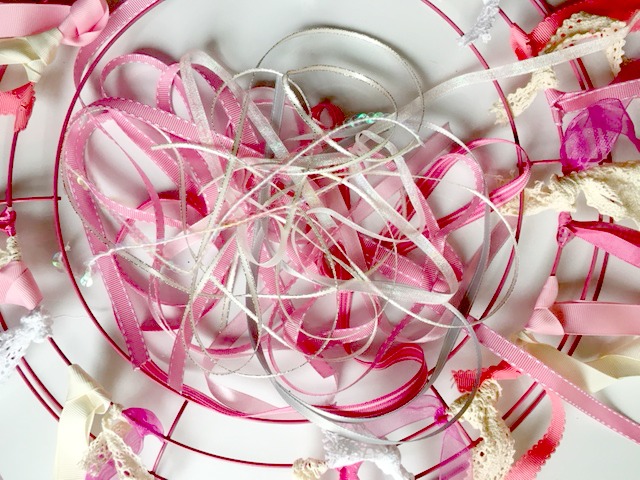
If some of your ribbons have been folded you will want to iron them. Some of my best photos have ribbon with bends and folds and it really bugged me. So off they came and I ironed them flat. Make sure the iron is set to gentle.
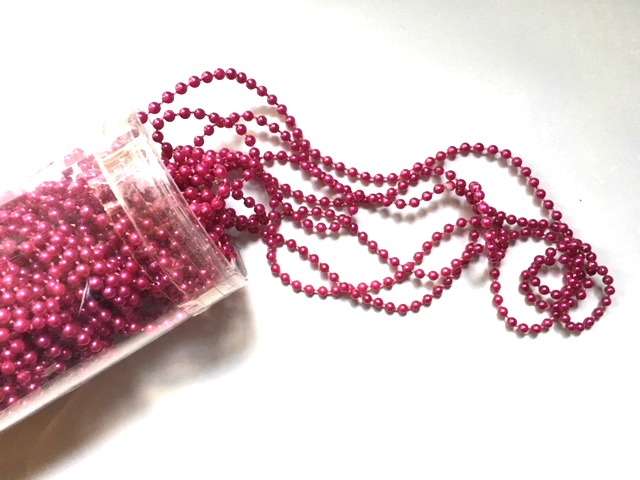
A friend gave me this bottle of beads. The strand of beads is really long so there is plenty to add several lengths on this project. I also had a spool of sequined ribbon and that adds a nice bit of sparkle.
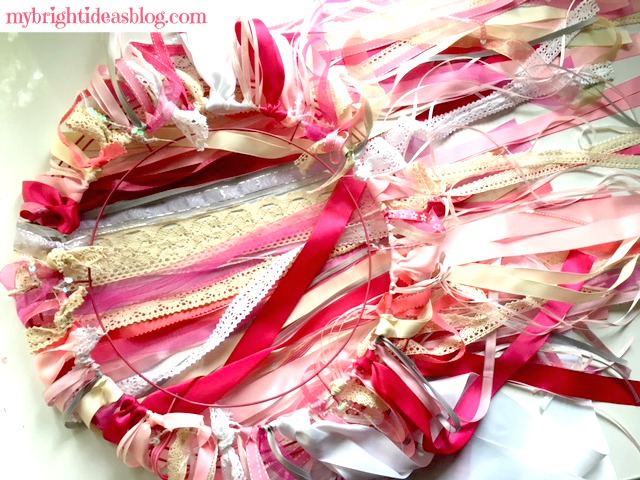
It’s actually quite beautiful now. When I lift it up there is very little wire showing.
Time to Hang it up!
Now you will need to string it up. I could have used ribbon but there is literally none. It’s all used up on this mobile. So use fishing line…its very inexpensive and clear. I used a binder loop as the connection and it will help with movement if you are using it outdoors in the breeze.
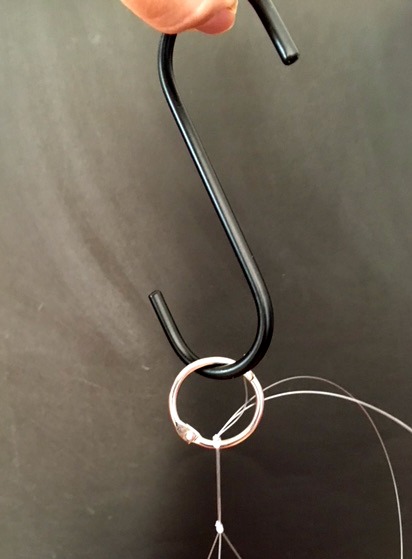
Knot it on the wreath in three places and then pull the three strands together and upwards. Tie it in a knot twice leaving 1/2 an inch (1 cm) between the knots to hook the binder clip. Then use the S hook to hang it from a tree branch.
If you hang it on a very low branch you will find your children in it. You’ve been warned…LOL
 The photo above is the mobile I did before I spray painted it. You can see some of the black wire. It’s up to you – if you want to skip the spray painting step. In the end I took the ribbons off and spray painted it pink and then started again.
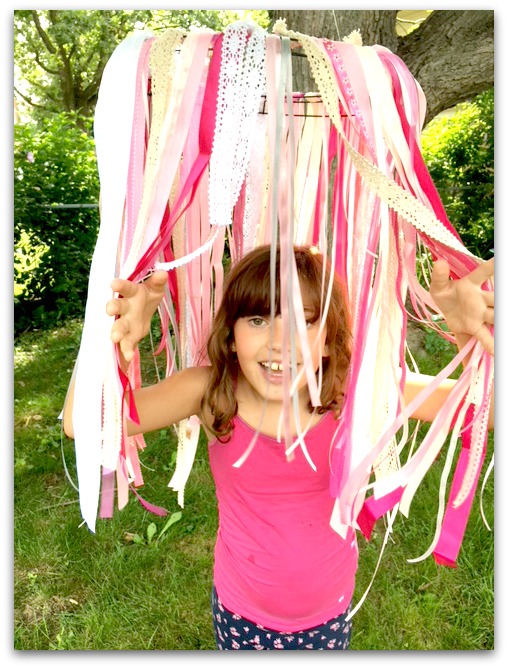
This would be really fun hanging over an outdoor tea party!
I choose my projects based on things I actually want to have around my house and I’m excited to make. This project is both! It turned out lovely and my daughter is happy to have it as an addition to her pink room.
Happy crafting – til next time!
Here are two ribbon and lace mobiles that I found in a store in a neighbouring town.
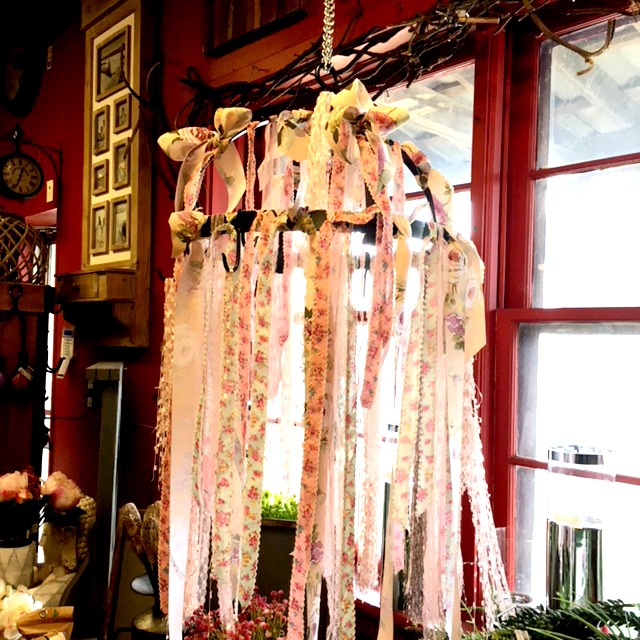
The one above is using a kitchen pot holder rack.
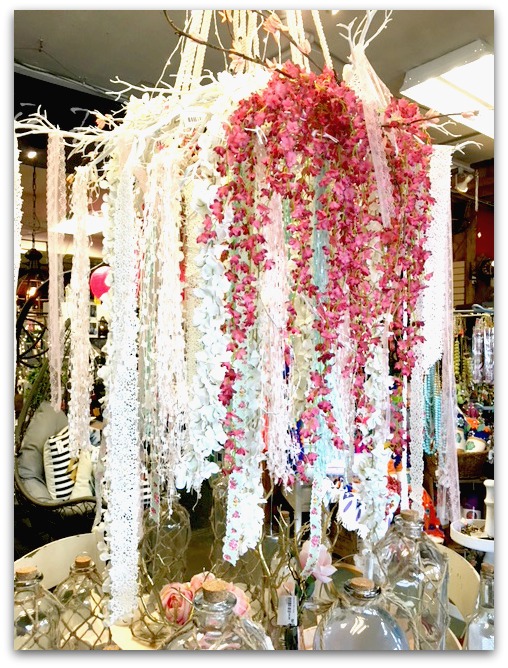 The one above is using a big white willow wreath. They had such a nice impact that I immediately pulled my phone out to take a photo. Add some twinkle lights and it would be absolutely wonderful!

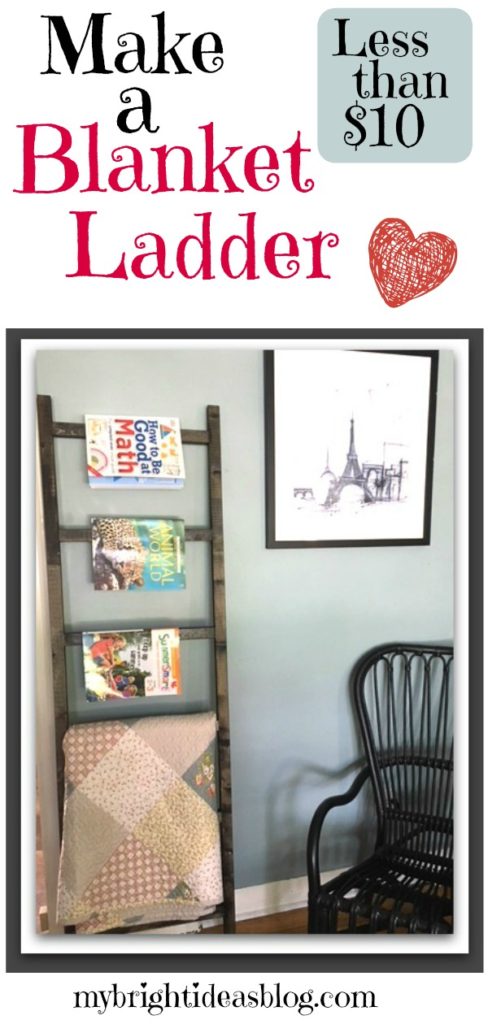
How to Build a Blanket Ladder – Easy Project!
Blanket Ladder DIY
This project is one of the cheapest projects you could make. If you have the stain, varnish and screws left over from a previous project the great news is the lumber should be less than $10.
You will need:
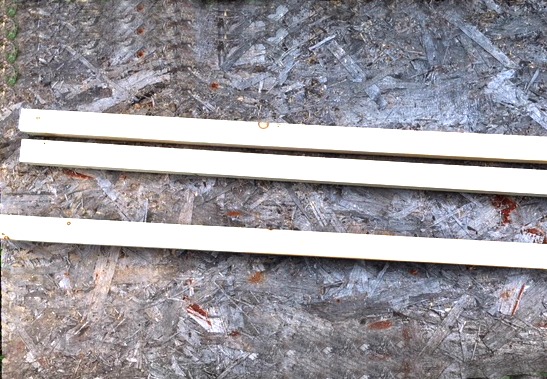
- Lumber 3 – 8 foot 2×2 (3 x $2.50 each = $7.50)
- Power Drill, drill bit and screw driver bit
- Pencil
- Stain
- Sand paper
- Clear Coat Varnish
- 10 – 2 1/2 Wood Screws
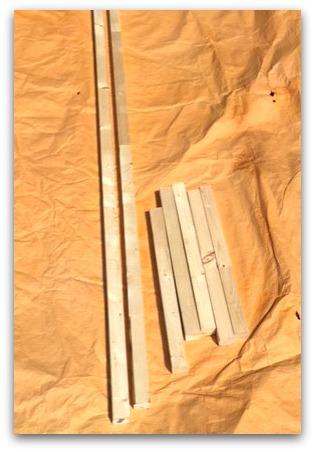 Cut 2 pieces to 6 feet long. Cut 5 pieces to 18 inches long. (This is the size I made)
OR
Cut 2 pieces to 5 feet long. Cut 4 pieces to 18 inches long. (Good if you have a small room)
![]()
Do you see that blue sky? 30 mins later the sky had dark clouds and I was hustling everything back into my garage to avoid a major thunderstorm.
![]() Lay out the wood and decide on your set up. I chose to put the first ladder rung 3 inches from the top. Then each one is set to be 12 inches below the next one. This left about 6 inches from the bottom of the ladder.
Lay out the wood and decide on your set up. I chose to put the first ladder rung 3 inches from the top. Then each one is set to be 12 inches below the next one. This left about 6 inches from the bottom of the ladder.
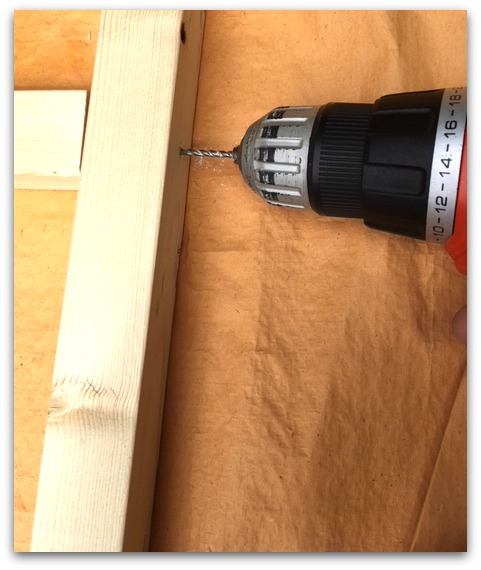 I predrilled the holes to help the wood not split. That would ruin the wood-trust me I’m famous for doing this and having to head back to the store for a fresh piece of wood. Doh!
![]() I started to drill each screw into the wood to make the next step of adding the rungs easier.
I started to drill each screw into the wood to make the next step of adding the rungs easier.
![]() Use a square to ensure the rungs go on straight.
Use a square to ensure the rungs go on straight.
![]()
Do you want to have it super smooth finish or rough and distressed…decisions decisions…?
Smooth…then its time to go over it with sand paper or a hand sander.
Distressed…last chance to scratch it up a bit. Rub it with the side of a screw or key. You can even wack it with hammer.
![]() Even if you like it distressed you can almost skip all the sanding but do tidy up the ends with a quick rub using sand paper.
Even if you like it distressed you can almost skip all the sanding but do tidy up the ends with a quick rub using sand paper.
Now for the STINKY wood stain!
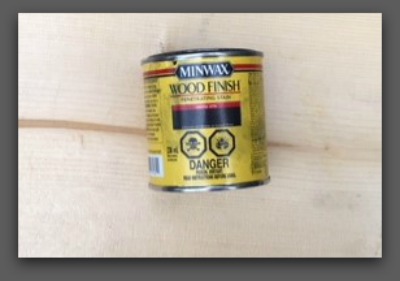
Next step is staining it. Choose a stain that will go with your décor. I really like a dark walnut finish but this blanket ladder is going into a room with a lot of black. So I used an ebony stain by Miniwax. If you are indoors open a window. If you can do it outdoors that is even better.
![]()
Watch the seams for areas where you have missed stained the first time. I used a craft paint brush to touch up the gaps and unintentional light patches.
After allowing it to dry, put a thin coat of clear protector over top. Keep in mind, clear coats come in a mat finish or glossy. I prefer glossy for the sake of smoother dusting my wood furniture but the mat finish looks really nice too. I chose to use a SPRAY clear coat.
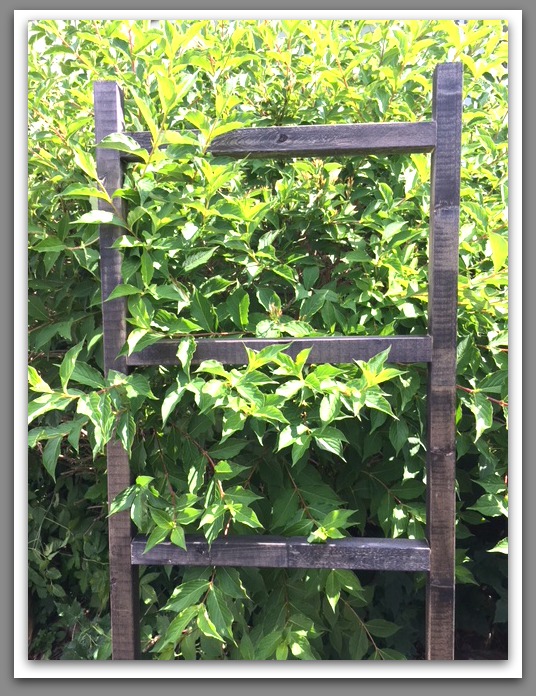
This looks so nice next to the greenery. Maybe I should use it as a trellis instead!
![]()
![]()
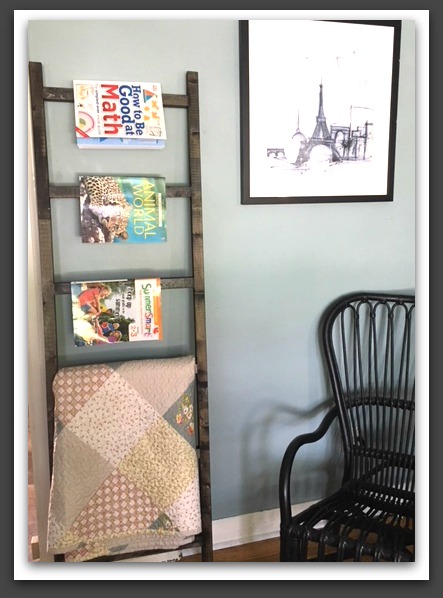
This could double as a magazine rack too. I didn’t have any magazines around so I used the kids summer school work books. Tee hee…. :o)

This is such an easy project! Are you teaching your teenager some DIY skills?
What if a teenager used this ladder to set out their school clothes for the week…
Add a blanket and what a nice housewarming gift this would make!
Crafts Using Burlap and Buttons – Easy Project that Looks Great!