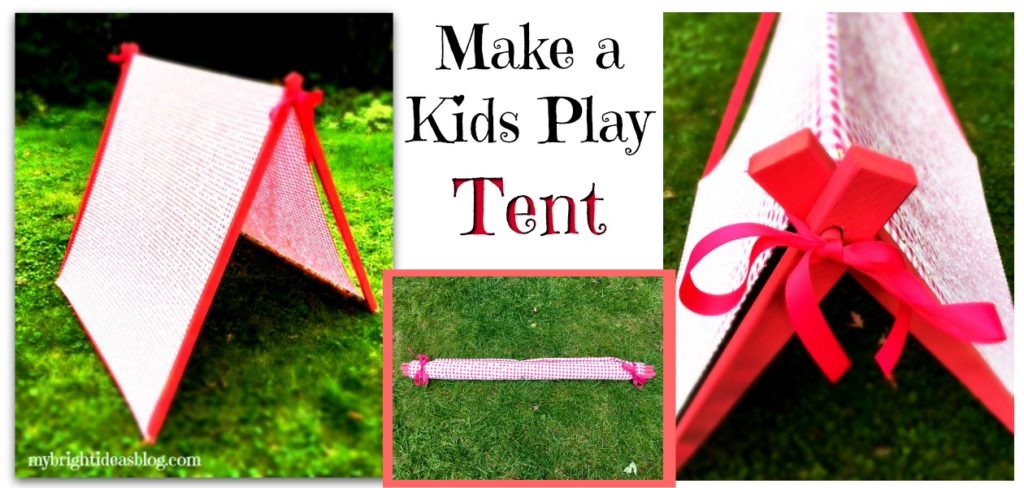
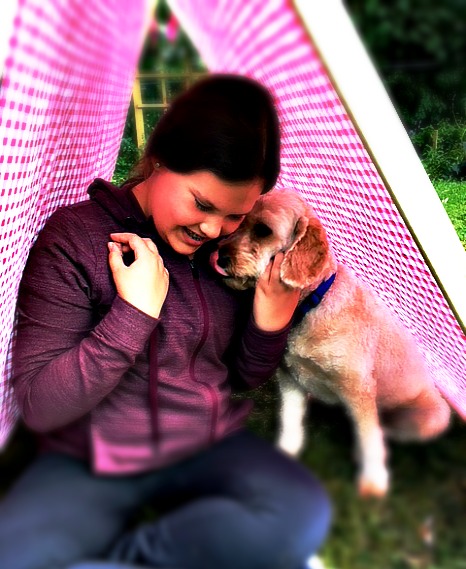
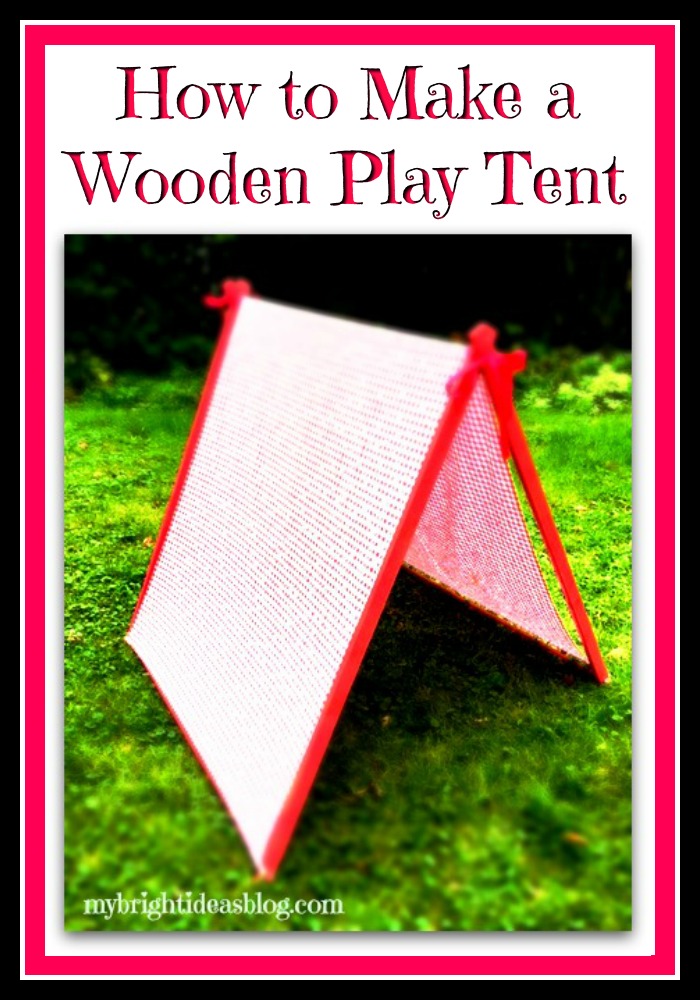
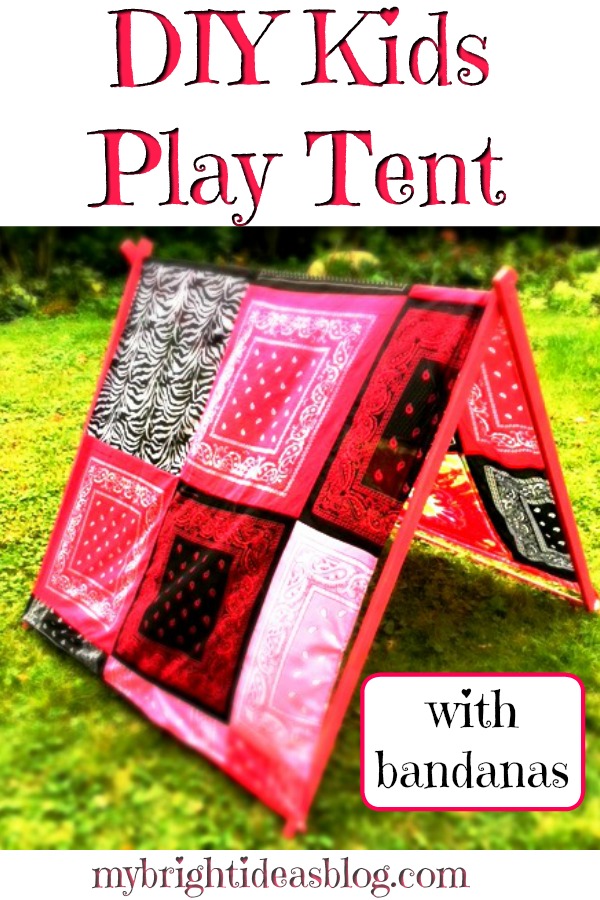
Here is a tutorial for a DIY Kids Play Tent! This won’t take much time or money to build. It would be an easy woodworking and sewing project for kids to help with. Why did I wait so long to make this!?!? The kids love it!
My daughters have always loved building tents. It’s fun for kids to steal the cushions and blankets and chairs to build a tent….sometimes even begging to fall asleep in it. I just wish they would put the cushions and blankets back when they are done….but that’s another story.
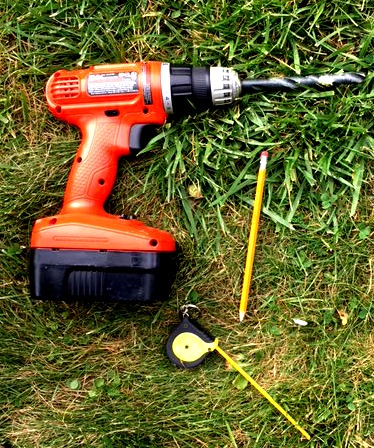
For the tent frame, you will need:
- 3 – 1/2 inch wide dowel (4 ft long) (approx. $8)
- 2 1x2x8 wood boards (cut in half) (approx. $5)
- power drill
- 1/2 inch drill bit
- tape measure
- pencil
- paint (optional)
For the tent fabric, you will need:
- fabric 45 inches wide x 90 inches long (115 cms wide by 230cms)
- scissors
- ribbon (2 pieces 30-40 inches/75-100cms long)
- thin elastic (4 pieces 5 inches/13cms long)
- safety pins (6)
- needle and thread or sewing machine (optional)
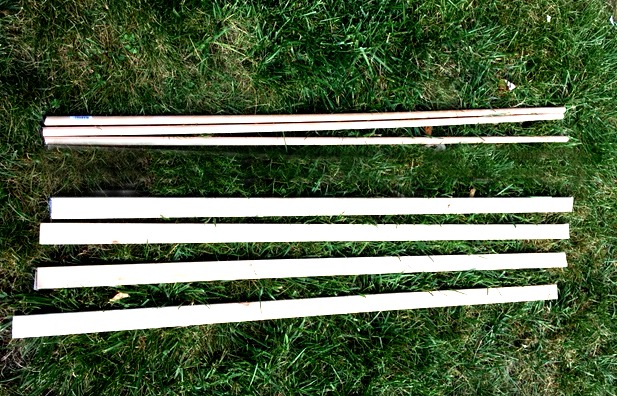
This is literally all you need, 3 x 1/2 inch dowels. They come from the store 4 feet long so there is no cutting here. Also, 2 boards 1×2 cut in half-so you have 4 pieces of 1×2. You can ask them to make this cut at the hardware store if you don’t have a handsaw or mitre saw.
Gather your drill, tape measure and pencil.
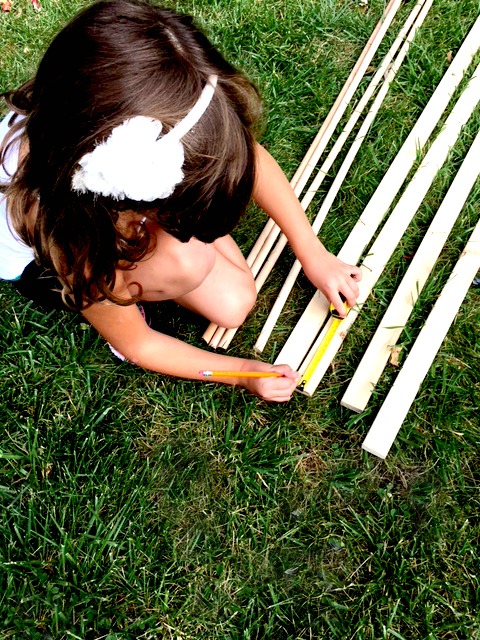
Measure and mark 2 inches from one end and 1 inch from the other end.
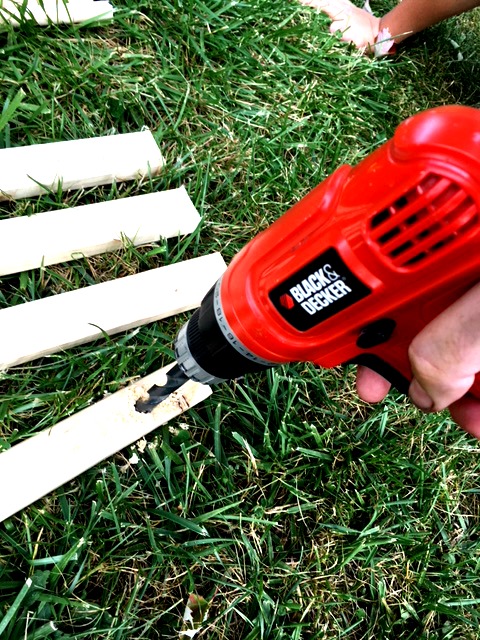
Drill the hole with a 1/2 inch drill bit. Test to see if your dowel will fit through the hole. You need it to be able to slide in fairly easily. I found it too tight and frustrating to put together when tight fitting so I ran the drill through the hole again in and out, in and out, to make it slightly bigger.
The top is the end that has a hole 2 inches from the top. The bottom has a hole 1 inch from the end.

Slide the first piece of dowel through the top holes of two of the 1×2’s The second piece of dowel can be inserted into the bottom holes.
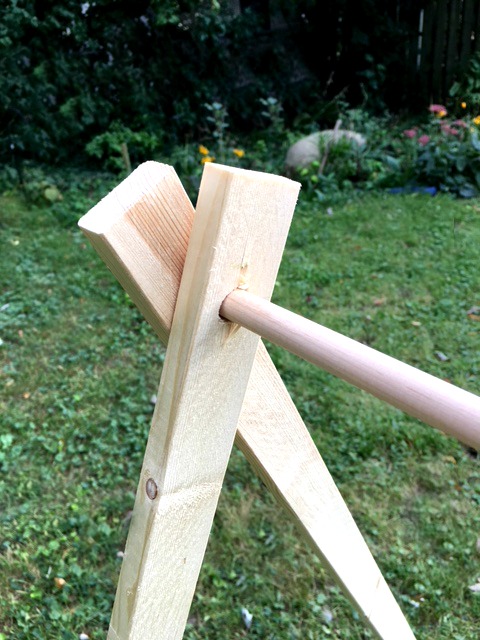
Add the next piece of 1×2 onto the top dowels to make an A.
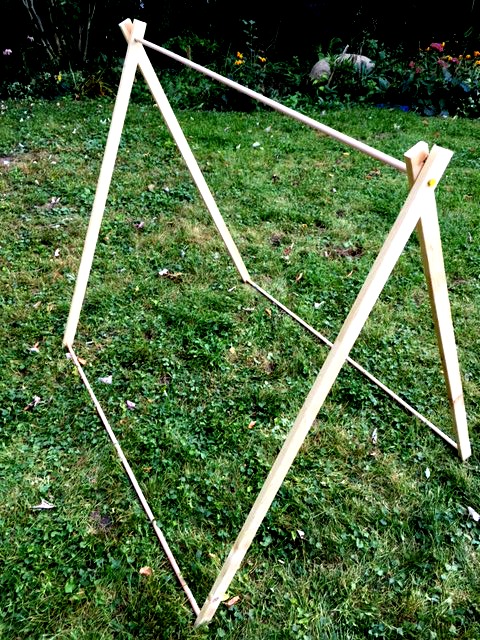
Slide the third dowel into the bottom end of the 1×2’s.

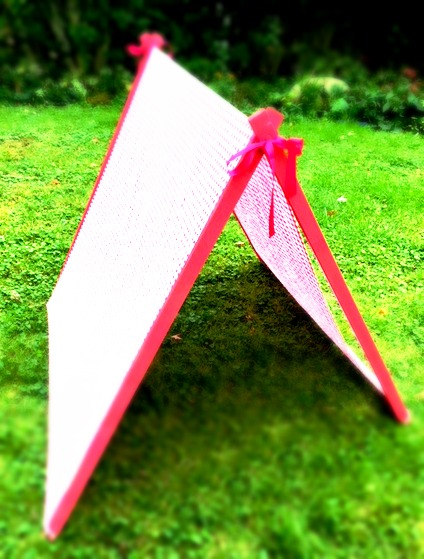
That’s it for the tent frame. Now for the tent fabric.…
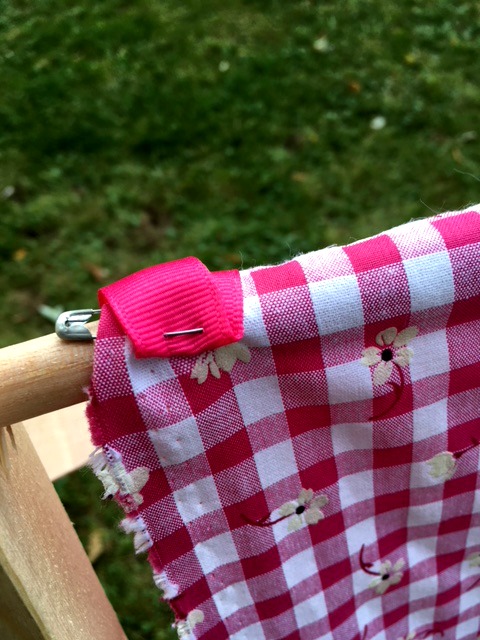
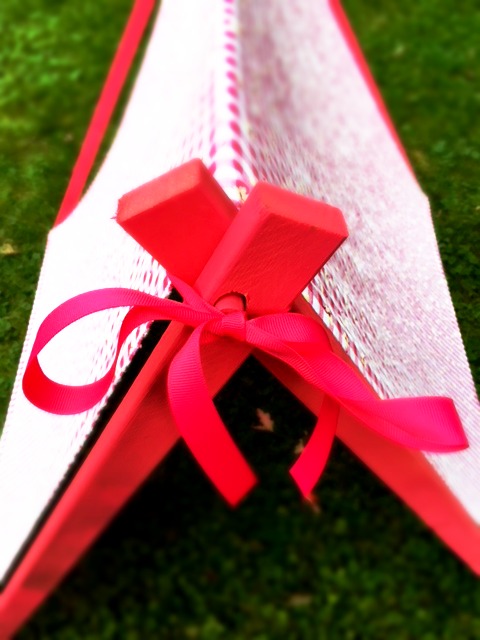
Slide your fabric over the top of the A frame. Pin a ribbon to the front and back ends.
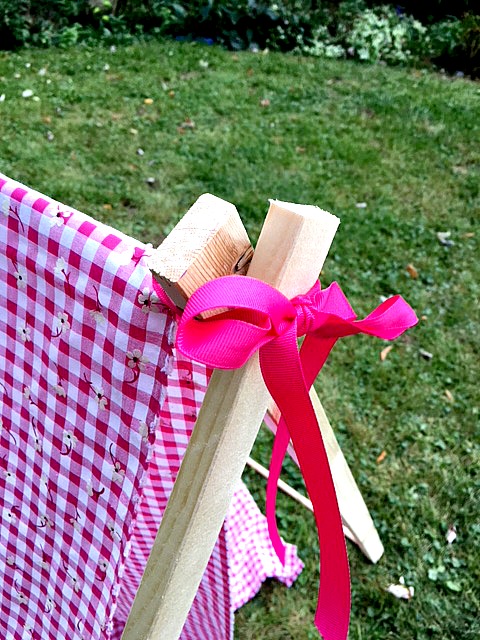
This ribbon isn’t essential but it does look nice and it will be helpful ties when you are storing the tent away.
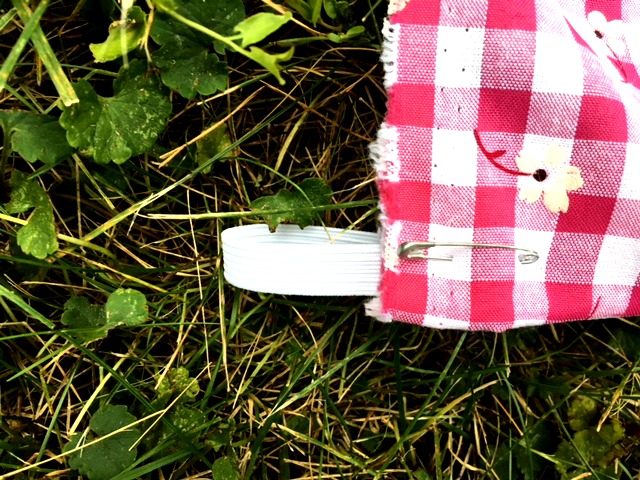
Pin a small piece of folded elastic onto all 4 of the bottom corners of the tent fabric.
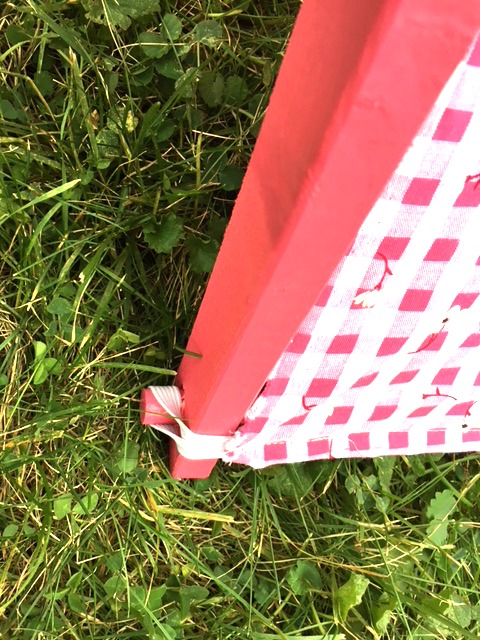
Hook the elastics over the ends of the bottom dowels.
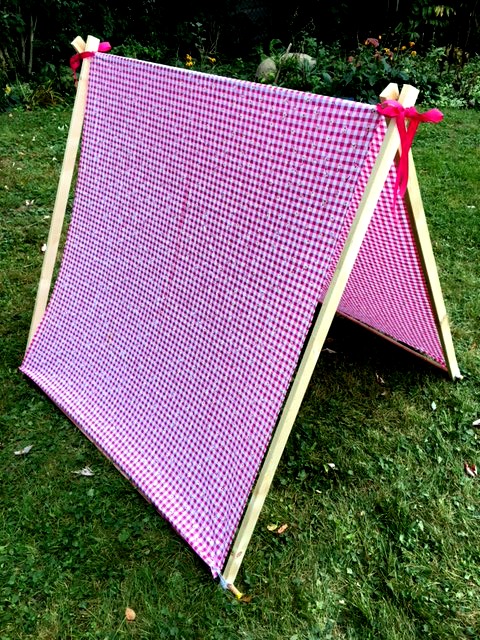
It looks fine with just pins holding everything in place. You may want to hand or machine sew the ribbon and elastics in place. I did sew those in permanently and also hemmed the bottom of the fabric. It’s looking good enough to give away as a gift!
After this sweet picture was taken we decided the only thing to make it better is to paint it pink.
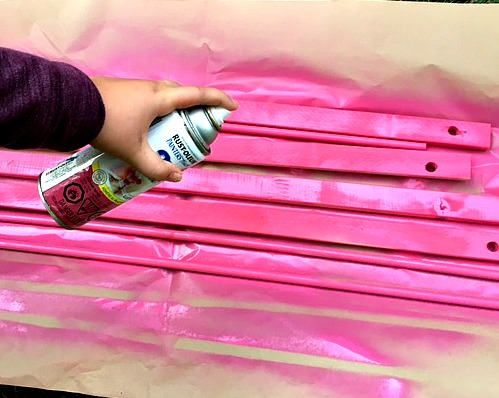
I already have loads of spray paint….because I love to change the color of things. See my previous posts and you will find I used a lot of spray paint this summer. This project doesn’t take much paint so its a great way to use up leftovers.
After allowing it to dry put it all together. Admire your handy work!
Did I mention that this is super easy to pack up?
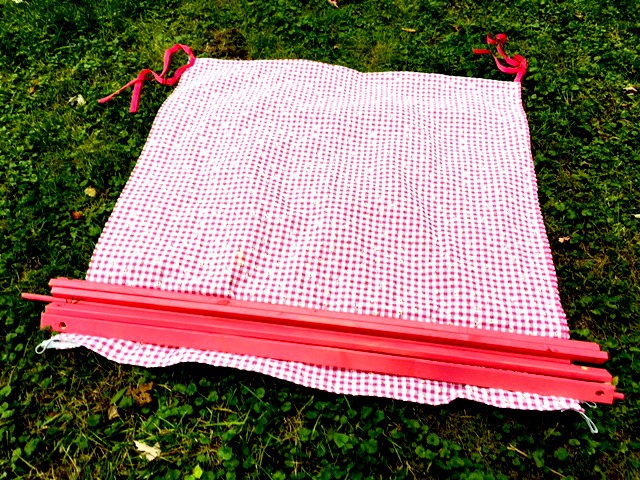
Fold the tent fabric in half. Next, place all the wooden tent parts on the end of the fabric.
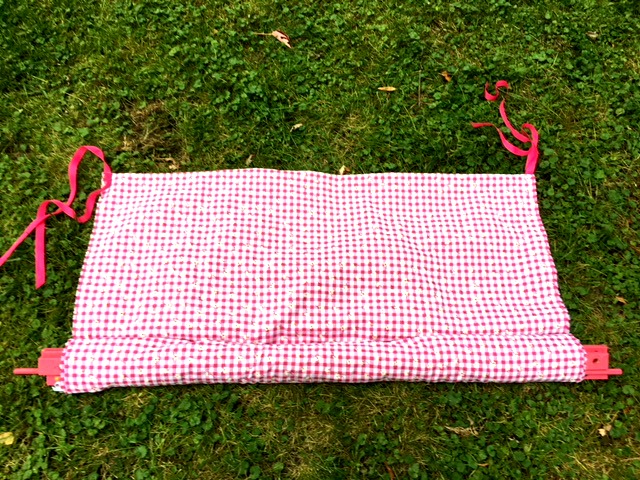
Roll up the fabric into a tube to hold the wood pieces together.
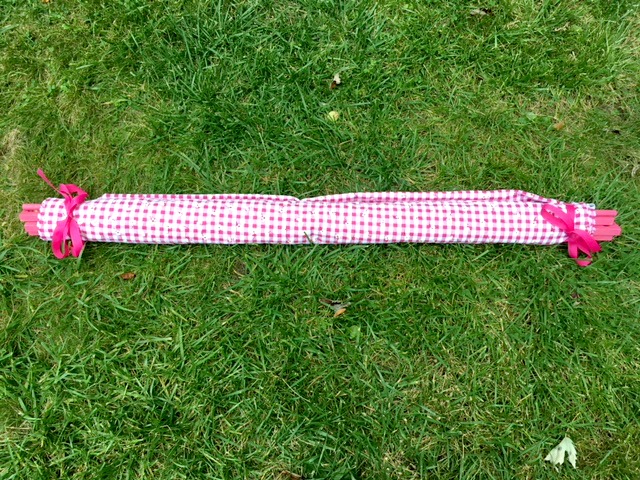
Lastly, tie the ribbons to keep it compact for storing or travelling. Remember when the babies were tiny and you wanted a place for them to nap that was in the shade at the park or beach? This would have solved the problem!
This was so easy to make. I can’t believe I didn’t do it when my kids were smaller.
Please pin or post this to facebook and share this easy DIY with your friends!
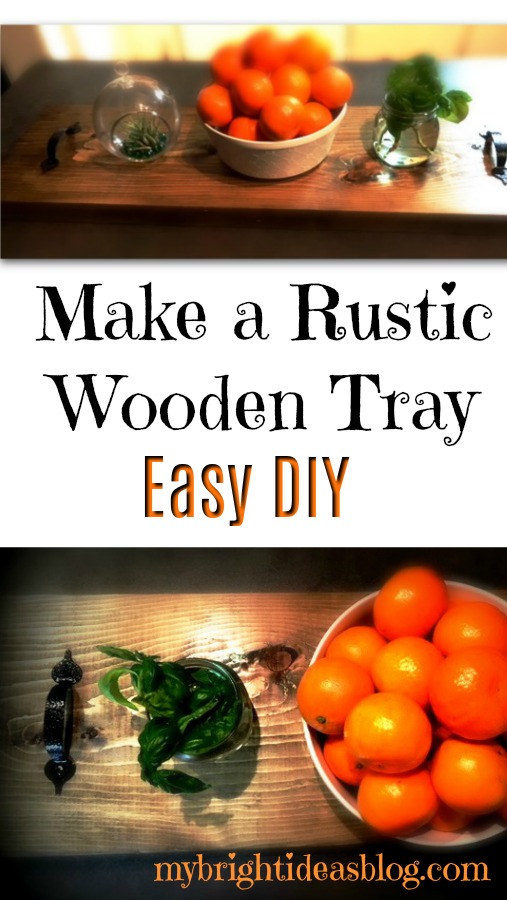
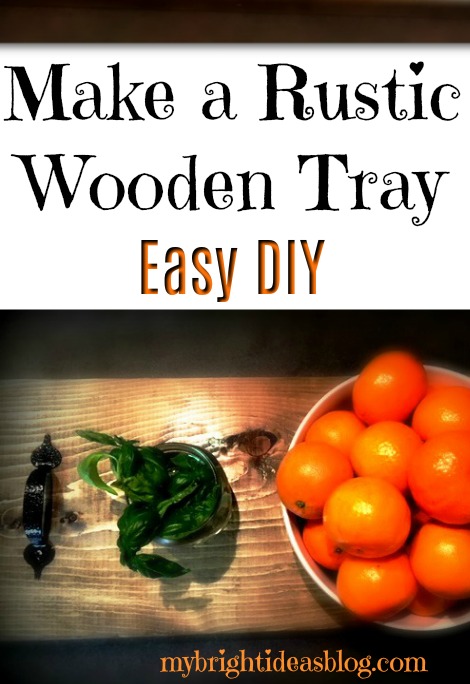
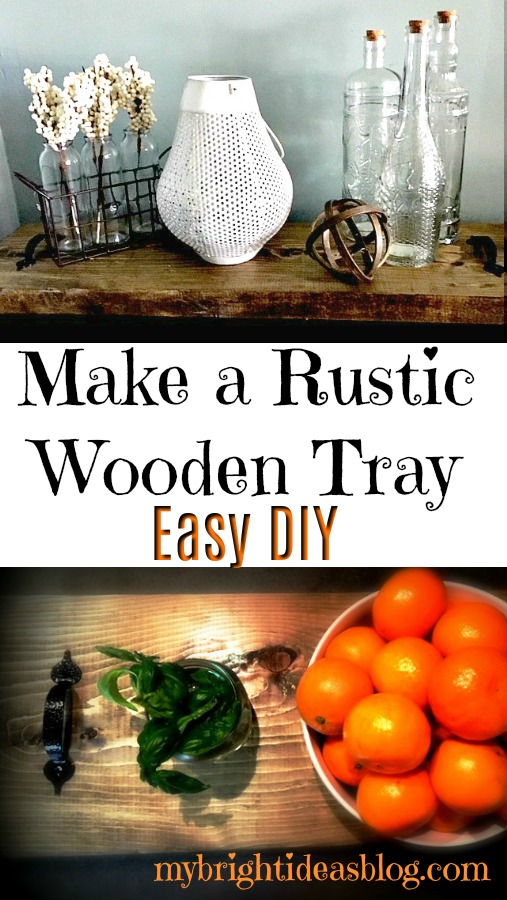
Make a Dark Stained Rustic Wood Tray – Easy DIY!
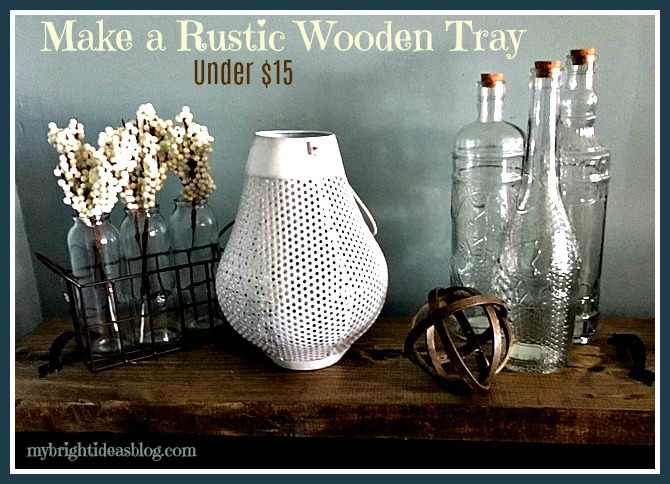
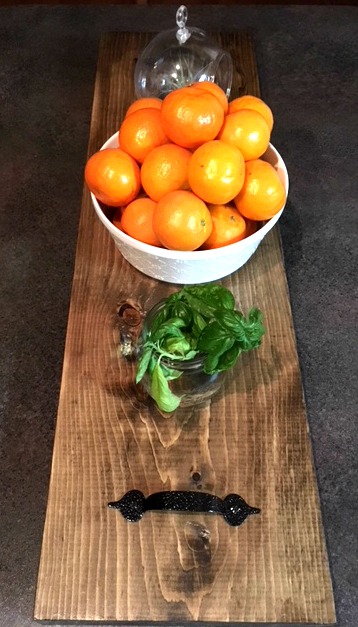
Shortly after making this rustic wood tray I had it placed out on the table with my bowl of clementines and we had company over. My friend Tina’s eyes lit up and said that looks like a Charcuterie Board! I had no idea what she was talking about.
Apparently, these boards are French named partly because harcuterie is the French word for smoked, dry-cured or cooked meats. So during a cocktail party or anytime your entertaining you put out a sampler of all sorts of meats on a wooden board. Cheese and crusty bread or crackers, dips and olives could also be intermingled on your board.
They can be the size of a large wooden cutting board.
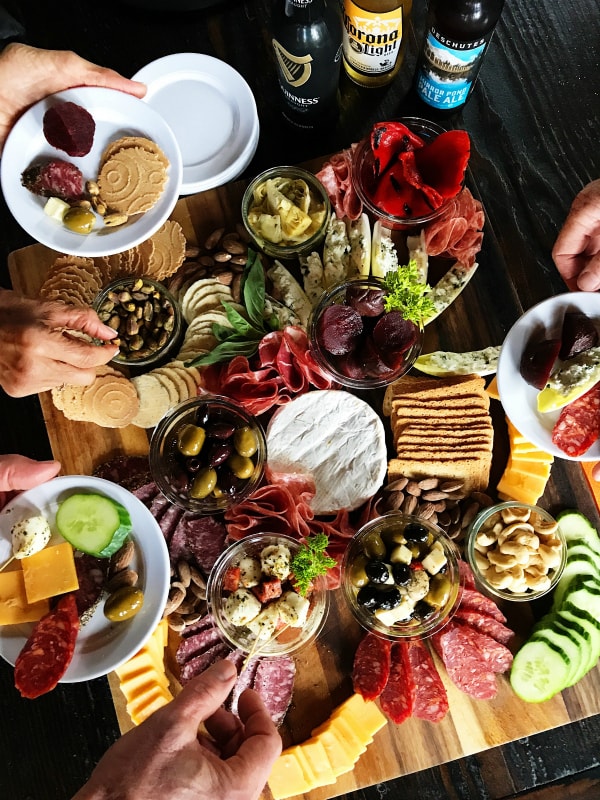
reluctantentertainer.com
Or as big as the table top!
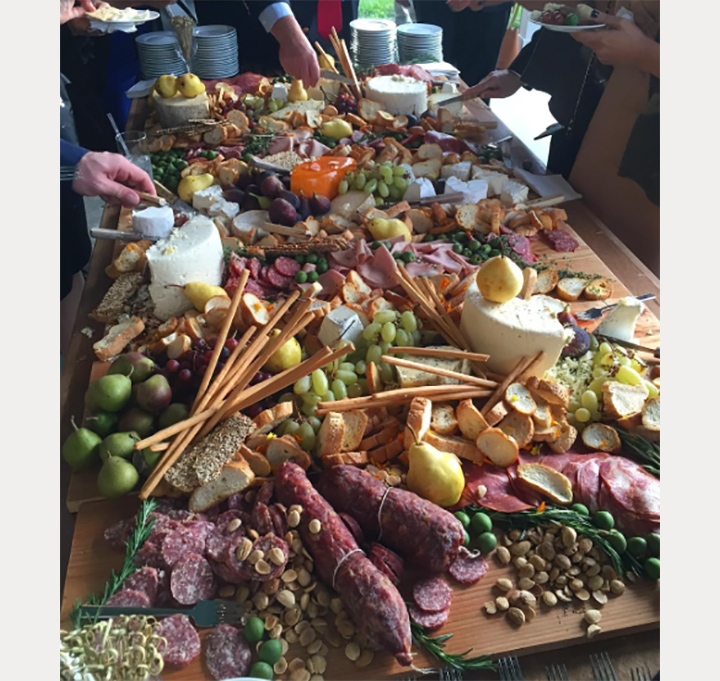
moncheribridals.com
The above photo is wedding spread!
Now this is not a blog about entertaining and making beautiful food. I’m a crafter and DIY-er so I’m going to be telling you about how I made my ridiculously easy to make serving tray.
You will need:
- 1 board 2x10x8 (this is long enough to make 3!)
- 2 handles ($3 each)
- sand paper
- stain
- rag
- clear varnish or polyurethane
- paint brush
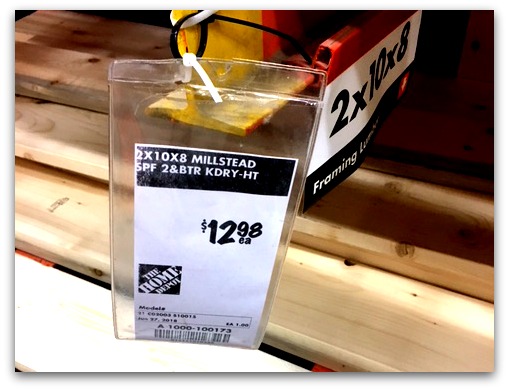 The board above is 2x10x8 cut into three pieces-so you can 2 away as gifts-That makes the lumber approximately $4.50 per tray!!!! That is amazing. When you look at these in the stores and online they can cost $50 to 100.
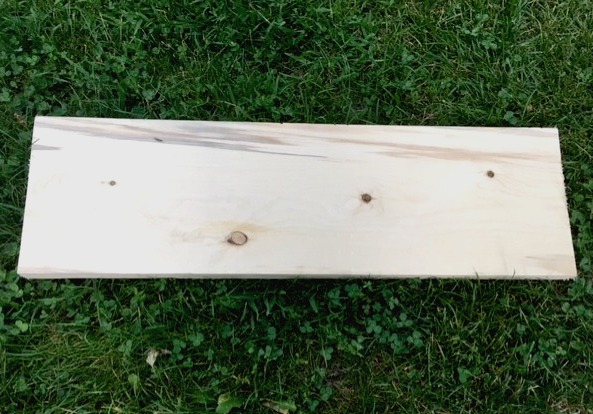
Cut the board into the lengths you prefer. The one I show in the photo was 31 inches long, the second one I made was 30 and the last one was 35 inches. I would recommend that you measure the side table you are going to put this on. Are you planning to make this to be a centre piece in the middle of the dining room table? Then 35 inches is great! But, if its a dresser that is 30 inches wide you don’t want to make it wider than 30 inches.
If you prefer your wood smooth, then you could sand it. If you like it very rustic then you could bang it up a bit with some random tools. I skip the sanding step usually unless there are frayed slivers on the ends of the boards.
With your stain and rag apply the color to your wood.
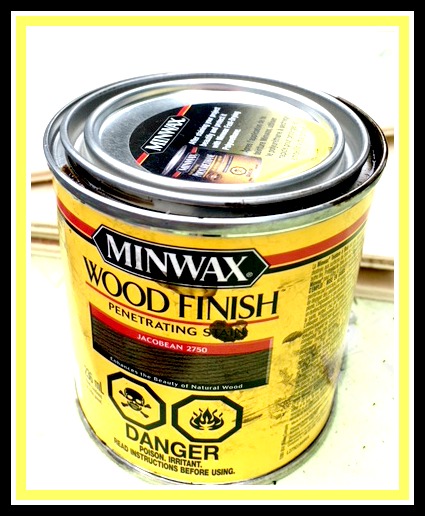
I used my favourite Miniwax color Jacobean 2750. I made the other pieces of board other colors (grey and ebony) but my favorite is always Jacobean.
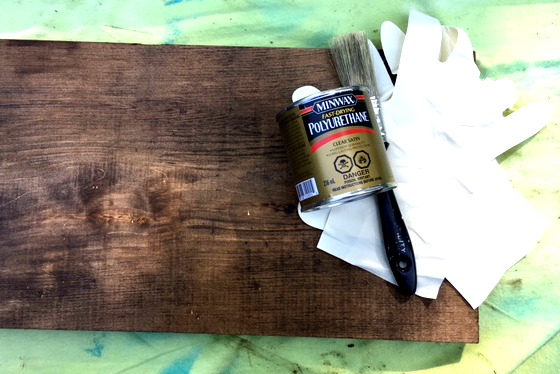
Since I don’t plan to put any food directly on my tray I used my usual clear coat over the wood to protect from wear and tear. This means I could even leave it outside in a rain storm and it would be fine.
If you do want to place food right on top of the tray there are many food safe options. They are not as durable (don’t leave it outside in a rain storm). Food safe options: Pure tung oil, raw linseed oil, mineral oil, walnut oil, beeswax, carnauba wax, shellac. One website suggested a mixture of mineral oil and beeswax. Here is the recipe…. https://www.finewoodworking.com/2006/08/01/food-safe-finishes
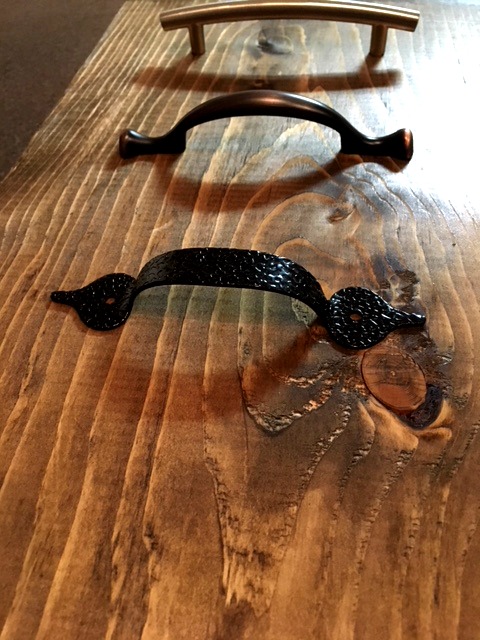
I picked up 3 of the cheapest handles the hardware store had. Each is $3-5 dollars making the cost of the project $11-15 each-assuming you already have the stain and varnish in your DIY stash of essentials. If you find some handles in the craft or specialty shops or even vintage handles by all means use them. They will be on top of the tray so it could be quite the conversation piece.
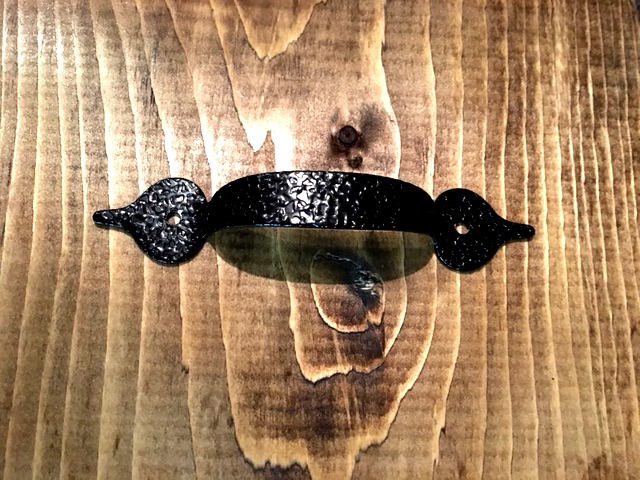
I chose this one because it screws in from the top. This is actually a good point. If you put on handles with screws that go in on the bottom you may need to counter sink the screw so they don’t scratch your table top. Or you could put 2 slim pieces of wood under the wood to lift it.
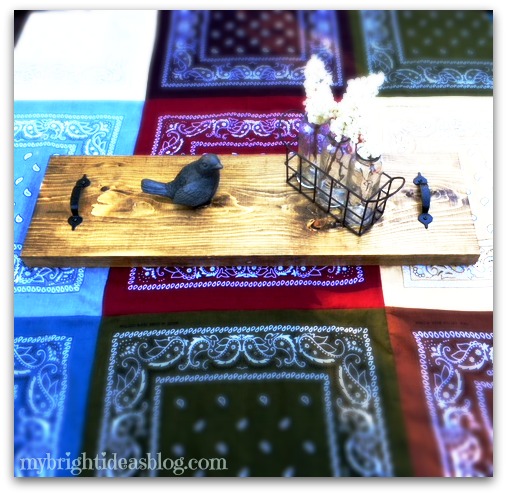
If like me, you chose handles that screw in from the top this isn’t a problem. Put the handles on the board and see where you would like them to be permanently. I put mine 3 inches from the ends (this board is 30 inches long).
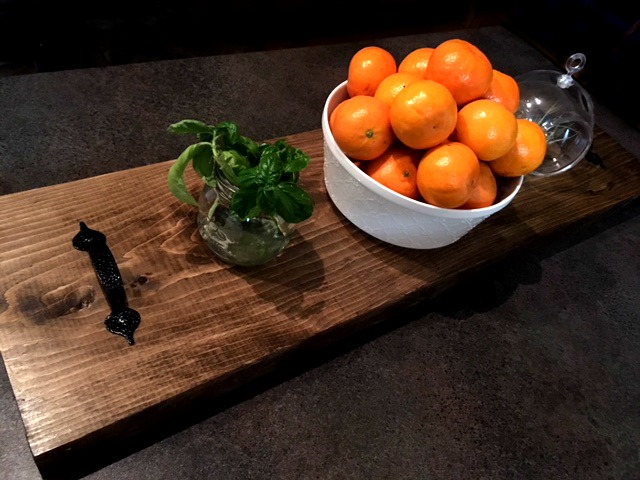
Voila it was that easy…its a simple board with handles.
This would look great on a side table with a few nicknacks between uses. If you do want to use this to lay out meat and cheese, olives and antipasto you could put down paper doilies, little bowls and plates or wrap the board with cling wrap. I would do this even if you use a food safe finish for faster clean up.
If you find this too long or the wood too thick cut the boards shorter to suit you and your space.
This goes to show that if you see something so awesomely simple, see if you can make it yourself for a fraction of the price.
I hope you give it a try!
…..
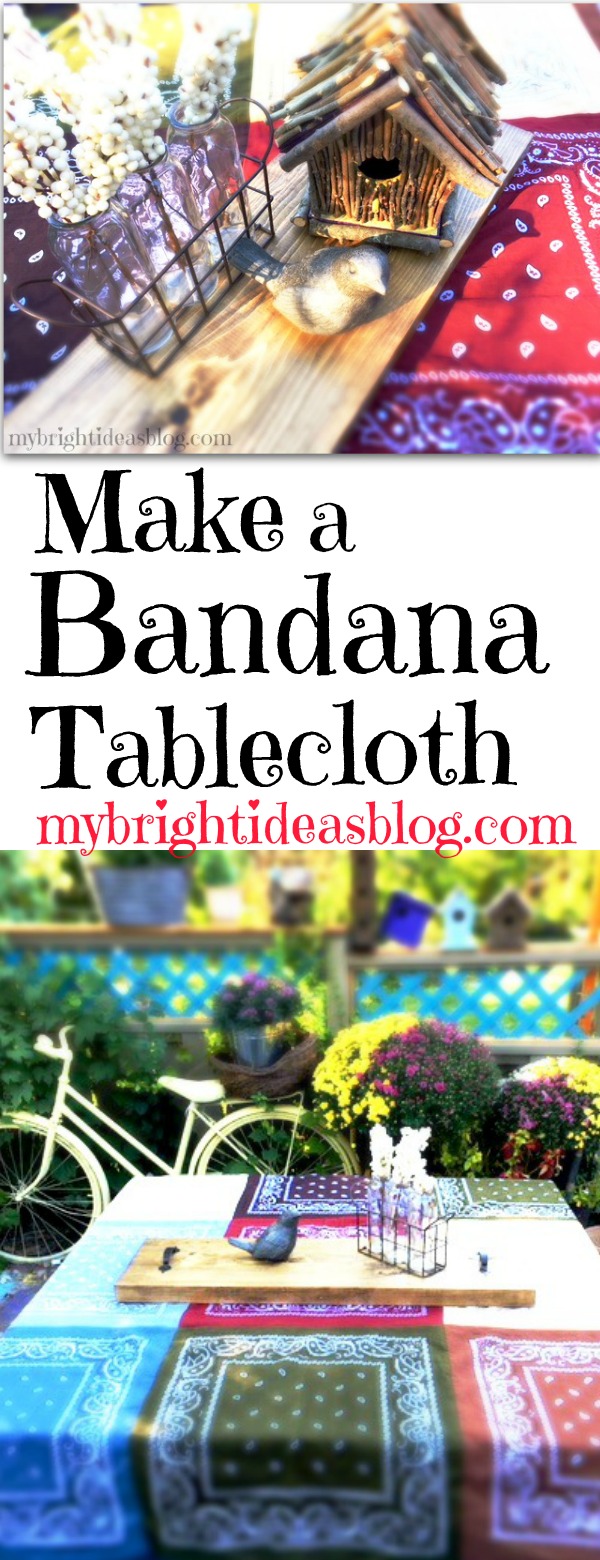
Make a Fall Table Cloth – From Bandanas
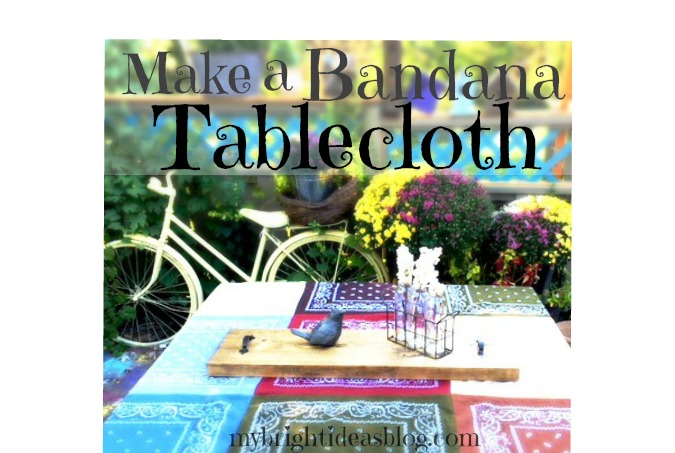
Signs of fall are everywhere. The flowers are scraggly and need to be pulled. Its all very sad to see the colour disappear. So my solution is to buy some bright mums and sew a bandana table cloth for the picnic table (or kitchen table).
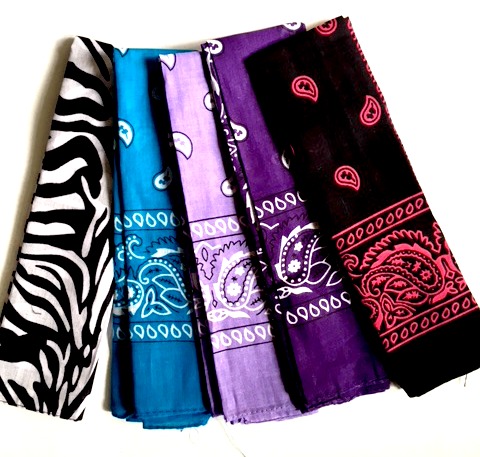
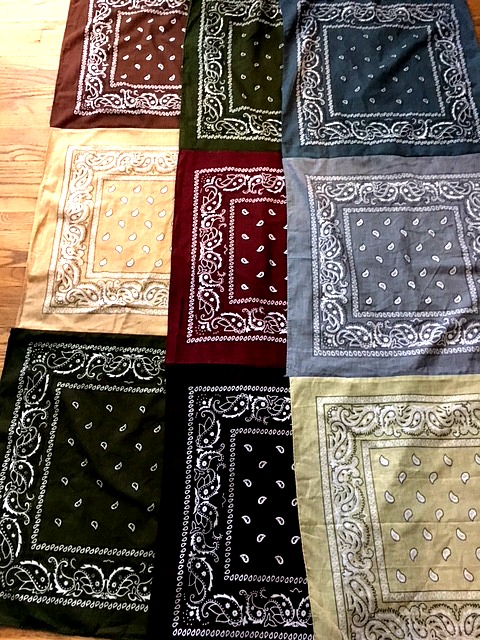
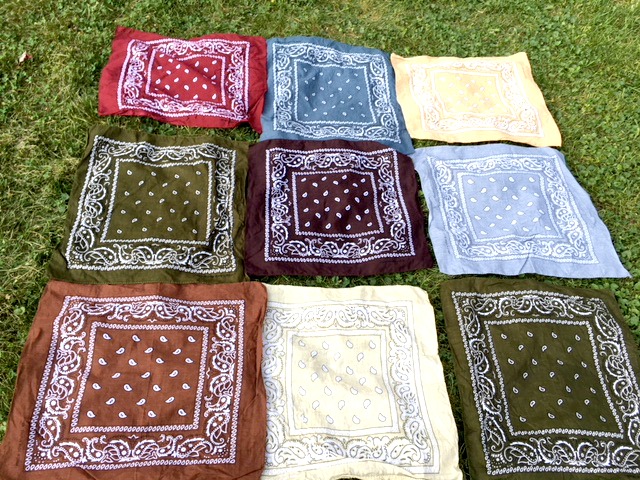 I was able to find an amazing collection of bandanas at “a Buck or Two”-its a sort of dollar store where things can cost several dollars. You can also buy bandanas (or search for hankerchief or handkerchief) online. I bought way too many so there will be several more projects to come!
I wanted an autumn theme so I chose greens, beiges, maroon, blue and brown. It might be a good idea to lay out the squares and take a photo if you want a specific layout. As you stack them up they can get a bit shuffled.
 They come folded and they are cotton so they really should be washed and dried before sewing to prevent shrinkage and bleeding colours.
You will need:
- 9 bandanas
- sewing machine
- pins
- scissors
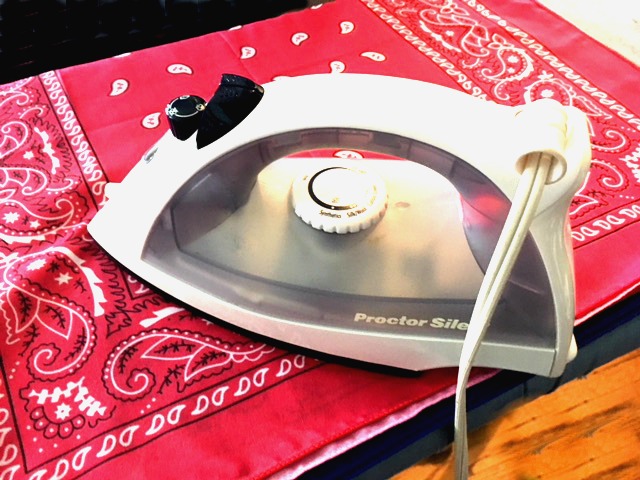
Get out the iron! Iron all the bandanas. Or find a kid who likes to iron….tee hee….
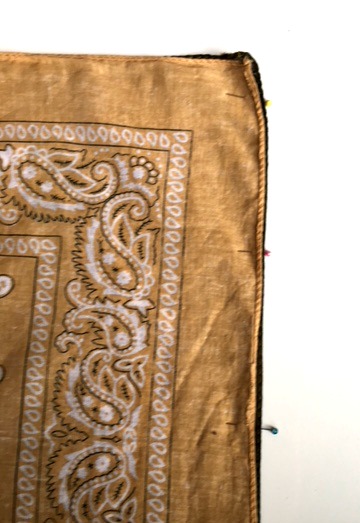
Start by pinning the first two bandanas, right sides together. Bandanas seem to have a slightly longer side. Mine were 20×21. Make sure they are all facing the same direction so are the same width. They are often not sewn straight or square. Fortunately, this project is very forgiving.
Hey who ironed this beige one!? Slacker!
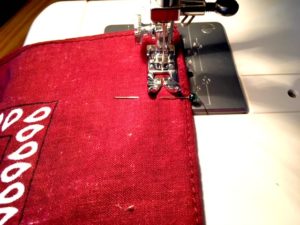
Sew along the edge.
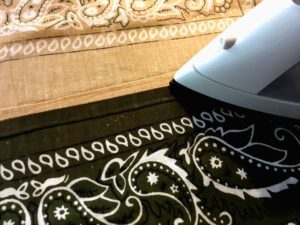 Iron the seems flat.
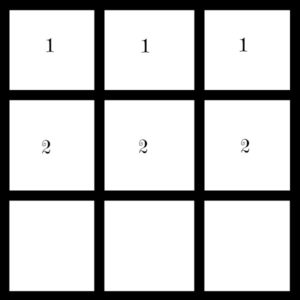 I started by pinning the top sets of 2. (1/2)
 Next, I sewed the 3rd square onto the bottom of the pair (2/3).
 As you can see, now I have three strips of three bandanas.
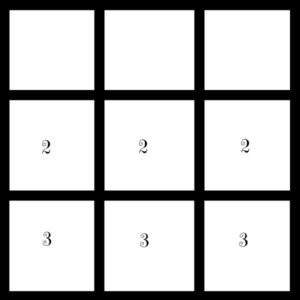
Start by pinning the left line to the middle line. Match the centre seem/corners. Sew the strips together.
 Finally, line up the middle corners of the last line of squares to pin it to the last line of squares. Sew them in place to complete the tablecloth. Finish by ironing it.
Now your done! If you are detailed oriented you could fold over the edge of the tablecloth and sew a hem. But as you can tell I’m not that sort of gal and the bandanas are all finished so there is no edges to fray. If your squares didn’t line up hemming it could correct a jagged edge. Happily mine matched up this time!
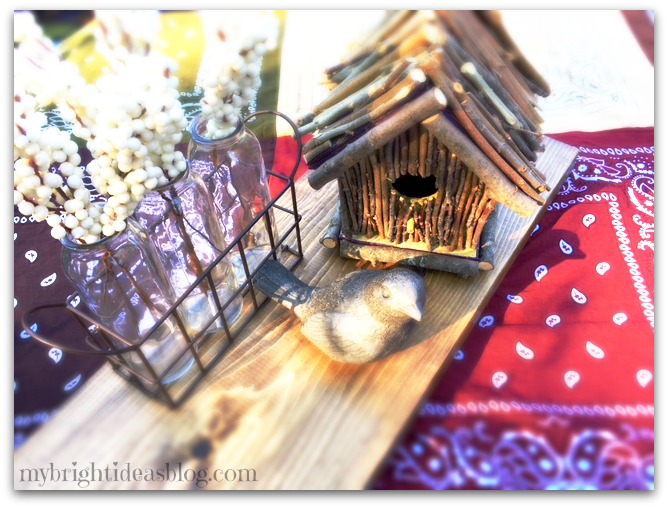 Isn’t this little bird adorable. I got it at Canadian Tire! Never overlook your local hardware store’s garden centre. You never know what you’ll find.
 Thank you for reading to the end! Please pin this on Pinterest and follow me on your favorite social media!
Below are a few more of my projects you might want to look at.
…


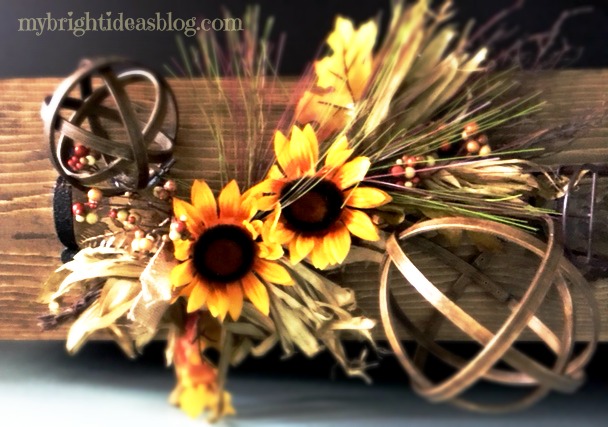
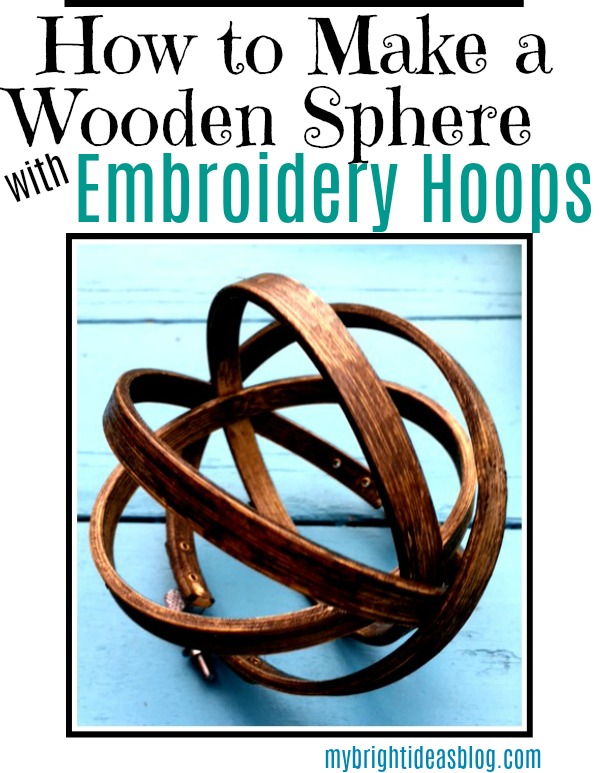
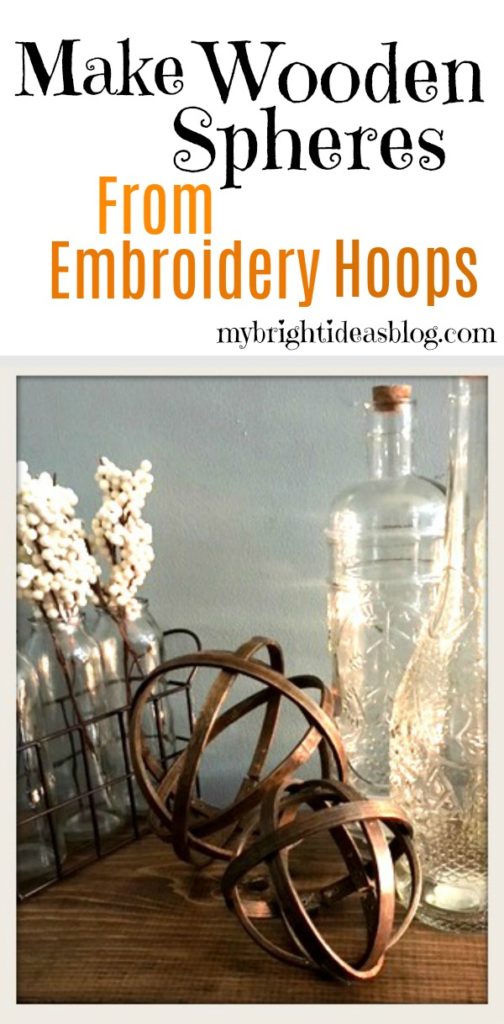
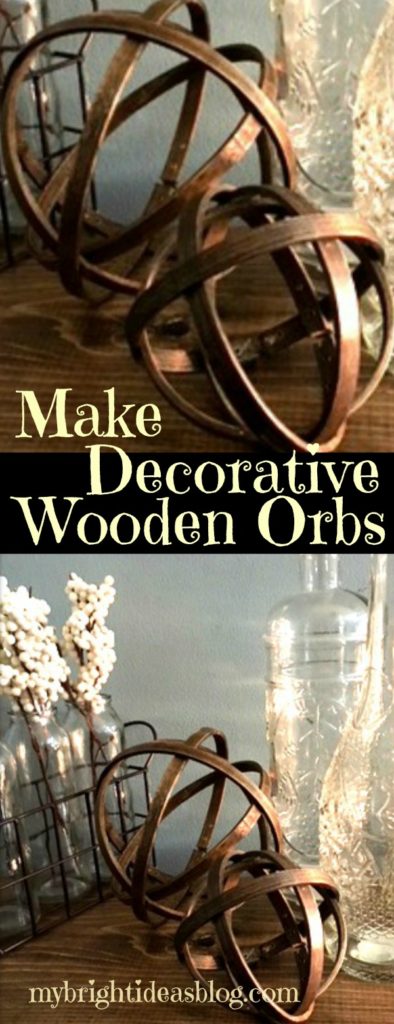
How to Make a Decorative Sphere – From Embroidery Hoops
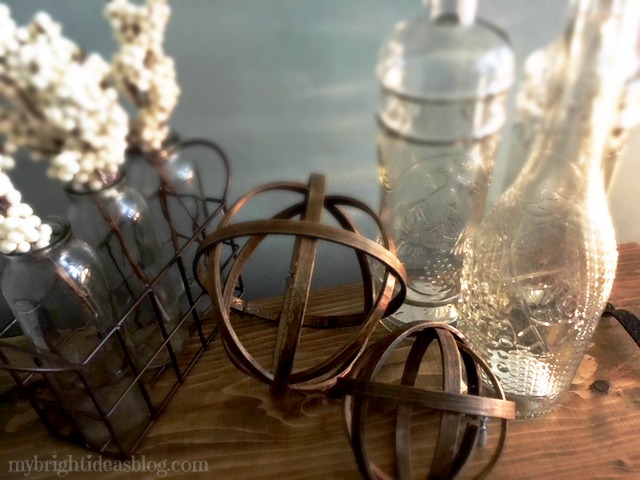
I’ve been wanting to make decorative spheres for a few months. After much pinning and pondering I’ve decided to go for it!
This has to be the easiest way and most clever idea for doing just that! All you need is 2 embroidery hoops per sphere.
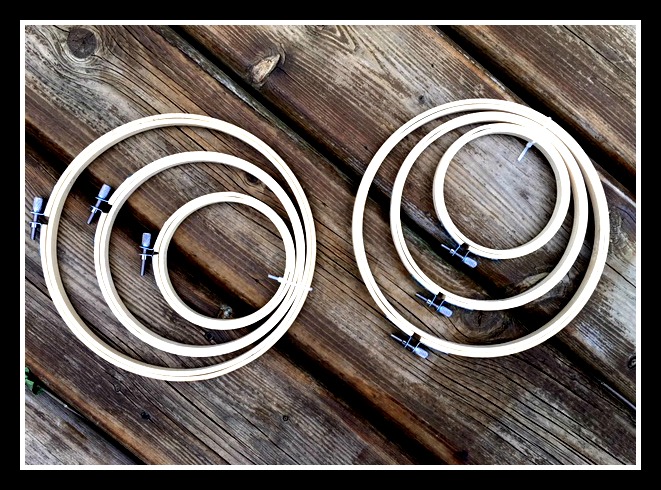
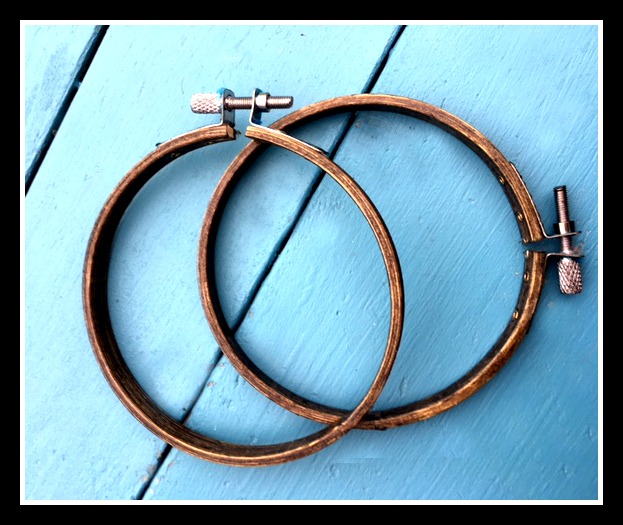
You will need:
- 2 embroidery hoops (the same size) per sphere
- paint or stain
- paint brush or rag
- (optional) varnish or polyeurothene
That’s it! If you use spray paint you can get that list even shorter.
You can buy embroidery hoops at the craft store, Walmart maybe even the dollar store. They vary in price depending on size. Expect to pay around $2.50 each-purchase 2. I wanted to make three sizes so when I saw Michaels had 3 packs for 5.98. I thought that is a better value. When you buy these wooden hoops they will come with one smooth hoop inside of another one with tightening clamp screw.
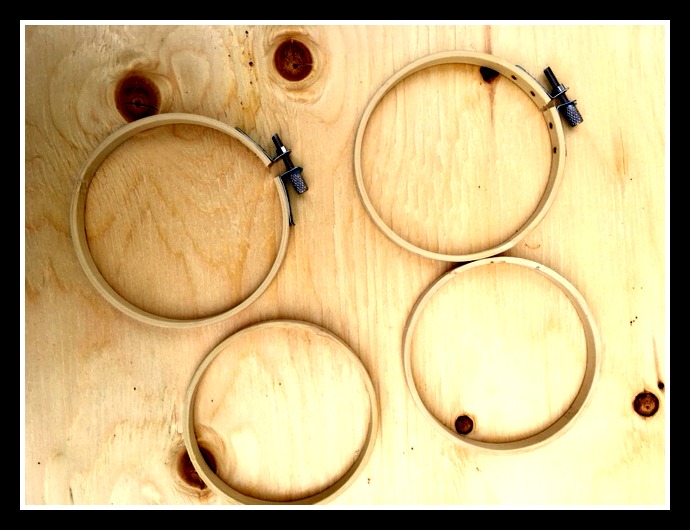
The first step is to get 2 embroidery hoops the same size and take them apart so there is 4 hoops.
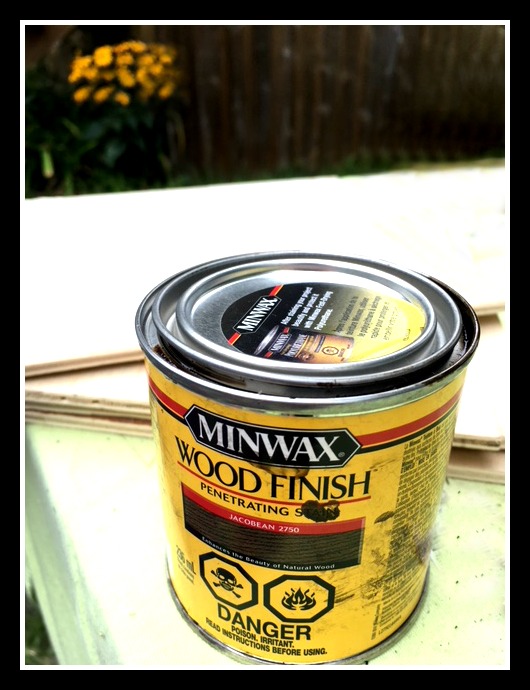
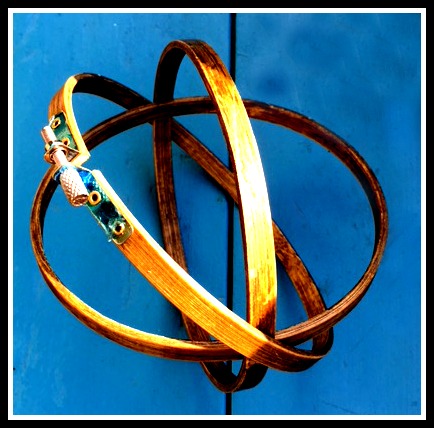
Next I got a cloth rag and my favorite stain. Miniwax Jacobean #2750. If you can’t get this kind you can get a similar effect with a Dark Walnut….It would look great if it was spray painted black or white too….Whatever matches your décor.
Dip the rag in the pot of stain and rub it on the wooden hoop.
Allow the stain to dry. Adding a clear coat of varnish is optional. It would give a bit of a sheen and make it more durable if you put it outside. I have seen some posts where folks put these on their porch in a planter. In the great outdoors, I imagine they will age quickly and only last a few seasons of sun and rain. Putting a clear coat will help it to last longer.
I plan to make something similar out of wire for outdoors and I’ll let you know if its a success.
Now lets put it all together!
Gather your 4 hoops and get ready to be impressed!
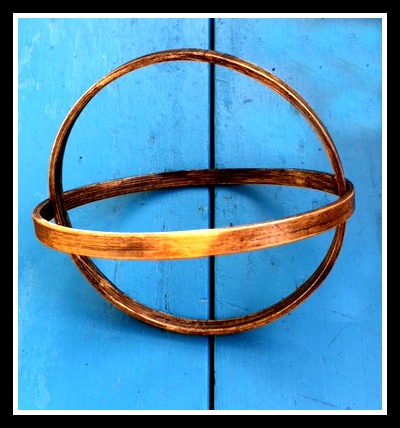
Insert one of the smooth hoops into the other smooth hoop.
Next, slide a third hoop with the screw tightener over top of the other 2 hoops. Tighten the screw a few twists.
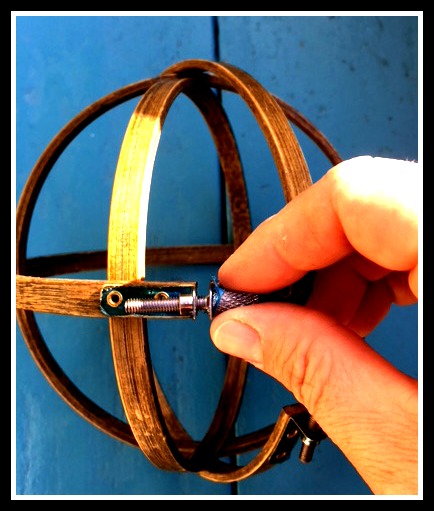
Lastly, put the 4th hoop with the tightener on the outside of all of the other hoops but this one place crosswise.
I prefer to put both of the tighteners close together so that when its on display they will both be on the bottom. It might show a little but it helps the sphere to not roll away.
Here it is on display.
Thanks for stopping by to check out this post. I have a lot more rustic wood projects drying on my workbench. Subscribe to my email list so you don’t miss out when they are ready share!

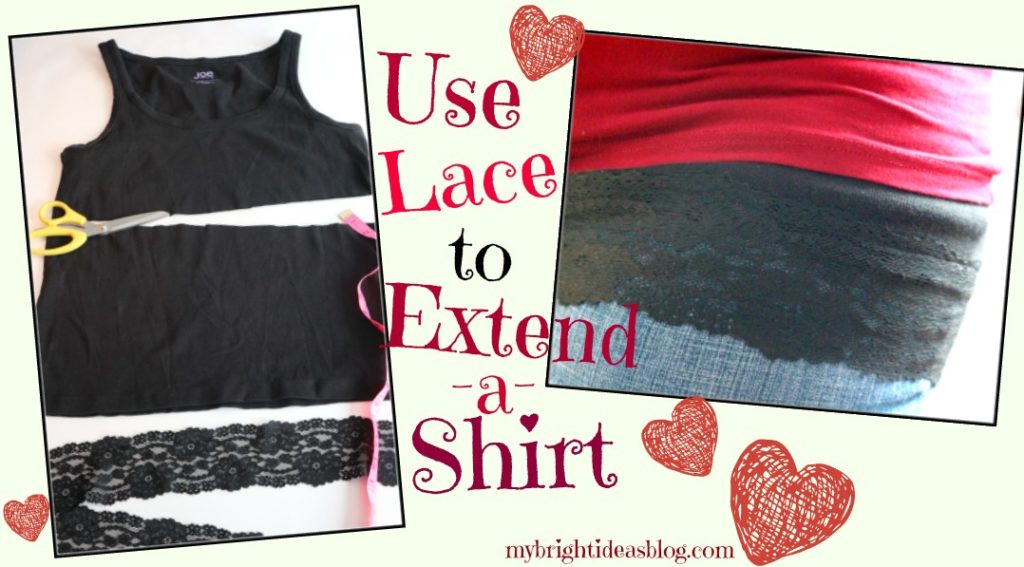
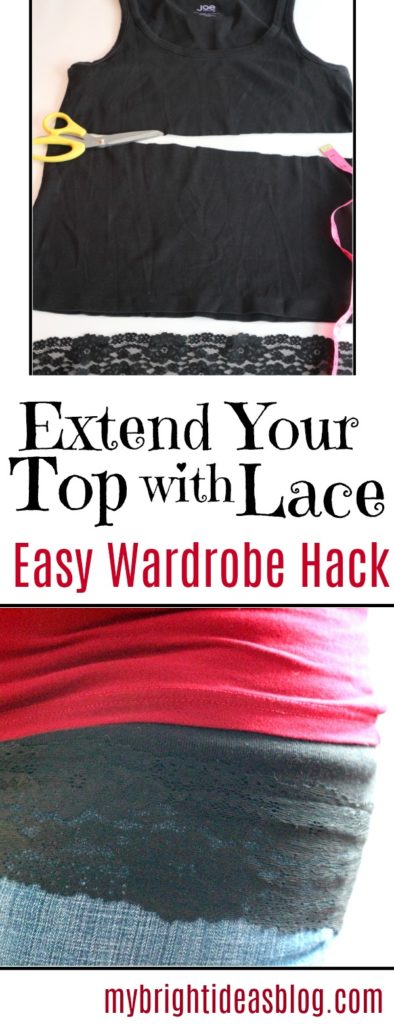
Extend a Short Shirt with Lace-Great Wardrobe Hack!
Add inches to the length of your short tops with a lace extender. This is worn around your waist with an elastic waistline and looks like you’re layering tops. This post will show you how to make a shirt-extender from an old shirt and a bit of stretchy lace and elastic.
This is a really easy project and a great item to have in your wardrobe.
When I was pregnant they called it a belly band. A tube of fabric that went under your shirt so your tummy didn’t hang out under a shirt that was getting shorter by the day.
At https://www.motherhood.com/ its called a “tummy sleeve” or “belly band”.
It occurred to me then that EVERYONE could you use a shirt extender. Sometimes your shirt can shrink leaving you with something you aren’t comfortable wearing anymore. Or maybe you like leggings or something to break up a plain shirt. So here is a tutorial about making a t-shirt extension out of an old top.
You will need:
- An old shirt
- Co-ordinating wide stretchy lace (3 inch wide)
- Elastic (1/2 inch or 1 cm wide)
- Safety Pin
- Pins
- Scissors
- Measuring tape
- Sewing machine
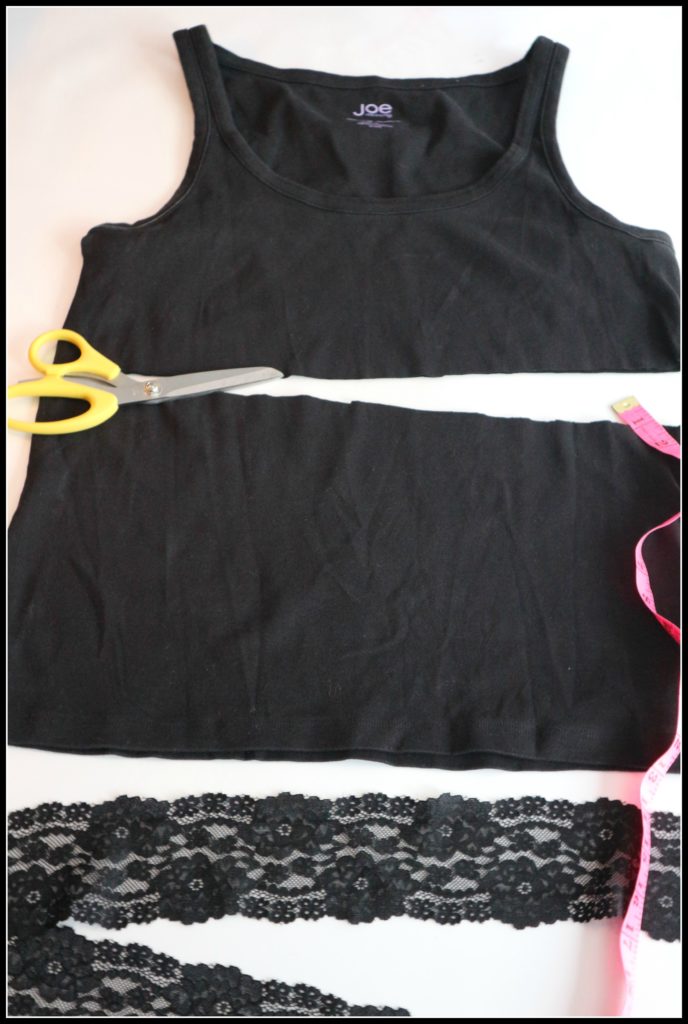
I had a tight fitting cotton tank top that had shrunken and was ready to be re-purposed.
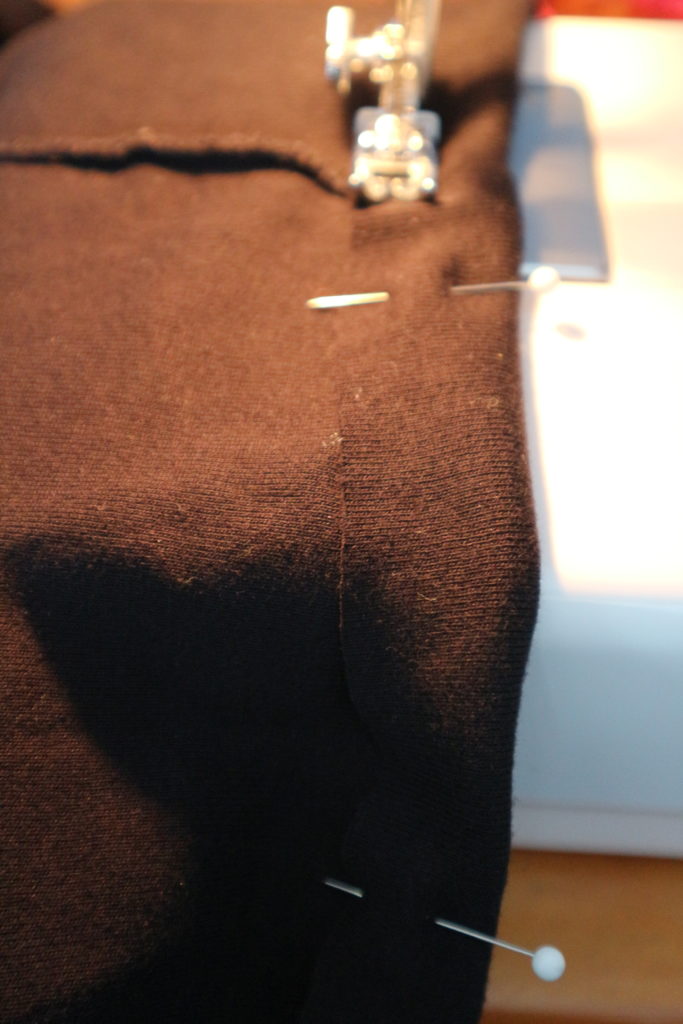
Decide on the length that you would like the top extender to be by measuring your waist to hip with a tape measure. Add on an inch for the casing-plus the lace could add a few inches.
Measure the length and cut off the bottom of your old top. I cut mine 11 inches or 28 cms from the bottom hem. Leave the hem as it is. You can just sew the lace right on top of it.
The length of the lace piece should be a 1/4 inch longer than the width of the shirt hem.
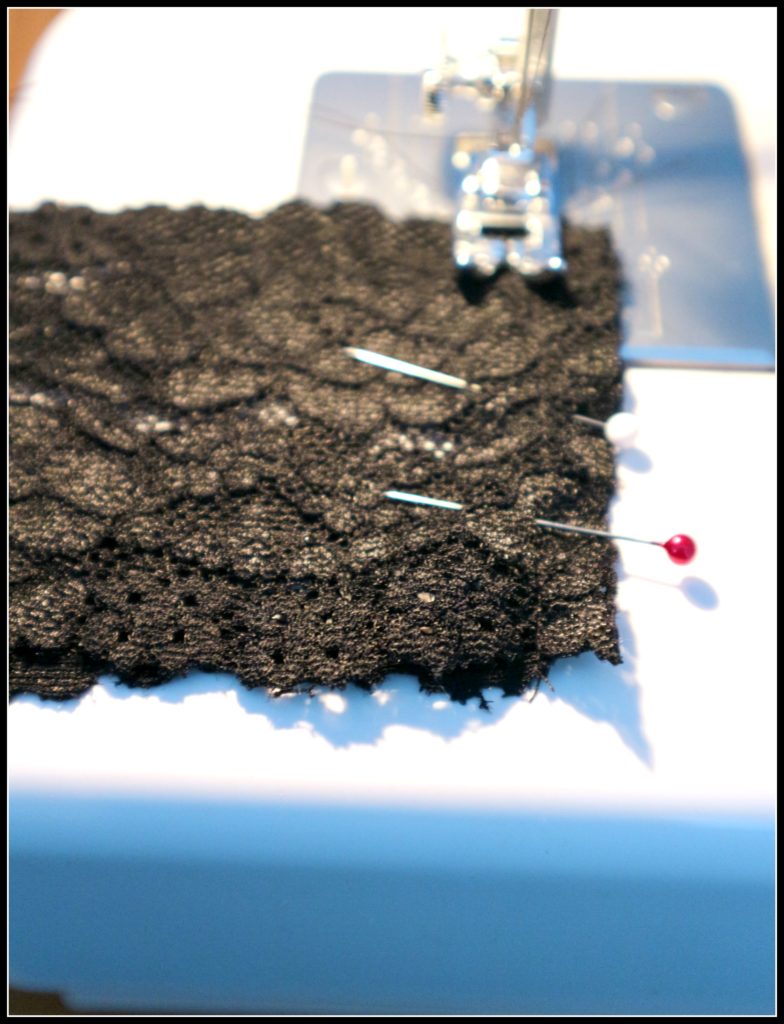
Pin the ends of the lace together and sew the end closed.
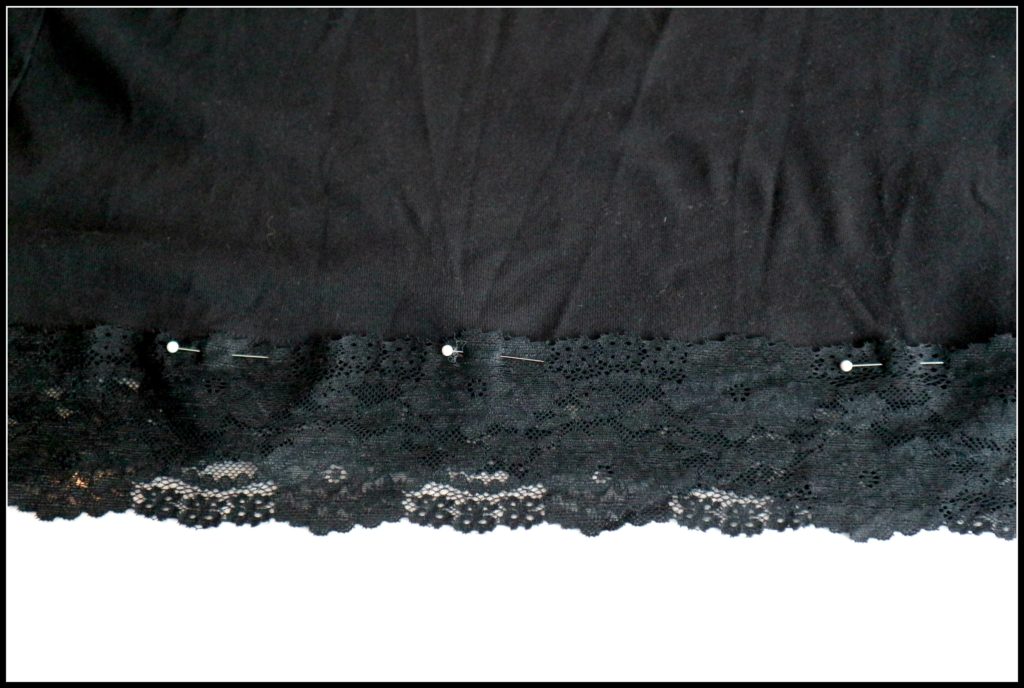
Pin the lace to the bottom of the cut shirt. Be sure that the seam you sewed to join the lace-lines up with the side seem of the top. I decided to sew my lace on top of the t-shirt material. But that was just my preference.

Attach the lace to the bottom edge by sewing all the way around it.
Then we will go up to the top part of the waist band.
At the top of the fabric, fold over the edge 3/4 of an inch. Pin the edge all the way around to form the elastic casing. Sew in place leaving a 1-2 inch gap.
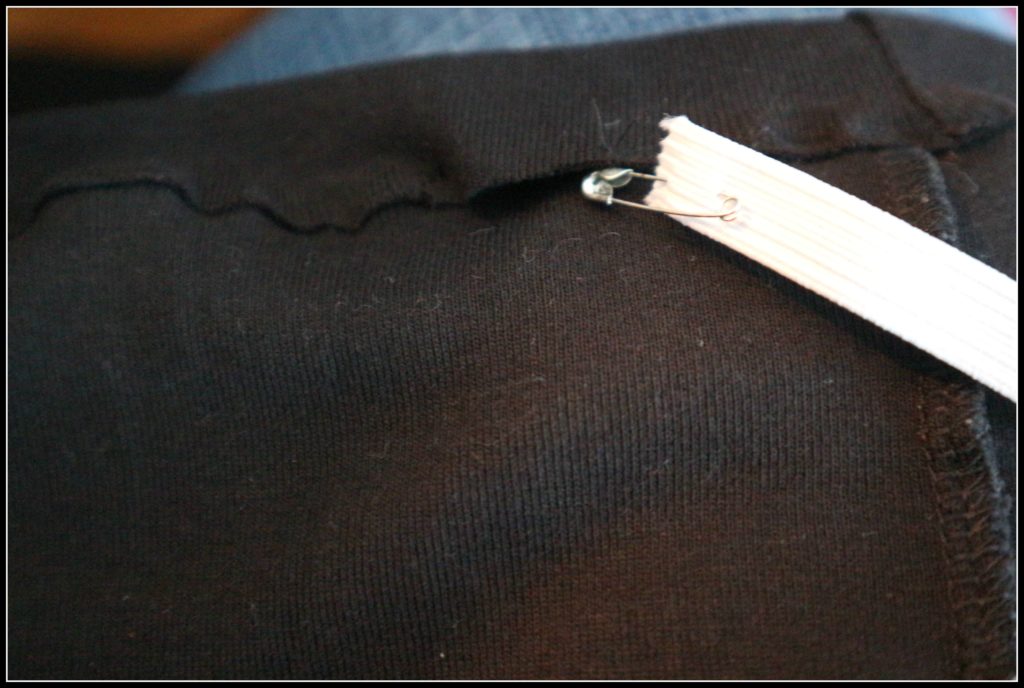
Place a safety pin on the end of your elastic and push it through one side of the 1 inch opening in the casing. Guide the elastic around the casing until you reach the other end of the casing hole. Pin the two ends of the elastic together.
Try on the shirt extender and see how the elastic feels on your tummy. Is it too tight? Or too lose? Or fits just right.
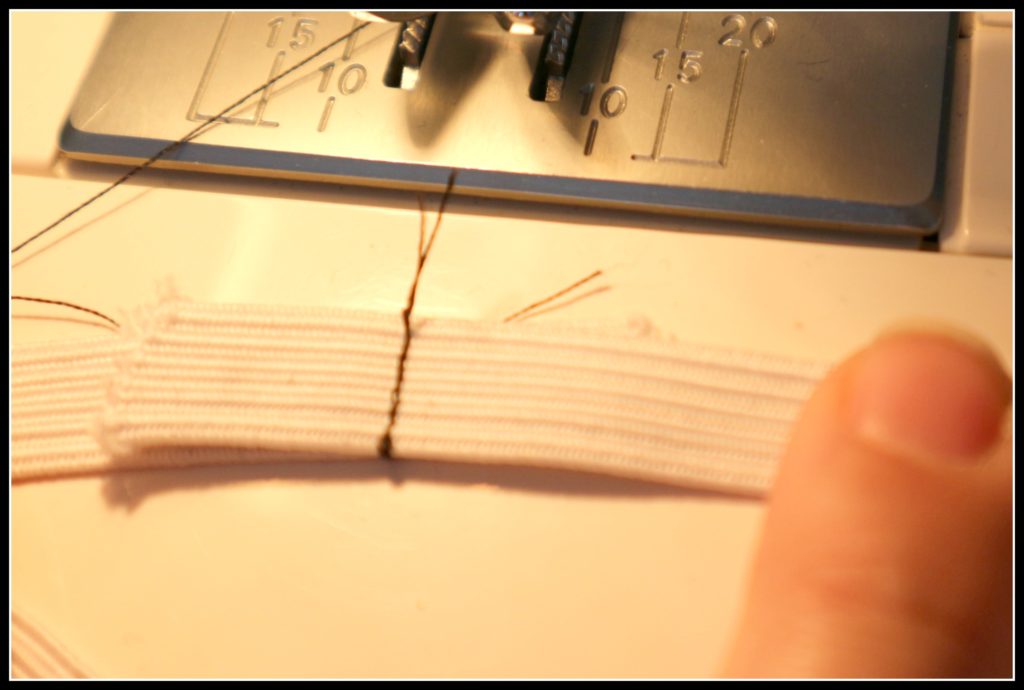
If you are happy with the feel of the elastic, permanently join the ends by sewing them together. I usually go forwards and backwards 2 or 3 times just to be sure.
One final step, finish sewing closed the 1 inch gap in the casing.
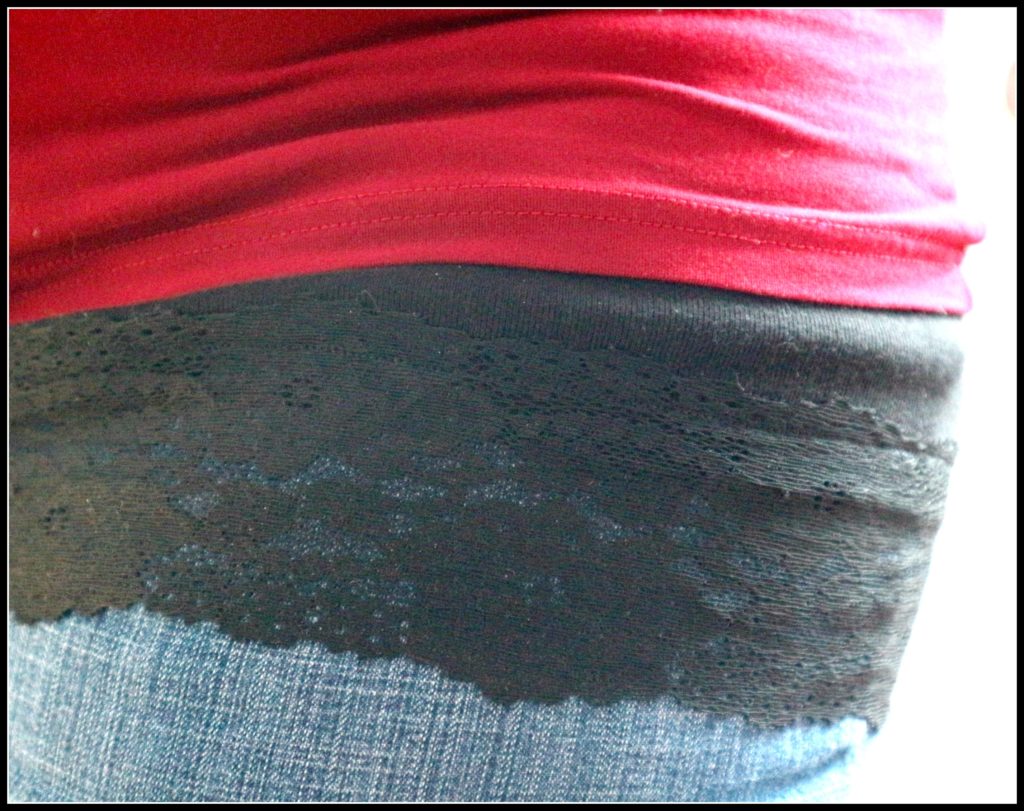
Voila Your Finished! That’s it! What did that take you…. 15 minutes max? Now you can wear it under any shirt for a layered look or just prevent people from seeing your knickers if you have a job that requires some bending over. Oh dear me!
The finished length after adding the lace, casing and elastic almost 12 inches or 30 cms long.
This was a super easy project and a great item to have in your wardrobe. Let me know if you need any further description.
Below is a link to a tutorial for adding lace right onto a favorite shirt that is getting too small. Check it out!
…

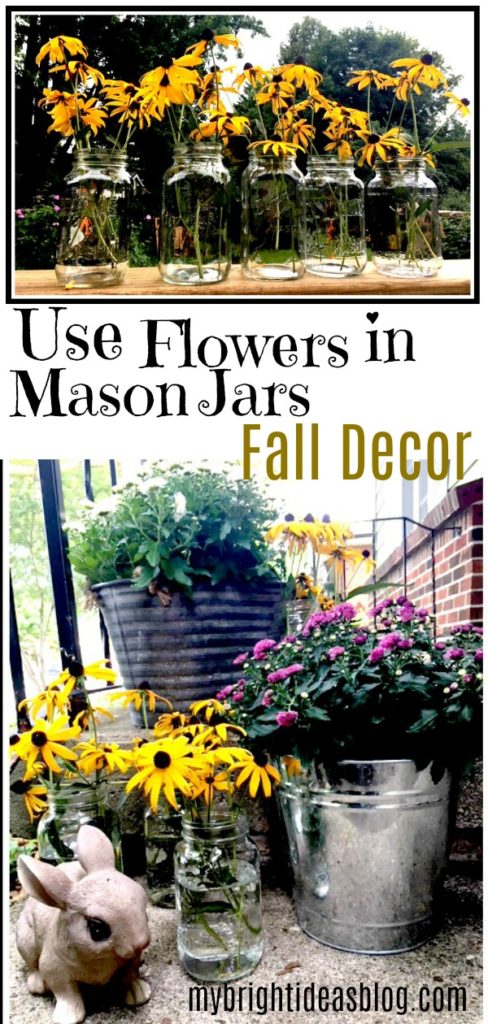
Use Flowers in Mason Jars for Fall Decor
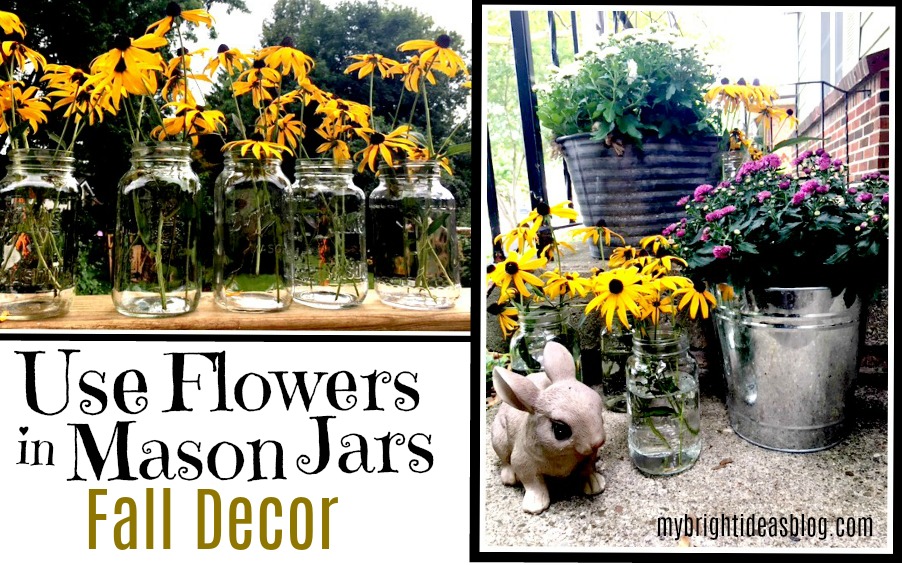
It’s early September and the summer is over. Even if the weather is still hot in your area like it is in mine-the garden is showing that its winding up for this year. Even when everything looks overgrown and scraggly you can count on your Black-eyed Susan’s for their bright cheery flash of yellow.
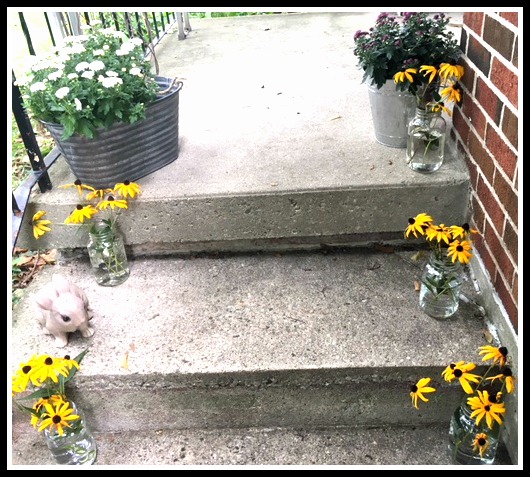
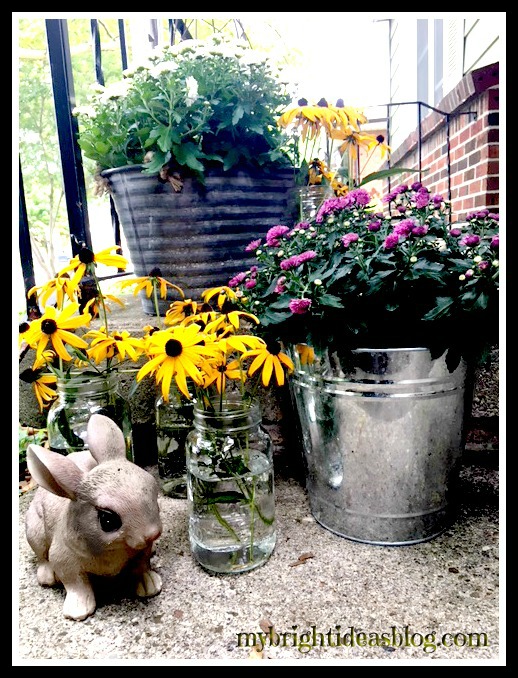
Have you got a porch, deck or entranceway that could use dash of colour? I recommend snipping some Black-eyed Susan’s and grabbing some mason jars. I’ll show you what I mean.
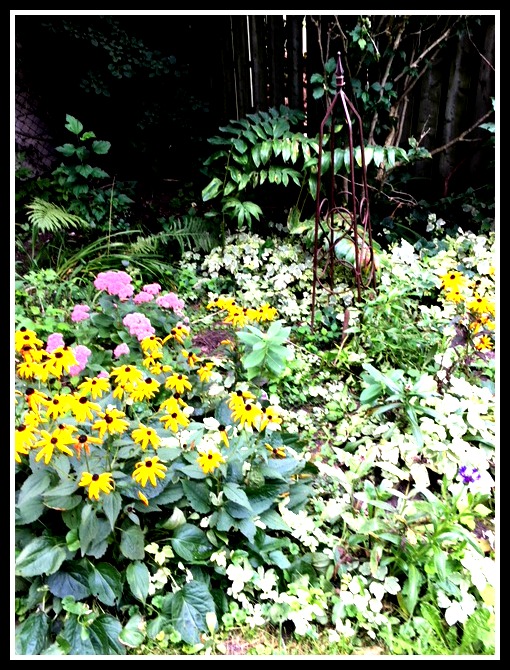
After a week away we came home to the garden that looks like this. It’s supposed to look like an English Garden. Ha ha hahaha! Sorry if you fell off your chair laughing hard while looking at my “English Garden”.
It’s gotten overgrown with weeds and plants choking out other plants. But because of those cheery yellow flowers, I don’t despair with this jungle garden!
I know, I’m a terrible gardener aren’t I? Well there are only so many hours in the day…maybe next year…
You will need:
- Mason Jars (or any other jars -empty jam and pasta sauce jars- you might have)
- Garden Snips
- Flowers
- Water
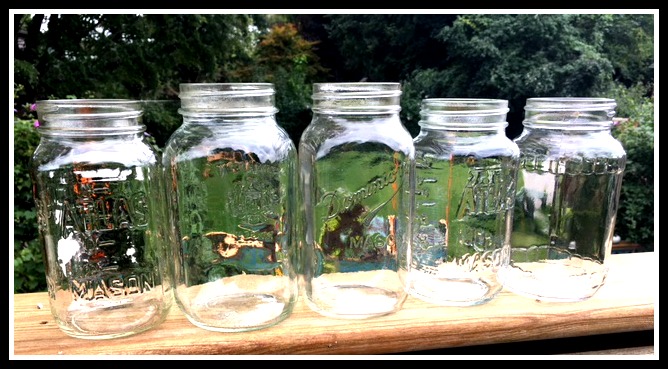
I have had this collection of mason jars for a while in a cupboard….. that I think they belong to my mom. Over time she has shared a lot of pickles and chutneys that she preserved and I have been a naughty daughter and not returned her lovely jars.
So I went to my overgrown garden with some garden snips (sharp scissors will do) and clipped a bit of the Black-eyed Susan’s.
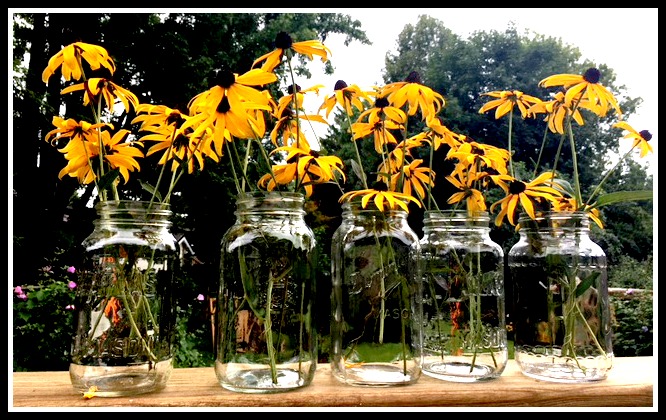
When company is coming this is a nice way for the kids to help roll out the red carpet-or rather the yellow carpet. Get them arranging some jars, add water and add flowers.
These could last for 2 weeks and if the Black-eyed Susan’s are still doing well you could cut more flowers and top these jars up with fresh cuttings.
It’s sad to see the summer close and flowers get scraggly-we need to face it, it’s the end of the season. 🙁
Using mason jars as vases is a great way to keep their cheerfulness and move that colour to other areas-indoors and outdoors.
Here is another Autumn Project!
Here are more Mason Jar Projects!
How to make an Autumn Wreath from Branches!
The other day, I was having a visit with my neighbour Tanya, and I looked at her door with a wreath that was way over due for a change. I think it she put it up in April….now its September…She mentioned that she should go shopping for an autumn wreath. I said Whoah! Don’t buy anything. Leave it with your buddy ol’ pal to make one.
I didn’t want to make it a typical round wreath but what could I do to make it different…but in-expensive….mmmm.
Meanwhile….my garden looks like a jungle. We have had lots of rain and sun and this means everything had big gnarly growth spurts.
When we purchased the house we were surprised that we had 25 Rose of Sharon bushes around the backyard. That is a lot of purple Rose of Sharons. They are pretty when they are in bloom and get quite full adding to privacy along the chain link fence. However, they do attract bees and the pods open and drop seeds and grow more and more and more.
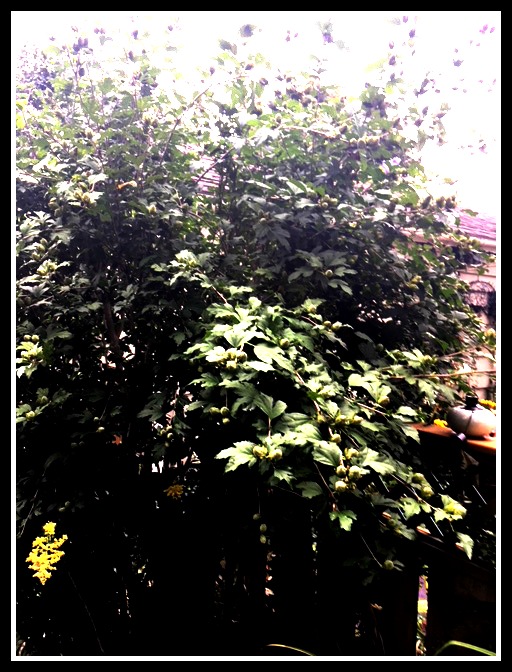
There is a lot of trimming to do….and did I mention there is 25 of these shrubs? Momma Mia that’s a lot of trimming to do this week.
I was thinking about the promised wreath I wanted to make for Tanya. But I was looking at the trimming to do…wreath….trimming….and then it hit me!! Use the branches from the shrubs to make Tanya’s autumn wreath!
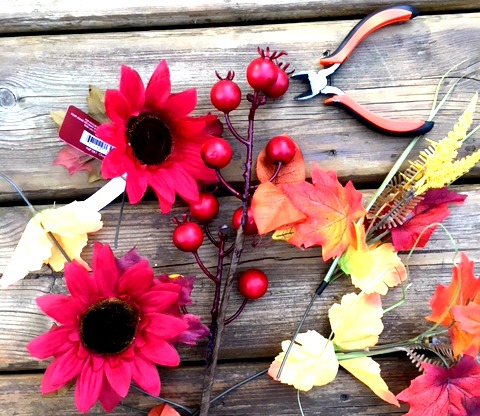
Supplies I used:
- Shrubs or Trees branches
- Garden Snips
- Twine or Rope
- Wire Cutters
- Autumn Flowers
- Glue Gun (I didn’t need it but I had it handy)

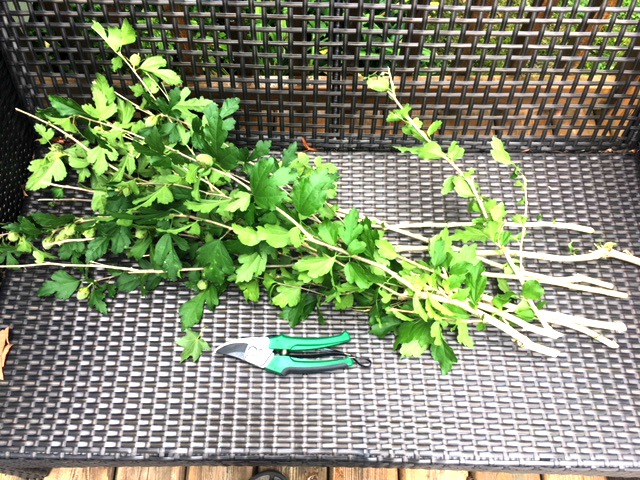
I pulled off the little branches and the leaves on 9 longish branches.

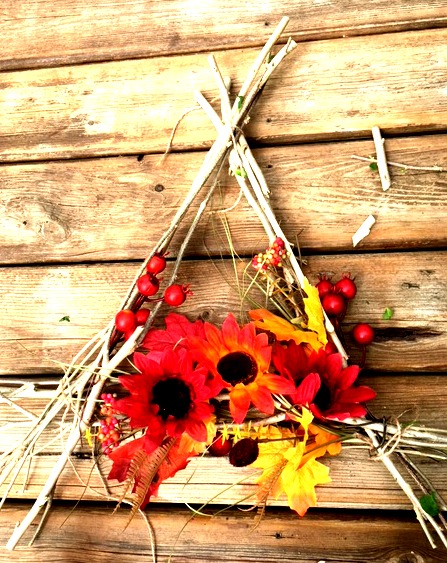
I put 3 twigs in a triangle shape and located some twine.
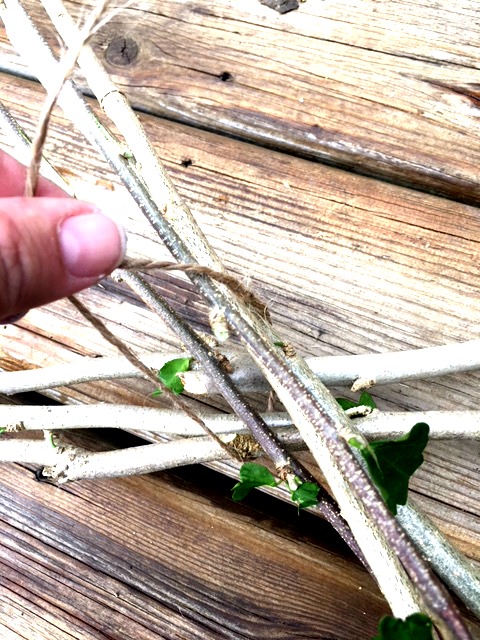
Twine is great for tying your sticks together. I better keep it handy for the rest of the trimming that is still waiting for me.
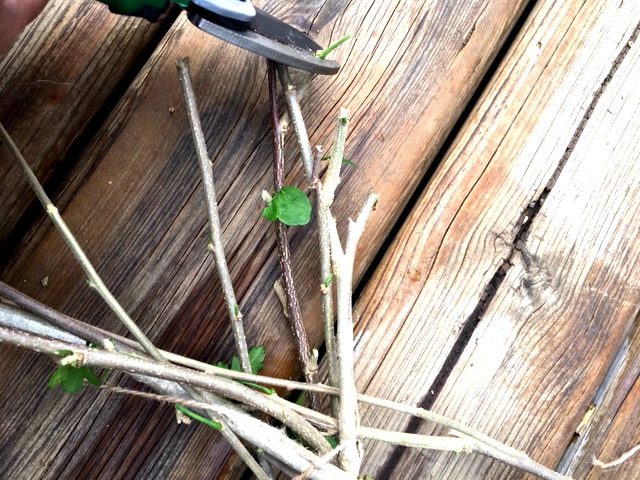
At first, I was going to keep the ends long and staggered but I decided to trim the ends down further.
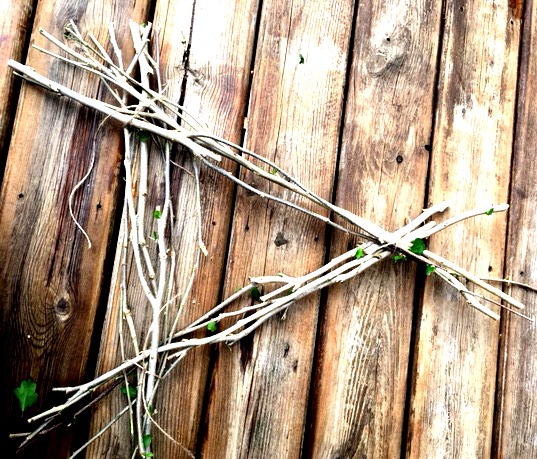
I like the rough ends but we don’t want to poke out Tanya’s family’s eyes!
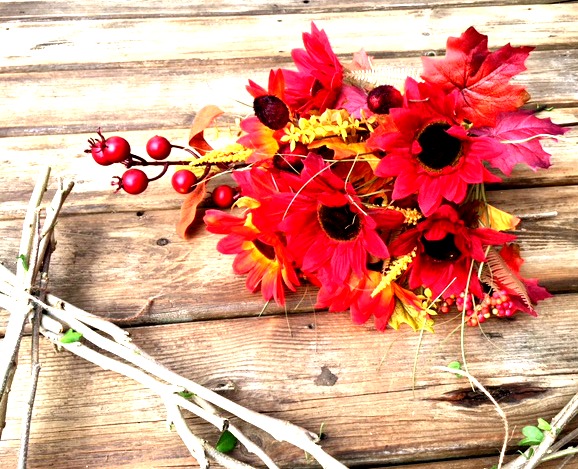
Time to add the flowers. I picked up a few bunches of autumn flowers from the dollar store. I only used a few sprigs from this lovely bouquet. I could easily make a few more of these as gifts (or to put on the craft table at work…of course). I spent about $10 on the flowers and twine so if I made another 3 or 4 that would make them each costing only $3 each. Cha-ching!
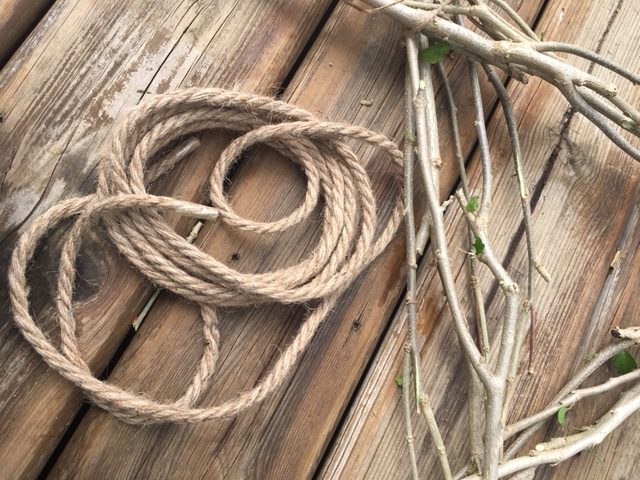
I had some thick twine that I used to reinforce the corners. Ribbon or lace would look cool too. Use what ever scraps you have.
I didn’t need to use a hot glue gun because I wove the ends into the twigs and wrapped the wire of artificial flowers around the twigs. You might want to use a hot glue gun to secure short pieces to the twigs.
Since the sticks make up the base and they are free-from my backyard-this is quite inexpensive. I’ve got enough flowers left to make another 4 of these! Cool…any other neighbours with a bare front door?
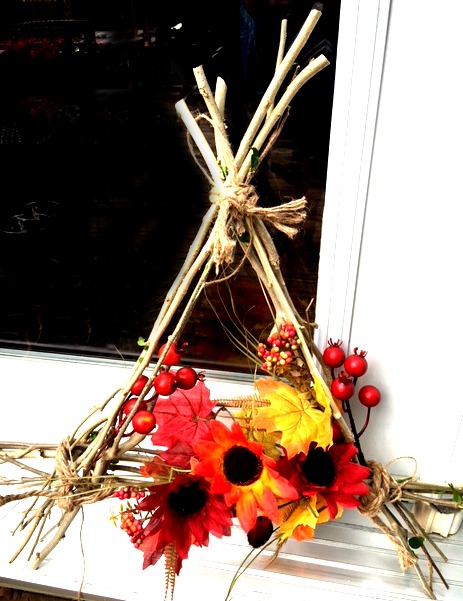
So rustic and woodsy.
Now who is going to clean up the left overs and finish the trimming….sigh…better get back to work.
See you again soon!


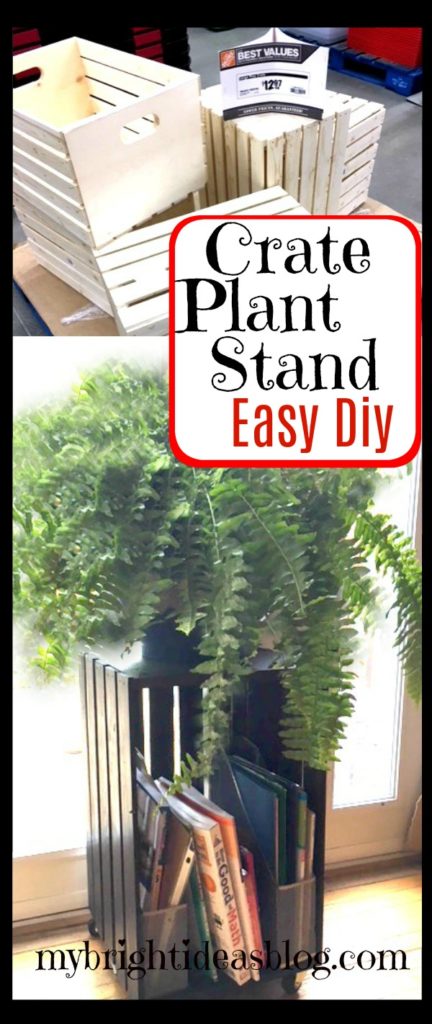
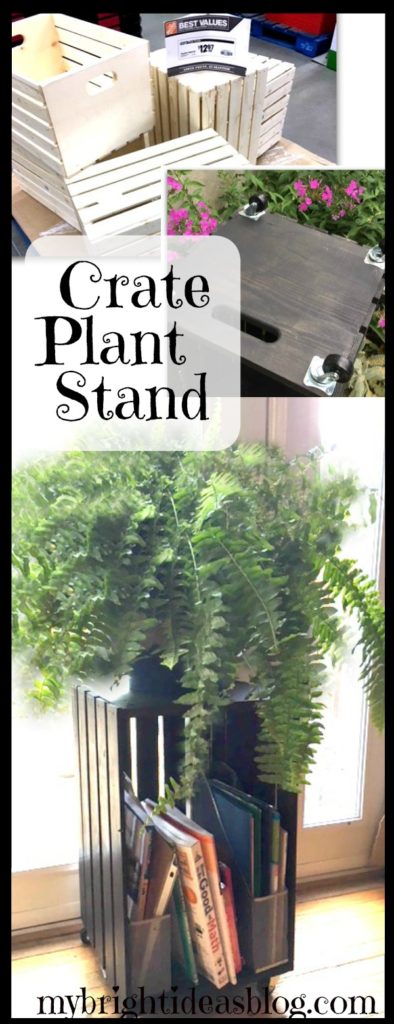
Make a Wood Crate Plant Stand – Super Easy!

Have you seen these bare wood crates around at the craft stores, hardware store and even Walmart? I sure have and I love em!
I had one lying around without a purpose so I decided to make it into a plant stand for my lovely new fern. Simply paint or stain it, tip it on its end and add some wheels and you have got a super easy and cheap end table, night stand for the bedroom or like me a plant stand on wheels.
What you will need:
- large crate
- paint or wood stain
- 4 caster wheels
- screws (description below)
- screw driver or drill
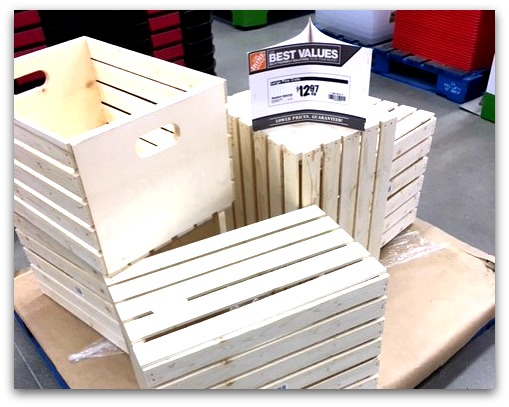 These crates come in more than one size. I used one from Home Depot which was their bigger $12 crate. You could also choose 2 smaller ones, turn them on their sides and attach them.
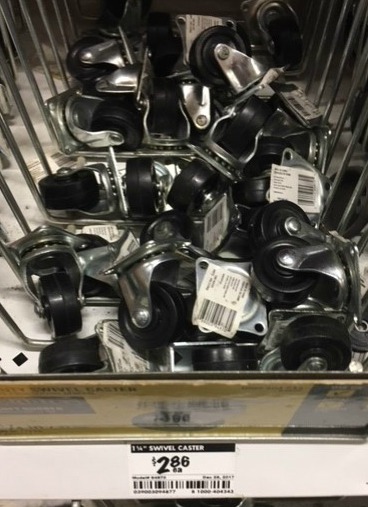
Purchase 4 swivel caster wheels. When you visit this area of your hardware store you may be shocked to see how many different kinds of and sizes there are of caster wheels.
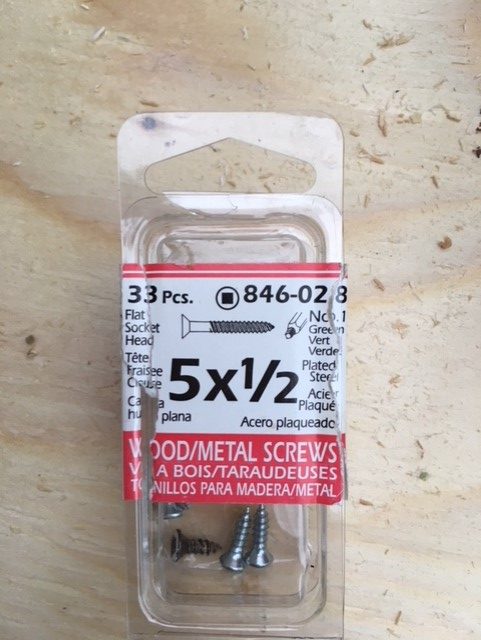
The screws used are really short. If you want to use a longer screw you may need to glue some strips of wood on the inside. You don’t want to use a longer screw and have the end poking through. I used short screws and they are holding just fine.
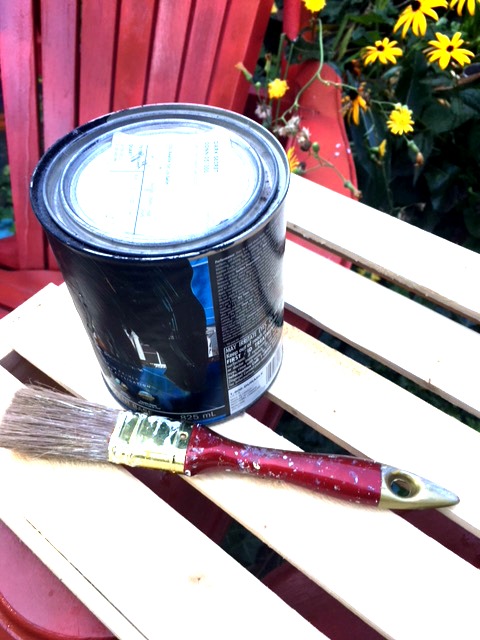
Paint or stain the wooden crate and allow to dry. I just used an acrylic black paint. Check your paint shelf and see what you have to use up. Spray paint would work, craft paint, stain to match other projects in the room…. Just make sure you are thorough because painting all the sides of the slats is a bit of work.
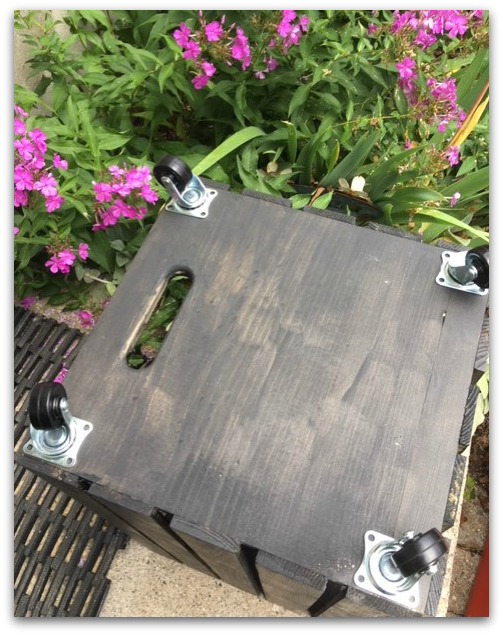 Place the castor wheels on the crate and decide their location.
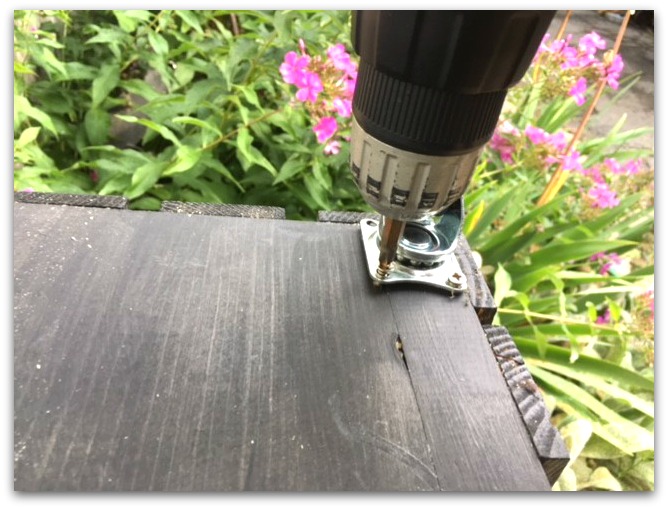
Drill the screws into the wood.
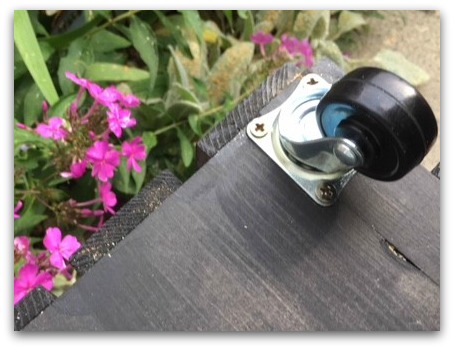
Admire your castor wheels. This is so easy, now I want to add wheels to everything.

Add a fern on top of the crate and some summer math books for the kids below. Voila!
Yesterday was the first day of school for my girls. They were so excited…even my sleepiest kiddo was in the shower before I was out of bed. Way to go B! They worked on their summer homework books really well since June. Hopefully they didn’t forget as much during the 2 month summer break. I bribed them-mind you and put rules on their screen time. Lol. But they did it!
Hopefully you get a chance to make a super easy crate plant stand or side table.
Have a super day!