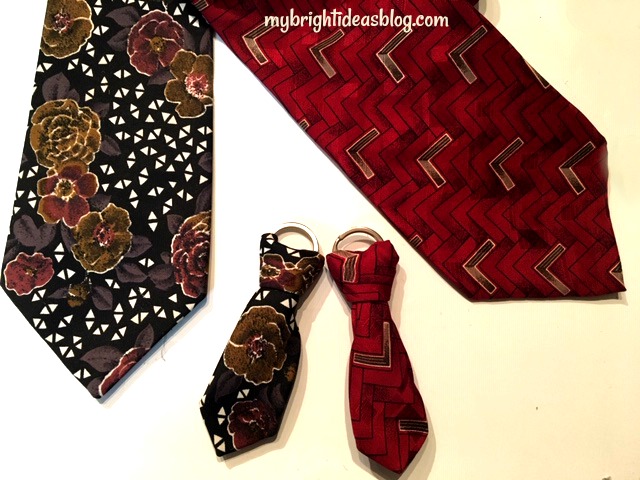
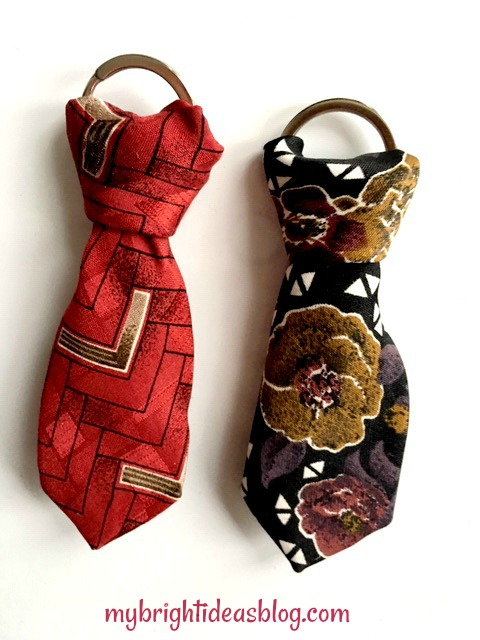
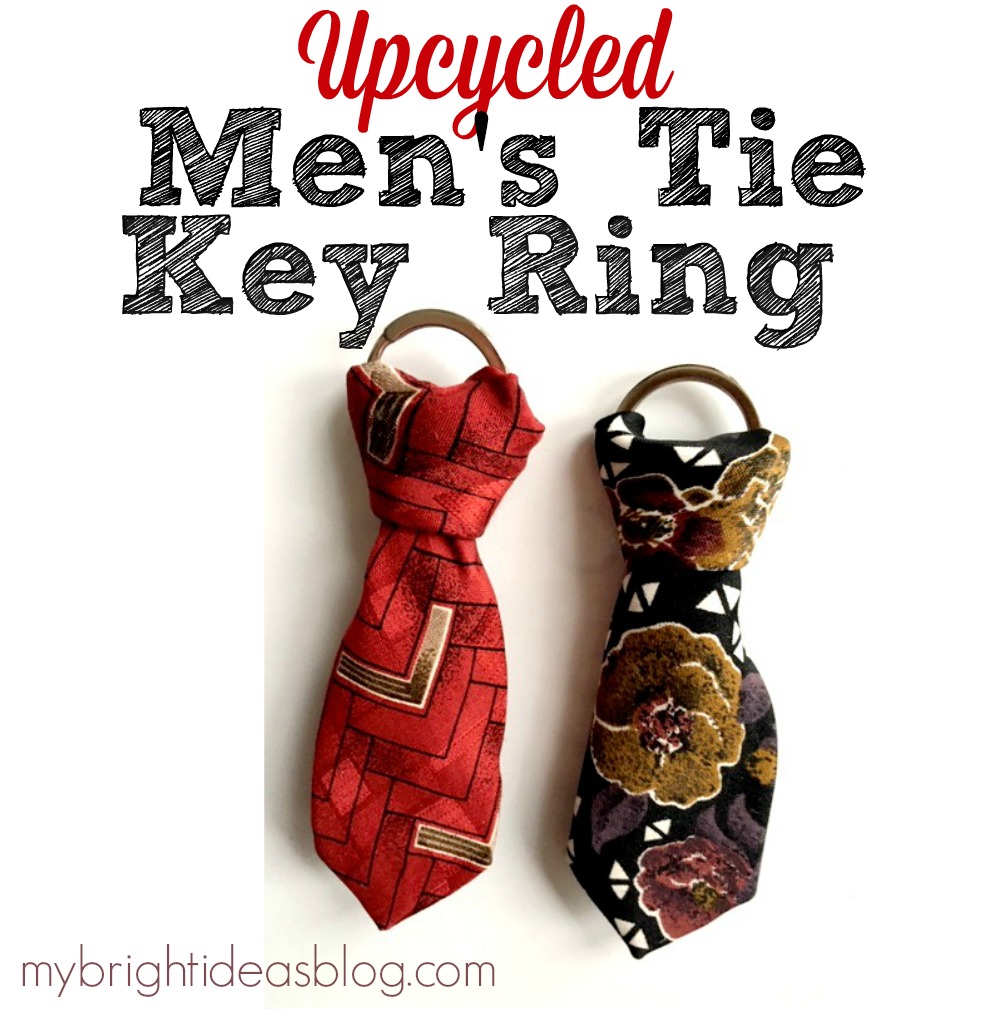
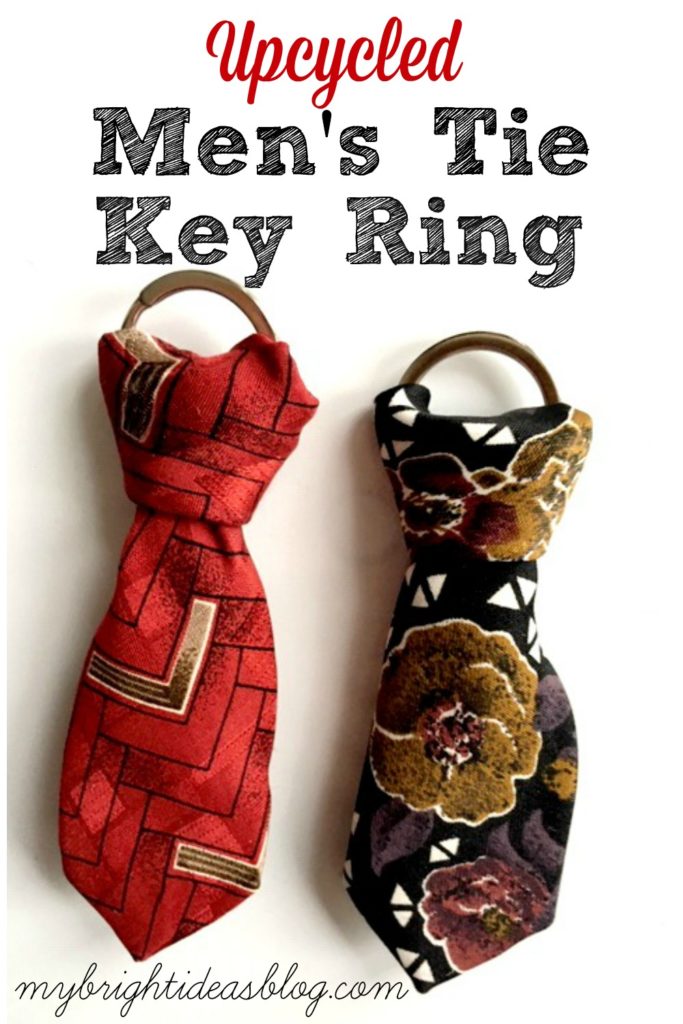
Looking for a fun way to upcycle a men’s tie? Here is an easy and super cute idea to turn it into a key ring.
You will need:
- an old tie
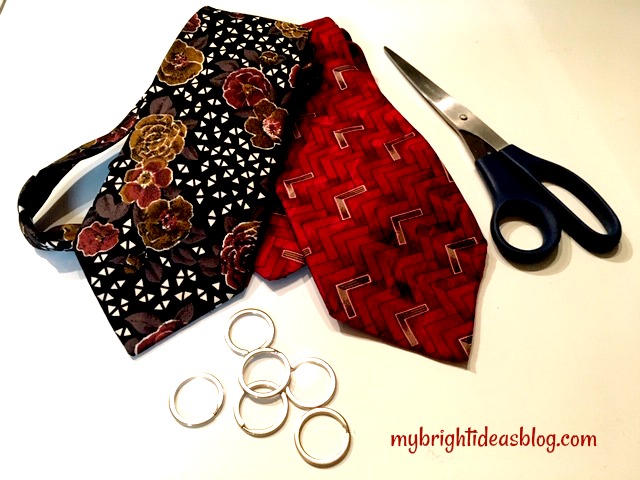
- a key ring
- scissors
- needle and thread (or glue)
- ruler
My hubby happens to have a lot of ties so he was willing to sacrifice these two ties for my project. Thanks dear!
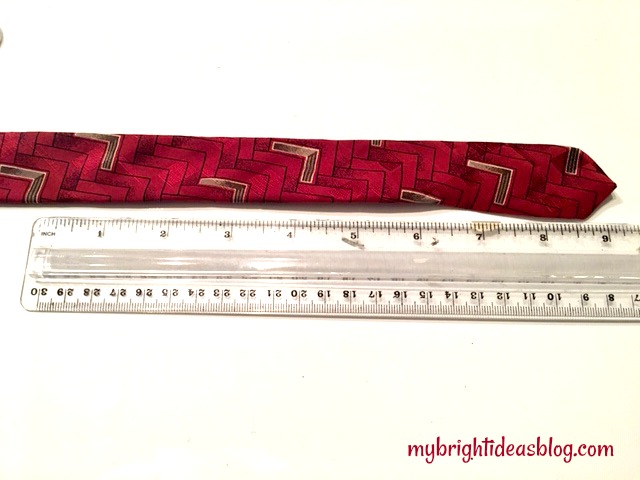
Cut the tie approximately 9 inches long.
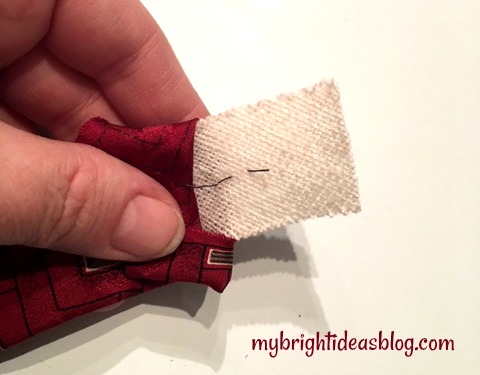
At the cut end, tuck the fabric out of the way and trim 1/2 inch (1cm) off interfacing that is inside.
Fold inside and tuck the fabric inside. You could sew or glue this end to make a clean edge.
I sewed it with just a few stitches.
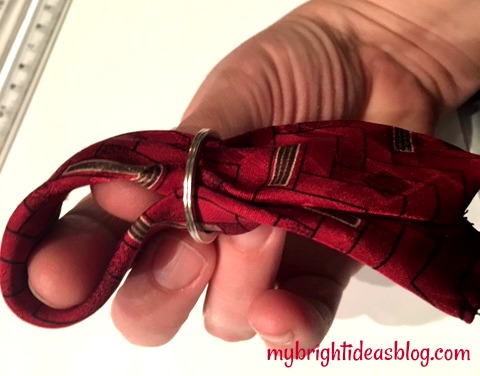
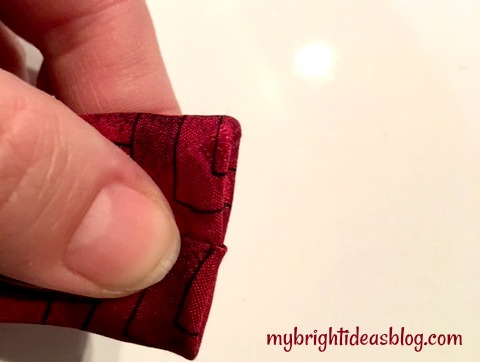
Next, fold the mini tie in half and slide it into the key ring.
Pull the ends through the loop to form a knot.
Pull the knot tight by tugging on the key ring. It looks like a proper tie knot without actually having to know how to tie it. The pointed end is perfect for the size of the key ring.
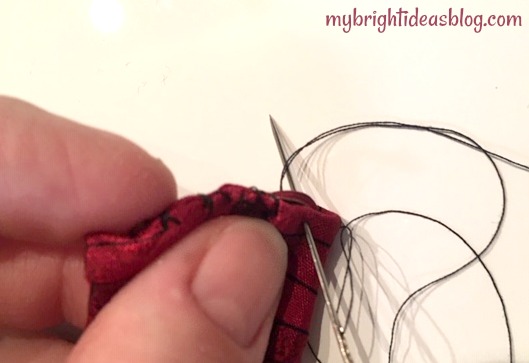
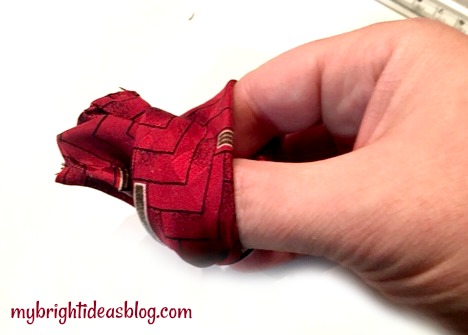
This is the back side of the tie. I added a few more stitches so the tie wouldn’t shift around, but that is optional.
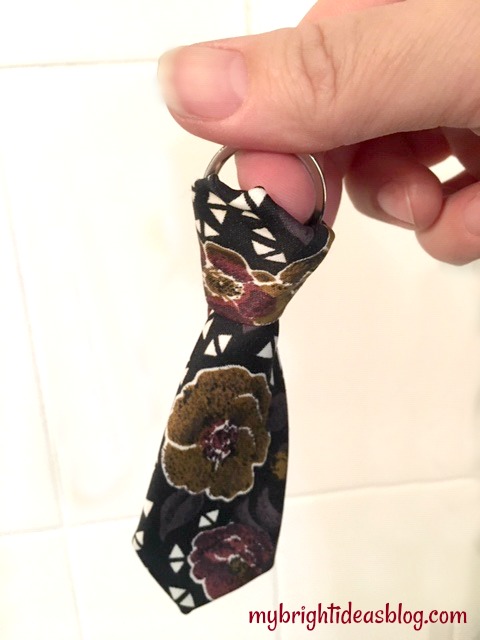
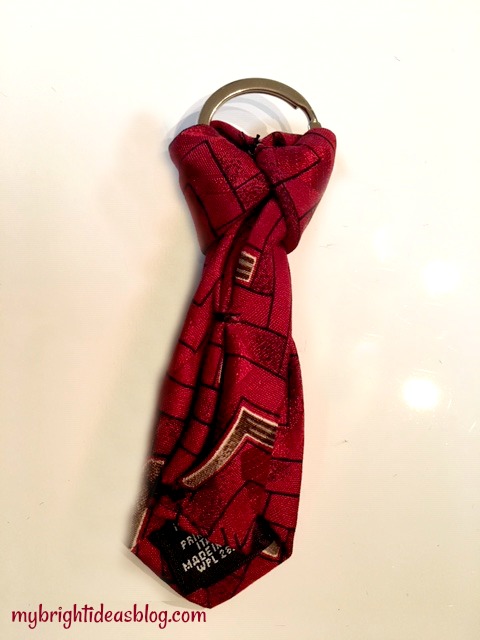
How cute is this?!?
Now there is still half of a tie left so I’m going back to Pinterest for some more ideas for tie upcycling. I will let you know how that goes!
…
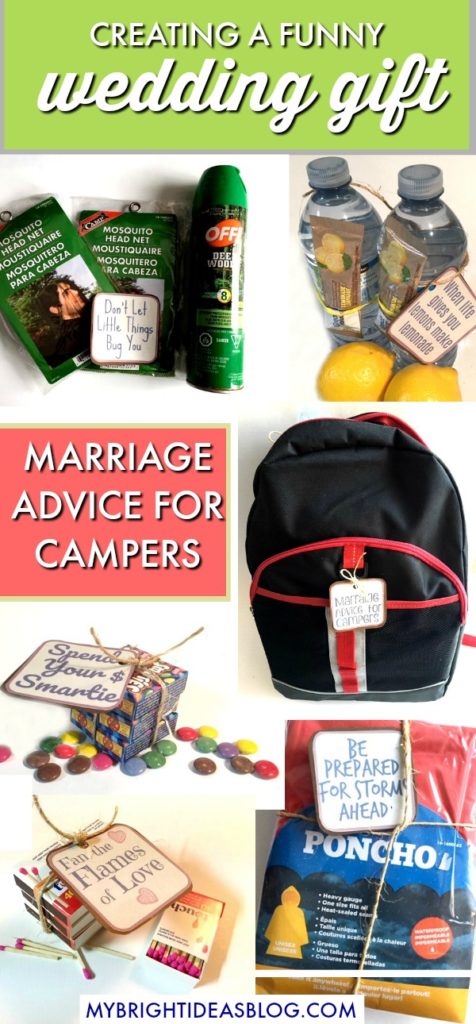
Funny Wedding Gift – Marriage Survival Kit!
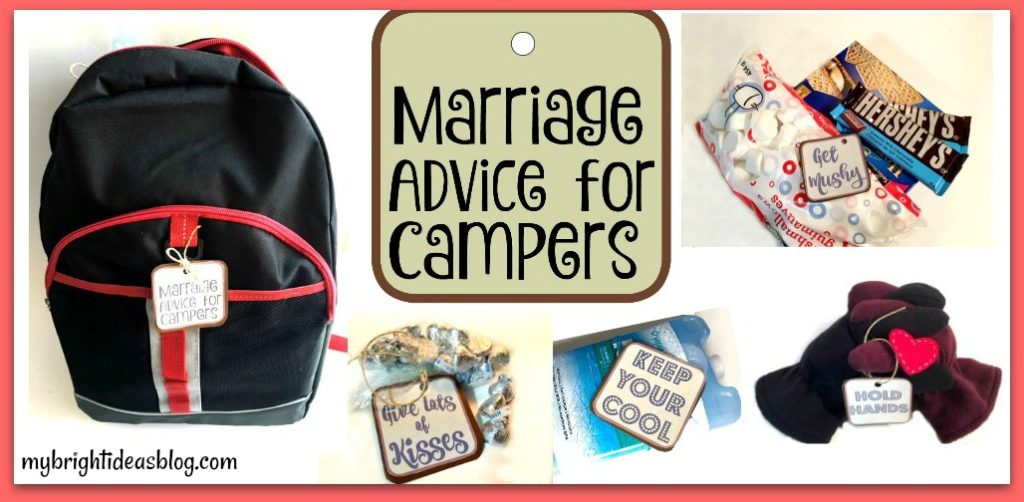
Are you looking for a funny, creative, imaginative wedding or shower present that won’t cost an arm and a leg? I was inspired to make something completely different for my niece’s wedding. Since I am the nutty aunt lets give them something unusual, something they will really remember.
First of all, I want to give credit to my inspiration….I had googled funny wedding gifts and this is what I found.
http://creativetryals.blogspot.com/2013/05/life-is-picnic-marriage-survival-kit.html Everybody loves picnics!
and
http://creativetryals.blogspot.com/2015/05/happy-camper-marriage-survival-kit.html We are campers and the happy couple had posted some camping trip photos so this happy camper marriage survival kit seemed like a good fit for us!
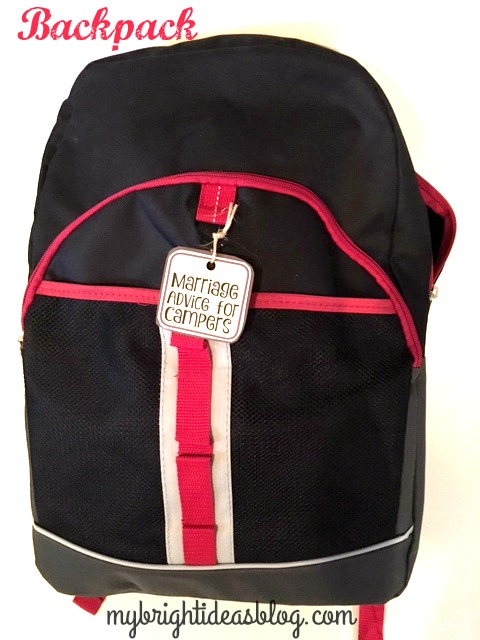
I will warn you right now that this shopping list will have you zigzagging all over the store. Many of these items came from the dollar store and Walmart. Pick and choose the items you wish to add. When we had everything together we could barely zip up the backpack. Don’t feel you need to use all of our suggestions.
We are a religious family and so are the happy couple so we decided to include a few Bible verses in this light-hearted gift.
Wedding Gift Shopping List
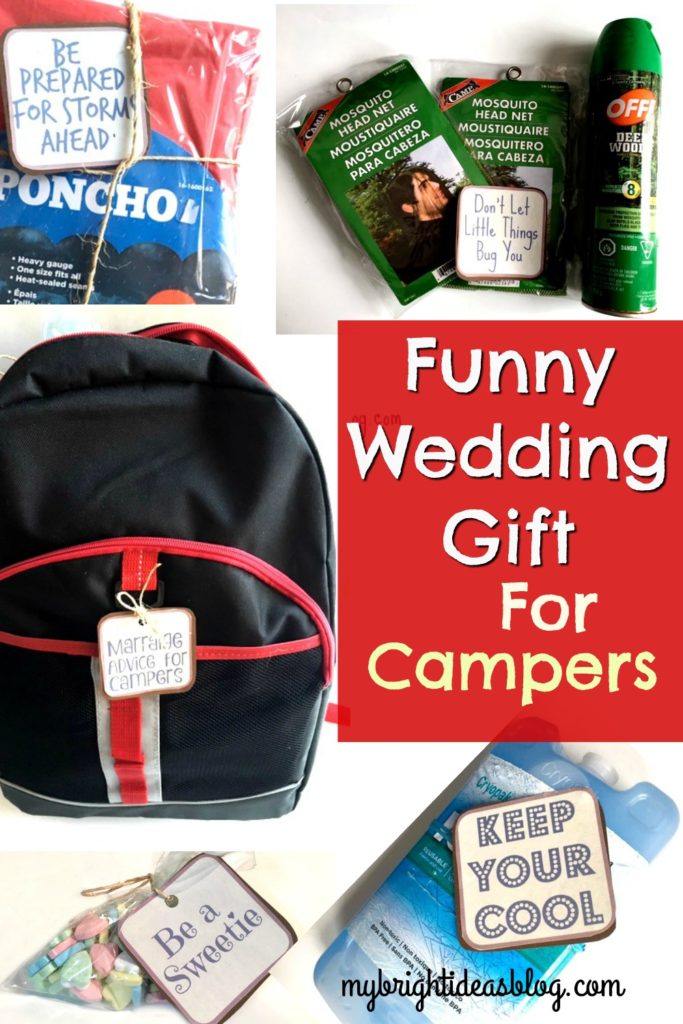
- cooler or backpack
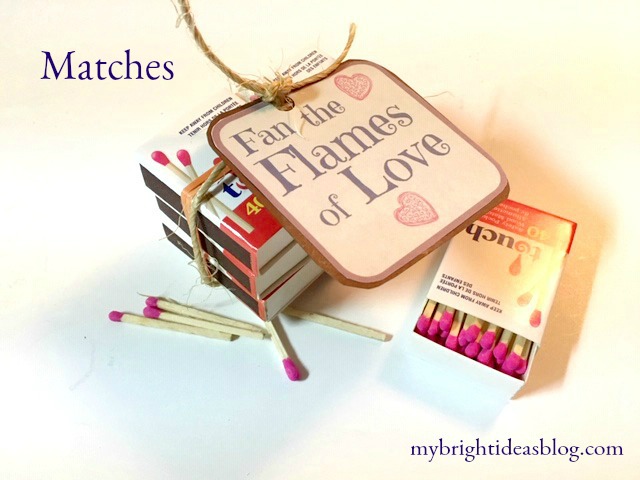
- matches
- gloves or mittens
- band-aids or first-aid kit
- ice pack
- rain jackets
- whistle
- flashlight or candles
- blanket
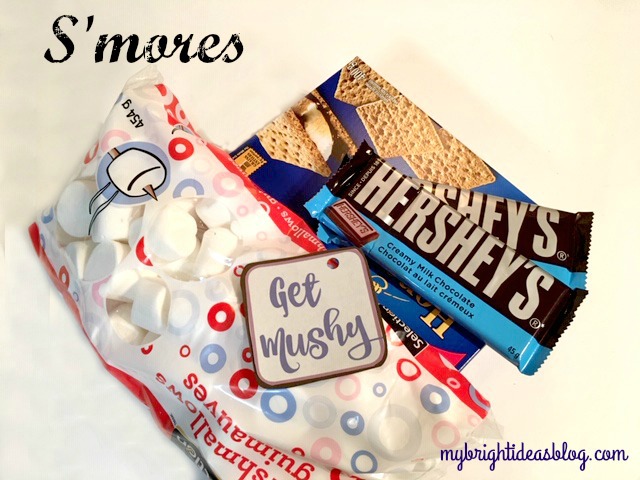
- smores supplies
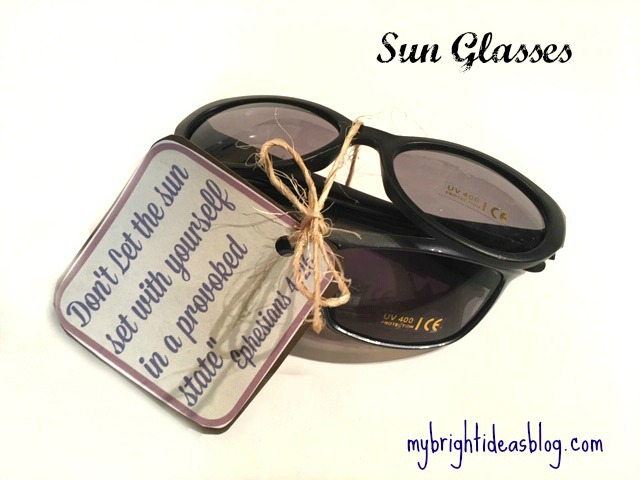
- sunglasses
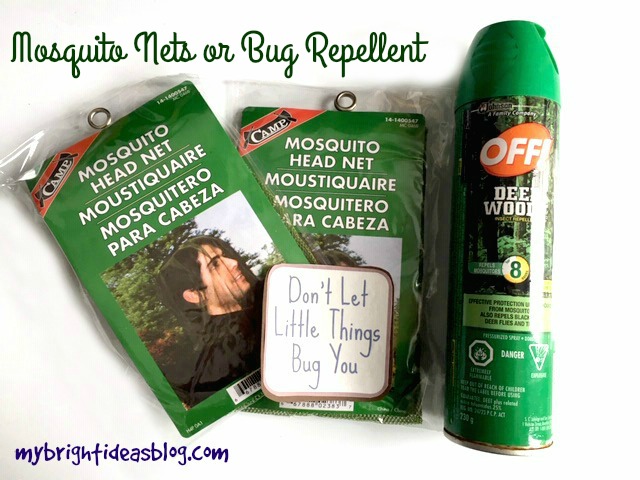
- mosquito netting and/or bug spray
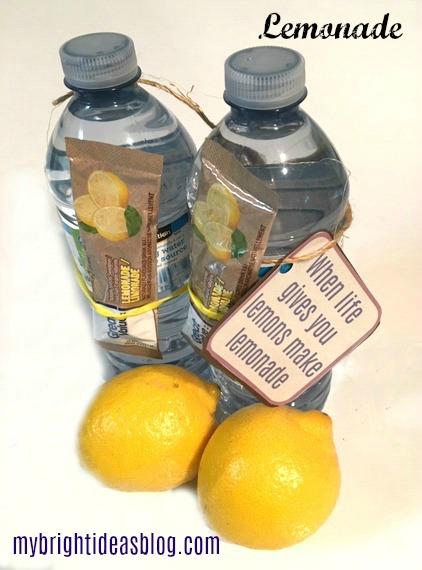
- water bottle and lemonade powder
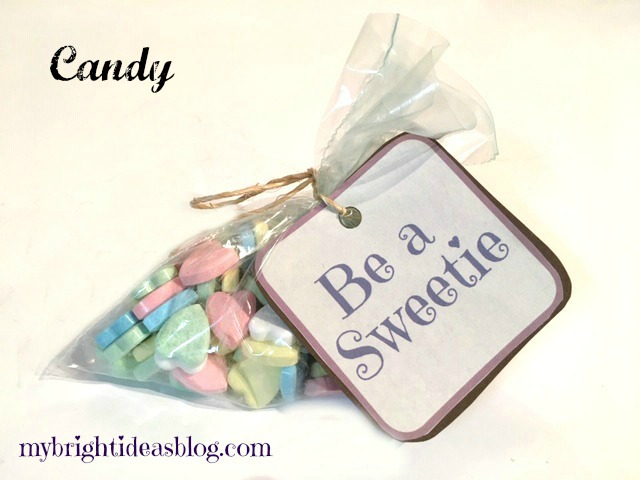
- candy
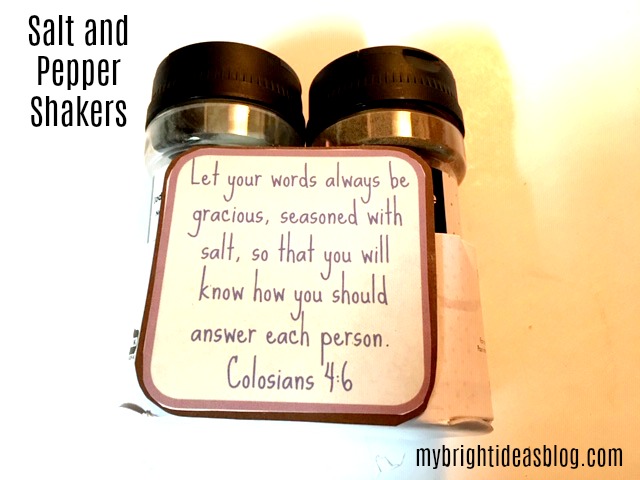
- salt and pepper
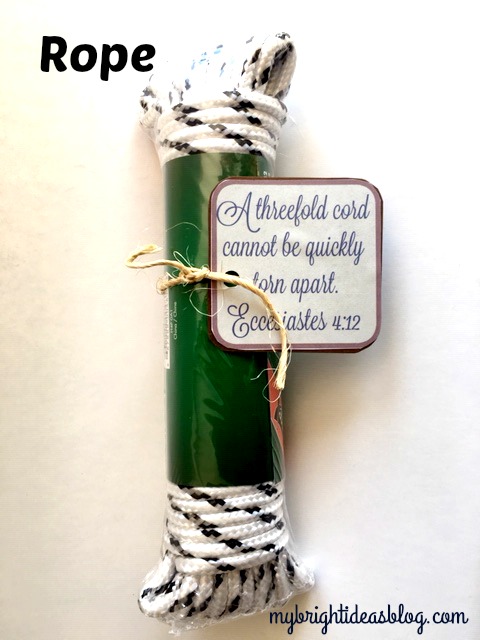
- rope
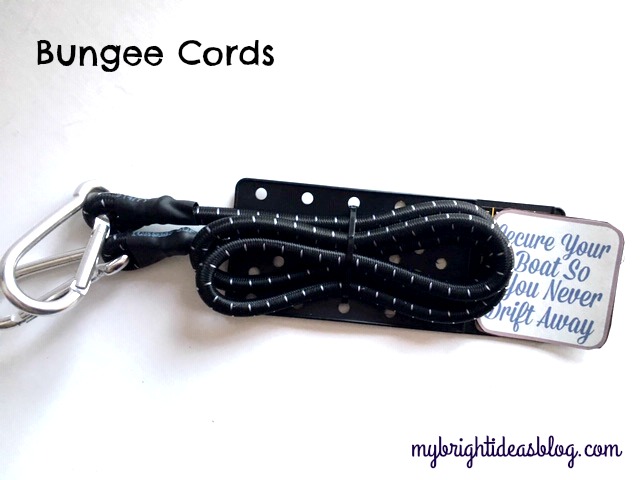
- bungee cord
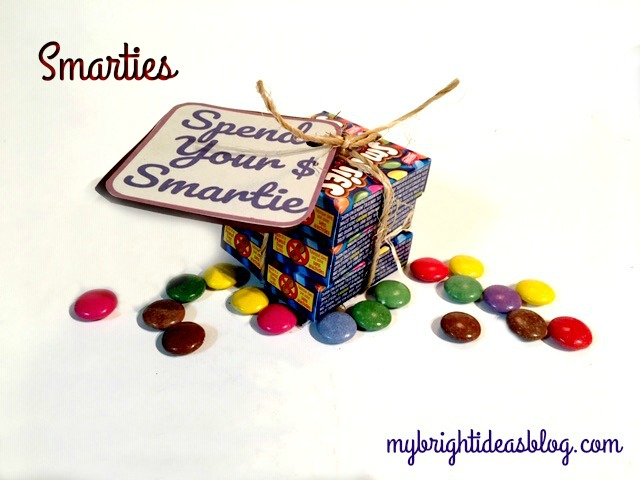
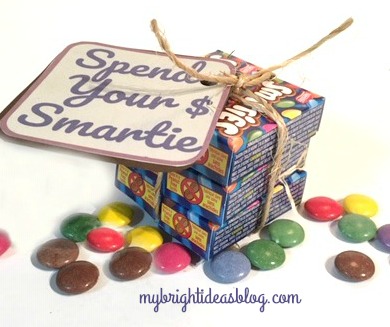
- smarties
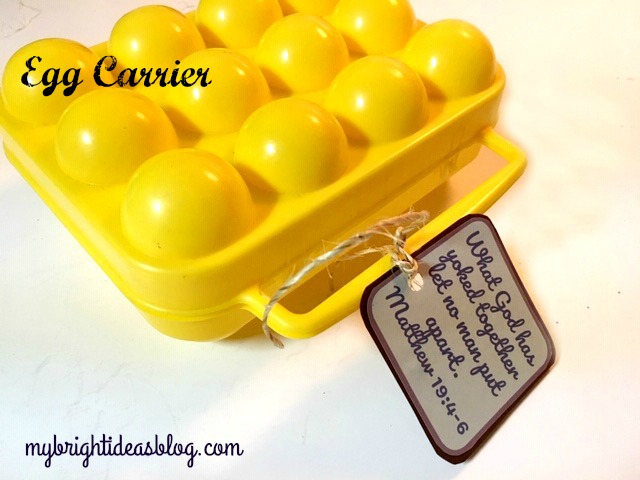
- egg holder
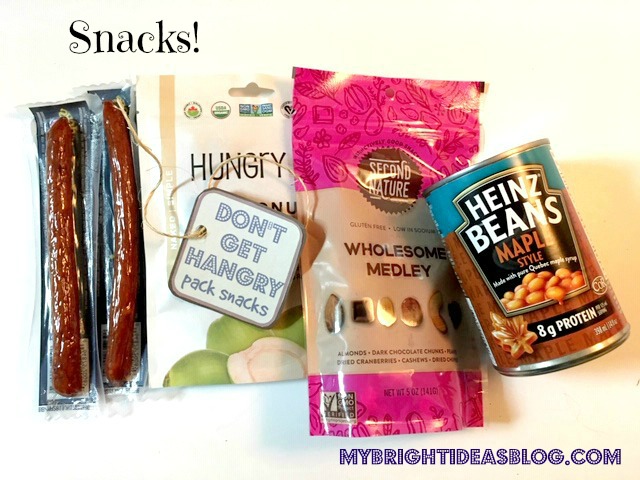
- snacks
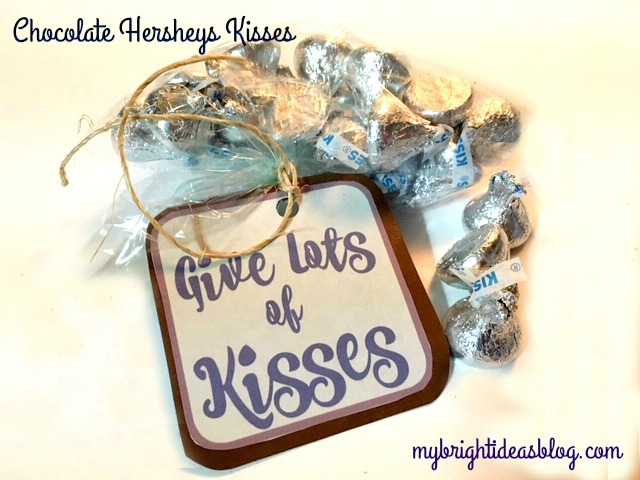
- Hershey’s kisses
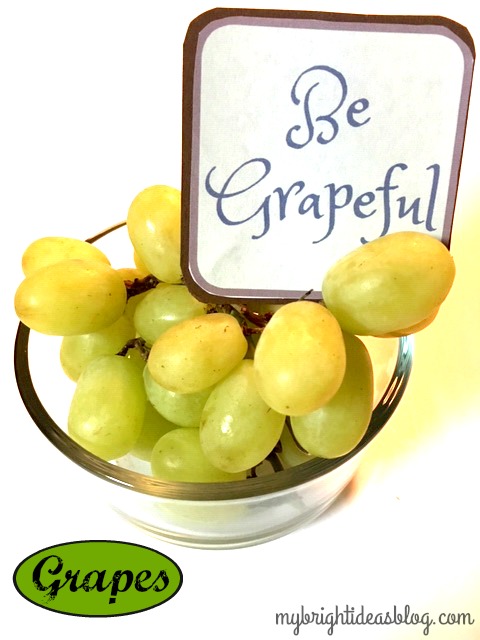
- grapes
So lets go through everything what is going into this gift.
Cooler or Backpack: You need to decide what it is all going to go into. Will this be a picnic theme, or camping or grab and go bag.
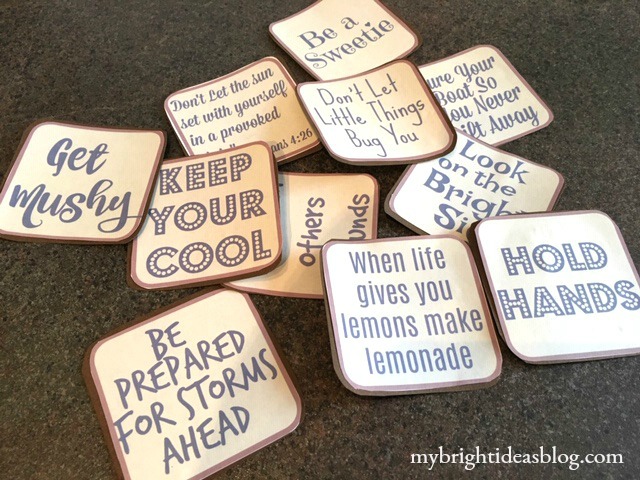
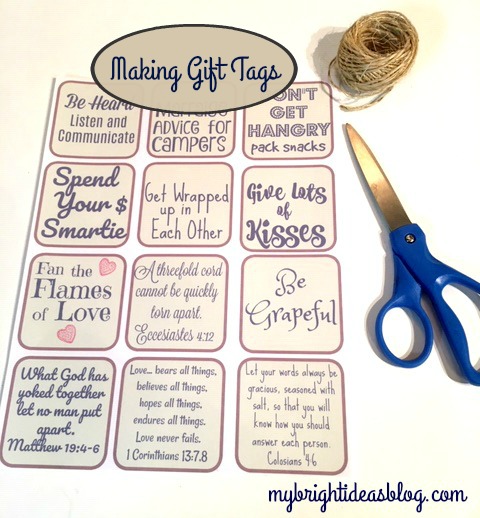
Matches: Fan the flames of Love
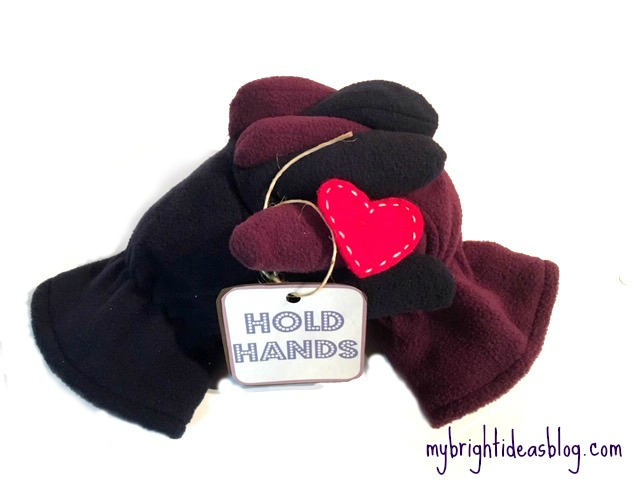
Gloves or Mittens: Keep holding hands for years to come.
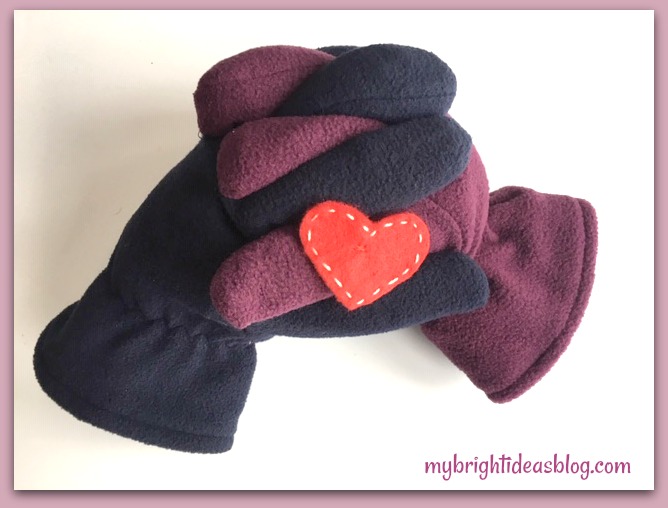
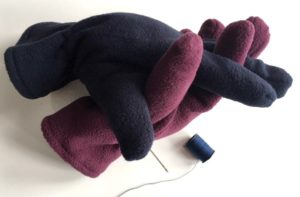
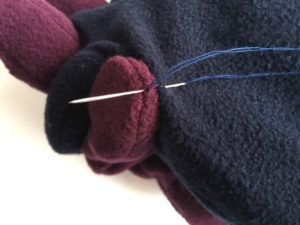
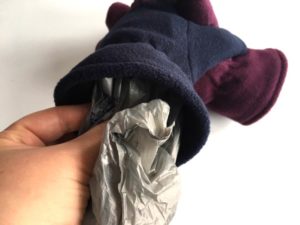
One pair of men’s gloves and one pair of women’s gloves, needle, thread, plastic bags or stuffing. Sew one men’s left glove to one right women’s glove. Stuff with plastic bags or pillow stuffing.
 Cut a piece of red felt into a heart and stick with white thread (or you could use cardstock thick red paper and a white pencil crayon).
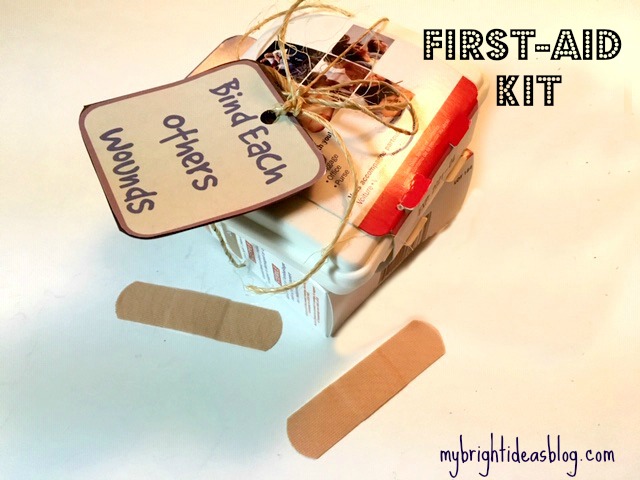
Band-aids or First Aid Kit: Bind each others wounds.
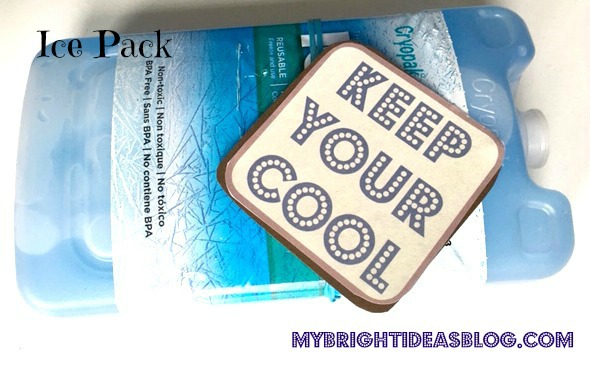
Ice Pack: Keep your cool.
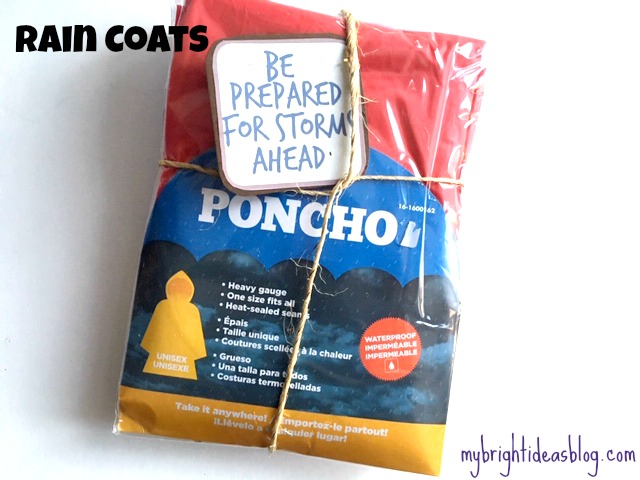
Rain Jackets: Be prepared for storms to ahead.
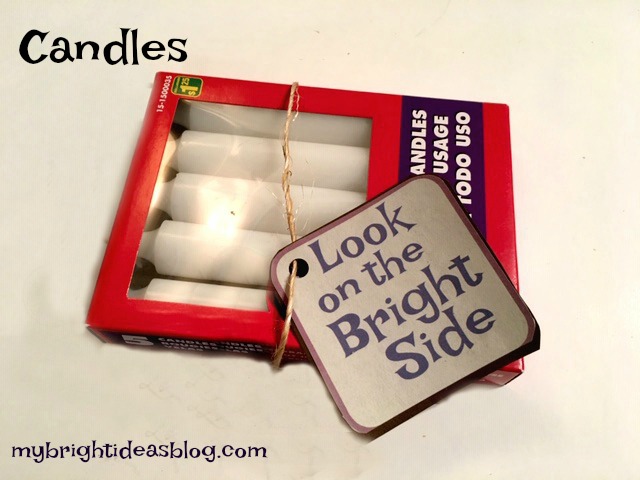
Flashlight or candles: Look on the bright side. Stay positive.
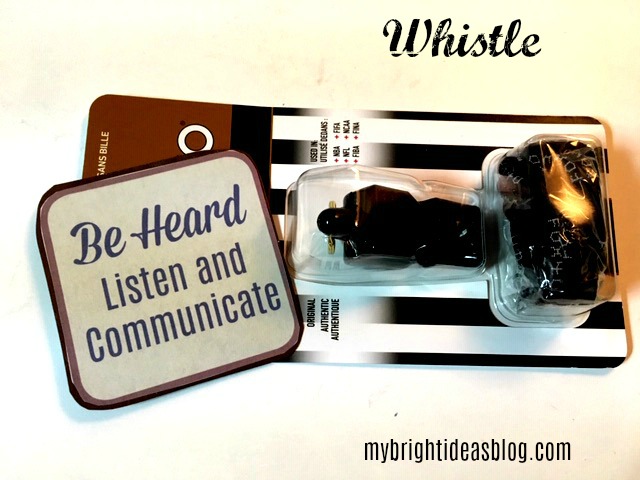
Whistle: Be heard. Listen and communicate.
Blanket: Get wrapped up in each other.
![]()
Smores Supplies: Get mushy!
Sunglasses: “Don’t let the sun set with yourself in a provoked state”. Ephesians 4:21. That verse simply means don’t go to bed mad.
Mosquito Netting: Don’t let little things bug you.
Water Bottles and Lemonade: We used water bottles and individual packets of lemonade flavor.
When life gives you lemons, make lemonade.
Candy: Be a sweetie!
Salt and Pepper Shakers: Thoughtful words and a kind voice is like seasoning your words with salt. “Let your utterance be always with graciousness, seasoned with salt, so as to know how you ought to give an answer..” Colosians 4:6
Rope: “A threefold cord cannot quickly be torn apart” Ecclesiastes 4:12. This verse is often read at wedding ceremonies. The three in the cord is husband, wife and God. Three cords together are stronger than one or two.
Bungee Cord: Secure your boat so you never drift away.
Smarties: Spend your money wisely…or smartie.
Egg Holder: “What God has yoked together, let no man put apart.” Matt 19:4-6. My hubby thought of this one! Yoked…I love a good egg joke… Tee He He.
Snacks: Don’t get hangry – pack snacks. Beans, trail mix, coconut chips, pepperettes….great non- perishables.
Hershey’s Kisses: Give lots of Kisses!
Grapes: Be Grapeful! Tip-If the gift isn’t going to be opened right away don’t include perishable foods.
Making the Gift’s Cards
The label’s are essential to making the gift funny. I printed them out on regular printer paper.
You will need:
- Printed labels
- Scissors
- Glue Stick
- Cardstock Paper
- Hole Punch
- Twine
Print the labels and cut them out.
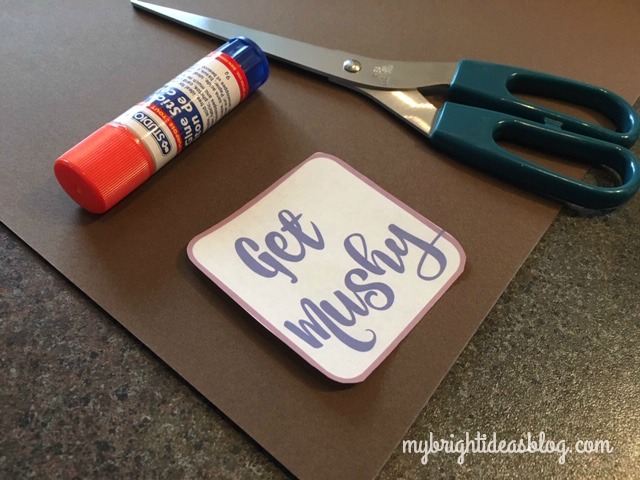
Cut the cardstock out to slightly bigger than the label.
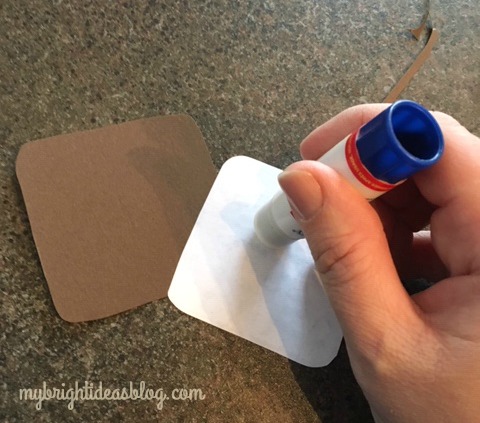
Glue the labels onto the cardstock.
Use a hole punch to put a hole in the label for the twine. Tie the twine and label onto each item.
![]()
![]()
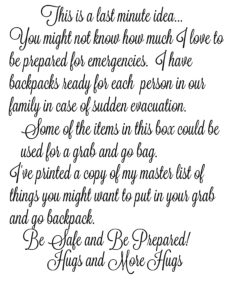
One final thought…The happy couple may not actually take these things on their camping trips. I’m not sure they would actually wear dollar store gloves or a plastic poncho and mosquito nets, much of this is meant as a joke. But the items here are useful for an emergency preparedness pack. I’m a big fan of having a “Grab and Go Bag” in case you need to evacuate your home with no notice. I am going to add a list of what many people recommend to put in your grab and go bag….clothes, toiletries, phone charger, phone number list, photocopies of your ID and your family members.
We packed everything into the backpack starting with the blanket on the bottom.
I included this note with my gift.
Have fun rolling with this idea! I would love to hear if you put a similar gift together.
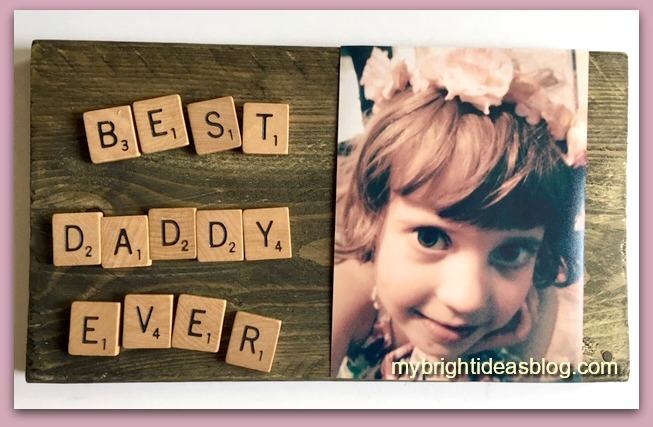
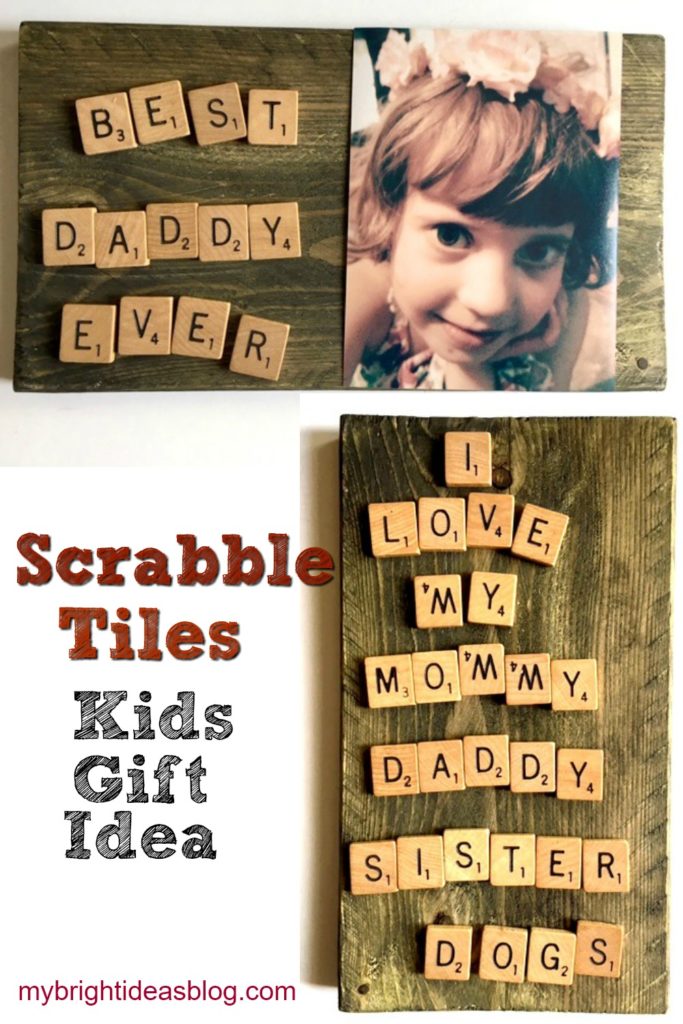
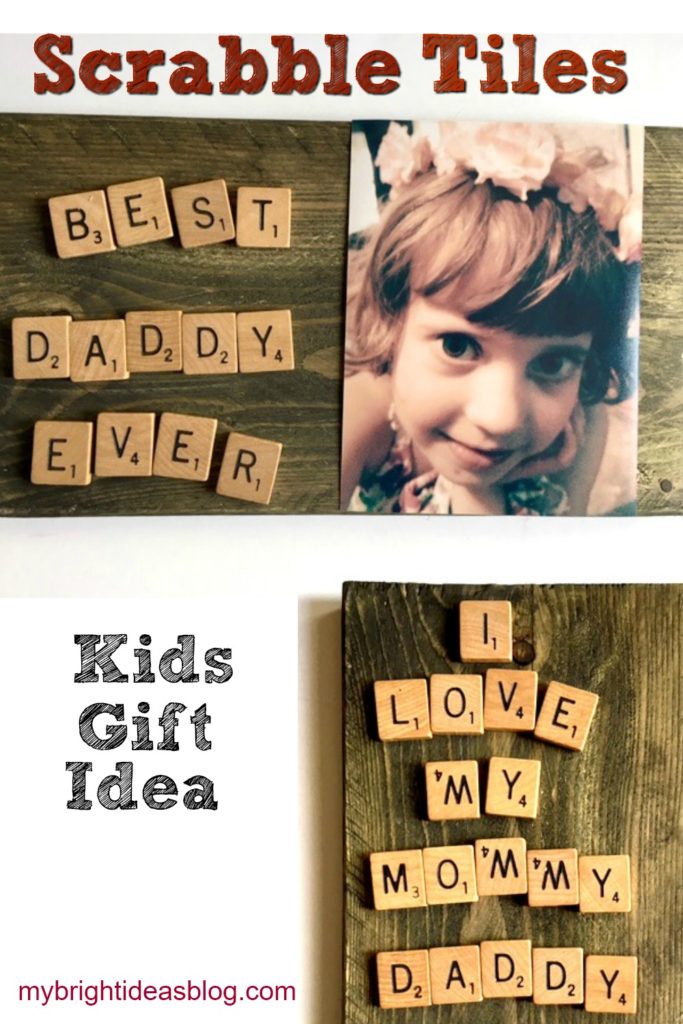
Scrabble Tiles Gift Idea for Kids
I have a sick kiddo at home (head cold, sneezy, wheezy) and she wants to use my craft supplies to make a gift for daddy’s desk at work. So here is what she came up with a love letter in Scrabble Tiles to Daddy and an old photo of herself.
Where can you get Scrabble tiles? From the board game of course silly! Or from a thrift store or online.
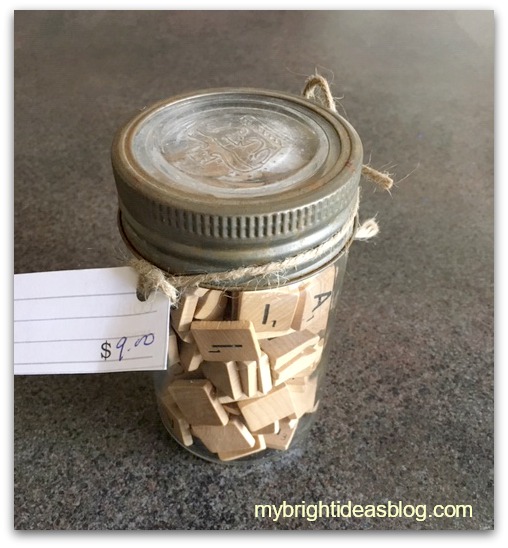
The other day I found myself parked next to an antique store I didn’t know existed. So I went in and found a gazillion things I would love to have and upcycle. The store was AMAZING! One of the items that I bought was a cool old mason jar filled with scrabble tiles.
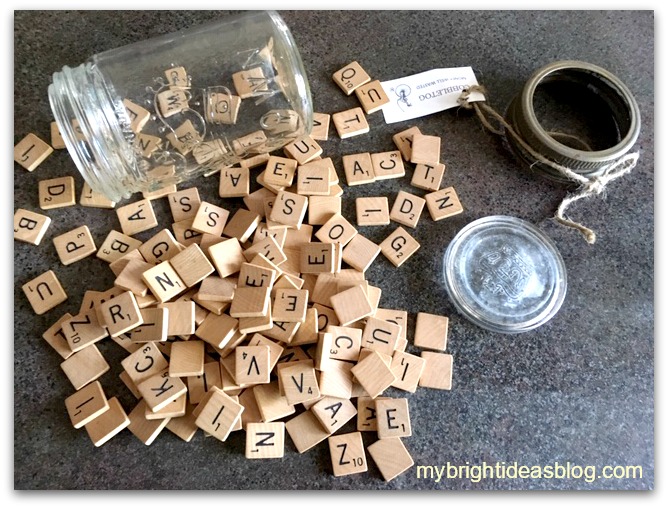
My sick little darling sorted out the letters into piles while I went rummaging for supplies.
You will need:
- scrabble tiles
- a piece of wood, picture frame or canvas
- white glue-for the photo (or to make it temporary use “sticky tack”)
- hot glue gun-for the tiles
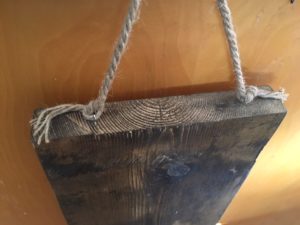
- hanging hook (optional)
![]()
I have scraps of wood and often will stain or varnish a few extra pieces in case I want to make a wooden plaque in a hurry. We chose out of scrap options a piece approximately 9 1/2 by 5 1/2. It was already stained with “Forest” Behr Semi-Transparent stain-which has a subtle green tinge to it.
![]()
Another option would be to use a blank canvas from the dollar store. You could paint with inexpensive craft paint in his favorite color or leave it white.
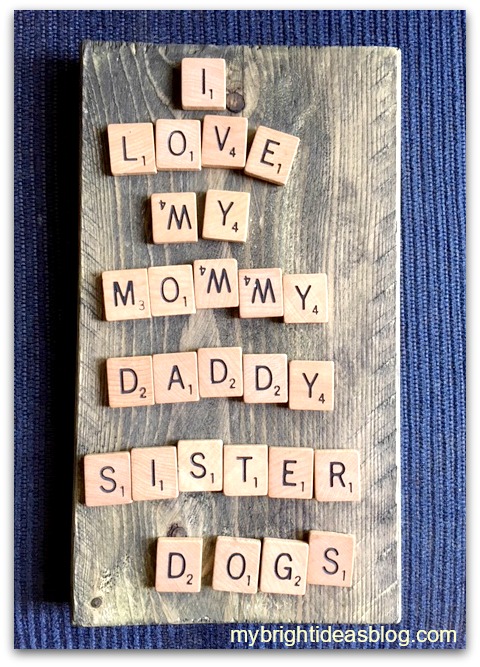
First she wrote out this…awe Mommy is at the top of the list!
I love that she is not bothered that 3 of her M’s are upside down W’s. When you see the letters are crooked its tempting to want to straighten them out but resist! It’s a child’s gift and adds character to the final product.
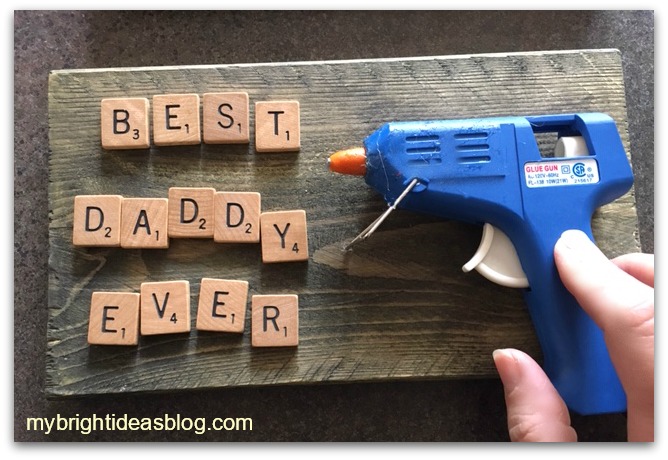
Arrange the letters and photo to your liking. Hot glue your scrabble letters to the wooden board.
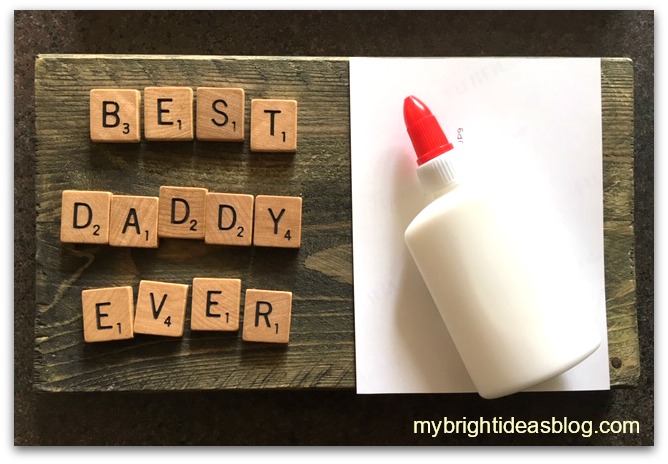
Have your child put a thin coat of glue on the back of the photo. Or if you want to be able to take the photo off later and replace it you could use sticky tack instead!
Would you look at those gorgeous eyes! This gift will melt his heart!
Crafts Using Burlap and Buttons – Easy Project that Looks Great!
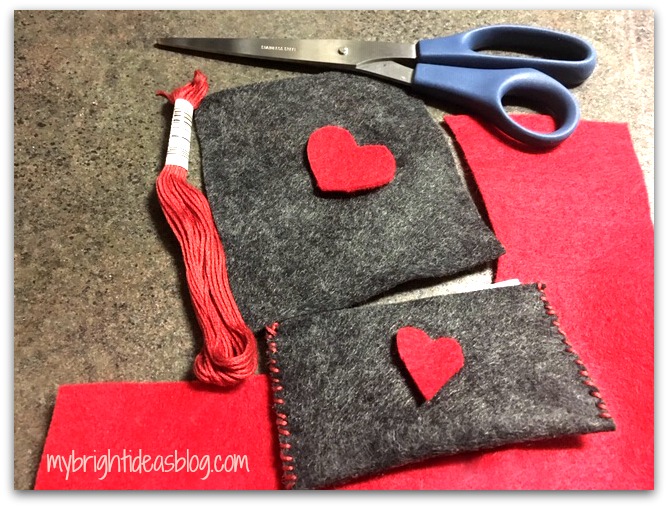
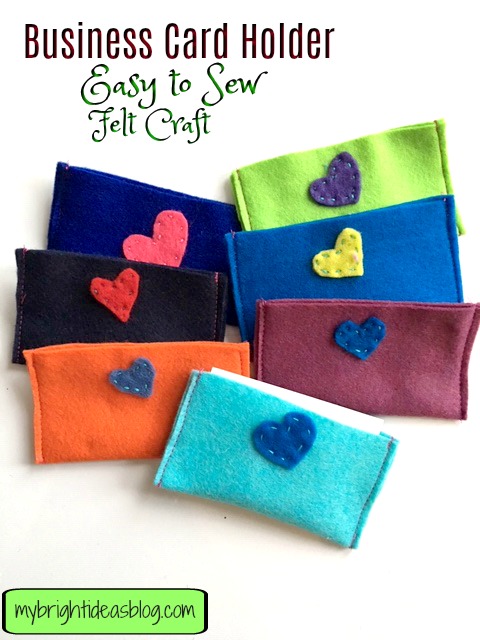
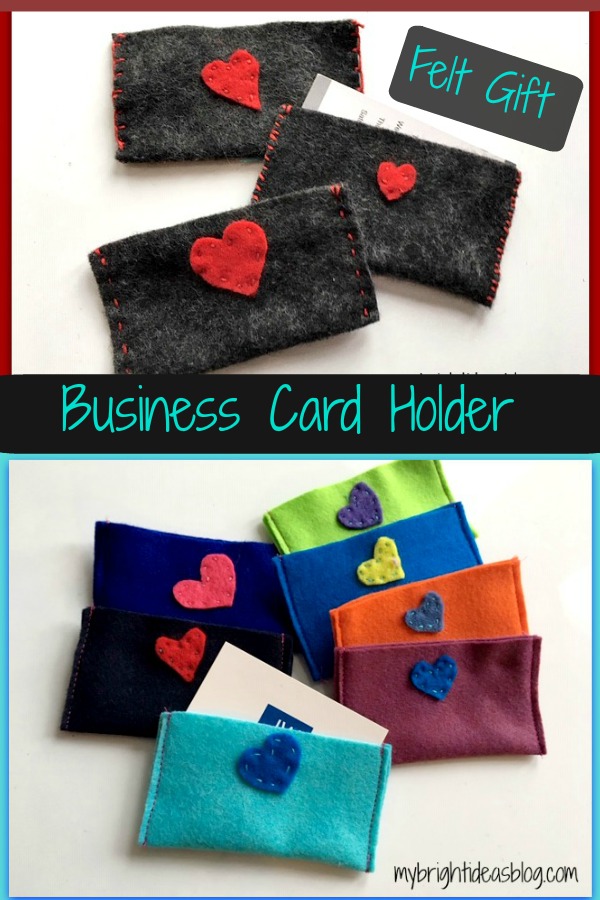
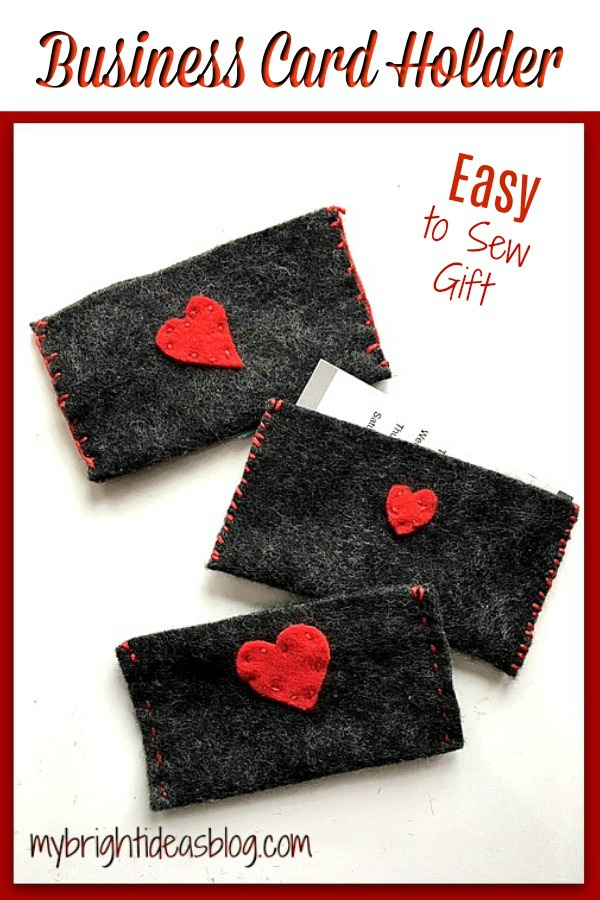
Felt Business Card Holder – Easy Kid’s Project!
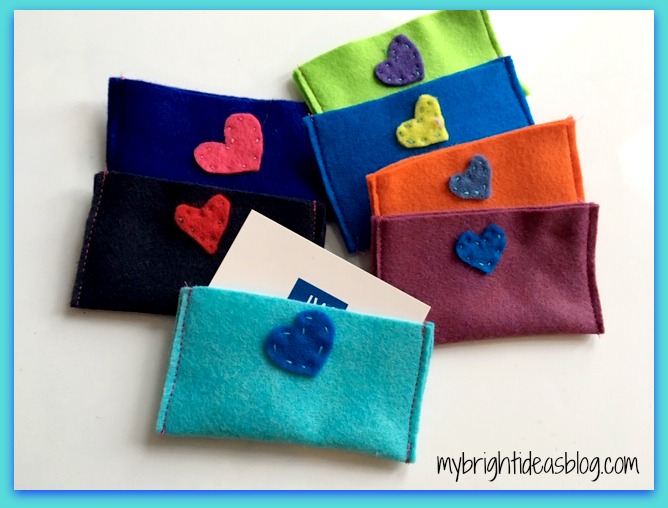
Learn how to make Business Card Holders out of Felt!
Looking for an Easy Sewing Project? Teach your child how to hand or machine sew with this quick gift idea. I’m going to show you how to make a felt business card holder with hearts or buttons for decoration and 3 ways to hand stitch.
We have a big event coming up where thousands of people from all over the world will be gathered and at the end swapping little gifts. So I have been searching for little homemade souvenirs for our family to give to the friends we meet. We might even get business cards printed-with our family email to put in the felt holder so we can become pen pals.
This seemed like an easy, fun, cute craft to make together. Plus teach some basic sewing skills…Brilliant!
You will need:
- 1 full piece of craft felt
- scrap pieces of felt for the heart
- scissors
- needle
- embroidery thread
- a business card
- sewing machine (optional)
- bright buttons (optional)
If you don’t already have felt and embroidery thread on hand you can get these from the dollar store, Walmart and craft stores.
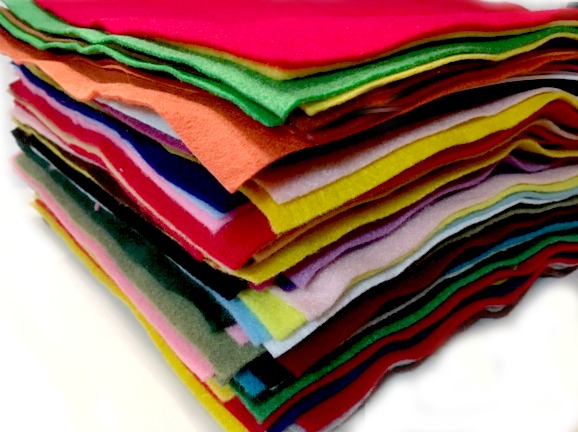
I must admit, I am a bit of a felt hoarder-so I have bought mine from several sources. I found the felt sold by Hobby Lobby for 33 cents was the best quality and value.
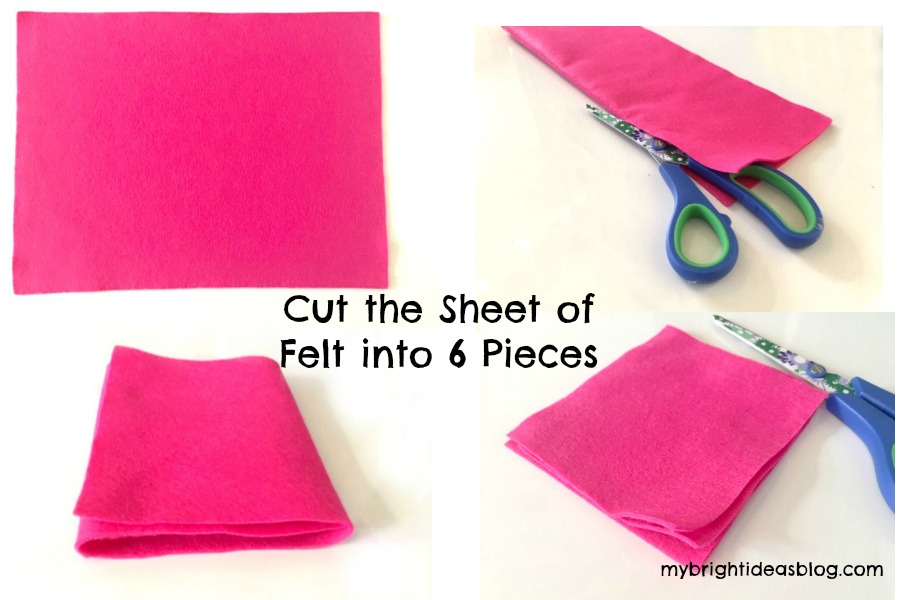
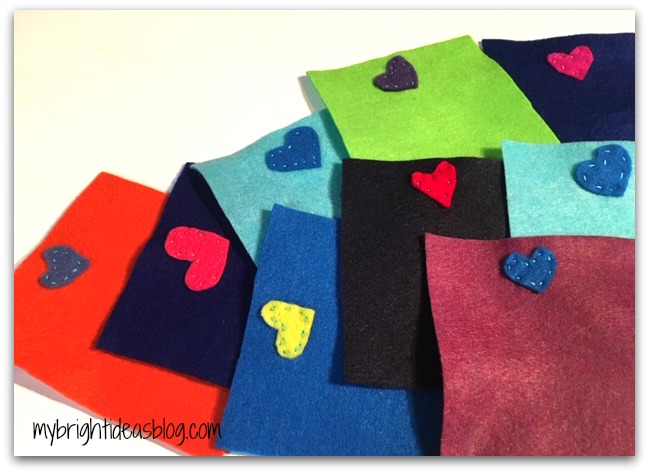
One sheet of felt is usually around 9 1/4 x 12 inches (24 x 30 cm). This is the perfect size to cut into 6 business card holders. Fold the sheet in half lengthwise and cut along the fold. Fold one of those pieces into thirds and cut on the fold. (bottom photos) In the end you should have 6 pieces 4 x 4 1/2 inches (10 x 12 cm).
Have a business card handy to make sure it fits.

To get started cut small love hearts to decorate the outside of the card holder.
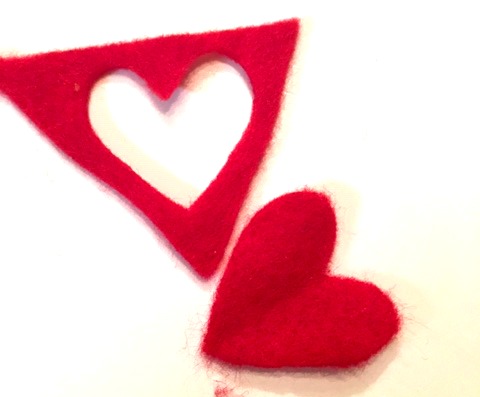
The easiest way to cut a heart is to fold the scrap of felt in half and then cut half the heart so both sides are the same.

Choose matching or contrast embroidery thread.
Divide regular embroidery thread into 2 sections of 3 strands each.
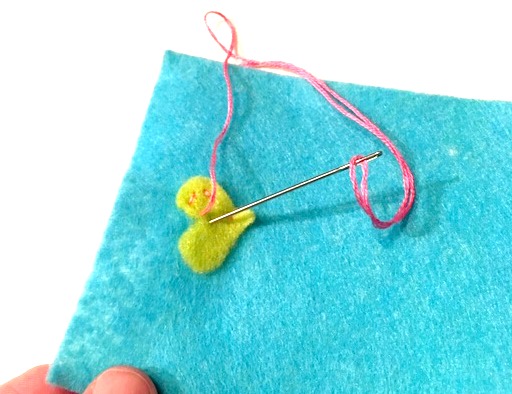
Knot the embroidery thread and begin sewing small stitches to attach the heart to the top of the felt.
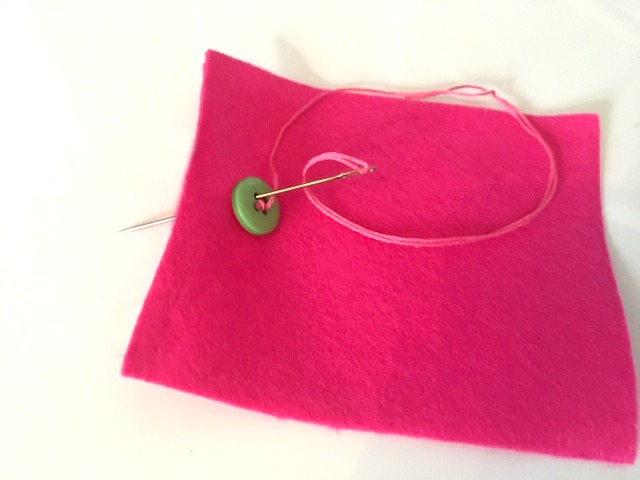
Another idea is just to sew a bright button on instead of a heart. Teaching your child how to sew a button on and a simple hand sewing could really be helpful later in life.
A side note: Would you believe that while I was proof reading this my hubby has handed me a pair of his work pants and a button that just fell off. That proves just my point-thanks dear!
Fold the felt in half to form the little folder to hold the business cards. Here are 3 options we tried for hand stitching.
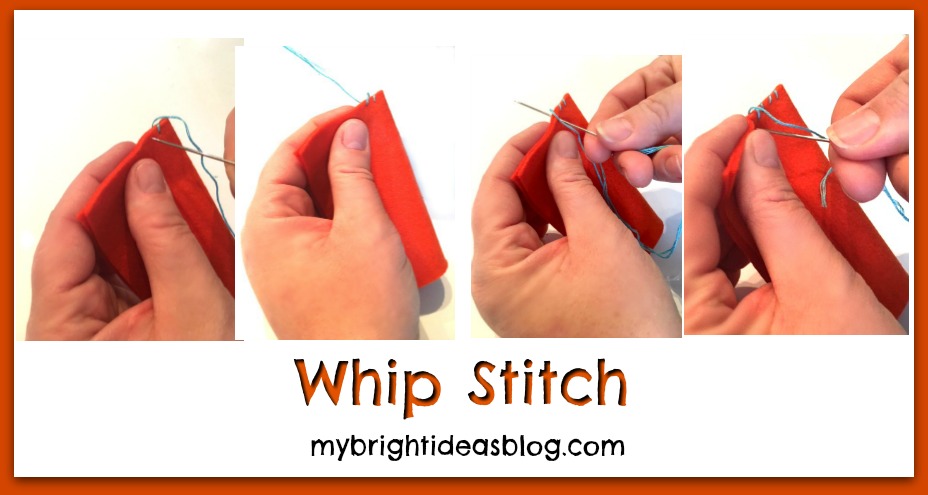
Whip Stitch: Knot the end of the thread and start on the inside of the fabric. Sewing in from the front and out the back and around. Back in the front a smidge to the left of the previous stitch.
![]()
Blanket Stitch: Start from the inside to hide the knotted end, then go through both layers. Stitches can be a bit further apart with the blanket stitch. Go in through the front of the fabric. As you pull the thread through, insert your needle through the loop and pull it securely to make your knot. Insert the needle into the front again the same distance from the previous stitches. At the final stitch go through a second time to make that knot and then insert your needle between the two layers of fabric and cut the thread.
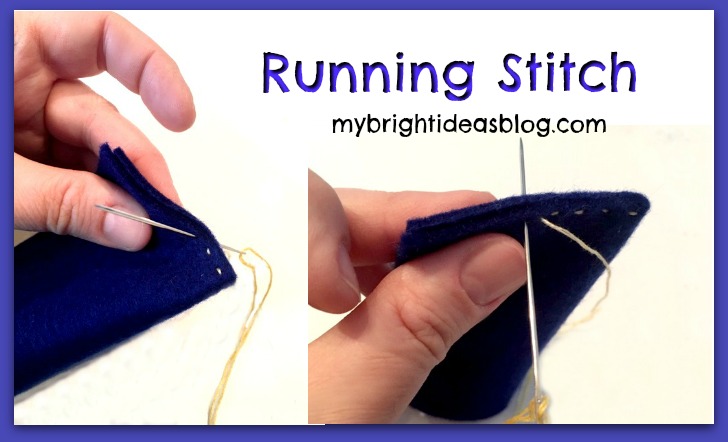
Running Stitch: Knot the embroidery floss and begin on the inside to hide the knotted end. Use a running stitch to go in and out all the way up both edges.
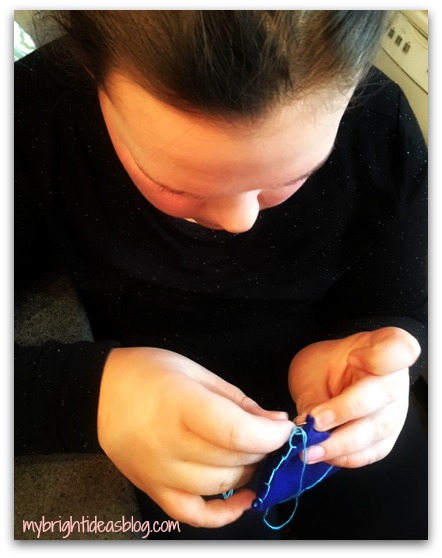
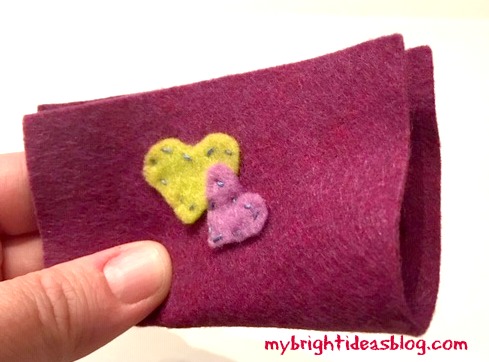
My 11 year old preferred the blanket stitch. Not bad for her first attempt.
She also liked having one small heart over a larger heart.
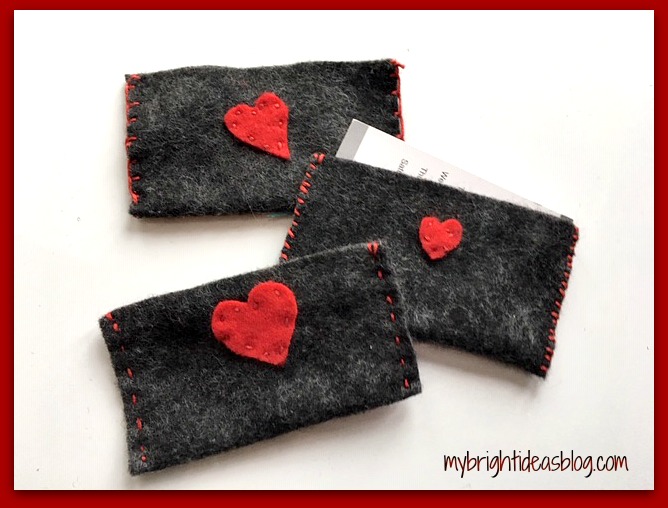
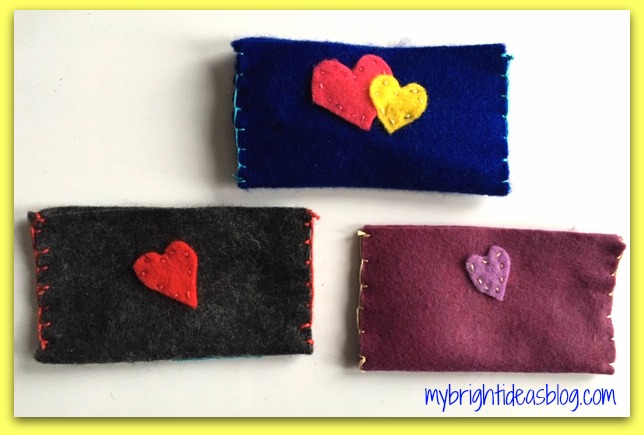
The grey felt with red hearts with red stitching looks pretty good!
Option 2
To make the process faster (as I mentioned we want to make a lot of them)…we sewed the hearts on first and got a little bit faster with each one.
We hand sewed 10 hearts onto squares of felt and ran them through the sewing machine to make a tidy edge.
Could this get any easier! What a great idea…I want to thank my friend Ashley for sparking this idea over dinner last week. Great food, lovely ladies and a bit of craft talk snuck into to the evening…my favorite!
On this blustery, winter day you might be inspired to work with felt too! I have added links to a few of my posts from last year for you skim through and see if an idea is sparked for you too.
Sew a Super Easy to Make Felt Crown – Add to your dress up clothes!
100th Day of School Celebration-Glue Buttons on a shirt for a Gumball Machine
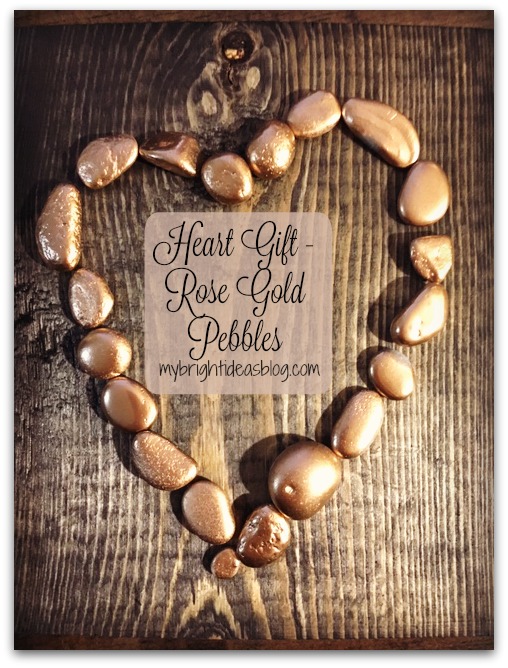
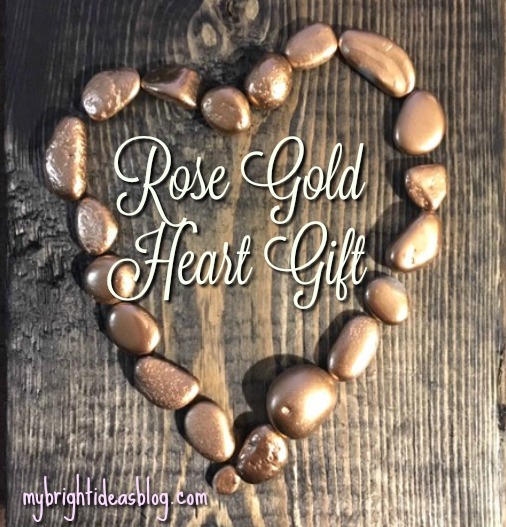
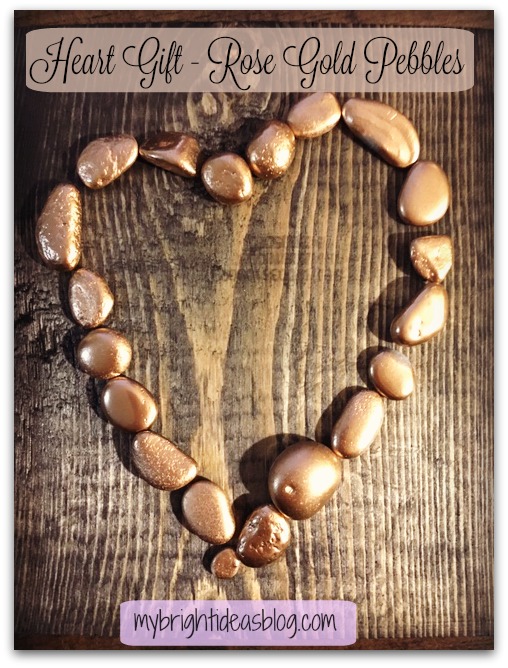
Rose Gold Spray Painted Stone Heart Gift Idea
Rose Gold Spray Painted Stone Heart Gift Idea!
Love is in the air this week! We had a family wedding yesterday and it’s inspired another heart gift.
You may recall from previous posts that I have stack of cut wood scraps that I keep making into little plaques. Well, here is another one. This is so easy we could almost turn it into a kids gift if we used craft metallic paints instead of spray paint and white glue instead of the glue gun.
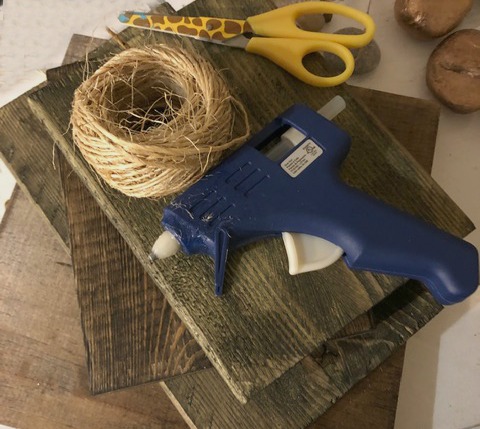
You will need:
- Krylon Foil Metalic Copper Spray Paint
- Pebbles
- Scrap of wood approx. 6 x 8 inches
- Dark wood stain and Rag
- Hot glue gun
- Picture hanger or eye screws and rope (optional)
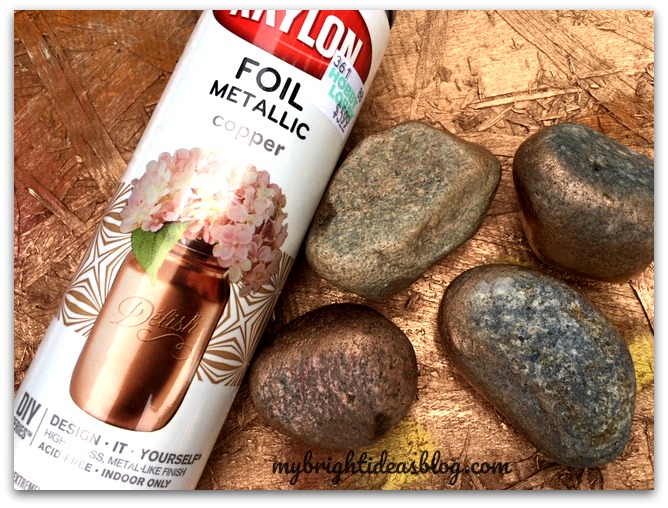
I picked up this pink gold Krylon paint from Hobby Lobby for $5.99. Rose Gold is such a pretty color. I love shoes and purses and cell phone covers in this color.
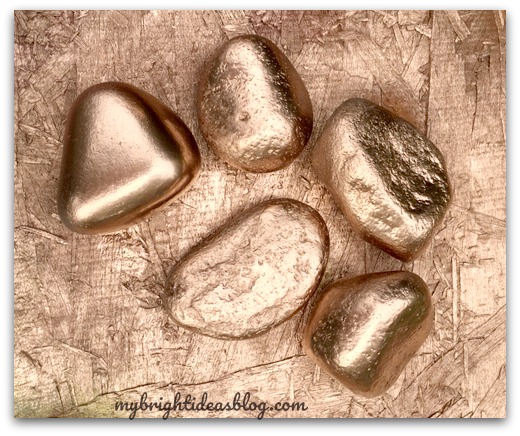
Spray paint the stones with pink metallic paint, allow to dry for 30 minutes and then check to make sure the sides are covered. Reapply to areas if needed.
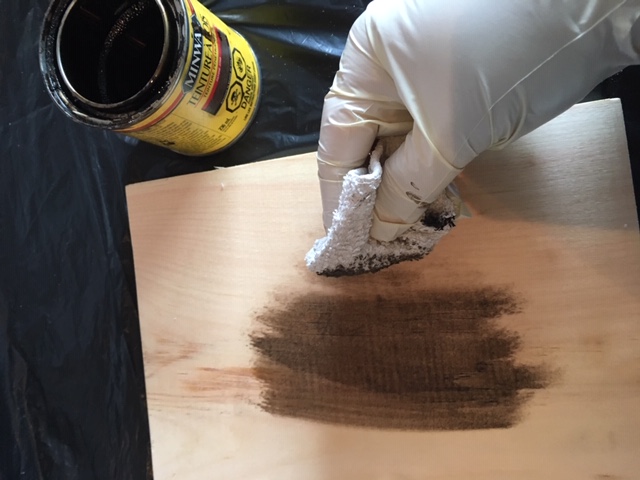
While the pebble are drying, grab a rag and your dark wood stain. I used Minwax Jacobean. If you have walnut on hand it will have a similar impact.
Before you go further you should consider if you want to hang this on a wall or just lean it on a shelf. If you decide to hang it you should put the hangers on now.
This option requires hammering tiny little nails into the back of the wood. Then it can hang on a nail.
For a rustic looking alternative you could screw eye hooks into the top and hang it up by a rope.
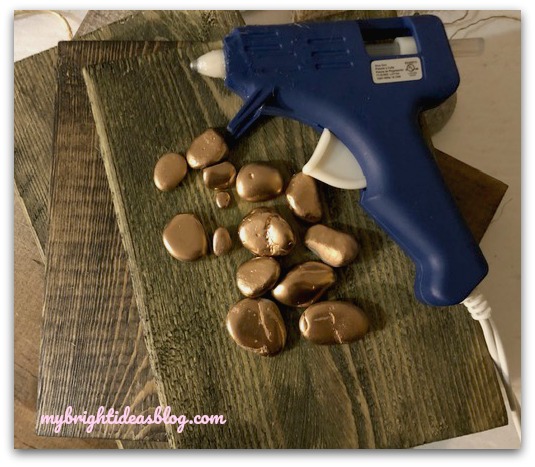
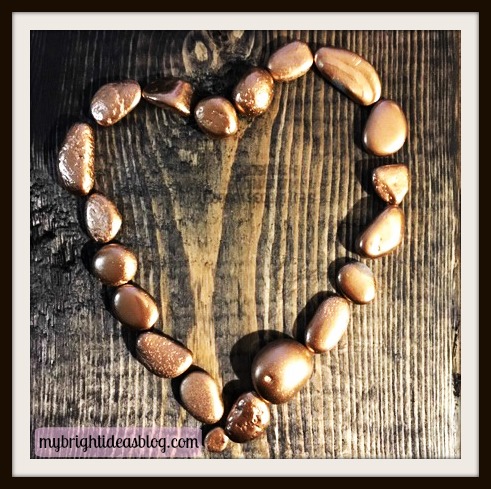
Lay out your pebbles in a heart shape and get your glue gun.
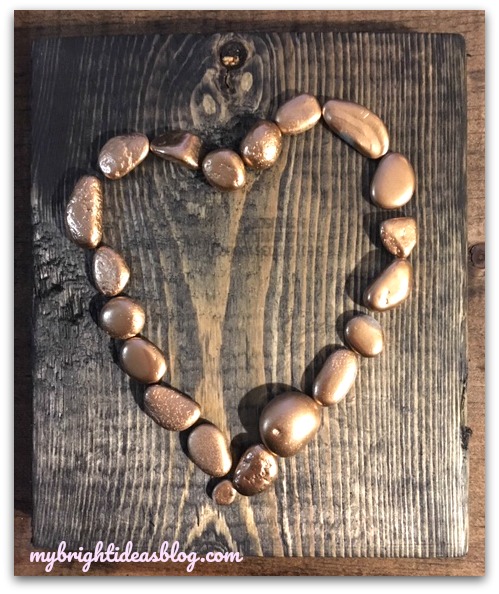
Using your hot glue gun, secure each pebble in place in a heart shape. That is all there is to it!
Scroll down to see some of my other wood and pebble art projects….
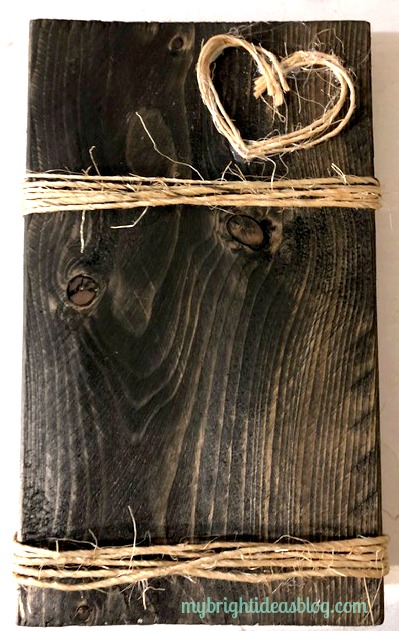
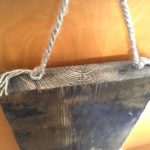
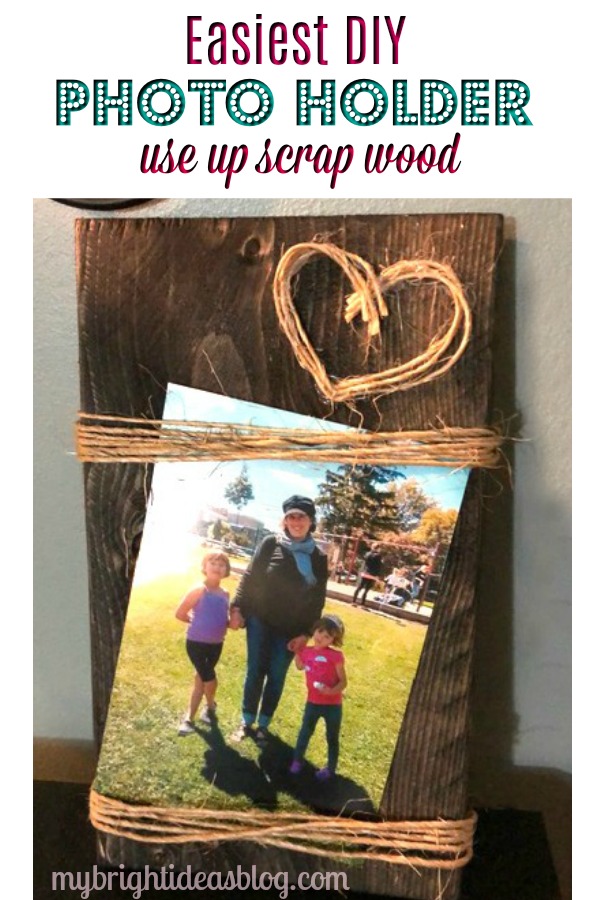
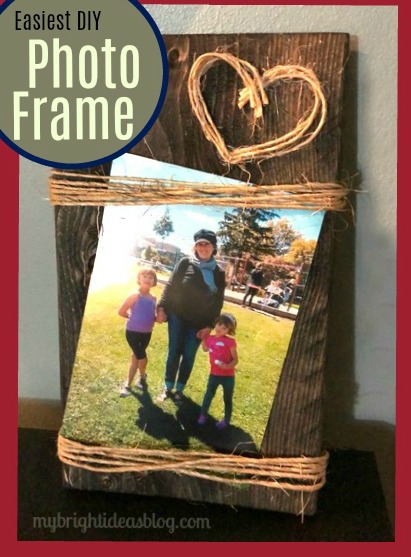
Easy Wood Photo Frame Idea
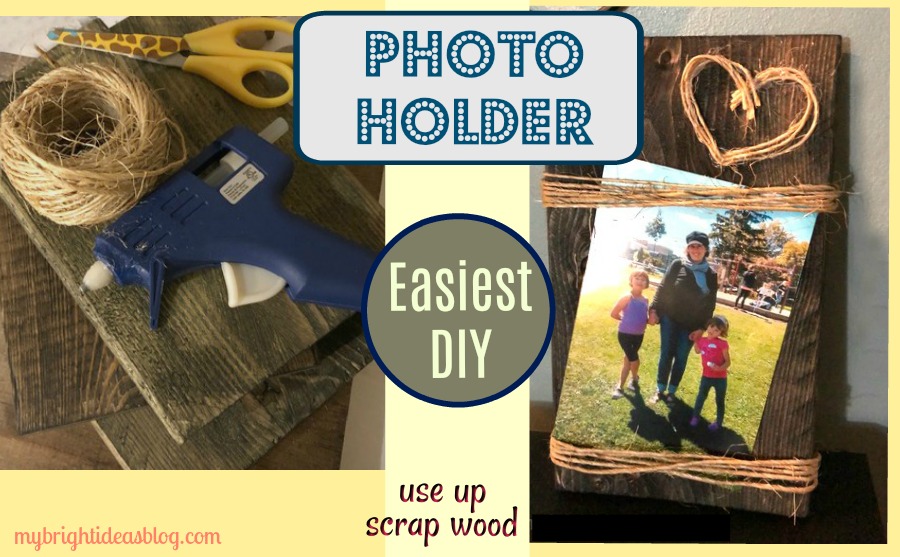
Let’s make a 5 minute craft that looks great-a rustic picture frame that holds a typical 4×6 photo.
Before the winter weather came in our direction I planned ahead for winter crafts by cutting up scraps of lumber and coating it with a bit of dark wood stain. You never know what sort of crafts could use a bit wood and hot glue gun. I’ll post some other wood scrap ideas at the bottom of the post.
Rustic Wood Photo Holder
You will need:
-
- a scrap of wood approx. 5 inches by 9 inches
- walnut wood stain
- rag
- basic twine
- hot glue gun
- ruler
- picture hook or eye screws
- 4×6 photo
The piece of wood I used was a 1×6 board originally. In actuality its more like 5 1/4 inches wide and 9 1/4 inches long (13cm x 24cm). Use what ever you have this doesn’t need to be exactly the way I did it.
Stain the wood with a rag dipped into a dark brown stain such as Minwax Walnut or Jacobean.
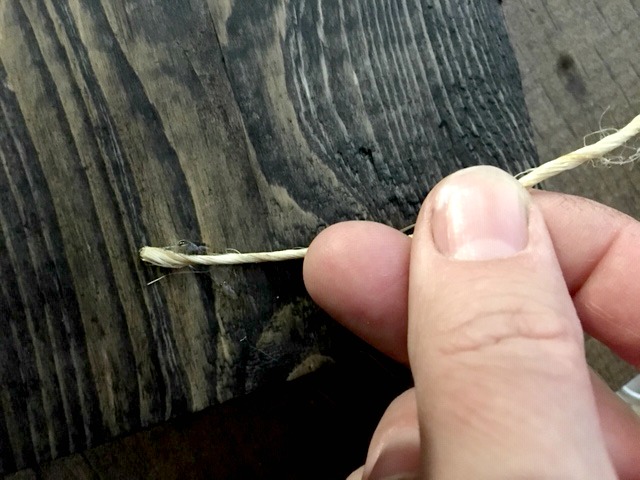
After the stain is dry, choose the better looking side to be the front. Turn it over and using a hot glue gun, glue the end of the twine to the back of the wooden board approx. 1 inch from the bottom.
Wrap the twine around the board approximately 5 times keeping it fairly tight and adding more hot glue to secure each line of twine.
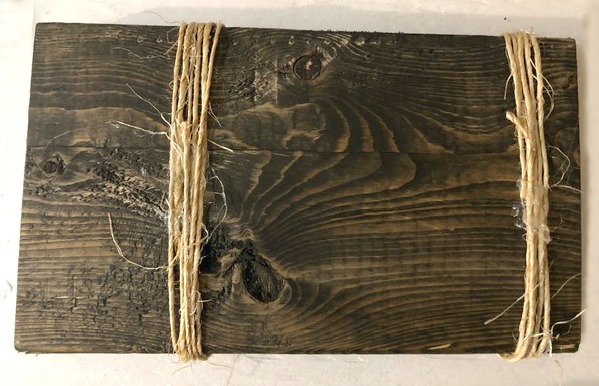
Repeat again 5 and 1/2 inches away from the first twine wrapped section. Have a 4×6 photo handy to test out the distance you would like the top and bottom of the photo.
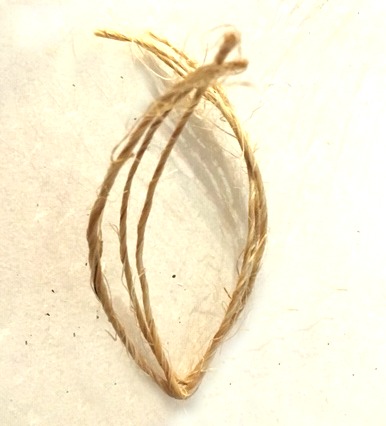
Take 2 or 3 strands of twine and cut to 7 inches long.
Bend the twine in half so there is a point for the bottom of your heart.
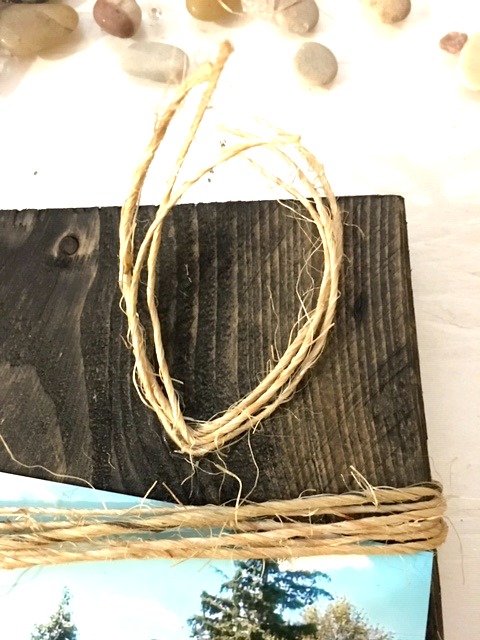
Add a dab of glue to the bent area of the twine and secure it onto the board. I added to the top right.
Add more small dabs of glue at the top of the heart. Use very little here because we don’t want it to dribble and show on the finished side.
If you would like it to be able to hang up on the wall you could hammer in a picture hook. Another option is the screw in eye hooks and tie more twine or jute rope to hang it up.
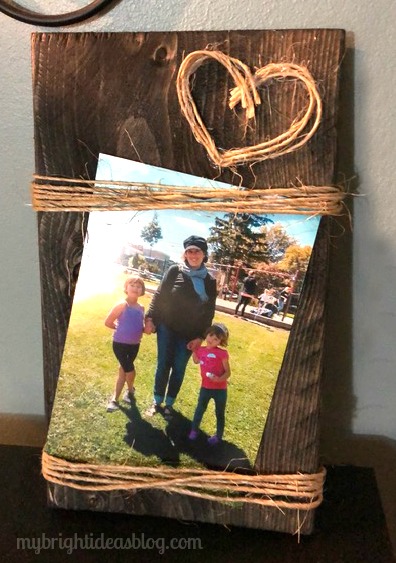
Add a special photo and give it as a gift.
I put this on the craft table at work and it sold right away! Fortunately, I have a stack of wood ready for more crafting. See the links below for more ideas for how to use up the little pieces of wood you have in your cut off scrap pile.
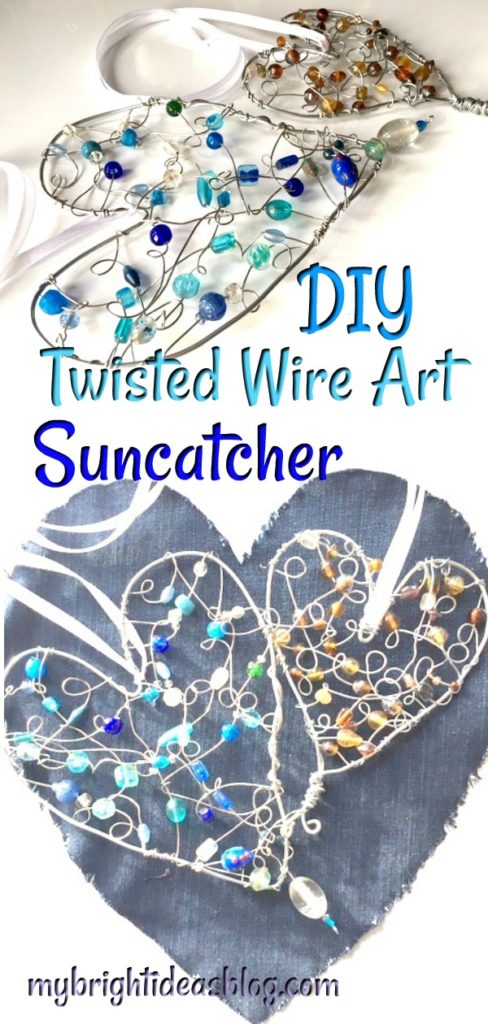
Twisted Wire Art – Love Heart SunCatchers
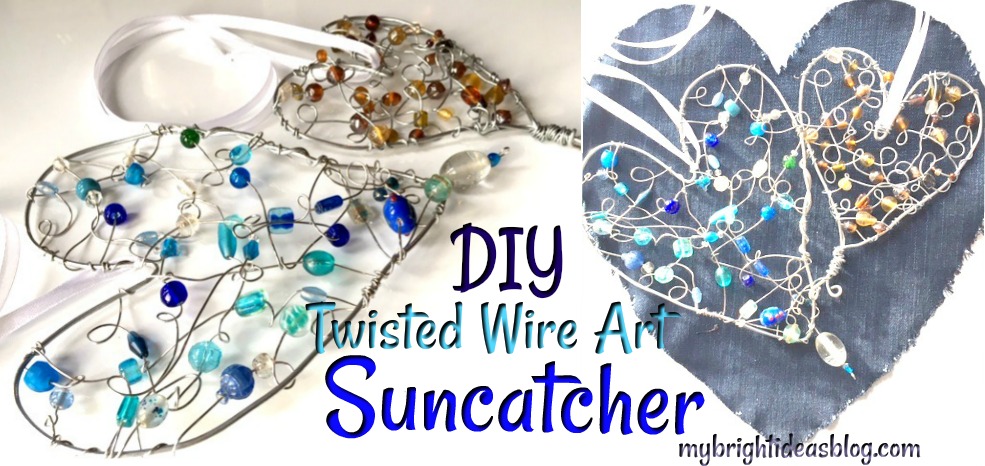
I have been excitedly pinning all sorts of “Wire Art Crafts” on Pinterest – But for some reason I’ve been nervous to get started….until now! This is my first attempt and I hope there will be many more to come! So let me show you how I made a beaded suncatcher!
You will need:
- wire (14 and 20 gauge wire)
- wire cutters
- wire plyers
- beads
- a cutting board or other desktop protection
- ribbon
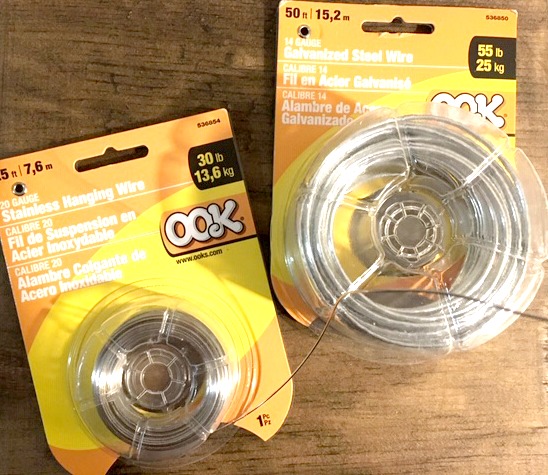
I recommend a cutting board because I don’t want you to scratch up your dining room table or kitchen counter or any other surface you craft on. Wire projects can leave sharp ends-which can do some damage.
For wire: I bought 14 and 20 gauge galvanized stainless steel. This is much cheaper at the hardware store than the craft store.
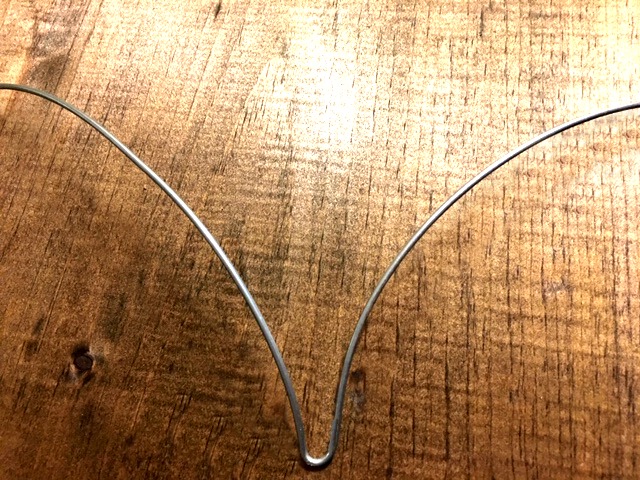
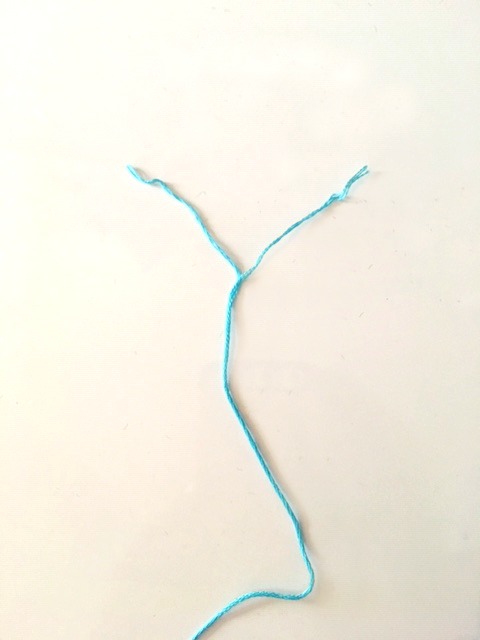
Cut a length of 20 gauge wire approx. 27 inches long (69cm). Use big wire cutters from your DIY tool box rather than jewelry making plyers. 20 gauge wire is thick!
Bend it in half so the heart shape begins to form the point in the top middle of the heart.
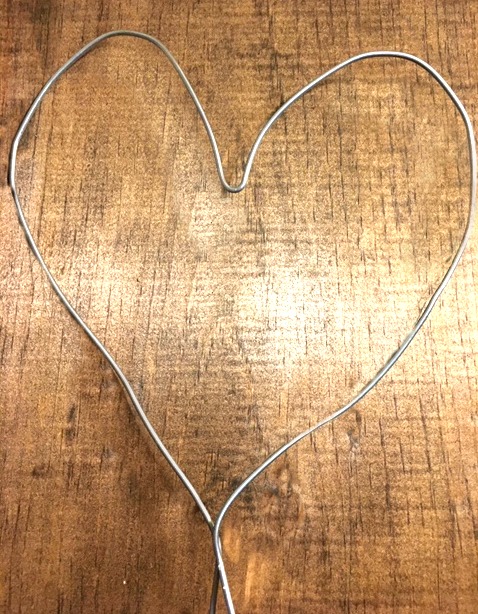
Gently manipulate the wire (with your hands not tools) to make the shape of a heart. Bring the bottoms together and twist.
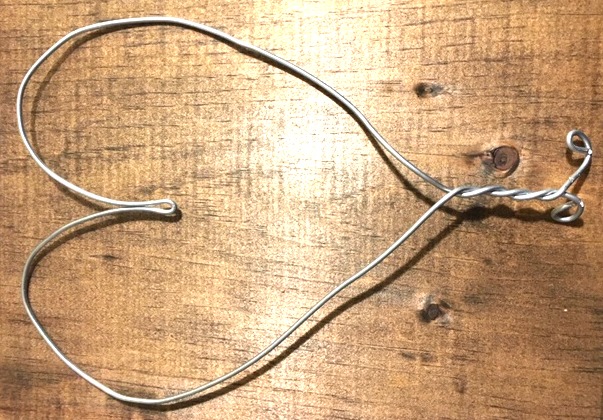
Keep twisting the bottom and rounding the ends.
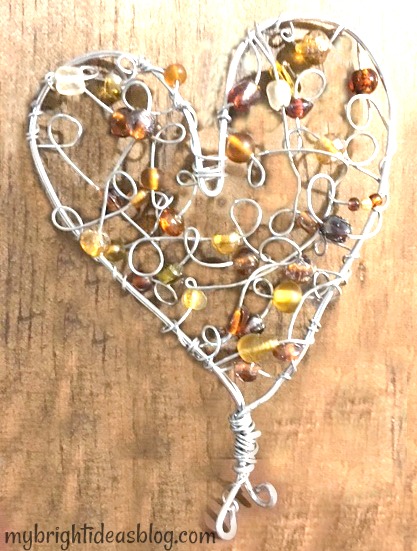
Fast forward to see how the amber one turned out….
For the blue suncatcher I formed the wire into a heart and wrapped the excess on the side.
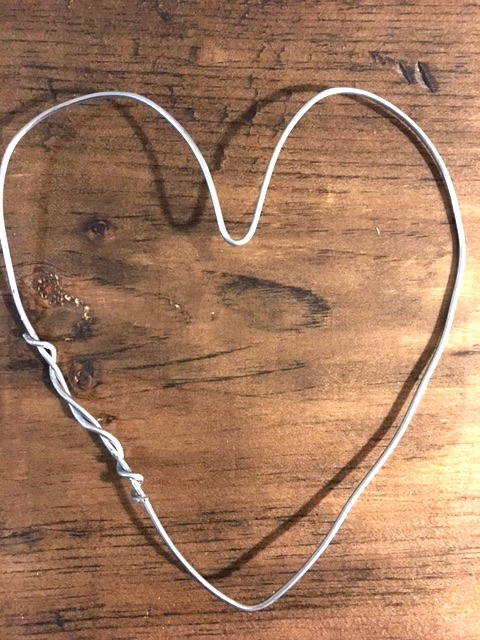
This is actually really hard on your hand muscles. Take breaks if you are getting achy muscles in your arms or hands. I think this looks a bit sloppy so I prefer the first option.
Now cut a piece of fine 14 gauge wire 30-40 inches long (90cm).
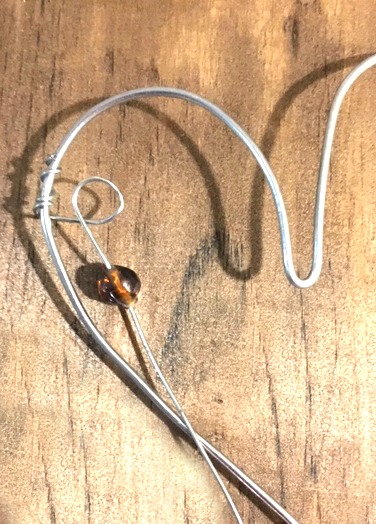
Start by twisting the fine wire around the side of the heart a few times and then wrap the wire around a round pen to make a loop. Slide the bead onto the wire and then make another loop around a pen. Have this loop face opposite direction.
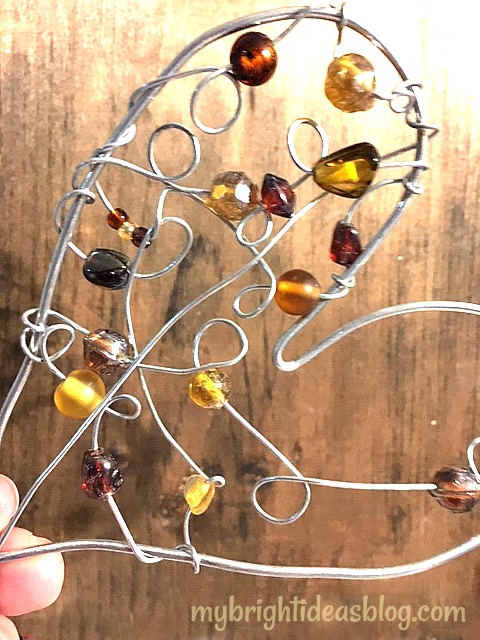
Continue wrapping the wire to make a loop and then bead it and next loop in the opposite direction. Wrap it around the side a few times and repeat making loops and adding beads, zig zagging over the heart. You may need up 3 yards (2.5 m) of wire for this part. This takes a bit of time.
When I finished this one off, I just wrapped the excess wire around the bottom of the suncatcher.
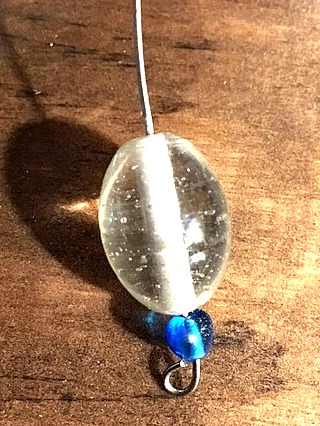
For the blue one I added a drop bead on the bottom. Cut a piece of 14 gauge wire 3 inches long. Twist the end around to anchor a few beads on. Wrap this at the end bottom of the heart.
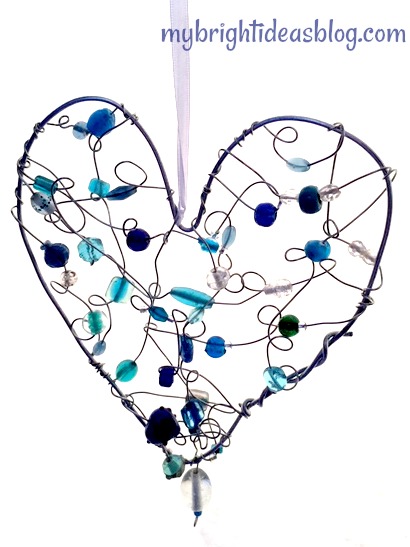
This is a great project for someone who doesn’t follow patterns well and likes to free style (Like Moi). It’s a random, twisting, original piece of wire art.
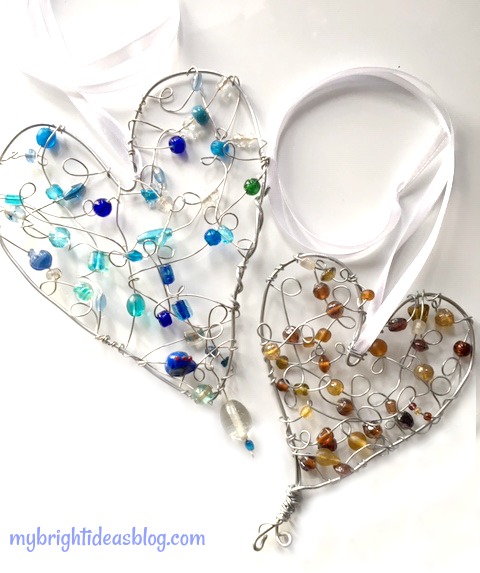
Finish the project by putting a bit of ribbon (or clear fishing line) through the top and tying it in a bow. Hang in your window!
I’m pretty pleased with my first attempts at wire art. I am eager to try it again soon!
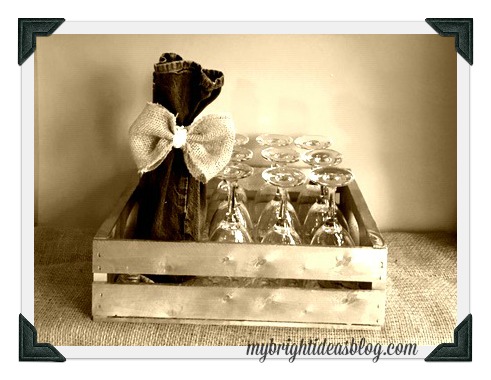
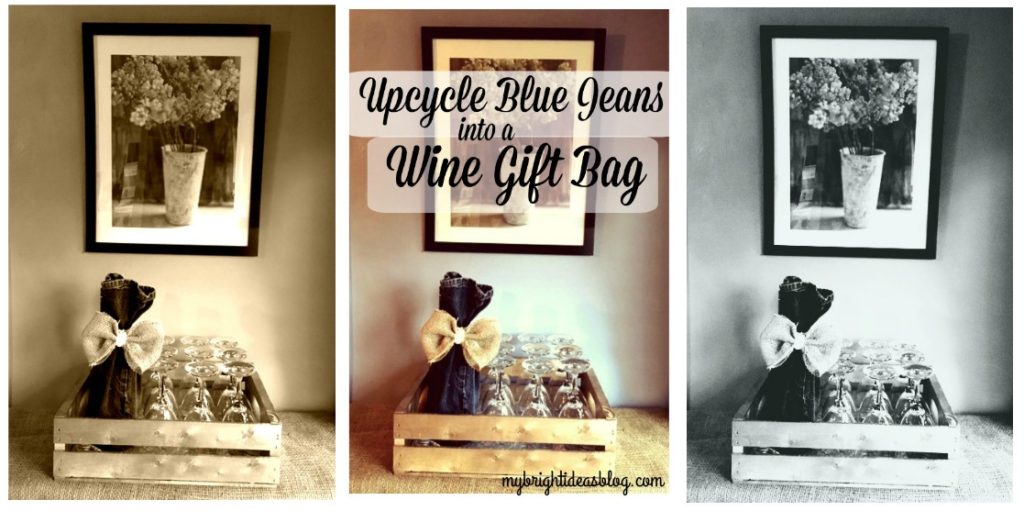
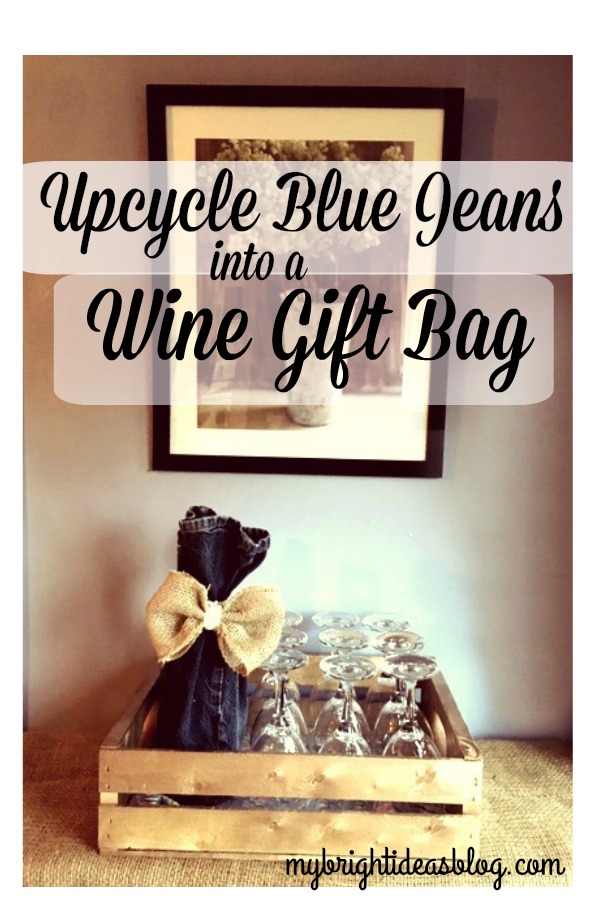
Upcycle Jeans into Wine Gift Bags!
Repurpose Jean Pant Legs Into Wine Bags!
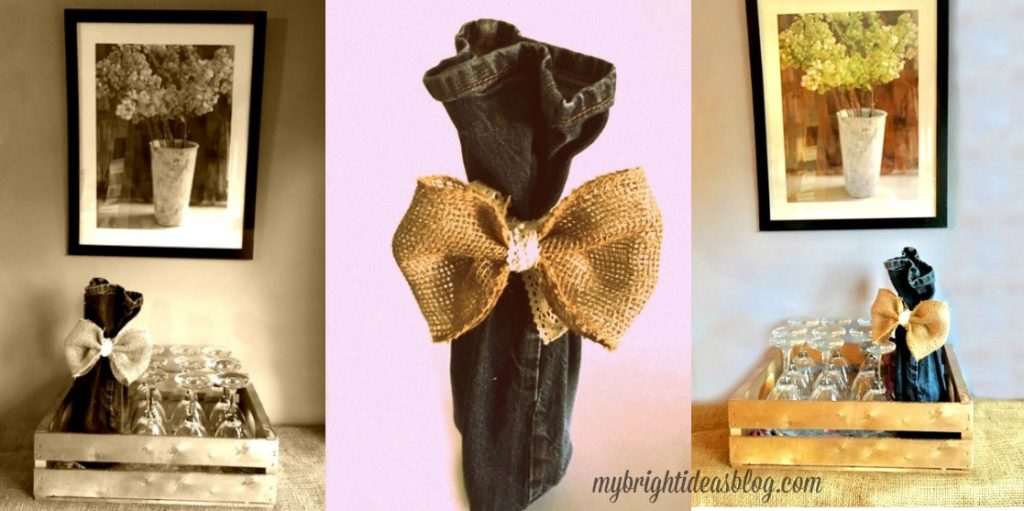
Want to bring an original hostess gift to a casual dinner party? Dress up your wine bottle with a pair of old blue jeans!
This will get your mind inspired for other upcycling and gift wrapping ideas too!
You will need:
- Blue jeans you don’t mind cutting up (child’s size would be ideal)
- Sewing machine or needle and thread
- Ribbon/String/Twine
- Burlap for bow or something else you can add to embellish
As long as the jeans are freshly washed it doesn’t matter if there is fraying on the cuff. We want the bottom of the jeans to be at the top so it can add character.
The pant leg opening should be around 6 inches (15cm) wide. So skinny jeans or children’s jeans are perfect. I picked up 4 pairs of kids jeans from my goodwill for around $3 each. I will be making more blog posts out of the scraps and pockets too. Save any decent leftovers when you are done.
If your jeans are adult size, no problem you can trim the pant leg width and make a seam.
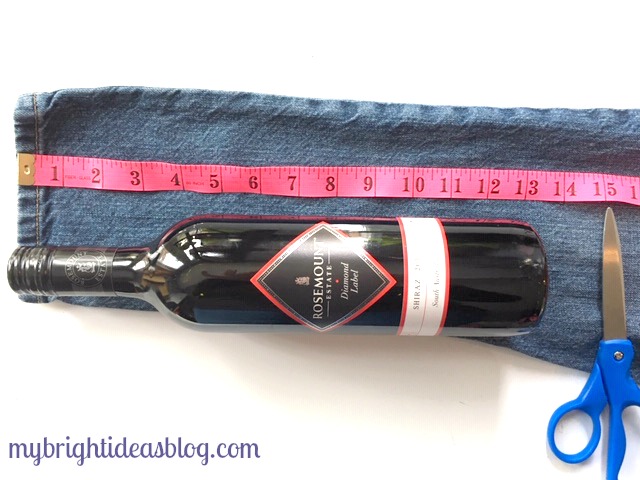
Cut the pant leg approximately 15 inches (or 38 cm). This will give you a bit extra for the seam on an average 13 inch bottle.
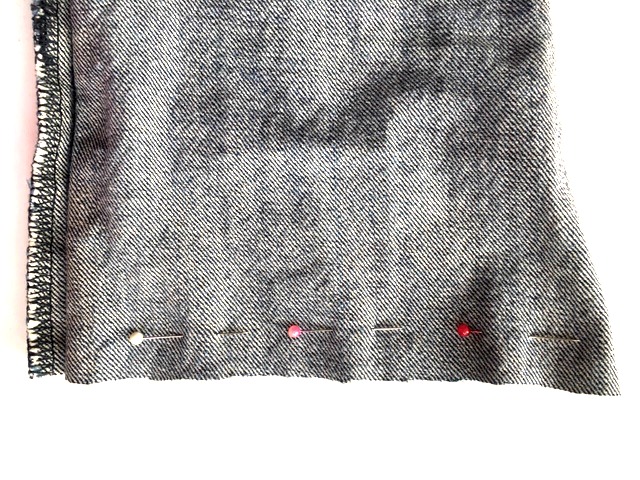
Turn the pant leg inside out and pin closed.
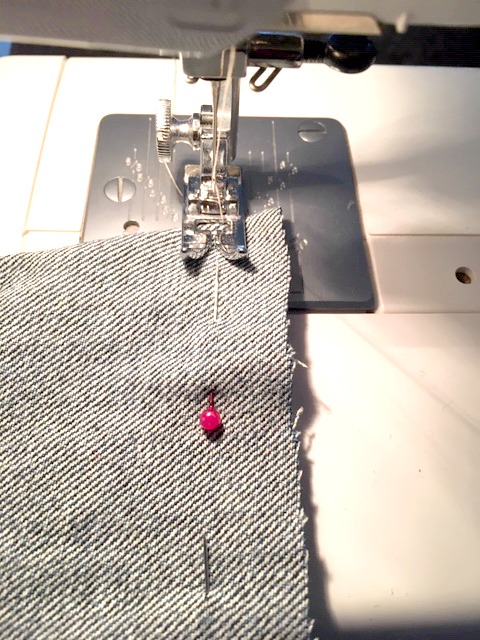
Sew straight across the bottom 1/2 inch or 1 cm from the edge. You could hand sew this if you don’t have a sewing machine.
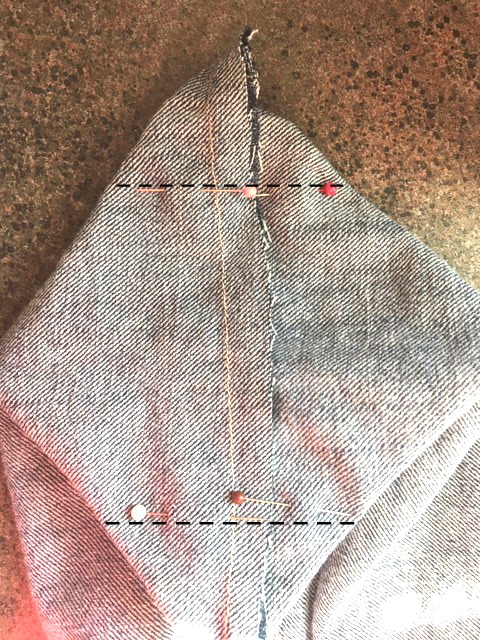
Now flatten the bottom of the bag and pin 1 inch (2.5 cms) from each corner. This will make your bag more boxy at the bottom and easier to stand up. Stitch across this line.
Cut off the triangles on the outside of your last stitch. Turn it right side out again.
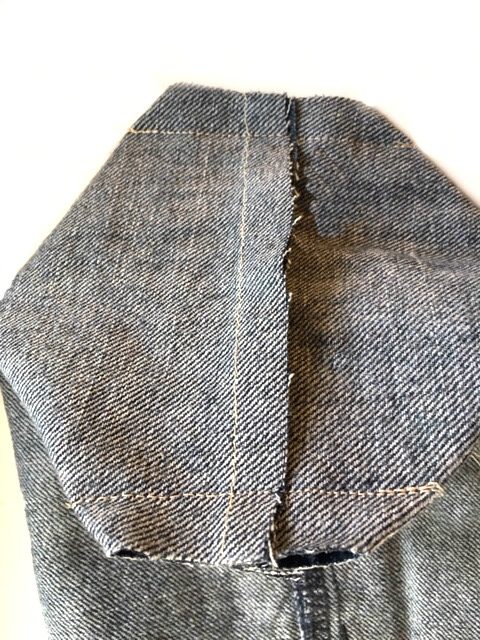
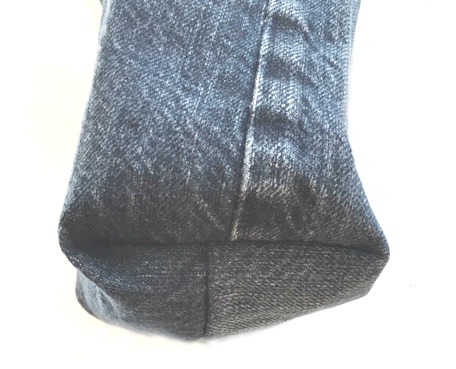 See what I mean? Boxy on the bottom to help it stand up.
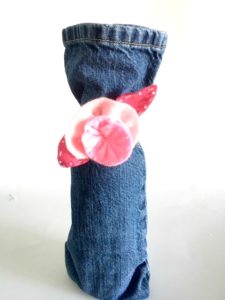
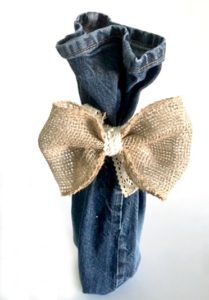
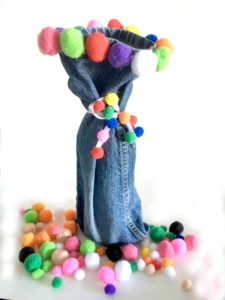
Now decide how you would like to decorate it. Put the bottle of wine in the bag and tie a ribbon or piece of twine.
If you like the felt pink flower in the photo on the left have a look at my cup cozy project link at the bottom of this post. http://mybrightideasblog.com/easy-to-make-felt-coffee-cup-cozy/
I also went a bit nuts with hot glue gun and pompoms in the photo on the right. Maybe you should save that for friends with a great sense of humour. Your accountant friends might think its a bit ridiculous! (no offence to the accountants)
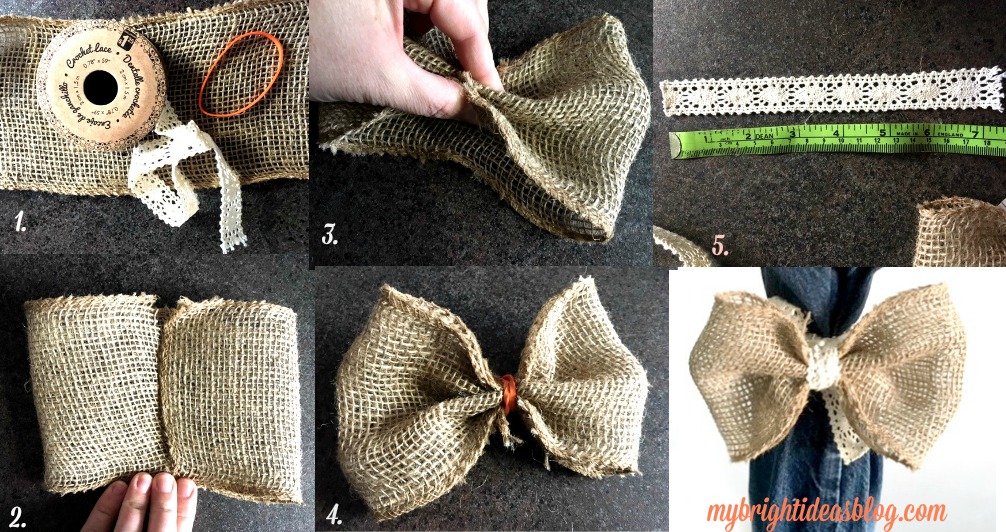
This bow is so easy to make and versatile for other project too!
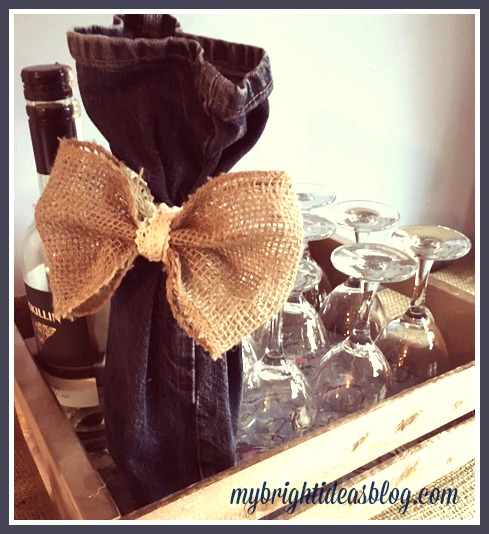
I hope this has inspired you to dazzle up a hostess gift of wine!
….
Easy to Make Fleece Hat with Flowers – Simple Sewing Project
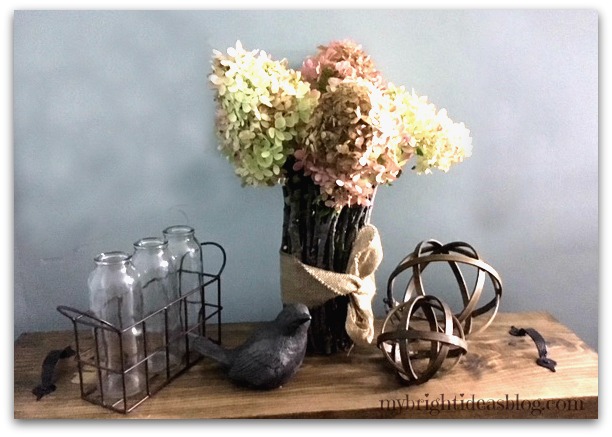
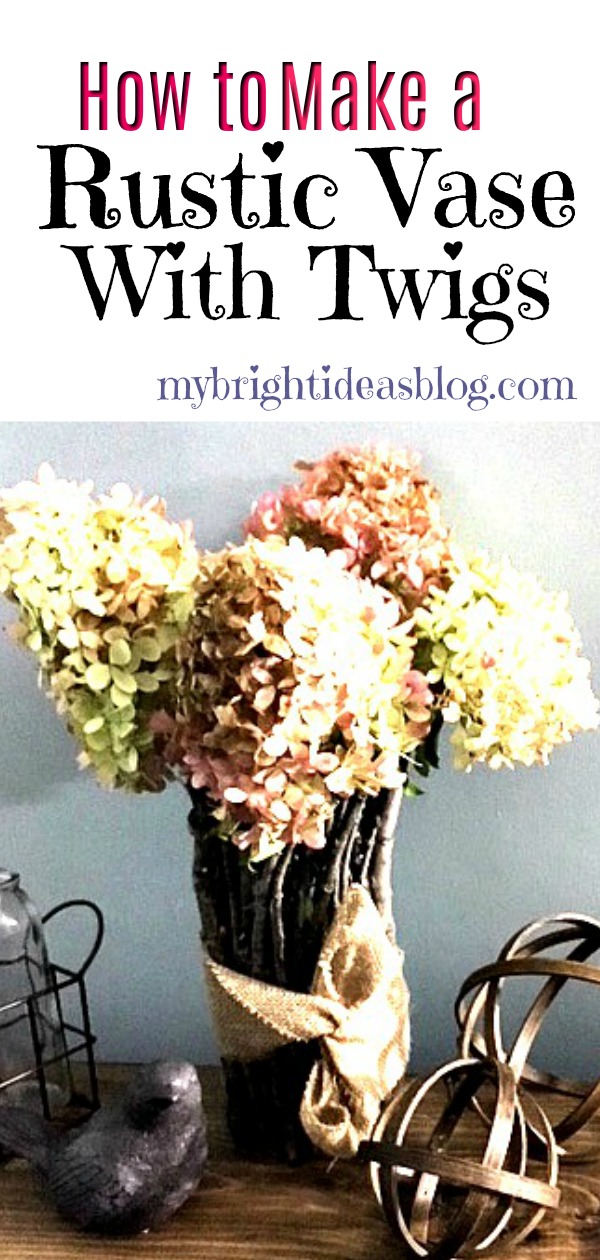
Make a Twig Vase – Super Easy DIY!
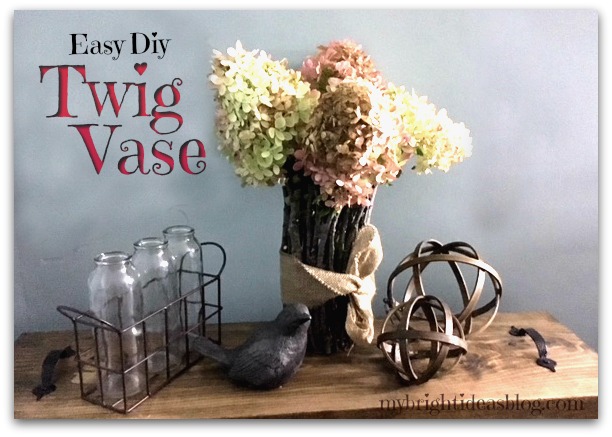
Here is a super easy, super rustic, super pretty twig vase! I am loving using twigs and sticks in crafts. It’s free! It’s also time to do some trimming in the backyard gardens so I get the job done and a craft project to do when the work is done!
You will need:
- an inexpensive straight vase
- twigs
- snips
- hot glue gun
- 6 or more hot glue sticks
- burlap or raffia
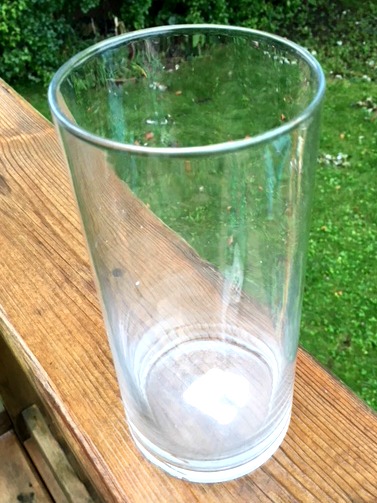
First, choose your vase. If you don’t have a tall straight vase already in the back of your cupboards then pop over to the dollar store, or a thrift store you will definitely find them there. I had this vase on hand. The Dollarama sticker was still on the bottom. $1.25. That is the total expenses on this craft if you already have the glue gun and glue supplies.
I love me a cheap craft!
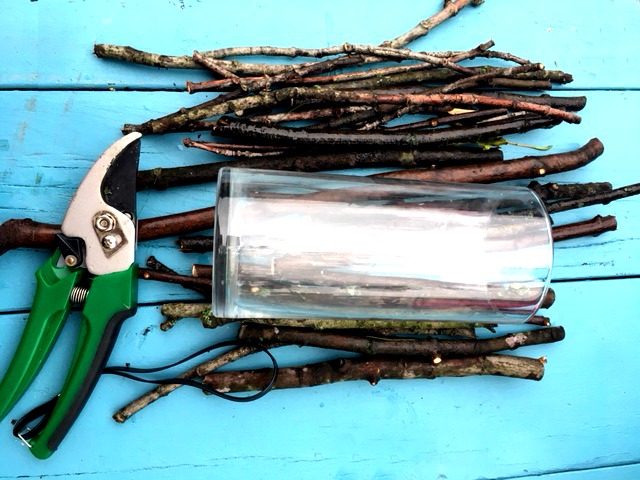
Using sharp shears, cut twigs in different lengths taller than your vase. Choose sticks that are as straight as possible. Trim off any side twigs as short as possible.
Plug in your glue gun. Set the twig in place and see where it will make contact with the glass of the vase. Add the glue in those contact places. I do this instead of running a line all the way down the stick. That is a lot of waste. Hold the twig in place 10 or 20 seconds while the glue cools. Mind your fingers!
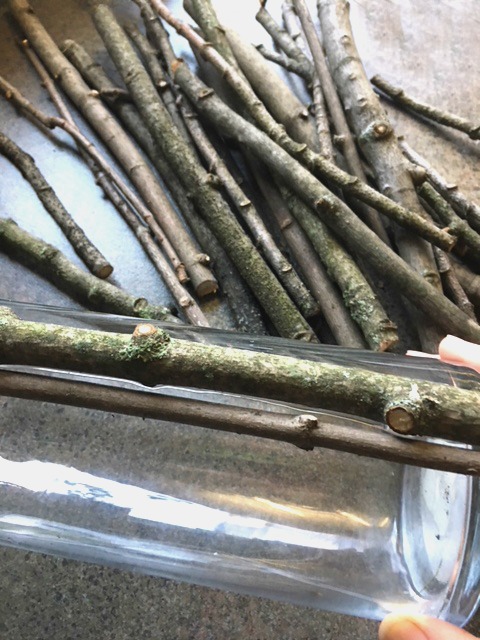
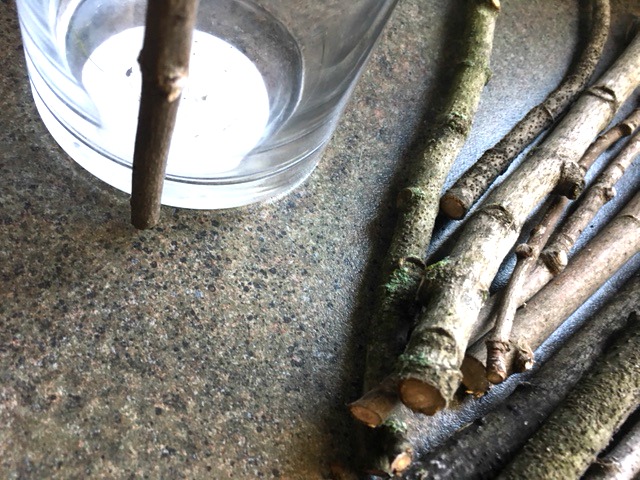
Work around the vase with each twig fitting tightly next to the previous twig. If there are spaces you can put a thin twig in later to fill in the gaps.
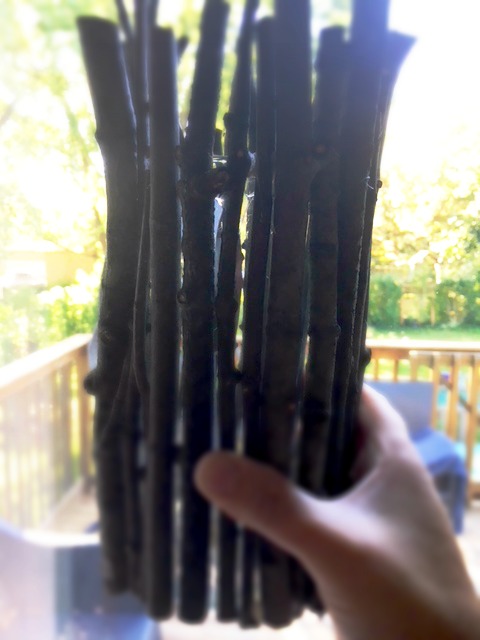
You will notice that the light does pass through the gaps. If that bothers you, cut a brown or black paper down to the vase size and slide it inside.
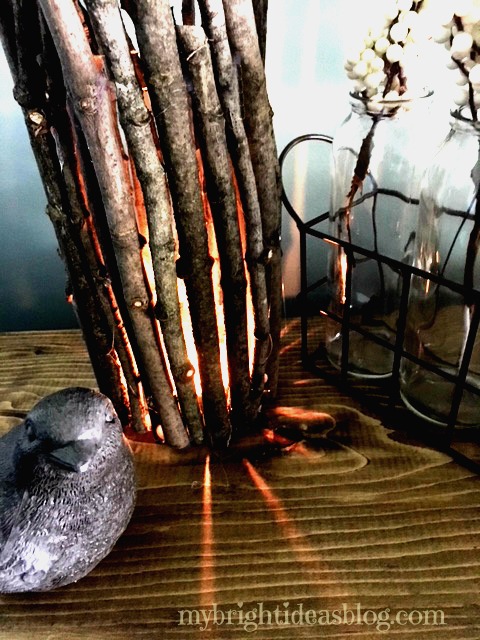
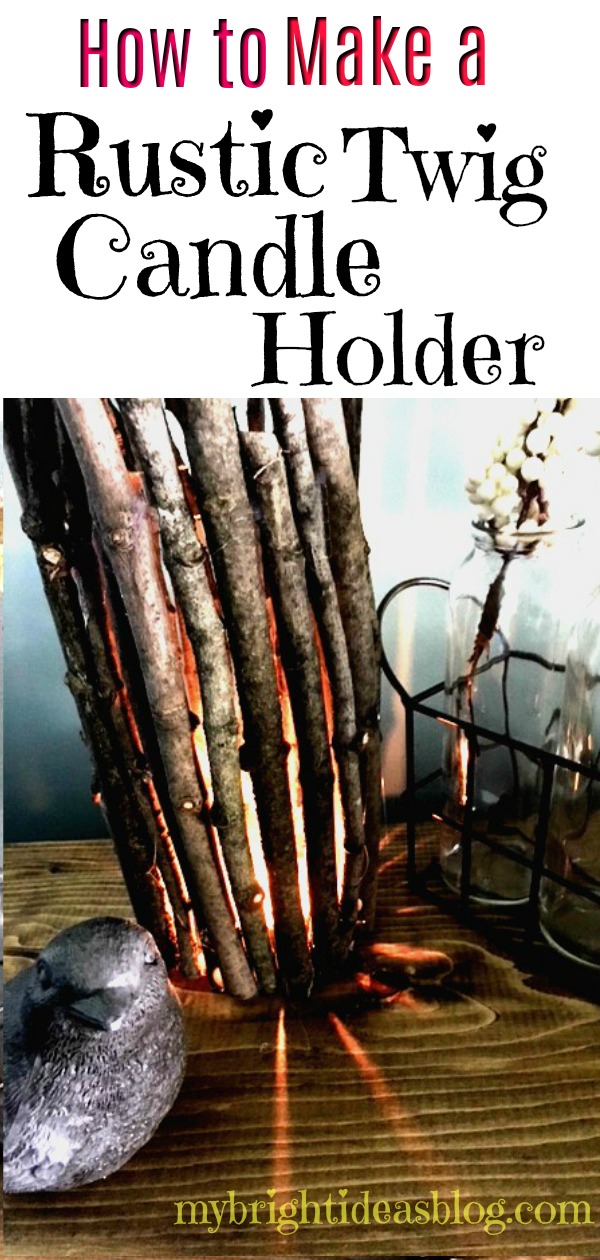
OR…you could embrace these gaps and use it as a candle holder. If you go this route please do not put paper in your vase. You will surely start a fire. Eek!
I didn’t mind the gaps in the vase so I skipped the paper and can use it with a tea light or with dried or artificial flowers.
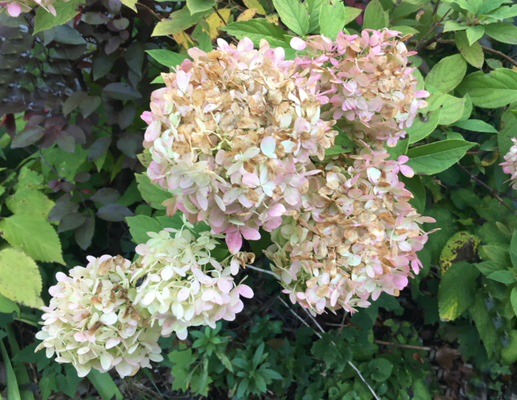
So to the garden we go for some flowers. I cut these hydrangeas. These are going to dry nicely in the vase and look the same for months and months.
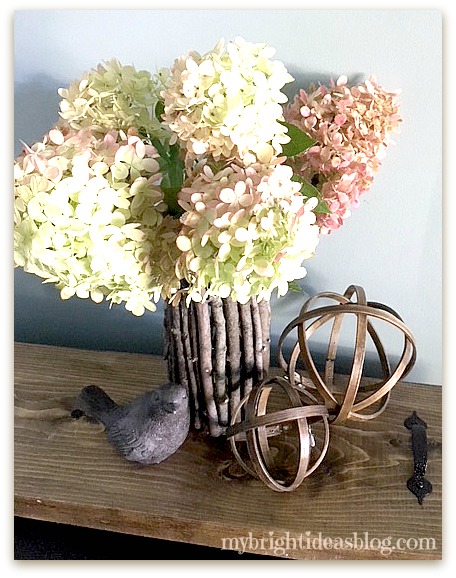
Isn’t that lovely? I hope you enjoyed this rustic twig/stick project. I really love making things with twigs.
Wait! Oh my days!!!! I forgot to put on the bow!
Cancel the photo shoot and back to the craft counter….
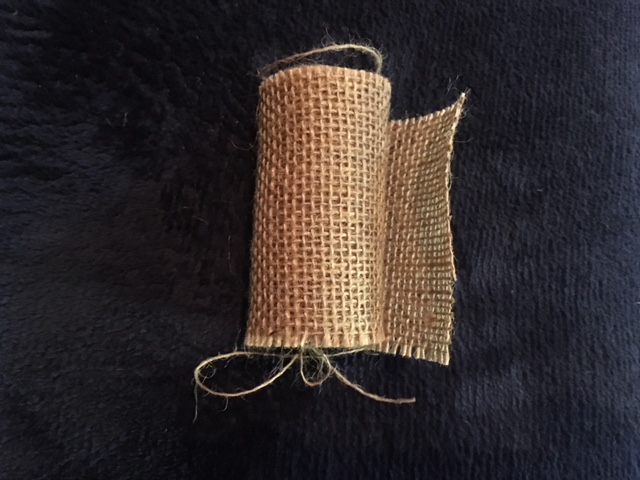
I know I have raffia somewhere but I can’t remember which craft bin I put it in. So instead I used this 3 inch wide burlap roll from the dollar store and wrapped it around the vase.
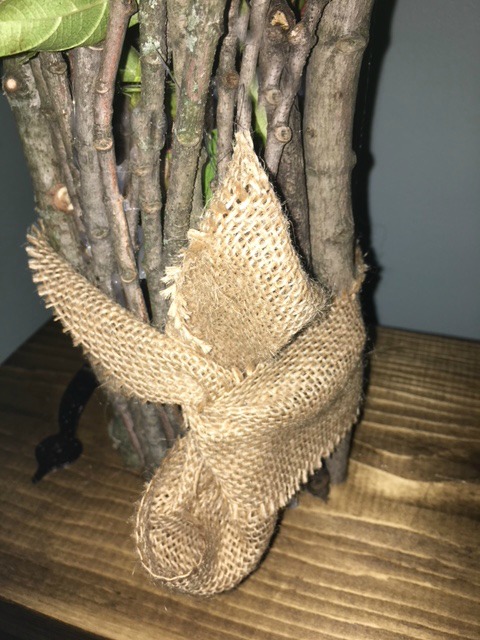
After tying it in a knot I tucked the ends under the centre. It looks like a bow but less bulky.
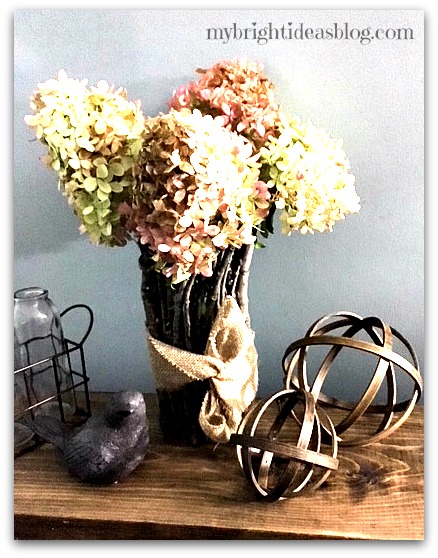
There now that is better! Its a lovely rustic vase perfect for this time of year!
I really appreciate you reading to the end and hope you will remember to pin this or share it on your favorite social media site.
If you would like to see how I made the orbs or wood tray in the photo above, click the links below.
Till next time!
…
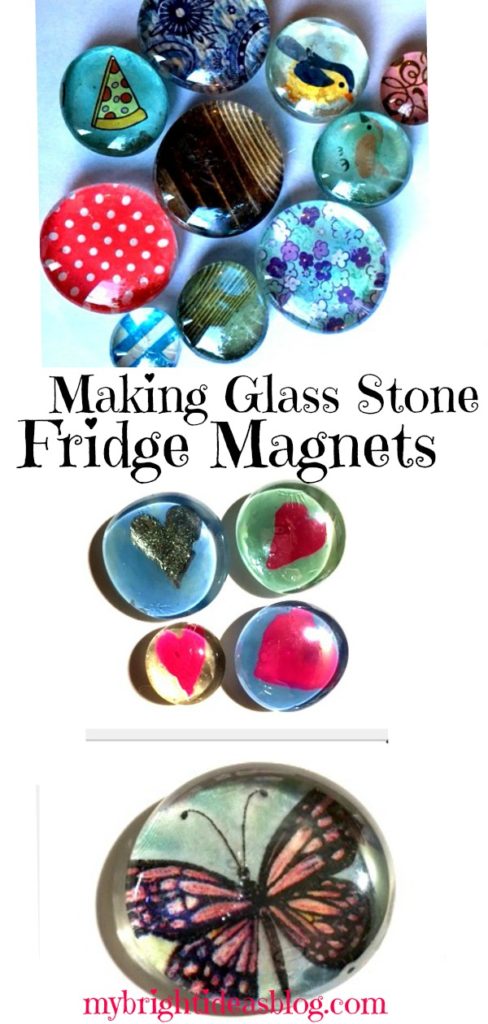
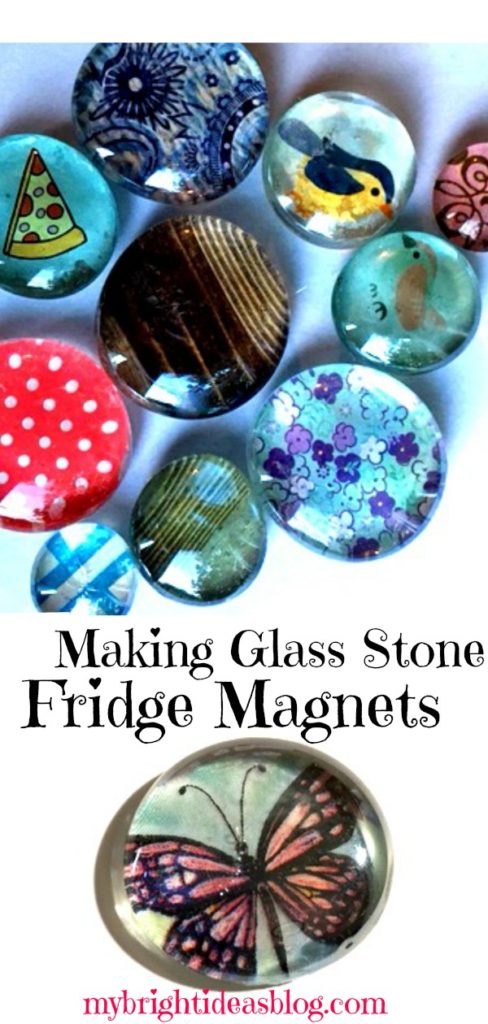
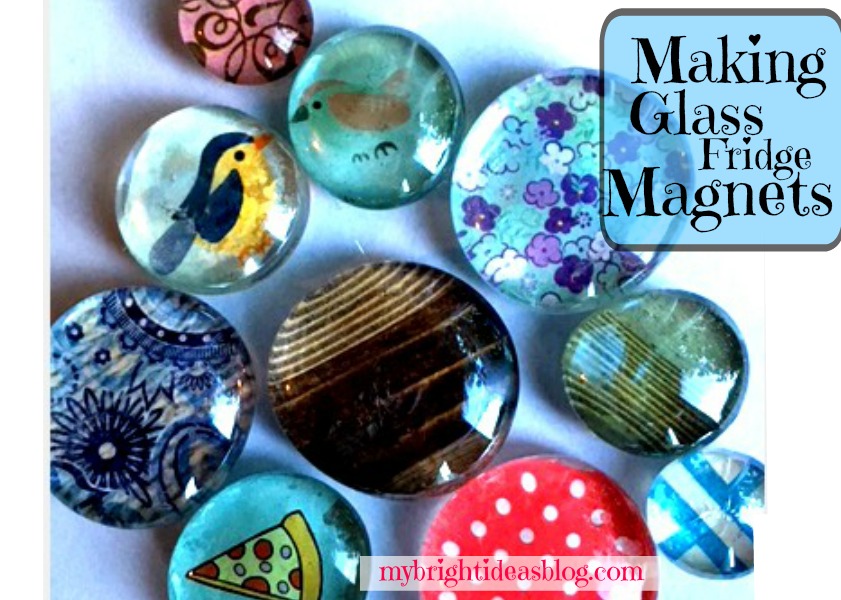
Make Glass Stone Gems into Gorgeous Magnets
Make Glass Stone Gems into Gorgeous Magnets
This craft is so crazy easy I can’t believe I didn’t make it sooner! Glass gems have a wonderful magnifying effect if you paint or glue a picture to the back of it. Then add a magnet to the back of it and you have a really cool fridge magnet gift or item to sell!
As I mentioned a week or two ago…the craft table at my work office is pretty empty so this is another project the kids and I have been working on to sell.
We will look at 2 ways to make a big impact with Glass Gem Fridge Magnets
Nail Polish Technique
 You will need:
- Clear Glass Gems (flat on one side)
- Nail Polish
- Tooth Picks
- E6000 Glue or Hot Glue Gun
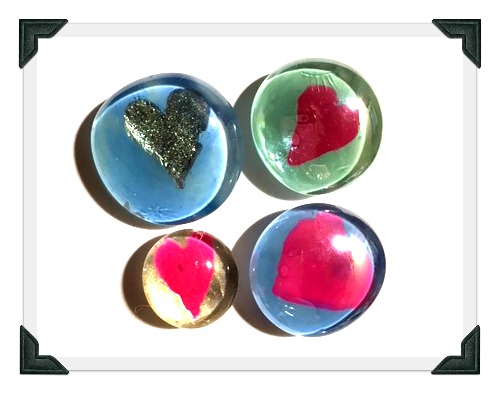
- Magnets
I have worked with 3 sizes (3/4 of an inch, 1 inch and 1 1/2 inches) of clear glass gems for this project. The small and medium sizes I purchased from the dollar tree. The largest size is from Michaels. Both stores also sell the magnets in various sizes also.
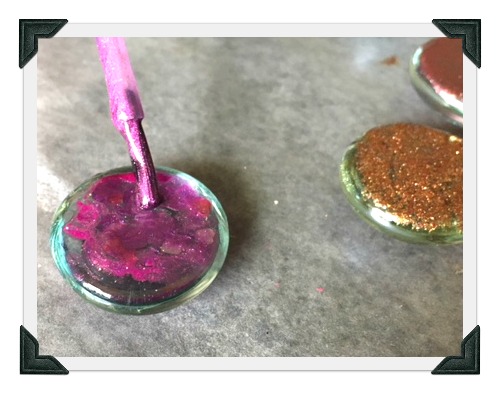
We really enjoyed using our sparkly nail polishes. Paint the bottom flat side of the stone with sparkle nail polish. If it seems sparkly but clear…allow to dry and put another solid cover over the sparkle layer.
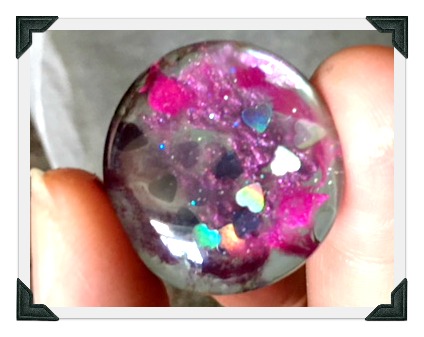 This is a pink love heart sparkle nail polish with clear and solid pink polish over top. When its dry it looks like its magnified.
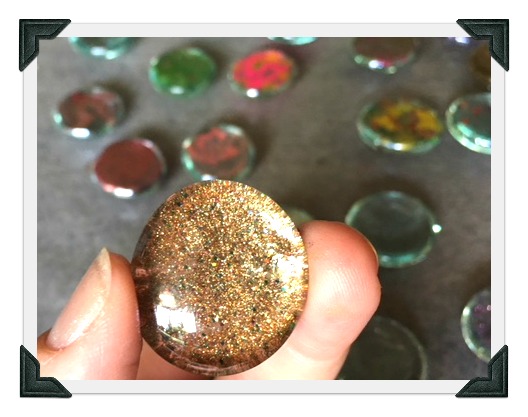
This glass gem has one thick coat of copper/gold nail polish. I love it! What a fabulous nail polish for these glass stone magnets!
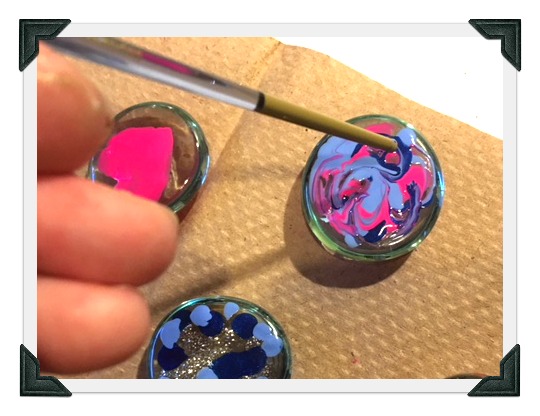
In the above photo you can see we put several dots on the glass stone and took a tooth pick (or end of a paint brush) and simply swirled the nail polish. The kids loved trying this!
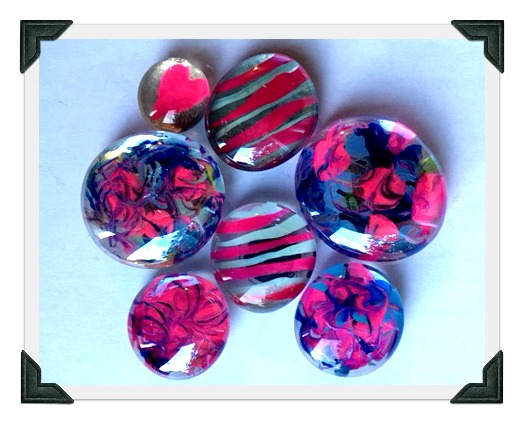
Swirls, stripes and love hearts…
To make the hearts, I took a pink bottle of nail polish and made a love heart on it. After it had fully dried I painted over it with silver sparkle, blue and turquoise for a really sweet gift magnet.
 Allow all nail polish to dry fully and then glue the magnet on the back of the glass stone. For my nail polish magnets I used the E6000 glue which is very durable and very smelly. If you choose to do the same, open the windows and allow ventilation. It’s very smelly stuff. It also is slower to dry so watch that the magnets don’t shift while drying. I found that I needed to space the magnets apart during this process. If placed too close together the magnets would pull towards each other and not dry in the middle of the glass stone. Do not touch for several hours or leave to dry overnight. Using a hot glue gun instead will fix the stinky and shifty problems. But watch your fingers. Neither glue option is great for the kids, so I would recommend the grown ups do the gluing.
Seriously though, open the window. Between the smells of all the nail polish bottles and the E6000 glue you are sure to have a headache and get grouchy. Not allowed! This project is too awesome to get grouchy!
Now lets move on to another lovely option….
Paper Technique
You will need:
- Patterned Paper or Napkins
- Scissors or hole punch
- Glue or Mod Podge
- Paint Brush or Sponge Brush
- E6000 or Hot Glue Gun
- Magnets
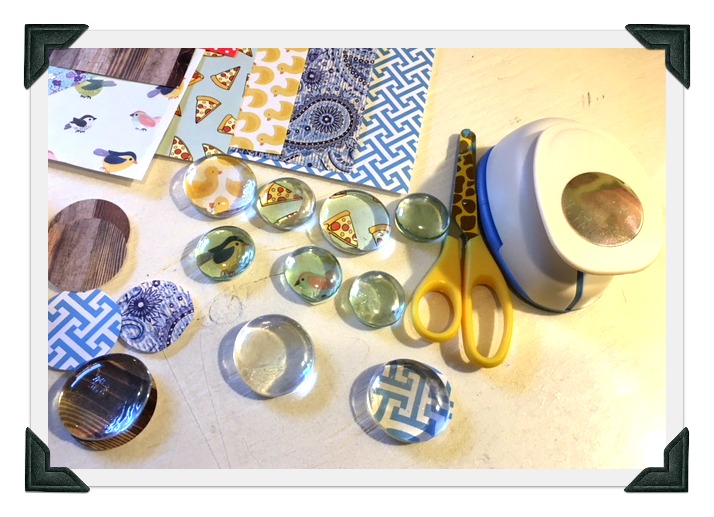 The variety of designs of scrapbooking paper is perfect for this project. But you could also use colorful napkins, tissue paper, photos, something special you draw or you print off. You just need to cut it to size and glue it on.
If you have a hole punch the right size by all means use it for a perfect circle. If not just use scissors and cut it slightly smaller than the stone.
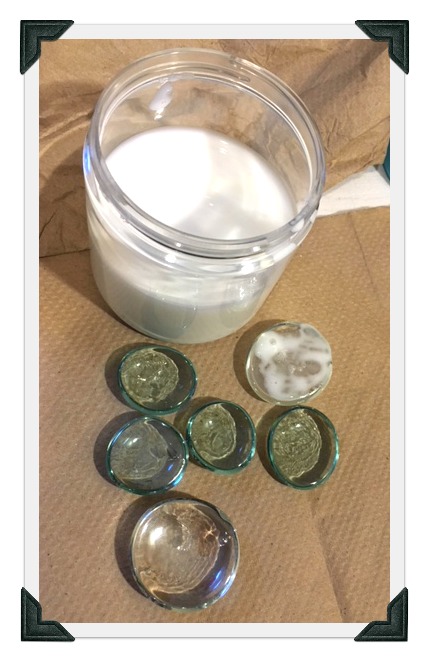 Brush mod podge or glue on the flat side of the glass stone. Add the paper circle with design facing down. When you are finished and flip it over it will show the beautiful paper through the glass.
Press the paper down. Brush on another coat of glue.
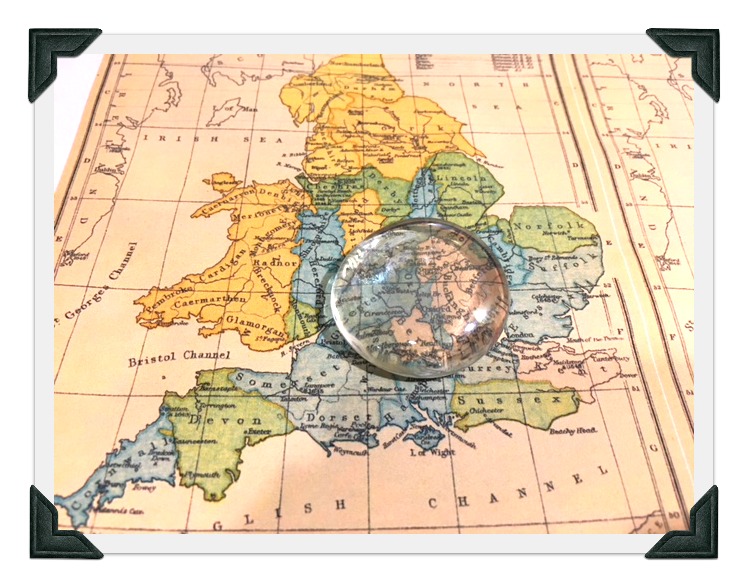 One of my favorite things was using a map. What a fantastic souvenir of a trip! Use the maps and train tickets or even concert tickets for your fridge magnets.
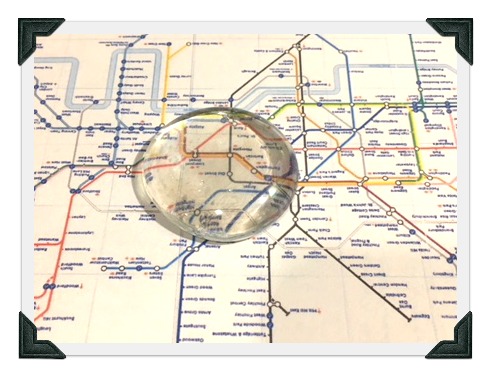
This is a map of the London underground. I wonder if it’s upside down in this picture. LOL!

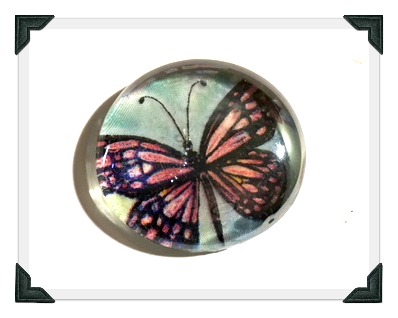
Dinner napkins come in beautiful patterns and I’ve just discovered you can glue/mod podge them to decorate all sorts of crafty projects. Hip hip hurray! Check out the butterfly magnets I made from napkins.
I cut down the napkin to size and removed all the layers of paper except the top one. This is like gluing tissue paper so handle with care.
 I recommend putting a layer of glue on the stone gem and add the tissue or napkin on top. Then after it is fairly dry, I would put another coat of glue on top of the paper to seal it from this side. If you put it on too soon it could shift or tear the tissue.
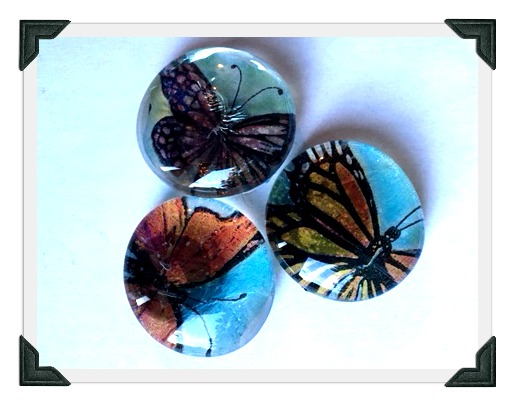 When it is all dry glue the magnet to the back. As you can see from the butterfly on the bottom left of this photo-the magnet may show through the finished design. This is because the tissue was so thin it made it a bit transparent. I could have prevented this by putting a bit of paper on the back or even adding a coat of opaque paint or nail polish.
This project is a bit addictive! So its a good thing we are taking them to the craft table at work and sharing their beauty with others. To display these for sale we are using an inexpensive cookie sheet.
As we have invitations to parties and BBQ’s this summer this is a great hostess gift for the kids to show their gratitude.
Check out this previous blog post where I also used the nail polish gems with wire for a suncatcher for the garden.
…