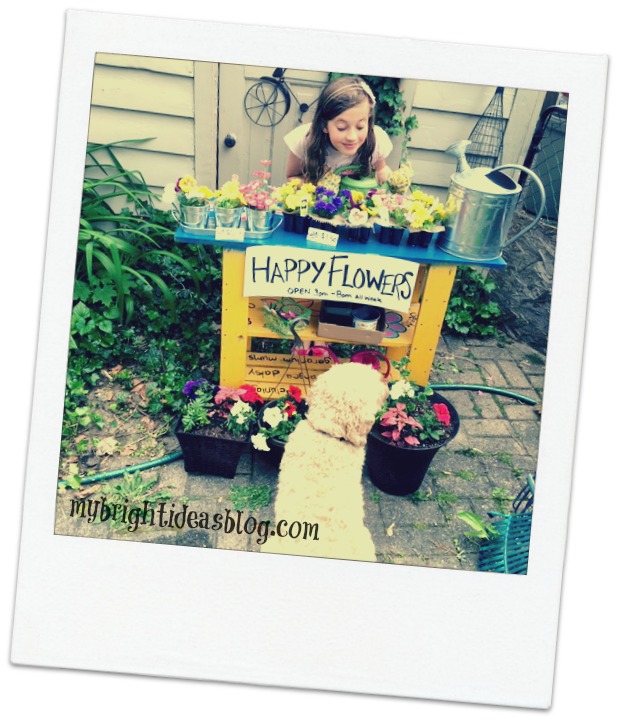
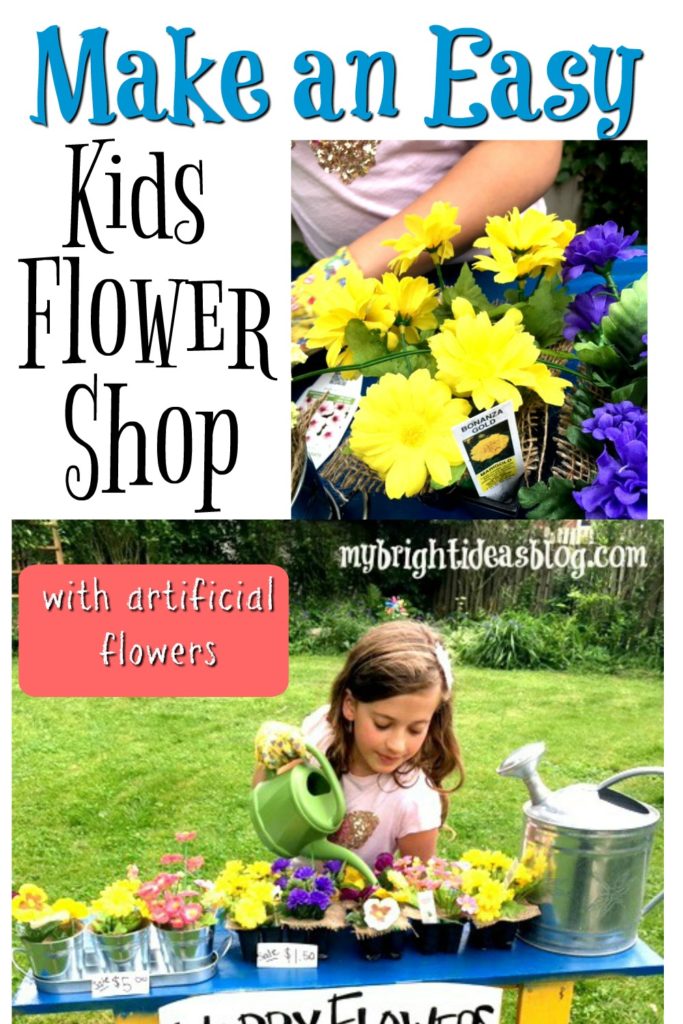
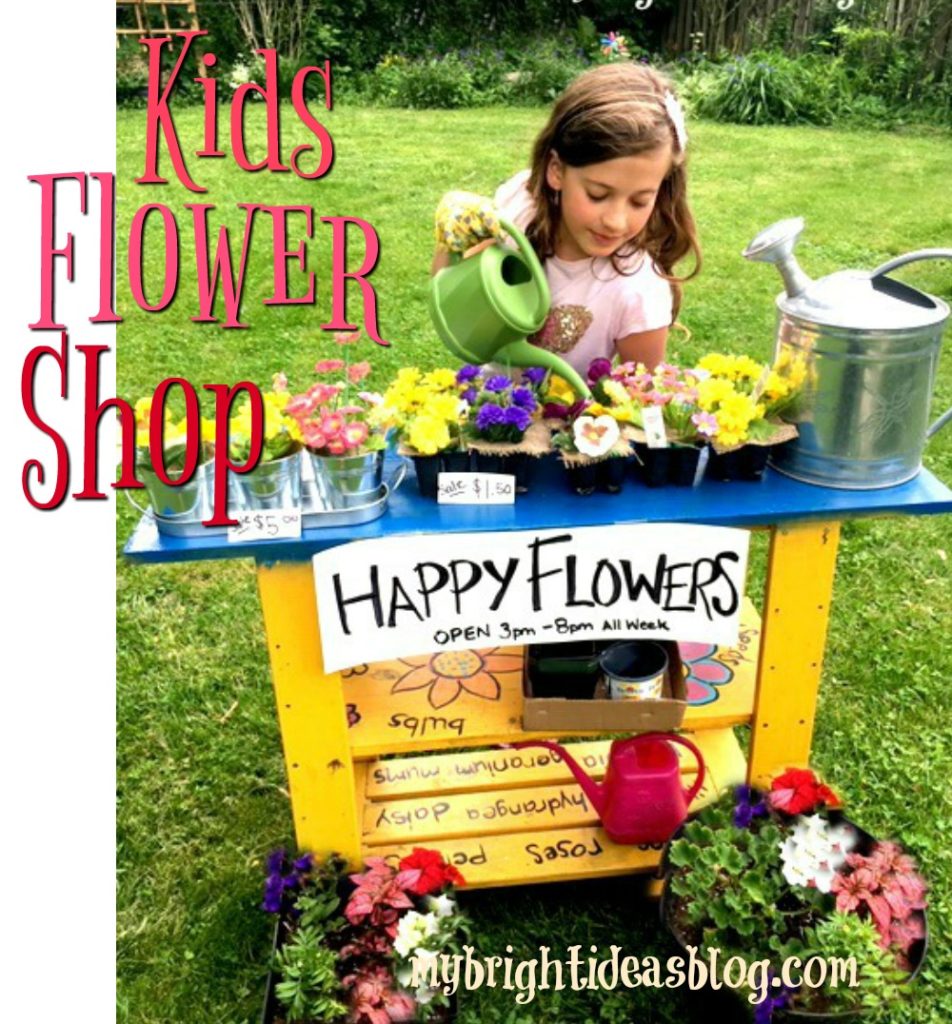
Watching my girls play in the backyard from my kitchen window sparked a great idea this week! Create a garden centre or flower shop for the kids. Using artificial flowers from the dollar store and a few other gardening things we can create a little centre for themselves. You can use real flowers too but this set up should last me a few years!
Several years ago I made a potting table out of a simple wooden shelf I wasn’t using anymore. Click on the link below to see how that was created.
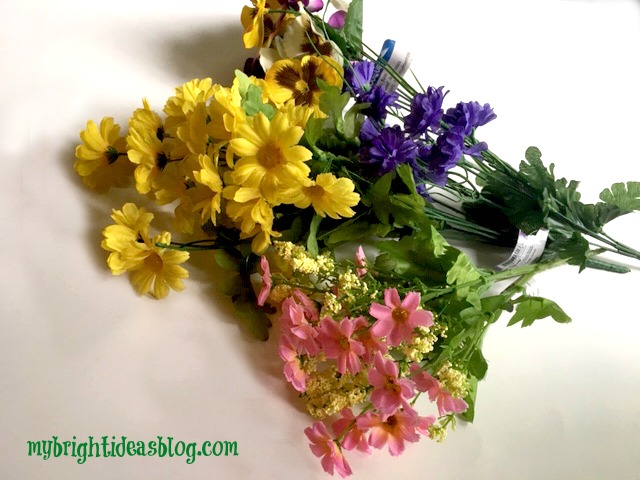
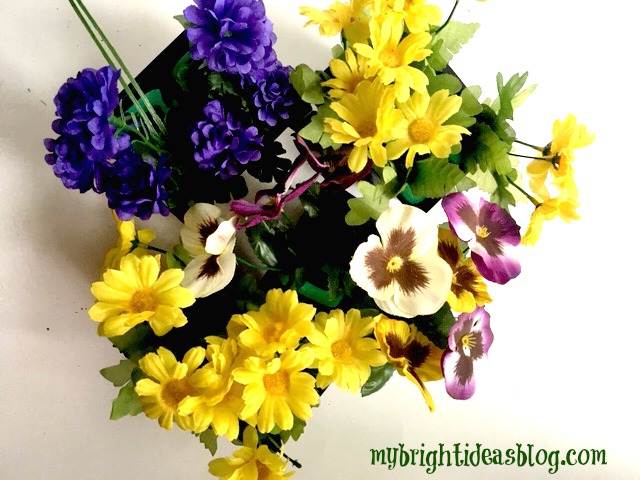
Next we need some flowers! I went to the dollar store for a few bunches of flowers that looked like something I actually have in my garden.
For this project you will need:
- several bunches of artificial flowers
- empty plant containers
- foam knee pad or pool noodle
- scissors
- wire cutter snips
- burlap (optional)
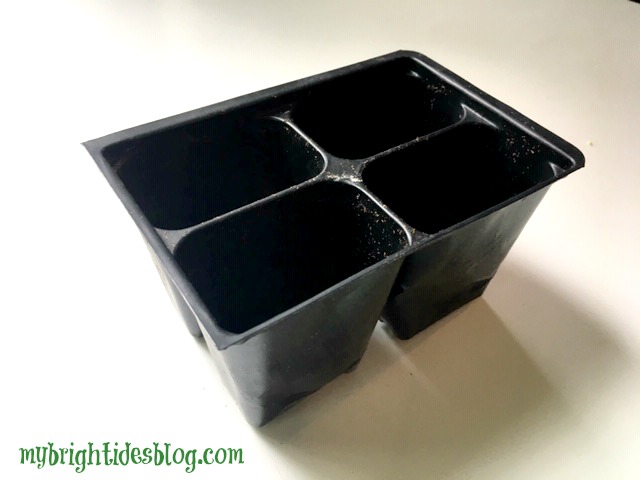
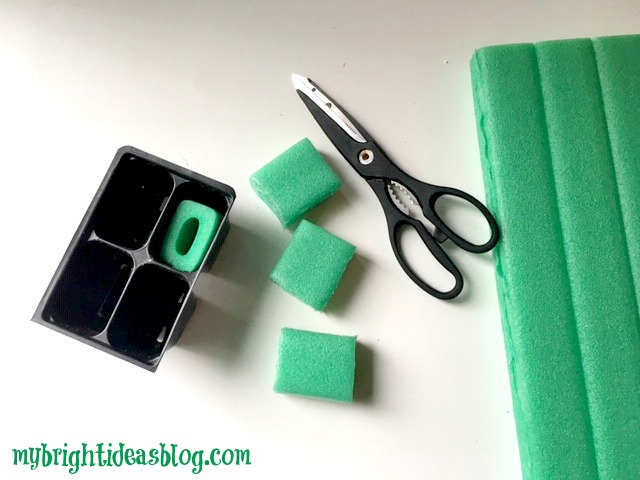
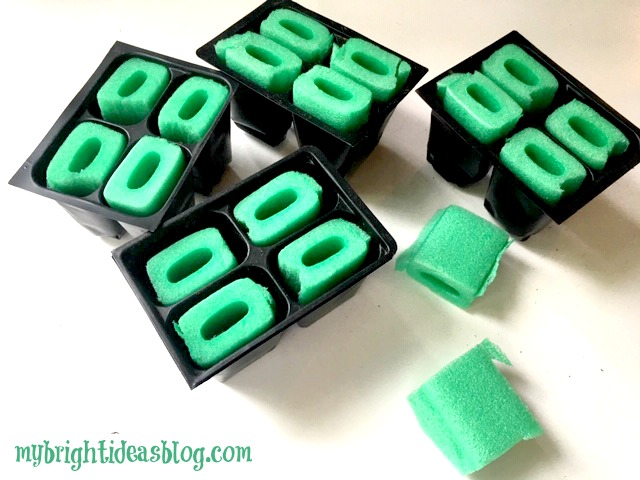
These are called 4 cell planter trays but you can use other sizes.
Every year the girls don’t want me to throw out the plastic containers that come with the little flower and vegetable plants we buy at the garden centre. They want all the little tags that come with them too so they imagine they are selling the flowers. After seeing them rearrange the empty containers imagining they had flowers in them-I thought why not get some dollar store fake flowers and make it more realistic for them.
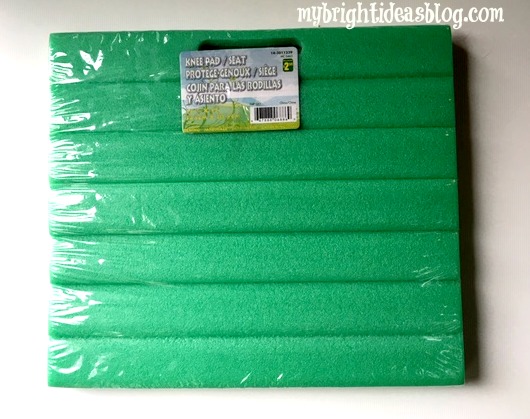 As I wandered around the dollar store I considered how I could get the flowers to stand up in the plant trays. I came up with this! A foam knee pad/seat pad.
It’s similar to a pool noodle but I thought this size would fit really well into my plant trays and I was right!
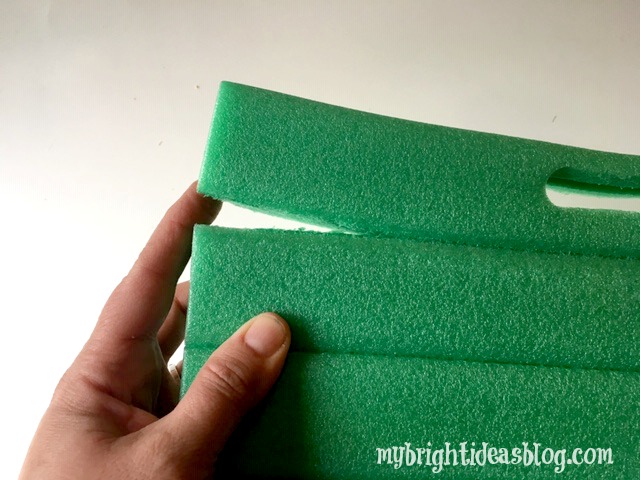
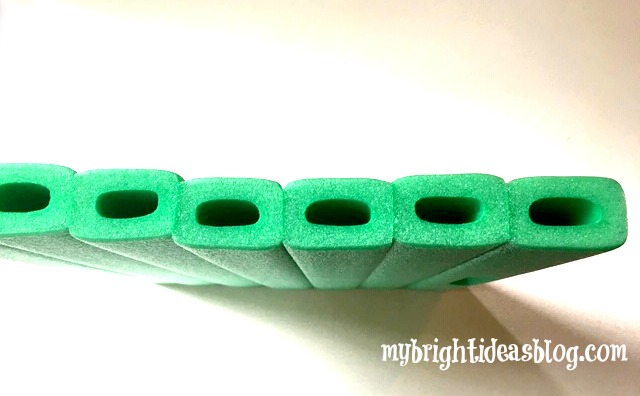
First of all, pull the sections of foam apart.
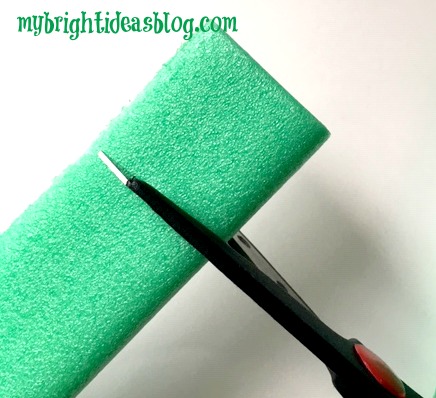
Then get your scissors and snip it 1 and 1/2 inches or 3cm long.
Test out the height and cut some more.
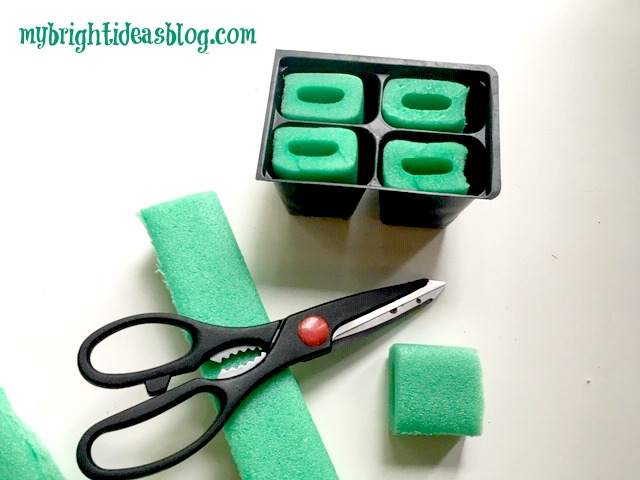
This is so easy. Just keep cutting off more. I wanted to give the at least 5 of these for their store. I might make even more…
Now for the flowers!
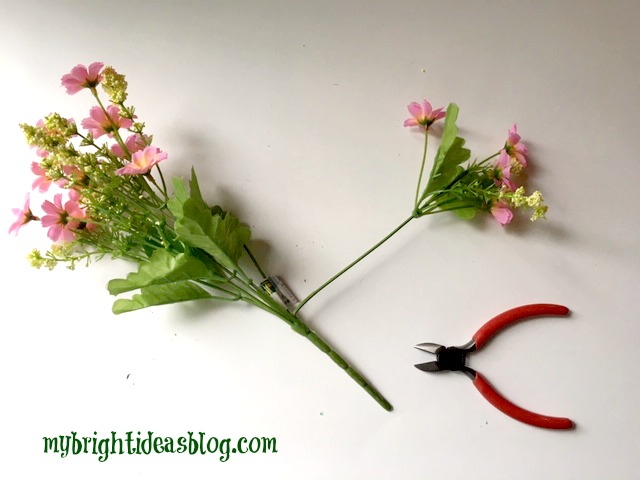
I started by bending out the branch of the flowers.
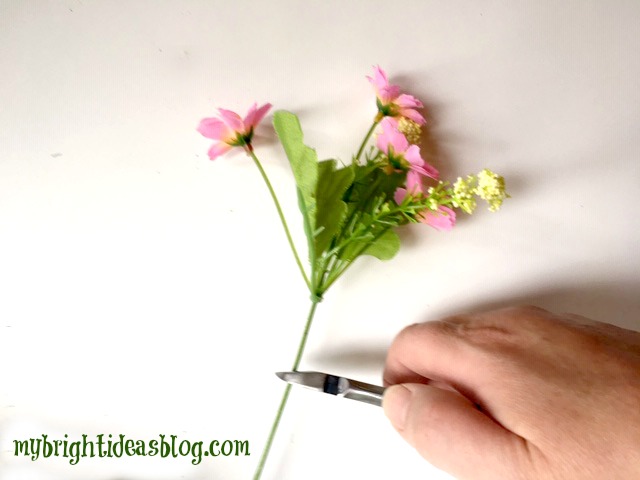
Snip it off several inches below the flowers. If you cut it too long, you can always bend the ends. I would rather they are too long than too short so the girls could make a little bouquet later or use them for something else.
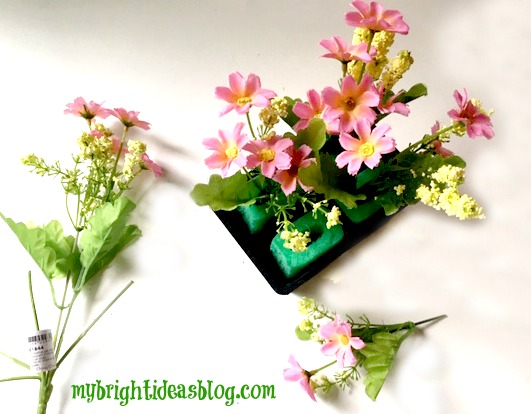
Now test it in the container and see how it looks.
This looked pretty good but I thought since I have a huge scrap of burlap waiting to be used. Why not add burlap to the top.
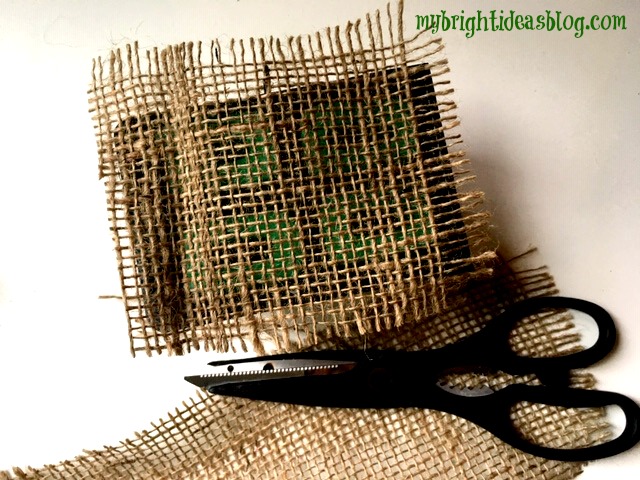
Cut that to size. It doesn’t have to be perfect.
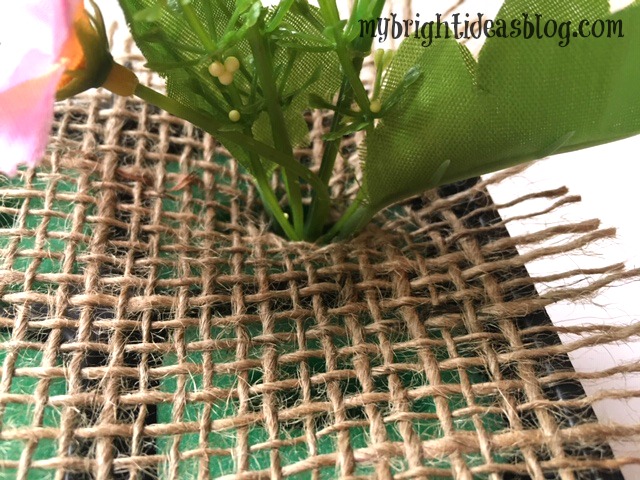
Next poke the flowers through the burlap.
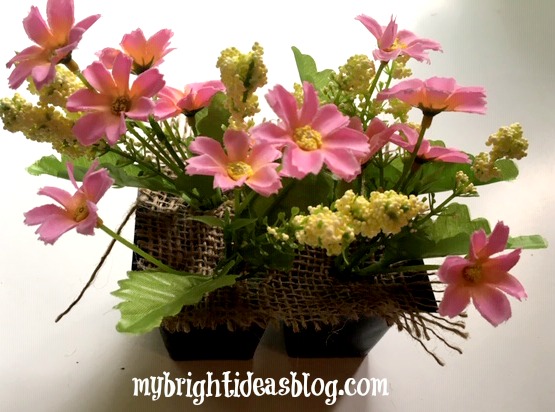
Voila!
You could hot glue all of it in place or you could just leave it so the kids can rearrange it and tend to their flowers.
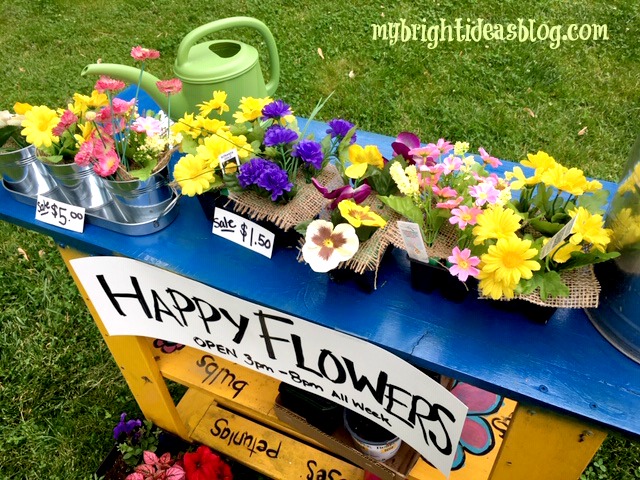
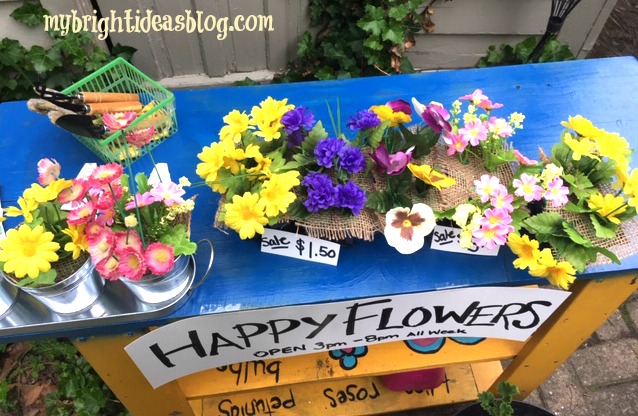
Next we set up shop on the table and added some signs.
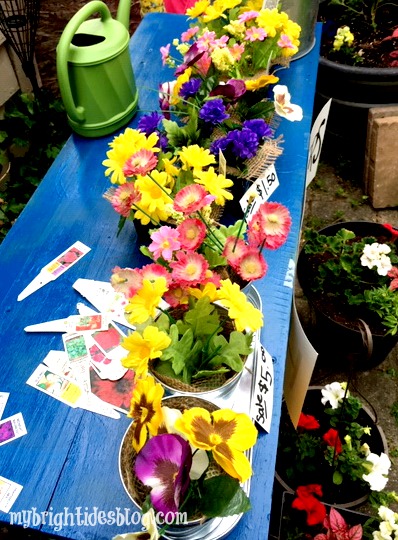
My kids also save all of the flower tags that come with every plant to tell you how much sun or shade it should get.
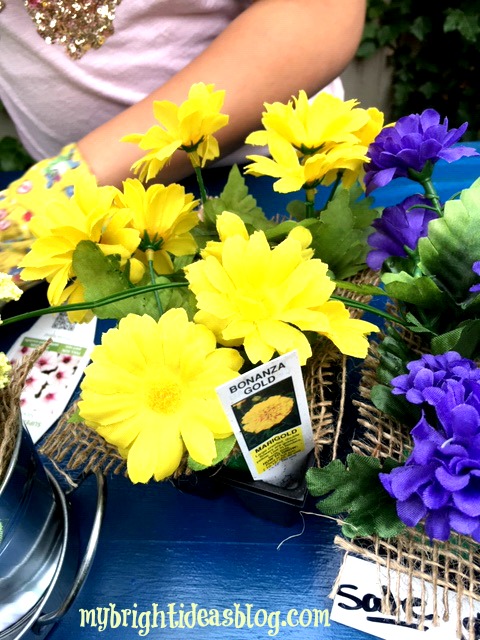
…So we tried to match up some to the colors of the flowers we had for our imaginary store.
If you don’t have the 4 cell-planters you can use any small containers. You could use a pool noodle or Styrofoam from packaging in a bigger one or several small pieces of foam to fill a bigger pot.
Also, look around for other gardening items you have for the store. We had gloves, a mini shovel and rakes and watering cans.
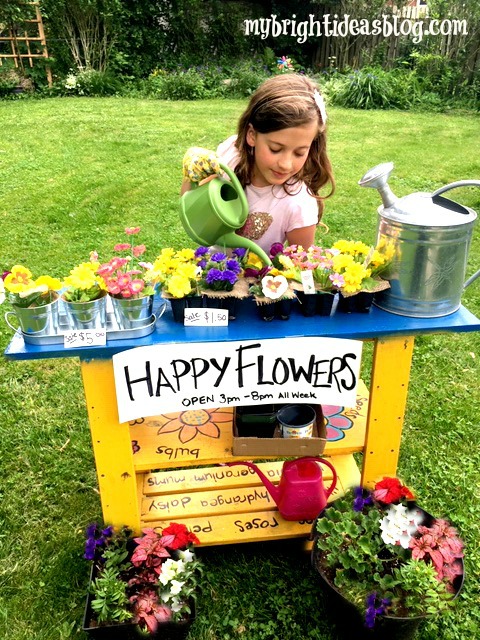
Hopefully, this inspired you to get the kids out playing with their imaginations.
…
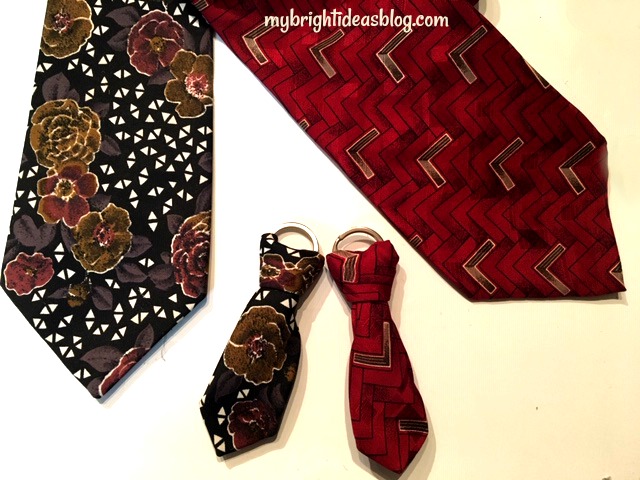
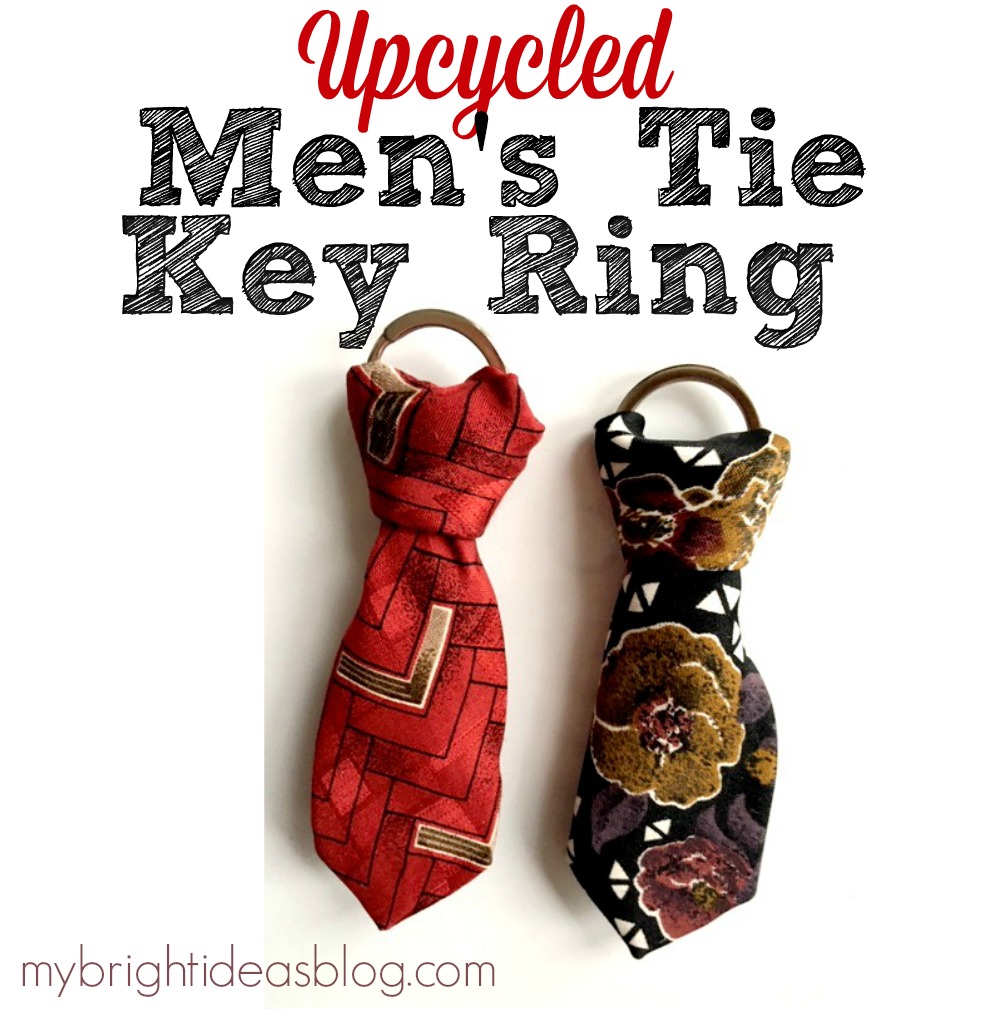
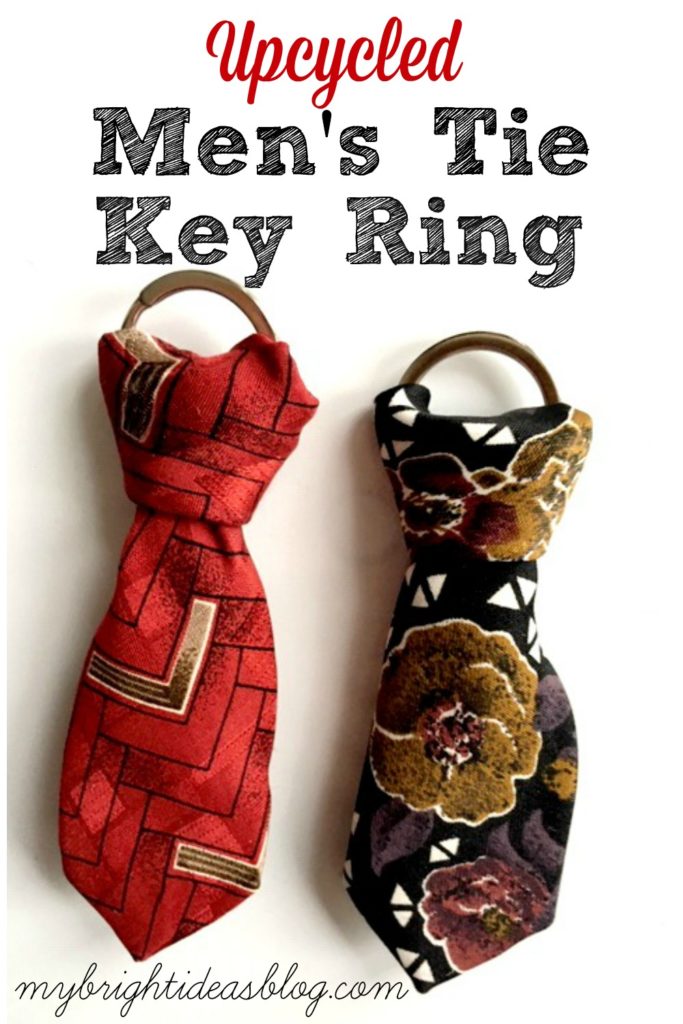
Upcycle Men’s Necktie for a fun Dad Gift Key Ring
Looking for a fun way to upcycle a men’s tie? Here is an easy and super cute idea to turn it into a key ring.
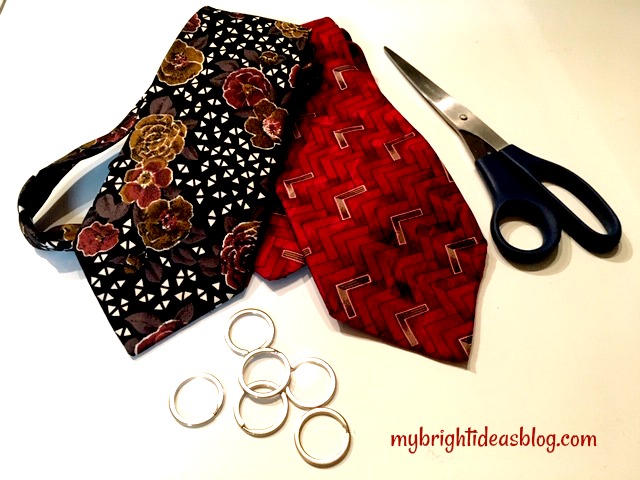
You will need:
- an old tie
- a key ring
- scissors
- needle and thread (or glue)
- ruler
My hubby happens to have a lot of ties so he was willing to sacrifice these two ties for my project. Thanks dear!
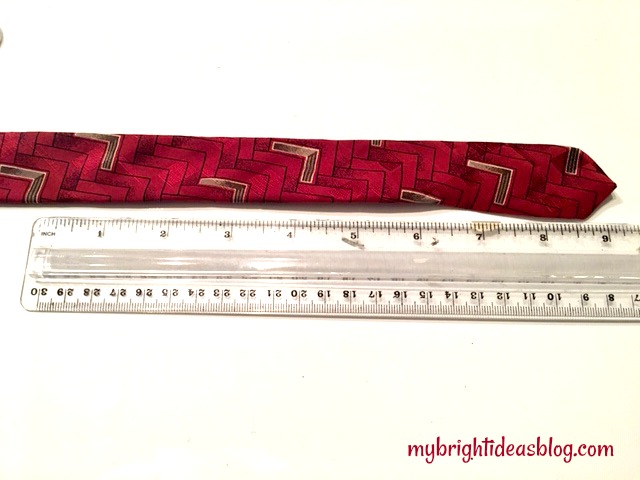
Cut the tie approximately 9 inches long.
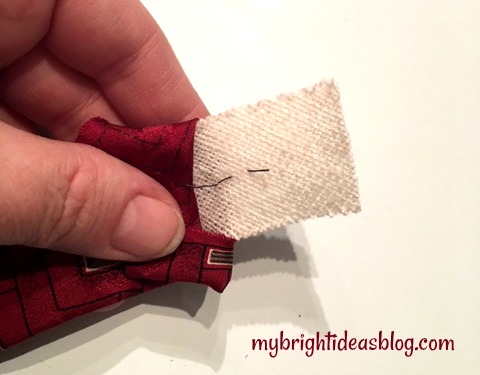
At the cut end, tuck the fabric out of the way and trim 1/2 inch (1cm) off interfacing that is inside.
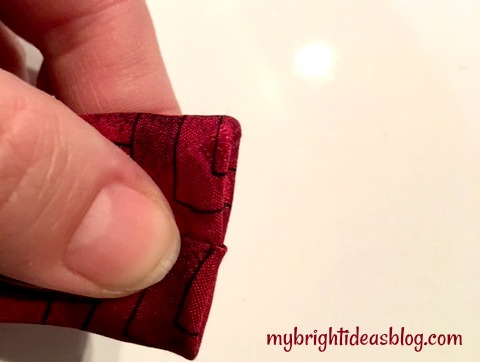
Fold inside and tuck the fabric inside. You could sew or glue this end to make a clean edge.
I sewed it with just a few stitches.
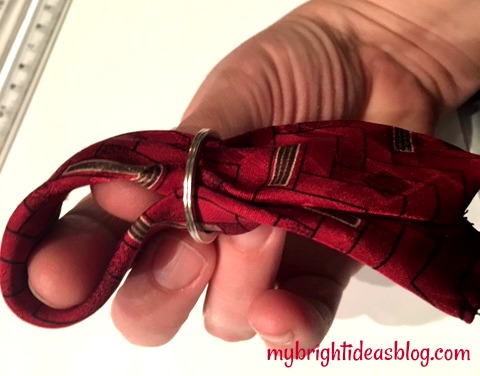
Next, fold the mini tie in half and slide it into the key ring.
Pull the ends through the loop to form a knot.
Pull the knot tight by tugging on the key ring. It looks like a proper tie knot without actually having to know how to tie it. The pointed end is perfect for the size of the key ring.
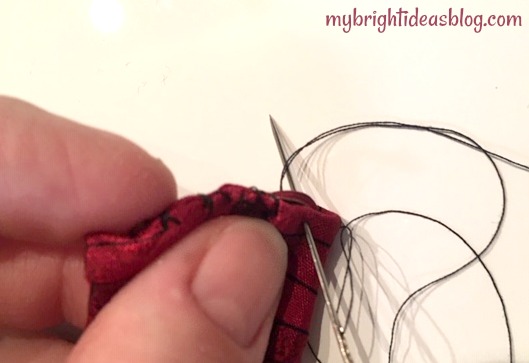
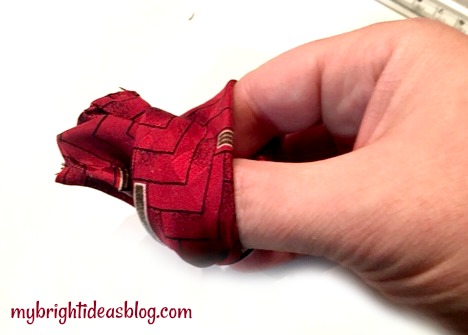
This is the back side of the tie. I added a few more stitches so the tie wouldn’t shift around, but that is optional.
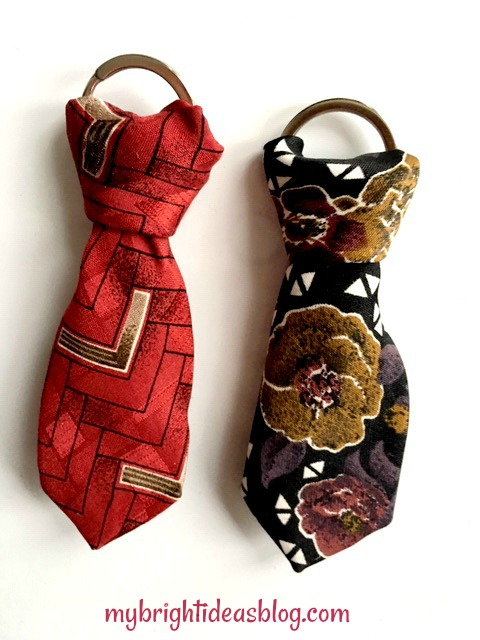
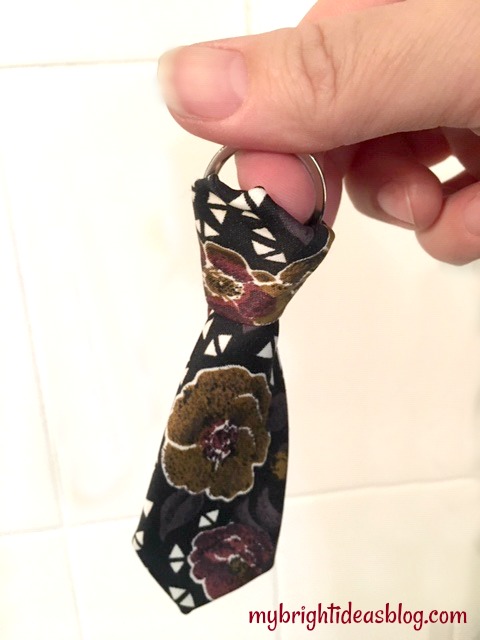
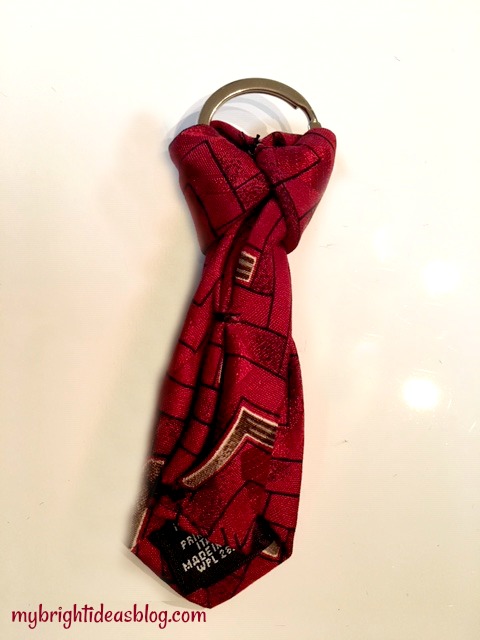
How cute is this?!?
Now there is still half of a tie left so I’m going back to Pinterest for some more ideas for tie upcycling. I will let you know how that goes!
…
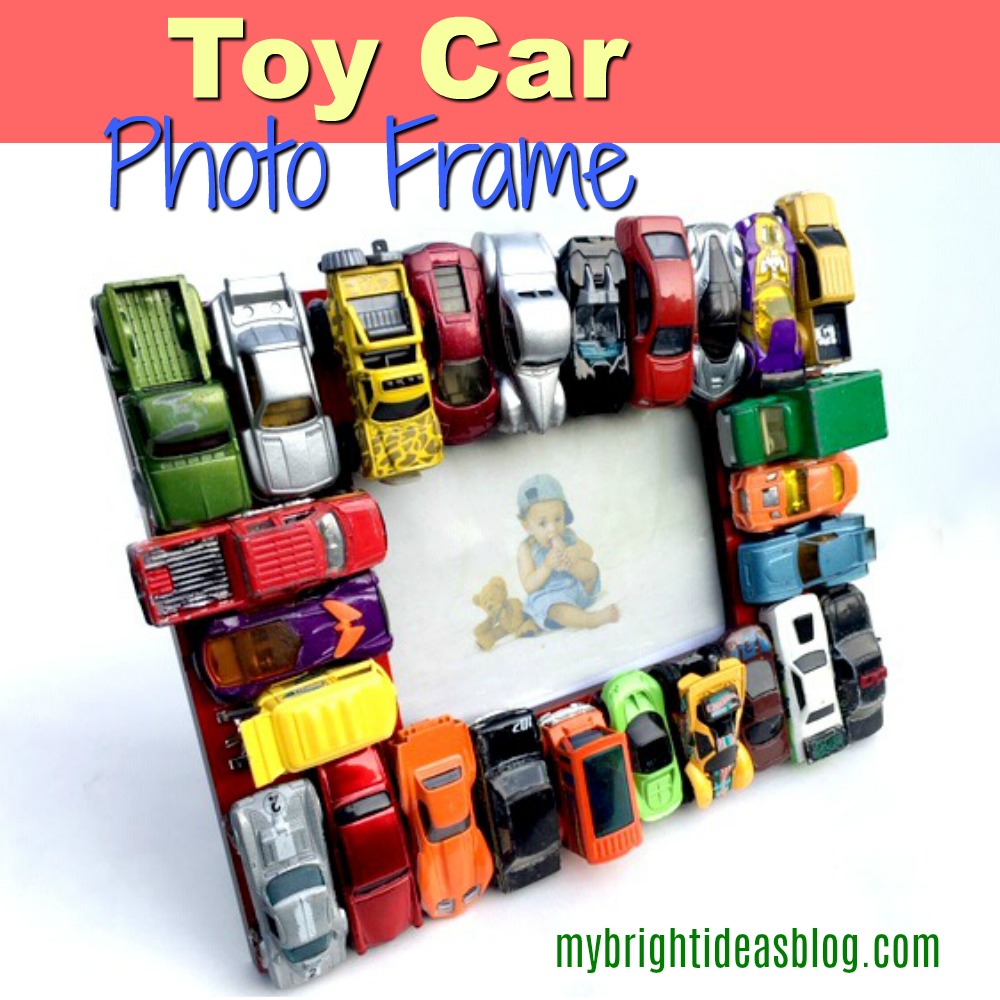
Upcycled Frame with Toy Cars
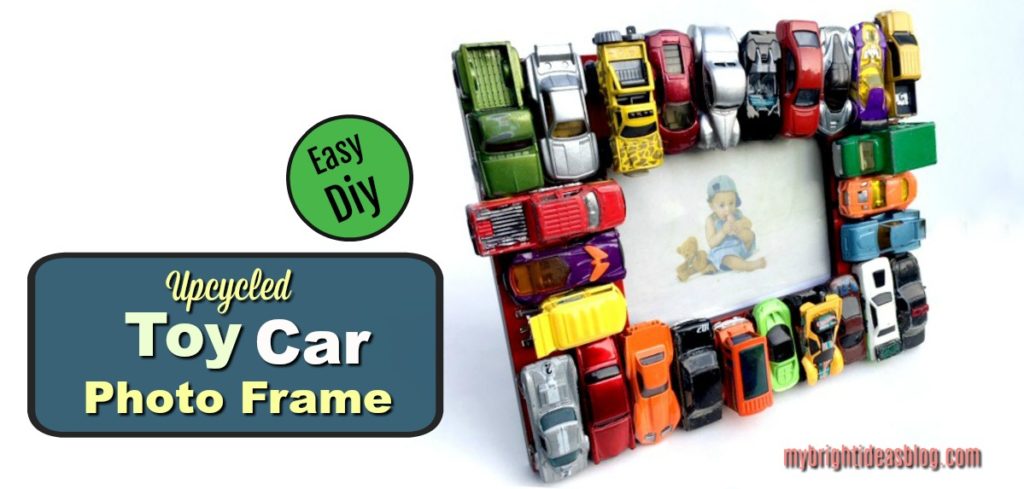
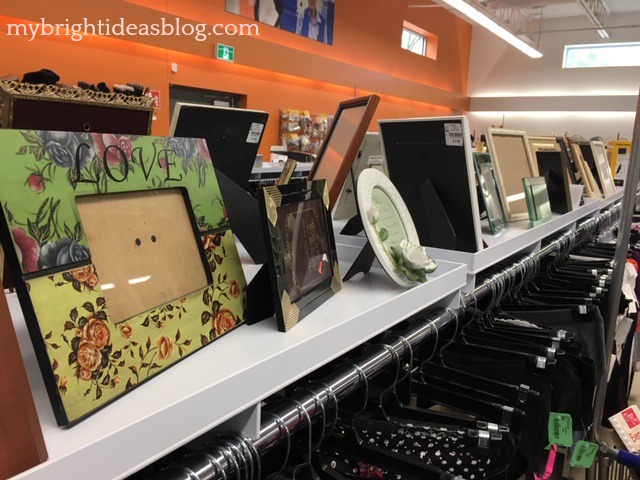
Ready for a super easy craft? You might have all of the supplies at home. If you don’t you can easily pick them up at your local thrift store.
To make an upcycled toy car photo frame you will need:
- toy cars
- picture frame
- spray paint
- hot glue gun and several glue sticks
I wandered through a newly renovated Goodwill and that’s when I this idea hit me. Find a flat frame and glue something to it! Yeah! The frame I chose was really out of date with its flowers “Love” on the top. I thought it would be the perfect size to fit a parking lot of cars.
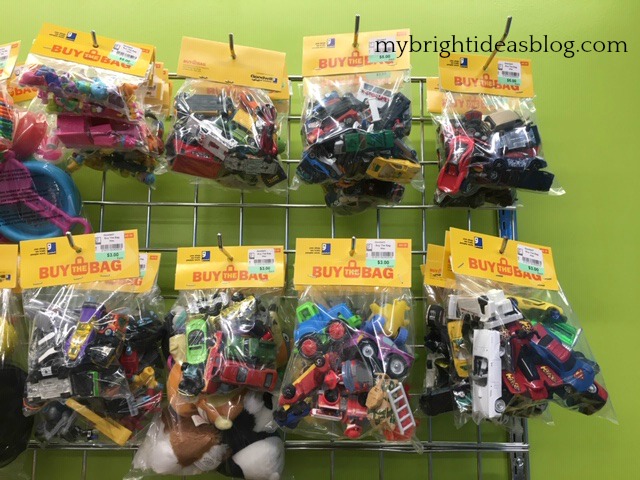
Then I went to bulk toy area and looked at the bags of cars! I chose 2 bags of cars for $3.00 each.
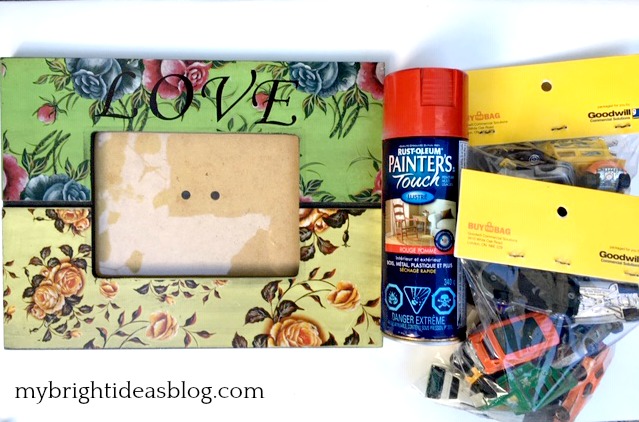
I brought everything home and admired it all….then located some left over spray paint in my painting stash. You don’t need much-so a bottle of spray paint left over from another project is perfect. I had a bright red Rustolium Painter’s Touch called “apple red”.
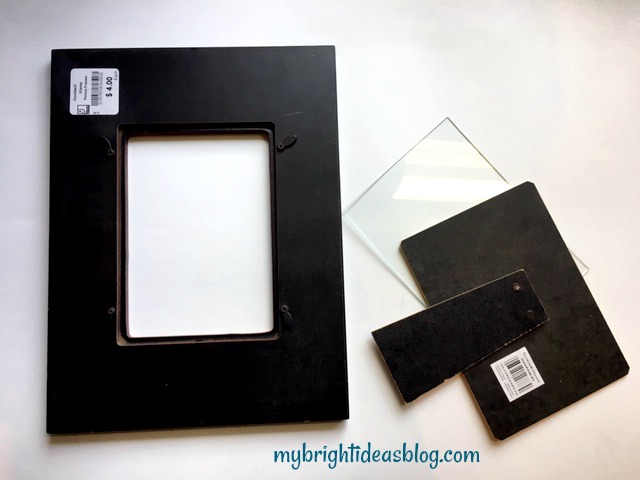
Take the backing and glass off of the frame and wipe it down with a damp cloth.
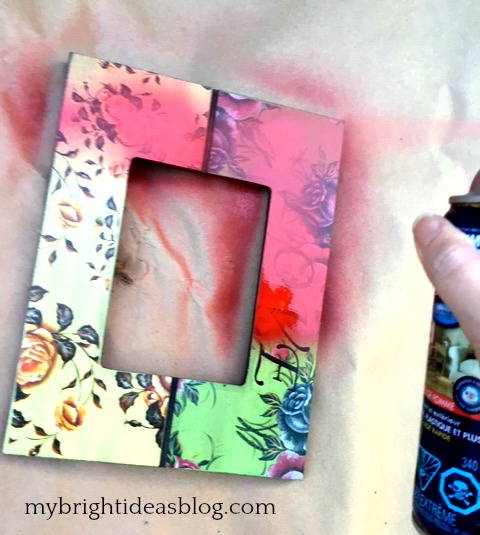
Shake up your can of spray paint and lay down some cardboard or news paper. Always spray paint outdoors on a day where there is barely any breeze.
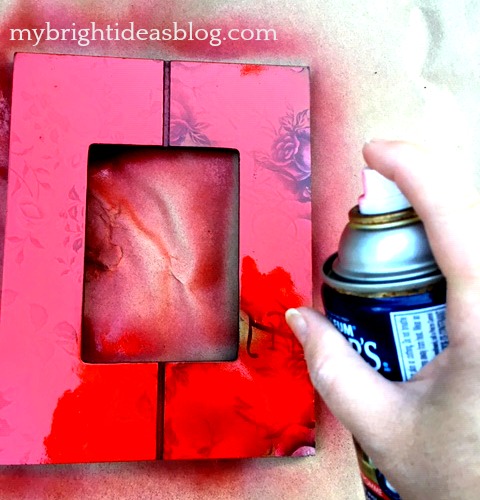
Follow the instructions on your paint as to when to do a second coat. The pattern on this frame wanted multiple coats. It is black on the sides and back so I just spray painted the front. It wasn’t perfectly covered with 2 coats but since we are covering it with cars I didn’t bother with a third coat.
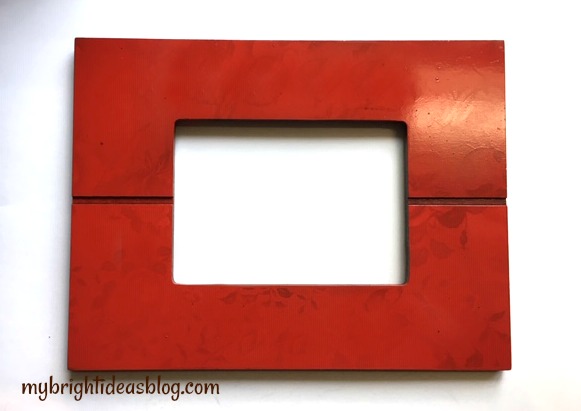
Allow it to fully dry before you begin the next step. I let it dry overnight. You can use that time to wipe down your model cars if they are dusty or sticky.
Now the fun part!
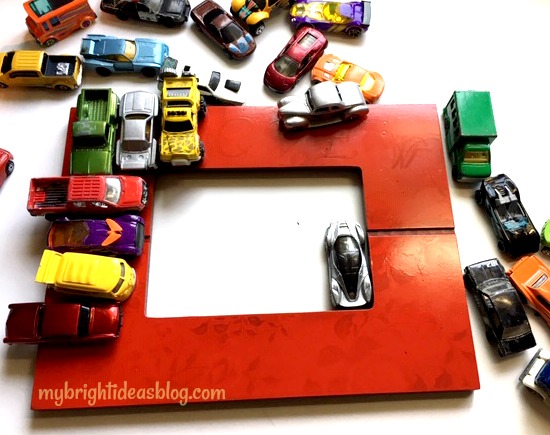
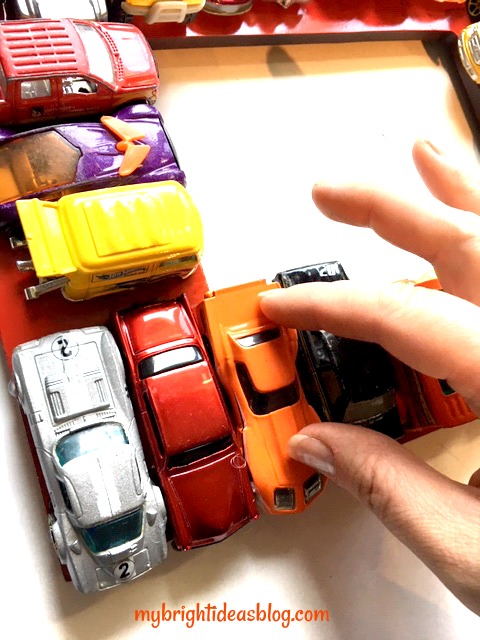
Arrange all the cars around the frame. I used 26 cars in total and would you believe my goodwill bags had 27. If your frame was narrower you could have them hood to bumper around the perimeter of the frame…like a traffic jam. This wide frame was a perfect for my parking lot.
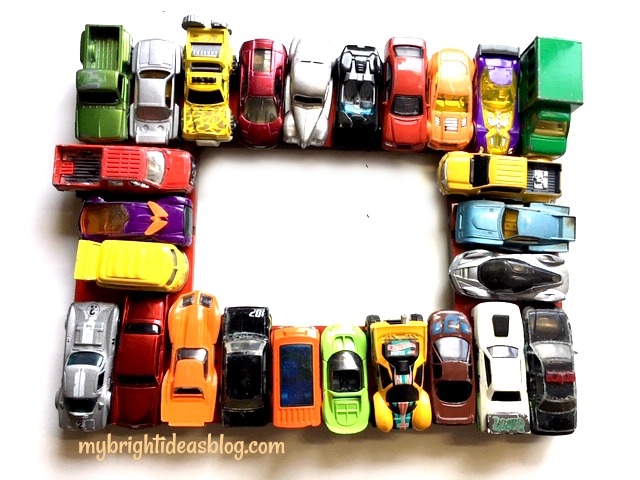
Watch for variety in color as you place the cars around the frame.
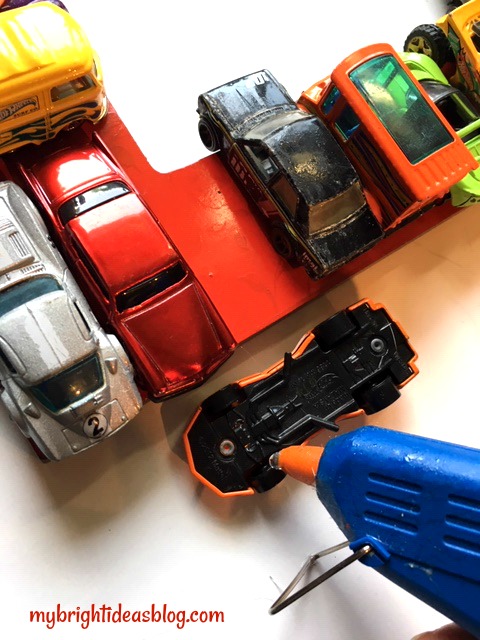
Next, you are ready to glue the toy cars onto the frame. Place a dot of hot glue on each wheel. These will be part of the car making contact with the frame.
Put the car back in its place and press firmly. After attaching the toy cars and trucks all around the frame check each one again to make sure that they are secure.
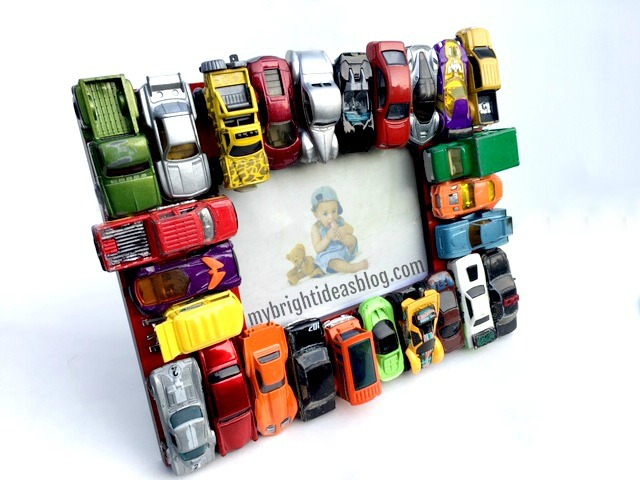
Since this frame will be sitting on a shelf I made sure that the bottom of the cars lined up closely on the bottom with no overhang. Otherwise it could be wobbly. Also, I should mention, that the frame is actually really heavy with 26 cars on it. Put it in a place where it won’t get knocked and fall on a toddler.

That is all there is to this project! Have fun!

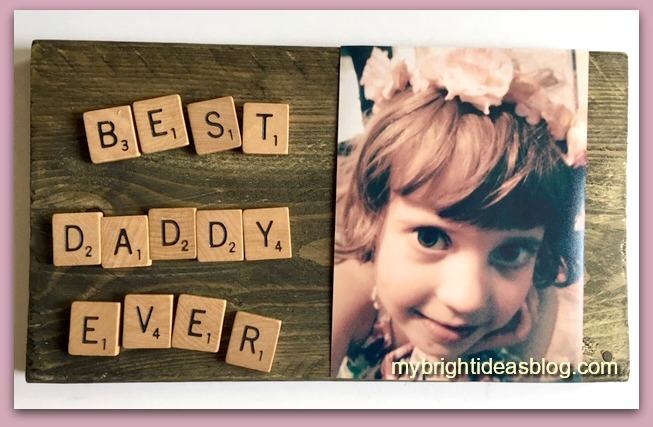
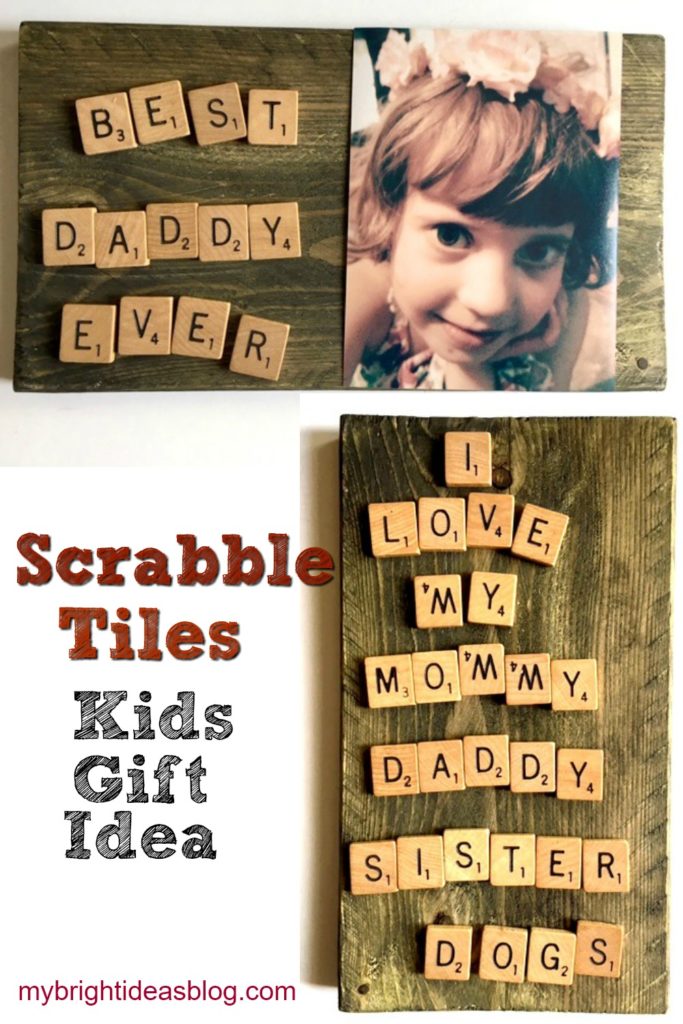
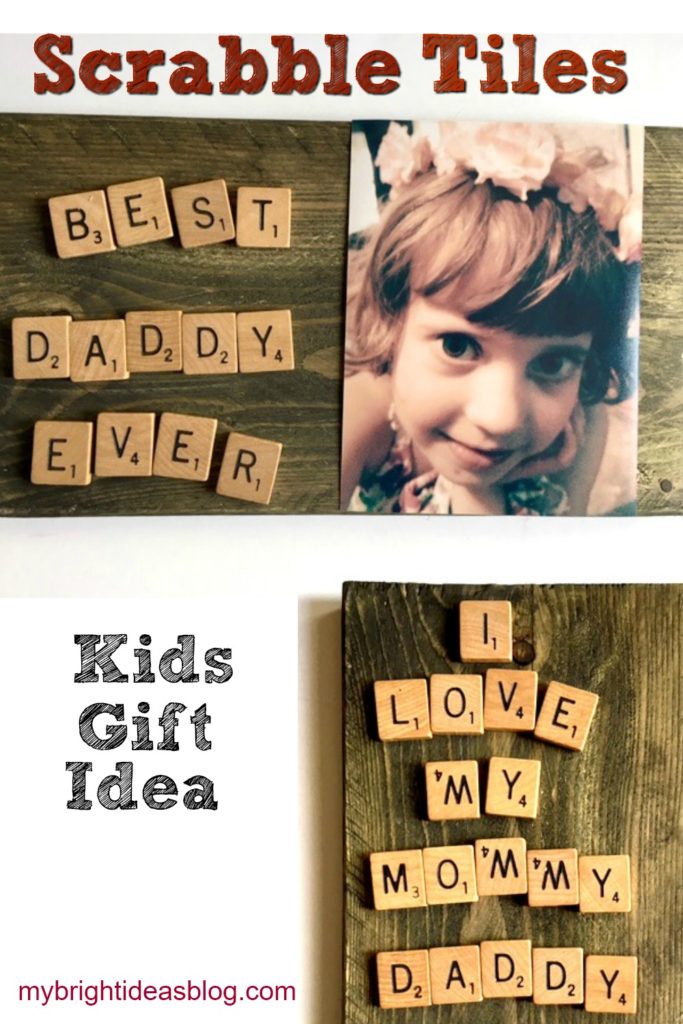
Scrabble Tiles Gift Idea for Kids
I have a sick kiddo at home (head cold, sneezy, wheezy) and she wants to use my craft supplies to make a gift for daddy’s desk at work. So here is what she came up with a love letter in Scrabble Tiles to Daddy and an old photo of herself.
Where can you get Scrabble tiles? From the board game of course silly! Or from a thrift store or online.
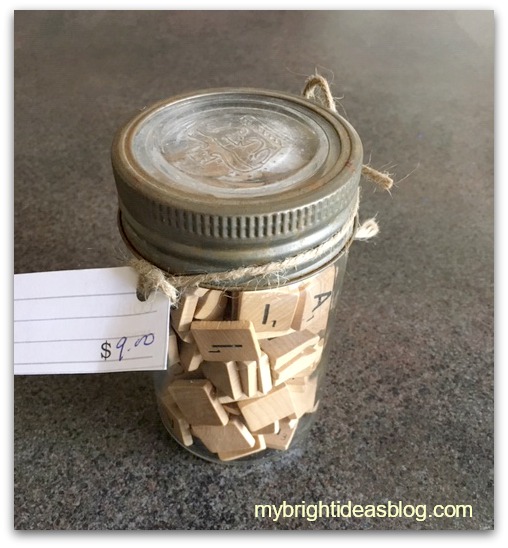
The other day I found myself parked next to an antique store I didn’t know existed. So I went in and found a gazillion things I would love to have and upcycle. The store was AMAZING! One of the items that I bought was a cool old mason jar filled with scrabble tiles.
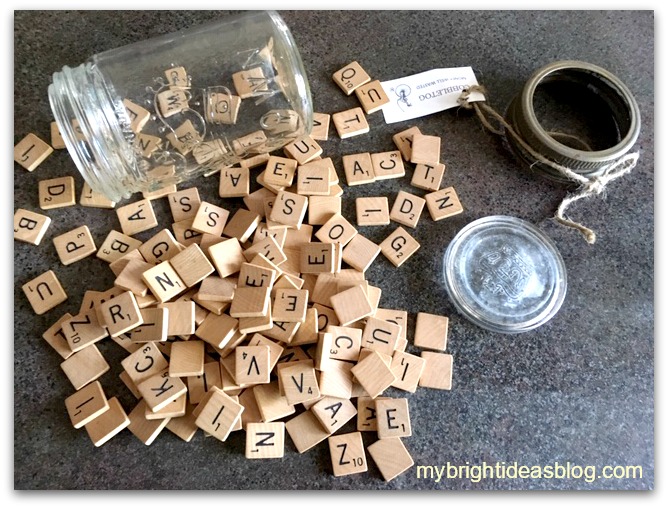
My sick little darling sorted out the letters into piles while I went rummaging for supplies.
You will need:
- scrabble tiles
- a piece of wood, picture frame or canvas
- white glue-for the photo (or to make it temporary use “sticky tack”)
- hot glue gun-for the tiles
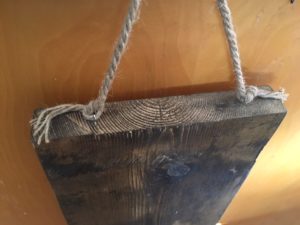
- hanging hook (optional)
![]()
I have scraps of wood and often will stain or varnish a few extra pieces in case I want to make a wooden plaque in a hurry. We chose out of scrap options a piece approximately 9 1/2 by 5 1/2. It was already stained with “Forest” Behr Semi-Transparent stain-which has a subtle green tinge to it.
![]()
Another option would be to use a blank canvas from the dollar store. You could paint with inexpensive craft paint in his favorite color or leave it white.
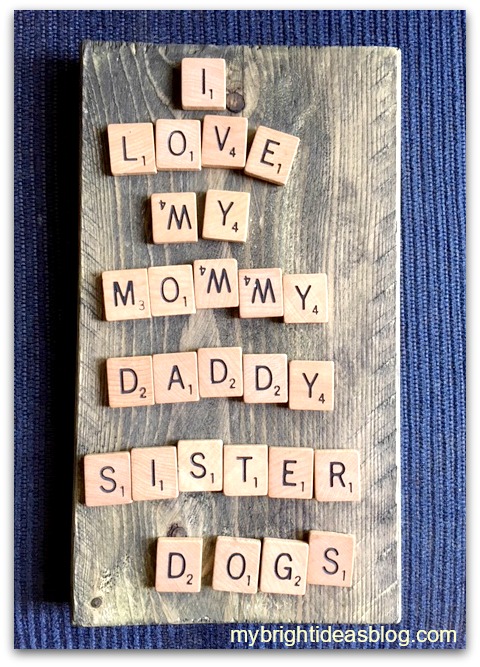
First she wrote out this…awe Mommy is at the top of the list!
I love that she is not bothered that 3 of her M’s are upside down W’s. When you see the letters are crooked its tempting to want to straighten them out but resist! It’s a child’s gift and adds character to the final product.
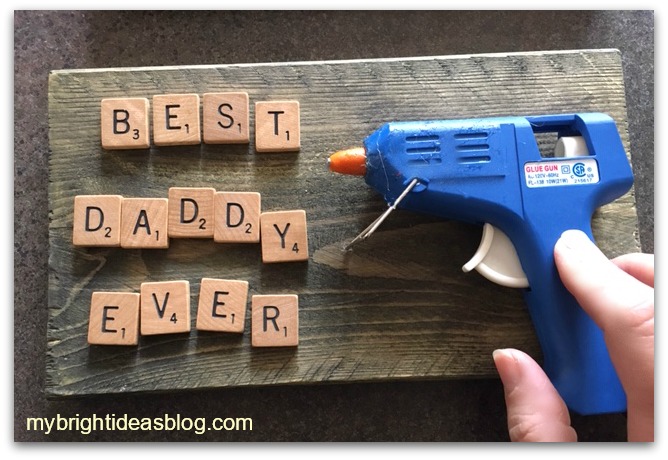
Arrange the letters and photo to your liking. Hot glue your scrabble letters to the wooden board.
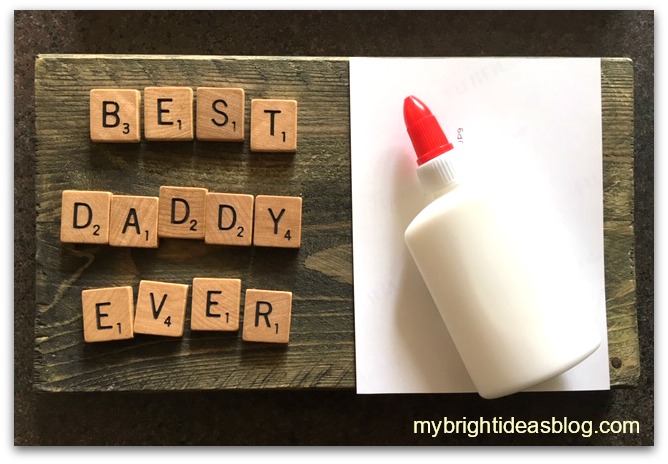
Have your child put a thin coat of glue on the back of the photo. Or if you want to be able to take the photo off later and replace it you could use sticky tack instead!
Would you look at those gorgeous eyes! This gift will melt his heart!
Crafts Using Burlap and Buttons – Easy Project that Looks Great!
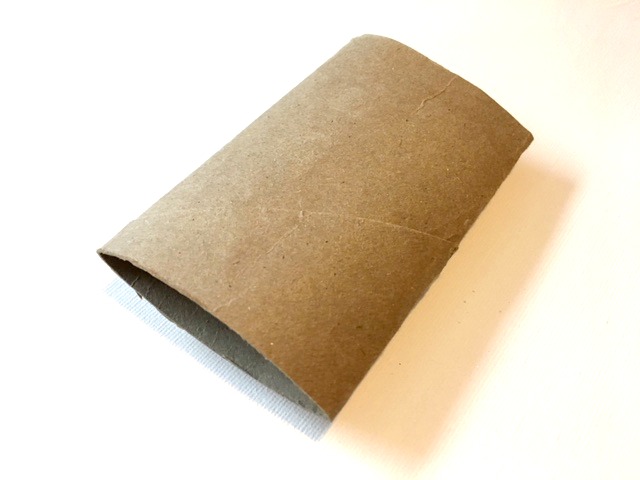
Toilet Paper Roll Daisy Wall Art
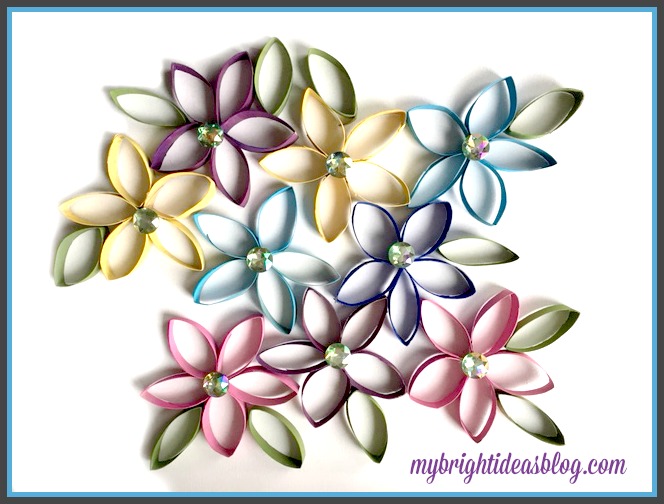
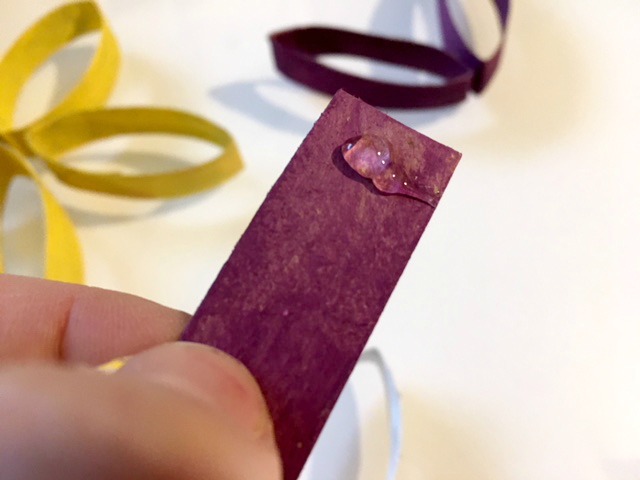
Last year I did a post on making daisy flowers out of toilet paper rolls. I do love to save my toilet paper rolls for crafts so I had plenty more to continue on with more flowers. So this time we are gluing the flowers to a canvas and making a picture to hang in a little girls bedroom.
You will need:
- large white canvas
- 9 toilet paper rolls
- hot glue gun and glue sticks
- craft paint and paint brush
- big gems
For this project you need a plain white canvas from the dollar store ($4). Everything else you likely have in your craft cupboards. I followed the same instructions from the previous daisy toilet paper project. Each daisy makes 1 flower plus 2 leaves.
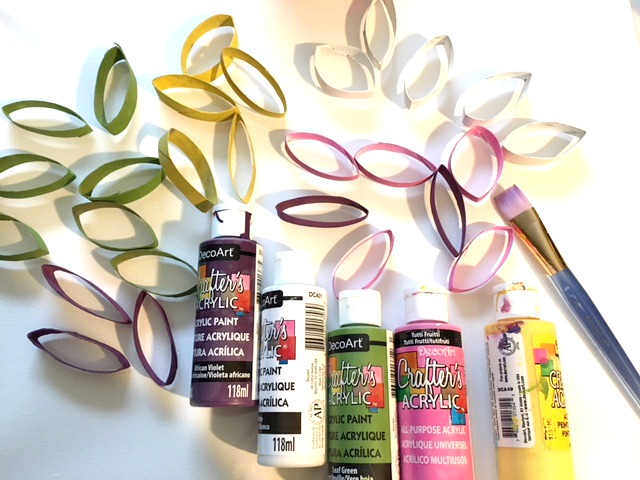
To make this I used 9 toilet paper rolls. I painted: 2 purple, 2 pink, 2 yellow, 2 turquoise and 1 royal blue. I cut the rolls first and painted after. But you might think its more efficient to paint first and then cut and then touch up the edges afterward. Fortunately , the paint will dry quickly.
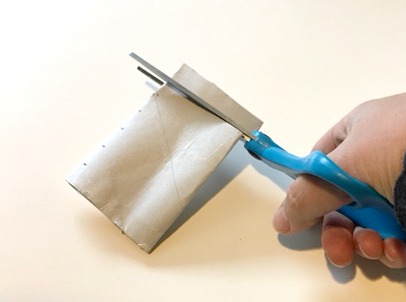
 Flatten your toilet paper roll.
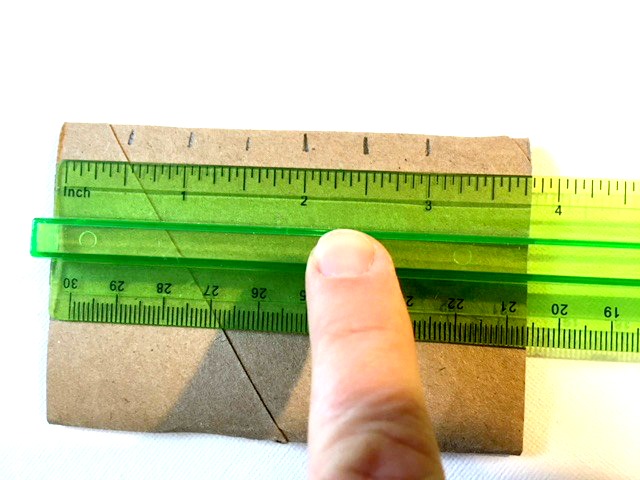 Mark cutting lines 1/2 inch apart.
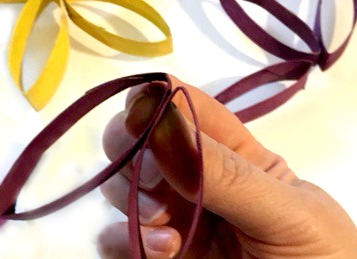
Pinch two petals together. Hold a few seconds while the hot glue dries.
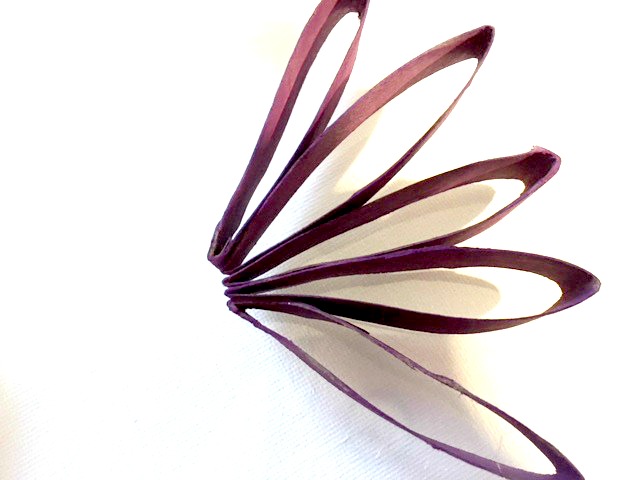
Glue and pinch all 5 petals together. Pull the two outside petals toward each other and glue them together.
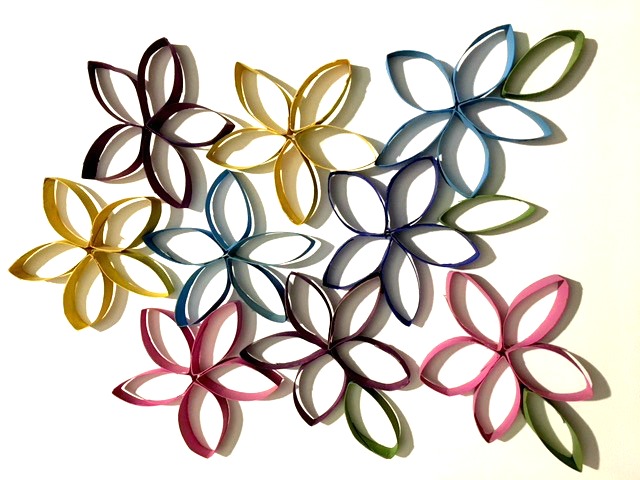 Lay out your flowers and leaves and add a dab of glue to attach them to your canvas.
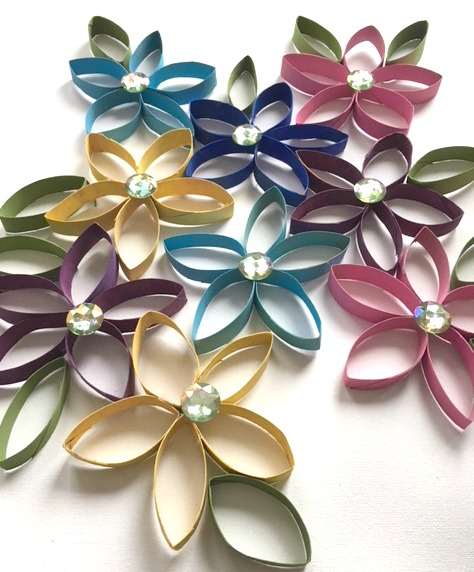
Add a big gem to the centre and attach with hot glue.
Hang your canvas on the wall. Super easy! If your young child is going to do this, please help with the hot glue gun or use white glue.
Look below for more toilet paper roll and Springtime craft ideas!
How to Make Spring Flowers Craft From Painted Toilet Paper Rolls
Toilet Paper Roll Crafts-Use your loo roll tube for easy Crafts!

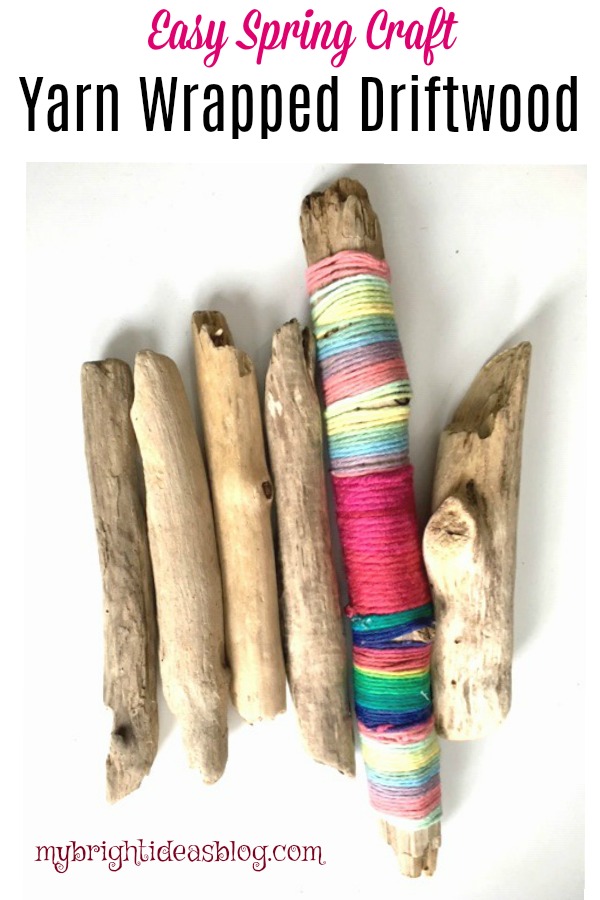
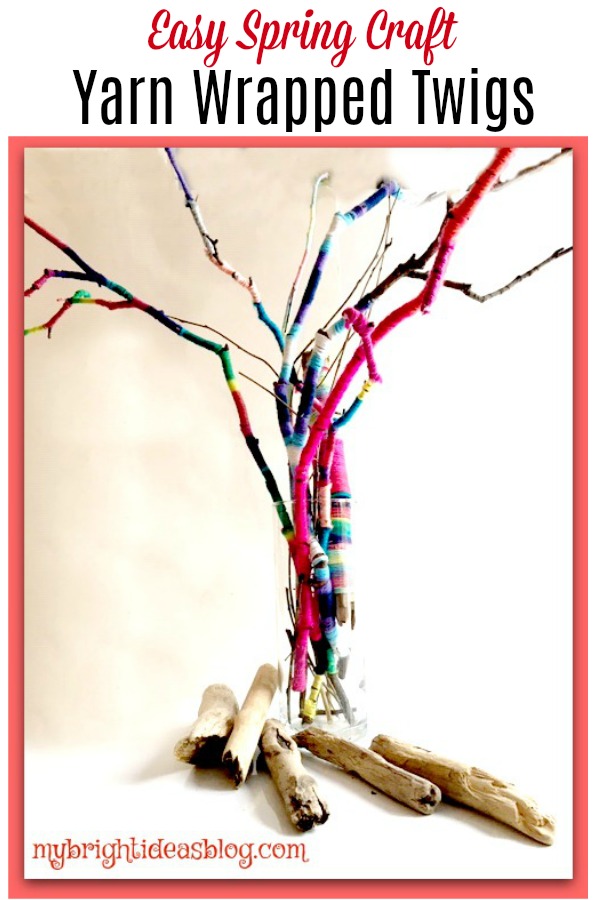
Yarn Wrapped Sticks – Easy Spring Craft
Want to add some spring colours to your home? Why not try wrapping yarn around some sticks?
Part of my inspiration:
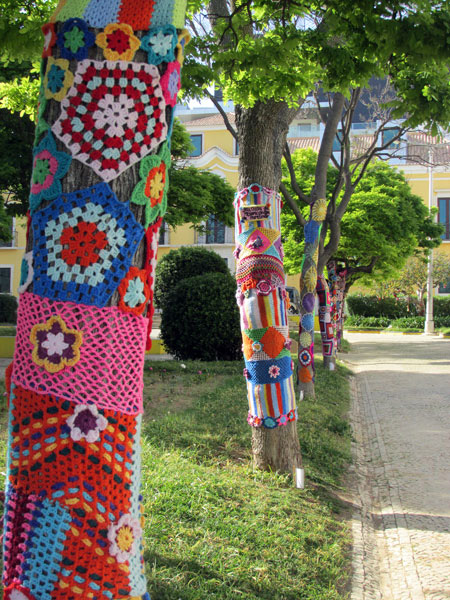
Have you heard of yarn bombing? If you haven’t you really should google it. It’s hilariously amazing! People are knitting or crocheting a sort of non permanent graffiti. You might find a park bench, bike, phone booth or a tree that is literally wearing a perfectly fitting, bright coloured sweater! Sometimes the crafter that does it wants to make a point and sometimes it just adding color to something grey and sterile like a light post.
https://algarveblog.net/2014/05/05/yarn-bombing-in-portimao/
Here is just one cheery photo so you can see what I mean!
Anyhoo the photos people have posted make me so happy but I can’t knit or crochet ask my friends Lana and Gen who just attempted to teach me how-they were patient but it didn’t take I’m afraid. Someday I will give it another try but for now here is my happy alternative.
It’s so easy and cheerful you are going to love this craft idea!
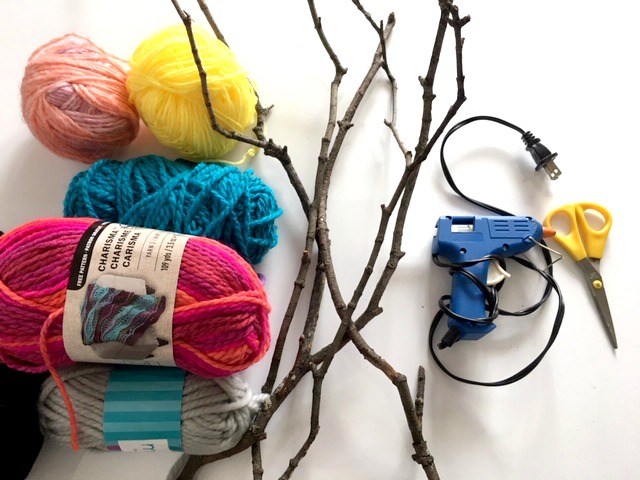
You will need:
- sticks
- yarn
- hot glue (optional)
- scissors
- vase
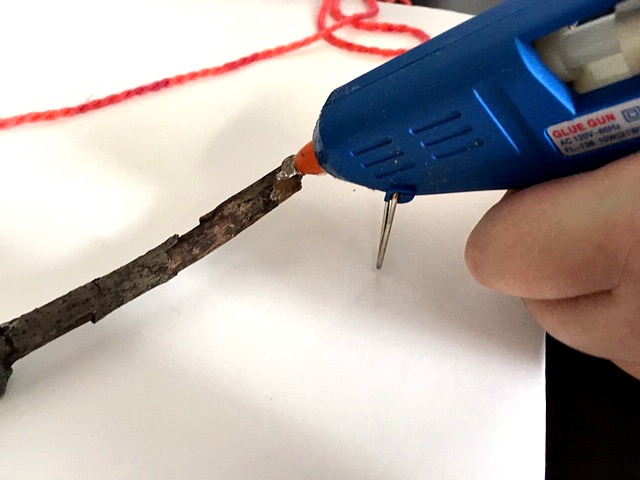
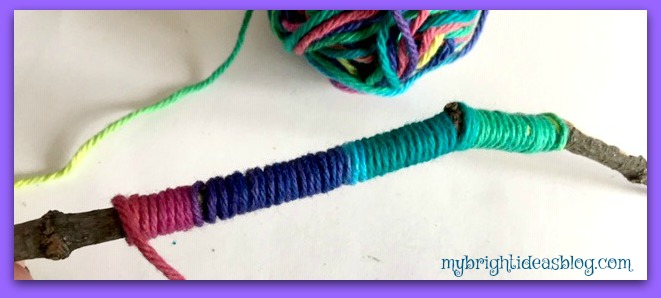
If you love your hot glue gun (as much as I do) start by adding a dab of glue to secure the end of the yarn.
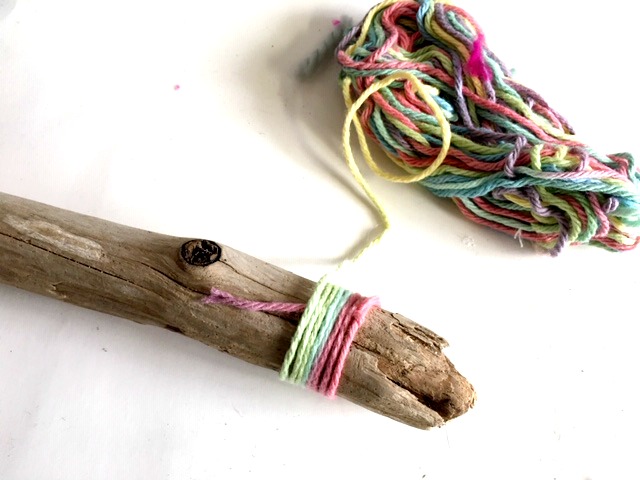
If you don’t want to use hot glue then just tie a loop around the end of the stick and tuck the tail in-as you wind the yarn around the stick.
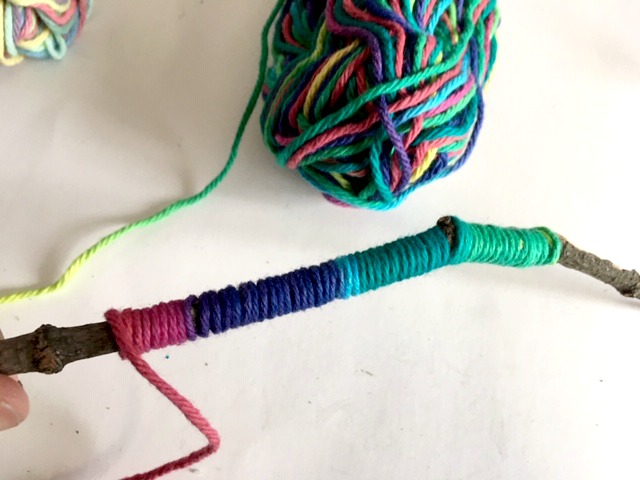
I really love the yarn that transitions the colours as you go. Its very smooth looking and only need to deal with the end at the beginning and the end.
If you don’t have yarn on hand that transitions you can use several colors and just change them as you get an inch down the branch.
When you are done just snip the stray ends.
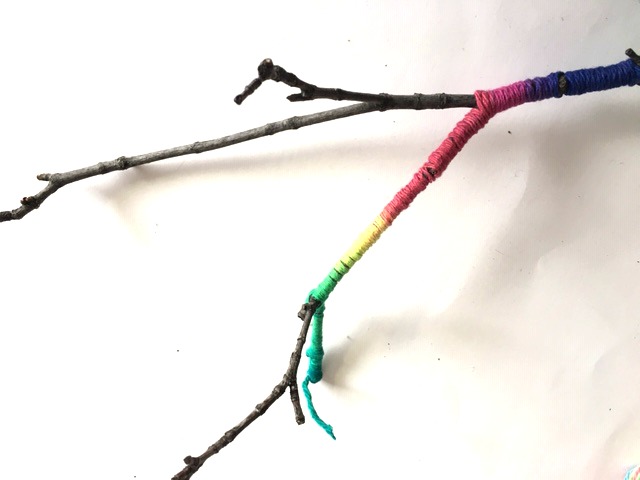
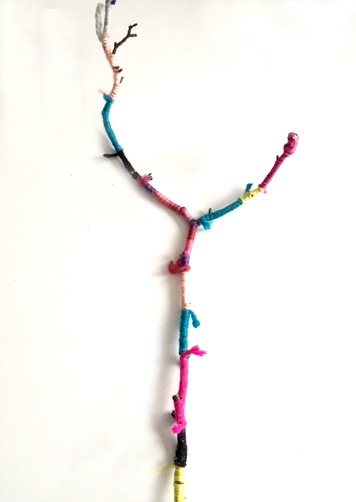
When you get to a split in the twig’s branches continue down one side and then go back to complete the other stems.
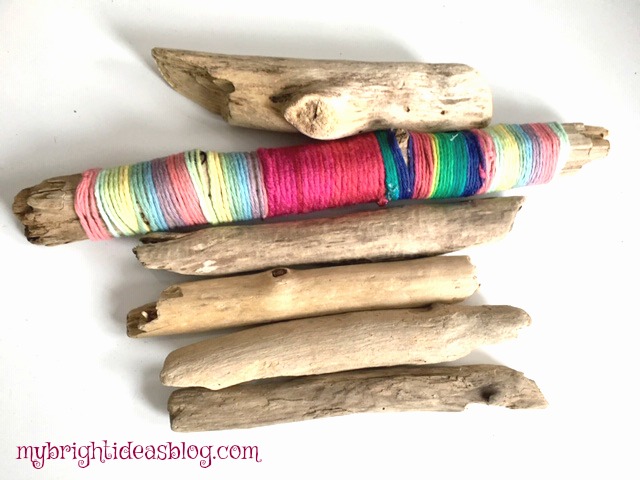
Using drift wood is even easier to manage.
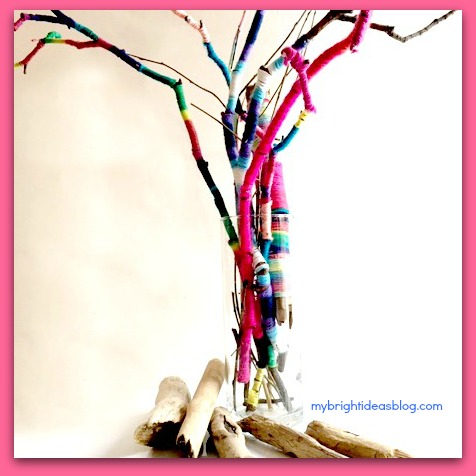
This took my 11 year old daughter and I an hour to do all of the sticks in the vase. We both enjoyed doing this. It was kind of an easy, soothing craft. It made a great mother daughter moment to stop and talk about things on our minds.
The results are very cheery decorative sticks with springtime colors that will go on a shelf or mantle.
Have a look at the other crafts linked below. I seem to enjoy the stick/twig projects. Mostly because they are free-out of the garden and something always need trimming.
Happy crafting!
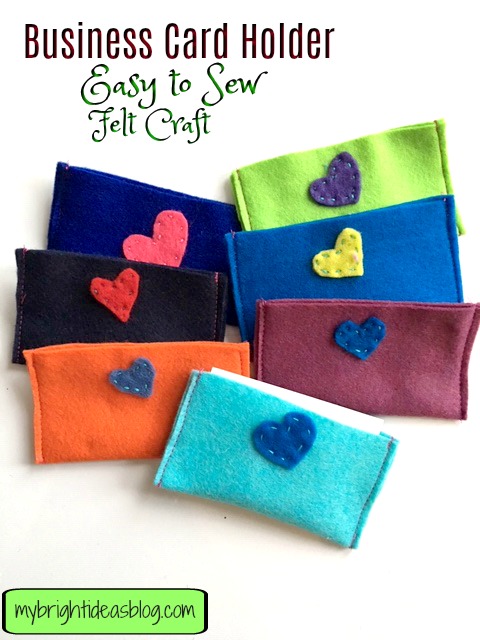
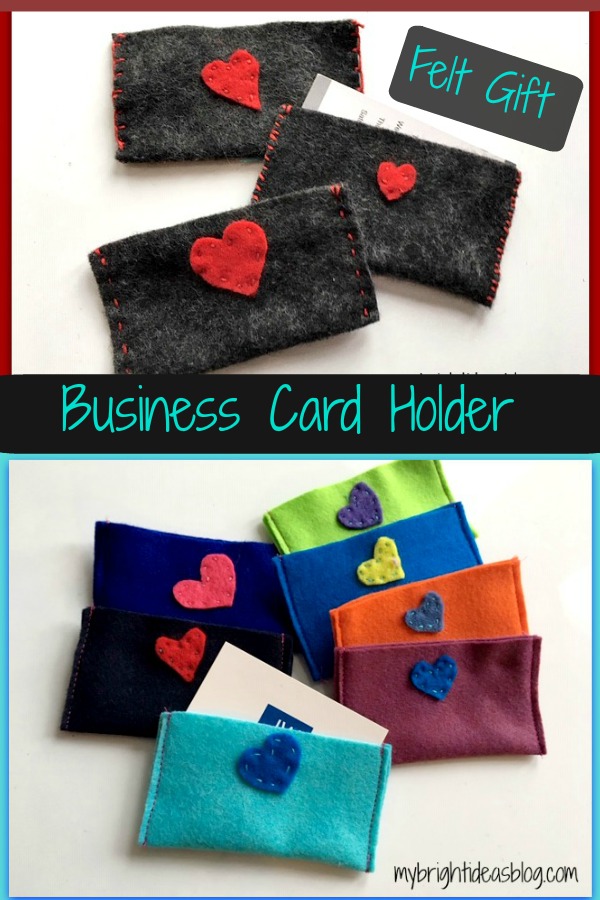
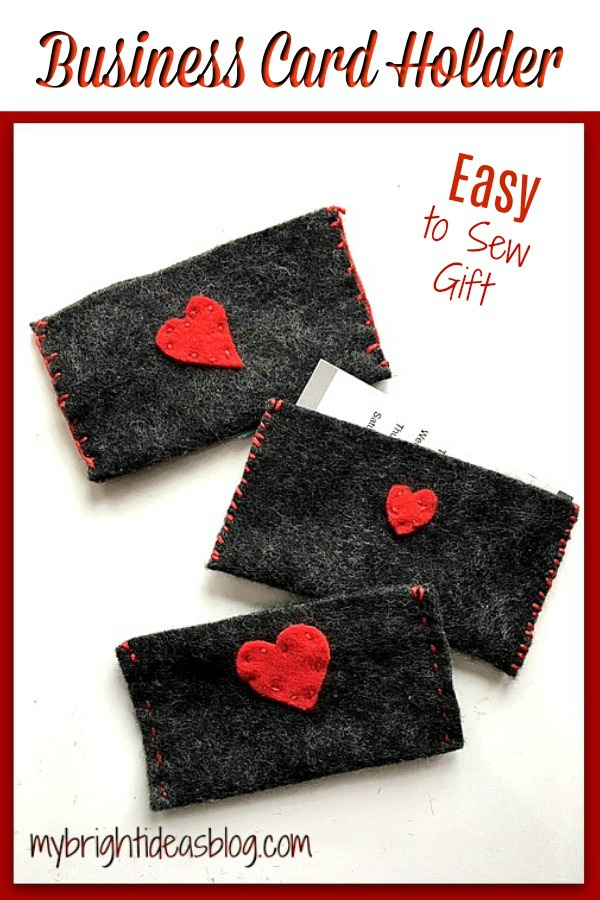
Felt Business Card Holder – Easy Kid’s Project!
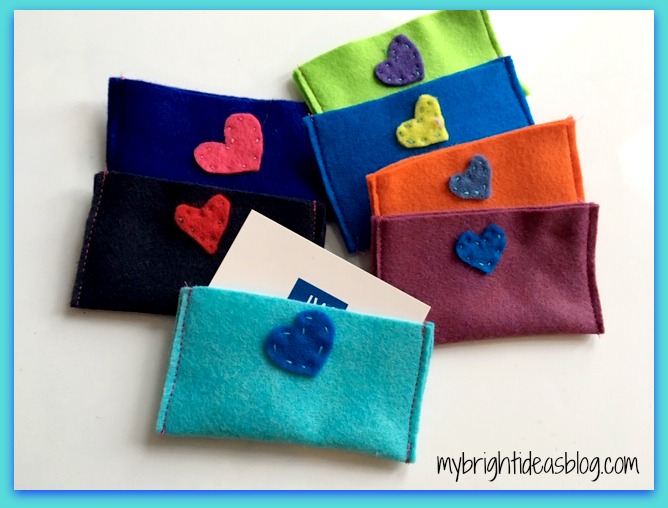
Learn how to make Business Card Holders out of Felt!
Looking for an Easy Sewing Project? Teach your child how to hand or machine sew with this quick gift idea. I’m going to show you how to make a felt business card holder with hearts or buttons for decoration and 3 ways to hand stitch.
We have a big event coming up where thousands of people from all over the world will be gathered and at the end swapping little gifts. So I have been searching for little homemade souvenirs for our family to give to the friends we meet. We might even get business cards printed-with our family email to put in the felt holder so we can become pen pals.
This seemed like an easy, fun, cute craft to make together. Plus teach some basic sewing skills…Brilliant!
You will need:
- 1 full piece of craft felt
- scrap pieces of felt for the heart
- scissors
- needle
- embroidery thread
- a business card
- sewing machine (optional)
- bright buttons (optional)
If you don’t already have felt and embroidery thread on hand you can get these from the dollar store, Walmart and craft stores.
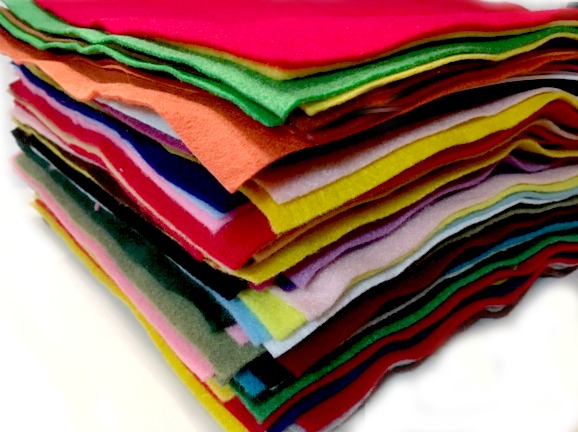
I must admit, I am a bit of a felt hoarder-so I have bought mine from several sources. I found the felt sold by Hobby Lobby for 33 cents was the best quality and value.
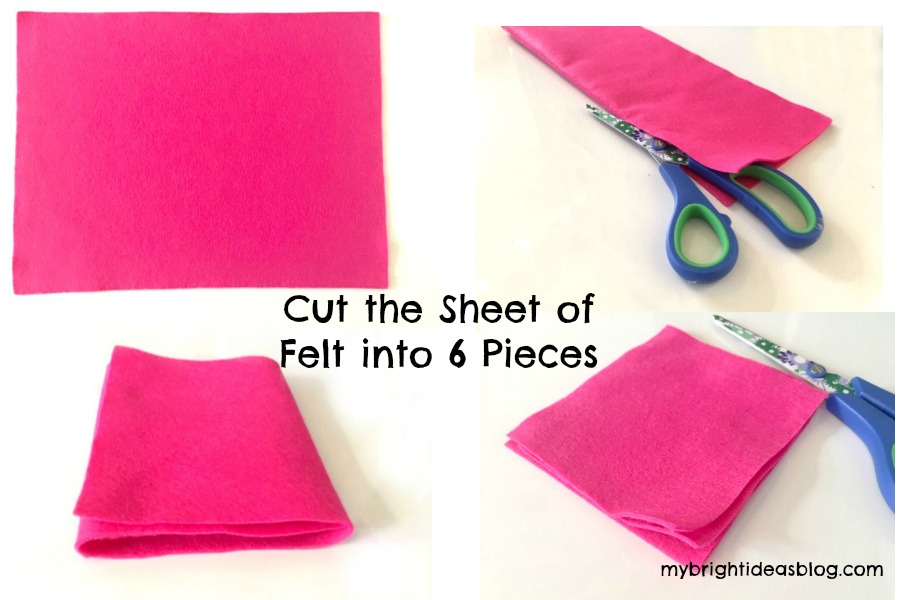
One sheet of felt is usually around 9 1/4 x 12 inches (24 x 30 cm). This is the perfect size to cut into 6 business card holders. Fold the sheet in half lengthwise and cut along the fold. Fold one of those pieces into thirds and cut on the fold. (bottom photos) In the end you should have 6 pieces 4 x 4 1/2 inches (10 x 12 cm).
Have a business card handy to make sure it fits.

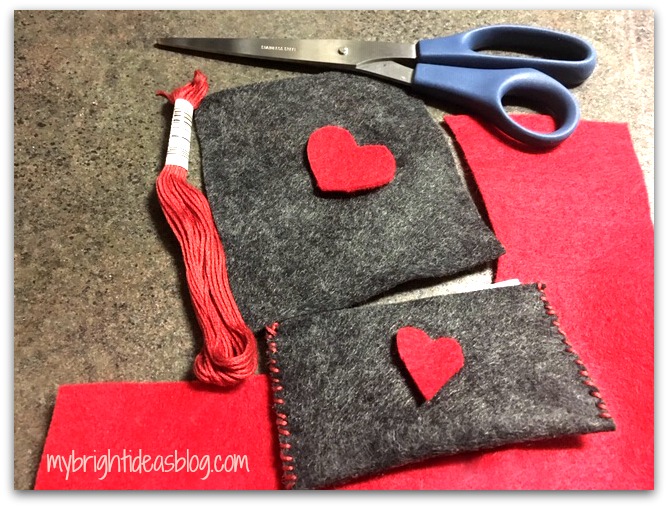
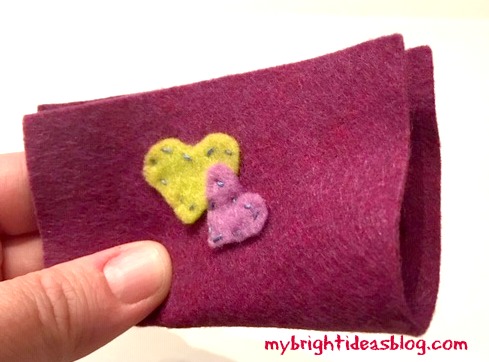
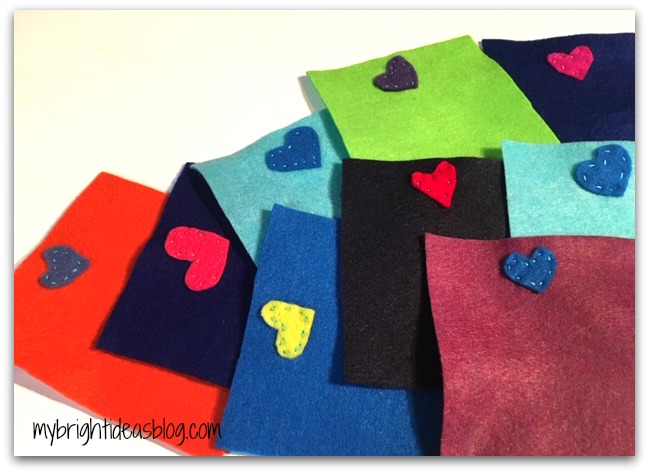
To get started cut small love hearts to decorate the outside of the card holder.
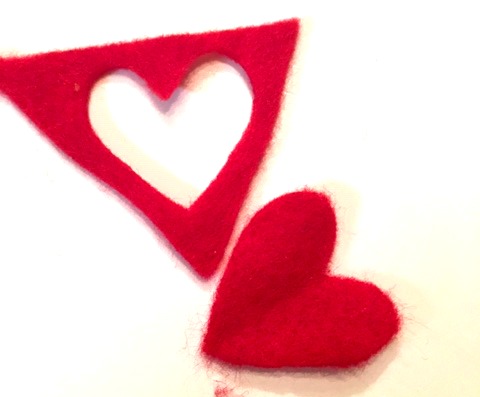
The easiest way to cut a heart is to fold the scrap of felt in half and then cut half the heart so both sides are the same.

Choose matching or contrast embroidery thread.
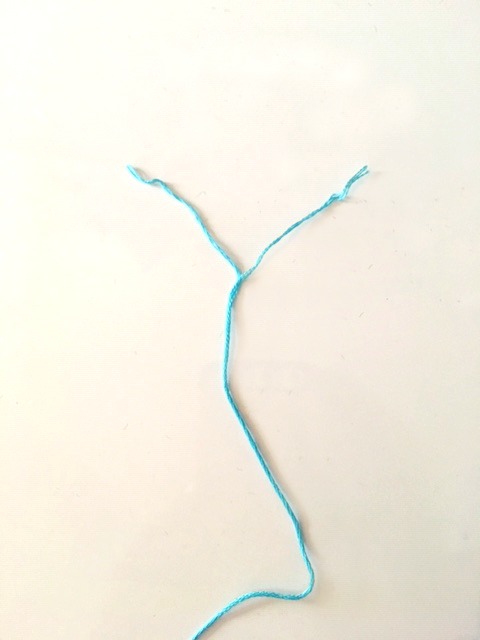
Divide regular embroidery thread into 2 sections of 3 strands each.
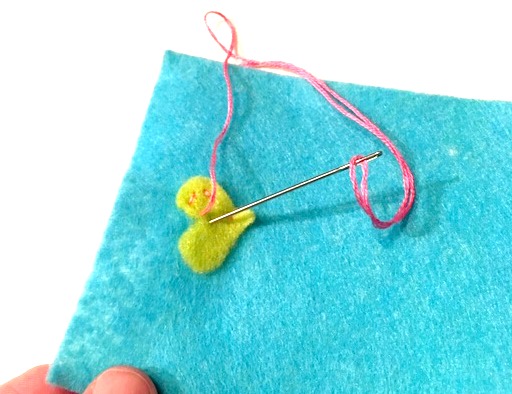
Knot the embroidery thread and begin sewing small stitches to attach the heart to the top of the felt.
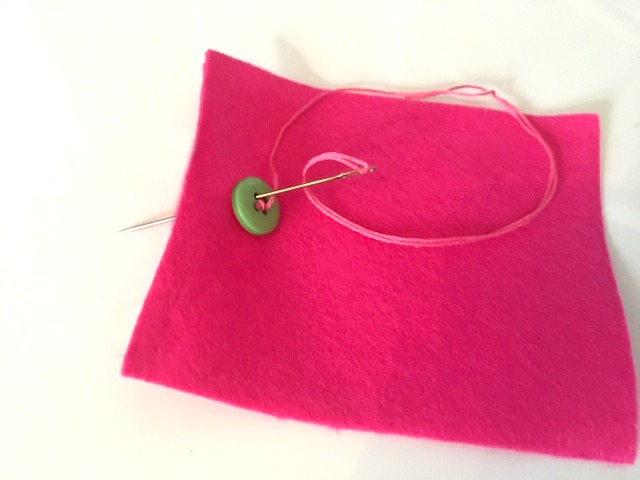
Another idea is just to sew a bright button on instead of a heart. Teaching your child how to sew a button on and a simple hand sewing could really be helpful later in life.
A side note: Would you believe that while I was proof reading this my hubby has handed me a pair of his work pants and a button that just fell off. That proves just my point-thanks dear!
Fold the felt in half to form the little folder to hold the business cards. Here are 3 options we tried for hand stitching.
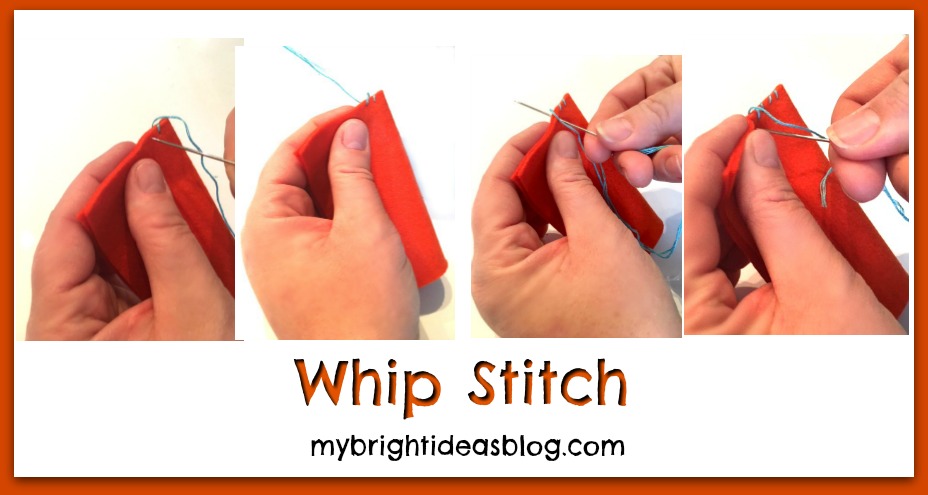
Whip Stitch: Knot the end of the thread and start on the inside of the fabric. Sewing in from the front and out the back and around. Back in the front a smidge to the left of the previous stitch.
![]()
Blanket Stitch: Start from the inside to hide the knotted end, then go through both layers. Stitches can be a bit further apart with the blanket stitch. Go in through the front of the fabric. As you pull the thread through, insert your needle through the loop and pull it securely to make your knot. Insert the needle into the front again the same distance from the previous stitches. At the final stitch go through a second time to make that knot and then insert your needle between the two layers of fabric and cut the thread.
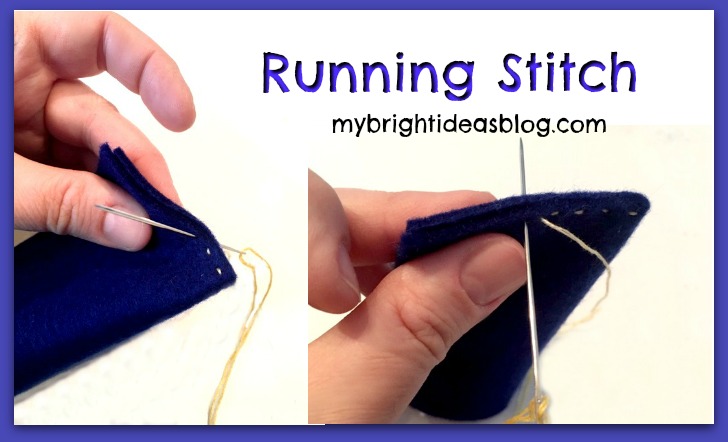
Running Stitch: Knot the embroidery floss and begin on the inside to hide the knotted end. Use a running stitch to go in and out all the way up both edges.
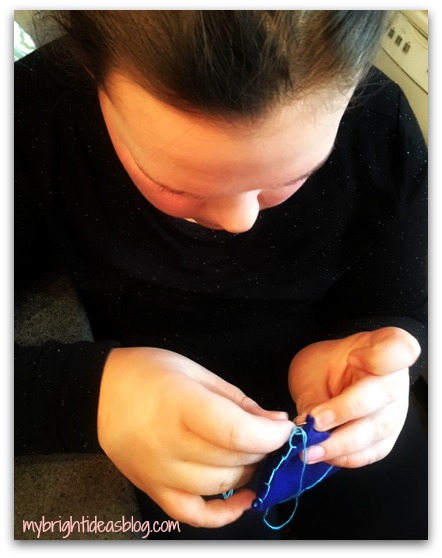
My 11 year old preferred the blanket stitch. Not bad for her first attempt.
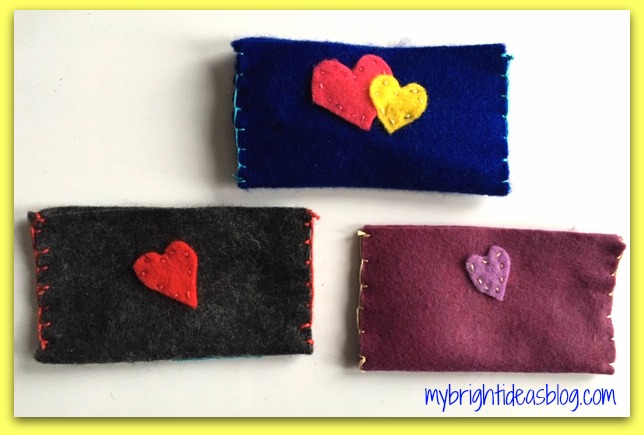
She also liked having one small heart over a larger heart.
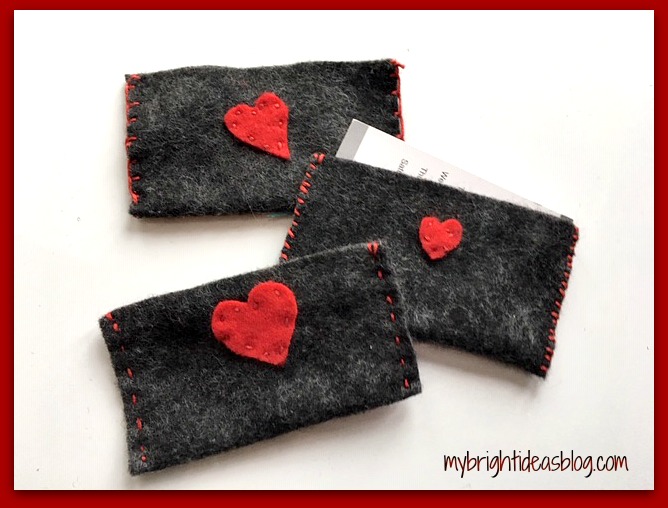
The grey felt with red hearts with red stitching looks pretty good!
Option 2
To make the process faster (as I mentioned we want to make a lot of them)…we sewed the hearts on first and got a little bit faster with each one.
We hand sewed 10 hearts onto squares of felt and ran them through the sewing machine to make a tidy edge.
Could this get any easier! What a great idea…I want to thank my friend Ashley for sparking this idea over dinner last week. Great food, lovely ladies and a bit of craft talk snuck into to the evening…my favorite!
On this blustery, winter day you might be inspired to work with felt too! I have added links to a few of my posts from last year for you skim through and see if an idea is sparked for you too.
Sew a Super Easy to Make Felt Crown – Add to your dress up clothes!
100th Day of School Celebration-Glue Buttons on a shirt for a Gumball Machine
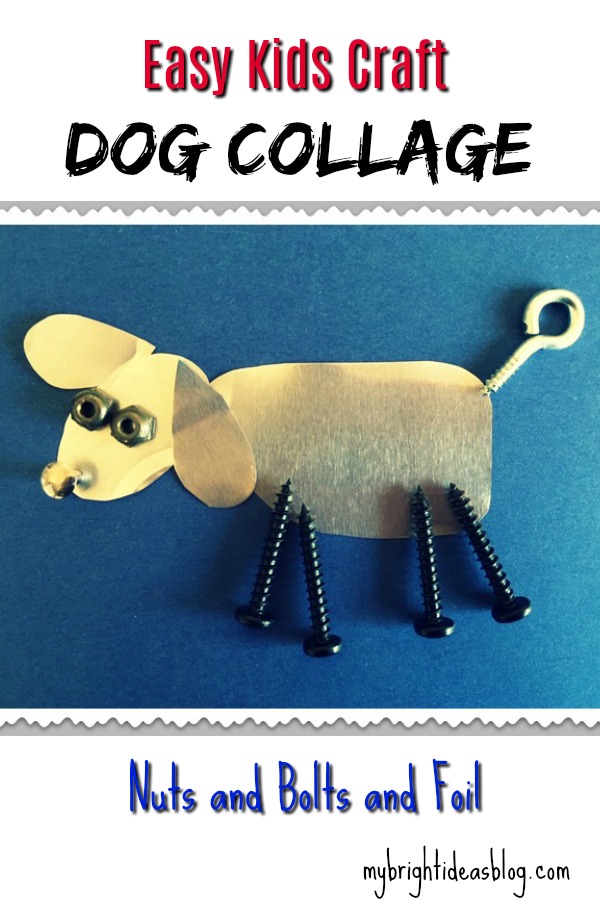
Easy Kids Craft – Foil, Nuts and Bolts Art
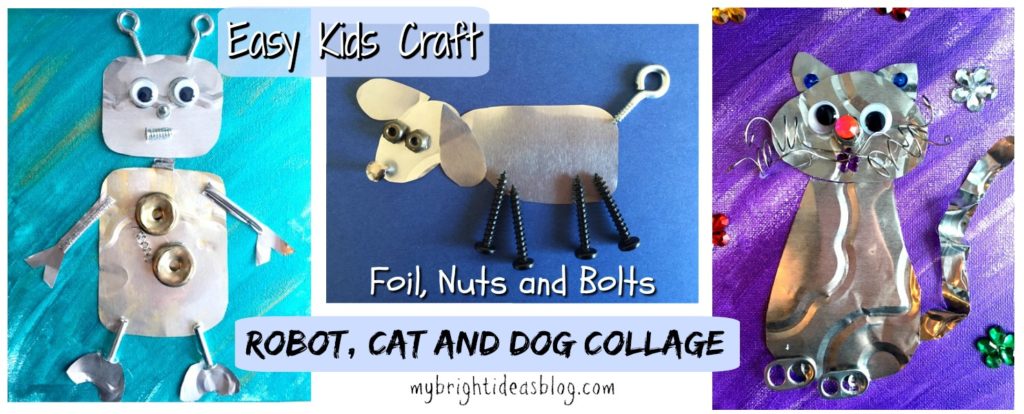
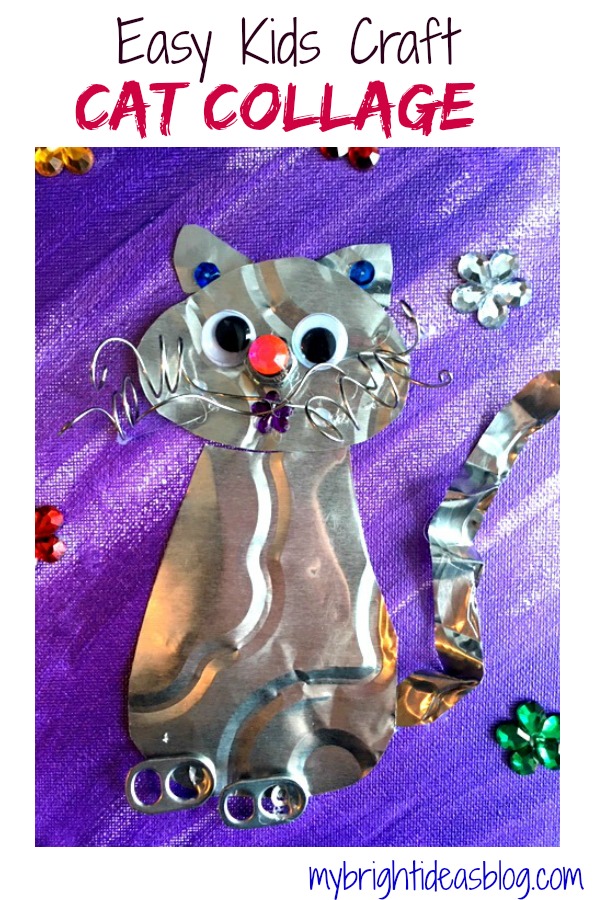
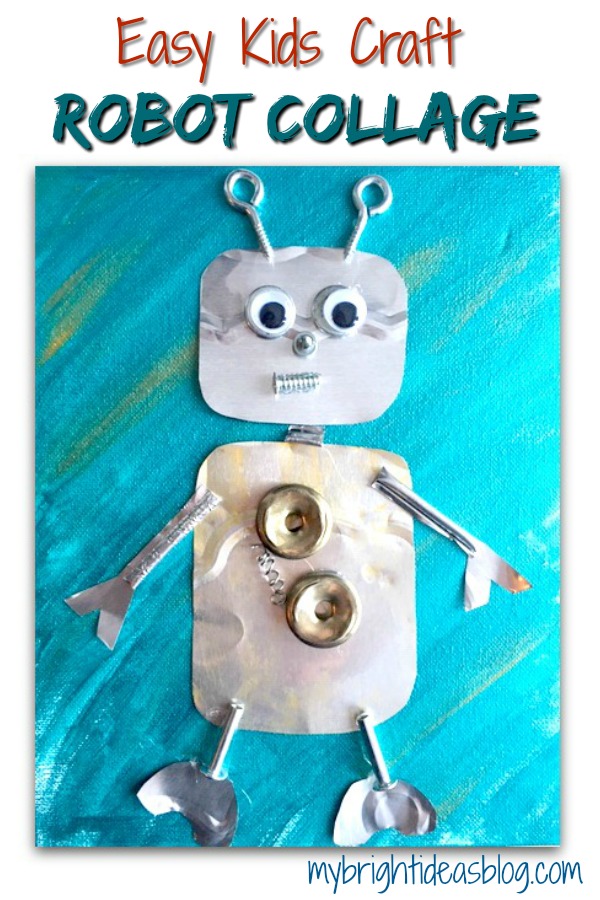
Today’s craft goal is create something fabulous but only use things you already have. Nuts, bolts, a foil cake pan… all of these things can be turned into a super cool craft and wall art for a kids room. We made a robot, a cat and a dog for our examples. But you feel free to let your imagination run wild.
You will need:
- an 8×10 canvas or piece of cardboard
- nuts and bolts and odds and ends
- a foil cake dish
- metallic craft paint and paint brush
- googly eyes (optional)
- scissors
- hot glue gun (or regular glue)
- a sharpie
Warning: This project is intended for older children not toddlers who might put these things in their mouths. Keep an eye on the little parts used for this. It could be sharp or a choking hazard for babies and pets.
Be safe lovely crafters!
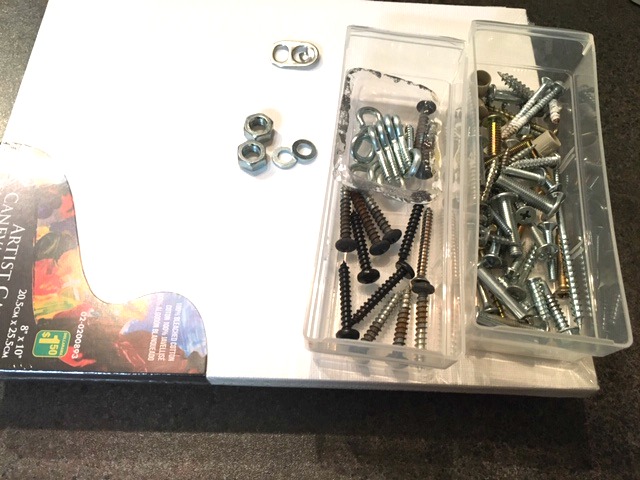
I’m just assuming that everyone out there has a few little miscellaneous drawers of screws from old projects and furniture that won’t be missed if we use them for a random craft project.
The canvas iwas a dollar store purchase. You can get the foil cake pan there too. Or you could just buy a cake or food in one of these pans and do the craft after you’ve licked it clean! :o)
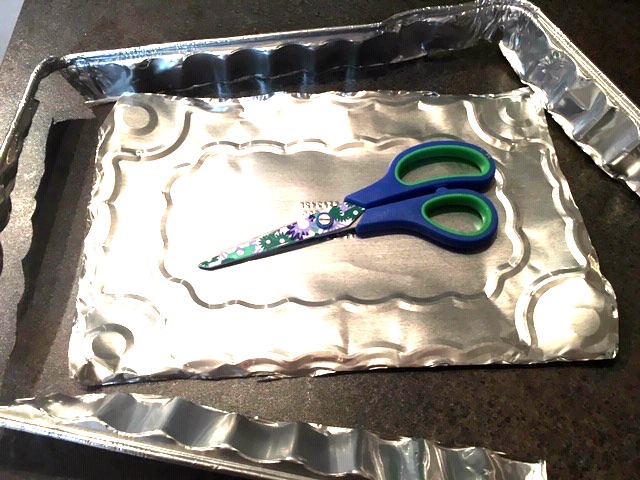
To prepare for this craft, cut out the bottom of the cake pan.
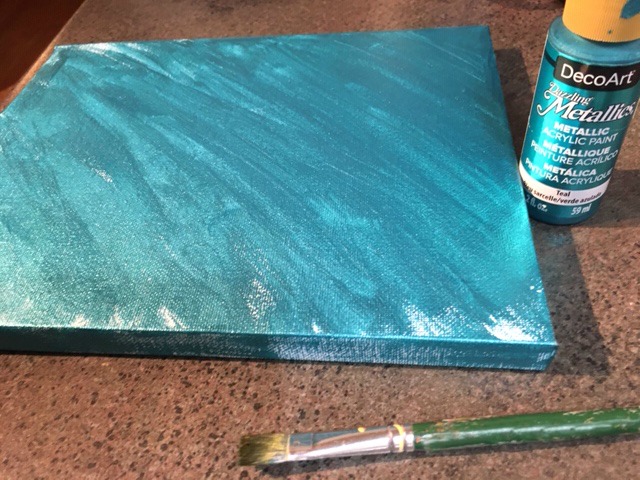
Paint your base canvas. I used metallic paint colours. If you don’t have a canvas just cut a piece of thick carboard to size and paint it.
Cat
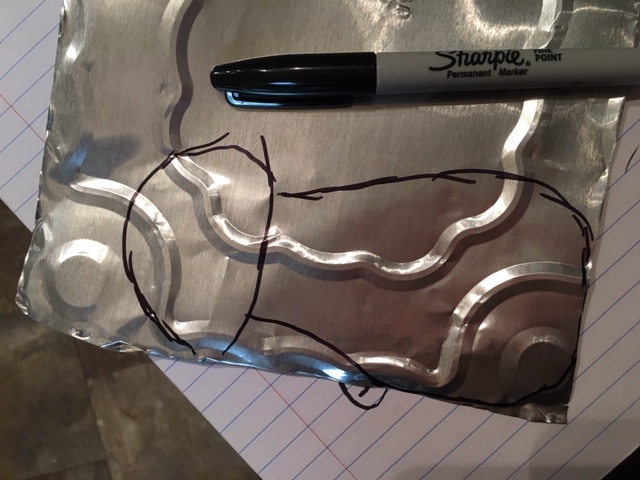
Draw the shape onto the foil with a sharpie. It doesn’t stay permanent on the cake pan foil right away so you can wipe it off if you make a mistake.
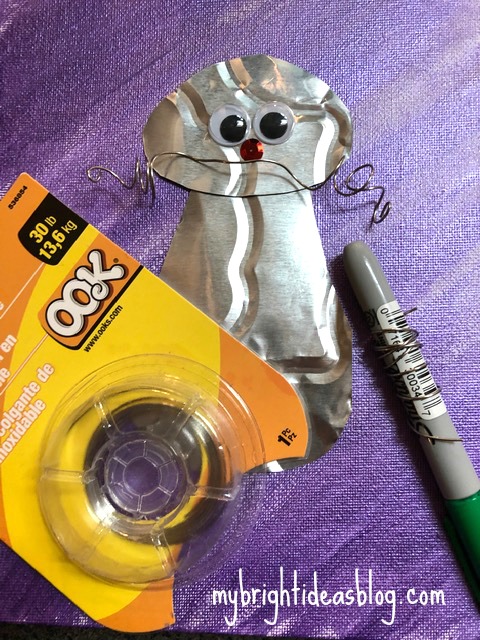
Lay out the pieces before you hot glue them to the canvas. To make the spiral for the cat’s whiskers I wrapped a wire around a pen. Then I stretched the wire out a bit so it looked a bit crazy. Wire is a bit hard to glue on. Find some points that will be touching the canvas and add a drop of hot glue to just those spots.
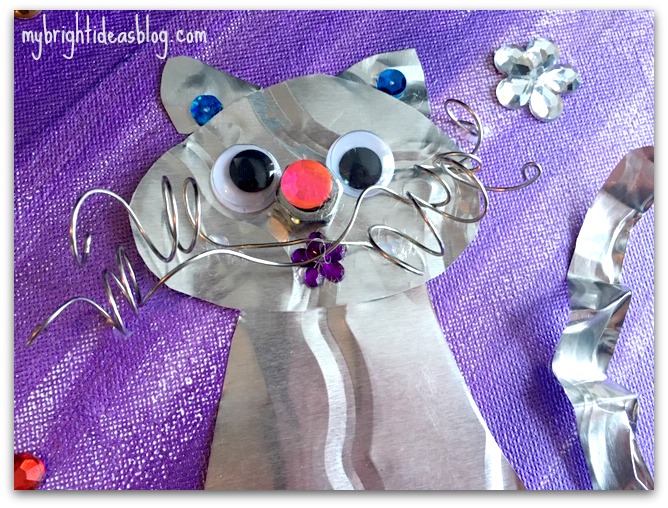
I used a bolt for the cat’s nose and then put a gem on top. For the tail I took a part of the edge of the pan and scrunched it a bit to give it extra wave. Secure it with a few dots of glue to the canvas.
The one gem on her nose looked so nice-I added one for the mouth, 2 for the ears and some big ones randomly around the cat.
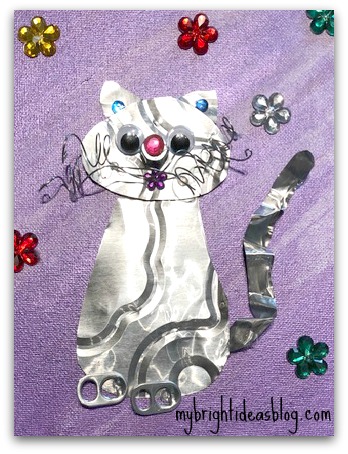
I almost forgot to mention the two pop can tabs were added for feet!
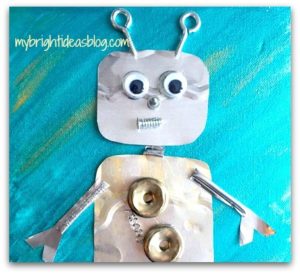
Robot
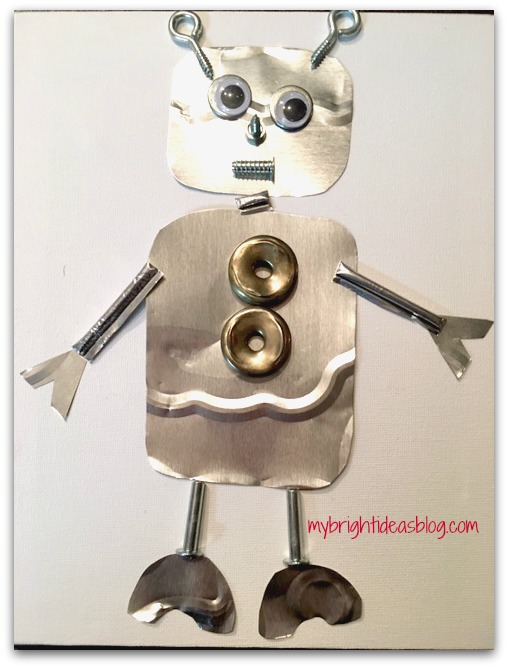
Again for the Robot, lay out your materials and arrange them together for the collage.
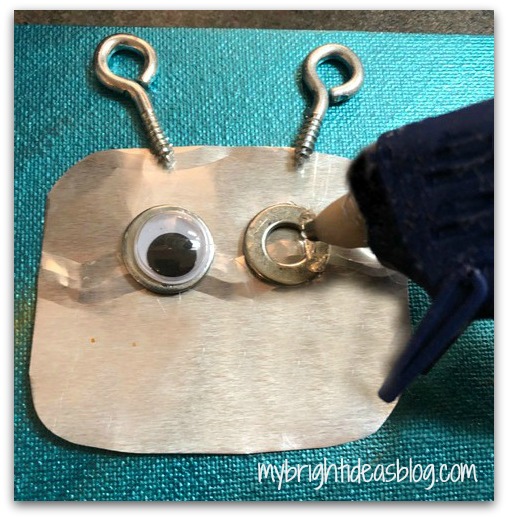
Secure each item with glue to the pre-painted canvas.
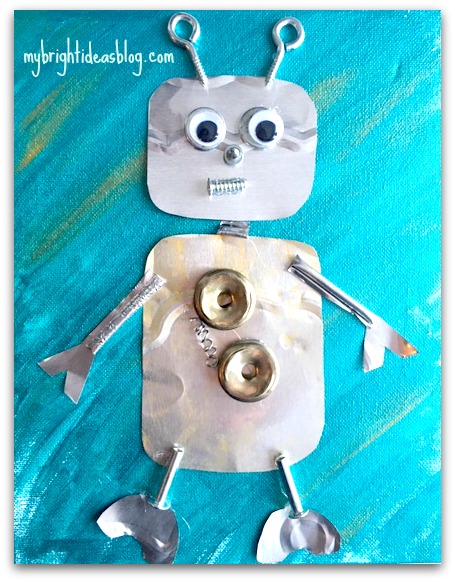
The robot is made of 2 squares with rounded corners. A few miscellaneous items from the junk drawer and cut up scraps from the foil cake pan. The wire on the middle of the robot is the same wire from the cat project but it looks smaller because I wound around a smaller object. If you have a spring from an old pen it would be similar.
This robot turned out great! You’ll love how the metal of the foil reflects the light.
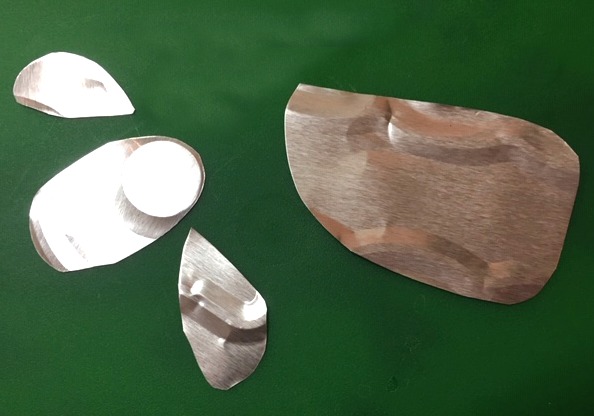
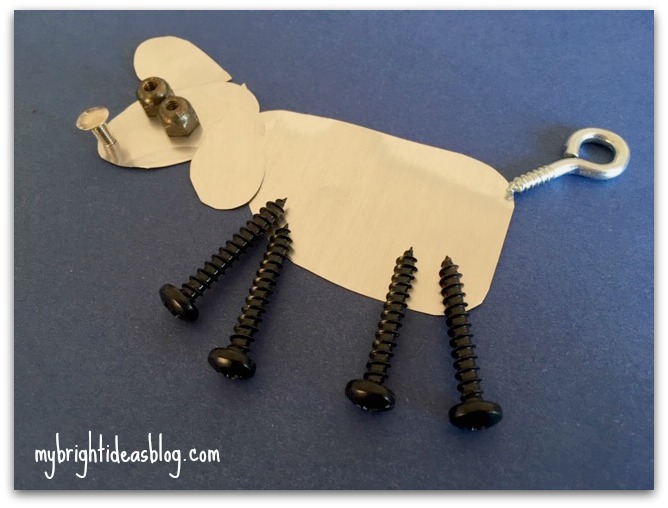
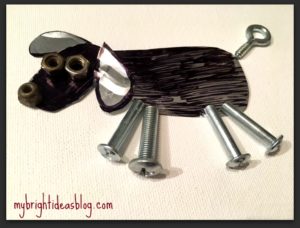
Dog
The dog is simply 4 pieces cut out of the cake pan.
I made one on a white canvas so I colored it in with black sharpie.
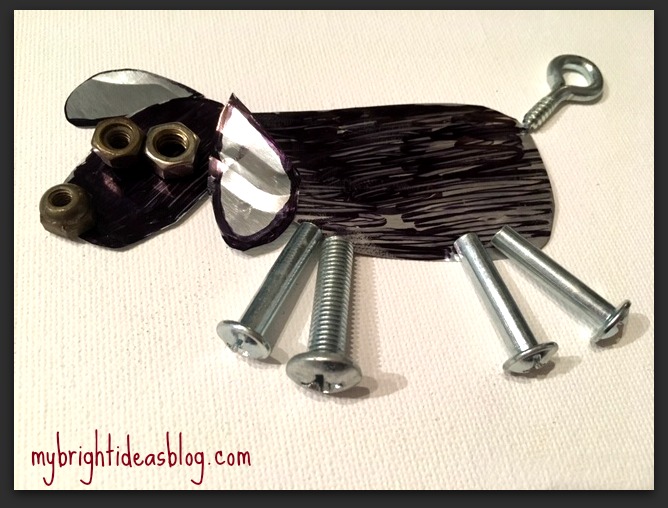
I also make another one on a piece of dark blue cardstock. The foil cake pan looks white in this photo but its still metallic silver. I think it looks like a sheep! Bahhhhh.
This was a super easy and fun craft to make!

Here are some previous blog posts with simple fun projects for the kids!

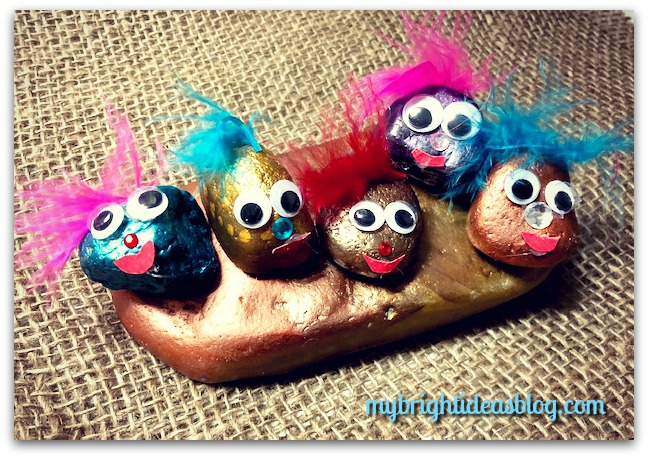
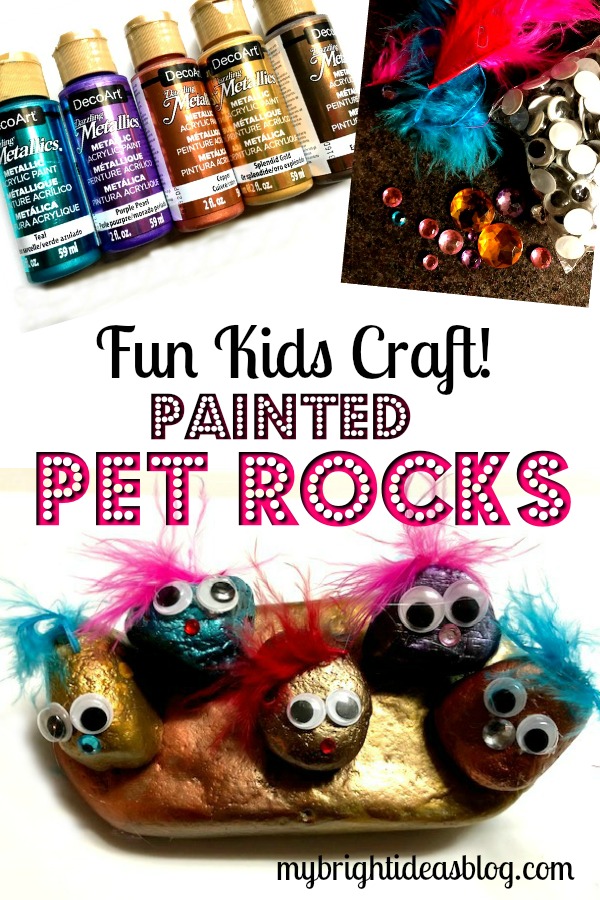
Make Adorable Pet Rocks – Easy Kids Craft!
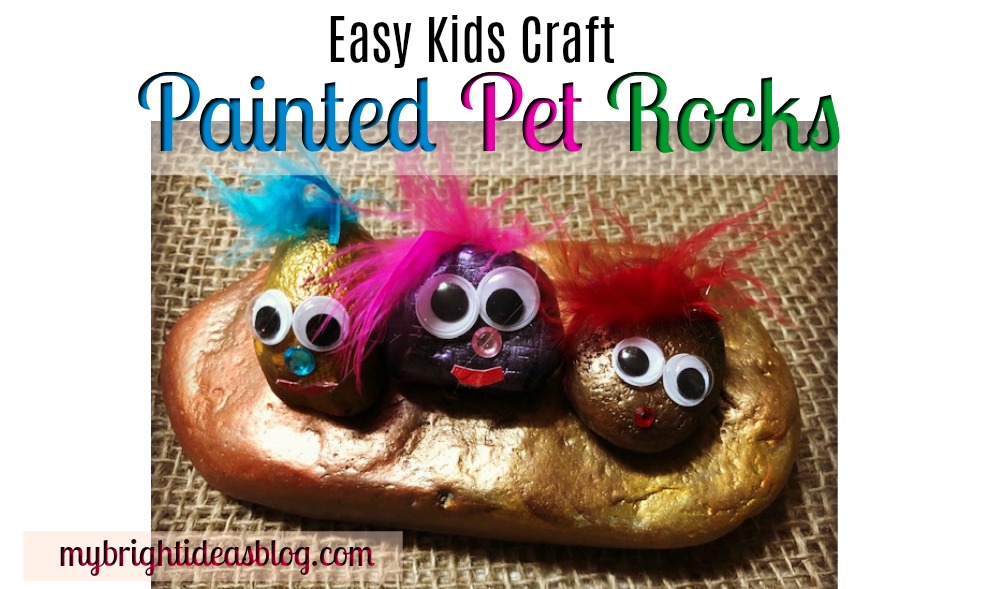
Okay so we have a few more days until the kids are back to school. Is anyone getting stir crazy yet? Not to worry I have a craft idea for their entertainment. Grab a few stones and basic craft supplies and turn them into PET ROCKS! It turns out quite cute actually, the grown ups might want to join in for this project.
You will need:
- rocks
- paint preferably glossy (or better yet metallic!)
- gems
- glue (hot glue or white craft glue)
- feathers
- a scrap of red paper or felt
- googly eyes
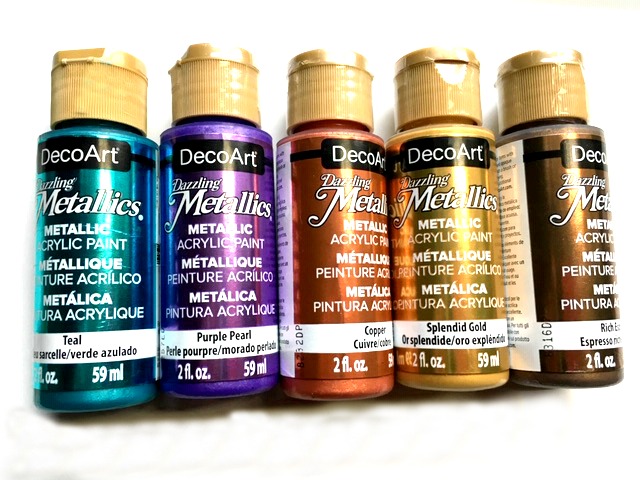
I’m in love with these metallic paints. They look great on rocks!
For today’s project you can use any craft paint but I prefer glossy!
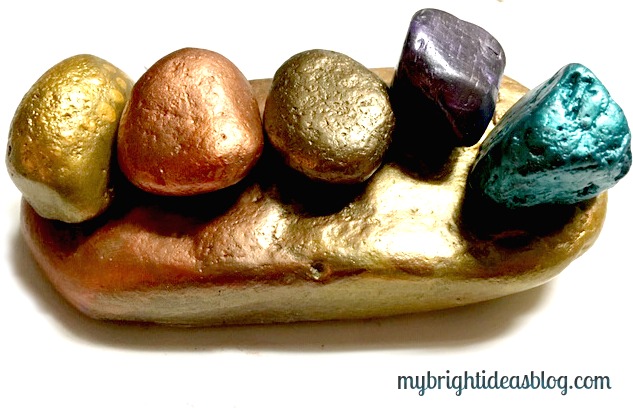
I found this huge flat stone in our rock collection and painted it gold. Then I painted each stone a different colour.
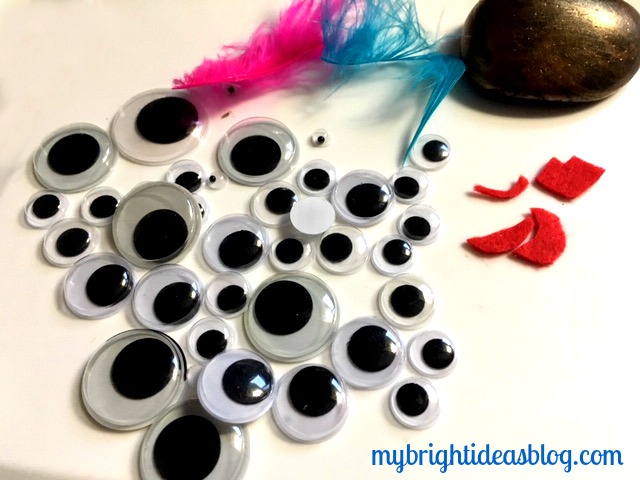
Googly eyes! I have probably over a thousand googly eyes in my craft cupboard. I have no idea why there is so many….today I will use another 10. LOL!

I’m impatient for white glue to dry so I use hot glue to attach the googly eyes on.
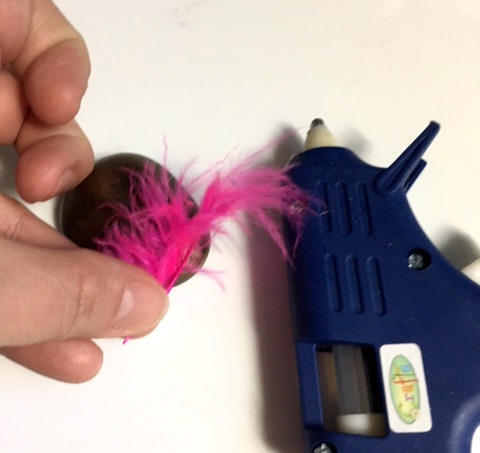
The feathers that I used are just small scraps that had fallen out of feather boas. You just need a tiny bit of something for the hair. Yarn or twine could work if you don’t have feathers. Look around your craft cupboards and see what you already have to embellish your pet rocks.
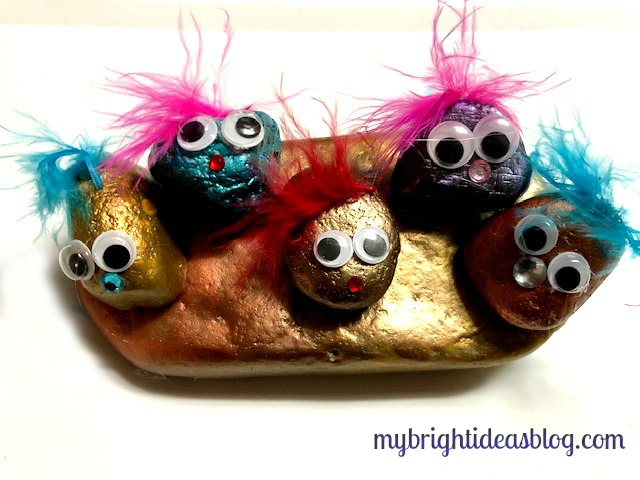
Add a gem for the nose. Or try a pompom nose…they make cute noses too.
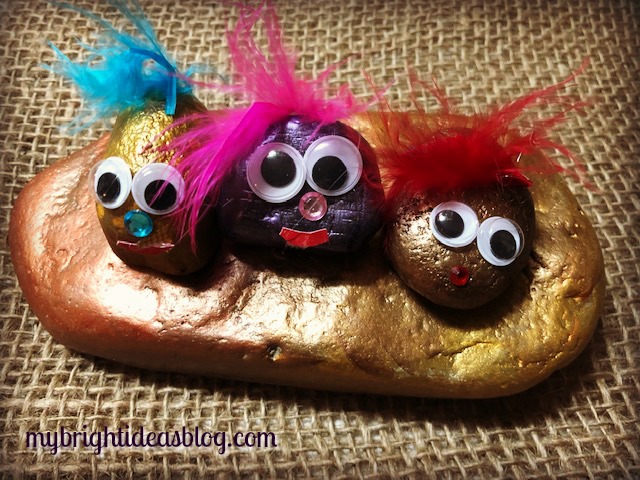
For the mouths you could draw on a smile with a sharpie or if you can’t find where you put your permanent marker….like me. You could just cut out a tiny smile on red paper or felt and glue it on.
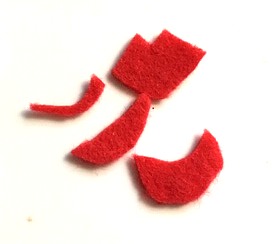
Felt is tricky to cut something so small. You may need to help your little ones with the mouth using small sharp scissors. Or just use paper.
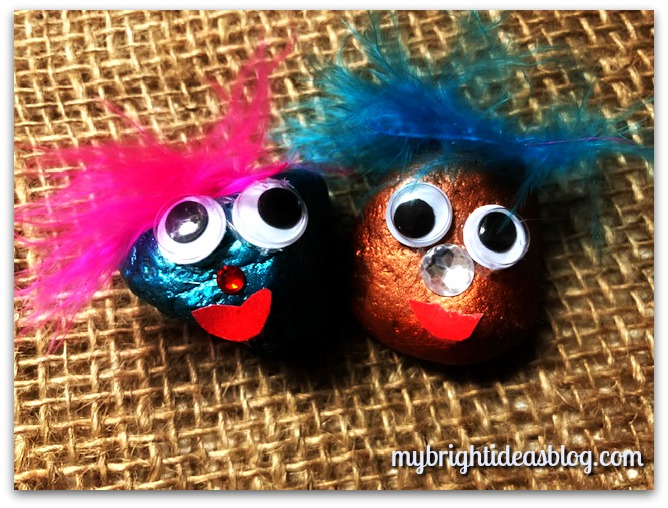
I get a kick out of gluing googly eyes on things. Suddenly they become a little person.
I hope you enjoy making Pet Rocks. Have a look below at a few links to previous posts I have done for crafts with personality!

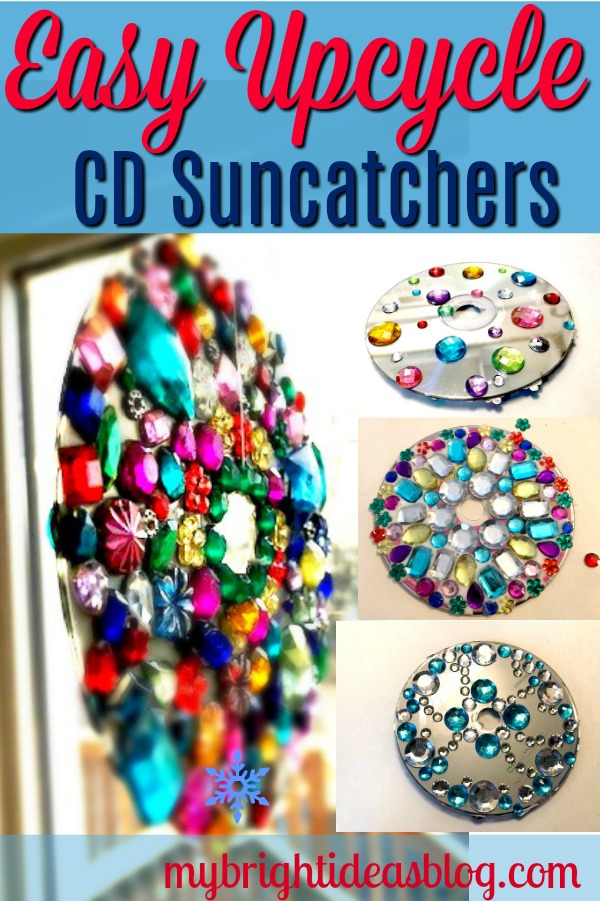
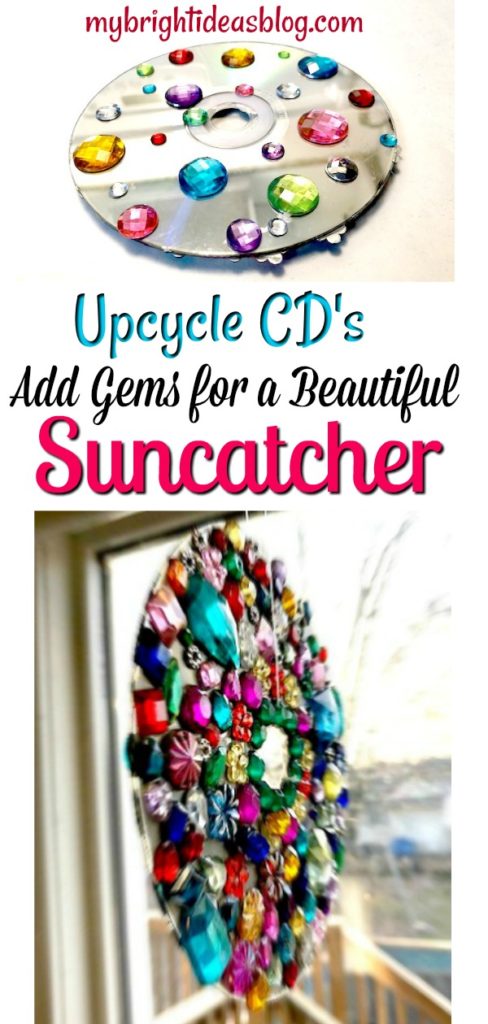
Upcycle CD’s into a Gem Covered Suncatcher
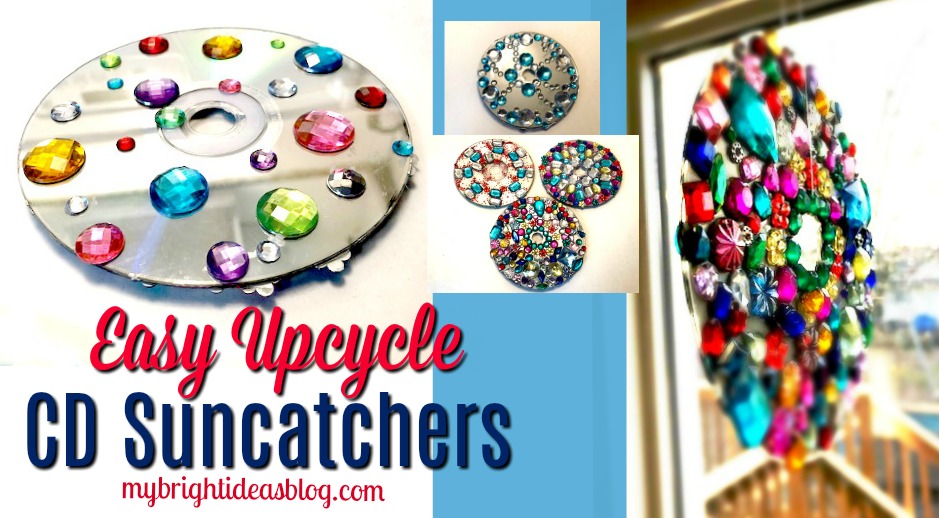
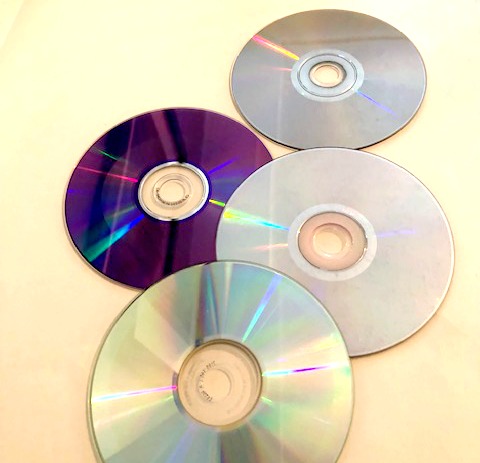
Have you got a collection of CD’s and DVD’s that you no longer need? Make a craft with them! There are loads of CD Upcycle ideas out there. Today we are going to turn a few old disks into beautiful suncatchers!
It’s midway through the Winter break for the kids, so we are looking for easy kids crafts. You will likely already have all the supplies for this craft in your cupboards.

You will need:
- Gem Stones
- Old CD’s or DVD’s
- Craft Glue
- Fishing Line
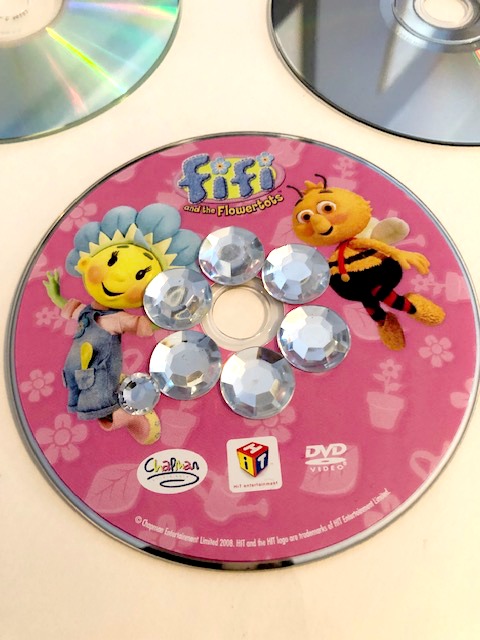
Have you seen Fifi and the Flowertots? It’s a super cute British kids cartoon. This DVD was sent to us from family in England. We watched it for years. We decided we are finished with this disk and it’s the first one to get glamourous.
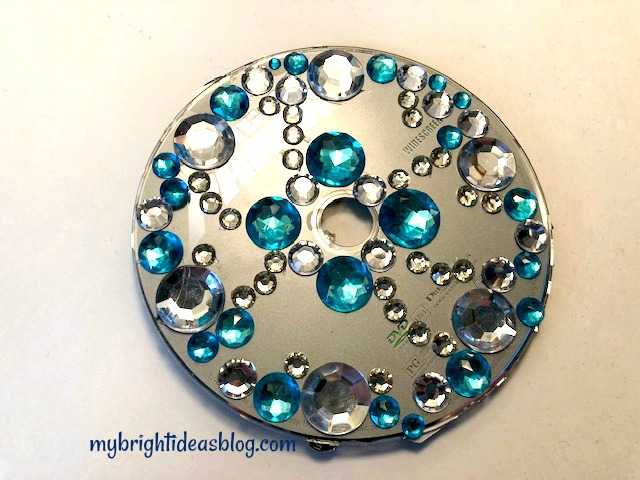
This disk has pink showing through which makes it original. Simply glue your gems to the CD.
It looks really pretty if you can make a pattern with the gems.
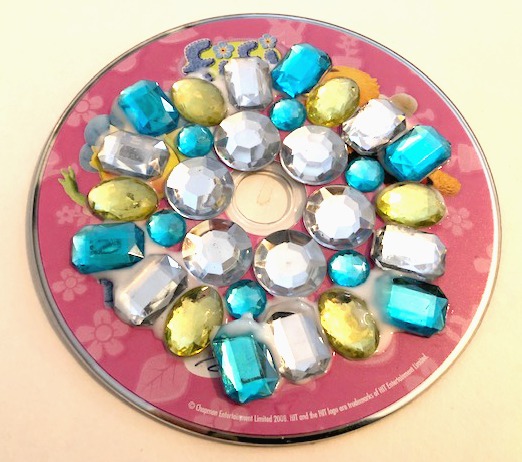
This one started out organized but then things got very random.
The sparkle of the CD’s plain silver side will look fantastic spinning in the sun. Adding the gems makes a beautiful combination.
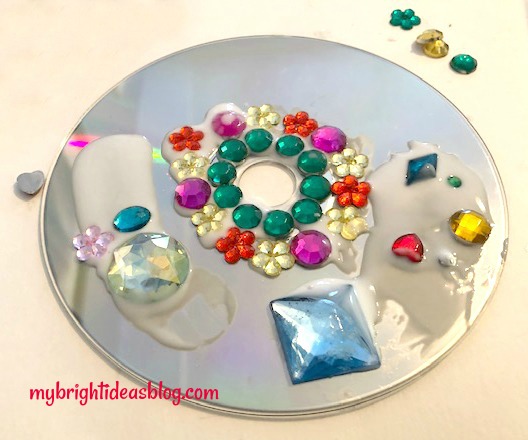
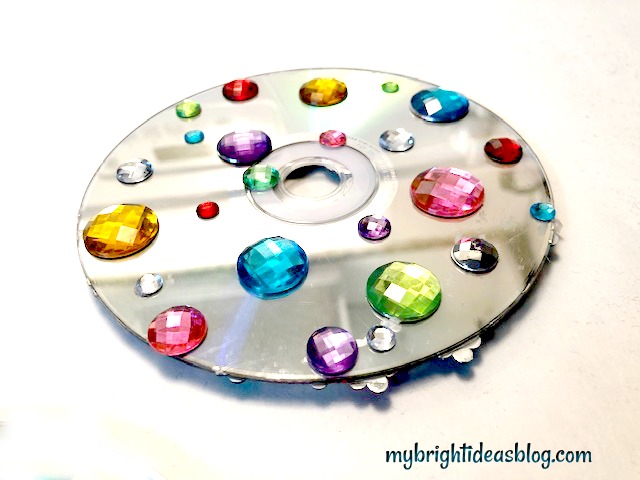
Okay it looks like a mess here but when it’s done its dazzling!
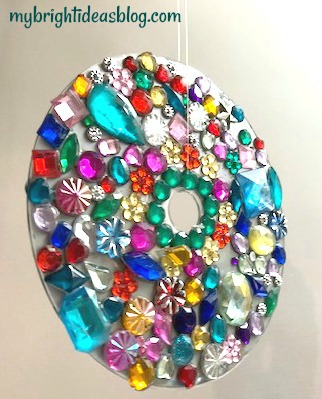
This is full of variety in sizes and random colours and it looks beautiful!
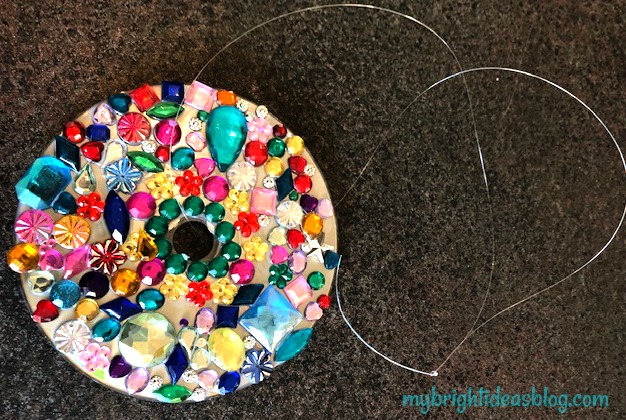
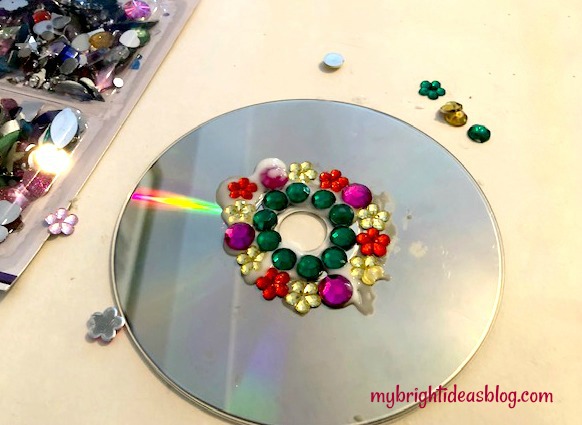
There is no need to drill a hole to tie it up. It already has one! Cut an arms length of fishing line, insert it through the Cd’s hole and tie a knot.
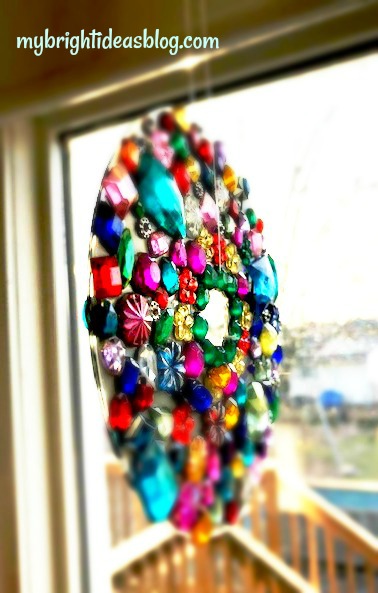
Hang it from the kitchen window and wait til you see the sun hit it!
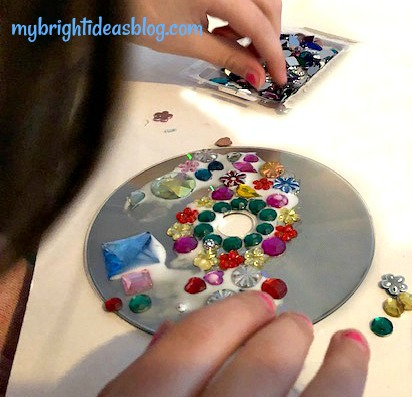
This shows that your CD upcycle doesn’t need to be full of gems to look good. This one required no glue since the gems came on a page of gem stickers. No mess! Also, its quick-no need to wait for glue to dry.
Flip it over and decorate the other side.
This could be a great craft for a camping trip! Gem stickers, old CD’s, and ribbon or fishing line.
This was done with stickers also. Do you have a pre-teen who babysits? This would be a great craft for the babysitter to take to their babysitting job. I loved it when we had a young babysitter arrive with projects and crafts for the kids. Very good business plan kids!
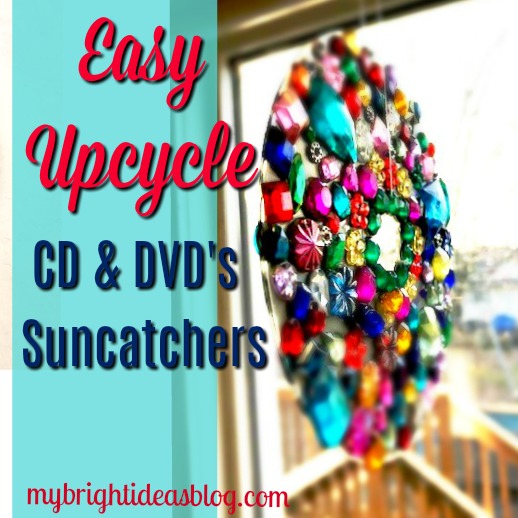
This CD and DVD upcycle craft is a project you will really enjoy doing with your kids! I could see this given as a gift from the kids to their grandparents….or a sick friend or a teacher gift.
Have a look at some other suncatchers I’ve already done.