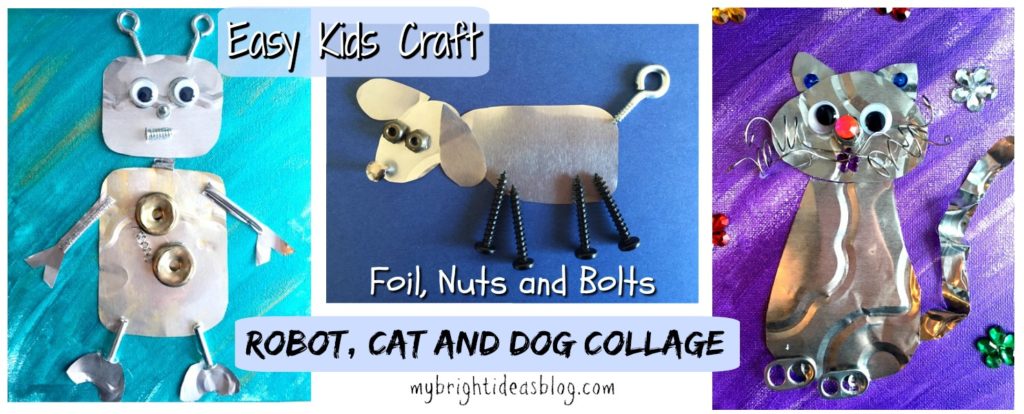
Today’s craft goal is create something fabulous but only use things you already have. Nuts, bolts, a foil cake pan… all of these things can be turned into a super cool craft and wall art for a kids room. We made a robot, a cat and a dog for our examples. But you feel free to let your imagination run wild.
You will need:
- an 8×10 canvas or piece of cardboard
- nuts and bolts and odds and ends
- a foil cake dish
- metallic craft paint and paint brush
- googly eyes (optional)
- scissors
- hot glue gun (or regular glue)
- a sharpie
Warning: This project is intended for older children not toddlers who might put these things in their mouths. Keep an eye on the little parts used for this. It could be sharp or a choking hazard for babies and pets.
Be safe lovely crafters!
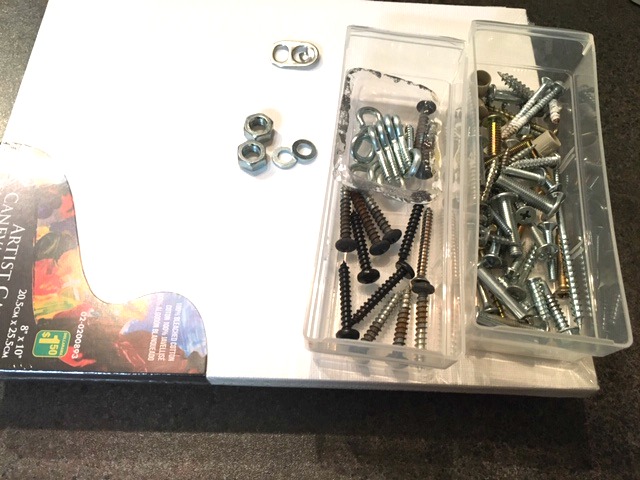
I’m just assuming that everyone out there has a few little miscellaneous drawers of screws from old projects and furniture that won’t be missed if we use them for a random craft project.
The canvas iwas a dollar store purchase. You can get the foil cake pan there too. Or you could just buy a cake or food in one of these pans and do the craft after you’ve licked it clean! :o)
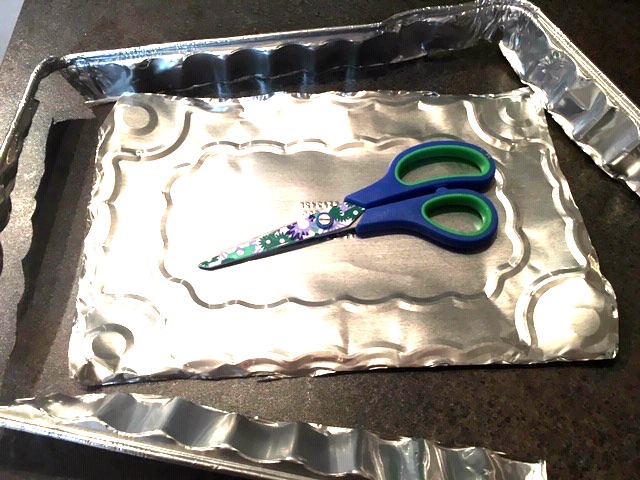
To prepare for this craft, cut out the bottom of the cake pan.
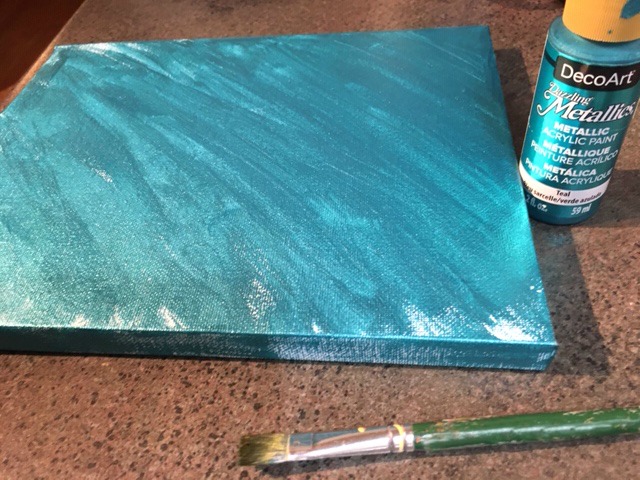
Paint your base canvas. I used metallic paint colours. If you don’t have a canvas just cut a piece of thick carboard to size and paint it.
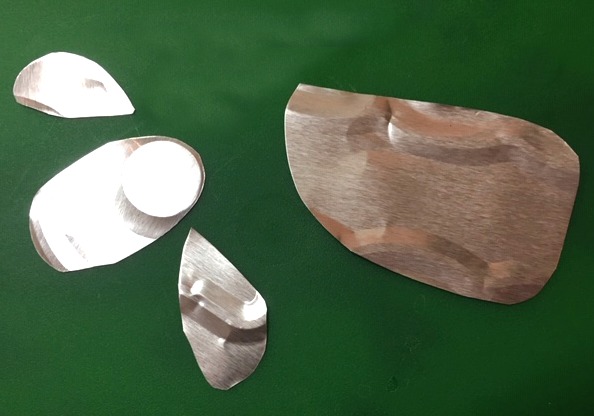
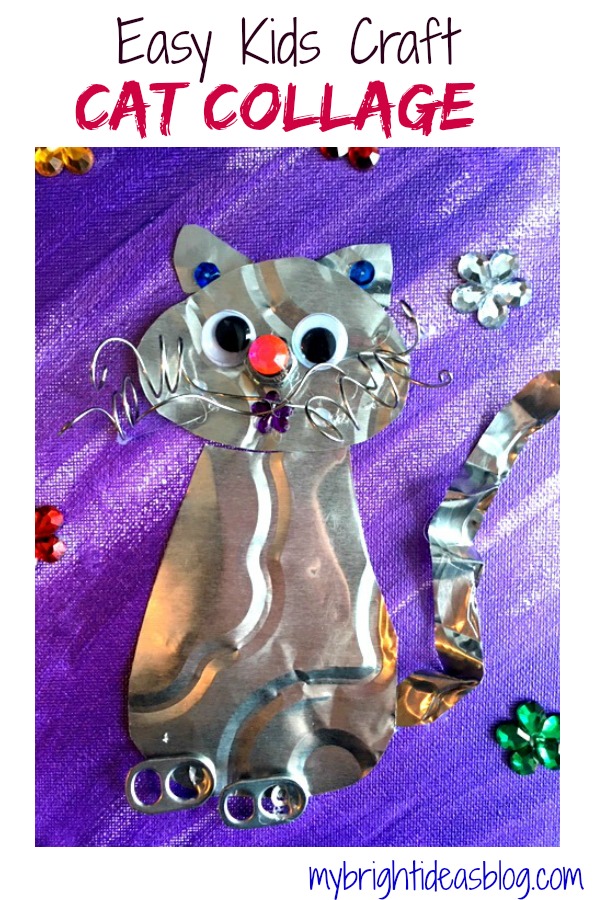
Cat
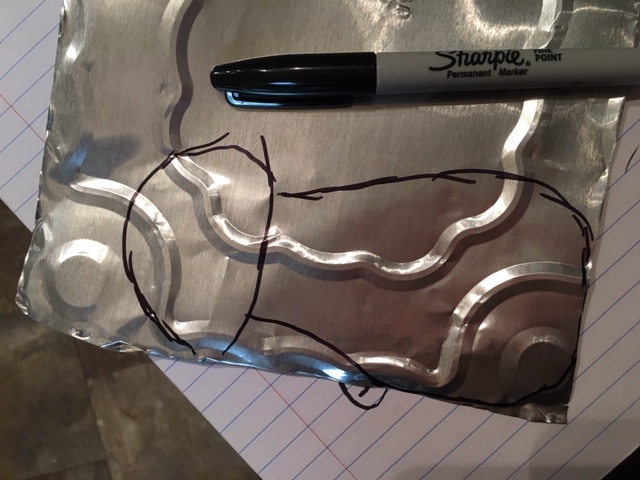
Draw the shape onto the foil with a sharpie. It doesn’t stay permanent on the cake pan foil right away so you can wipe it off if you make a mistake.
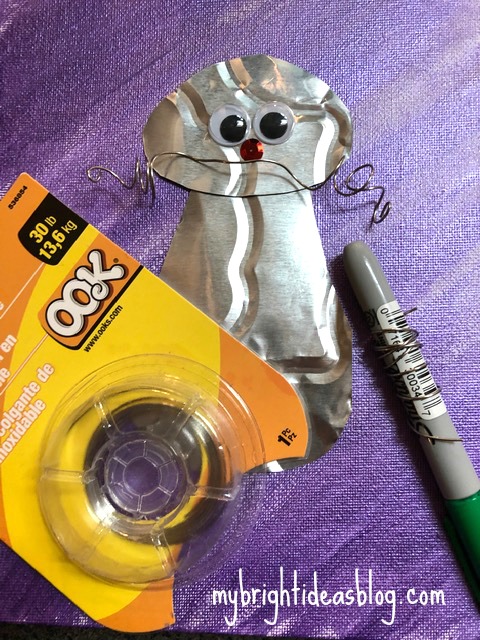
Lay out the pieces before you hot glue them to the canvas. To make the spiral for the cat’s whiskers I wrapped a wire around a pen. Then I stretched the wire out a bit so it looked a bit crazy. Wire is a bit hard to glue on. Find some points that will be touching the canvas and add a drop of hot glue to just those spots.
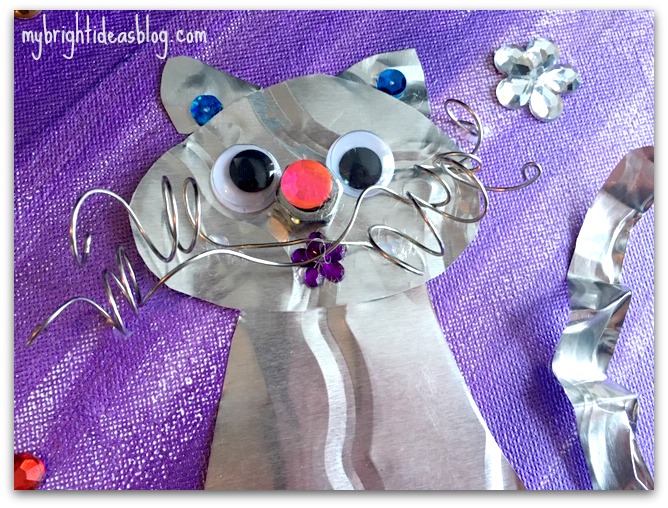
I used a bolt for the cat’s nose and then put a gem on top. For the tail I took a part of the edge of the pan and scrunched it a bit to give it extra wave. Secure it with a few dots of glue to the canvas.
The one gem on her nose looked so nice-I added one for the mouth, 2 for the ears and some big ones randomly around the cat.
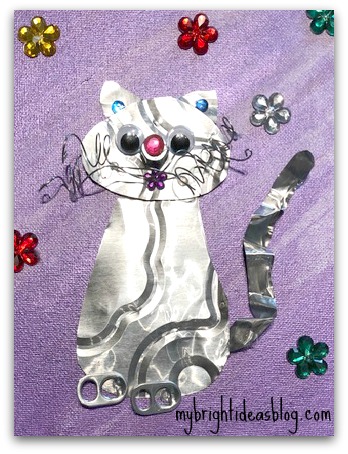
I almost forgot to mention the two pop can tabs were added for feet!
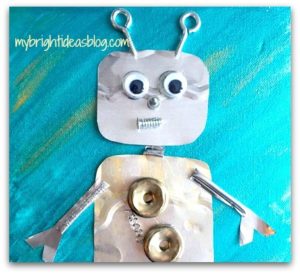
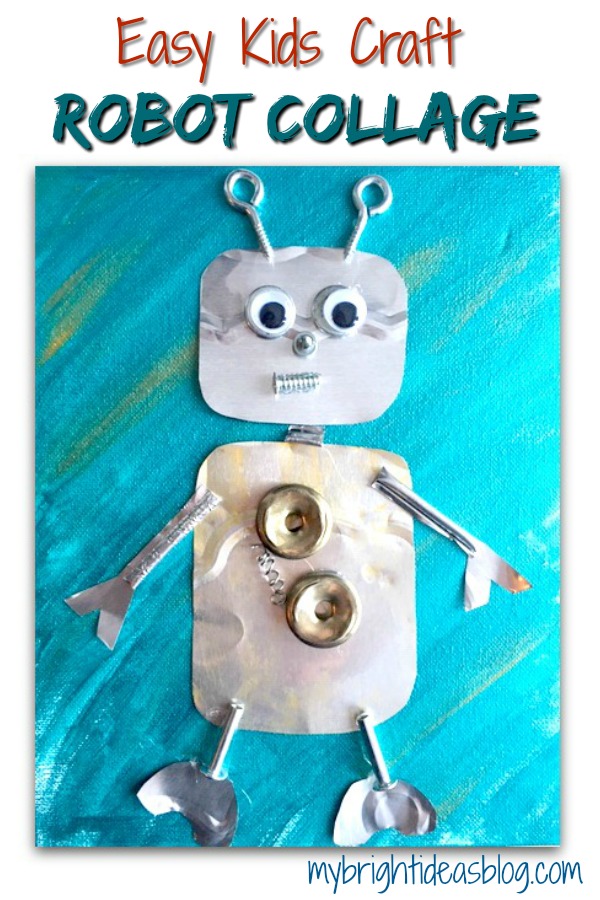
Robot
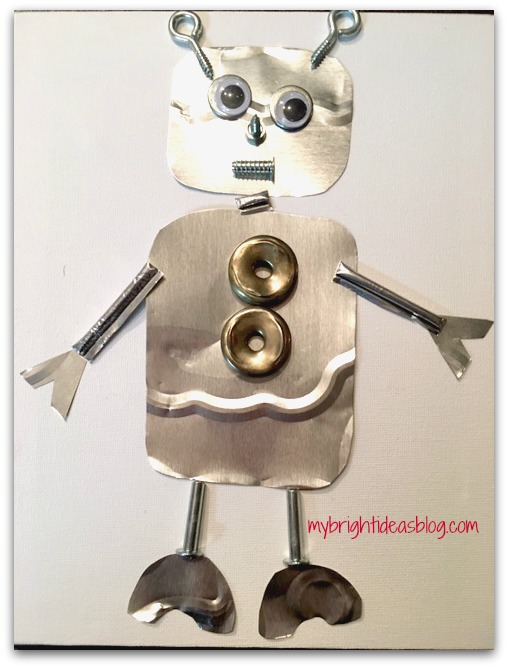
Again for the Robot, lay out your materials and arrange them together for the collage.
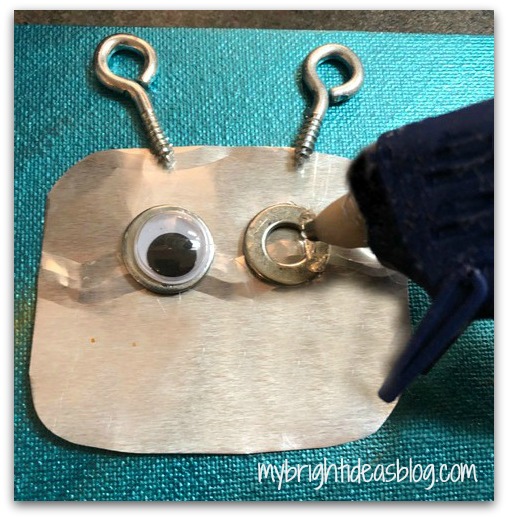
Secure each item with glue to the pre-painted canvas.
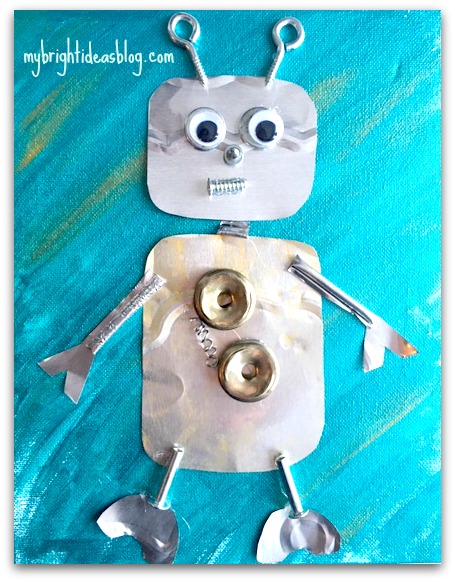
The robot is made of 2 squares with rounded corners. A few miscellaneous items from the junk drawer and cut up scraps from the foil cake pan. The wire on the middle of the robot is the same wire from the cat project but it looks smaller because I wound around a smaller object. If you have a spring from an old pen it would be similar.
This robot turned out great! You’ll love how the metal of the foil reflects the light.
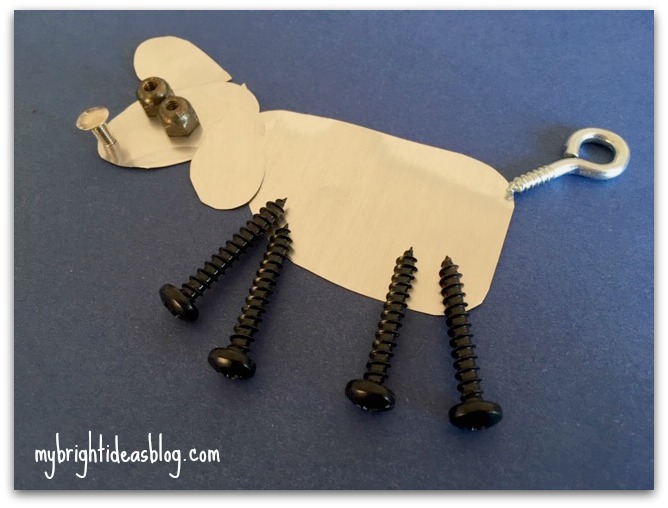
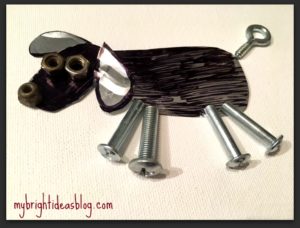
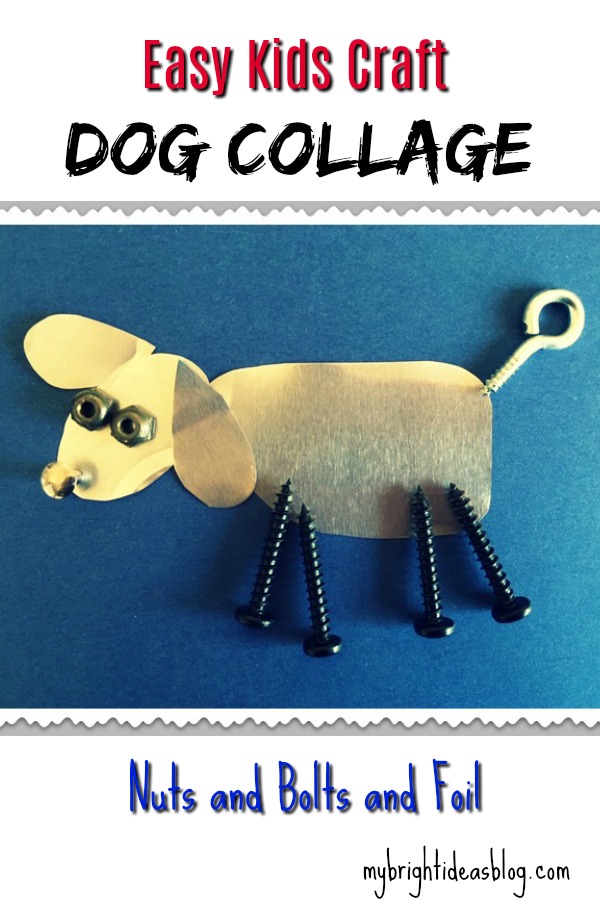
Dog
The dog is simply 4 pieces cut out of the cake pan.
I made one on a white canvas so I colored it in with black sharpie.
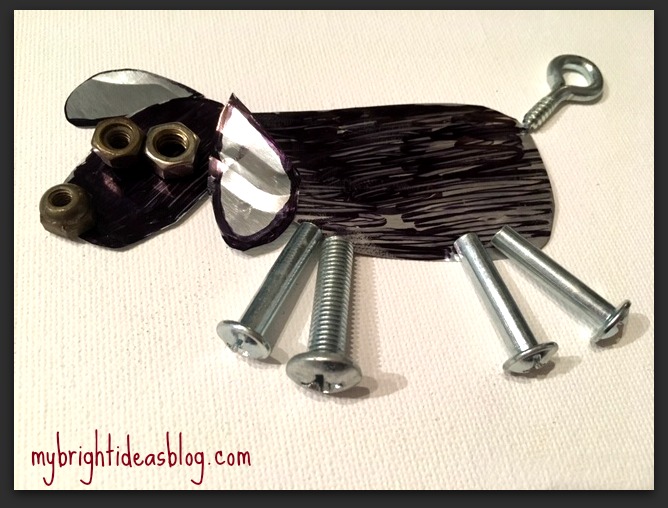
I also make another one on a piece of dark blue cardstock. The foil cake pan looks white in this photo but its still metallic silver. I think it looks like a sheep! Bahhhhh.
This was a super easy and fun craft to make!

Here are some previous blog posts with simple fun projects for the kids!

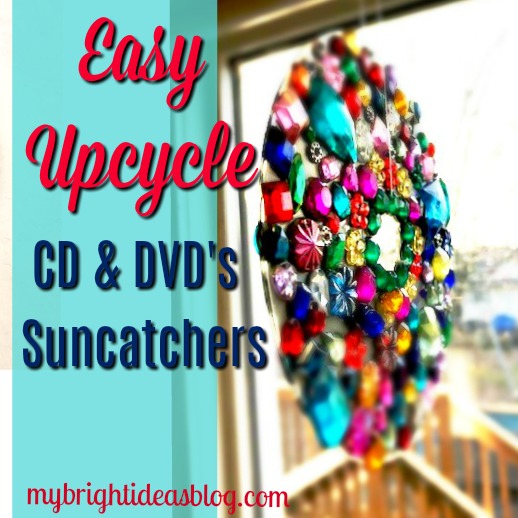
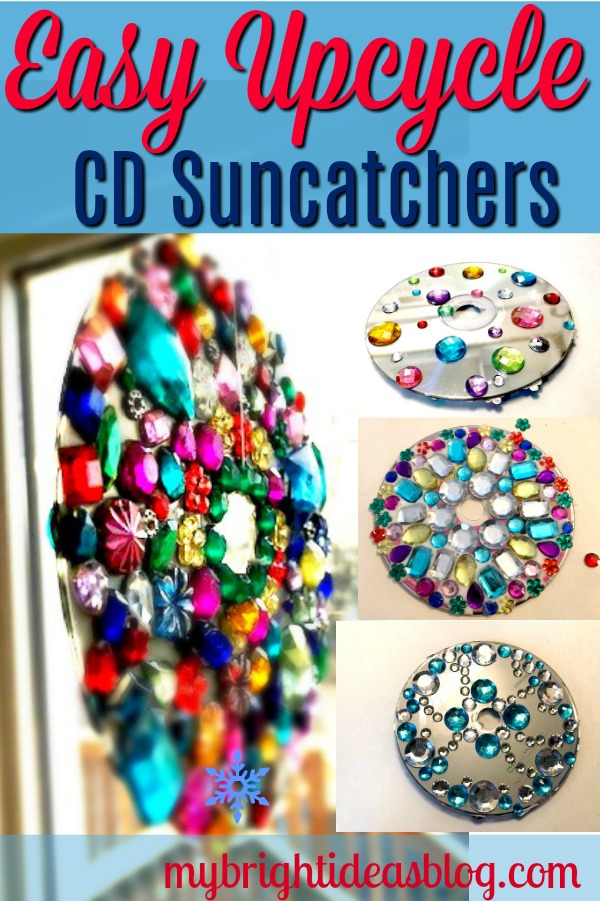
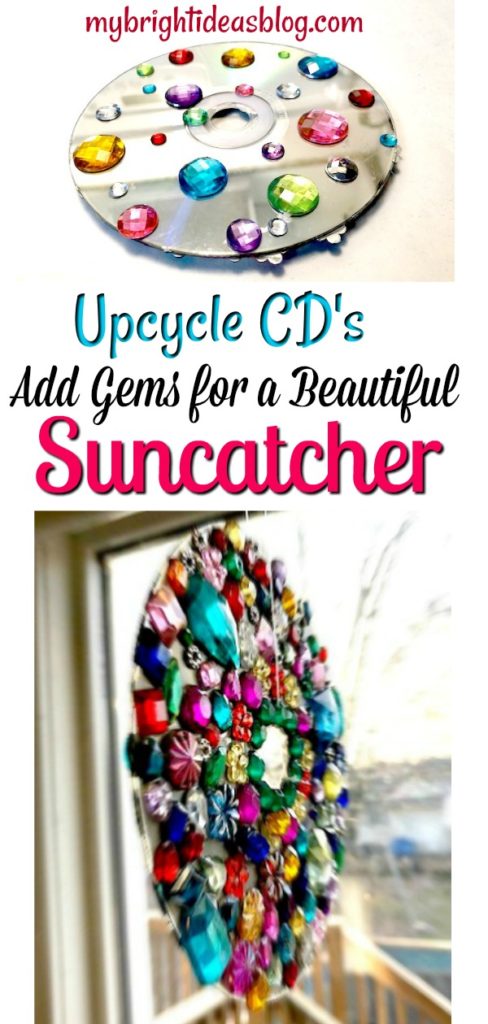
Upcycle CD’s into a Gem Covered Suncatcher
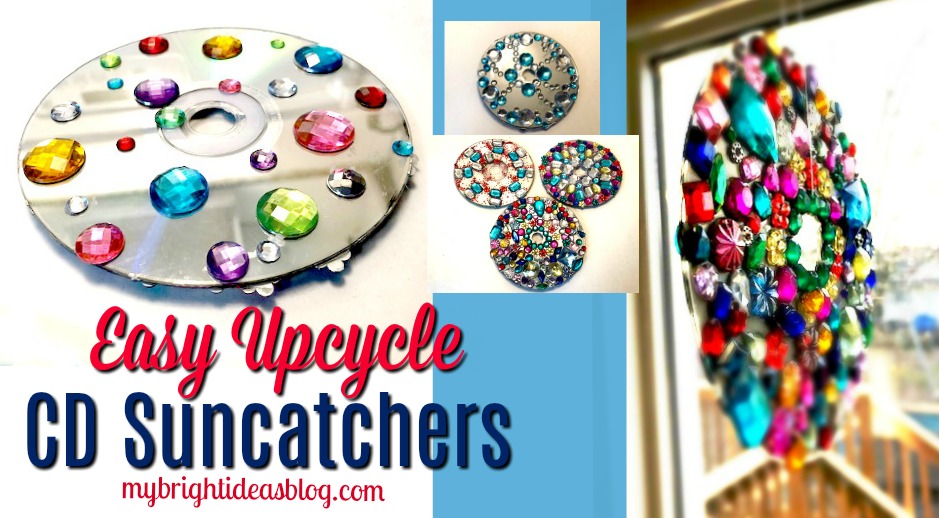
Have you got a collection of CD’s and DVD’s that you no longer need? Make a craft with them! There are loads of CD Upcycle ideas out there. Today we are going to turn a few old disks into beautiful suncatchers!
It’s midway through the Winter break for the kids, so we are looking for easy kids crafts. You will likely already have all the supplies for this craft in your cupboards.

You will need:
- Gem Stones
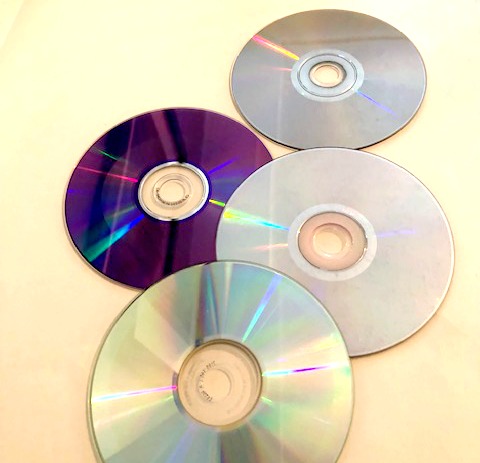
- Old CD’s or DVD’s
- Craft Glue
- Fishing Line
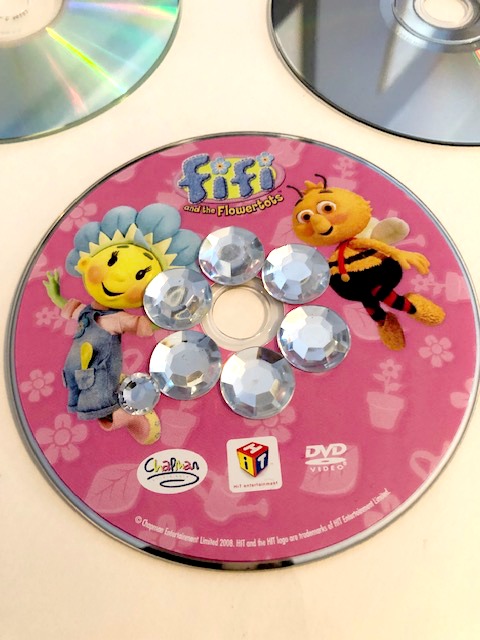
Have you seen Fifi and the Flowertots? It’s a super cute British kids cartoon. This DVD was sent to us from family in England. We watched it for years. We decided we are finished with this disk and it’s the first one to get glamourous.
This disk has pink showing through which makes it original. Simply glue your gems to the CD.
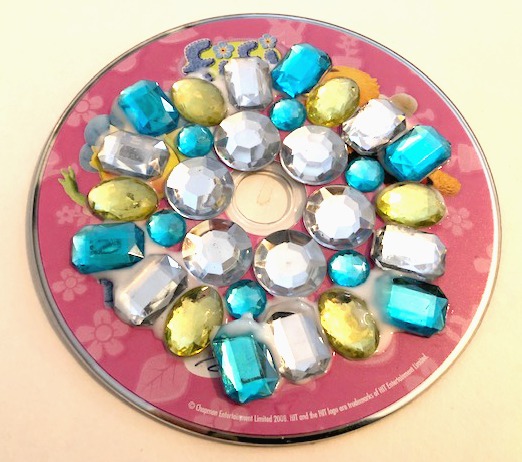
It looks really pretty if you can make a pattern with the gems.
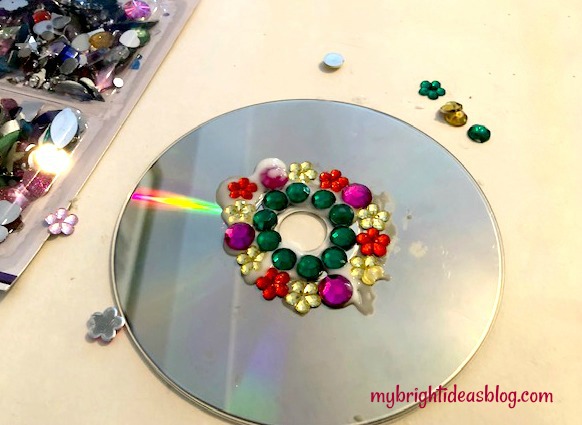
This one started out organized but then things got very random.
The sparkle of the CD’s plain silver side will look fantastic spinning in the sun. Adding the gems makes a beautiful combination.
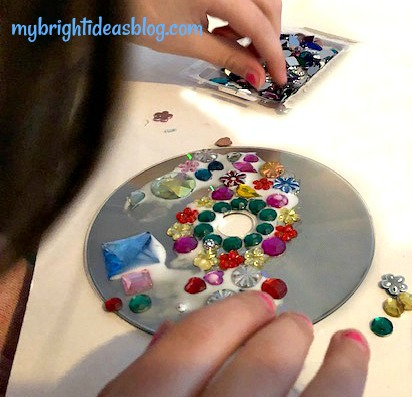
Okay it looks like a mess here but when it’s done its dazzling!
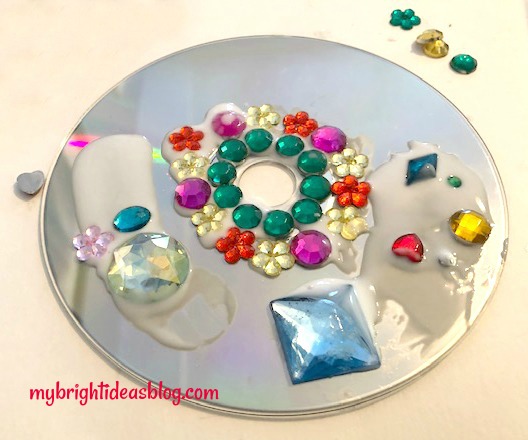
This is full of variety in sizes and random colours and it looks beautiful!
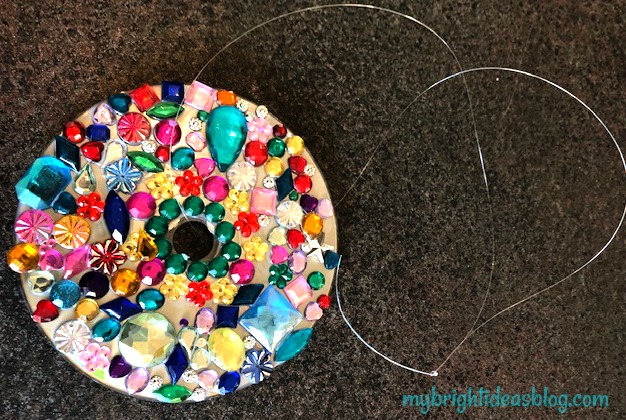
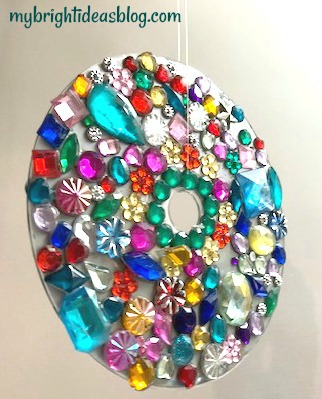
There is no need to drill a hole to tie it up. It already has one! Cut an arms length of fishing line, insert it through the Cd’s hole and tie a knot.
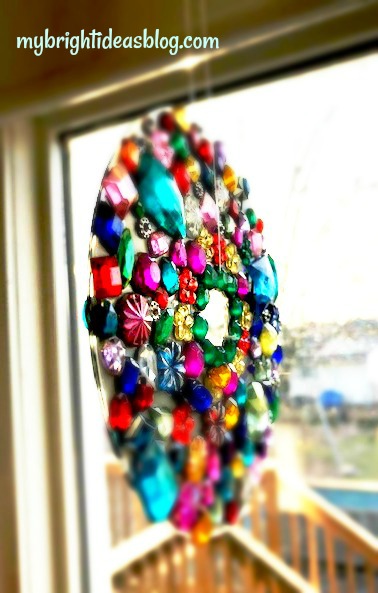
Hang it from the kitchen window and wait til you see the sun hit it!
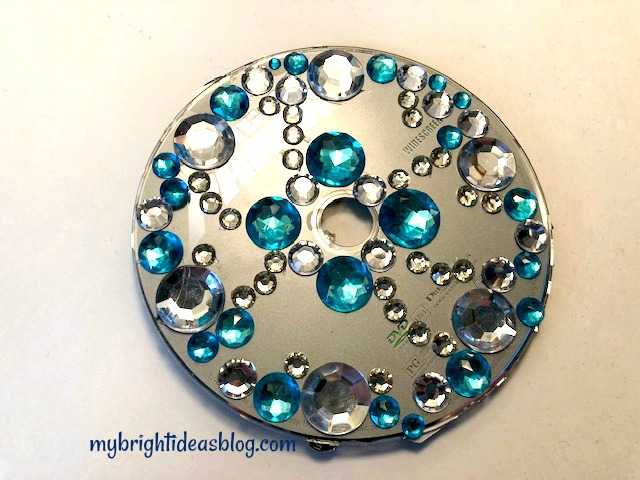
This shows that your CD upcycle doesn’t need to be full of gems to look good. This one required no glue since the gems came on a page of gem stickers. No mess! Also, its quick-no need to wait for glue to dry.
Flip it over and decorate the other side.
This could be a great craft for a camping trip! Gem stickers, old CD’s, and ribbon or fishing line.
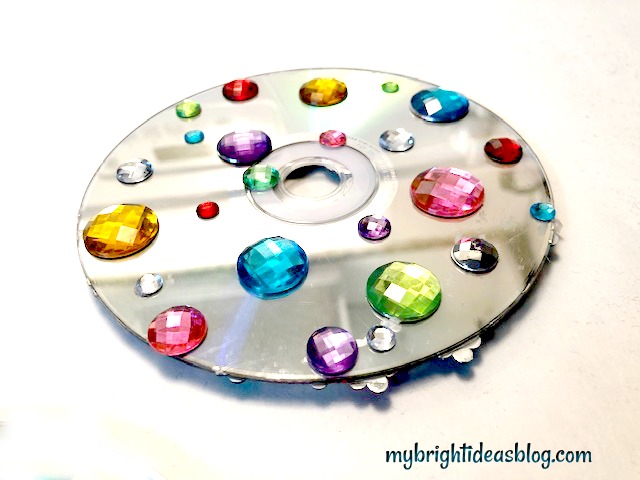
This was done with stickers also. Do you have a pre-teen who babysits? This would be a great craft for the babysitter to take to their babysitting job. I loved it when we had a young babysitter arrive with projects and crafts for the kids. Very good business plan kids!
This CD and DVD upcycle craft is a project you will really enjoy doing with your kids! I could see this given as a gift from the kids to their grandparents….or a sick friend or a teacher gift.
Have a look at some other suncatchers I’ve already done.
Upcycled Jeans – Sweatshirt Refashion


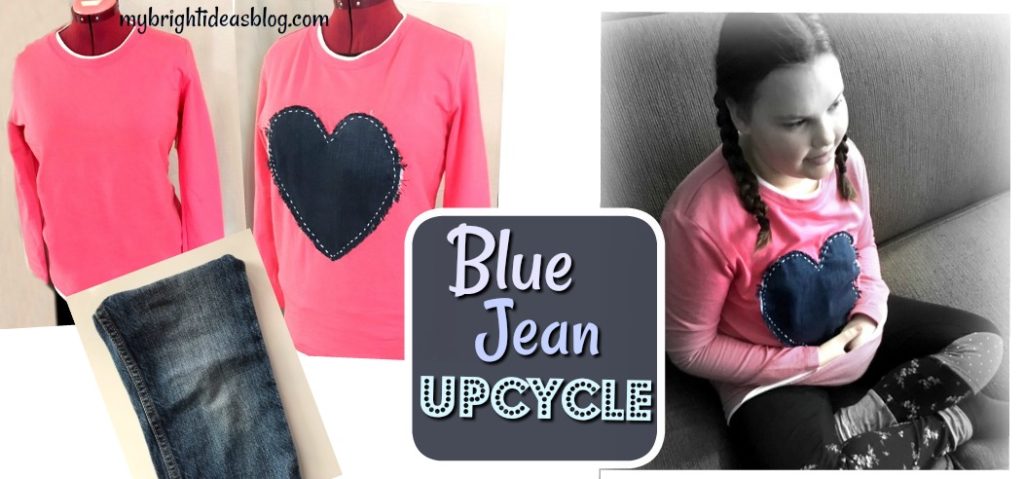
On a previous post we took the leg of a pair of jeans and turned it into a wine bottle gift bag. (See below for a link on that!) Today we have another upcycle project for those jeans that we are cutting up for parts. We are going to upcycle a plain shirt and add a love heart made out of old jeans.
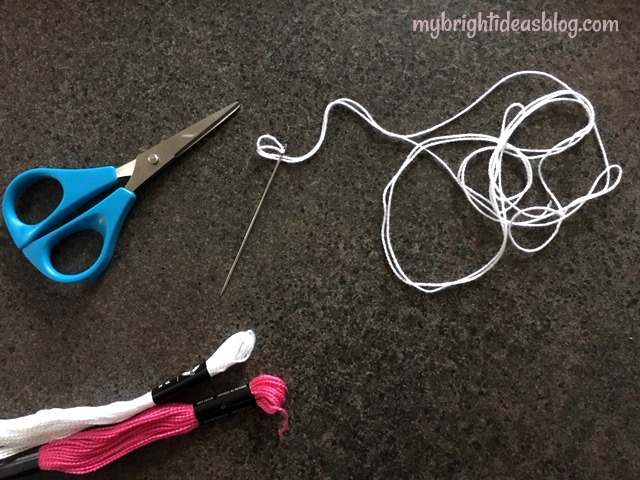
You will need:
- t-shirt or sweatshirt
- old blue jeans (actually just a leg)
- needle
- thread or embroidery floss
- scissors
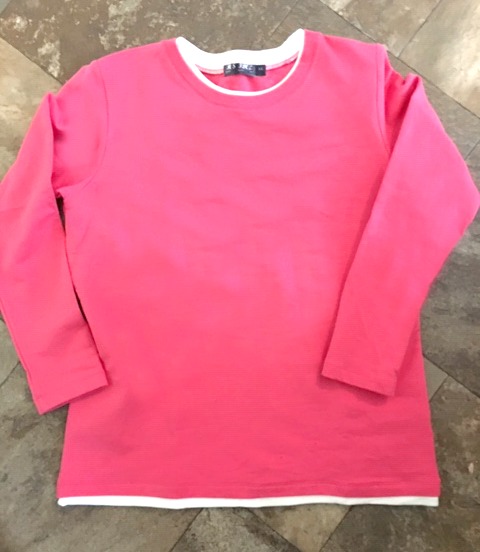
I found this shirt on a clearance rack for $7.00. Perfect for my project. You can use an old t-shirt or sweat shirt you already have in the closet. Or, this is an awesome solution to a favorite shirt with a stain on the front.
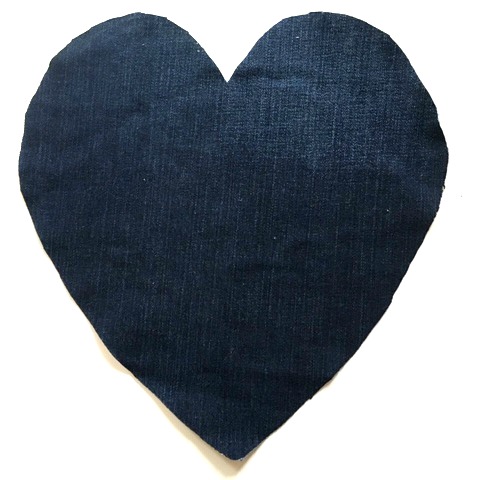
I just realized I didn’t take a photo of the jeans before cutting them into the heart. To make the perfect heart, find the widest part of the pantleg and cut out a square piece the maximum size you would want your heart to be. You can always trim it down if you cut it too big at first. Fold the square in half with right sides facing in. Draw a half heart onto the back of the denim with a white chalk. Cut through both layers of fabric so its perfectly matching.
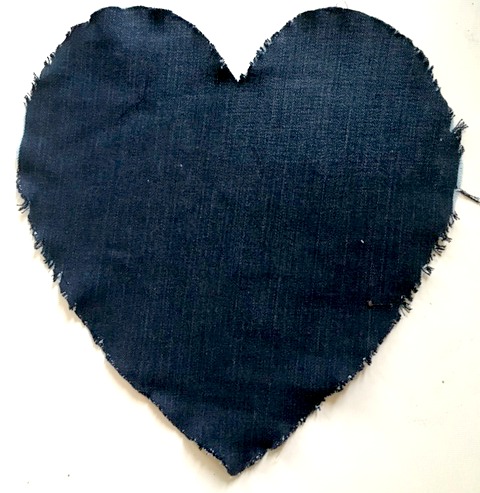
It’s a shame to ruin the perfect heart but we want to make it a little frayed. Using your fingers, pull on the edge pieces of the denim heart so the threads begin to pull away.
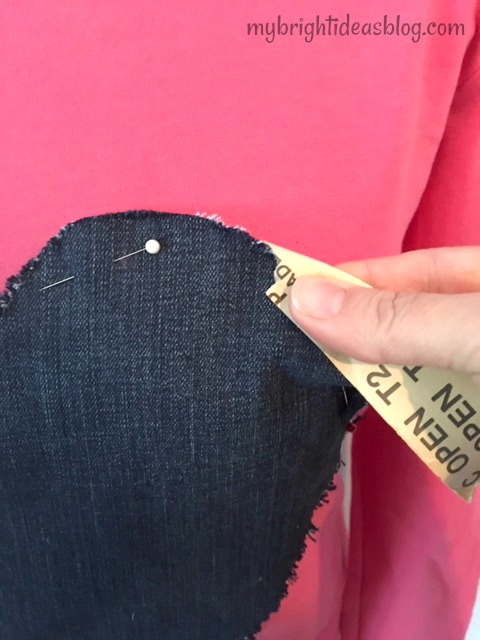
After pinning the heart in place I decided I wanted it a bit more frayed than it was. I pulled the edges again with a scrap of sandpaper and pulled some more on the edges. This works surprisingly well.
Sewing on the Heart
Choose a colour for your embroidery thread. I decided to go with white. Thread your needle and knot the end.
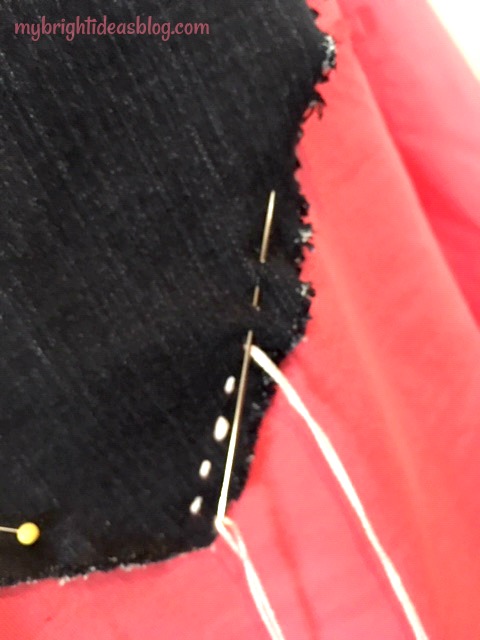
Start from behind and pull the needle through the shirt and denim heart. Continue in and out doing a running stitch. Try and make your stitches the same distance apart all the way around the heart.
Finish by knotting it on the inside. Could it be any easier!?!?!
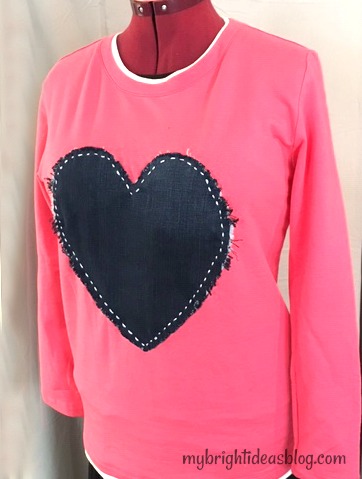
 Here is Gus and Gemma with the upcycled shirt’s new owner. It was a surprise gift to my daughter B and she seemed really touched by it. Her pants are also an upcycled idea using strips of old leggings to sew onto a new pair. See the link below-they turned out pretty fun!
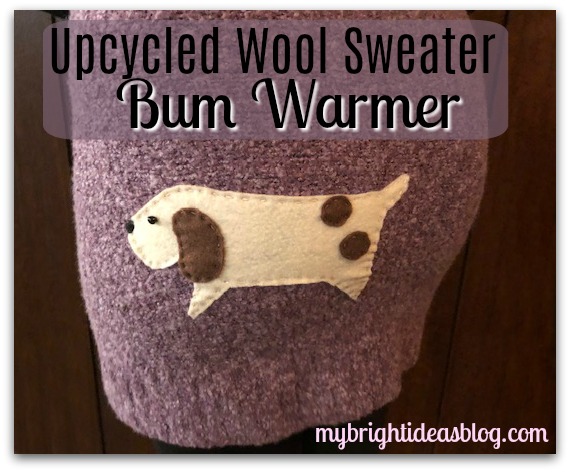
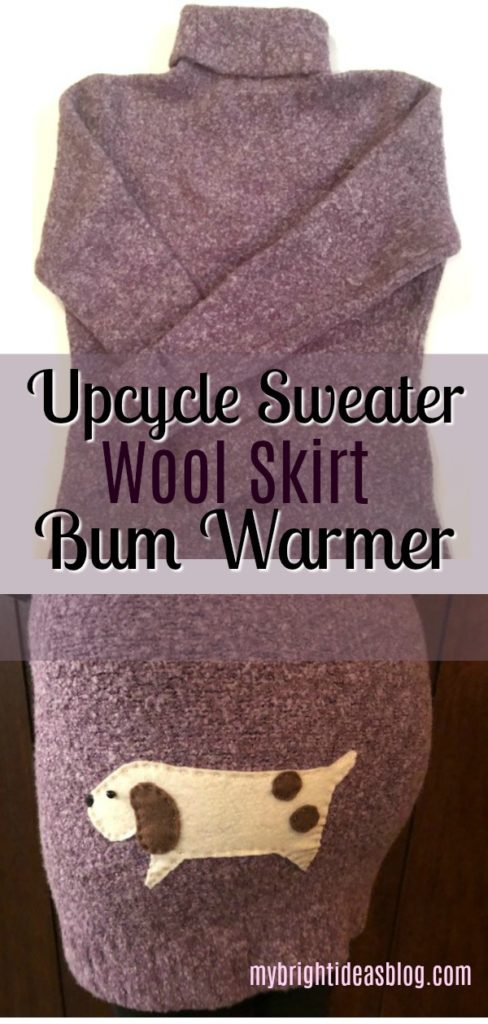
Upcycle Sweater into a Wool Skirt or Bum Warmer for Winter!
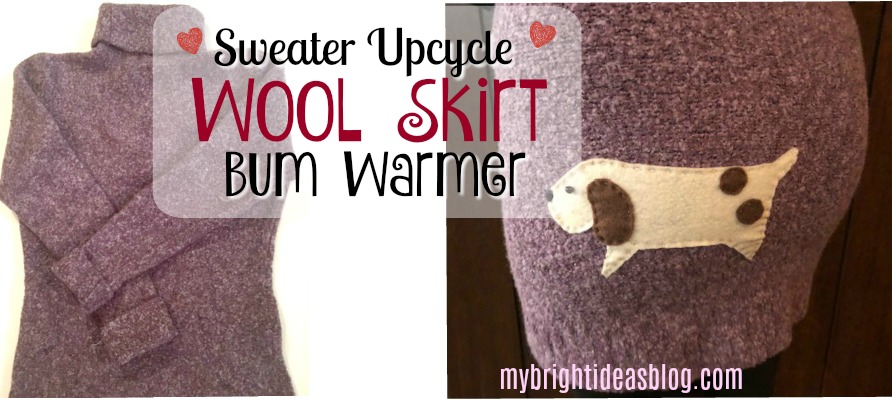
Have you been ice skating or waiting for the bus and felt a cold gust on your behind? Can you get your hands on a wool sweater you don’t mind chopping up for parts? Keep reading and I will tell you how to make an upcycled skirt or BUM WARMER and if you like…put a dog applique on it.
You will need:
- a wool sweater
- scissors
- sewing machine
- elastic
For the optional Dog Applique-you will need:
- embroidery floss (brown, black, cream)
- needle
- felt (cream and brown)
- paper and pencil
- scissors
- 1 black bead (optional, you can do with out a bead and sew a black dot on)

Do you remember the wool sweater above? It’s been upcycled before and now we are cutting it up for more parts! You might already know this but knit sweaters will unravel if you just cut them. So you need a sweater with wool in it. When you wash the sweater in hot water and put it in the dryer it will shrink and “felt”. This prevents it from unravelling. Now we can cut it like it’s fabric.

The sleeves are already gone to the dog, now we are going to use the best part! The area below the armpit could be made into so many things! A purse, tea cozy, slippers, mittens, big dog sweater….So many ideas so little time. If you would like to see what we did with the sleeves scroll to the bottom of the post.
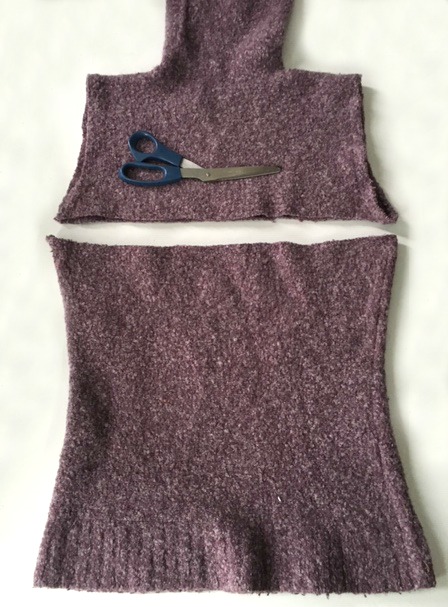
Cut straight across the sweater.
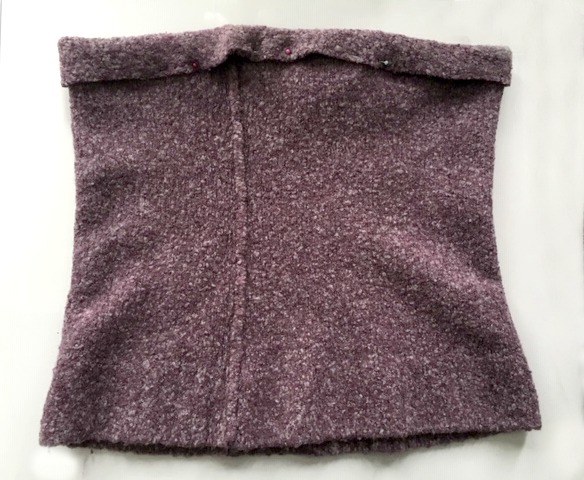
Fold over the top one inch (2 cm), and pin in place.
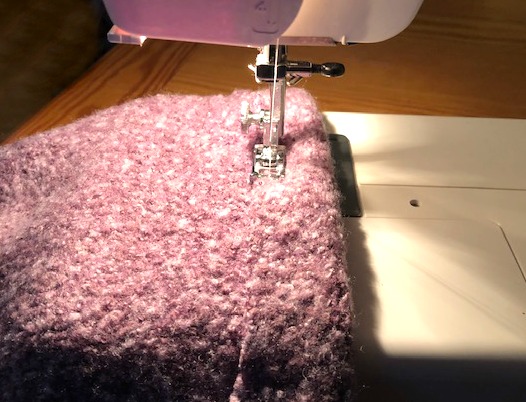
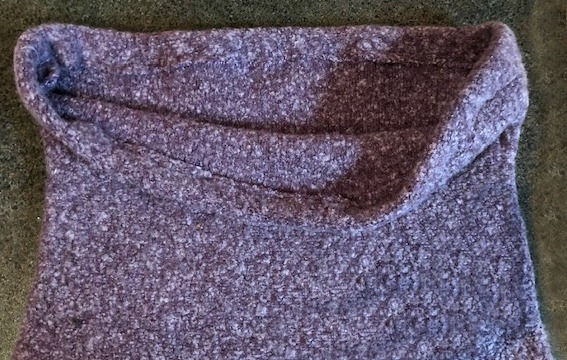
Sew almost all the way around to make a casing. Leave a 1 inch gap to slide the elastic inside.
If you don’t put on the applique and decorate it with felt then slide the elastic in now. However, since I wanted to add something fun to the booty of the bum warmer, I’m going to insert the elastic as the final step.
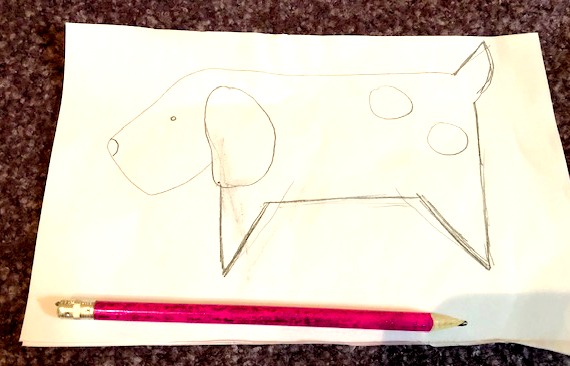
Cut a page in half. Find a photo of what you would like to applique on the bum. I recommend a flower or an animal that is really simple. This dog was found when I searched for dog felt projects or how to draw an easy dog. I tried to copy the simple dog I found.

Pin the page to your felt and cut out the dog applique.
Try on the bum warmer and pin the applique into the area you would like to have it. It can go on the front or the back.
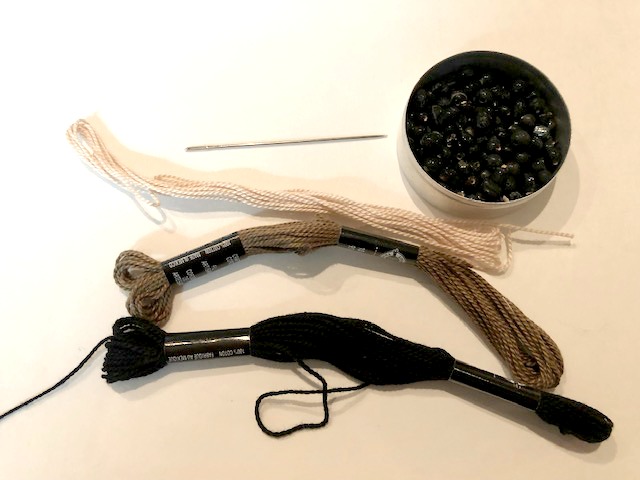
Grab your embroidery floss, needle, scissors and black bead.
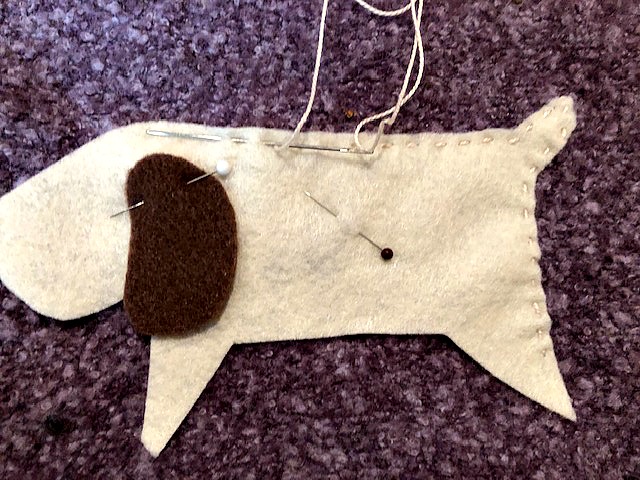
Hand sew the applique on using embroidery floss. I used matching thread but you could make it stand out by using a contrasting thread. I just did a very quick running stitch to attach the dog to the skirt.

Then I added the ear and too spots to his behind.

The last step is to insert your elastic. I like to put a huge pin on the end of the elastic and insert it into the 1-2 inch gap we left. Then wiggle it through the casing. When you get it all the way around the waist area and back to the gap, pin it to the other end. Check to make sure that the elastic didn’t get twisted. Adjust to the desired width. Try the skirt on again and test out the size. If you are happy sew the elastic together and remove the safety pin. Machine sew the casing closed.
This sweater will fit a preteen daughter to an adult XL woman. As long as the elastic is comfortable, the wool will stretch with your size. I could have tightened the elastic and made it a skirt for my 8 year old too. If you find its getting a bit stretched out just wash it again. Use warm water instead of hot and warm dryer so it doesn’t shrink too much.
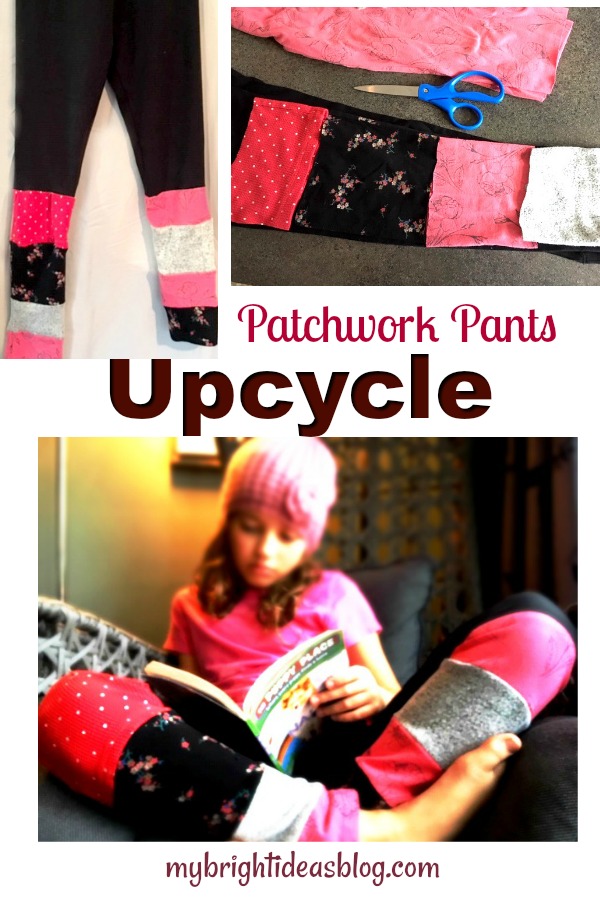
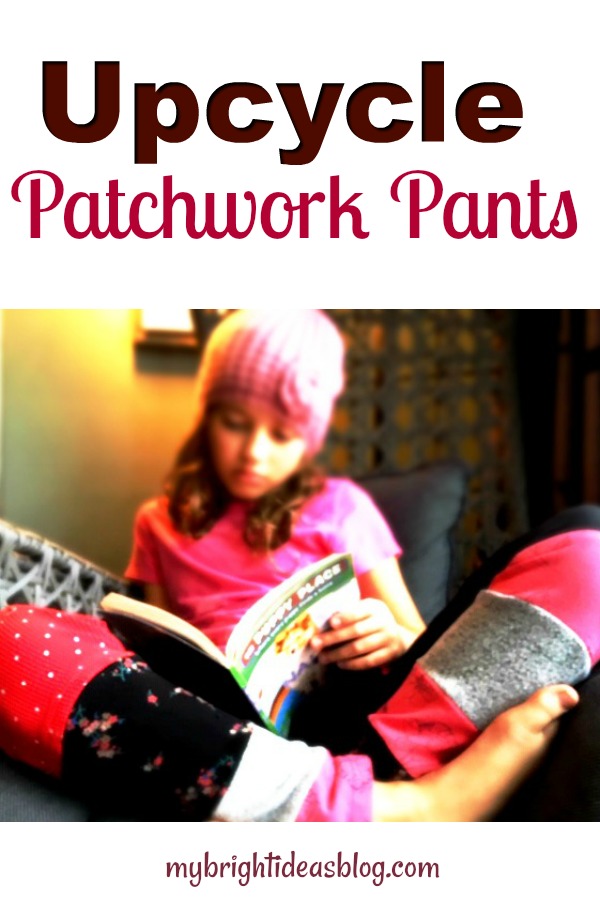
Patchwork Leggings DIY
Upcycle Patchwork Leggings!
Have you got old clothes you’d like to add to your new clothes. Well might I suggest making patchwork leggings by mixing patterns together. I’ll show you how!
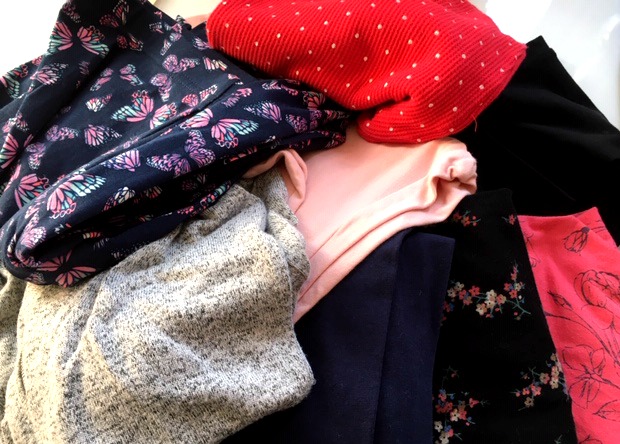
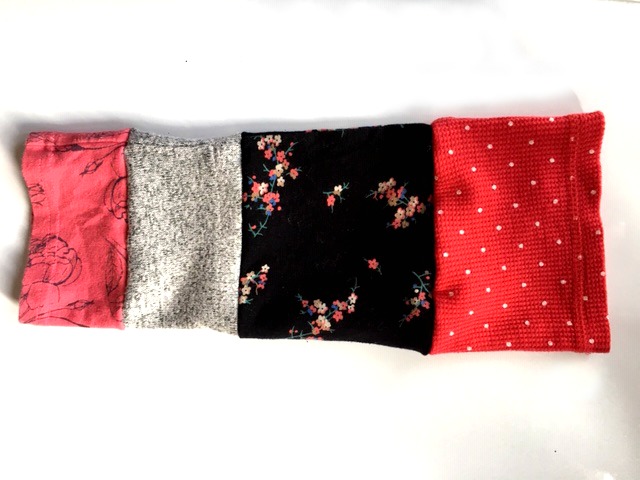
Here is a stack of hand me downs. The grey piece is an adult sweater top and the red and white polk a dot is also a waffle top. I added both of these so that it gave it a bit of texture. The other patterns are all leggings worn a few years ago by my eldest waiting for her little sister to grow in to them.
Change of plans – I’m chopping them up for parts!
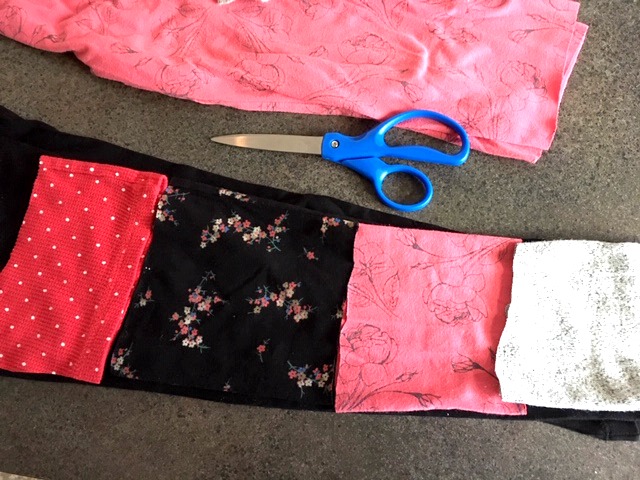
I laid out the new black leggings which is going to be the base piece. Eventually I will cut it off below the knees – But not yet!
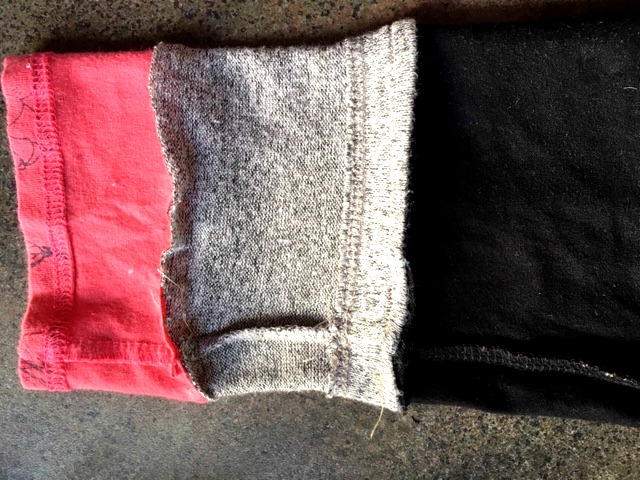
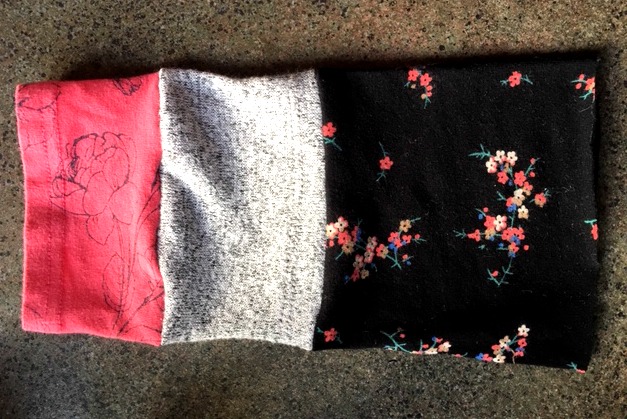
First I used it as a sizing guide. The legs will need to follow the same tapered pattered. The sleeve from the grey shirt was the most narrow so it became the lowest on the leg. It was already hemmed so that saved me hemming it at the end. The red polka-dot shirt I had used a wide piece from the front. That also needed a side seem to make it a tube like the others.
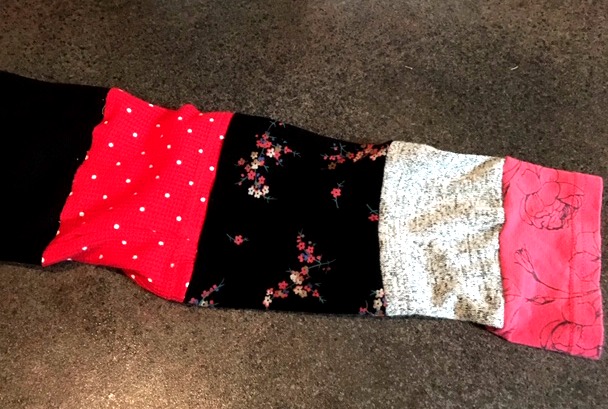
I only wanted below the knee to have patchwork because kids playing on the floor will find seems on the knees irritating if not painful.
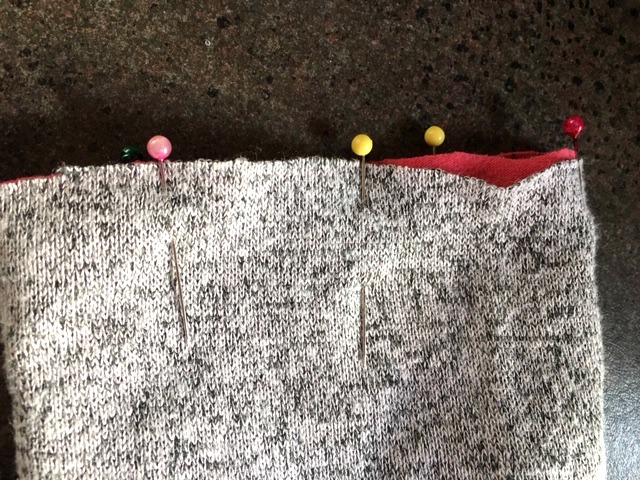
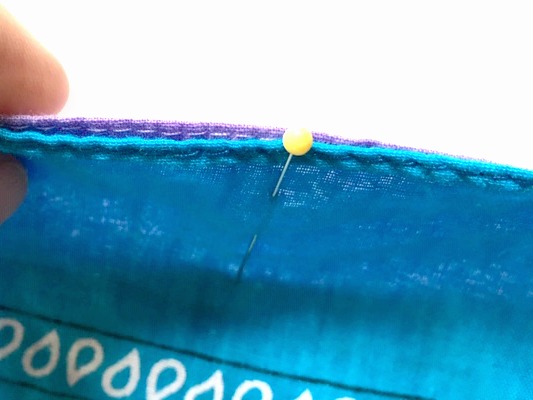
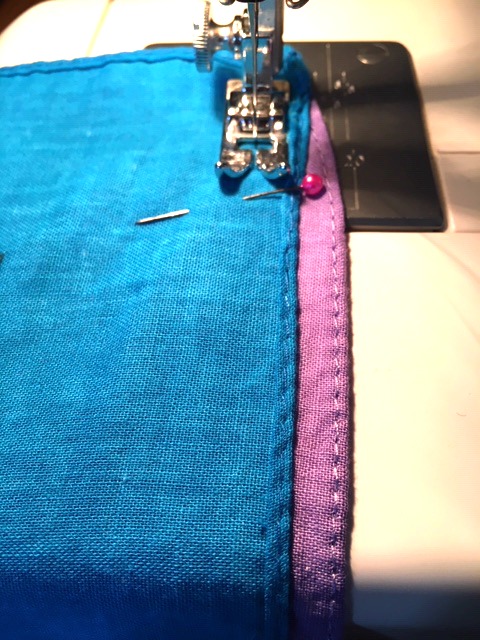
Starting from the bottom of the pantleg, pin the first two pieces – with right sides together.
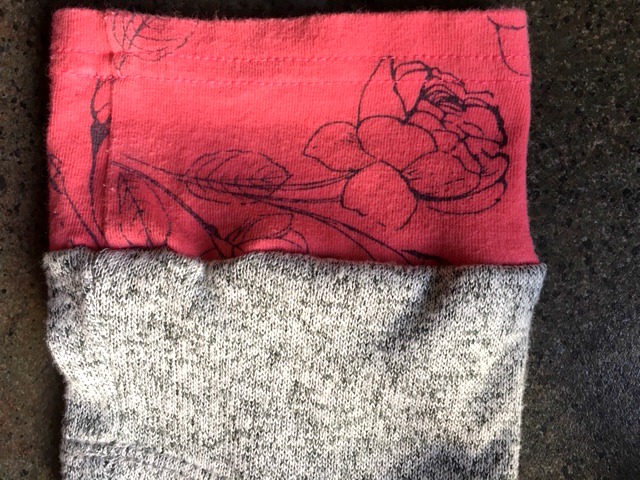
Turn inside out. Next. with right sides together again, pin on the third piece to the second one. Stich this seam.
Leggings tend to have one seam on the inside of the leg so make sure they all line up.
Turn it right side out.
On this pair of legging I sewed 4 pieces on each leg. Then I cut one of the legs off the black pants and pin and sew the 4 patches of the lower leg to complete the pants.
Remember that right sides go together. For some reason I kept sewing it on wrong and then removing it and doing wrong again. Doh!
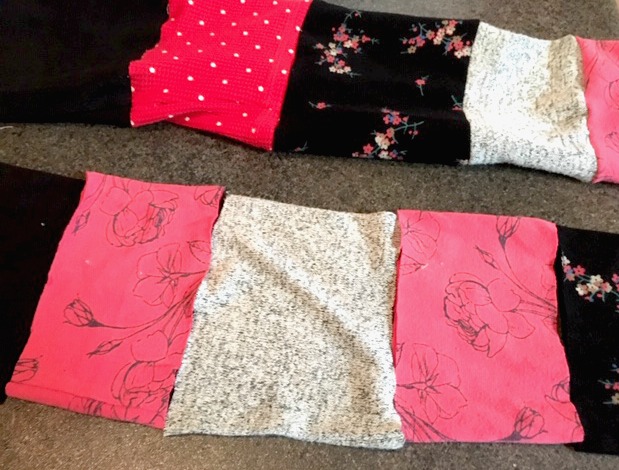
With one leg completed do the next leg. Make sure they are the same length when completed.
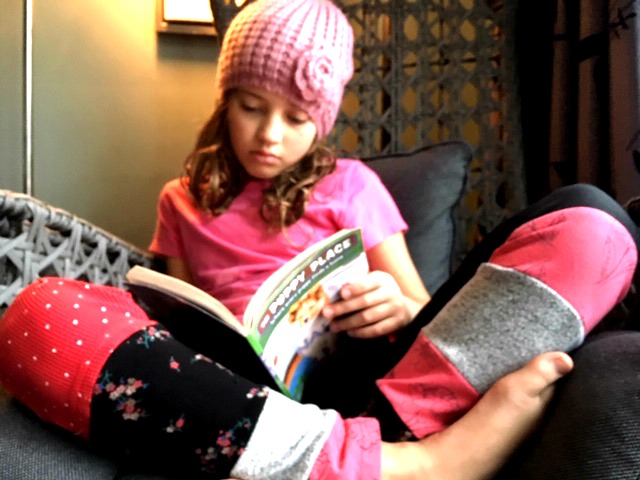
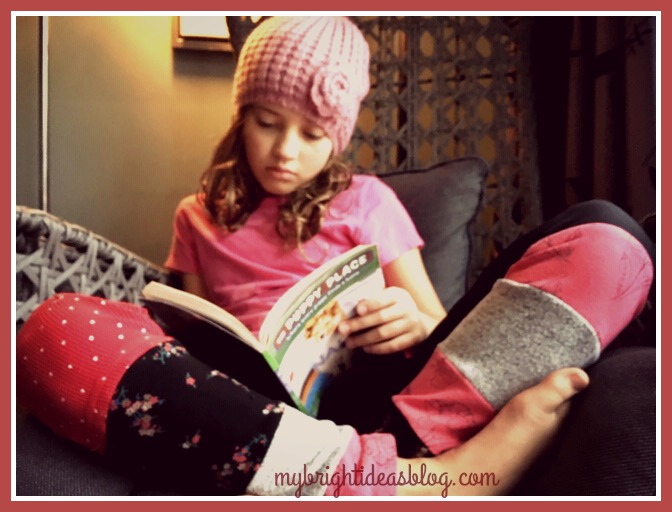
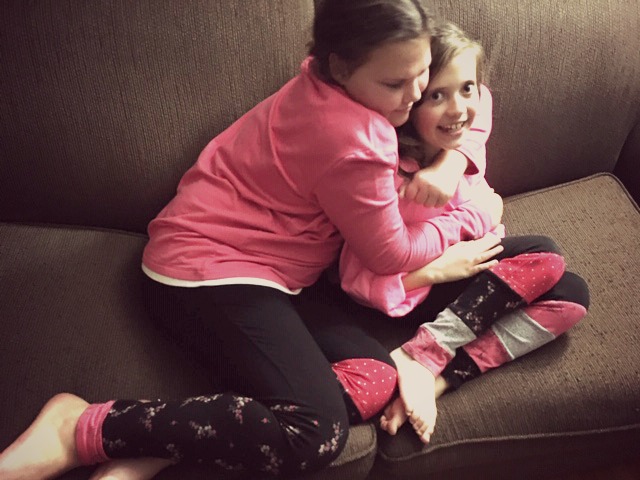
After a while of me taking photos of her while she read she let me know what she thought of that….
I love how one eye is peeking at me.
Okay I think she has had enough…so I found her sister…
For her leggings I didn’t have them matching with similar patches on both legs. She has a long one and a short one on her right pant leg and smaller patches on her left leg. She was delighted when I pulled this out on Thursday night because Friday was pajama day at school and her pj’s were not for public viewing.
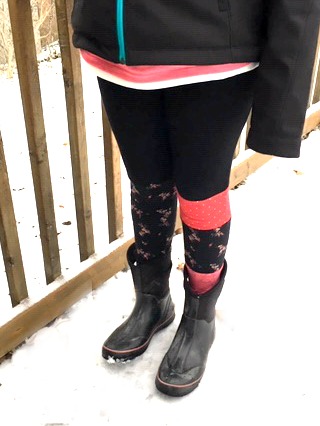 On super cold days these would make great long-johns or pants under snow-pants.
There you have it two girls in upcycled original pants. There is enough scraps left over to make more pants…or to make co-ordinating sleeves on tops.
Thanks for reading another one of my posts. I’ll link some of my other upcycles too.
T-Shirt Refashion – Add details from baby clothes to jazz up plain clothes!
…
Make an Easy Bandana Pillow

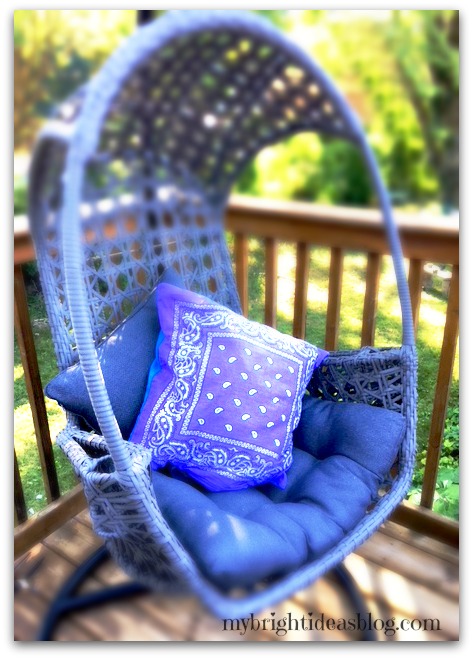
So a month or two ago I purchased way too many bandanas. Since then I’ve been looking for ideas to use some of them in projects. Today I’ll show you how to use 2 more! Let’s make a pillow for the bed, couch, or dog.
This is the beautiful Gemma. She is our 2 year old Yorkiepoo (Yorkshire Terrier mixed with Poodle). She loves to share my chair when I’m using the computer. Gemma stays up as late as I do and then sleeps in behind the bend in my legs. She is quite yappy to the squirrels but she is a dream dog at home. One of her favorite places to nap is in her crate. So let’s make her a new pillow.
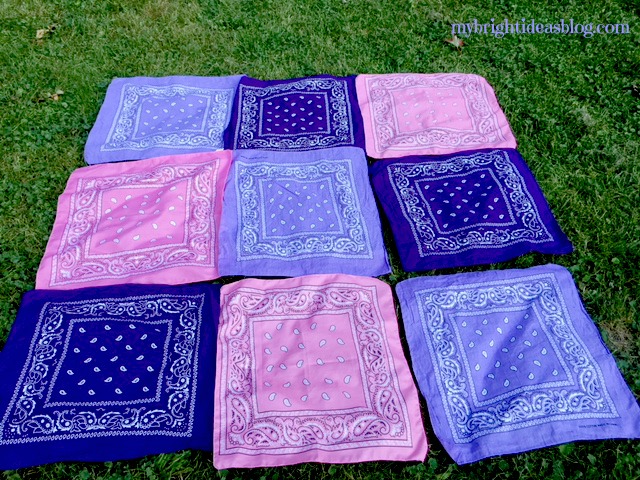
You will need:
- 2 bandanas/handkerchiefs the same color or complimentary colors
- sewing machine
- needle and thread
- pins
- pillow or stuffing
With right sides together, match up the corners and pin them. They don’t make handkerchief/bandanas all the exact same size. So don’t get frustrated. When you sew them together you will be able to correct their wonky sides.
See what I mean. The purple one is not cut straight or is slightly bigger, so it’s sticking out. Sewing them together with a straight line will disguise the mismatch.
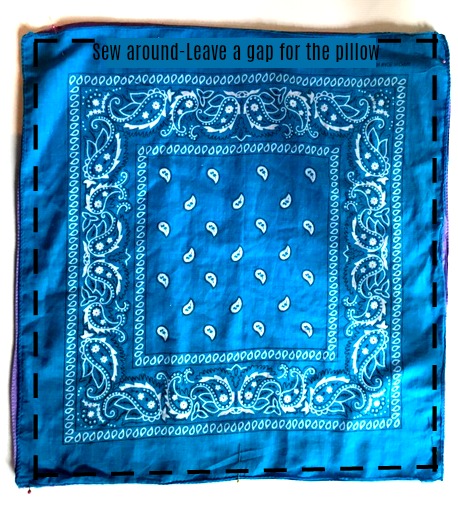
Sew almost all the way around leaving a wide gap on one side.
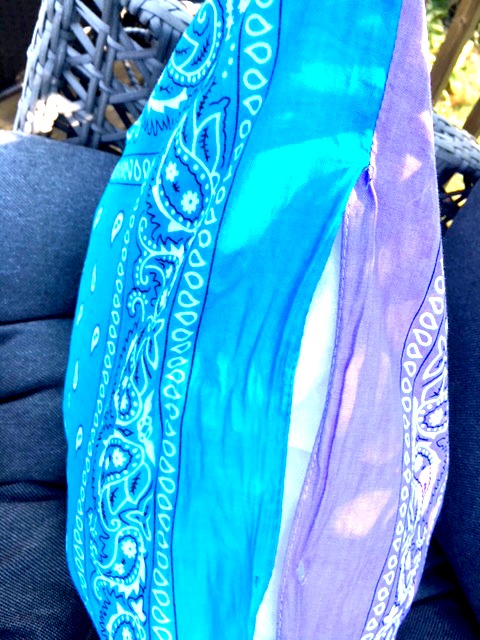
Turn the pillow case inside out and insert the pillow. Since this will be used for Gemma’s crate I didn’t buy a new pillow form. Instead, I used a cheap, old limp bedroom pillow that was wasn’t very fluffy anymore. It easily fit into this pillow case.
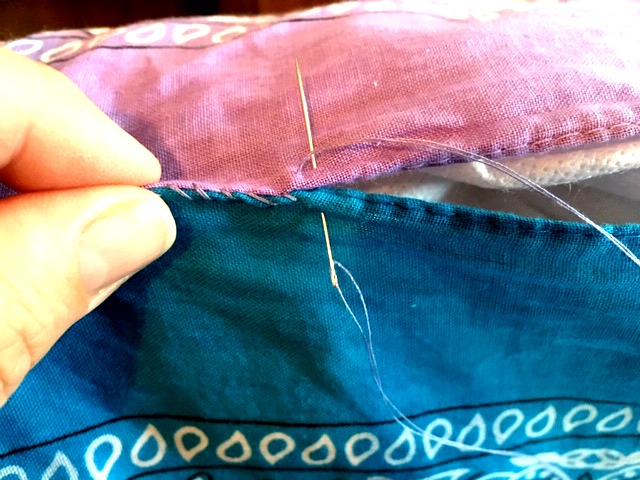
Next, take your needle and thread and hand sew this opening closed.
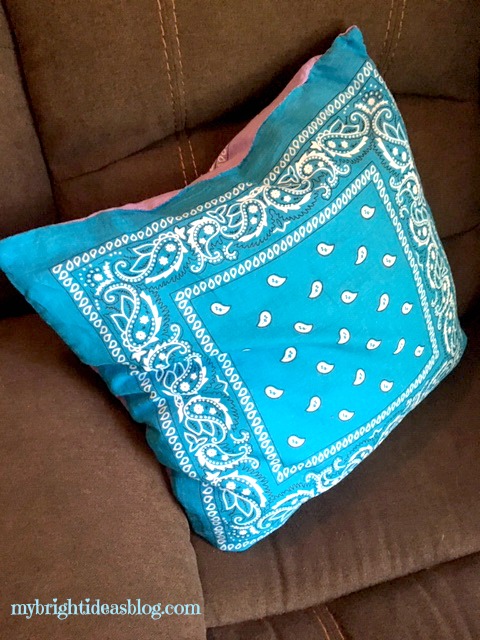
You could use this on the couch, on a bed, outdoor furniture, in the car or……
…..for your sweet puppy dog.
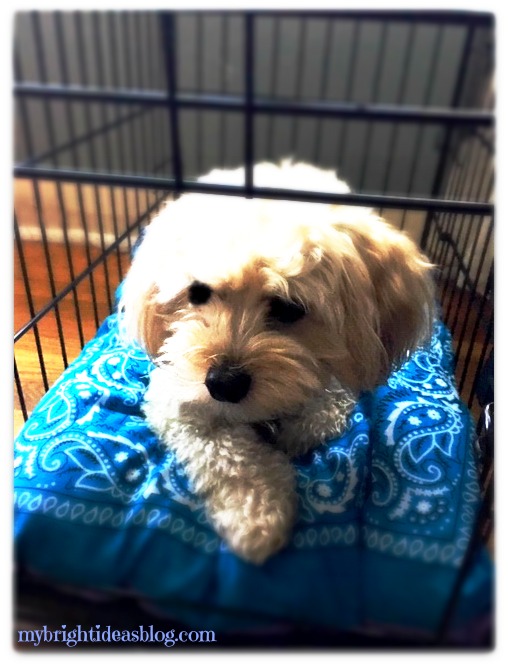
Thanks to Gemma for being a gorgeous model for this little photo shoot.
Feel free to comment with suggestions for what to do with the other 15 bandanas I still have left over. Did you see the Fall table cloth I made last month? Have a look.


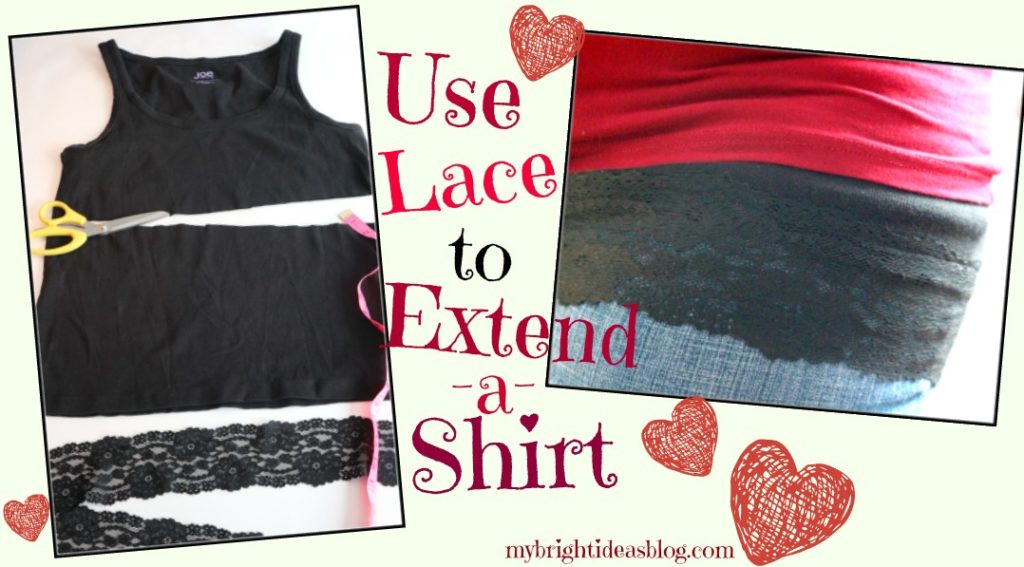
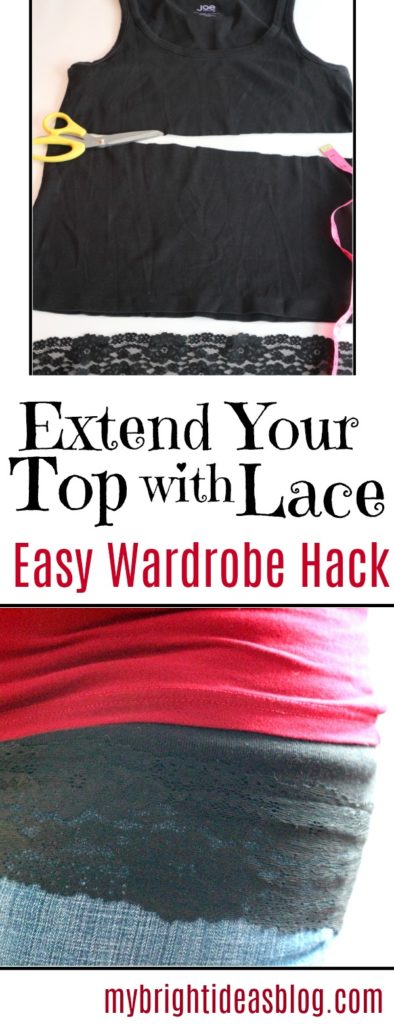
Extend a Short Shirt with Lace-Great Wardrobe Hack!
Add inches to the length of your short tops with a lace extender. This is worn around your waist with an elastic waistline and looks like you’re layering tops. This post will show you how to make a shirt-extender from an old shirt and a bit of stretchy lace and elastic.
This is a really easy project and a great item to have in your wardrobe.
When I was pregnant they called it a belly band. A tube of fabric that went under your shirt so your tummy didn’t hang out under a shirt that was getting shorter by the day.
At https://www.motherhood.com/ its called a “tummy sleeve” or “belly band”.
It occurred to me then that EVERYONE could you use a shirt extender. Sometimes your shirt can shrink leaving you with something you aren’t comfortable wearing anymore. Or maybe you like leggings or something to break up a plain shirt. So here is a tutorial about making a t-shirt extension out of an old top.
You will need:
- An old shirt
- Co-ordinating wide stretchy lace (3 inch wide)
- Elastic (1/2 inch or 1 cm wide)
- Safety Pin
- Pins
- Scissors
- Measuring tape
- Sewing machine
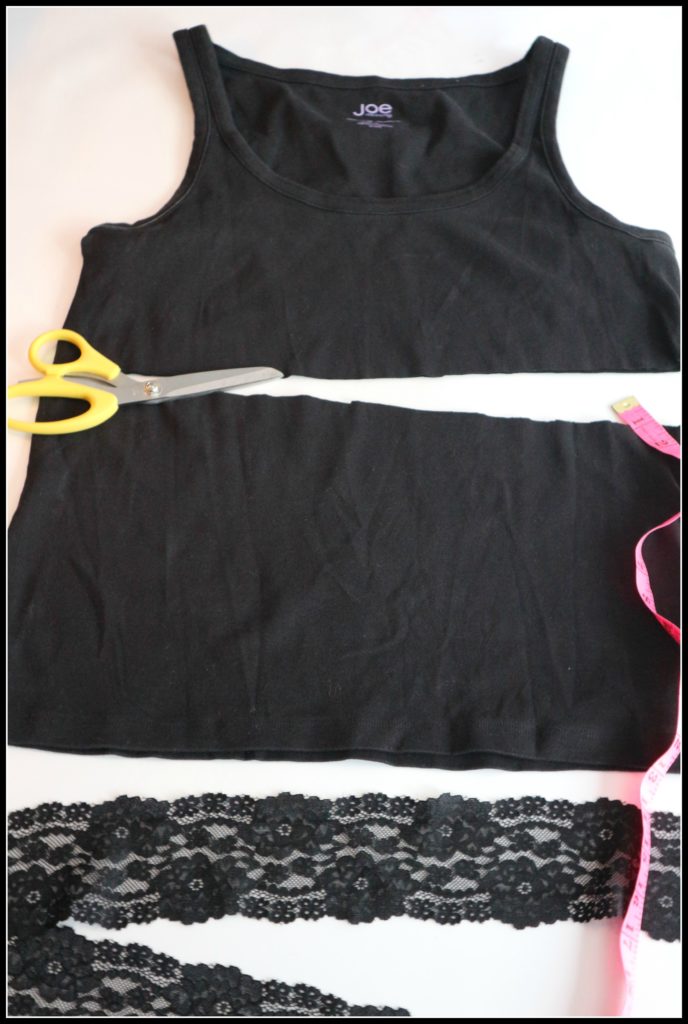
I had a tight fitting cotton tank top that had shrunken and was ready to be re-purposed.
Decide on the length that you would like the top extender to be by measuring your waist to hip with a tape measure. Add on an inch for the casing-plus the lace could add a few inches.
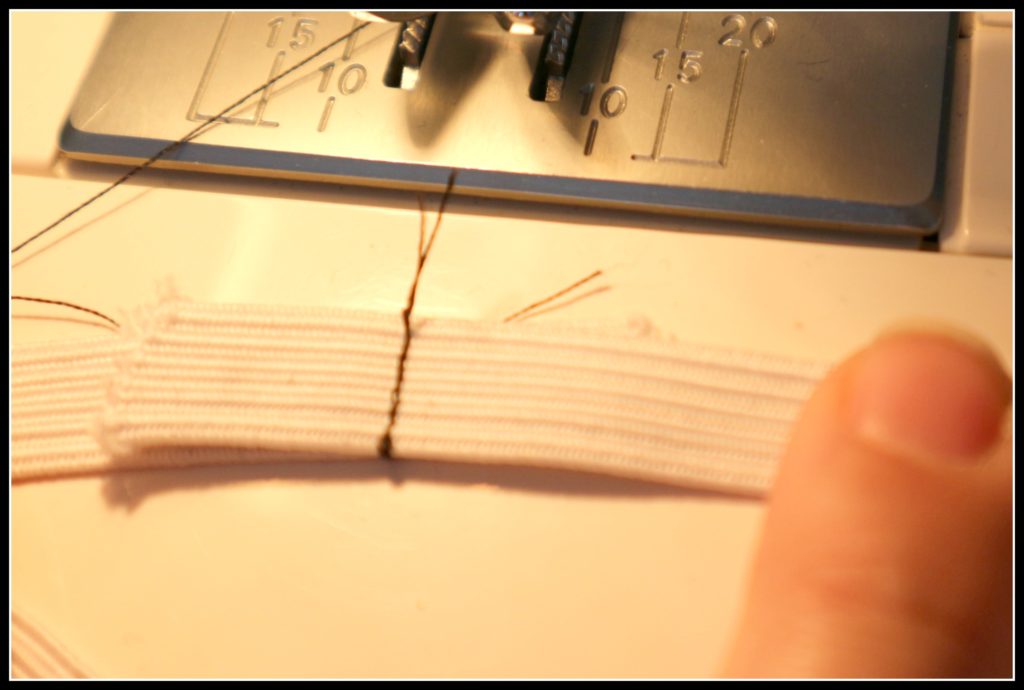
Measure the length and cut off the bottom of your old top. I cut mine 11 inches or 28 cms from the bottom hem. Leave the hem as it is. You can just sew the lace right on top of it.
The length of the lace piece should be a 1/4 inch longer than the width of the shirt hem.
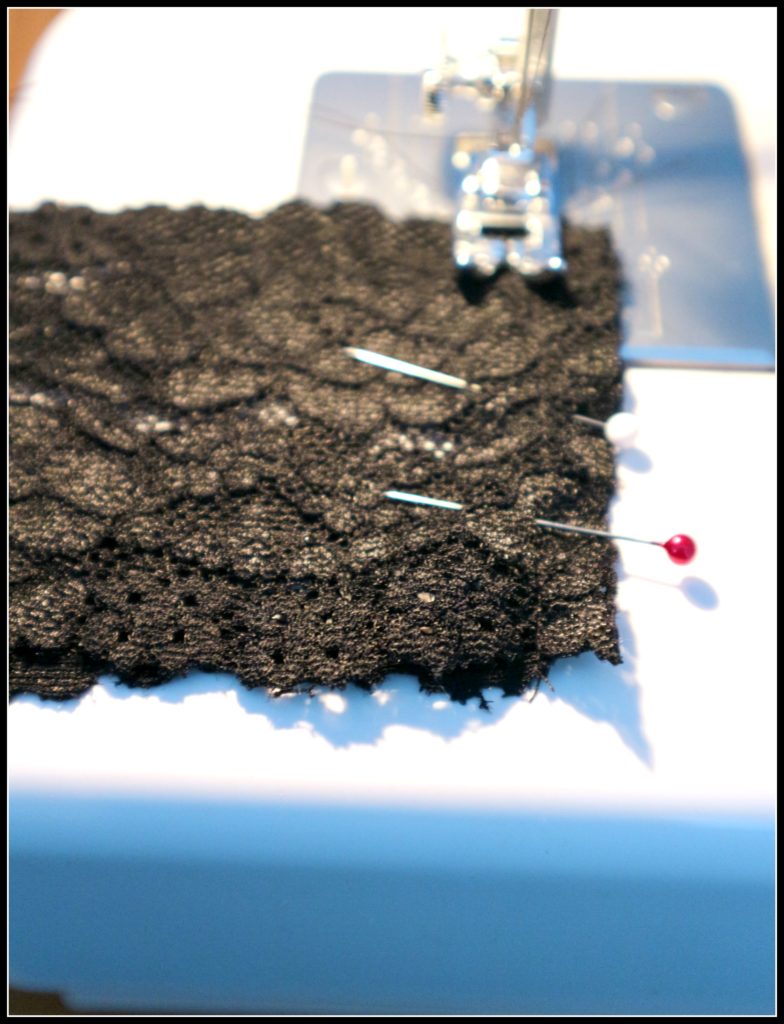
Pin the ends of the lace together and sew the end closed.
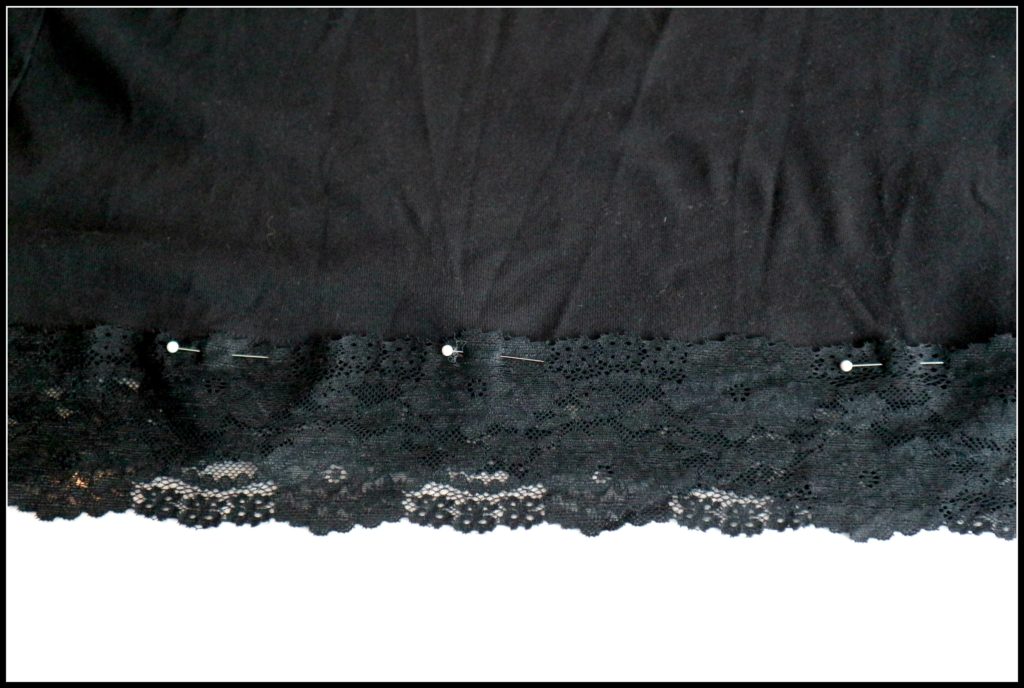
Pin the lace to the bottom of the cut shirt. Be sure that the seam you sewed to join the lace-lines up with the side seem of the top. I decided to sew my lace on top of the t-shirt material. But that was just my preference.

Attach the lace to the bottom edge by sewing all the way around it.
Then we will go up to the top part of the waist band.
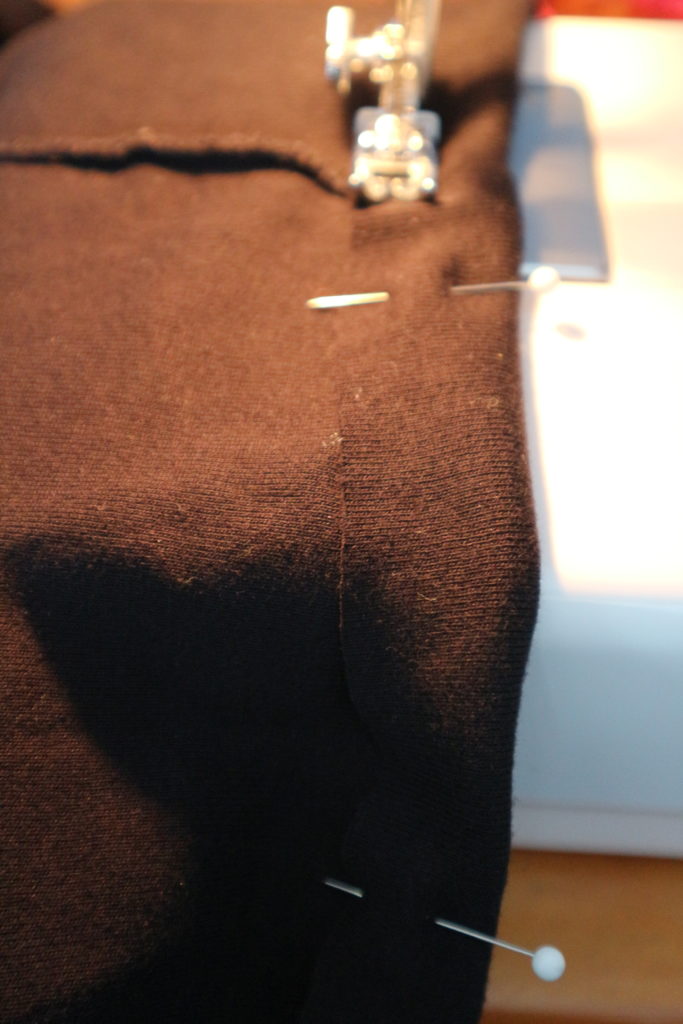
At the top of the fabric, fold over the edge 3/4 of an inch. Pin the edge all the way around to form the elastic casing. Sew in place leaving a 1-2 inch gap.
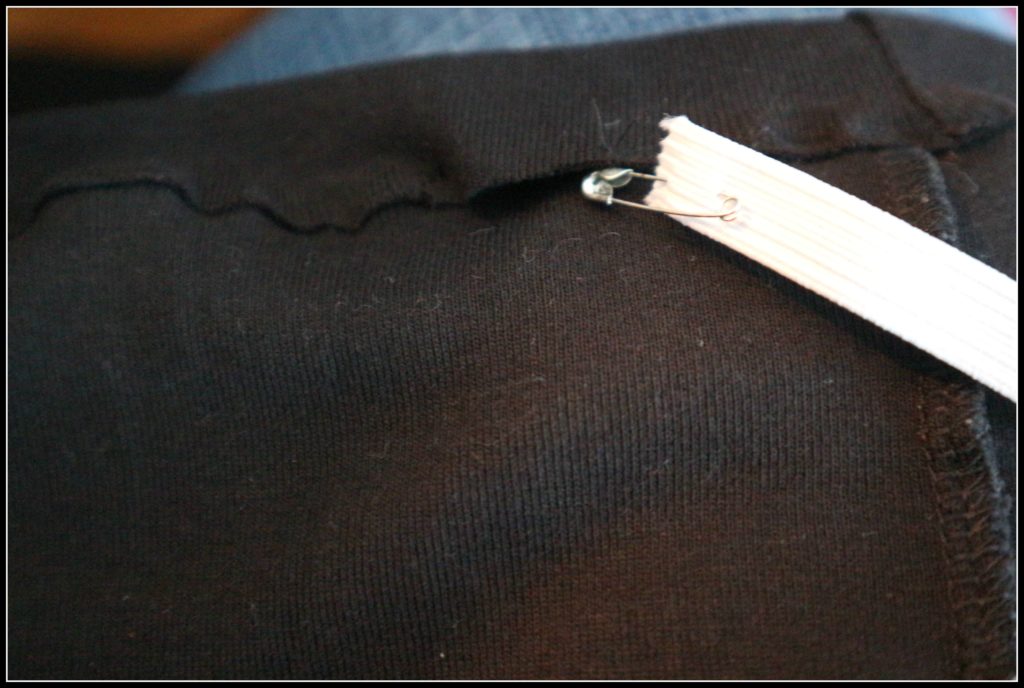
Place a safety pin on the end of your elastic and push it through one side of the 1 inch opening in the casing. Guide the elastic around the casing until you reach the other end of the casing hole. Pin the two ends of the elastic together.
Try on the shirt extender and see how the elastic feels on your tummy. Is it too tight? Or too lose? Or fits just right.
If you are happy with the feel of the elastic, permanently join the ends by sewing them together. I usually go forwards and backwards 2 or 3 times just to be sure.
One final step, finish sewing closed the 1 inch gap in the casing.
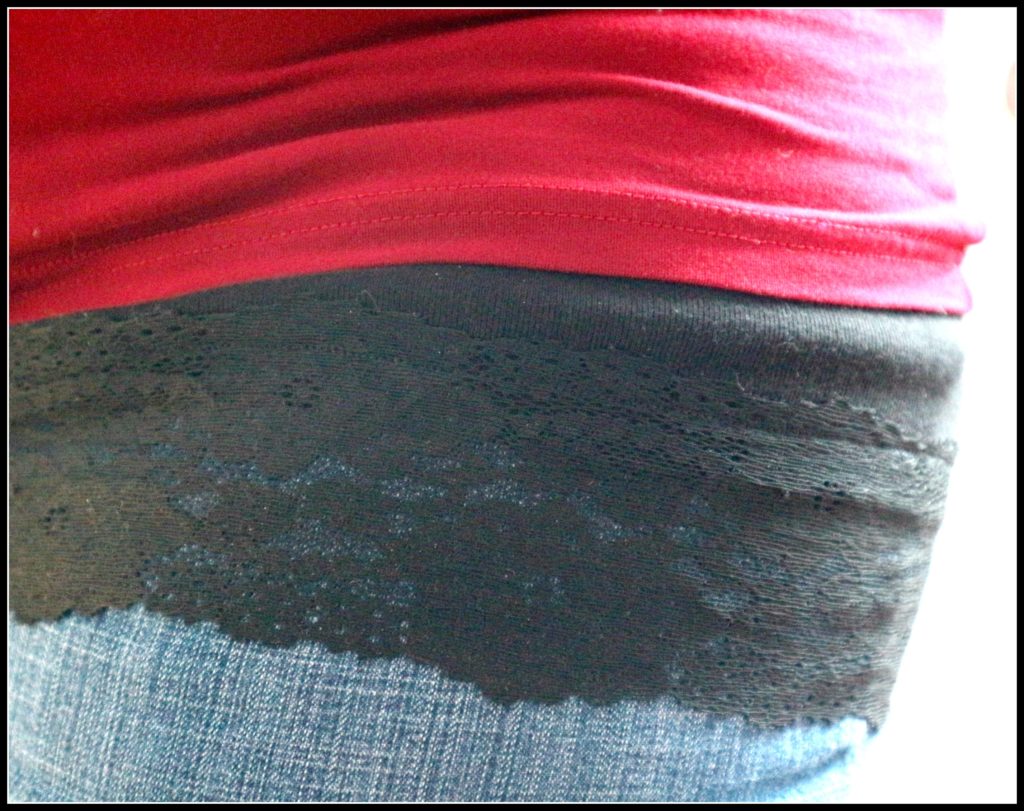
Voila Your Finished! That’s it! What did that take you…. 15 minutes max? Now you can wear it under any shirt for a layered look or just prevent people from seeing your knickers if you have a job that requires some bending over. Oh dear me!
The finished length after adding the lace, casing and elastic almost 12 inches or 30 cms long.
This was a super easy project and a great item to have in your wardrobe. Let me know if you need any further description.
Below is a link to a tutorial for adding lace right onto a favorite shirt that is getting too small. Check it out!
…
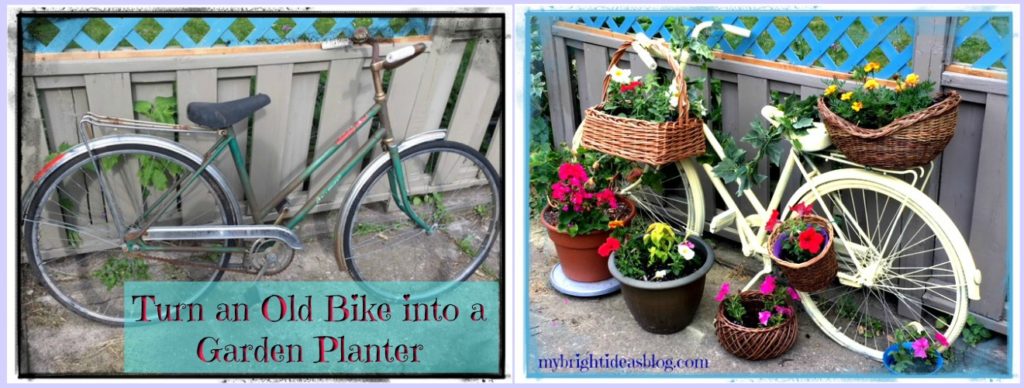
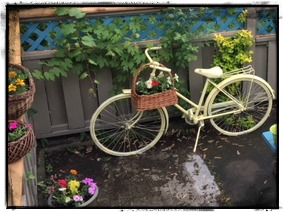
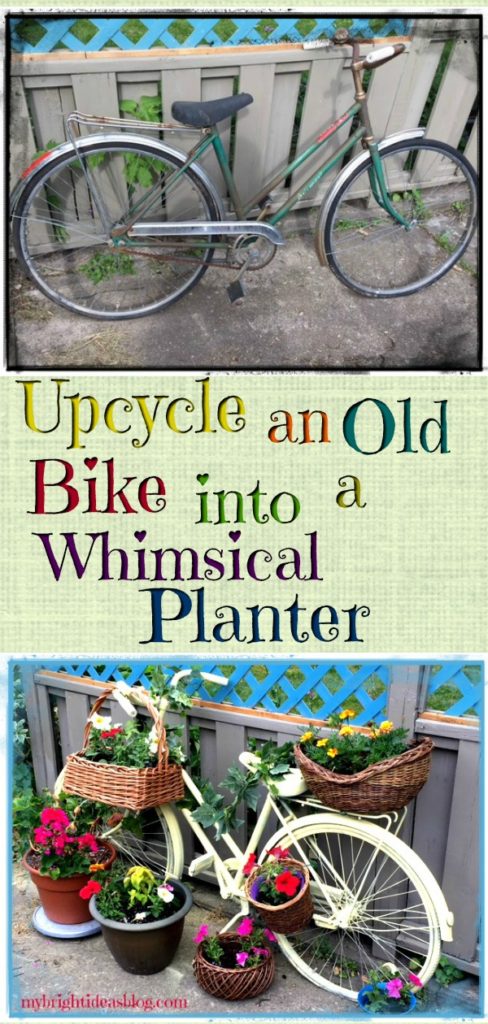
Turn An Old Bike Into a Garden Planter Feature!
Bicycle Planter Garden Feature
Have you seen painted bikes around town? I have seen a few-plus lots of pictures of painted, planted, garden bikes on Pinterest and at last I’ve made one for myself! Here it is!
We have really being trying to put an effort into our back garden this year. In return we will want to be out there visiting with friends and family. We are off to a good start with our effort to spend a bit of time nearly every day to pull weeds and water the gardens….and spray paint a few things along the way…let me tell you about that!
How to Upcycle a Bike into a Planter!
The first step to this project is to get a used old bike. I have found a few at the used sports store for $30 or more and I thought how sad is it to wreck a good working bike. So I waited to find a cheap one on Kijiji.ca which is a buying and selling website that is very popular in my area. I found this beauty for $15.
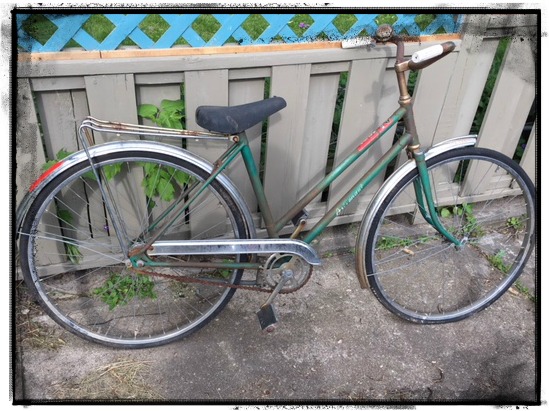
If you look closely you can see the rubber on the wheels is actually peeling apart. The bike doesn’t turn right or left so I felt okay about painting it and ending its time on the open roads to be part of my backyard.
Besides the old bike you will also need:
- safety glasses
- a damp rag
- fine sandpaper
- spray paint (2 or 3 cans)
- baskets
- plants
- plastic bag or coconut coir lining
- quality potting soil
To prepare the bike for painting the first thing to do is wipe it down. This bike was covered in dirt and cob webs from the previous owner. Next, using a fairly fine sand paper …100 grit maybe…sand lightly the surface of the metal. This removed some rust on the fender and frame of the bike. You don’t want that in your eyes so pop on a pair of safety glasses first. If you were painting a gorgeous looking bike or a bike you would want to ride around town – you should pay a lot more attention to detail. You would take the wheels off and make sure everything is smooth. However, this bike was already in rough shape so I just gave it another wipe with a damp rag to get the dust off and moved on to the spray paint.
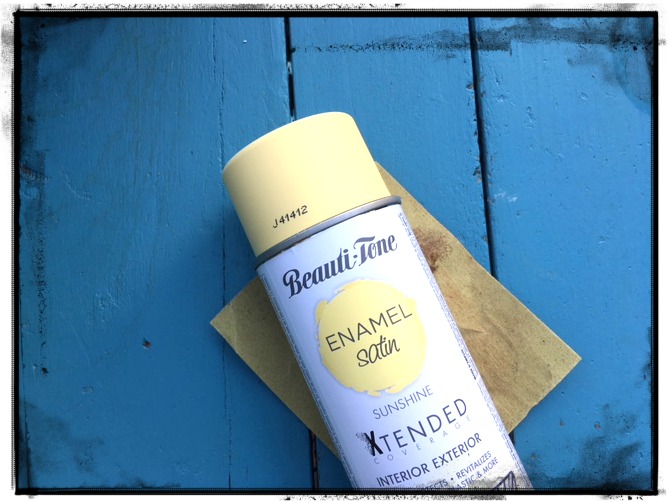
I had a hard time choosing what color to paint it. After much deliberation I decided on this brand “Beauti-Tone” of spray paint in red on some Muskoka chairs and loved how it sprays. I chose a satin “Sunshine” yellow.
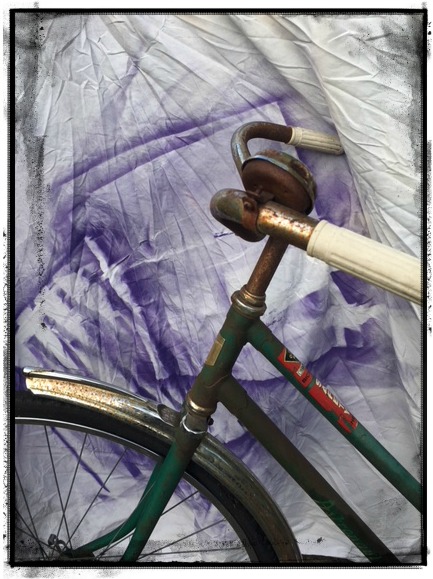 Spray paint is amazing for covering over all sorts of blemishes. I had thought that I would peel off the old stickers on it but then couldn’t be bothered and painted right on over it. I used an old sheet for a drop cloth and needed a can and a half of spray paint-so buy 2 cans!
Follow the instructions on your spray paint. Spray paint outdoors if possible on a non breezy day.
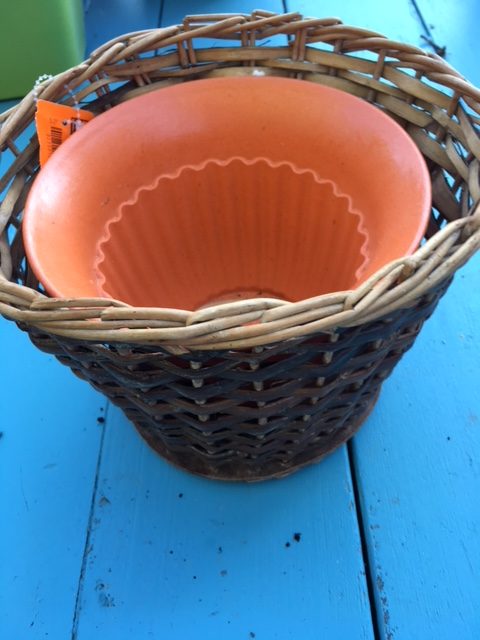
Recently I popped into the Goodwill charity shop. I was looking for bowling balls to paint into decorative gazing balls for the garden. (I’m so excited to do that project soon!) That day there was a slew of beautiful baskets and other odds and ends that looked perfect for some of my future projects.
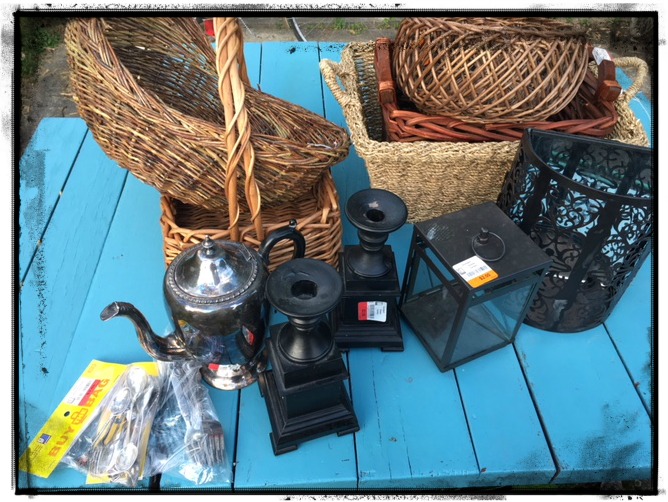
What great finds! Everything I got was around $3 each. These wicker baskets could have been painted to match the bike but I like the natural brown. I just LOVE baskets!
When I was a kid, my grandfather would pop around to our house with a basket whenever he found berries in season or a pie for desert. He would knock at the side door and my sisters and I would run around the house shouting Grampa is here! Such a favorite visitor. He was very generous with his love and baskets of berries. So thoughtful. I think that’s why I love baskets, I love Grampa gifts that come in the baskets!
I thought this basket would be great zip tied to the handle bars or on the luggage rack at the back.
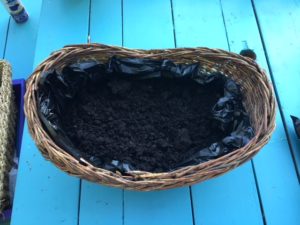
You can’t simply put dirt into the basket because every time it gets watered or rains it will seep through the cracks. Using a natural basket in the sun and rain is going to age it fairly quickly. Before adding the soil you might want to use a clear spray paint on the basket to help it last longer.
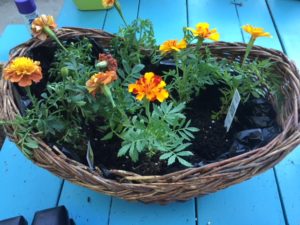
You can line the bottom of the basket with a plastic (garbage bag), newspaper or coconut coir liner. If you use plastic there won’t be any drainage allowed so you might want to poke some tiny holes in the plastic. Add some good quality soil and then the plants.
If you can find a pot that fits inside the basket that would be even better for packing things away at the end of the summer.
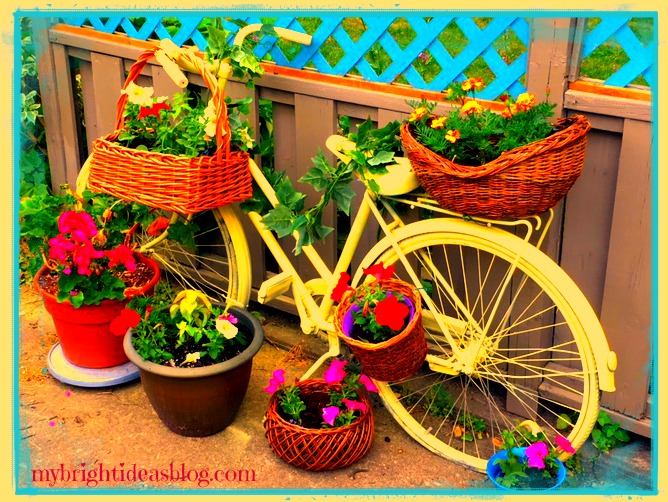
I was tweaking the photo above and turned the bike vibrant bright yellow. I really like it brighter so I might change it next year to a darker yellow or red. Ooh la la!
When your planters are ready you can you use plastic zip ties to attach each basket to the bike. I also used gigantic zip ties to attach the bike to the fence. I purchased my zip ties from the dollar store. Make sure it is fairly steady. The weight of the dirt in the baskets was surprisingly heavy. I would hate to see the bike topple over in a big wind storm-what a mess! I placed my bike planter right onto a concrete patio, but many put it in the flower gardens. In this case you could dig holes for the wheels and bury the bike a bit so its actually in the ground.
Wondering what I did with the other items on from the thrift store?
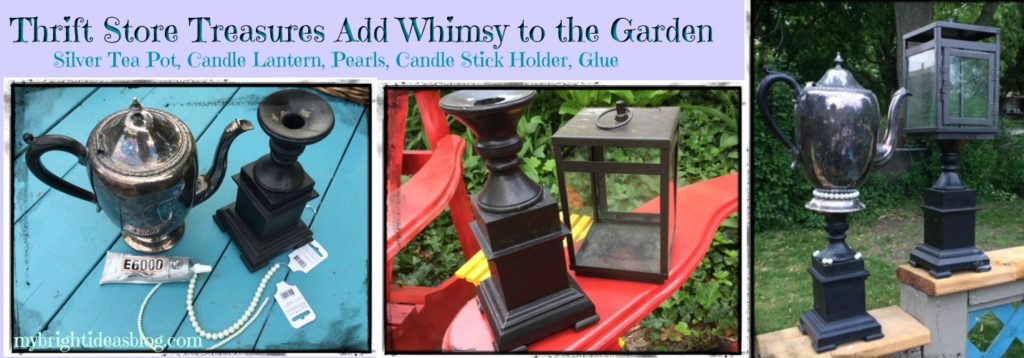
I simply glued the silver plated tea pot to a black candle stick with E6000 Glue. Then I took a string of pearls ($1.25 The Dollar Tree) and glued it to the base of the tea pot. Why not?! Express your whimsical self with color and fun items.
Next invite friends over for a backyard visit and root beer float! There are lots of conversation pieces decorating the garden this year. I’ll show you some other things I’ve been up to soon!


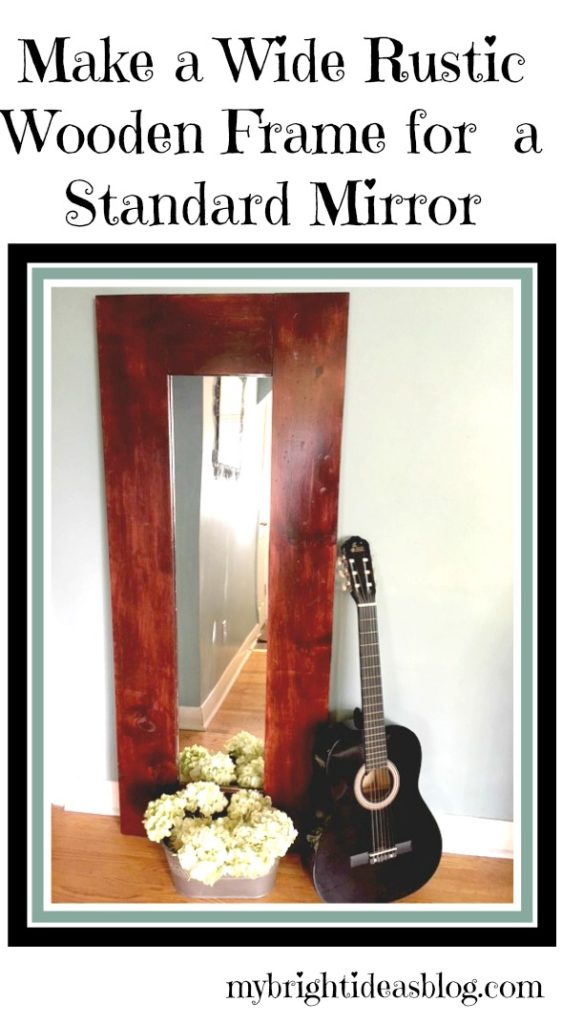
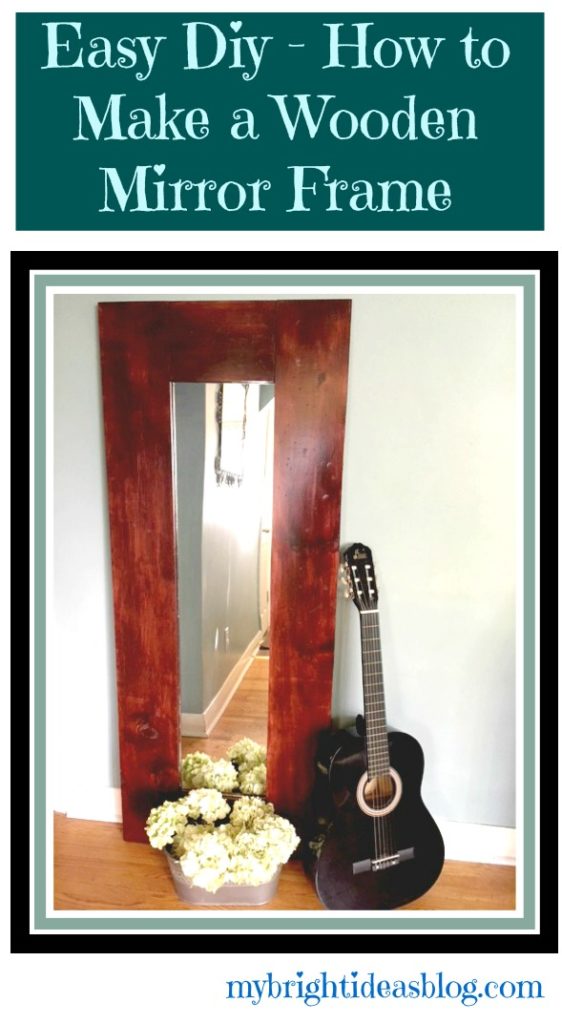
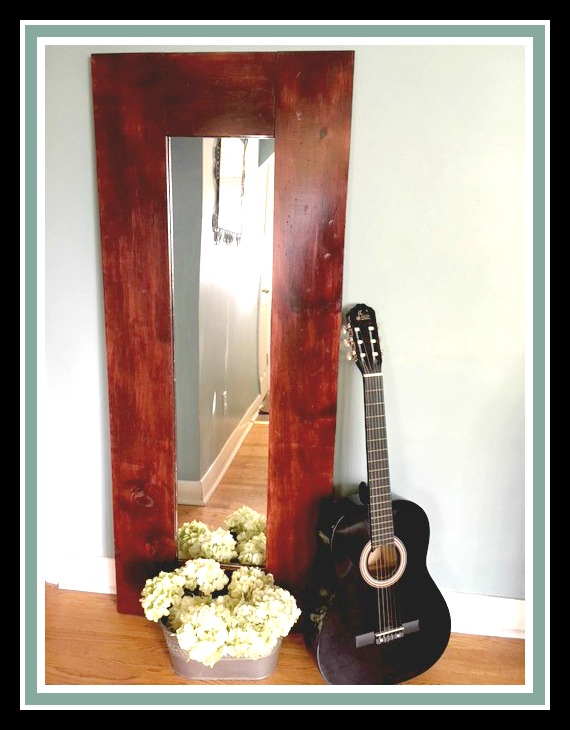
DIY Make a Wide Wood Frame for an Inexpensive Mirror
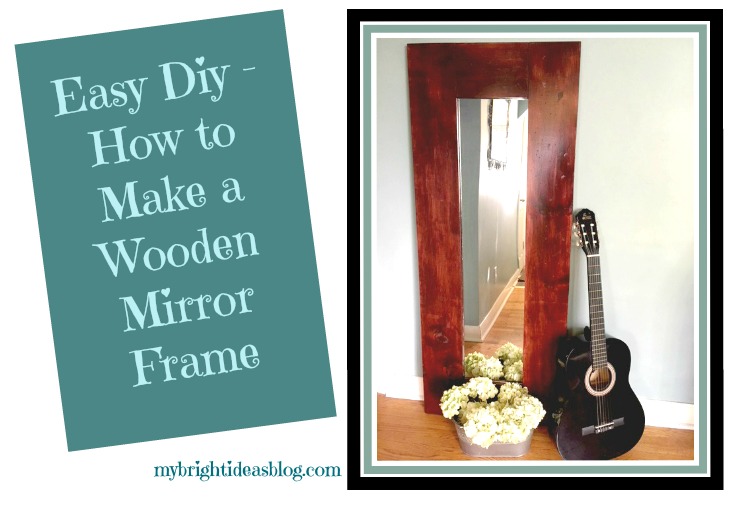
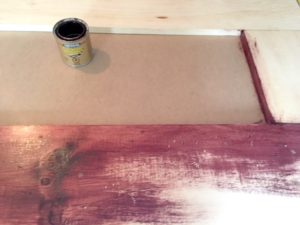
This week I got it into my head to take a cheap mirror and make it really substantial with a wood frame. Recently, I replaced all the doors to the bedrooms and closets and that was where most of our mirrors were. Hanging on the backs of doors. Now the doors are so new and lovely I can’t bear to attach anything to them. So I’m heading out the door not knowing if my skirt is stuck in the back of my tights…or any other possible wardrobe mistake is happening.
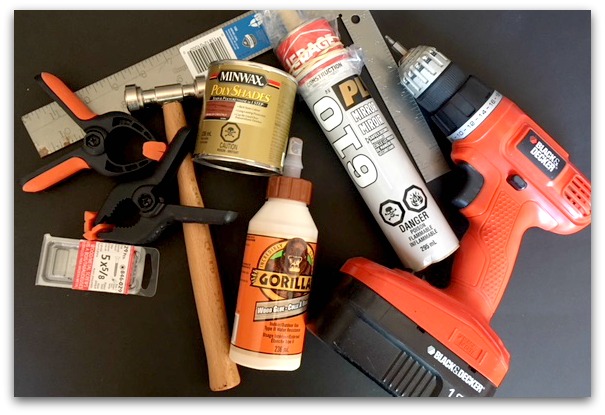
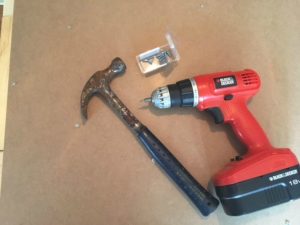
For this project you need:
- one 1/4 x 48 x 96 backboard cut down to size $21.40 (mine was 25 x 61 – but measure your mirror and pine pieces first) I had this cut done at Home Depot
- inexpensive pine boards (I needed 2 boards 1x8x6 $7.97 each) choose straight boards
- a mirror $13.99 – mine was 13×49 but when you take it out of the plastic frame it was 10 1/2 x 46 1/2
- exacto knife
- tools to bang up the wood if you want it distressed…hammer, saw, big nail
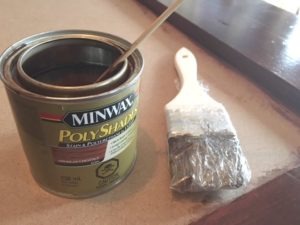
- stain and brush (mini wax polishade $11.97,this is an “all- in-one” stain and polyurethane so you brush it on)
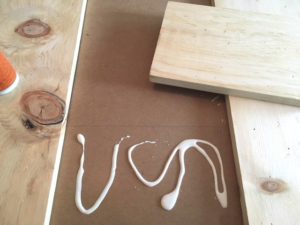
- Wood Glue $5.27
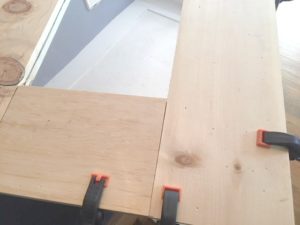
- Clamps (at least 10)
- Screws $2.97 (5 x 5/8)
- Mirror Caulking $6.97 (LePage 610 Mirror) and Caulking Gun
Carefully Dismantle the Mirror
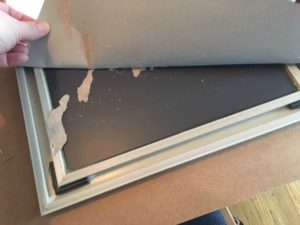
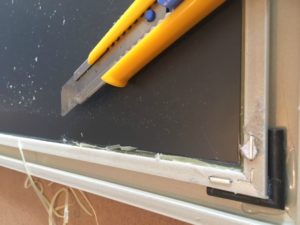
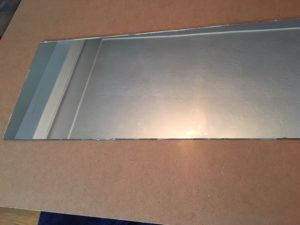
The very first step before you cut your wood is buy the mirror. If you just follow my sizing for wood cuts you may have a different size mirror and have to recut or get new wood. Remove it from the frame by turning it over and tear off the paper on the back. Take an exacto knife and cut away all of the glue on the edges. The mirror is actually a lot thinner and delicate than you might think-so don’t assume it will pop out. It will break easily. I found I needed to slice the along the edge of the plastic frame and then turn the knife and cut at a different angle. This required a lot more time and patience than I expected.

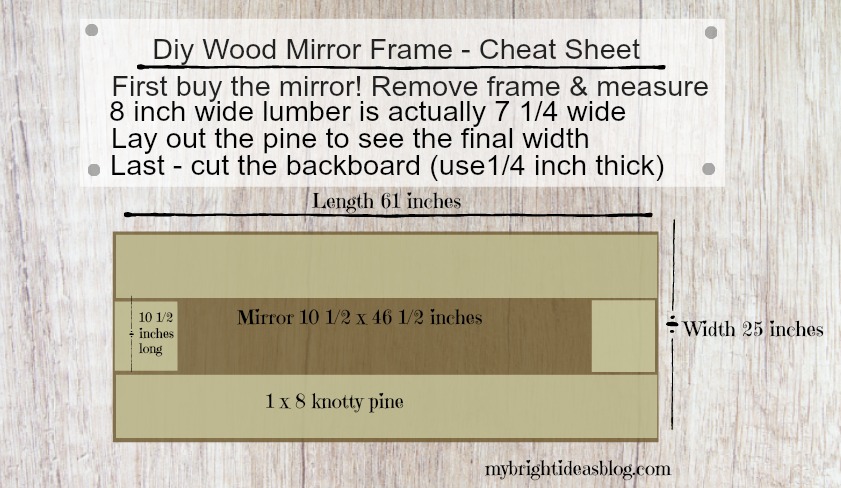
Very carefully lay the mirror on your surface and measure. I wanted to use a wide wood-you can go wider or narrower just adjust the size of your backboard. You may be able to find the right wood in the lumber area near the fence building supplies this will be less expensive. I went with the wood in the furniture building section because of the sizes available.
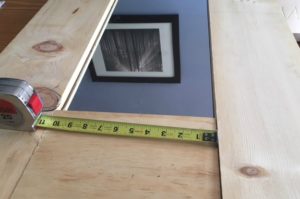
My mirror is 10 1/2 inches by 46 1/2 inches wide.
The pine boards were 1 x 8 x 6. But you must remember that they aren’t truly 8 inches wide. Its more like 7 1/4. That is why you need to lay things out measure to determine the needed width of the backboard. A bit too small is okay but it can’t be bigger than your finished project. That would look kind-a dumb.
The finished size of my mirror and pine is 25 inches by 61 inches so that is the size I need to cut the backboard. I had Home Depot cut this one because I don’t have a table saw and it will fit in the car easier!
Place the mirror on the backboard and then see if your pine is exactly how you want it. My side pieces were 61 inches long and the cross pieces were 10 1/2 inches. Everything looking good? Now trace the mirror with a pencil on the backboard. Remove the mirror…carefully…and put it in a safe place. I put mine behind a cabinet. Since we put on 2 coats of the finish it could take 24-48 hours. Keep the kids away from that mirror.
Distressing the Wood-Optional
If you are wanting to make the wood look rustic this is when to do it. It feels a bit wrong ruining nice wood-like your keying a car. I used a hammer with several screw on attachments to bang in several different kinds of marks and also I dragged it across the wood to make a few lines. You could use a regular hammer, counter sinker and saw to make these markings.
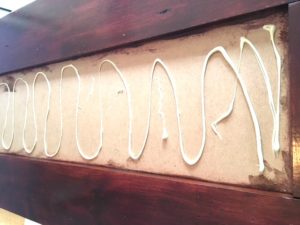
Putting it all together
Now that the wood is nicely banged up lets put it altogether. Use the wood glue and put the 4 wood pieces where they belong on the back board. Clamp in place quickly-the glue makes the pine slip around. At this point I got out the mirror again. Do I need to say carefully again? I hate broken glass with kids and dogs in the house. I’m a worrier! I thought before everything was set I would double check that the mirror fit in. It did! Now get it back to its safe place behind the cabinet.
Put in a few screws into the bottom to keep the boards in place. This is awkward since you need to come from below with your project pulled a little off the table. The majority of screws went in after the glue had dried and I could flip it over.
Finishing Steps
In this project I used Miniwax PolyShades “Stain and Polyurethane in One” with a paint brush. I originally chose a shade too red and sanded it down a bit and added American Chestnut for my second coat. If you have a stain only product, use a rag and not a paint brush.
Stir this product a lot. You can feel that the polyurethane part of the mixture separates and sinks to the bottom. Stir it mid project a few times just to be sure.
This called for a very thin coat, wait 8 hours, rub surface with steel wool, wipe off fine dust, apply another very thin coat until you have the desired color. So there is a bit of waiting involved on this project. I wrapped my paintbrush in plastic wrap between coats so it didn’t harden.
The final step is to glue in the mirror! Almost done! I used LePage 610 PL Mirror Adhesive. It doesn’t say on the package how long you need to wait for the glue to dry. The instructions say the first 10 minutes is key if you need to reposition the mirror. Don’t move it after 10 minutes. It should be a perfect fit. I applied the adhesive to the backboard and then placed the mirror on top. I gently applied even pressure to push the mirror into the glue. The website actually says that it is cured in 48 hours. Not realizing this until later I moved mine after only 3 hours because I needed the table it was on.
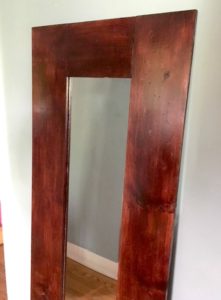
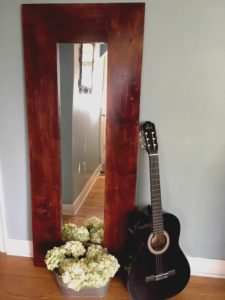
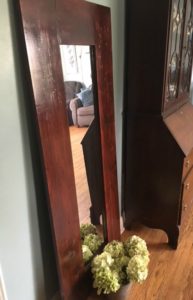
Mirrors are recommended to make a small room appear larger. That is great for our little house but mostly we just need it to make sure our clothes are on straight. The finished product is a bit heavy but could be attached to a wall to raise it up.
The cost of this project depends on if you have some basic supplies already. Home Depot will make all the cuts for free if you need it.
I purchased the pine and backboard, mirror, screws and mirror calking so the project cost approx. $65. I have enough backboard left over to make another one using an old mirror- this time I might just paint the frame black or white and put it in a bedroom. The only thing I would need to purchase for the second one is the pine boards for another $16. The best part is that their were no worrying about mitred corners. This project takes a bit of time but its pretty easy!
Let me know if I am missing any details. I’m happy to hear feedback if you have questions!
…
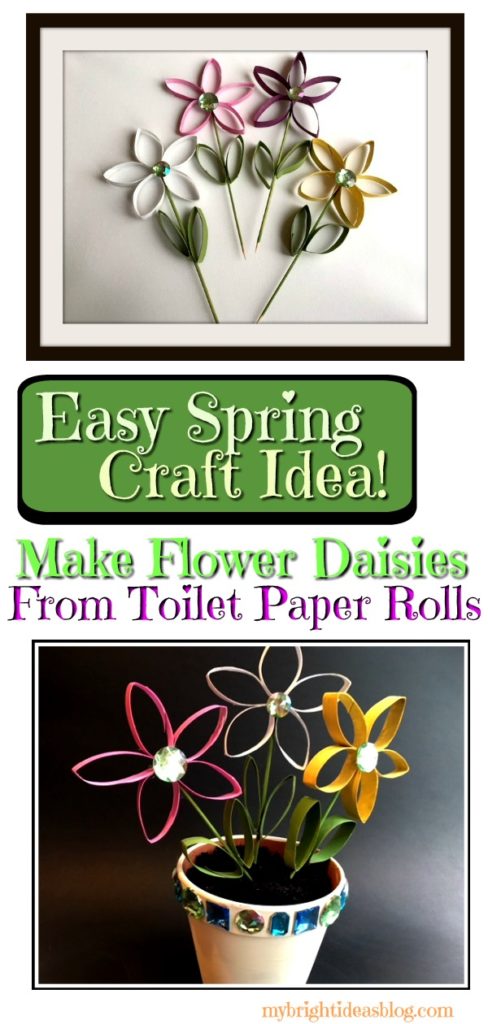
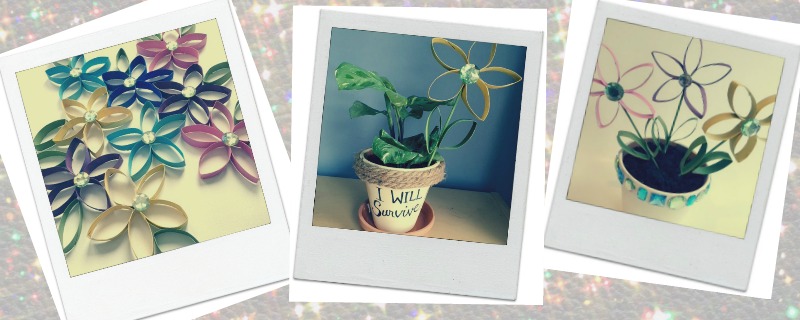
How to Make Spring Flowers Craft From Painted Toilet Paper Rolls
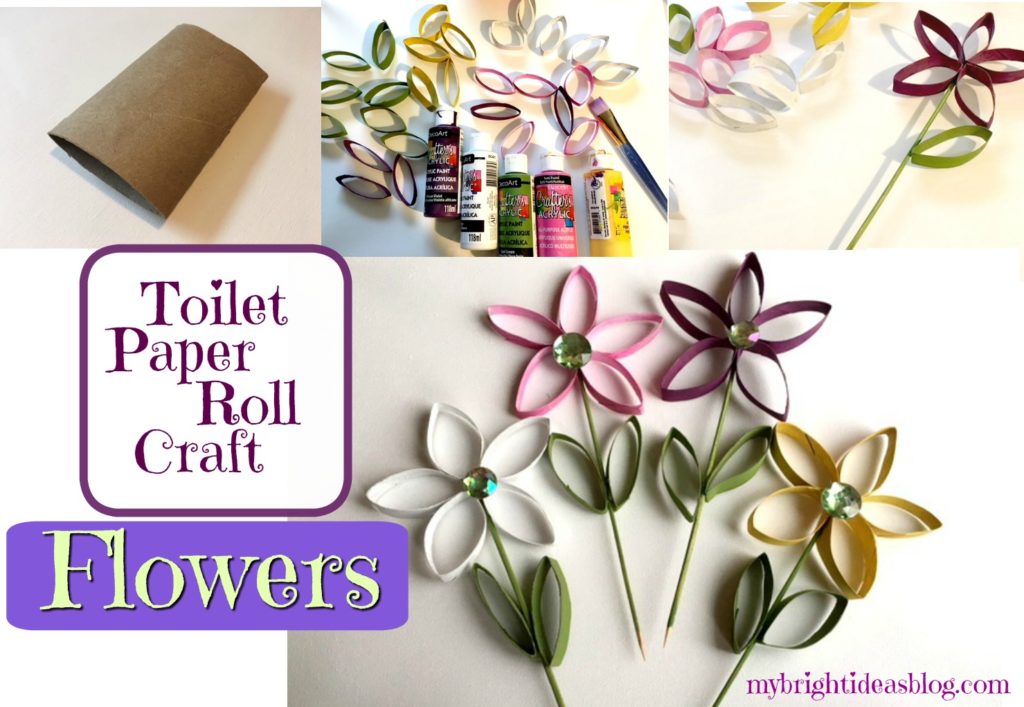
Looking for something to do with all those toilet paper rolls that your hoarding? Or am I the only one who doesn’t toss them directly into the recycle bin? Well all it takes is one toilet paper roll to make 5 flower petals and 2 leaves.
What a nice idea as we welcome Spring…ignore the fact that I’m posting this in mid April and we are shut in from an ice storm. Not to worry, Springtime will be back tomorrow.
For each flower you will need: 1 toilet paper roll, ruler, scissors, glue gun, craft paint and paint brush. For the stem I used a wooden skewer but for safety sake you could use a popsicle stick. For the flower centre I used a big shiny gem but you could use a pom pom or button.
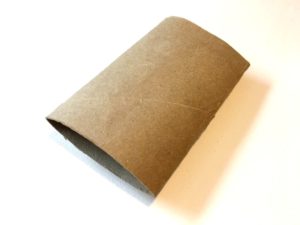
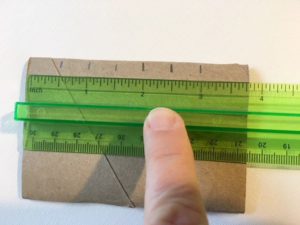
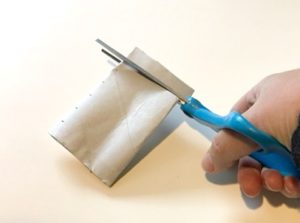
To begin you need to flatten your cardboard roll. Next measure and mark approximately 1 cm or 1/2 inch. It doesn’t have to be exact but we want to end up with it cut into 7 equal pieces.
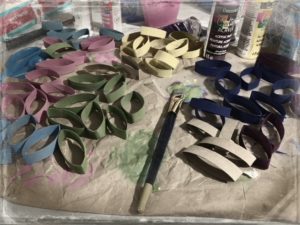
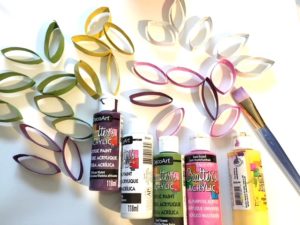
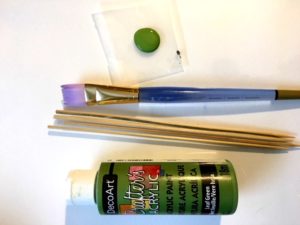
Take 5 pieces of the cardboard tube and paint them all the same color. This will be the flower petals. Paint the remaining 2 pieces green for leaves. I was surprised at how messy you can get trying to paint this. Paint the inside first then the outside. Then paint the stem skewers or popsicle sticks green. As I mentioned I did use skewers but my 8 year old was poking her big sister with it reminding me how dangerous this would be in a toddlers hands. So as a safer option I would choose a popsicle stick. They come in a few sizes-if you can get the long skinny type like they have at Starbucks that’s what I would choose but any kind would work. Now allow everything to dry thoroughly.
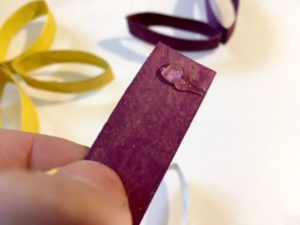
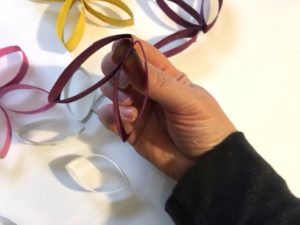
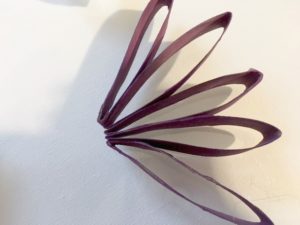
After the petals have had a chance to dry we begin to glue the first two together. Put a dab of glue on the end of one and pinch it with another while it dries. Add a dab of glue to the next one and pinch them together. Add on each one the same way until all 5 petals are glued together.
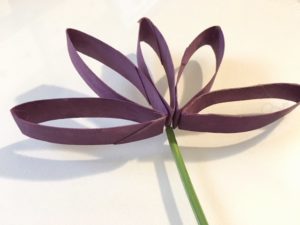
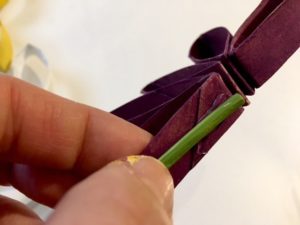
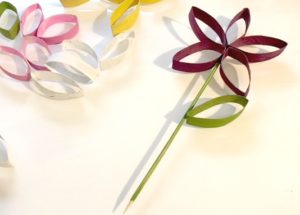
Place the stem in the middle of the petals and add a dab of glue to it. Pinch the daisy petal to the stem. Add a dab of glue on the other side of the stem and pinch the other petal to stem. This will complete the daisy shape. Put a dab of glue on the stem and place on the leaves-one at a time.
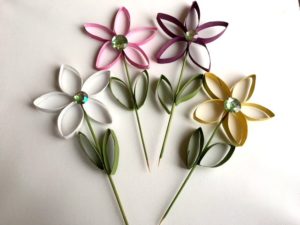
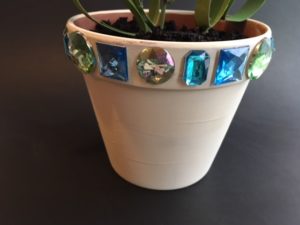
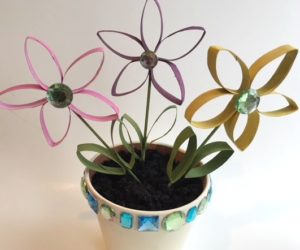
To finish it off glue the gem (or button or pom pom). Now you can pop it into a plant and give it away as a gift. I had extra gems and a flower pot handy so I hot glued the gems all around the flower pot too. It was so easy that I am in the process of making a bit of wall art out of the daisies.
Here is another post using toilet paper rolls.
Toilet Paper Roll Crafts-Use your loo roll tube for easy Crafts!
…