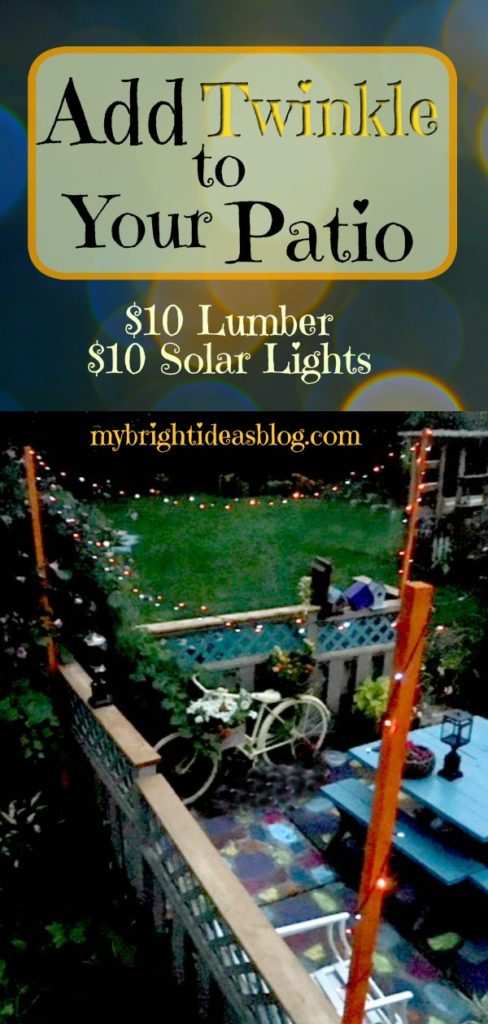
$20 Solar Twinkle Light Project – No Tools Needed
Usually by this time of the summer I have had enough of the heat and let the weeds take over and the vegetable garden dry up. But this year has been different! This year I have been adding colour to the backyard patio. I have painted the old picnic table and parts of the fence turquoise, the white Muskoka chairs are now red, an old bike is now yellow with plants attached and the entire patio a multi color design.
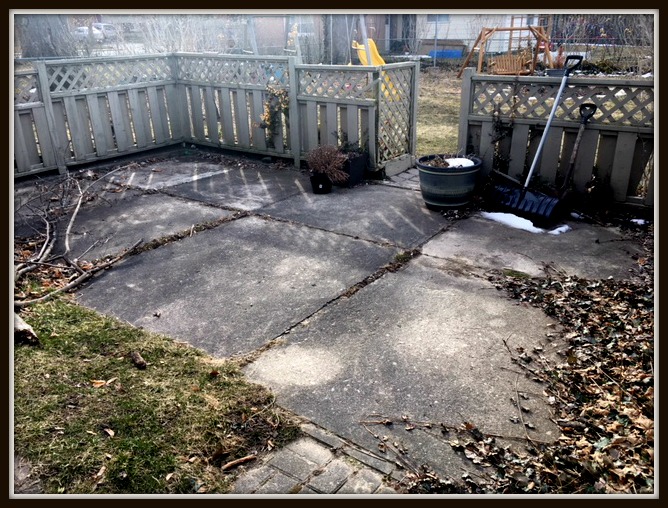
This is what it looked like as the final bit of winter melted away. So dismal! In the summer our garden is lush and private but everything is bare naked in the winter. Grey and bleak….
We have a lattice privacy fence around the patio area that needed a bit of repair and some paint touch ups battered by the winter. This is the going to be the support for the 2×2 pieces of lumber.
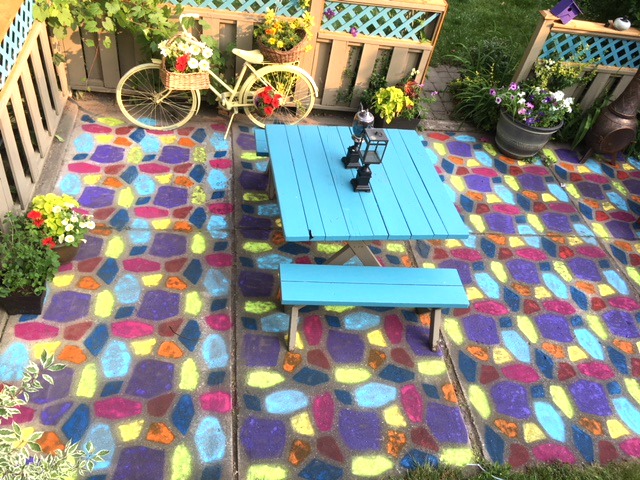
Below is a pic of the other half of the patio and garage area after I finished painting the patio.
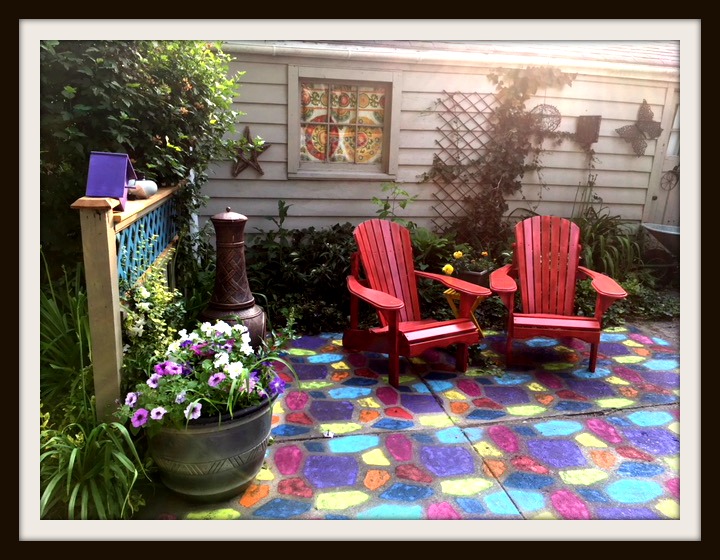
Have a look at the painted patio blog post from July.
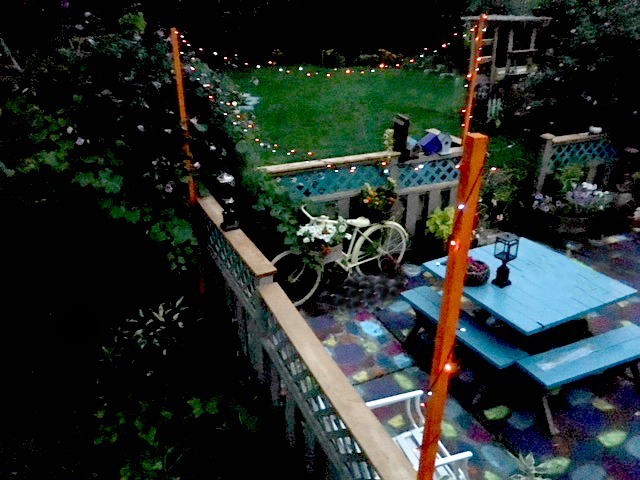
So the next logical step for this backyard makeover is to add some twinkle lights. Being the frugal person that I am-I must brag that I did this project for $20!
First stop – the hardware store….
 You will need:
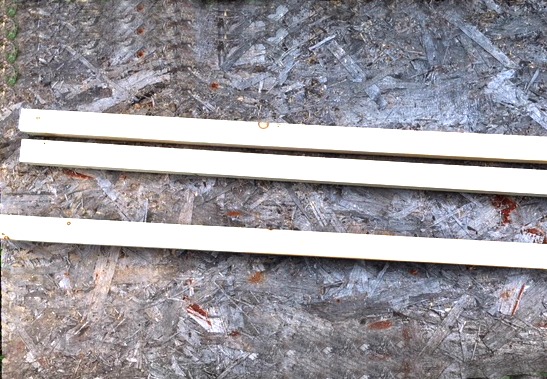
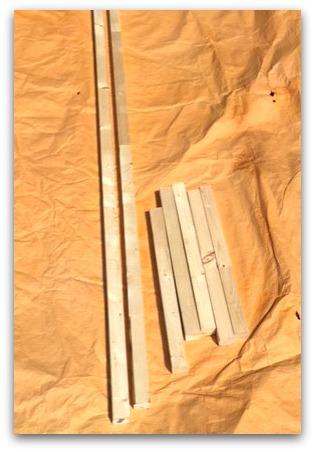
- 2×2 lumber (3 for $2.70 each)
- string of solar power lights (sale $9.99)
- left over deck stain or spray paint (it costs $6.99 usually but I had this left over from the patio project)
- zip ties (dollar store)
- cup hooks (dollar store)
Step 1 Spray Paint The Boards
The great news is we use the full pieces so no power tools are needed. Just choose a paint color and get started.
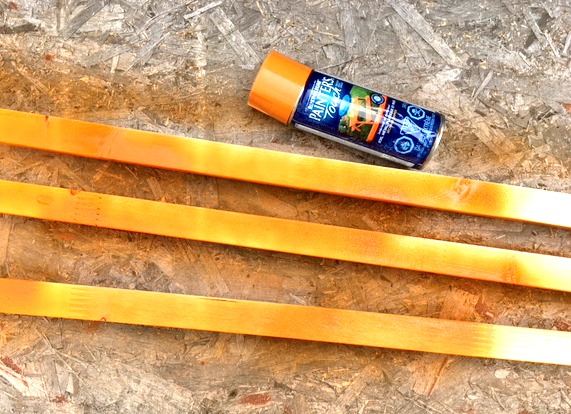
I wanted to make a splash of color so I chose to use my bright orange. I could have used a dark green or left over deck stain or fence paint if I was feeling subtle. But I wasn’t….
Spray the 3 2×2 boards on two sides then allow to dry before flipping them over and doing the other two sides.
Step 2 Add The Hooks
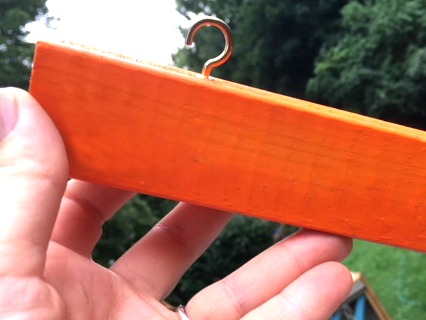
I used mug hooks because you simply screw it into the wood. The hook is twisted into the wood a few inches from the top.
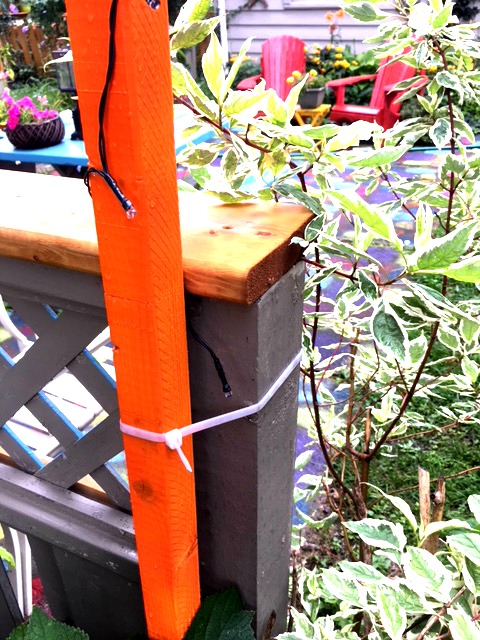
Step 3 Tie The Supports To The Fence
Securing the 2×2 to the fence was easy with zip ties. When we are putting everything away before the snow comes these zip ties will be cut off and my orange light supports will be put away in the garage.
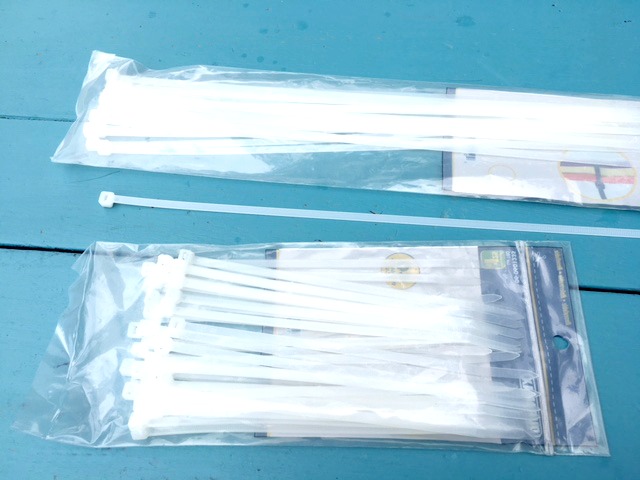
The dollar store or hardware stores have these for super cheep I used the 14 inch zip ties.
If you don’t have a handy fence or deck to secure the wood to, you can find others who have put them in cement in a bucket to create a portable pole. Some use 2×2’s or 2×4’s and even 4×4’s.
Check out this link to a tutorial using barrels and concrete and then turning it into a planter. Its great if you have no walls, deck or fence to secure it to. https://www.diynetwork.com/how-to/outdoors/patios-and-decks/how-to-make-planter-posts-for-string-lights

Step 4 Adding The Lights
It’s August, so now is the perfect time to find clearance solar powered lights. Lets give a shout out to solar lights! What a wonderful invention this solar power is. No extension cords to plug it in. No batteries. Just leave the little solar panel out facing the sky.
![]()
Turn the light on so it has a chance to charge up with solar energy before sunset. F means flashing, S means static so the lights will be still.
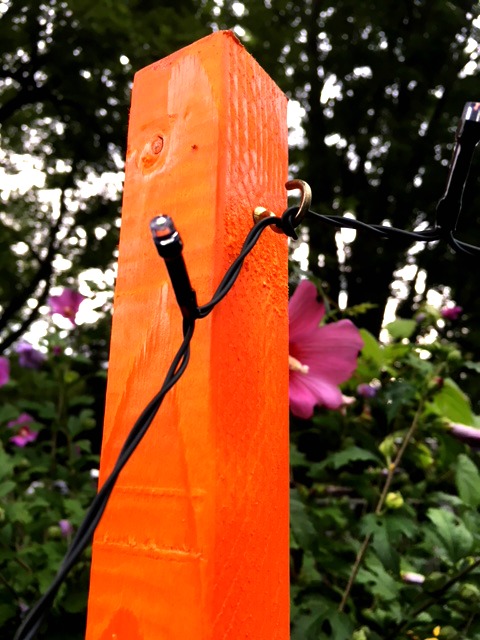
Wrap the solar light cord around the 2×2 support. At the top wrap it around the hook a few times. Next drape it over to the next support. We simply wrapped it around that hook and over to the third hook. Finally wrap it down the third pole and its done.
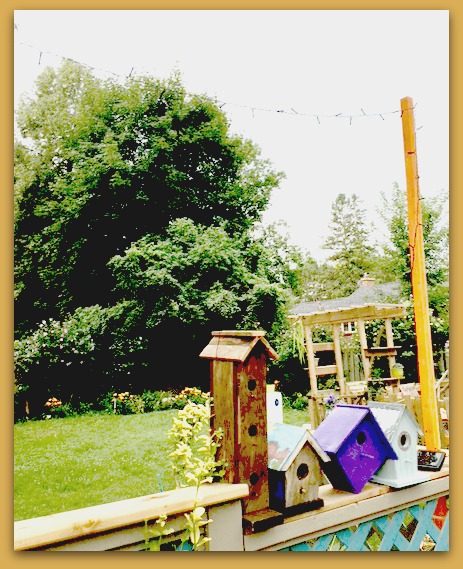
Next to the bird houses you can see the solar power part. I need to think of how to put it more out of sight since it does need the sunlight to charge it for after the sun sets.
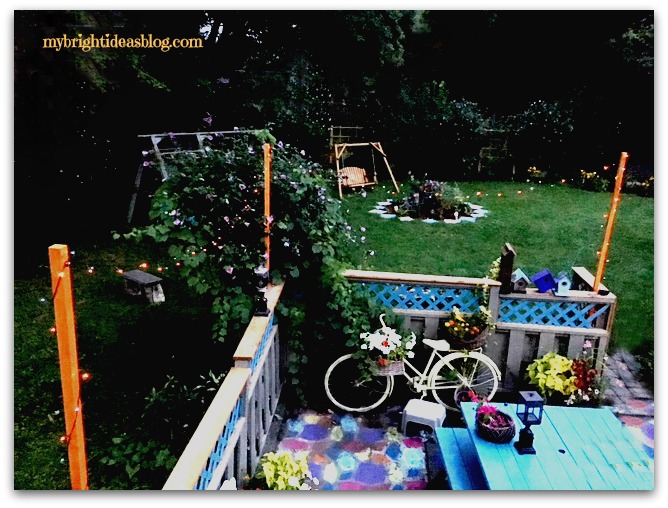 As the sun begins to set, I can see they are lighting up perfectly. Twinkle lights are such a simple pleasure!
Now I feel like calling some friends to come over for a root beer float and having a little party under the lights!
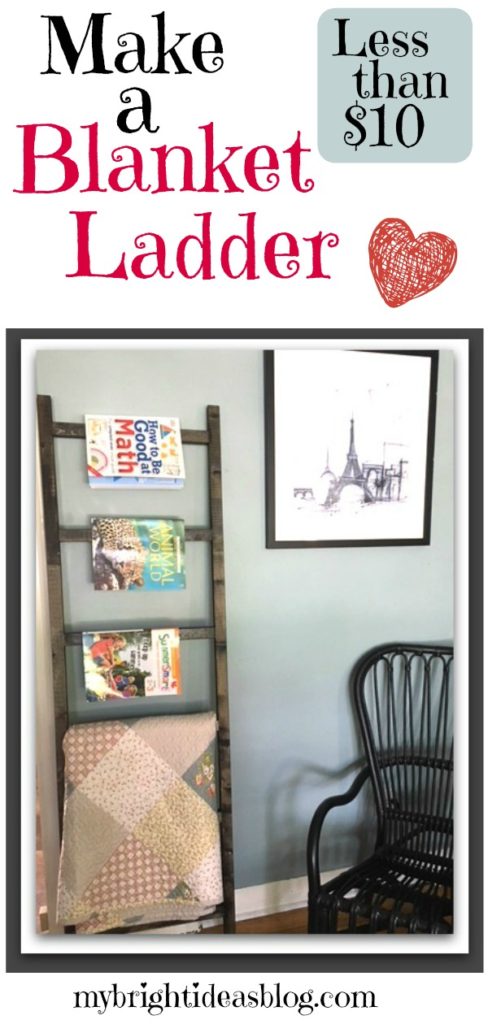
How to Build a Blanket Ladder – Easy Project!
Blanket Ladder DIY
This project is one of the cheapest projects you could make. If you have the stain, varnish and screws left over from a previous project the great news is the lumber should be less than $10.
You will need:
- Lumber 3 – 8 foot 2×2 (3 x $2.50 each = $7.50)
- Power Drill, drill bit and screw driver bit
- Pencil
- Stain
- Sand paper
- Clear Coat Varnish
- 10 – 2 1/2 Wood Screws
 Cut 2 pieces to 6 feet long. Cut 5 pieces to 18 inches long. (This is the size I made)
OR
Cut 2 pieces to 5 feet long. Cut 4 pieces to 18 inches long. (Good if you have a small room)
![]()
Do you see that blue sky? 30 mins later the sky had dark clouds and I was hustling everything back into my garage to avoid a major thunderstorm.
![]() Lay out the wood and decide on your set up. I chose to put the first ladder rung 3 inches from the top. Then each one is set to be 12 inches below the next one. This left about 6 inches from the bottom of the ladder.
Lay out the wood and decide on your set up. I chose to put the first ladder rung 3 inches from the top. Then each one is set to be 12 inches below the next one. This left about 6 inches from the bottom of the ladder.
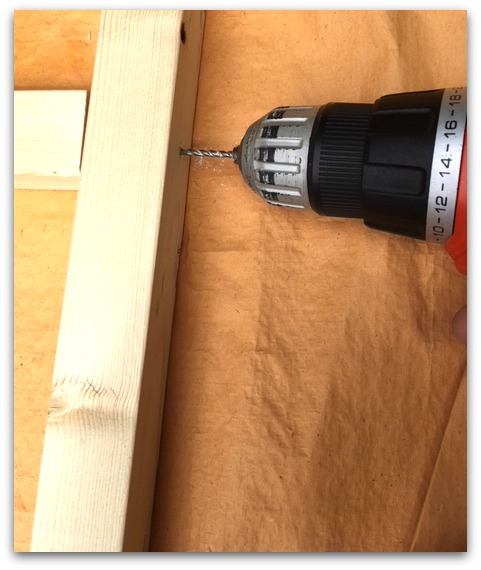 I predrilled the holes to help the wood not split. That would ruin the wood-trust me I’m famous for doing this and having to head back to the store for a fresh piece of wood. Doh!
![]() I started to drill each screw into the wood to make the next step of adding the rungs easier.
I started to drill each screw into the wood to make the next step of adding the rungs easier.
![]() Use a square to ensure the rungs go on straight.
Use a square to ensure the rungs go on straight.
![]()
Do you want to have it super smooth finish or rough and distressed…decisions decisions…?
Smooth…then its time to go over it with sand paper or a hand sander.
Distressed…last chance to scratch it up a bit. Rub it with the side of a screw or key. You can even wack it with hammer.
![]() Even if you like it distressed you can almost skip all the sanding but do tidy up the ends with a quick rub using sand paper.
Even if you like it distressed you can almost skip all the sanding but do tidy up the ends with a quick rub using sand paper.
Now for the STINKY wood stain!
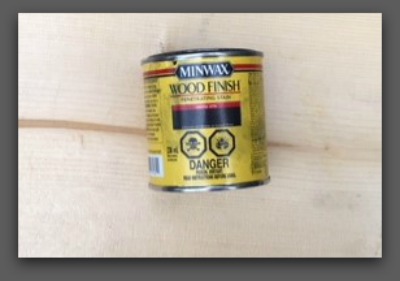
Next step is staining it. Choose a stain that will go with your décor. I really like a dark walnut finish but this blanket ladder is going into a room with a lot of black. So I used an ebony stain by Miniwax. If you are indoors open a window. If you can do it outdoors that is even better.
![]()
Watch the seams for areas where you have missed stained the first time. I used a craft paint brush to touch up the gaps and unintentional light patches.
After allowing it to dry, put a thin coat of clear protector over top. Keep in mind, clear coats come in a mat finish or glossy. I prefer glossy for the sake of smoother dusting my wood furniture but the mat finish looks really nice too. I chose to use a SPRAY clear coat.
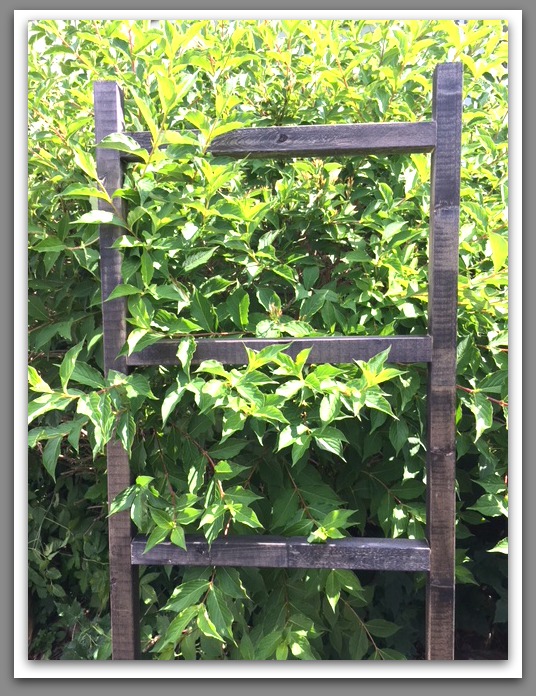
This looks so nice next to the greenery. Maybe I should use it as a trellis instead!
![]()
![]()
This could double as a magazine rack too. I didn’t have any magazines around so I used the kids summer school work books. Tee hee…. :o)

This is such an easy project! Are you teaching your teenager some DIY skills?
What if a teenager used this ladder to set out their school clothes for the week…
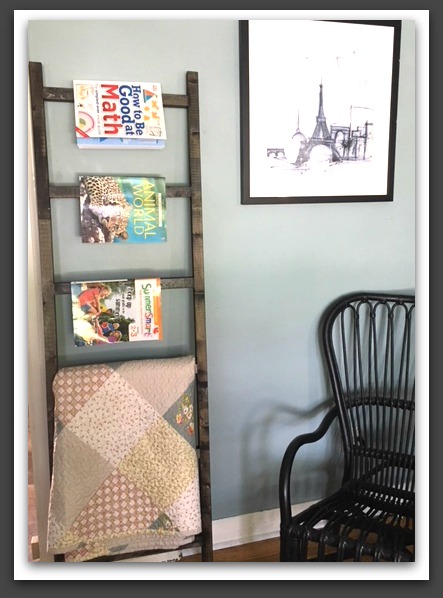
Add a blanket and what a nice housewarming gift this would make!
Crafts Using Burlap and Buttons – Easy Project that Looks Great!
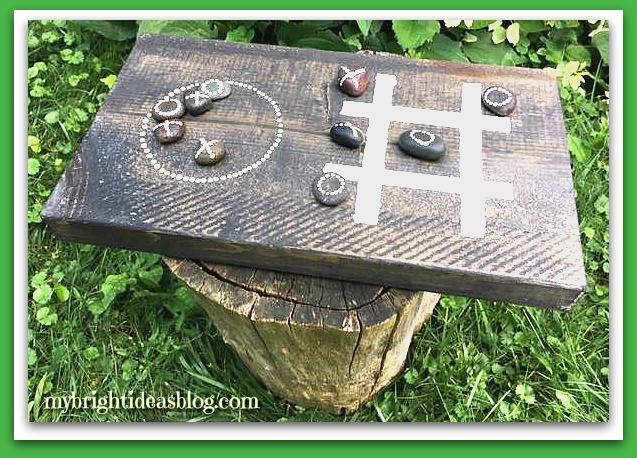
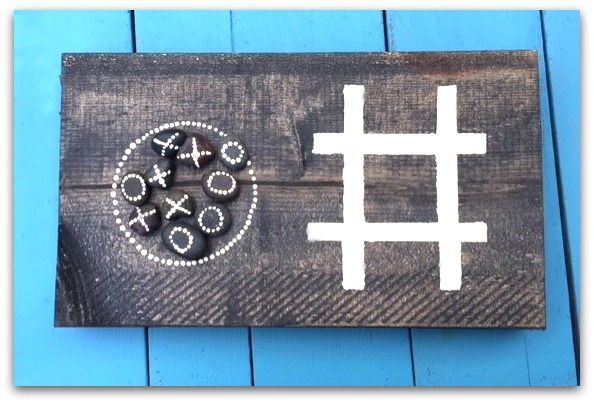
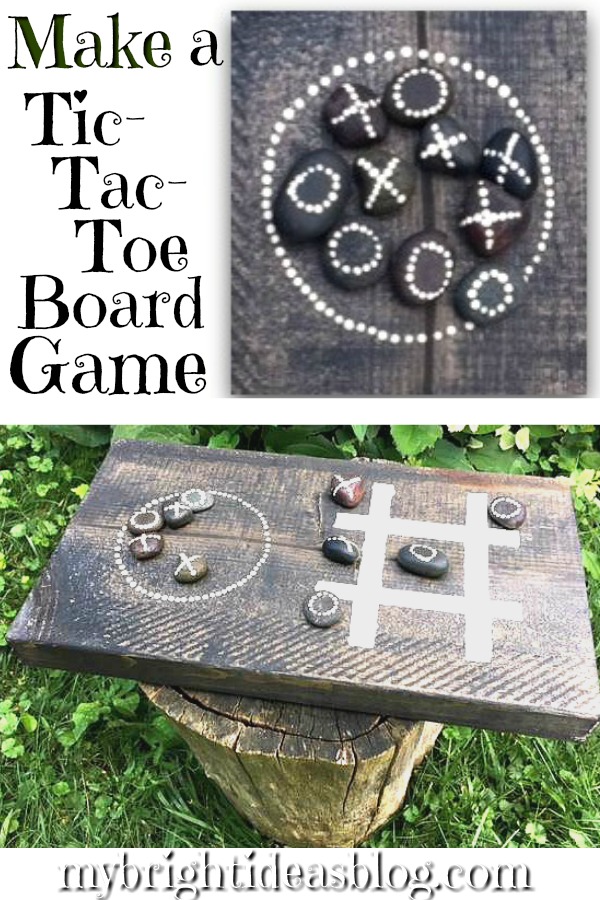
Make a Tic-Tac-Toe Board Game
Today I’ve got a SUPER EASY project you are going to love!
Outdoor Tic Tac Toe Board Game
I’ve been working on some of my wooden projects this week but every day we’ve had sun then clouds and then raining cats and dogs. One of my projects (a wooden sundial) to do with the kids requires a full day of full sun. So there, once again, we are running into the house to dodge raindrops with our sundial. What can you do but be patient and find another project to do. What funny summer weather!
I want to give credit to this bright idea….it was inspired by https://tarynwhiteaker.com/outdoor-tic-tac-toe-game/?m. When I saw her blog post, I immediately put it on my to do list. Outdoor games….hmmm it’s got me thinking about other giant outdoor games for summer family fun.
What you will need:
-
- 10 flat rocks (I used the bagged ones from the dollar store)
- a rectangle block of scrap wood
- wood stain and rag to apply it
- white/cream craft paint
- craft paint brush
- painters tape
- (optional) clear varnish (clear spray paint is handy for the rocks)
Lets Get Started!
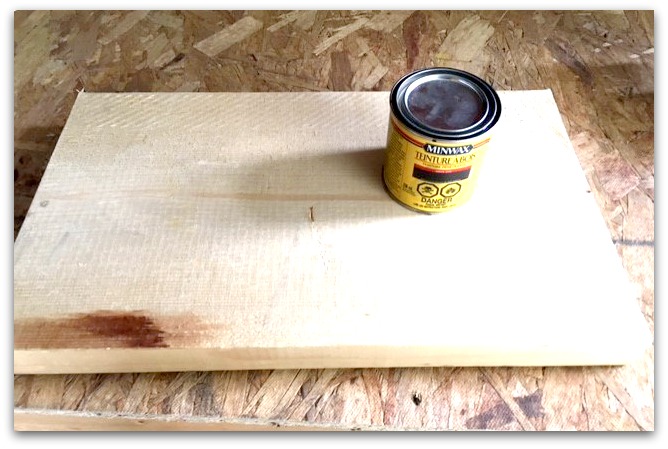 I hope you have a piece of wood left over from another project that you can use. The thickness and width and length is completely up to you. I had this piece of pine left over from a mirror project I made in the early spring. I will put a link to it at the bottom of this post.
The the scrap of wood was…9×16 (23cm x 41cm) and 2 inches thick.
![]() If there is any rough edges give the corners a bit of a sanding. We don’t want slivers. If you want it to be a smooth tic tac toe board, then you will need to put some more time into sanding it.
If there is any rough edges give the corners a bit of a sanding. We don’t want slivers. If you want it to be a smooth tic tac toe board, then you will need to put some more time into sanding it.
The stain I used is by MINIWAX called “Ebony”. If you put a thin layer on you get a grey/black effect. If you put on 2 heavy coats it will be nearly black. I used one coat for this project. I really like!
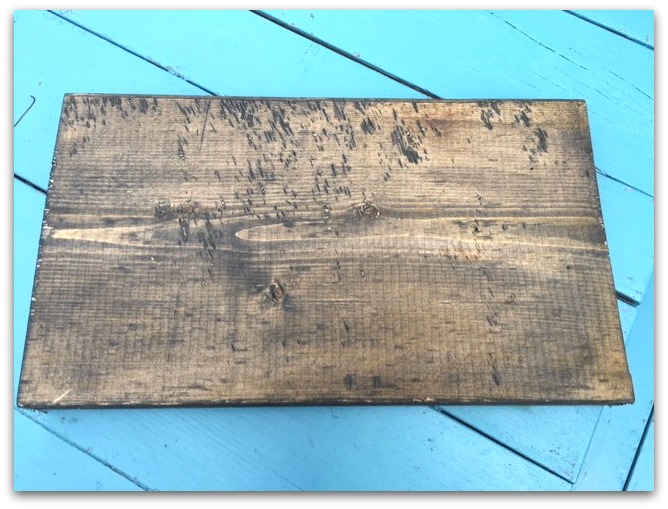
After the board is stained you will see that it’s quite banged up. I really like the rough, distressed lumber look.
You should give the stain plenty of time to dry before moving on to the next step. It started to rain so I abandoned this project until the next day.
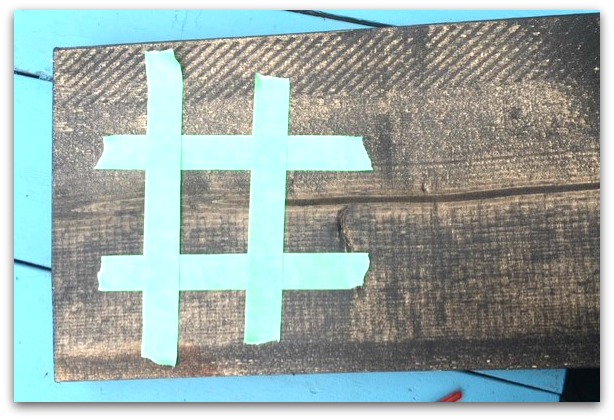 This photo shows me using painters tape to show me where I would want to paint the lines.
Grab Your Paint Brush!
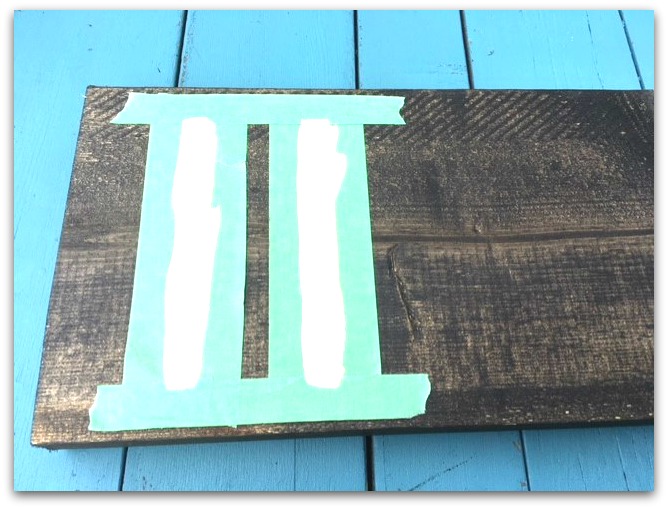 Using painters tape, mask out where to have the first two lines. Apply a coat of paint and wait 10 mins. It may need another coat of paint. Craft paint dries fairly quick but I gave it 45 mins and then was able to remove the tape and put in the opposite direction. Have a ruler handy to check the distance from the sides is equal.
If all of this is too tedious, you could just paint the lines on free hand. If you were doing your tic tac toe on paper or sand it would look more like the tape in the previous photo. Maybe I’ll try that next time. If you make a mistake you can wipe it off quickly with a wet cloth.
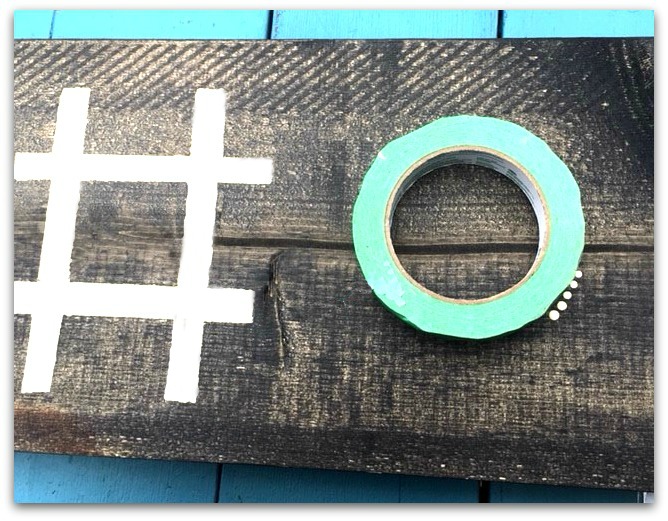
I was looking at the painters tape and thought hmmm…..why not paint a spot for the stones to rest. I love this technique for perfect dots. Dip your paintbrush handle into the paint and dab it on the surface 1-3 times and then reapply with paint and carry on.
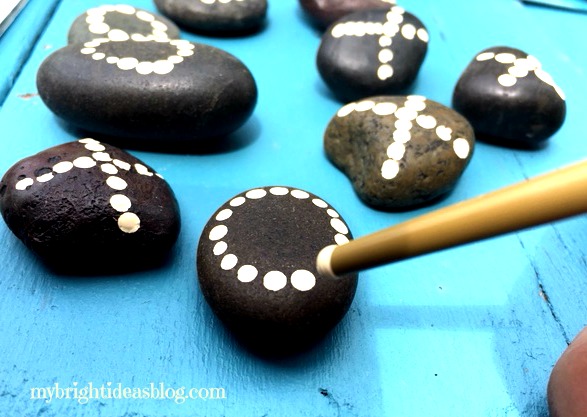
Originally I was going to use a stencil on the stones…..but that was not a success. Then I was going to free hand paint the X’s and O’s and that turned out ugly too. So my solution was to do the dabbed-dots again.
This looks so much better than the ones I hand painted. LOL!
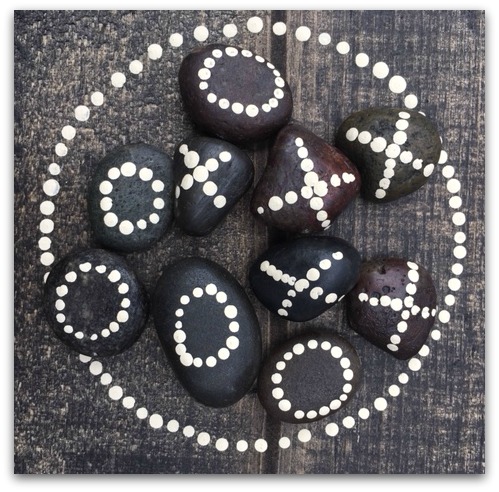
 This is so easy I wonder if I should make some more for housewarming gifts….or maybe sell them at my work craft table. Several of my recent posts have made it to the craft table at work. Fridge magnets, wind spinners, the memory wire bracelets and all those items add some sparkle to the other fabric and knitted items.
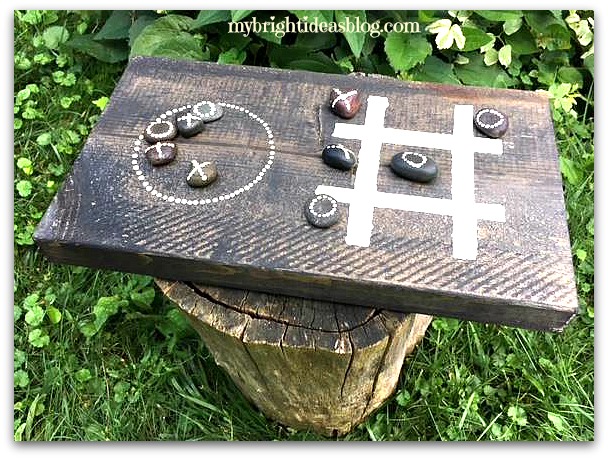 If you put a clear coat of varnish on the wood it will be ready to stay out doors all summer long come rain or shine. It adds an activity and rustic charm to the deck or patio.
(As an after thought, the rain lifted some of the dots off the stones so they should get a clear coat of spray paint.)
Thanks for reading! Enjoy your Sunday and get outside its going to be a beautiful day!


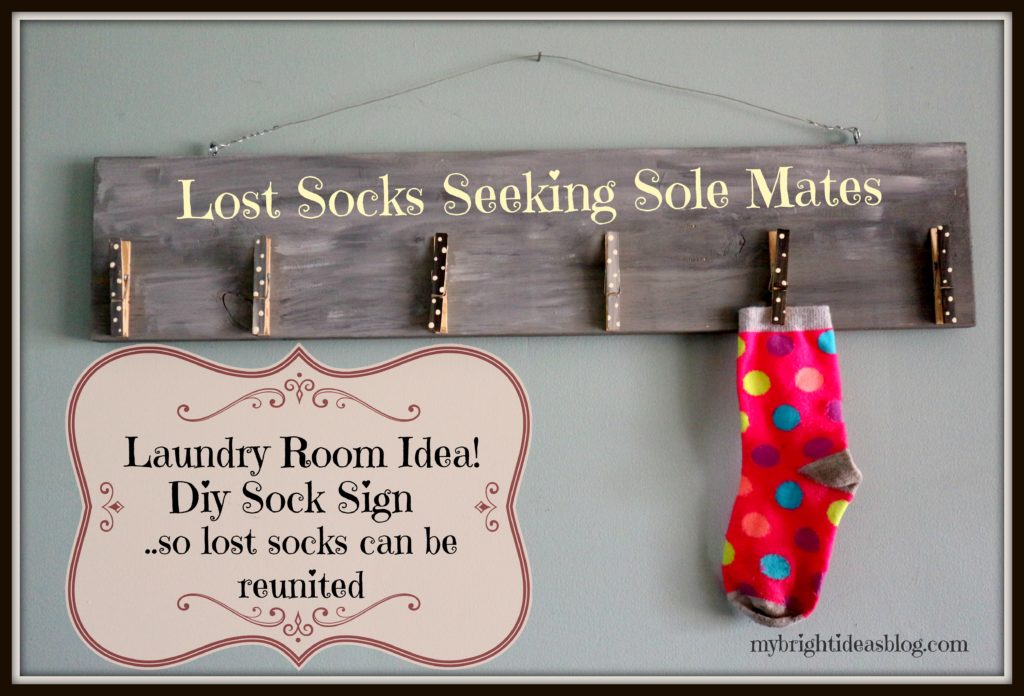
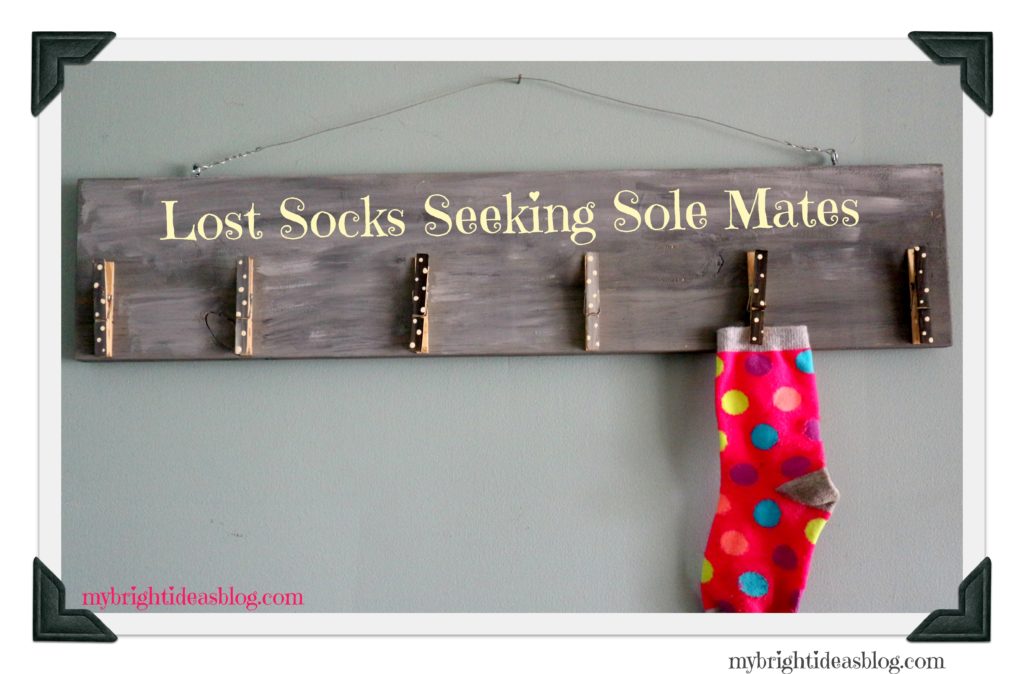
Lost Sock Seeking Sole Mate-Laundry Room Sign
I saw this idea on pinterest and immediately went in search of a left over scrap of wood. I found this 1×6 partial board that happened to be 26 inches long. Perfect no need to cut any pieces because my saw is in the garage and there is a ton of snow in the driveway. More wood diy projects to come when spring arrives in Canada.
So here we are with a cute idea for a laundry room sign to help lost socks make their way back to their mate.
You will need:
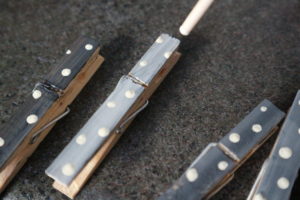
A scrap of wood, sand paper, paint or stain, a stencil for the letters, clothes pins, paint brushes, glue, hooks and wire.
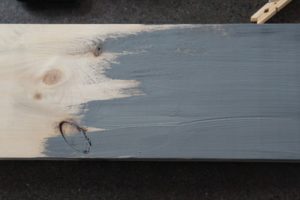

Before you get started smooth the front of the board with fine sand paper. This will make the writing a lot easier. Find some sort of paint or stain to start the back ground of the sign. I had my regular craft paint already out and just mixed the white and black and make a nice gray. I liked how streaky it turned out. Once this is dry test out where you would like to put the clothes pins. Be sure to write the message on the board before you glue the clothes pins on. You could use a letter stencil or free hand.
I painted the clothes pins gray and black and then put white polka-dots on them. I love painting polka-dots by using the tip of the paintbrush and dipping it in the paint.

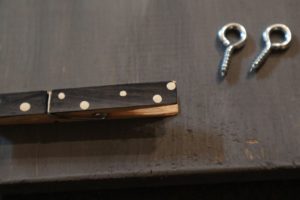
This was my first time using E6000 glue. It is slow to dry compared to my usual hot glue gun but so far its proving to be strong. I left it over night to be sure it was dry. In the tool box I found a little frame kit with wire and these screw in hooks. It was very easy to screw it into the soft wood. Then put the wire through the eye of the hook and wrap it around. That was all there was to it. I had everything for this lying around the house. If you don’t have the hook and wire you could also use picture frame hooks nailed into the back. Instead of wire you could use twine or ribbon.
You could write Lost Sock Seeking Sole Mate or Lost Socks in Search of Sole Mates. However, I was making up one to put on the craft sale table at my work and I wrote Lost Socks Seeking Soul Mates. I’m not sure how hard it will be to fix it since I wrote it in black paint. It will be hard to cover up. Grrrr. It’s not a funny play on words if you spell the pun wrong. Whoops-a-daisy!


Build a Shelf Behind the Couch
 A shelf behind the couch supported by just a few pieces of wood makes a great place to put nic nacs. Just a couple of boards, screws, and painted black.
I was visiting a friend and her beautiful new baby-with the most perfect nose I’ve ever seen-and spotted something that I meant to ask her about but forgot to come back to it because she was in the middle of a hilarious story of all the mishaps at a wedding she had attended this past summer. I can’t get into to the details but lets just say romantic barn weddings do have their fire hazards. It was a close call but the hobby farm was safe and all was well.
Anyway, I left wondering what was it behind her couch that allowed her to put picture frames and nic nacs behind the couch? Was it like a British style radiator cover -like a box? Was it a shelf screwed into the wall? Next visit I will ask, but in the meantime I was getting supplies to remake my closet into a pantry when I thought lets see if we can’t invent a shelf that would go behind my couch so I have a place for a few pretty things too.
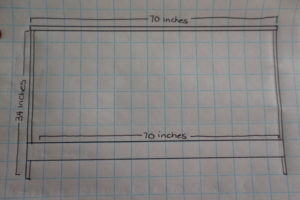
So I measured the height of the couch (34 inches) and the width (70 inches). I got 4 boards 1x6x6 (that will be 72 inches long so I cut off the extra 2 inches on 3 of the boards) the 4th board I cut into 2 pieces 34 inches long.e and 2 more boards the same length as stabilizers to the very skinny shelf. I predrilled holes into the top and put 2 screws on each end. Lay the structure on the floor and put in the first stabilizer wood across. Measure approximately 7 inches from the bottom…. 2 screws on each end should do it. Then gently flip it over so you can do the same on the other side.
If you are happy with how it looks then you can decide how to finish it. I have quite a bit of black in this room so I put on black paint but you could also put a stain and clear coat on it to match wood you have. The smoother the top the easier to dust so you should sand it smooth and wipe off the dust before painting.
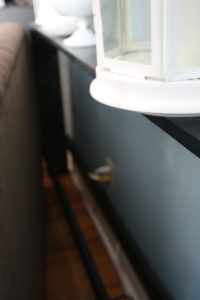
I felt like the room was so much cozier with my little shelf. Its a little room…in a little house, so we don’t have much space for pretty things. I like that this is also a space that a certain naughty puppy can’t grab things to chew on…unlike the coffee table. Also if your wee babe is starting to crawl and putting things in her mouth.
This project literally takes 15 mins to build if you have the pieces cut by the hardware store….only 5 mins more if you are cutting the wood yourself. An hour for the entire project plus remember to go back and do a second coat of paint. It’s that easy!
p.s. This won’t work if you have a recliner couch. Sorry.


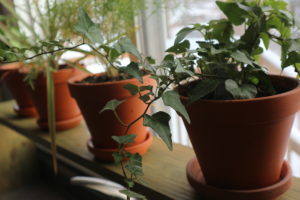
Wooden Window Shelf-Easy Diy Plant Display
Looking for a place to put some potted plants in the one window with all the sun. This super easy DIY- Do it yourself project for a shelf that goes over the sink.
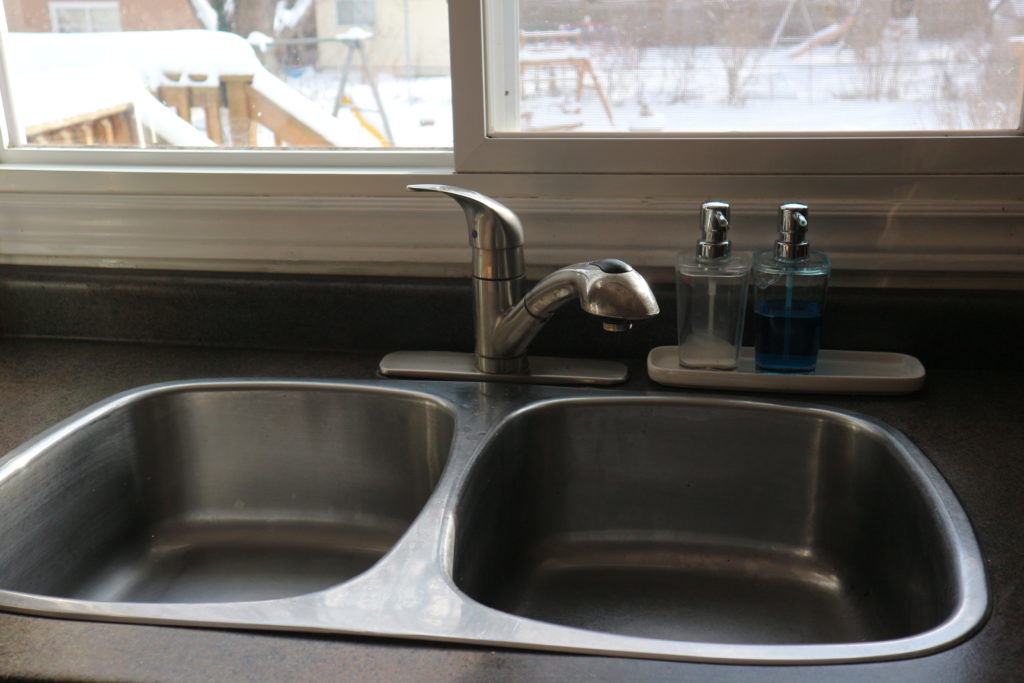
Tidy Sink…But so Boring….
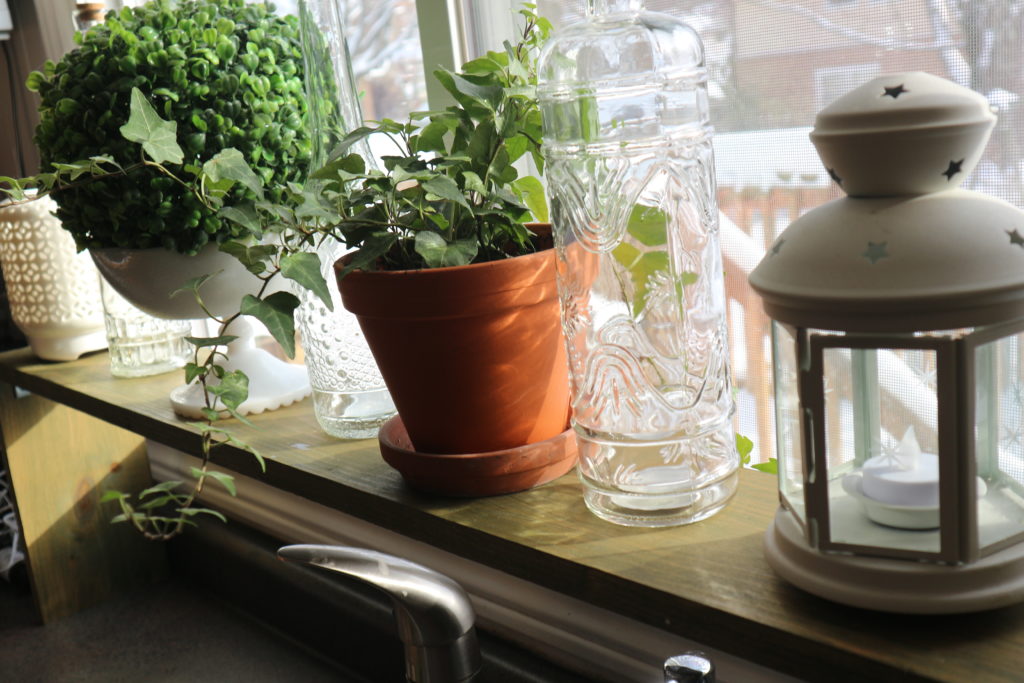
I’m writing this post about a year after I built this and I still love it. Especially in the winter when its the only sign of plant life. I usually put herbs in this window and then in the spring put them on the deck.
All you need is a board of wood and some brackets to attach them and a wood stain.
I cut my board to the size of my window but I could have cut it to the size of my sink instead if I wanted to have less shelf and more counter top. Its important that you figure out what height you need for your sink faucet to function normally.
You’ll need a 1×6 pine board – I cut my pieces 2 at 10 1/2 inches long and 1 at 45 1/2 inches long but you will need to measure your own window and sink widths and height of faucet and make some choices for your own on this.
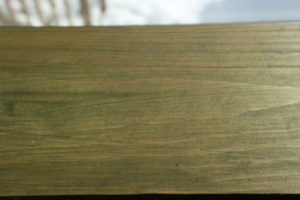
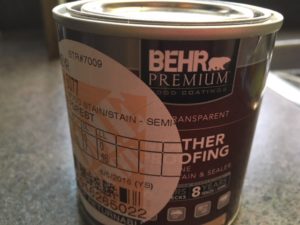
I have wanted to use a green stain on bigger projects but chickened out so I happy to try it on this project and love the results. I used Behr Premium Semi Transparent Wood Stain in the color Forest. http://www.behr.com/consumer_ca/products/wood-stains-finishes-cleaners-and-strippers/behr-deckplus-semi-transparent-waterproofing-wood-stain
The stain instructions say to do 2 thin coats and you can do the second coat within 1 to 2 hours of the first one.
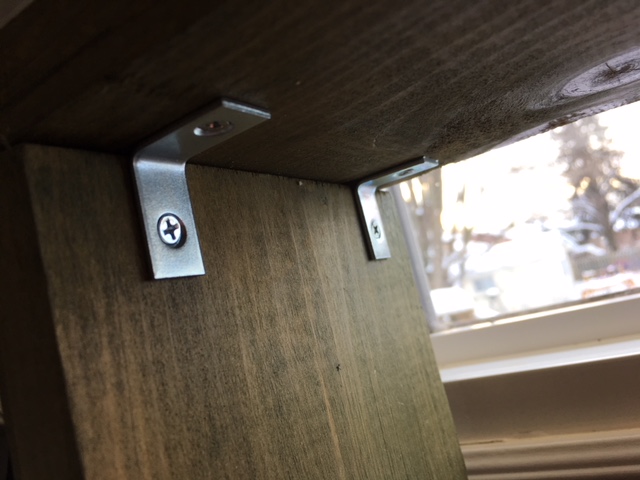
Once the boards were dry I used 4″ L” shaped brackets to hold them in place. You could also predrill and use wood screws if you prefer.
When its all done its just time to decide if you want a collection of herbs in terracotta pots or clear glass bottles or pretty white nic nacs or all of the above.