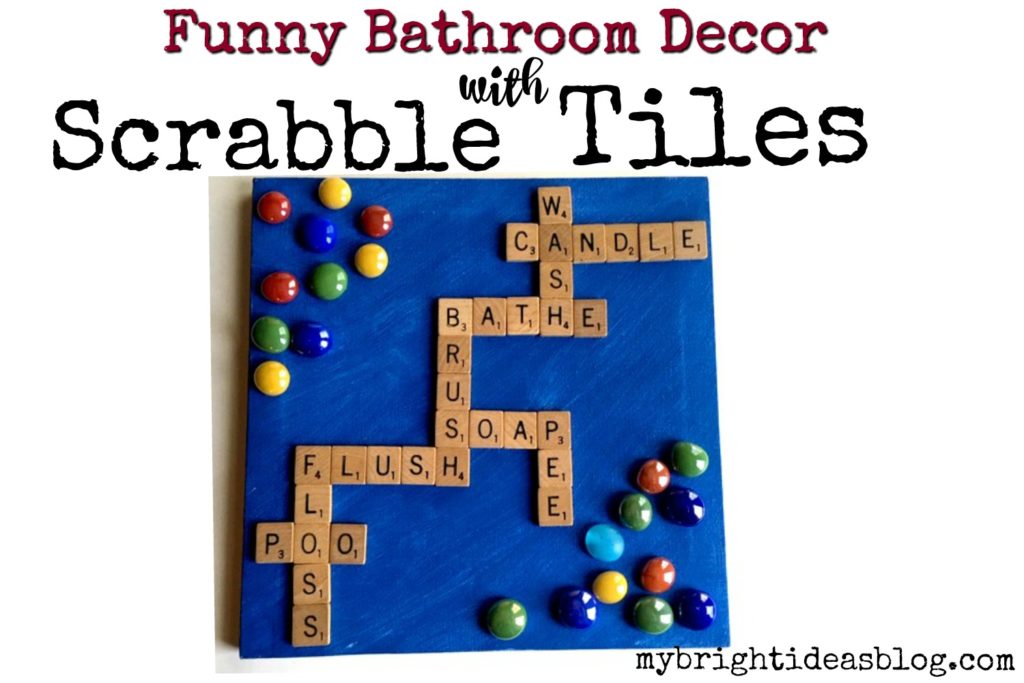
Here is a fun idea for using scrabble tiles to make a bathroom sign that will make your guests chuckle!
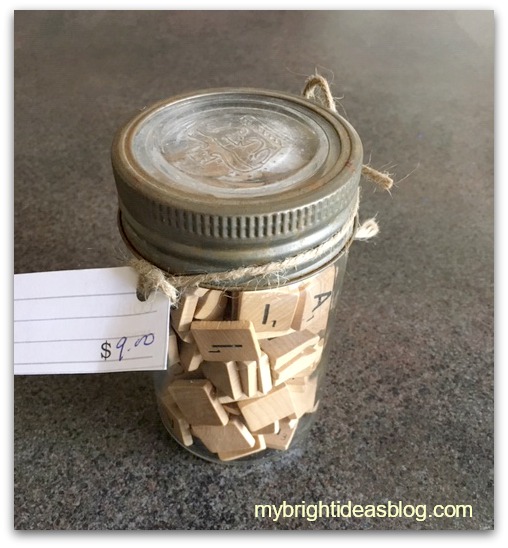
A while ago, I found this jar of scrabble tiles at an antique store. I could probably find scrabble tiles for a cheaper price in an old board game box at a thrift store but this cool old jar reminded me of my mom’s canned peaches…so I bought it.
For this craft you will need:
- scrabble tiles
- blank canvas
- craft paint and paint brush
- hot glue gun
- glass stones or other decorative items
![]()
I used a 12×12 blank artist canvas from the dollar store. Nothing but the best! Tee hee.
It would be sensible to paint your canvas right away so that it’s got time to dry.
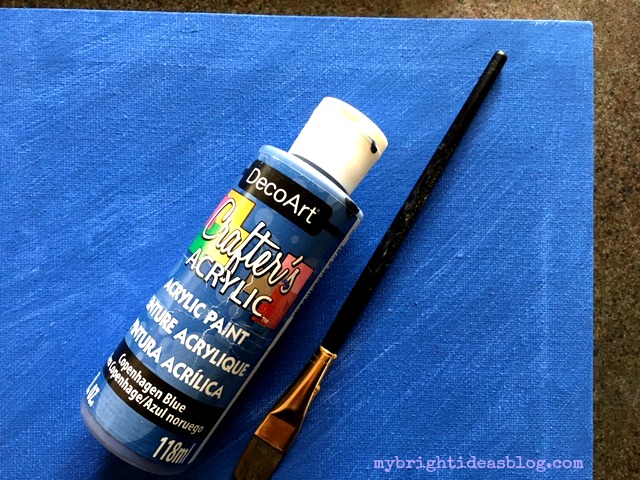
“Copenhagen Blue” craft paint, my brush, canvas, hot glue gun and glue are all dollar store supplies. I was really tempted to leave mine white so I didn’t paint it right away. But later I changed my mind. This meant that I needed to slide all the tiles off and paint it before I could glue it on.
Now for the fun part!
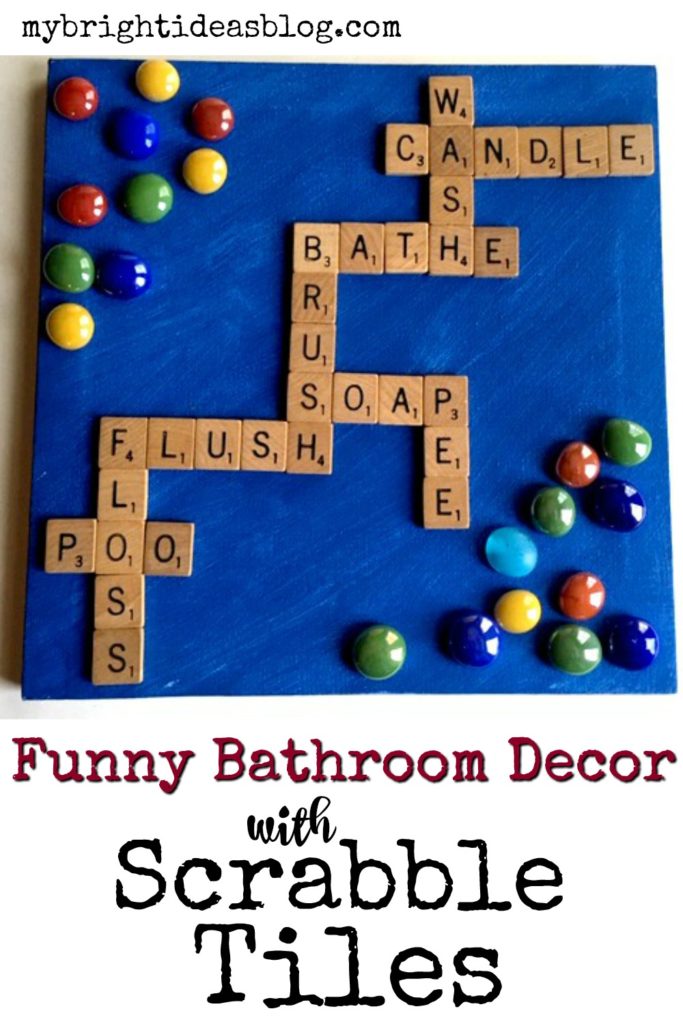
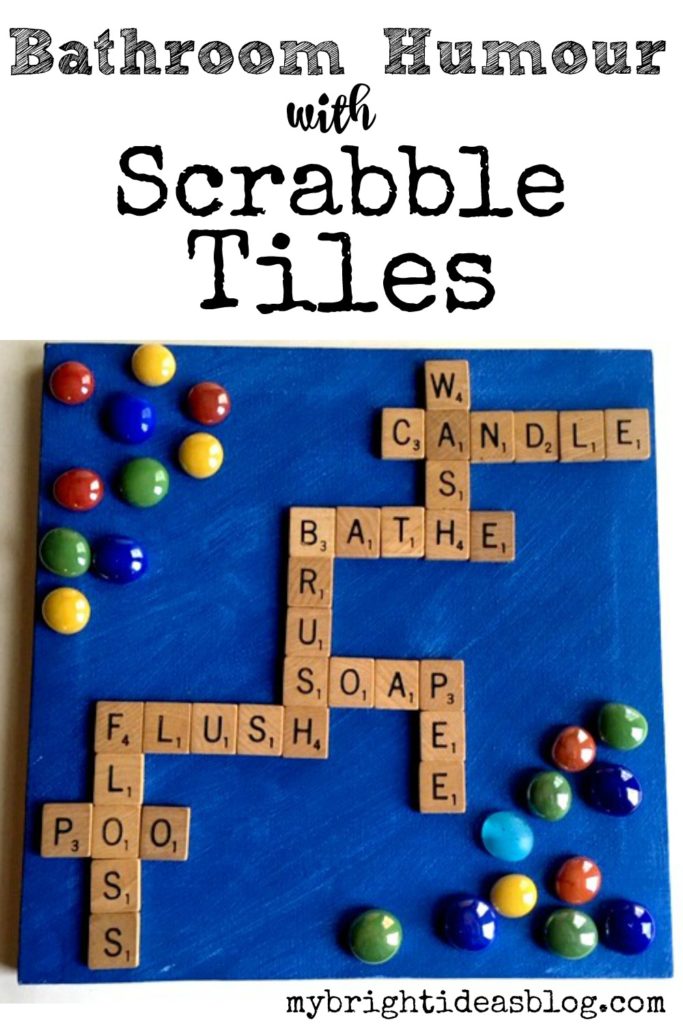
Spread out your tiles and see what sort of bathroom words you can find.
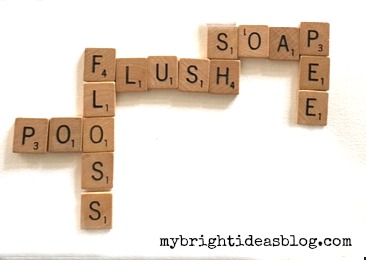
Pee, poo, aim and flush are my best toilet words. Shower, wash, bathe (or bath), soap, bubbles, shampoo, tub etc. for the bathtub words. Brush, floss, gargle, spit for the dental hygiene words.
After you have found the letters to your favorite words you need to make them line up with other words on your canvas or board. This can be a bit frustrating.
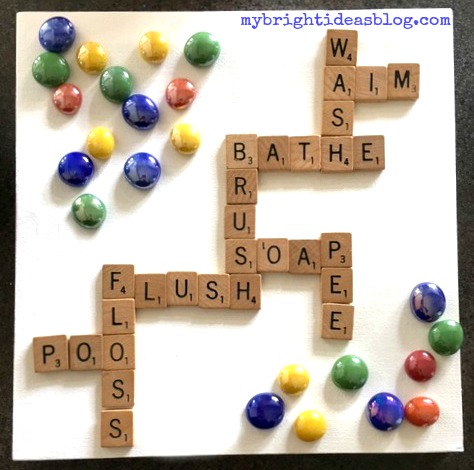
I tried some random craft supplies before I settled on the bright glass stones and blue paint.

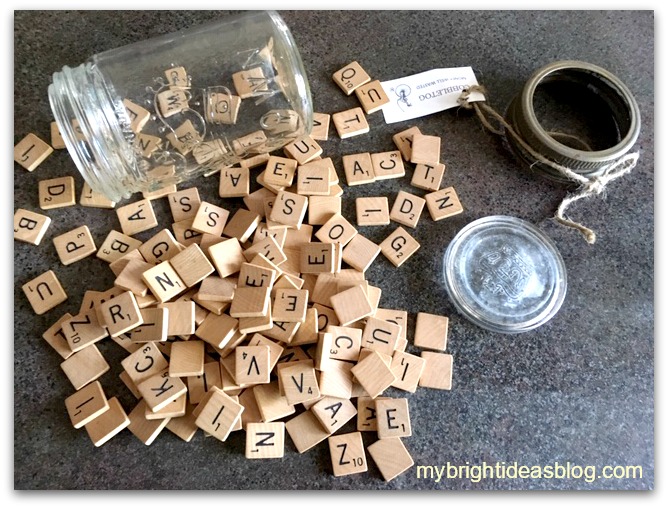
Since I hadn’t painted it yet I needed to carefully remove the tiles and set them aside while I painted my canvas blue. It dries very quickly.
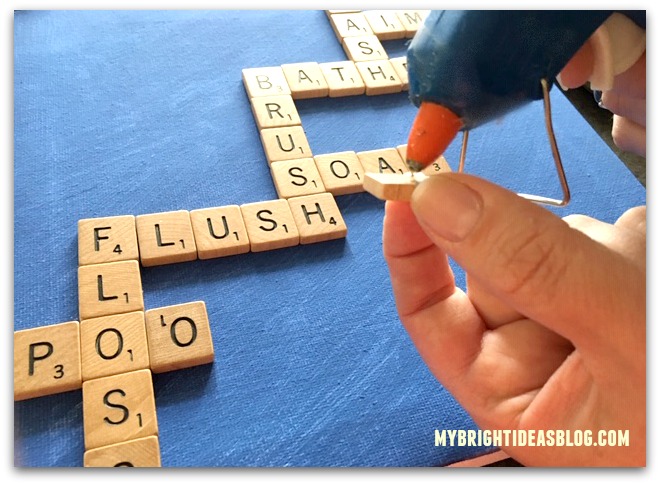
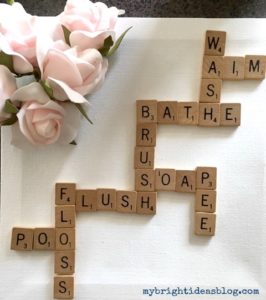
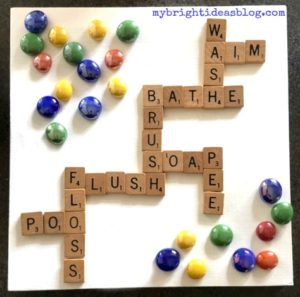
Then I recreated the words in the right order and using a hot glue gun, glue each peice into place.
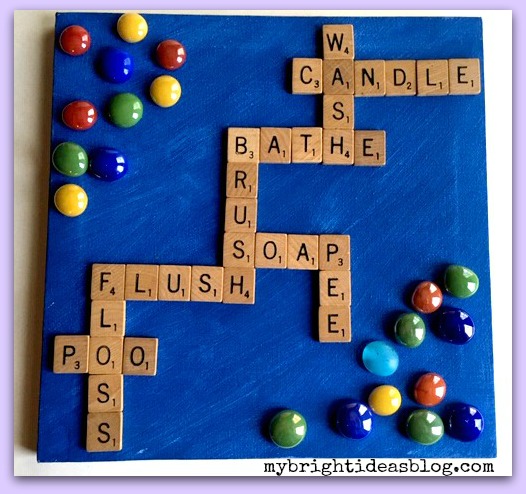
And there you have the final product! I thought the blue represented water and the glass stones were bubbles.
…
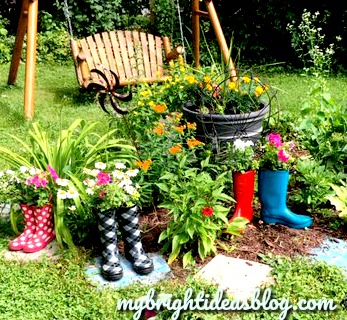
Add Colour to a Garden with Rubber Boot Flower Pots

Check out the colour added to my garden by turning old rubber rain boots into flower planters!
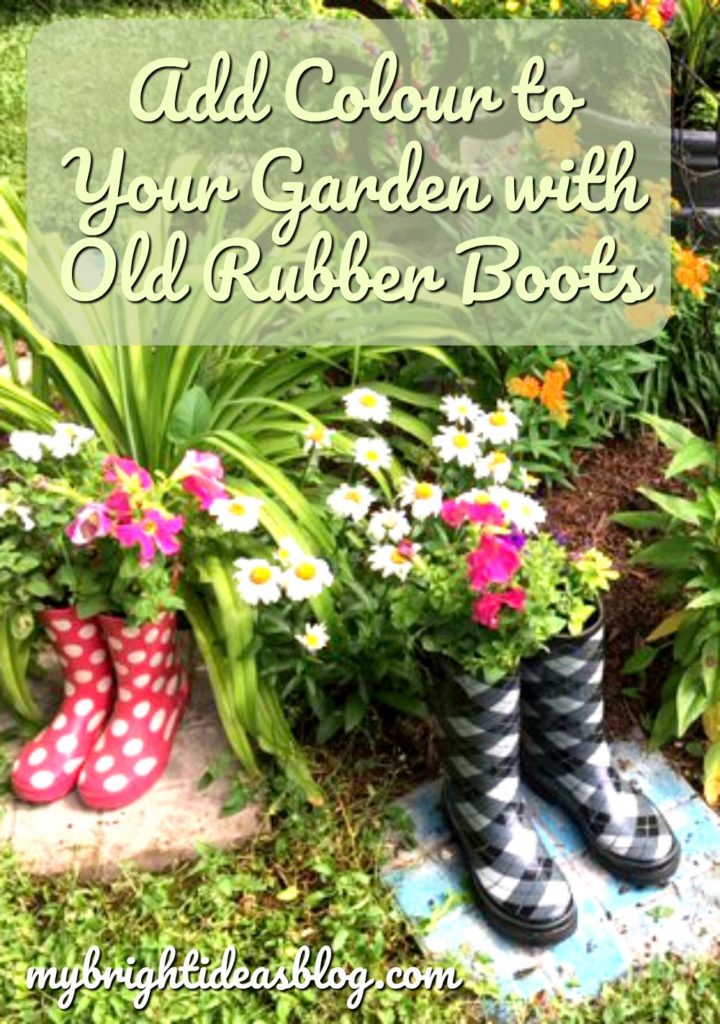
In an effort to declutter (an impossible goal for me I’m affraid). We found some rubber boots that we no longer needed. Three pairs of wellies we don’t use because the kids outgrew them or we just realized even in the rain we have other footwear options we would rather wear. The patterns on two pairs were really cute and the third pair was a classic old black pair. Why not turn them into something fun!
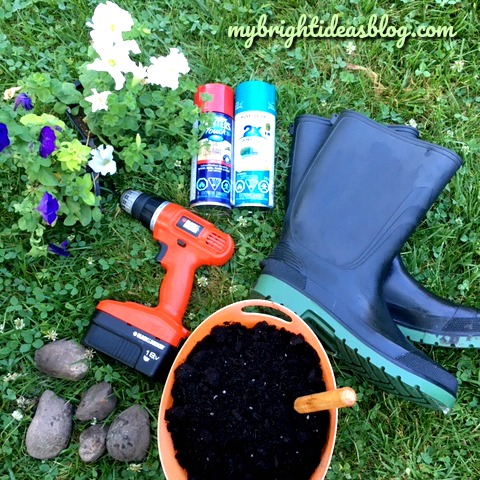
For this project you will need:
- old boots
- rocks
- sand/dirt mixture
- soil
- flowers (real or artificial)
- drill or screw driver
- spray paint (optional)
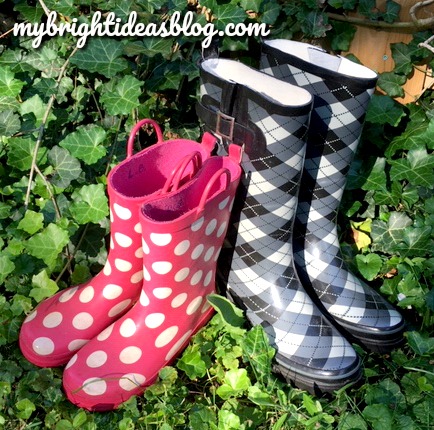
Don’t buy new boots for this project. If you don’t have any to upcycle go to the thrift store and look for a pair. They make rain boots in adorable colours and patterns, especially the children’s sizes. Even plain toddler yellow rain boots would look fantastic in the garden. I wish I had saved the girls smallest sizes. They were so adorable and small!
Before you get started, use a wet rag and wipe them clean…especially if you are spray painting them.
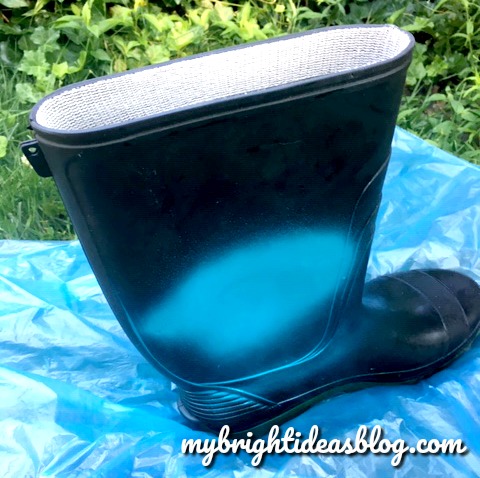
If you need to spray paint the boot, of course, do that next. Outdoors on a drop cloth or plastic. Don’t wait to start this project on the hottest day of the year. Our temperature yesterday was rising past 38 degrees Celsius (100.4 degrees Fahrenheit) and the spray paint would not dry! I have never had that happen before…and I have been spray painting things for years!
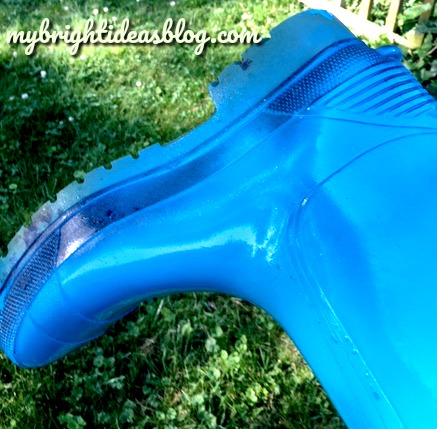
To get the bottom edge and toe of the boot put your hand right inside and turn it upside down for the second coat of spray paint. Allow to dry completely.
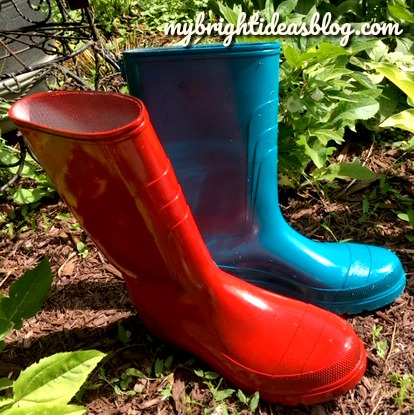
I painted one red and one turquoise. It doesn’t take much spray paint so you can use a colour in a leftover can from another project.
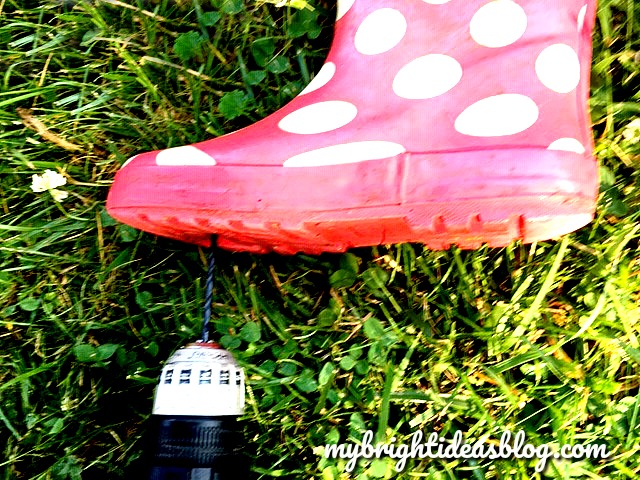
To prepare the boot for some drainage first remove any insoles and then put 3 or 4 holes in the bottom with a drill or screw driver.
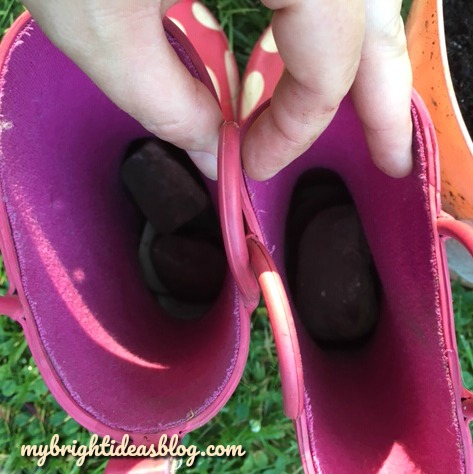
The next step is to put a few rocks in the bottom. This will help excess water drain away from the roots and to make it bottom heavy. If you happen to have sand or a mixture of soil and sand add a few inches of that over the rocks.
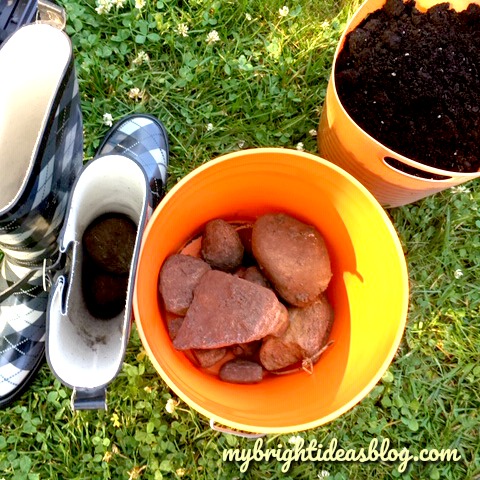
Then add the soil on top leaving several inches from the top of the boot.
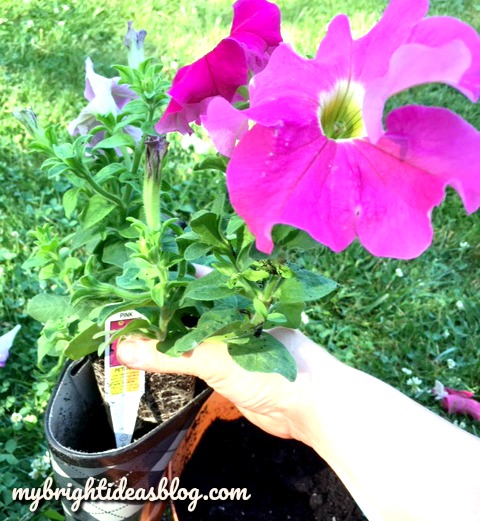
Next add some flowers. I chose petunias because they are so easy to care for and they will fill out the container nicely.
Place the flowers in the top of boot and add soil in any spaces around the plants.
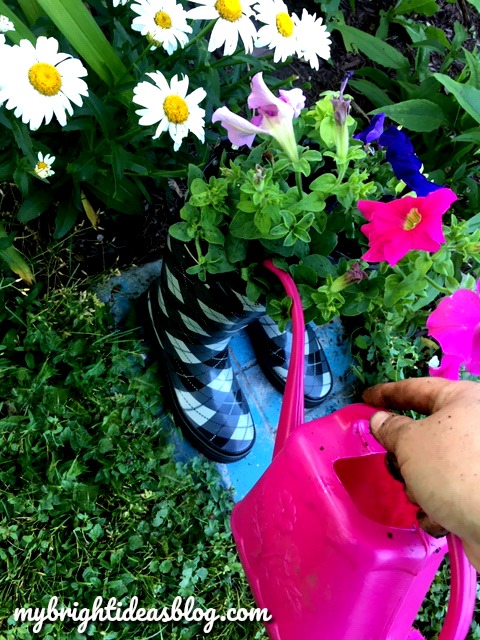
Thoroughly water! Every time you water it, have a look to see if the soil settled. You might need to add more soil. These are unusually tall planters.
Once every other week, add a bit of fertilizer.
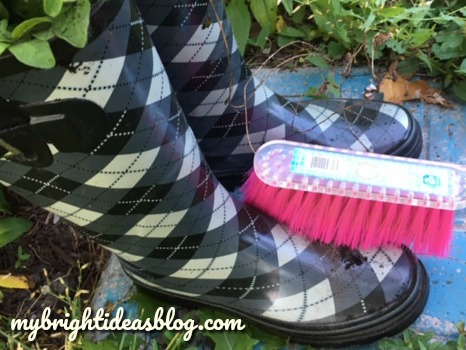
Get a whisk or small broom and clean up the boots.
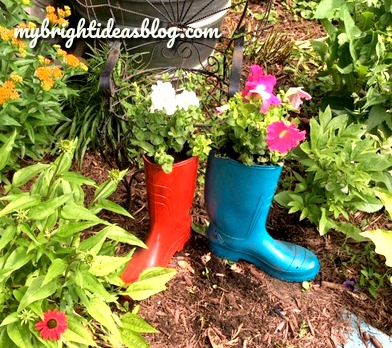
These would look great anywhere in the garden or next to a fence or on the front porch. Wherever you need some colour. I have a bare patch in a garden that looks like it needs a bit of colour.
By dinner time, my daughter looked out the window and said, “what are all those rainboots doing in the garden?” Tee hee hee!
I love to add colour to the garden. Have a look at some of the other posts I have shared to show more ideas for colourful summer projects.

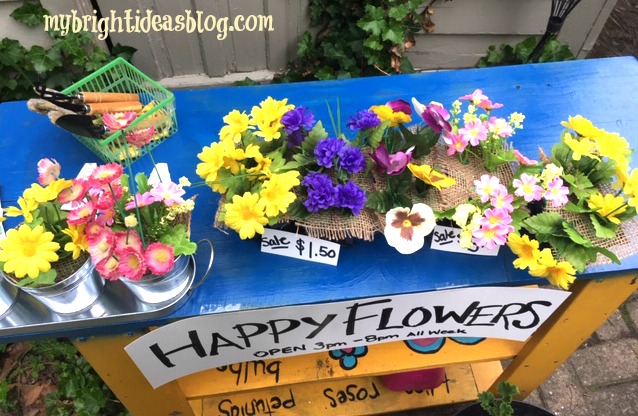
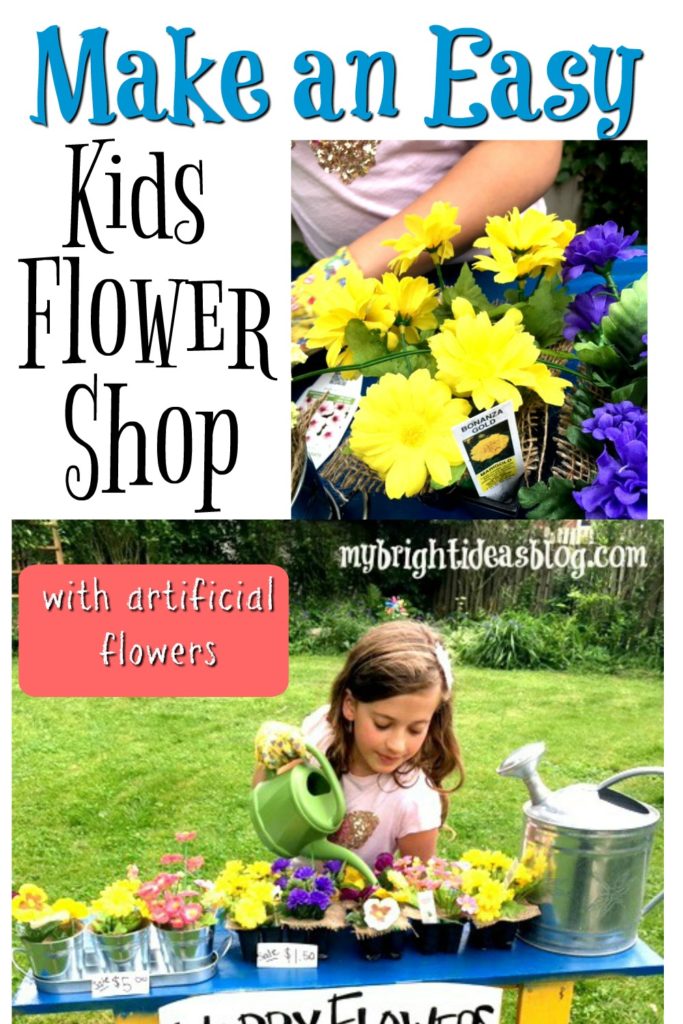
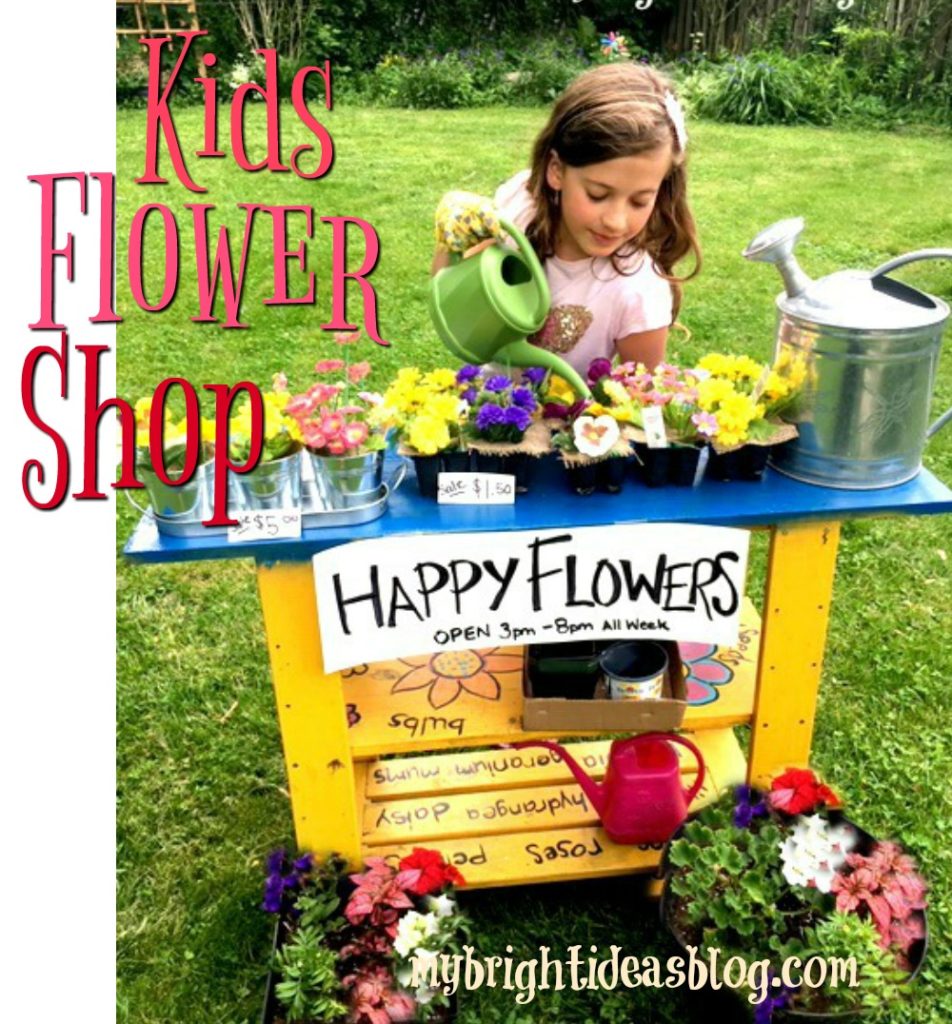
Create a Flower Shop Play Centre
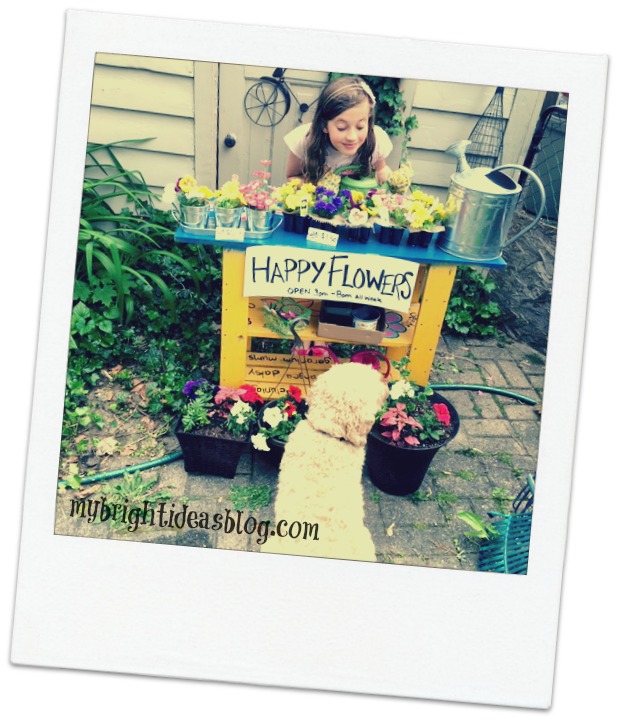
Watching my girls play in the backyard from my kitchen window sparked a great idea this week! Create a garden centre or flower shop for the kids. Using artificial flowers from the dollar store and a few other gardening things we can create a little centre for themselves. You can use real flowers too but this set up should last me a few years!
Several years ago I made a potting table out of a simple wooden shelf I wasn’t using anymore. Click on the link below to see how that was created.
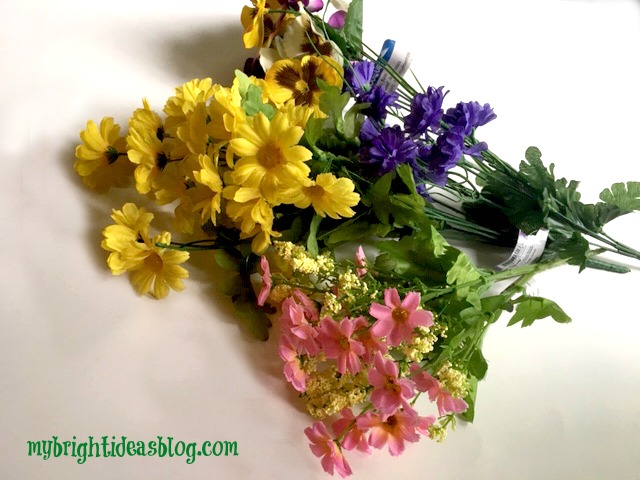
Next we need some flowers! I went to the dollar store for a few bunches of flowers that looked like something I actually have in my garden.
For this project you will need:
- several bunches of artificial flowers
- empty plant containers
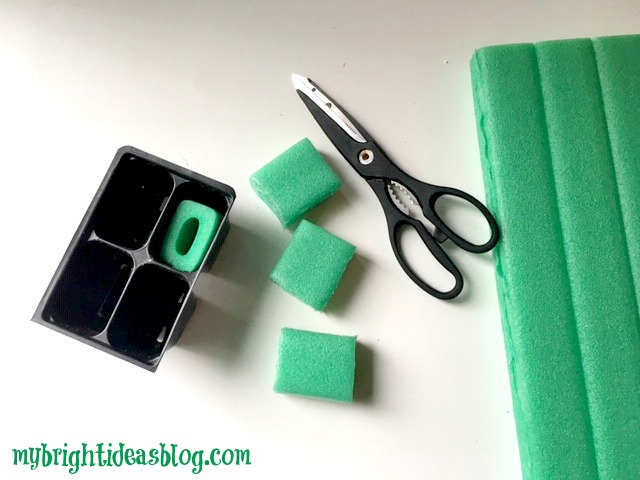
- foam knee pad or pool noodle
- scissors
- wire cutter snips
- burlap (optional)
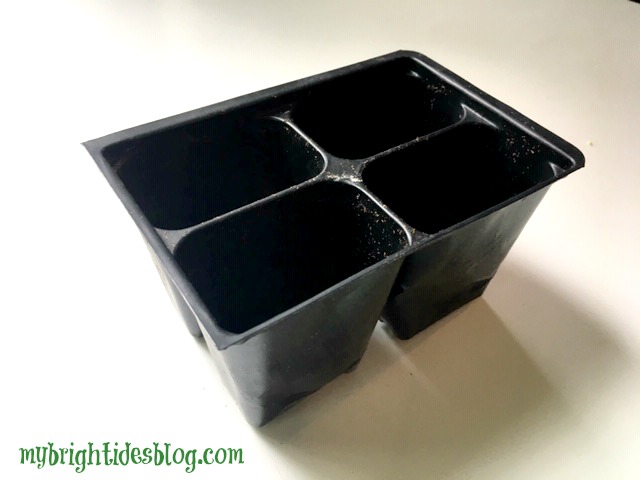
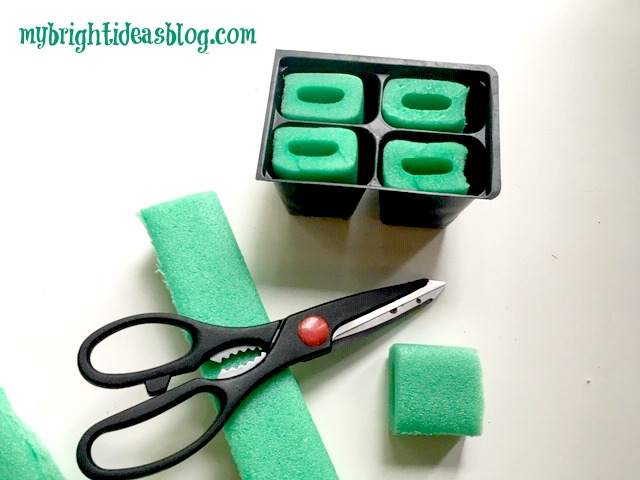
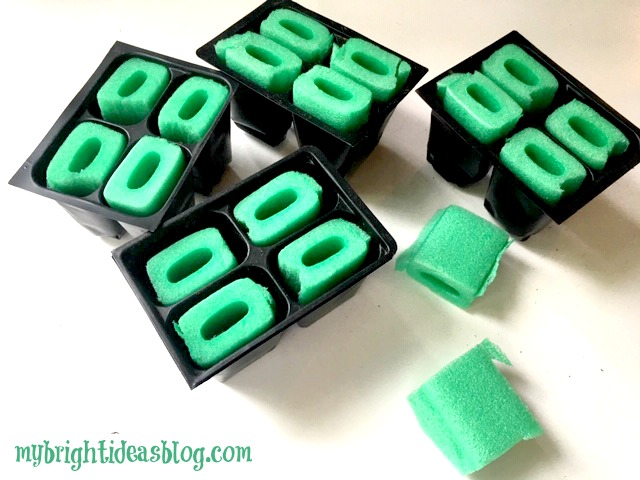
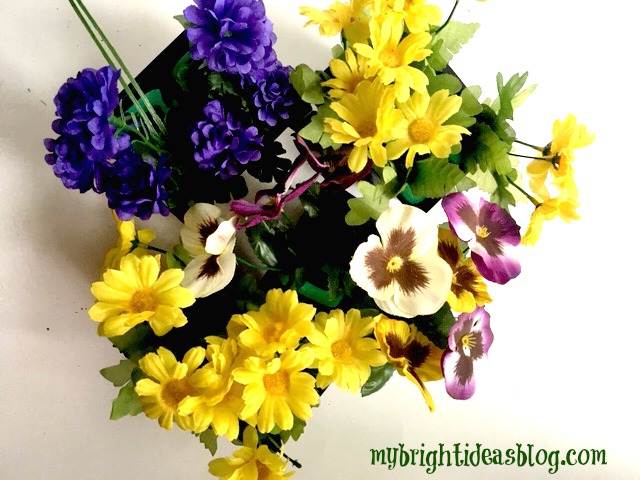
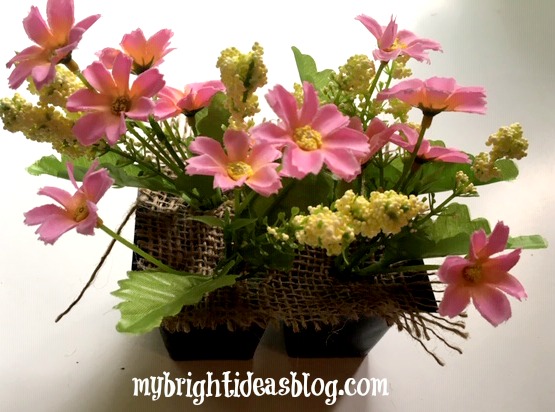
These are called 4 cell planter trays but you can use other sizes.
Every year the girls don’t want me to throw out the plastic containers that come with the little flower and vegetable plants we buy at the garden centre. They want all the little tags that come with them too so they imagine they are selling the flowers. After seeing them rearrange the empty containers imagining they had flowers in them-I thought why not get some dollar store fake flowers and make it more realistic for them.
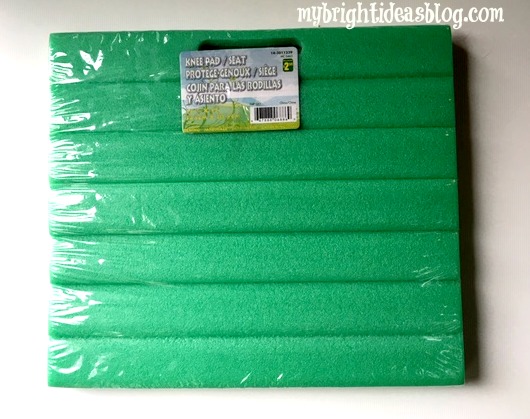 As I wandered around the dollar store I considered how I could get the flowers to stand up in the plant trays. I came up with this! A foam knee pad/seat pad.
It’s similar to a pool noodle but I thought this size would fit really well into my plant trays and I was right!
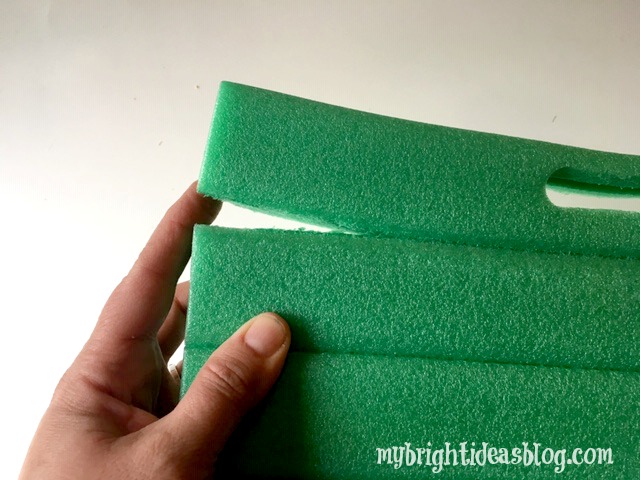
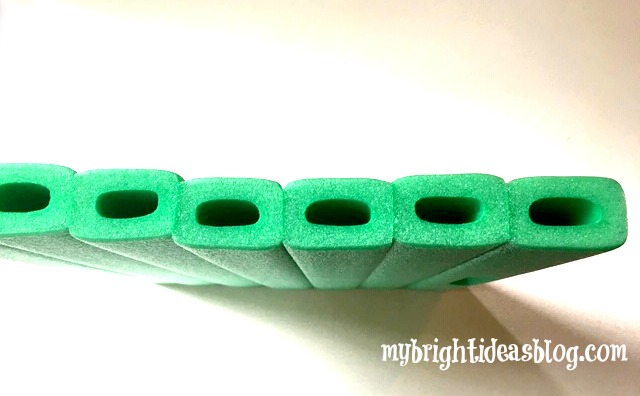
First of all, pull the sections of foam apart.
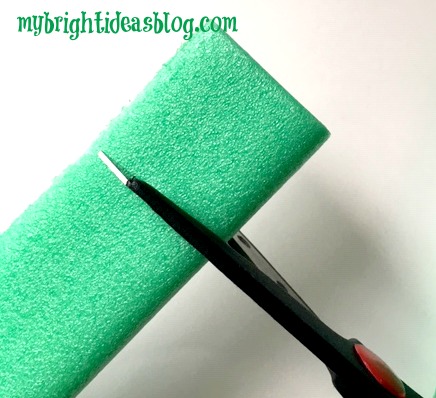
Then get your scissors and snip it 1 and 1/2 inches or 3cm long.
Test out the height and cut some more.
This is so easy. Just keep cutting off more. I wanted to give the at least 5 of these for their store. I might make even more…
Now for the flowers!
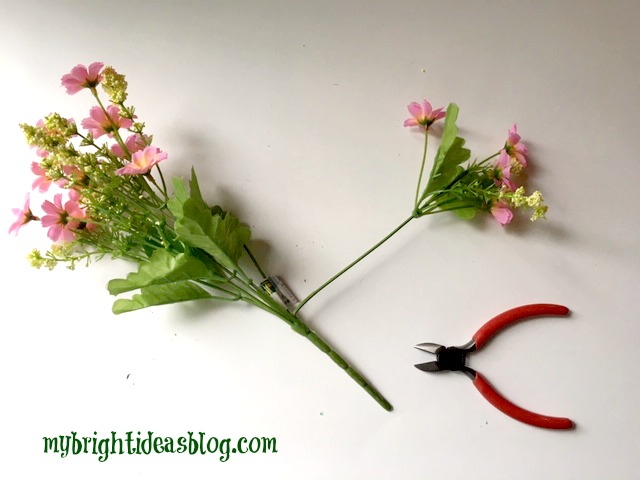
I started by bending out the branch of the flowers.
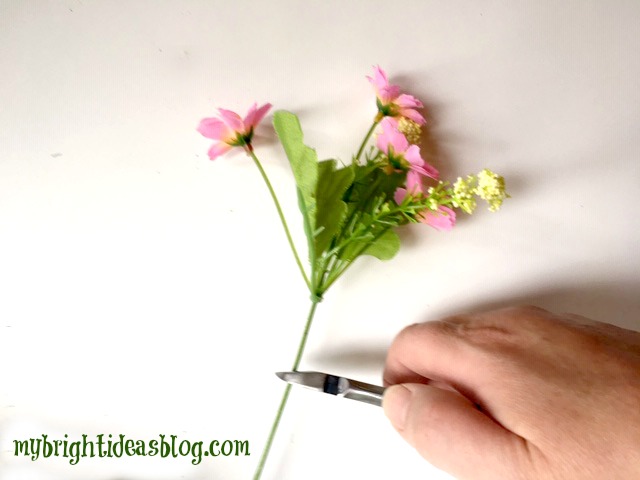
Snip it off several inches below the flowers. If you cut it too long, you can always bend the ends. I would rather they are too long than too short so the girls could make a little bouquet later or use them for something else.
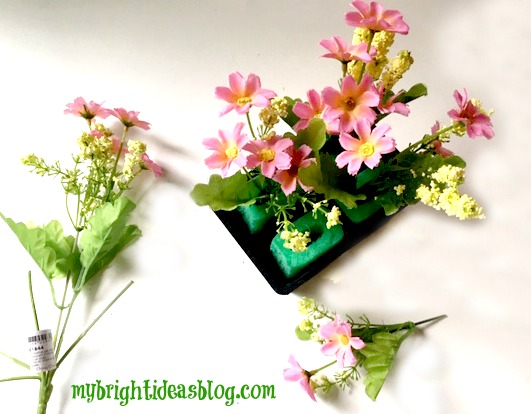
Now test it in the container and see how it looks.
This looked pretty good but I thought since I have a huge scrap of burlap waiting to be used. Why not add burlap to the top.
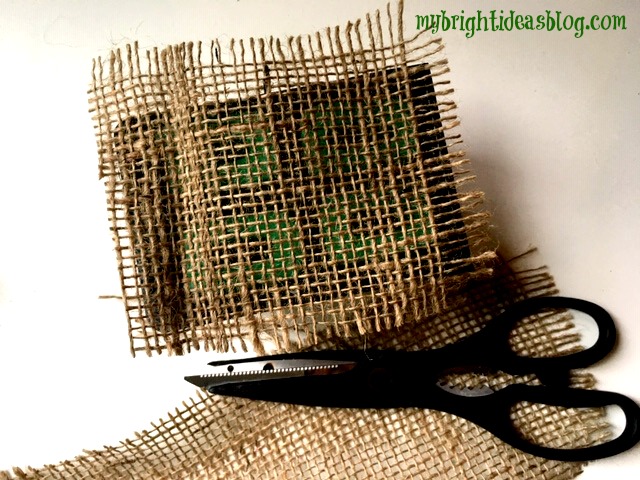
Cut that to size. It doesn’t have to be perfect.
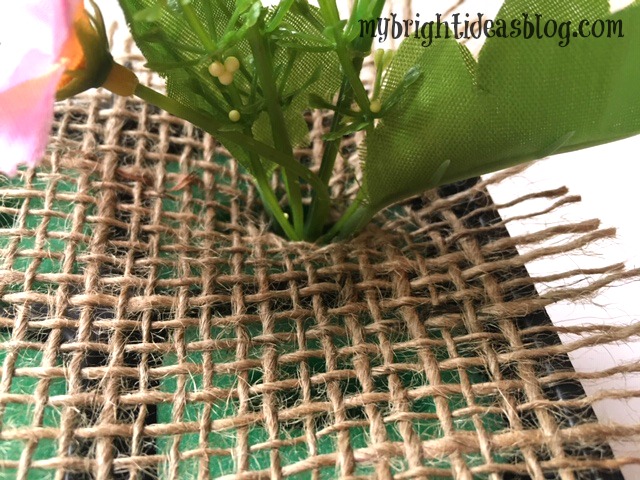
Next poke the flowers through the burlap.
Voila!
You could hot glue all of it in place or you could just leave it so the kids can rearrange it and tend to their flowers.
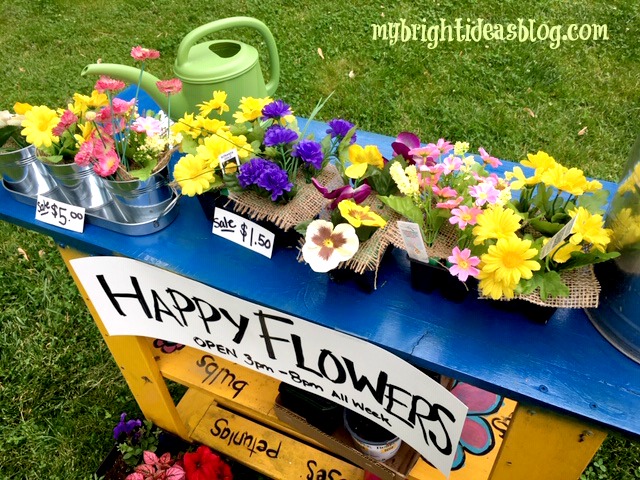
Next we set up shop on the table and added some signs.
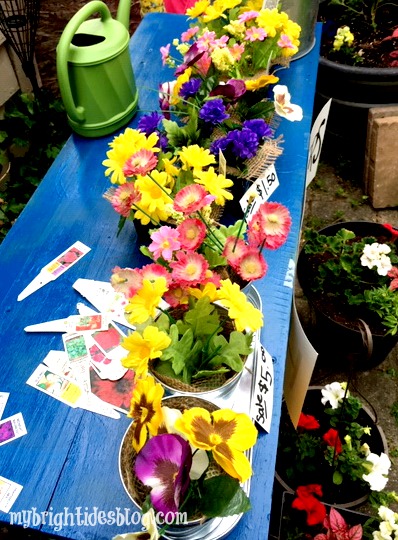
My kids also save all of the flower tags that come with every plant to tell you how much sun or shade it should get.
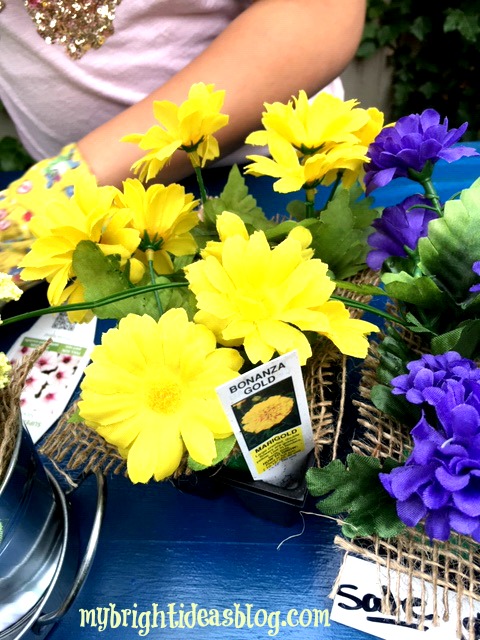
…So we tried to match up some to the colors of the flowers we had for our imaginary store.
If you don’t have the 4 cell-planters you can use any small containers. You could use a pool noodle or Styrofoam from packaging in a bigger one or several small pieces of foam to fill a bigger pot.
Also, look around for other gardening items you have for the store. We had gloves, a mini shovel and rakes and watering cans.
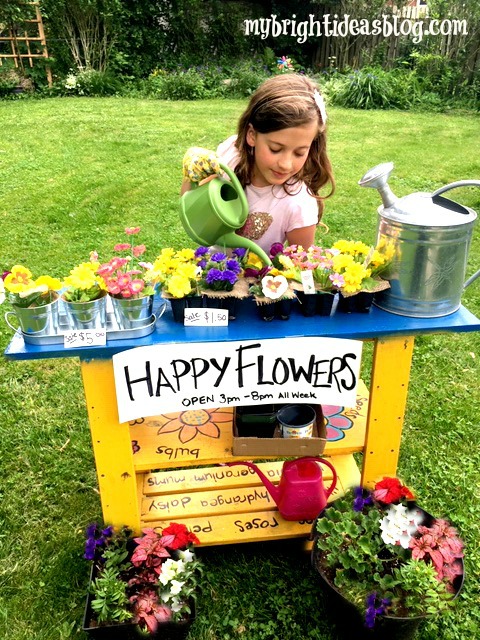
Hopefully, this inspired you to get the kids out playing with their imaginations.
…
How to Spray Paint Deck Chair Cushions
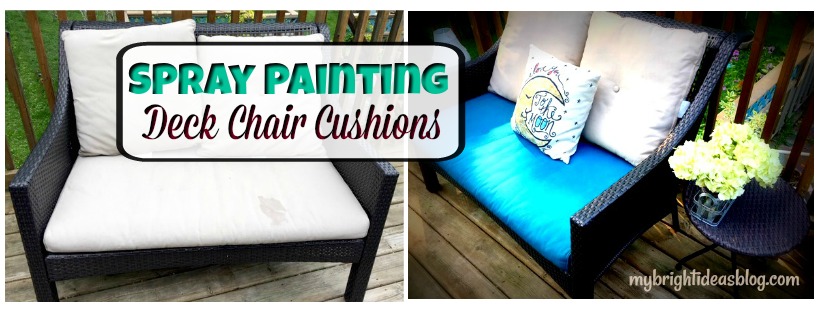
Have you had nasty stains on your deck chair cushions. Leaving them out in the rain is part of the problem, or people spilling their dinner, sticky fingers and the kids sitting on the chair immediately after applying spray on sunscreen…. Grrrr
So you could just buy new cushions but that is gonna cost ya! As a bit of a cheapskate I would like to get another 2 or 3 years out of these ones.
My solution is to spray paint…I tried 2 brands and let me tell you about how it turned out.
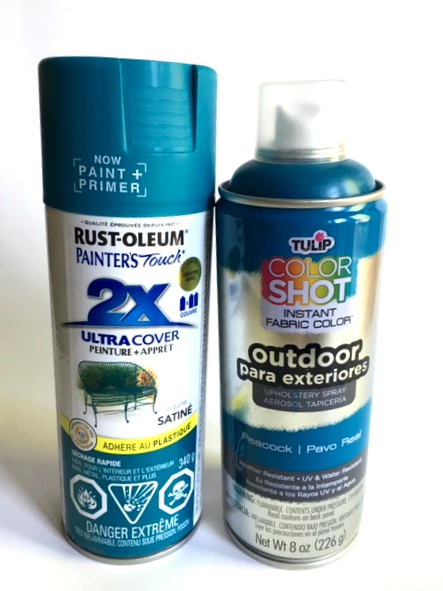
I’m comparing these 2 spray paints.
Rustoleum Painter’s Touch-Satin-Lagoon
and
Tulip Color Shot Outdoor Upholstery Spray-Peacock
The truth is the reason I tried 2 spray paints is not simply to experiment with different paints. I didn’t buy enough and ran out of my first bottle and couldn’t find another store that sells it. Fortunately, I found almost the identical color with another brand so I could finish the project.
So let’s get started!

So here is the beige cushions that I have started out with. We bought this loveseat from Canadian Tire 4 or 5 years ago…so it has really lasted well so far. In the back corner you can see the water damage….this is the good side.
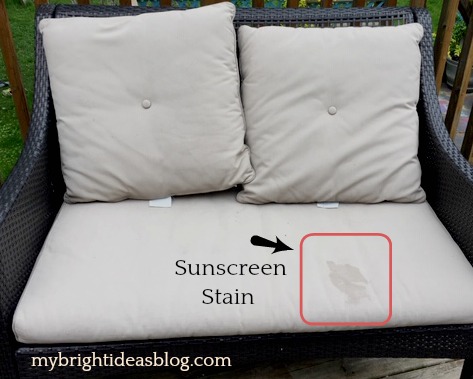
This year somebody left a big ugly greasy sunscreen mark. Hello summer!
If you chose a spray paint closer to your current cushion colour you might get away with just purchasing one bottle of spray paint but since my cushion is beige and I’m turning it so dark I need several coats. Definitely get 2 bottles.
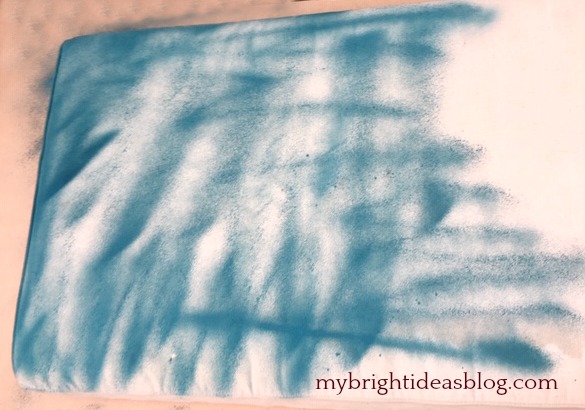
To start with I bought one can of Tulip Color Shot Outdoor Upholstery Spray- in Peacock blue from Hobby Lobby.
I love to spray paint things but this one is not even. This paint is supposed to make the fabric still feel flexible and nice to touch. But in my opinion, the way that it sprays is ineffective and wasteful.
This brand does not spray wide so you will get lines like the photo above. This is what the cushion looked like when my hubby came home and saw it. He wasn’t loving this idea. Pretty much it looked like I ruined it and now I’m all out of spray paint. One can covered the one side of the cushion and part of the second side.
I’m an hour drive away from Hobby Lobby so trying not to panic… I let it dry for several days while I searched to find a local store that sells it. No one near me sells it!
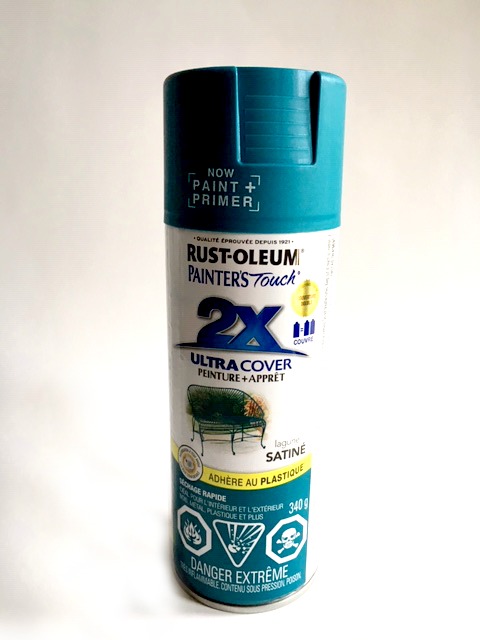
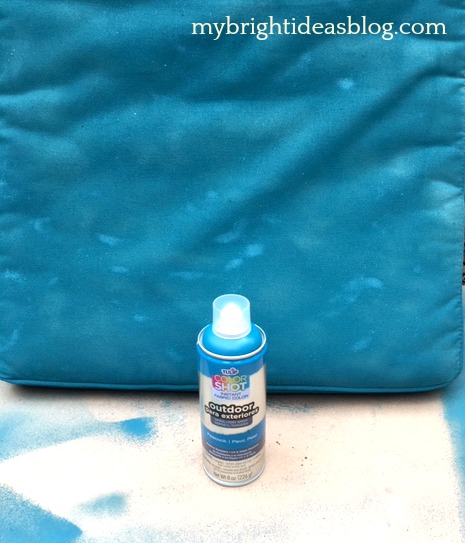
After checking 4 big stores I tried the little hardware store near to me. It has a great selection of spray paint. I took in my empty bottle and found a near perfect match with Rustoleum Painter’s Touch-Satin-Lagoon.
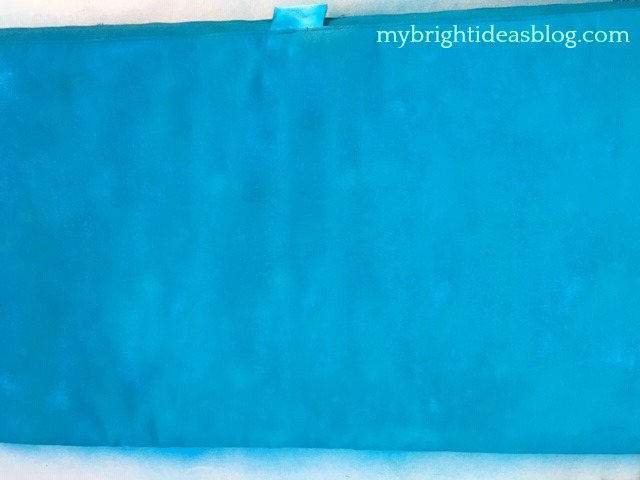
This spray paint has a wide even spray. It took a quick coat from this spray paint and it was nearly done. What a relief! An even and vibrant turquoise. After the paint dried it looked even better. It did need a little bit more coverage so it got another light coat of paint.
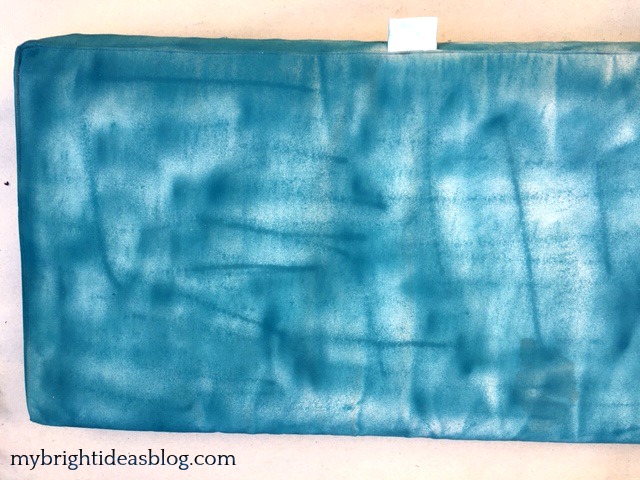
I would definitely recommend Rustoleum Painter’s Touch-Satin (Colour: Lagoon).

Looks fantastic right!?! Make sure you follow the instructions on your spray paint to see how long it would take to dry. I would make sure you have this project done several days before you have a backyard dinner party. You’ll want to make sure its fully dried. I have had no problems with the paint coming off on the pillows or anyone’s clothes. It’s really set and permanent.
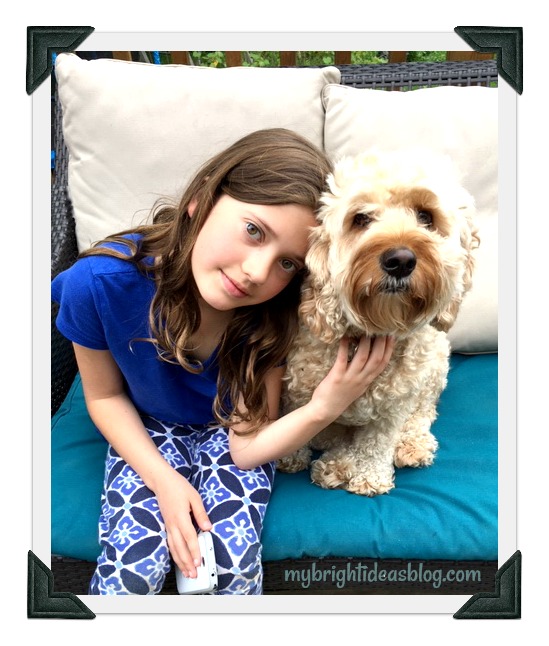
Gus approves of the new colour but lovely daughter M feels its not as soft to sit on. True enough, but I don’t mind how it feels. It’s a great solution to the stains and you can stretch the life of your current cushions for a few more years. Plus you could choose from a wide variety of colours and tape off sections to make your own designs.
Have fun adding color to your yard with spray paint…Lets see if I have some other ideas for adding color to things….
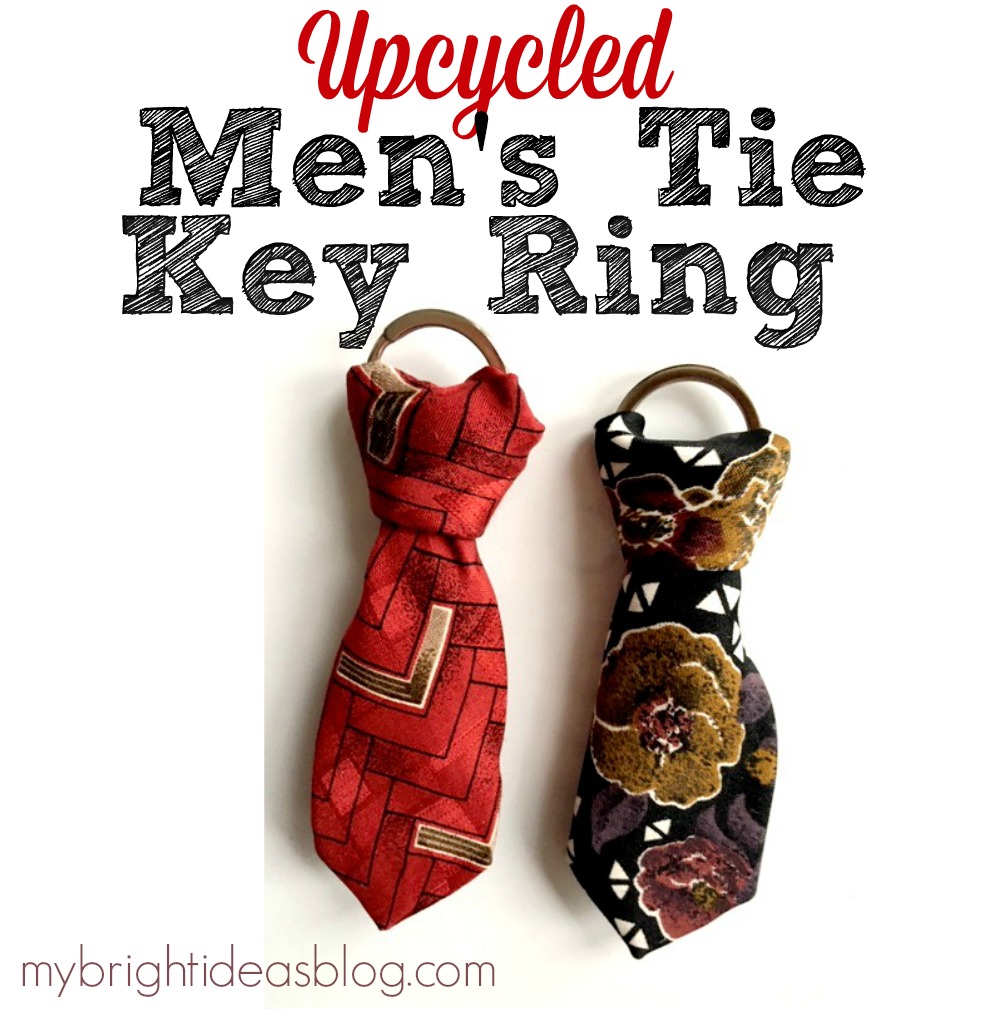
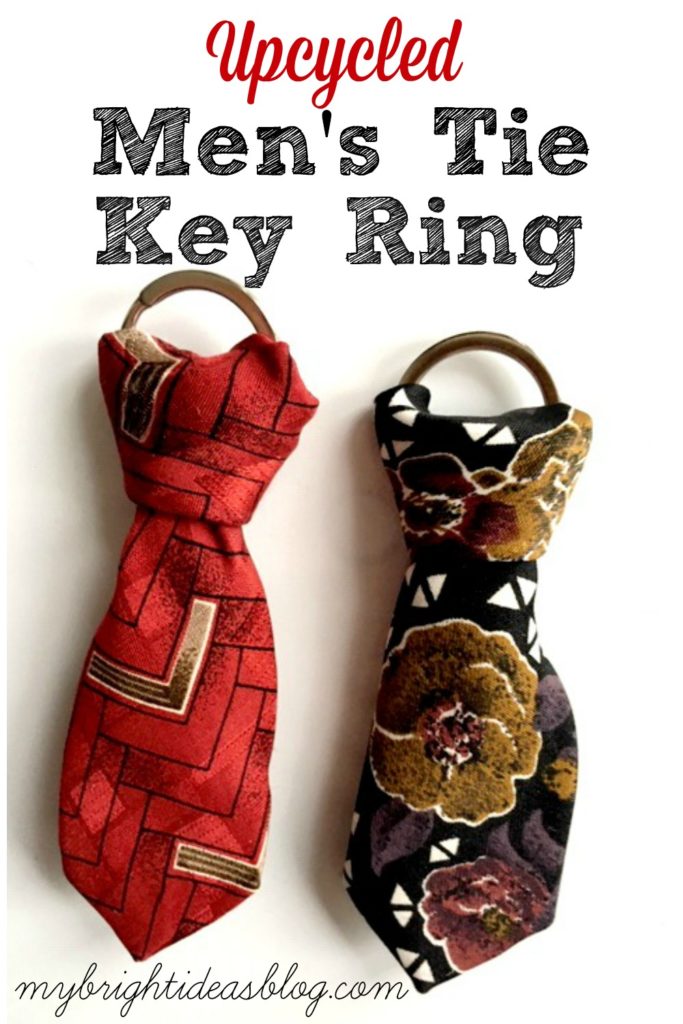
Upcycle Men’s Necktie for a fun Dad Gift Key Ring
Looking for a fun way to upcycle a men’s tie? Here is an easy and super cute idea to turn it into a key ring.
You will need:
- an old tie
- a key ring
- scissors
- needle and thread (or glue)
- ruler
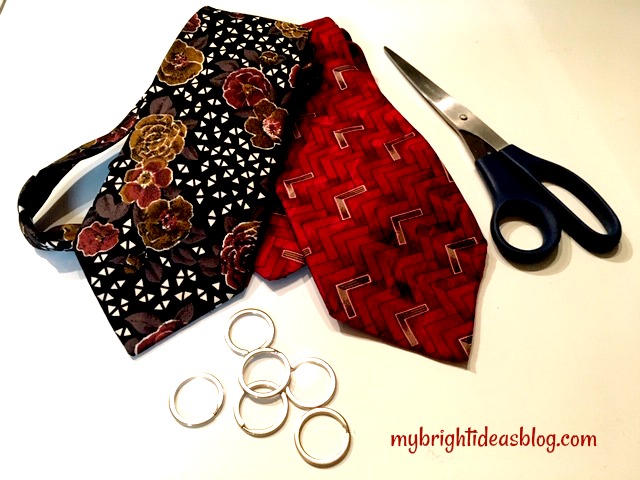
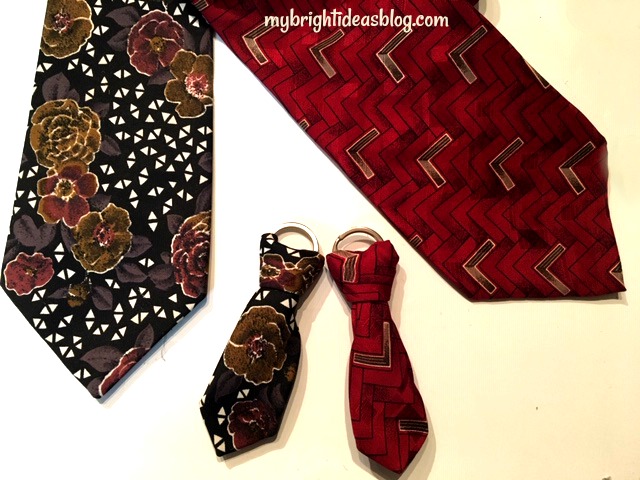
My hubby happens to have a lot of ties so he was willing to sacrifice these two ties for my project. Thanks dear!
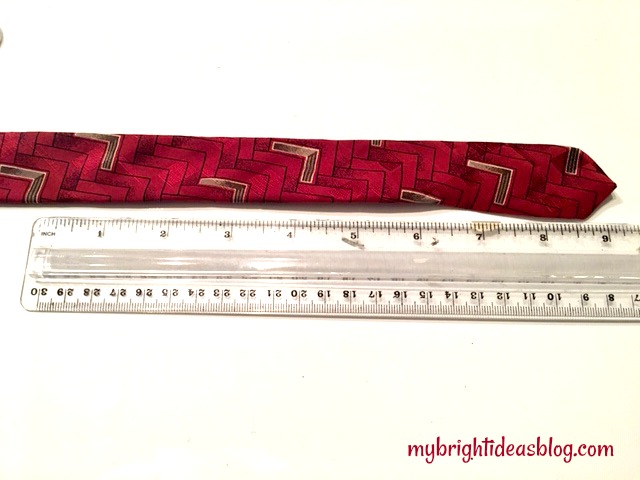
Cut the tie approximately 9 inches long.
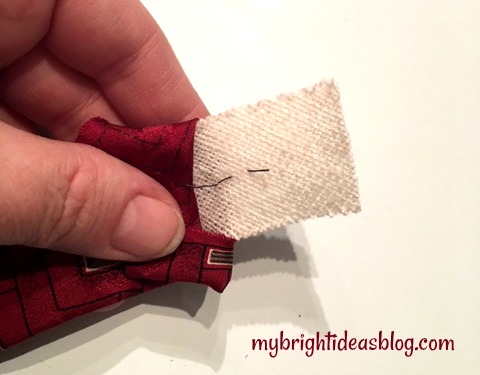
At the cut end, tuck the fabric out of the way and trim 1/2 inch (1cm) off interfacing that is inside.
Fold inside and tuck the fabric inside. You could sew or glue this end to make a clean edge.
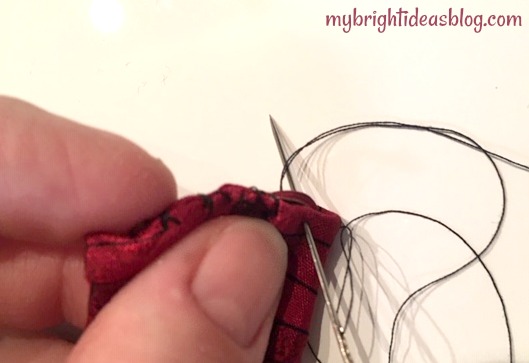
I sewed it with just a few stitches.
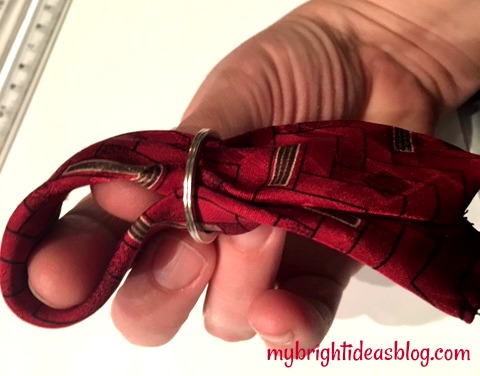
Next, fold the mini tie in half and slide it into the key ring.
Pull the ends through the loop to form a knot.
Pull the knot tight by tugging on the key ring. It looks like a proper tie knot without actually having to know how to tie it. The pointed end is perfect for the size of the key ring.
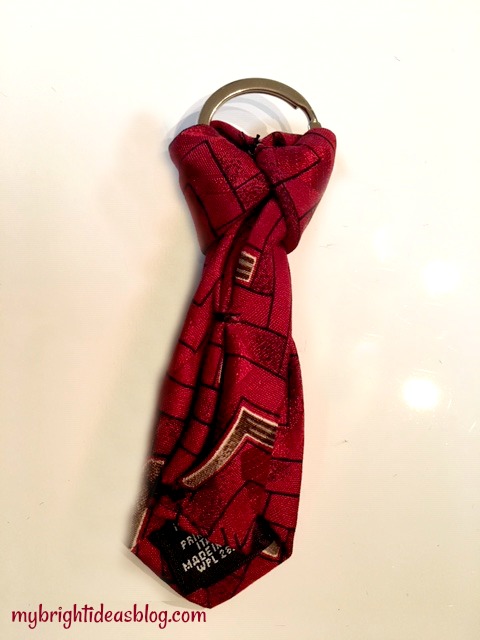
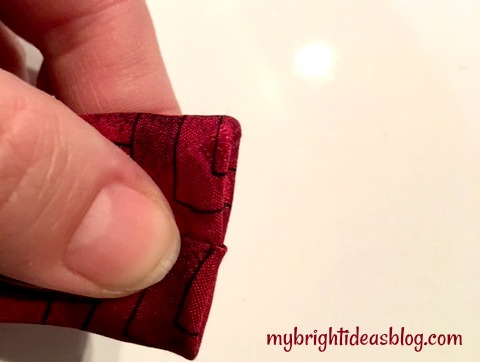
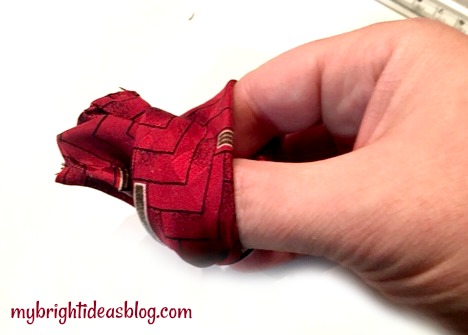
This is the back side of the tie. I added a few more stitches so the tie wouldn’t shift around, but that is optional.
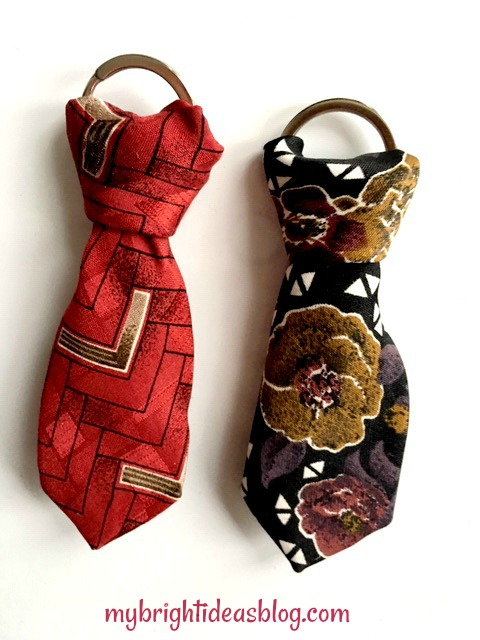
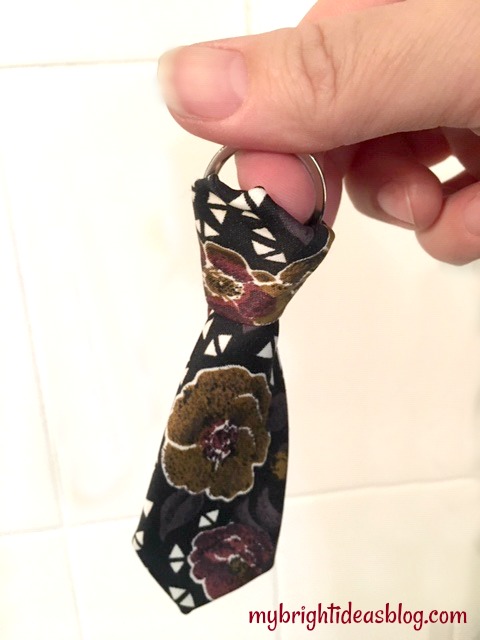
How cute is this?!?
Now there is still half of a tie left so I’m going back to Pinterest for some more ideas for tie upcycling. I will let you know how that goes!
…
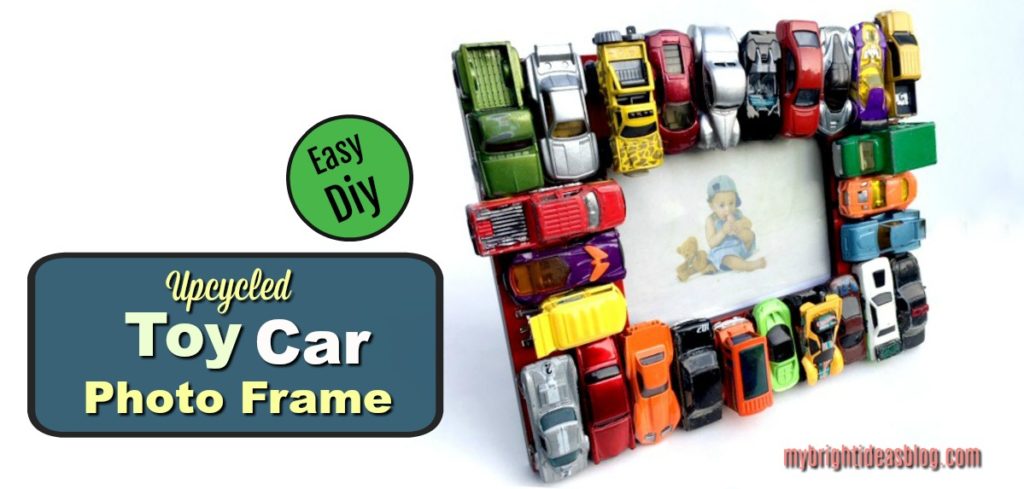
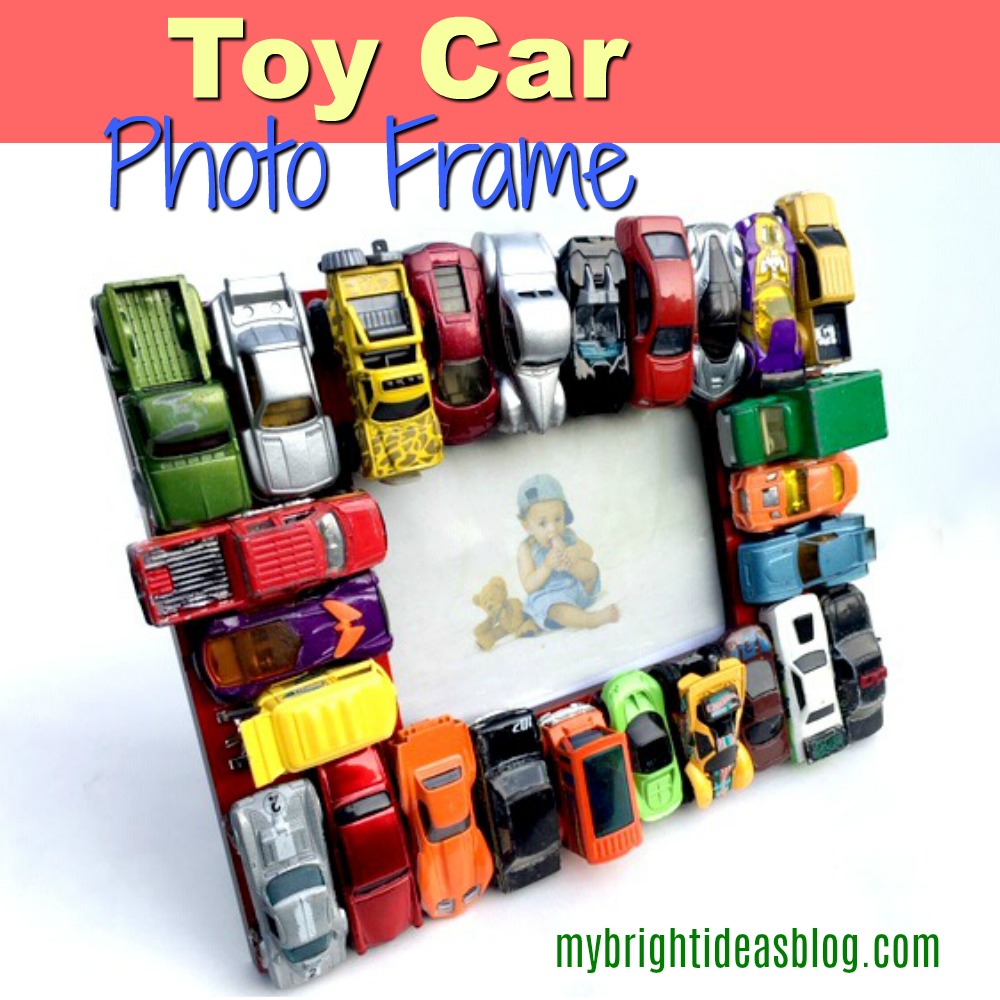
Upcycled Frame with Toy Cars
Ready for a super easy craft? You might have all of the supplies at home. If you don’t you can easily pick them up at your local thrift store.
To make an upcycled toy car photo frame you will need:
- toy cars
- picture frame
- spray paint
- hot glue gun and several glue sticks
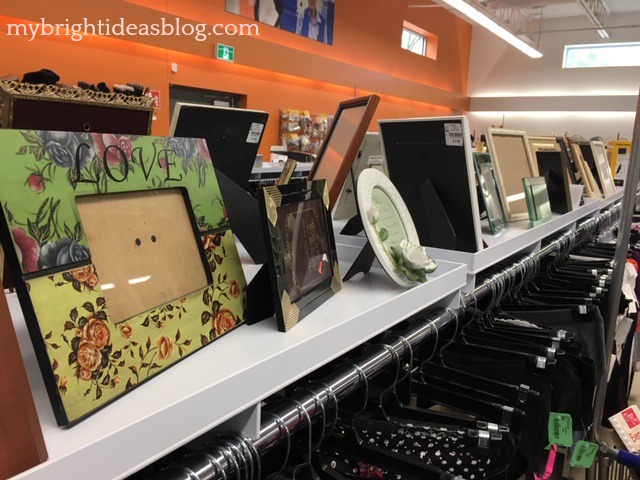
I wandered through a newly renovated Goodwill and that’s when I this idea hit me. Find a flat frame and glue something to it! Yeah! The frame I chose was really out of date with its flowers “Love” on the top. I thought it would be the perfect size to fit a parking lot of cars.
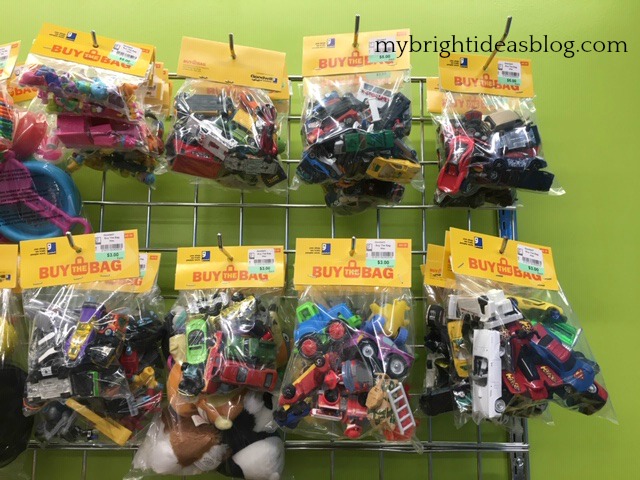
Then I went to bulk toy area and looked at the bags of cars! I chose 2 bags of cars for $3.00 each.
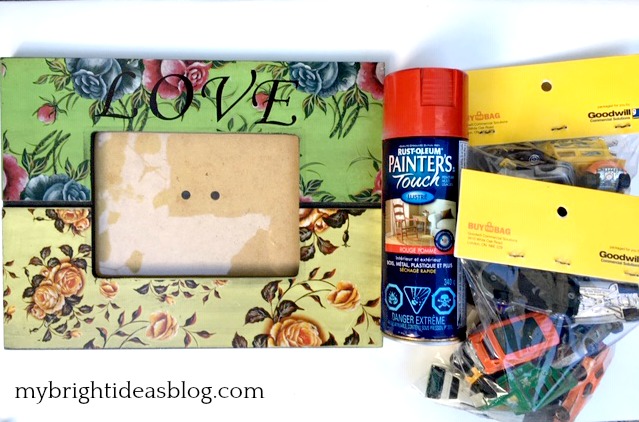
I brought everything home and admired it all….then located some left over spray paint in my painting stash. You don’t need much-so a bottle of spray paint left over from another project is perfect. I had a bright red Rustolium Painter’s Touch called “apple red”.
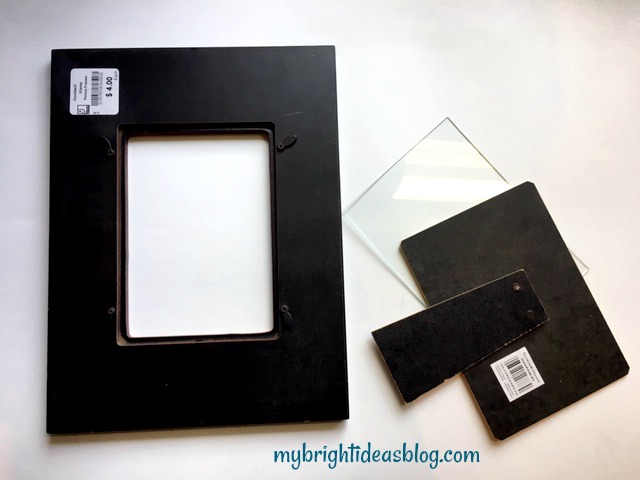
Take the backing and glass off of the frame and wipe it down with a damp cloth.
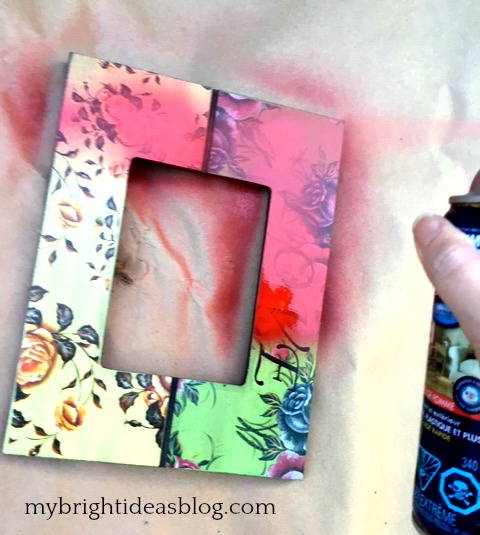
Shake up your can of spray paint and lay down some cardboard or news paper. Always spray paint outdoors on a day where there is barely any breeze.
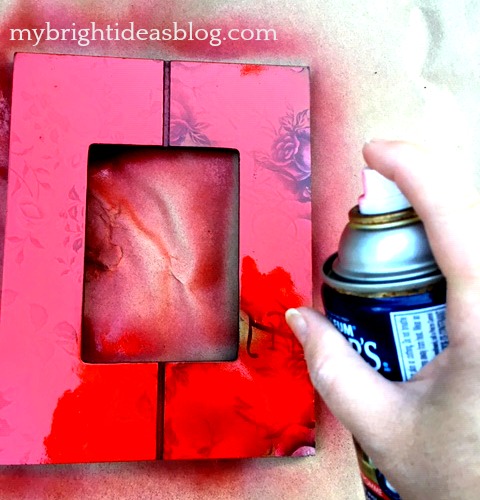
Follow the instructions on your paint as to when to do a second coat. The pattern on this frame wanted multiple coats. It is black on the sides and back so I just spray painted the front. It wasn’t perfectly covered with 2 coats but since we are covering it with cars I didn’t bother with a third coat.
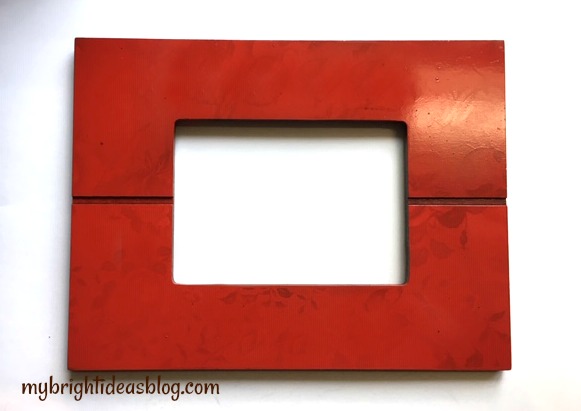
Allow it to fully dry before you begin the next step. I let it dry overnight. You can use that time to wipe down your model cars if they are dusty or sticky.
Now the fun part!
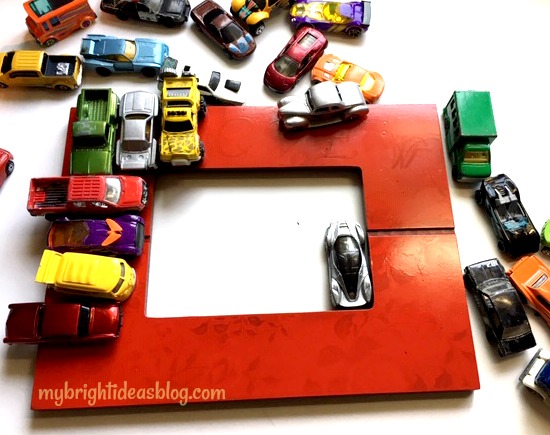
Arrange all the cars around the frame. I used 26 cars in total and would you believe my goodwill bags had 27. If your frame was narrower you could have them hood to bumper around the perimeter of the frame…like a traffic jam. This wide frame was a perfect for my parking lot.
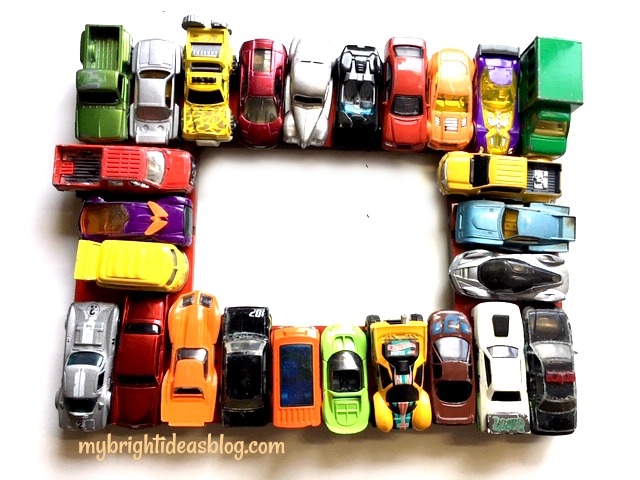
Watch for variety in color as you place the cars around the frame.
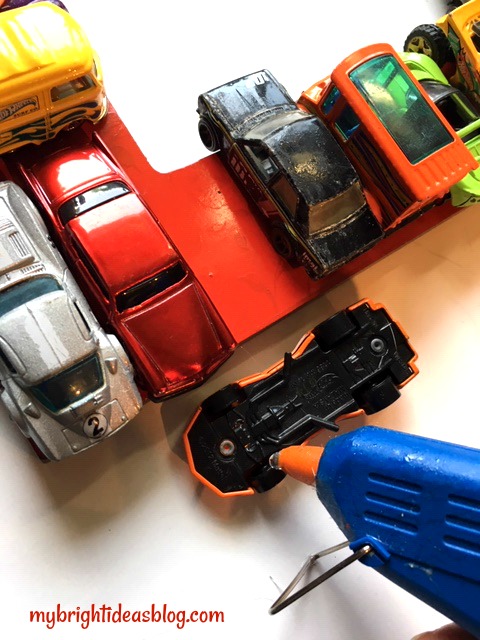
Next, you are ready to glue the toy cars onto the frame. Place a dot of hot glue on each wheel. These will be part of the car making contact with the frame.
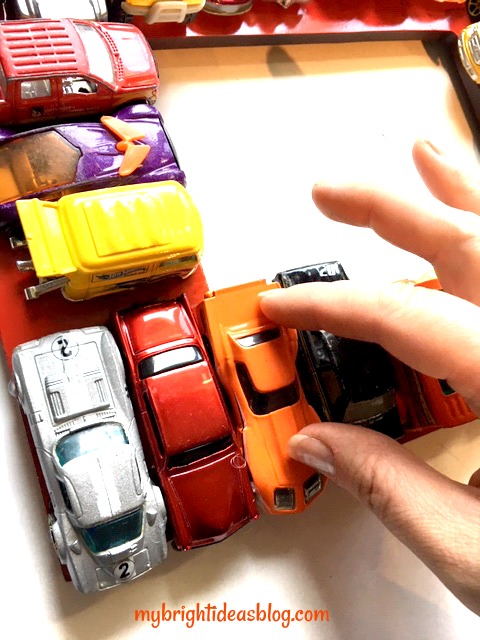
Put the car back in its place and press firmly. After attaching the toy cars and trucks all around the frame check each one again to make sure that they are secure.
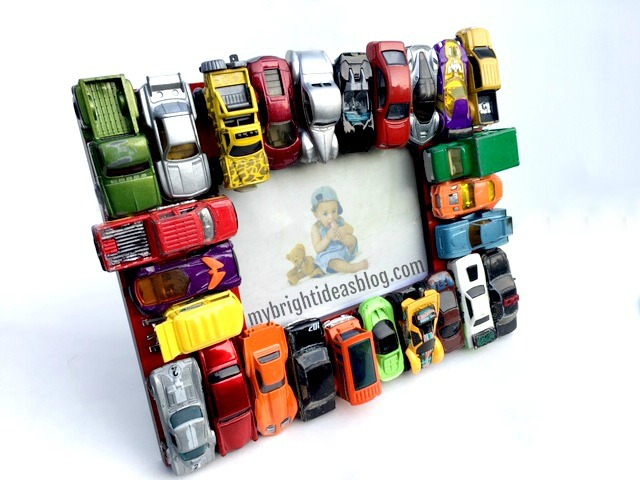
Since this frame will be sitting on a shelf I made sure that the bottom of the cars lined up closely on the bottom with no overhang. Otherwise it could be wobbly. Also, I should mention, that the frame is actually really heavy with 26 cars on it. Put it in a place where it won’t get knocked and fall on a toddler.

That is all there is to this project! Have fun!

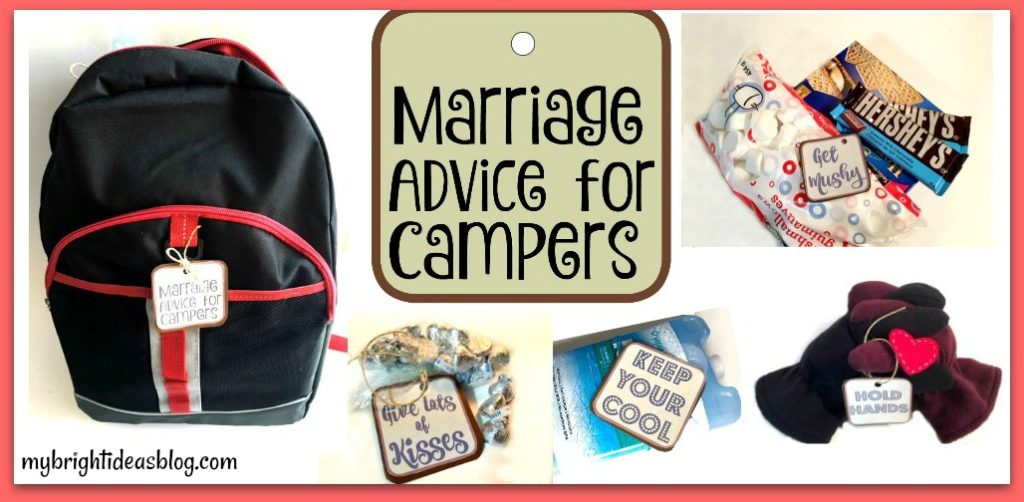
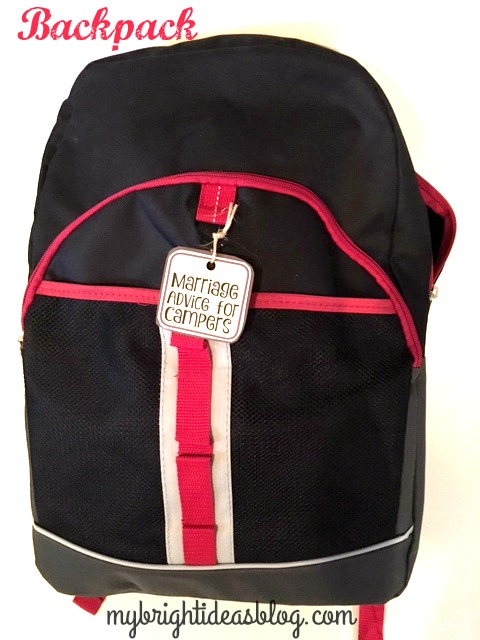
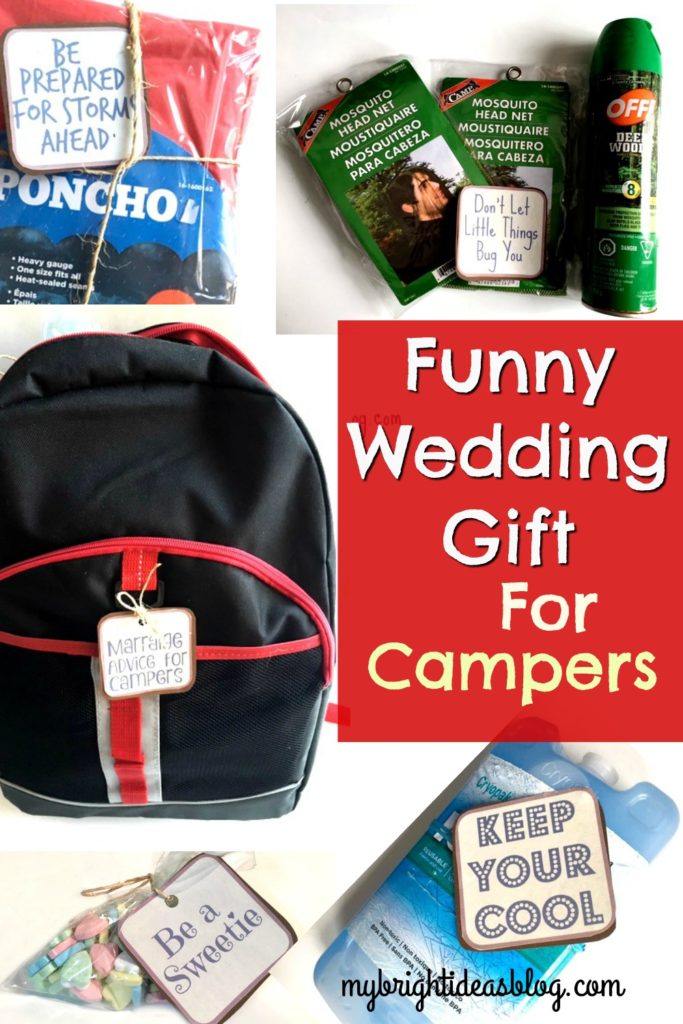
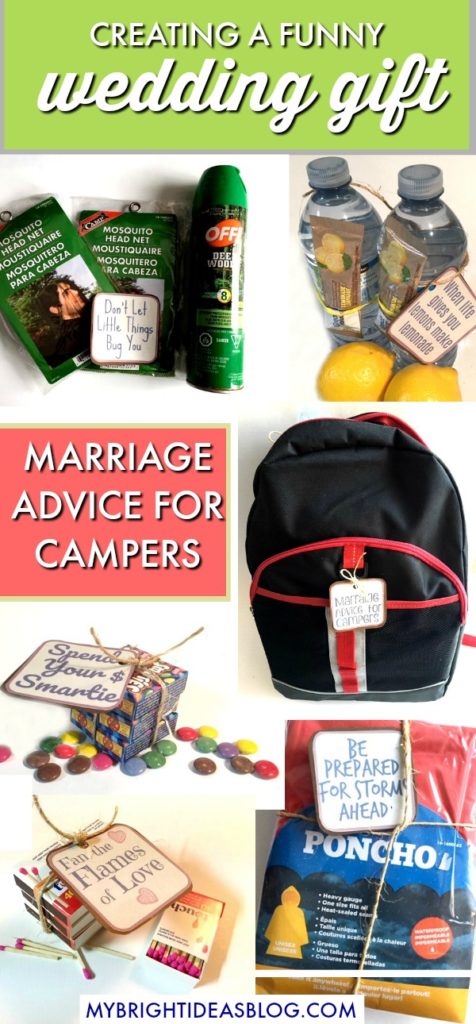
Funny Wedding Gift – Marriage Survival Kit!
Are you looking for a funny, creative, imaginative wedding or shower present that won’t cost an arm and a leg? I was inspired to make something completely different for my niece’s wedding. Since I am the nutty aunt lets give them something unusual, something they will really remember.
First of all, I want to give credit to my inspiration….I had googled funny wedding gifts and this is what I found.
http://creativetryals.blogspot.com/2013/05/life-is-picnic-marriage-survival-kit.html Everybody loves picnics!
and
http://creativetryals.blogspot.com/2015/05/happy-camper-marriage-survival-kit.html We are campers and the happy couple had posted some camping trip photos so this happy camper marriage survival kit seemed like a good fit for us!
I will warn you right now that this shopping list will have you zigzagging all over the store. Many of these items came from the dollar store and Walmart. Pick and choose the items you wish to add. When we had everything together we could barely zip up the backpack. Don’t feel you need to use all of our suggestions.
We are a religious family and so are the happy couple so we decided to include a few Bible verses in this light-hearted gift.
Wedding Gift Shopping List
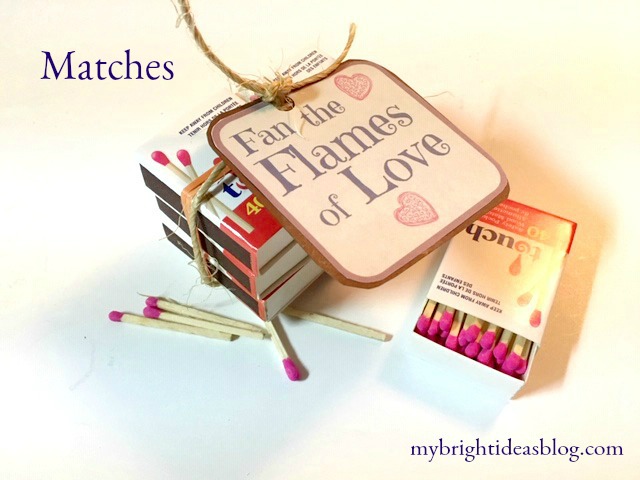
- cooler or backpack
- matches
- gloves or mittens
- band-aids or first-aid kit
- ice pack
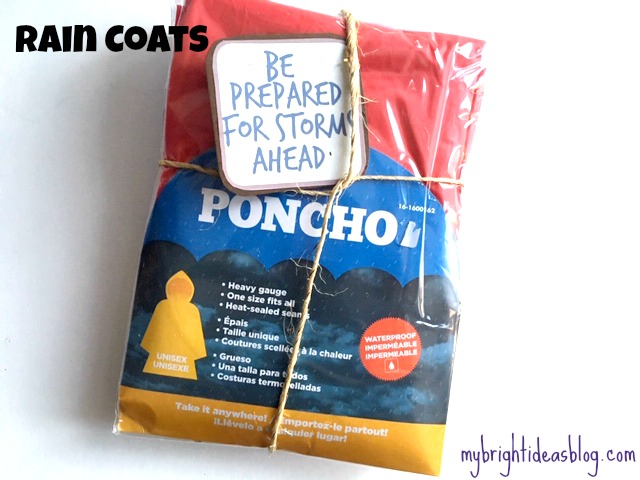
- rain jackets
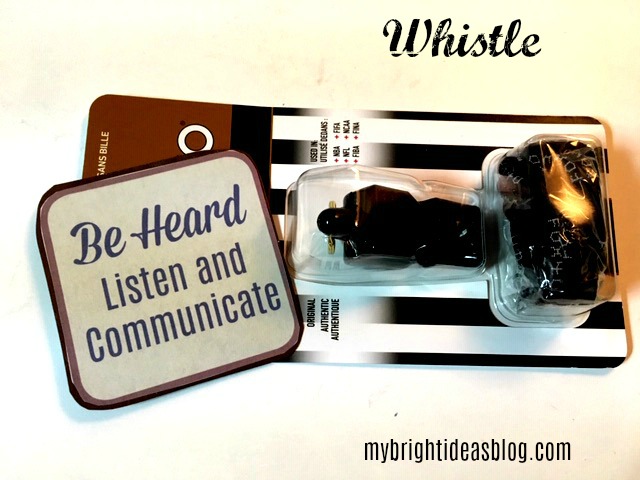
- whistle
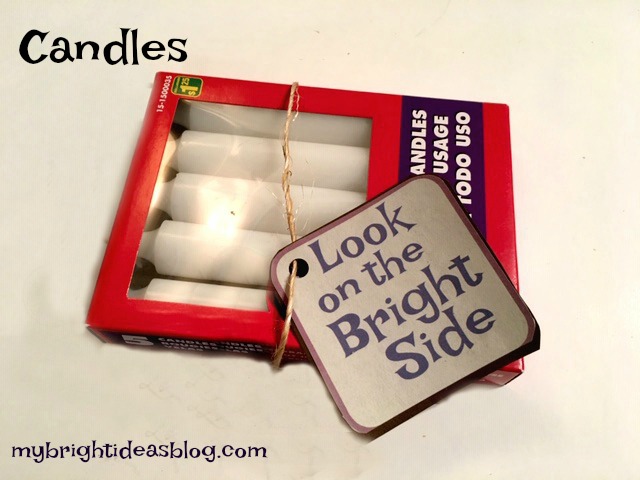
- flashlight or candles
- blanket
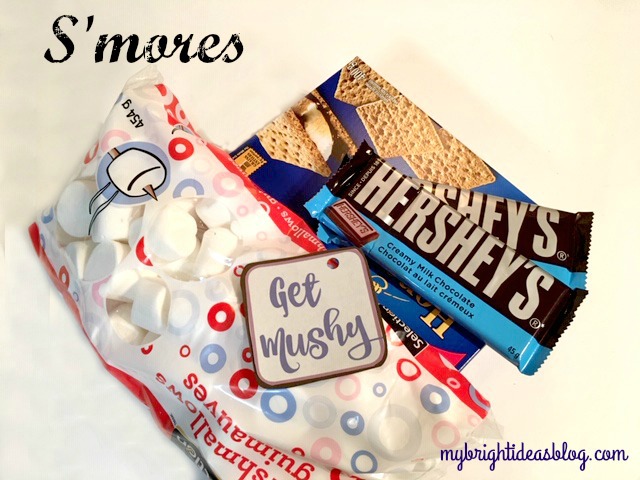
- smores supplies
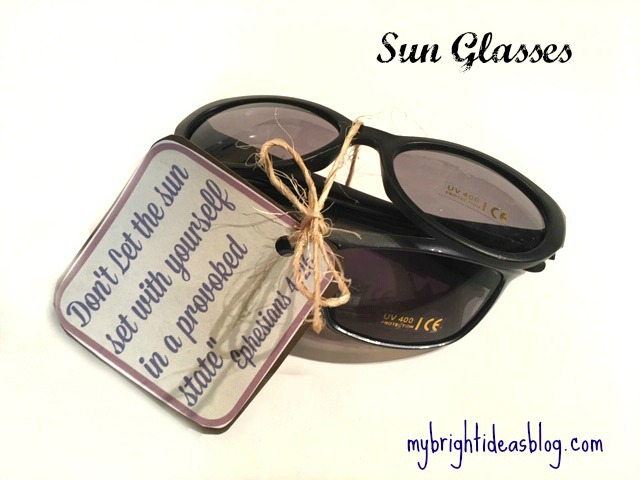
- sunglasses
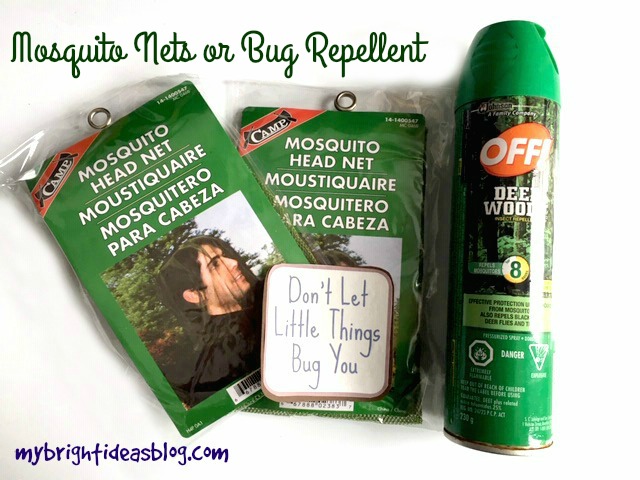
- mosquito netting and/or bug spray
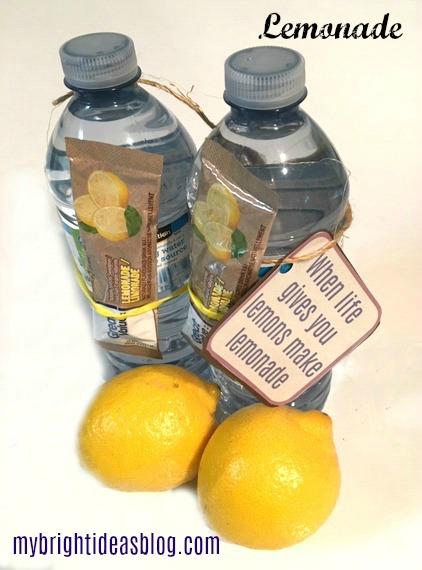
- water bottle and lemonade powder
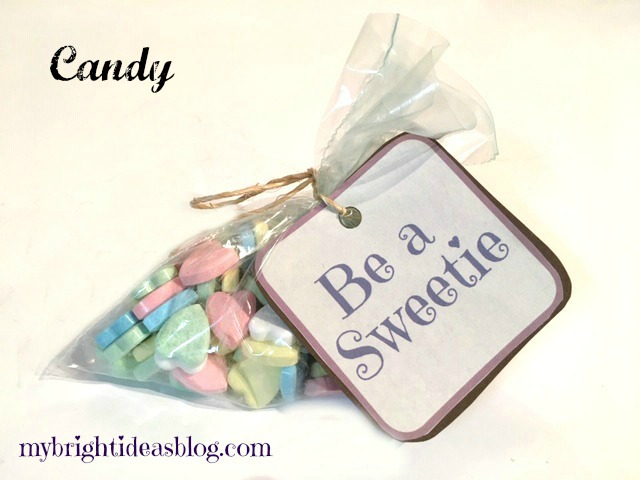
- candy
- salt and pepper
- rope
- bungee cord
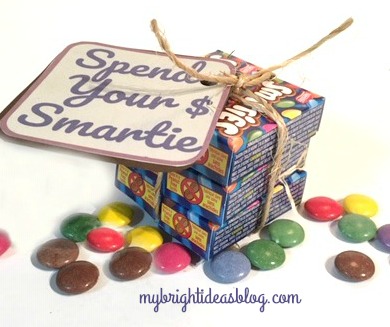
- smarties
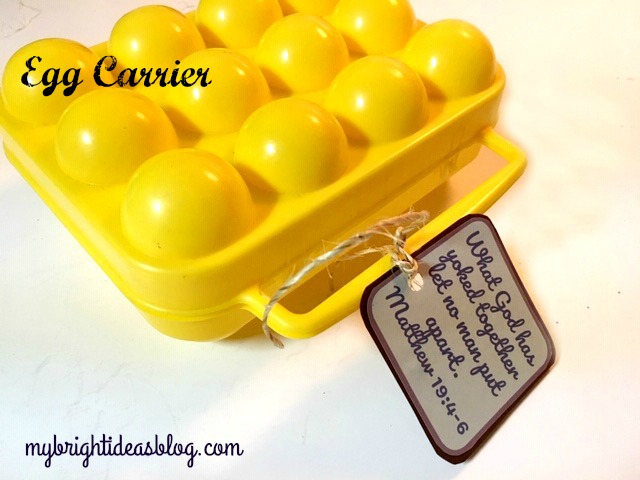
- egg holder
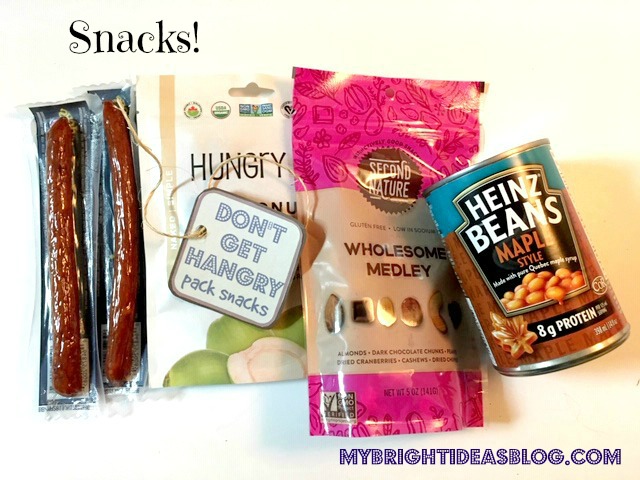
- snacks
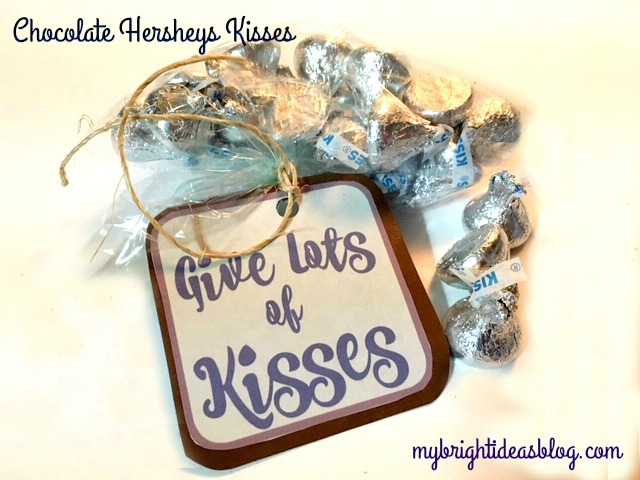
- Hershey’s kisses
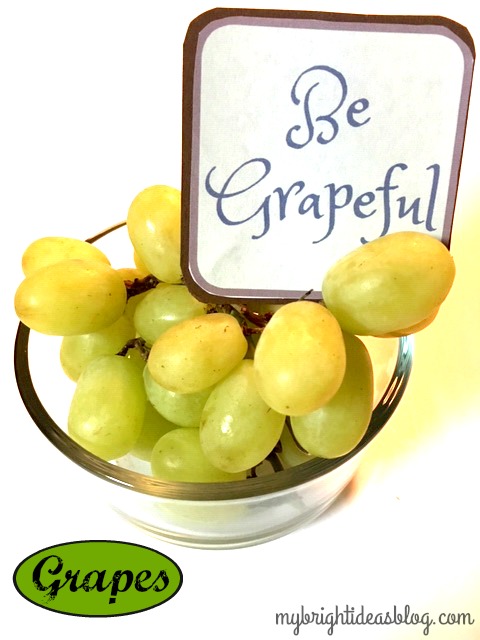
- grapes
So lets go through everything what is going into this gift.
Cooler or Backpack: You need to decide what it is all going to go into. Will this be a picnic theme, or camping or grab and go bag.
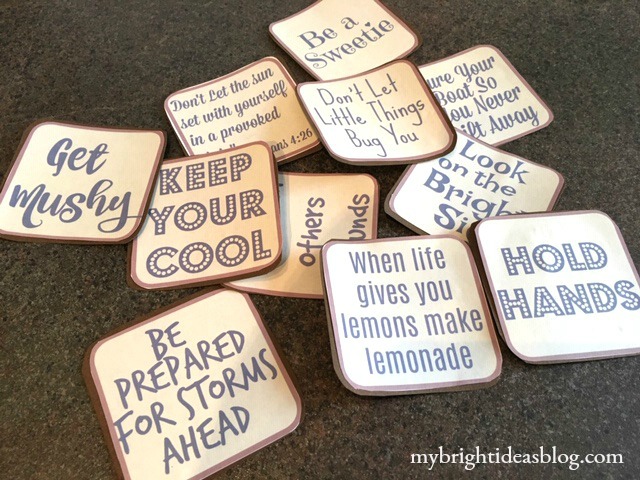
Matches: Fan the flames of Love
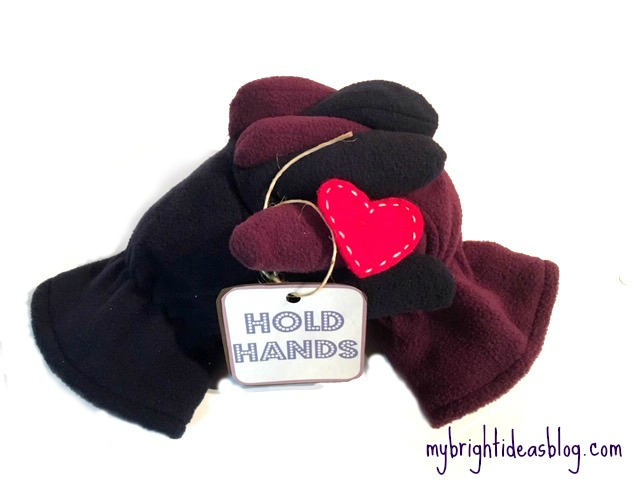
Gloves or Mittens: Keep holding hands for years to come.
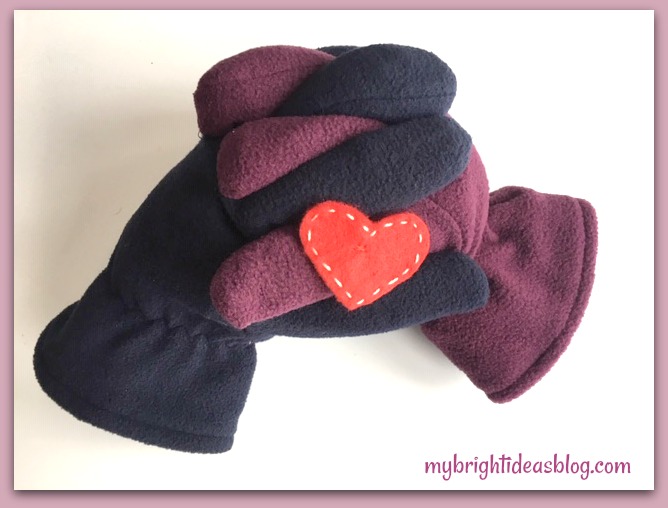
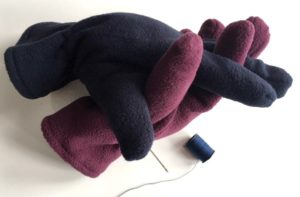
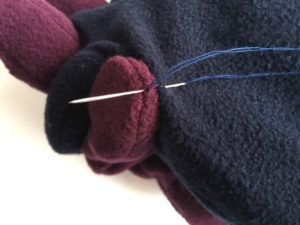
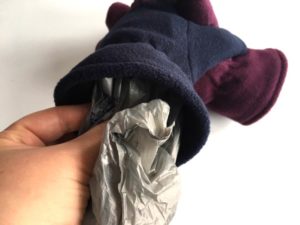
One pair of men’s gloves and one pair of women’s gloves, needle, thread, plastic bags or stuffing. Sew one men’s left glove to one right women’s glove. Stuff with plastic bags or pillow stuffing.
 Cut a piece of red felt into a heart and stick with white thread (or you could use cardstock thick red paper and a white pencil crayon).
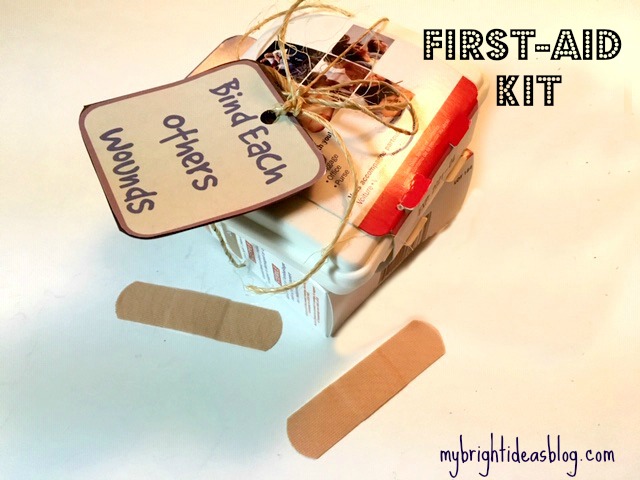
Band-aids or First Aid Kit: Bind each others wounds.
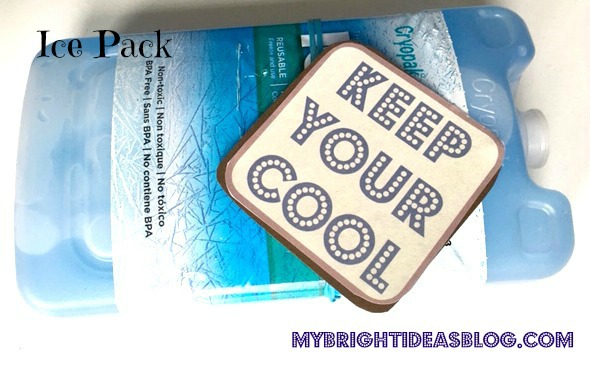
Ice Pack: Keep your cool.
Rain Jackets: Be prepared for storms to ahead.
Flashlight or candles: Look on the bright side. Stay positive.
Whistle: Be heard. Listen and communicate.
Blanket: Get wrapped up in each other.
![]()
Smores Supplies: Get mushy!
Sunglasses: “Don’t let the sun set with yourself in a provoked state”. Ephesians 4:21. That verse simply means don’t go to bed mad.
Mosquito Netting: Don’t let little things bug you.
Water Bottles and Lemonade: We used water bottles and individual packets of lemonade flavor.
When life gives you lemons, make lemonade.
Candy: Be a sweetie!
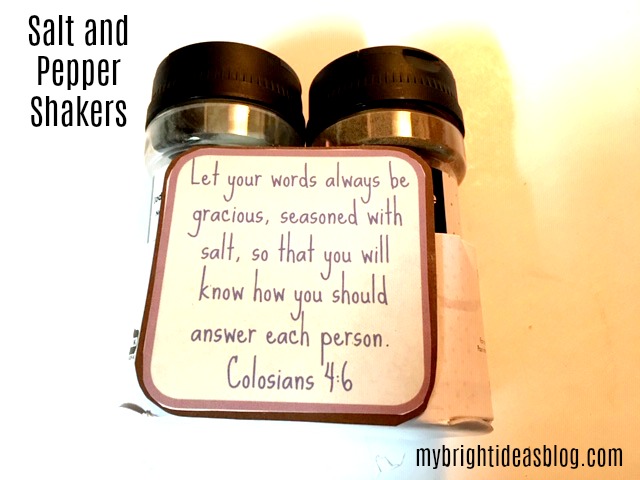
Salt and Pepper Shakers: Thoughtful words and a kind voice is like seasoning your words with salt. “Let your utterance be always with graciousness, seasoned with salt, so as to know how you ought to give an answer..” Colosians 4:6
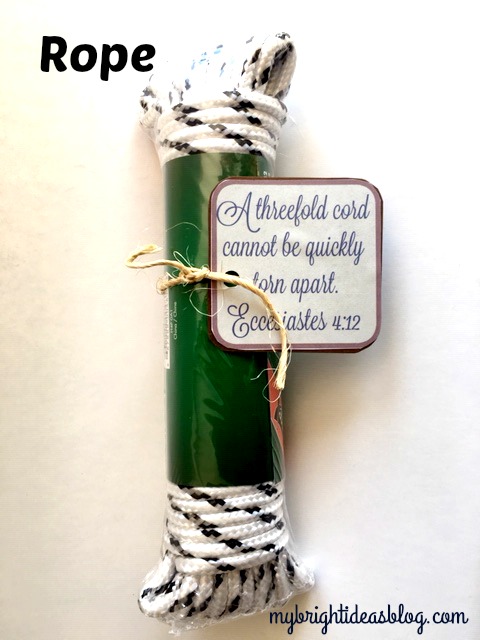
Rope: “A threefold cord cannot quickly be torn apart” Ecclesiastes 4:12. This verse is often read at wedding ceremonies. The three in the cord is husband, wife and God. Three cords together are stronger than one or two.
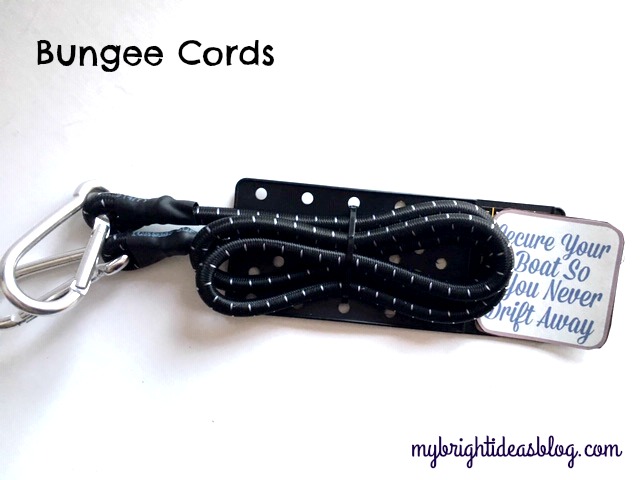
Bungee Cord: Secure your boat so you never drift away.
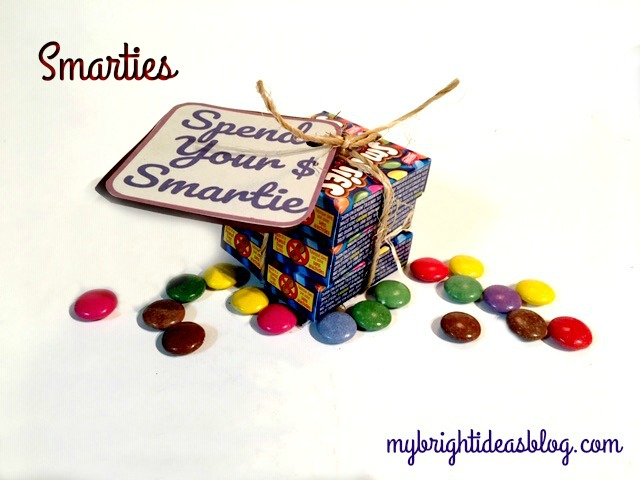
Smarties: Spend your money wisely…or smartie.
Egg Holder: “What God has yoked together, let no man put apart.” Matt 19:4-6. My hubby thought of this one! Yoked…I love a good egg joke… Tee He He.
Snacks: Don’t get hangry – pack snacks. Beans, trail mix, coconut chips, pepperettes….great non- perishables.
Hershey’s Kisses: Give lots of Kisses!
Grapes: Be Grapeful! Tip-If the gift isn’t going to be opened right away don’t include perishable foods.
Making the Gift’s Cards
The label’s are essential to making the gift funny. I printed them out on regular printer paper.
You will need:
- Printed labels
- Scissors
- Glue Stick
- Cardstock Paper
- Hole Punch
- Twine
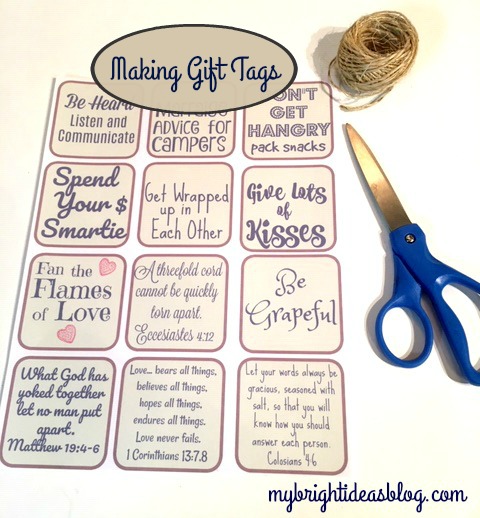
Print the labels and cut them out.
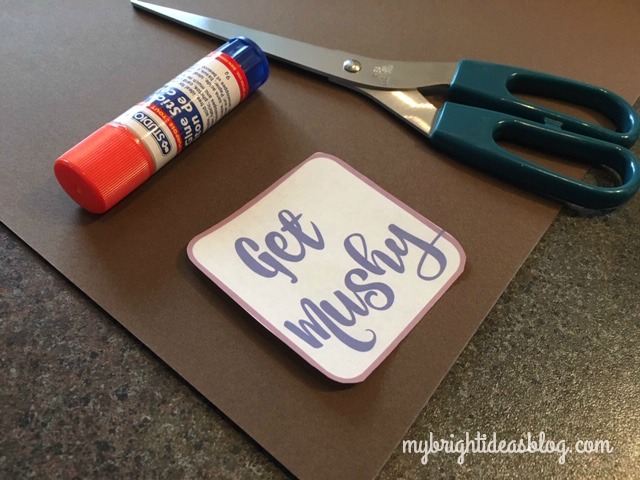
Cut the cardstock out to slightly bigger than the label.
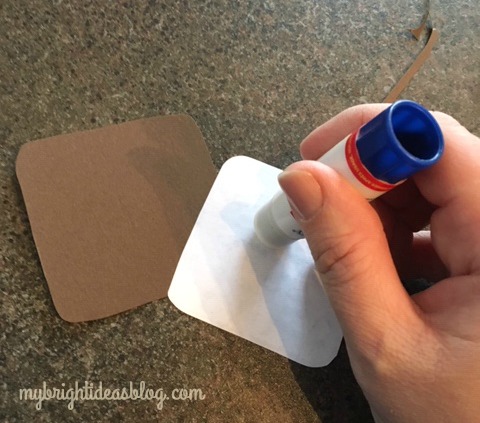
Glue the labels onto the cardstock.
Use a hole punch to put a hole in the label for the twine. Tie the twine and label onto each item.
![]()
![]()
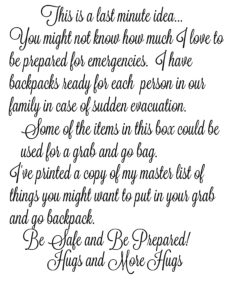
One final thought…The happy couple may not actually take these things on their camping trips. I’m not sure they would actually wear dollar store gloves or a plastic poncho and mosquito nets, much of this is meant as a joke. But the items here are useful for an emergency preparedness pack. I’m a big fan of having a “Grab and Go Bag” in case you need to evacuate your home with no notice. I am going to add a list of what many people recommend to put in your grab and go bag….clothes, toiletries, phone charger, phone number list, photocopies of your ID and your family members.
We packed everything into the backpack starting with the blanket on the bottom.
I included this note with my gift.
Have fun rolling with this idea! I would love to hear if you put a similar gift together.
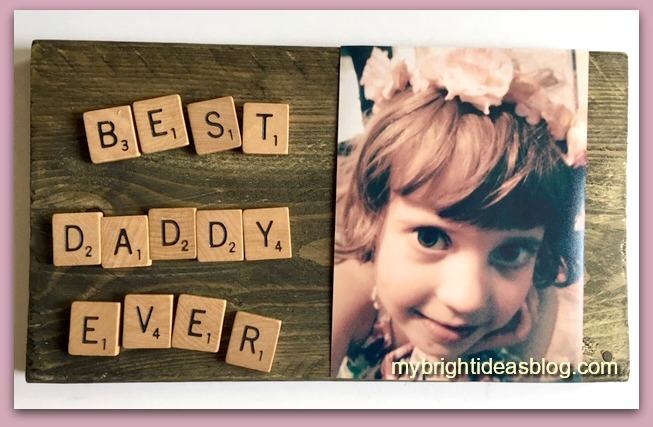
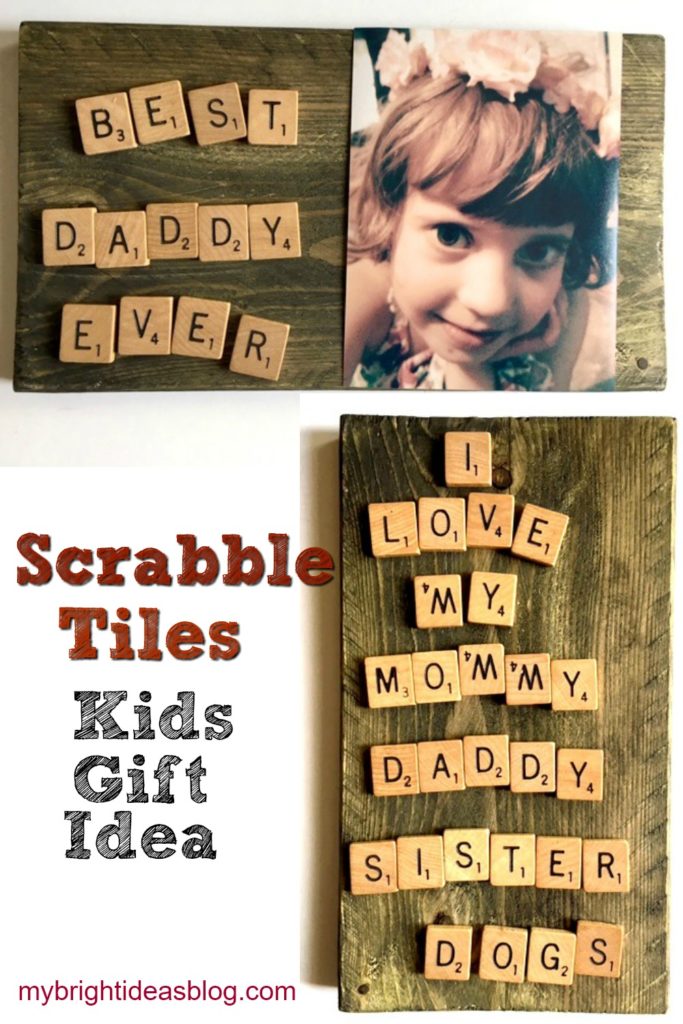
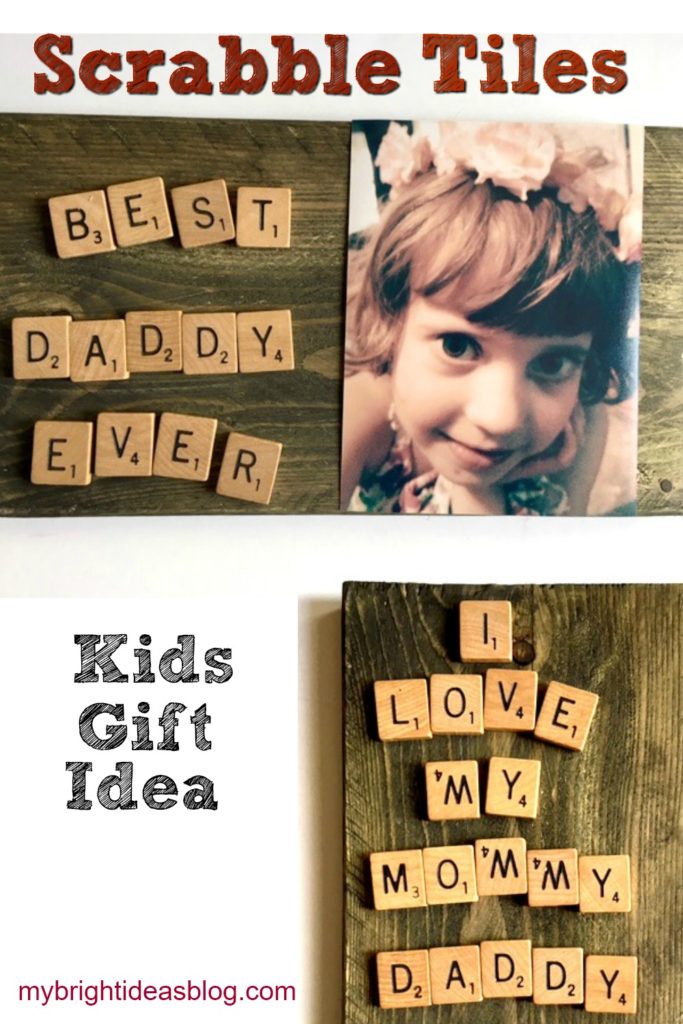
Scrabble Tiles Gift Idea for Kids
I have a sick kiddo at home (head cold, sneezy, wheezy) and she wants to use my craft supplies to make a gift for daddy’s desk at work. So here is what she came up with a love letter in Scrabble Tiles to Daddy and an old photo of herself.
Where can you get Scrabble tiles? From the board game of course silly! Or from a thrift store or online.
The other day I found myself parked next to an antique store I didn’t know existed. So I went in and found a gazillion things I would love to have and upcycle. The store was AMAZING! One of the items that I bought was a cool old mason jar filled with scrabble tiles.
My sick little darling sorted out the letters into piles while I went rummaging for supplies.
You will need:
- scrabble tiles
- a piece of wood, picture frame or canvas
- white glue-for the photo (or to make it temporary use “sticky tack”)
- hot glue gun-for the tiles
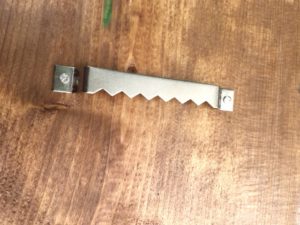
- hanging hook (optional)
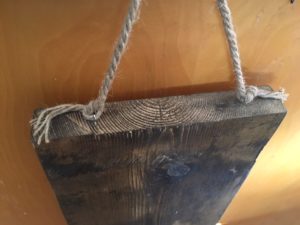
![]()
I have scraps of wood and often will stain or varnish a few extra pieces in case I want to make a wooden plaque in a hurry. We chose out of scrap options a piece approximately 9 1/2 by 5 1/2. It was already stained with “Forest” Behr Semi-Transparent stain-which has a subtle green tinge to it.
![]()
Another option would be to use a blank canvas from the dollar store. You could paint with inexpensive craft paint in his favorite color or leave it white.
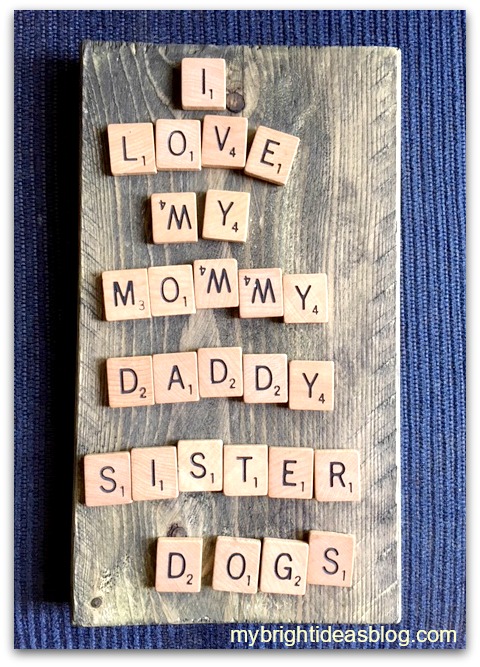
First she wrote out this…awe Mommy is at the top of the list!
I love that she is not bothered that 3 of her M’s are upside down W’s. When you see the letters are crooked its tempting to want to straighten them out but resist! It’s a child’s gift and adds character to the final product.
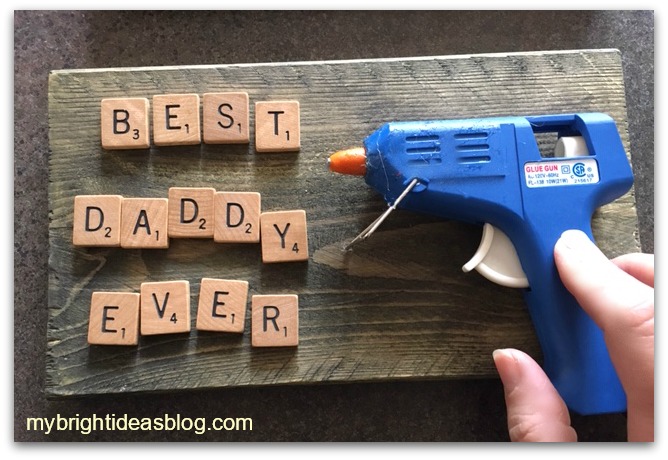
Arrange the letters and photo to your liking. Hot glue your scrabble letters to the wooden board.
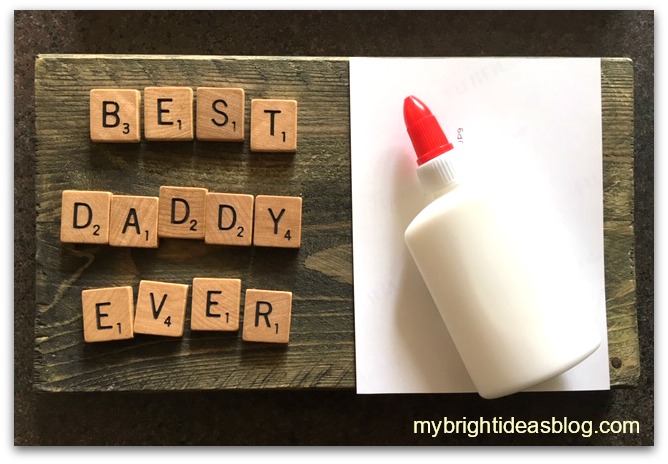
Have your child put a thin coat of glue on the back of the photo. Or if you want to be able to take the photo off later and replace it you could use sticky tack instead!
Would you look at those gorgeous eyes! This gift will melt his heart!
Crafts Using Burlap and Buttons – Easy Project that Looks Great!
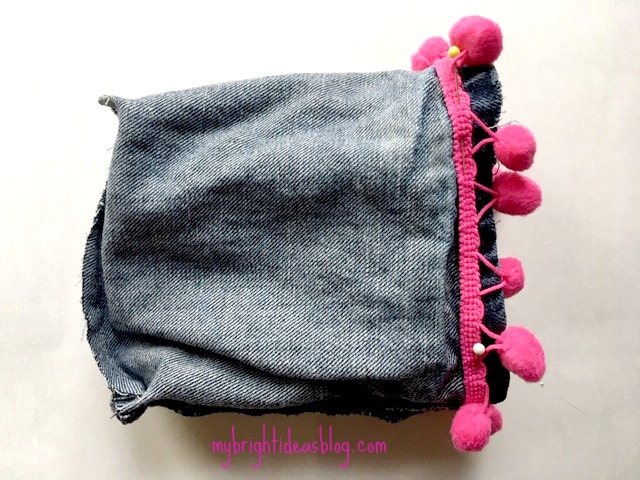
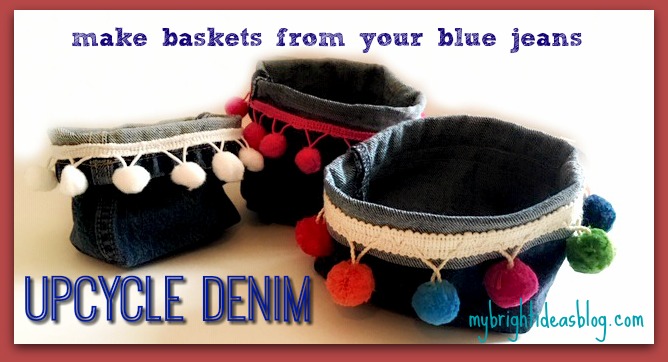
Upcycle Denim – Decorative Baskets made from Jeans
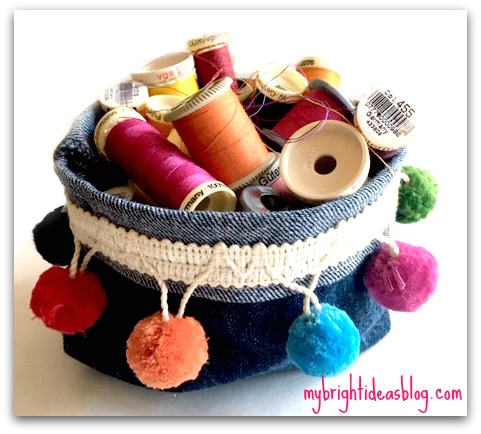
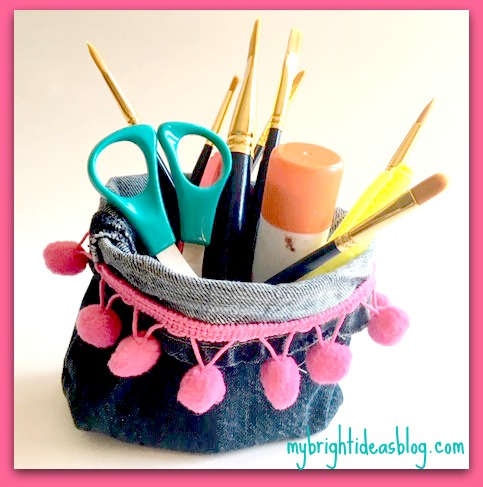
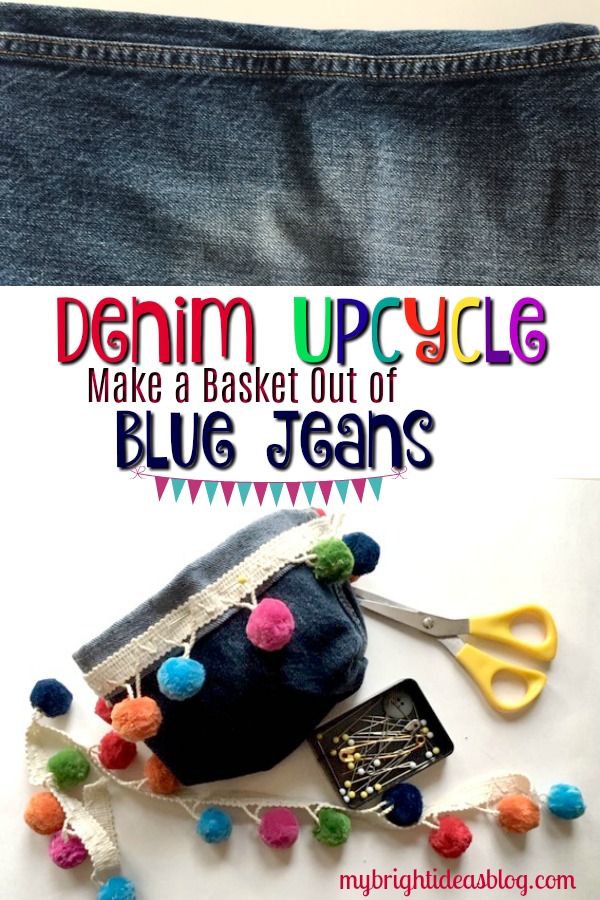
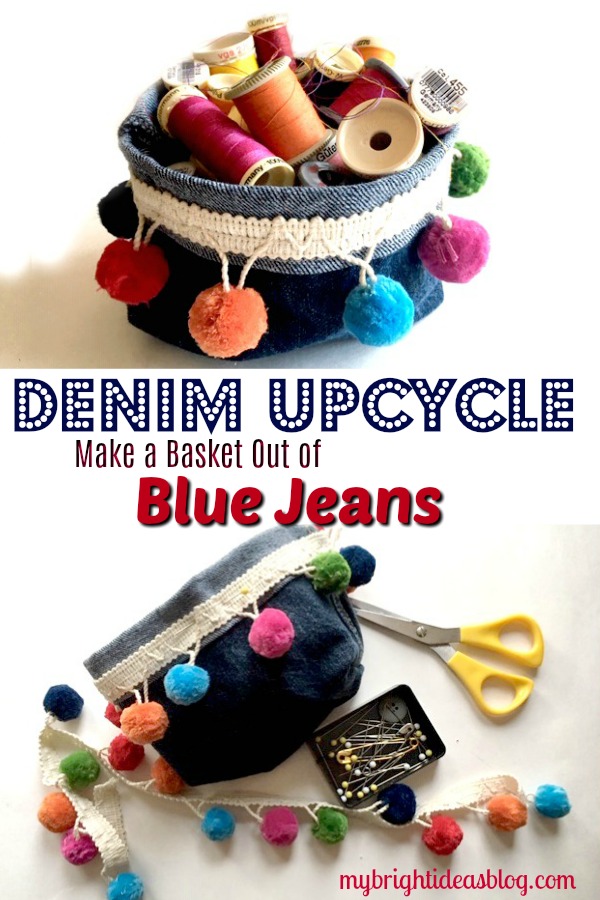
I’ve been working on another denim upcycle. If you have some blue jeans to cut up for an upcycle, you can turn it into a basket for your desk or craft area.
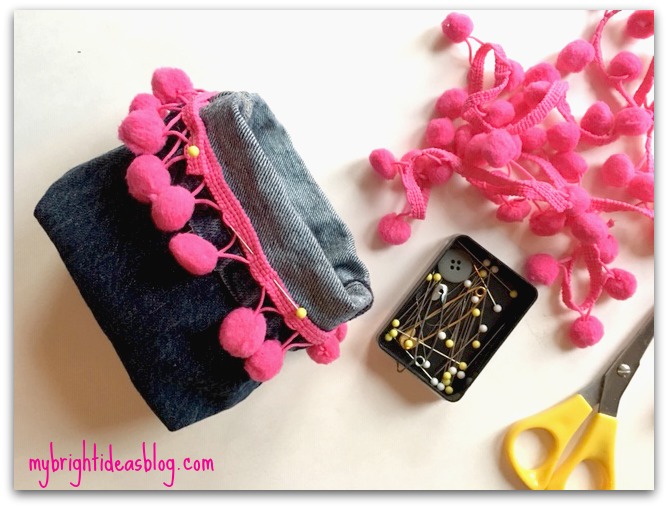
You will need:
- old jeans (I used kids jeans for a narrow basket)
- scissors
- trim
- sewing machine (or needle and thread)
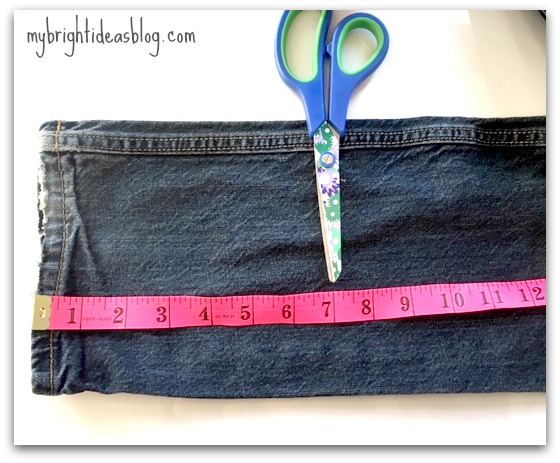
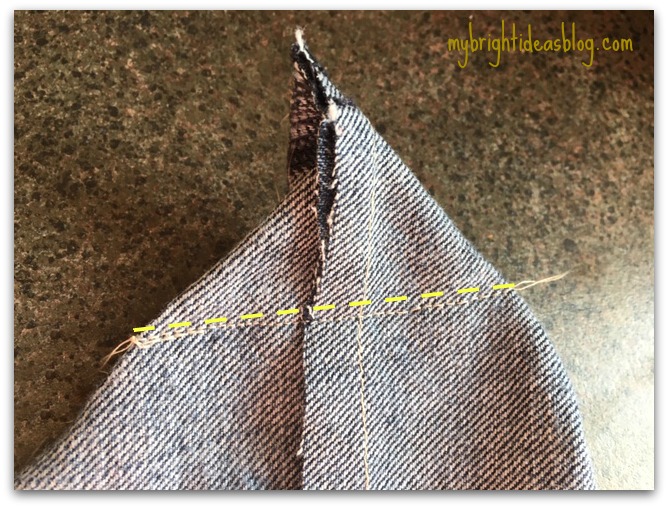
First of all, I cut the jeans off around 7 inches from the bottom. I don’t mind the rough bottoms as long as the jeans are clean before you start. I think the frayed bottoms look good too!
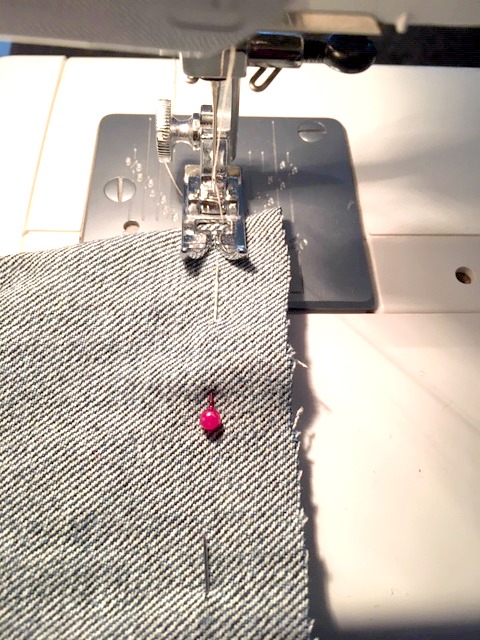
Turn the piece inside out. Sew straight across the bottom 1/2 inch or 1 cm from the cut edge. You could hand sew this if you don’t have a sewing machine.
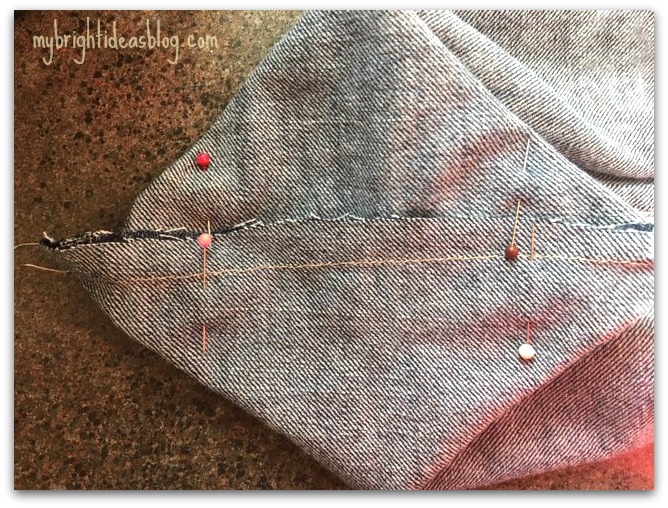
Now flatten the bottom and pin 1 inch (2.5 cms) from each corner. This will make your basket more boxy at the bottom and easier to stand up.
Stitch across the line.
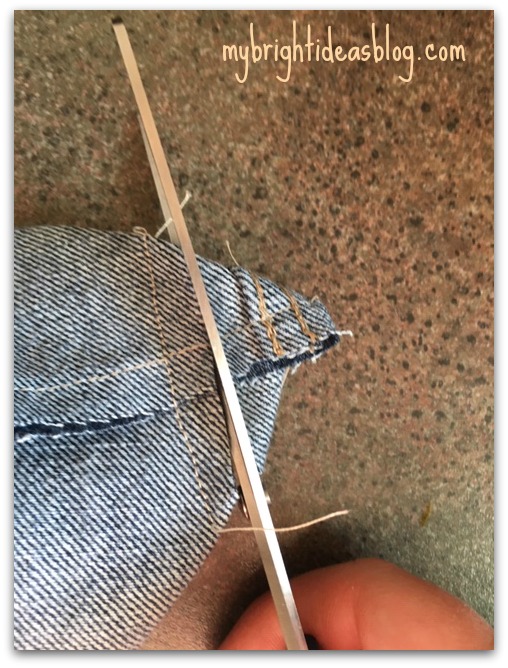
Cut off the triangles on the outside of your last stitch.
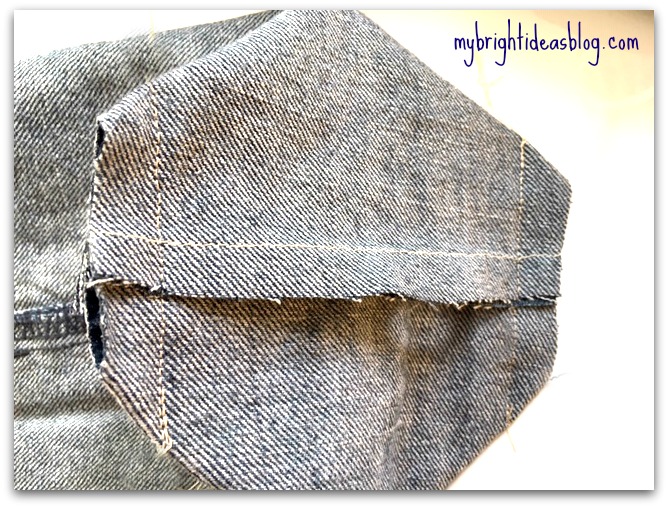
Turn the basket inside out.
The square corners that you just created will help it to stand up. You can roll over the edge once or twice.
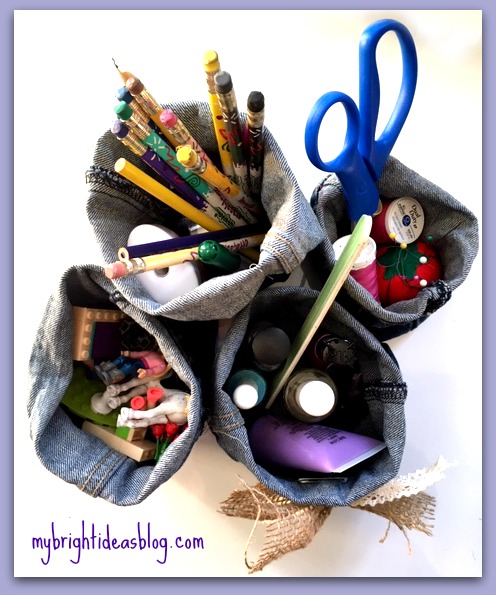
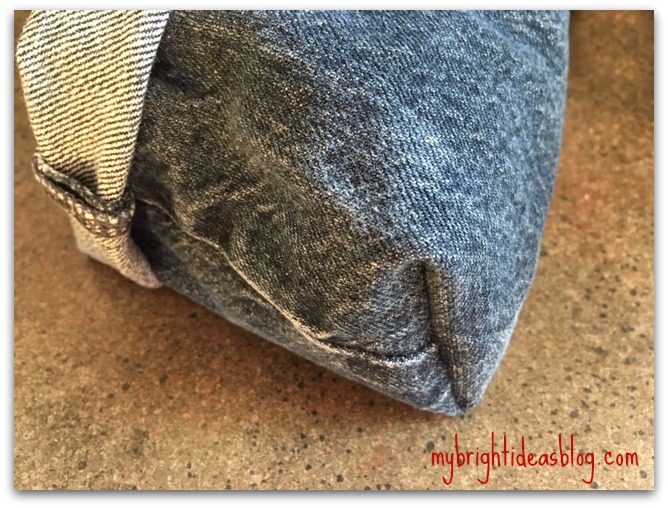
So you can stop there and fill up your baskets with small toys, pens, sewing items, nail polish etc….or…add some garnishes.
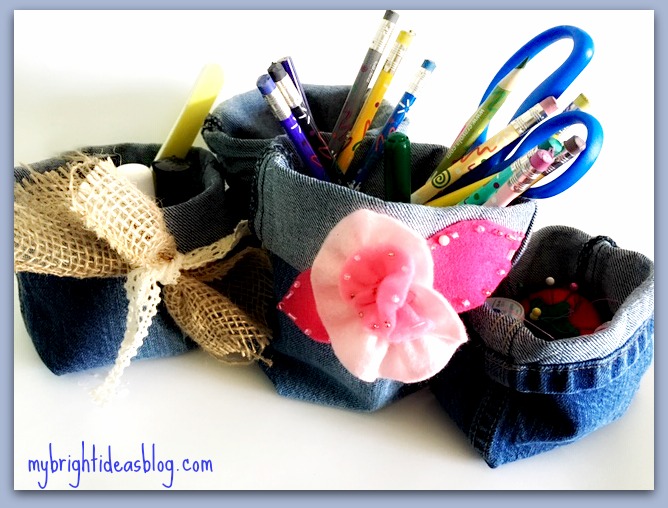
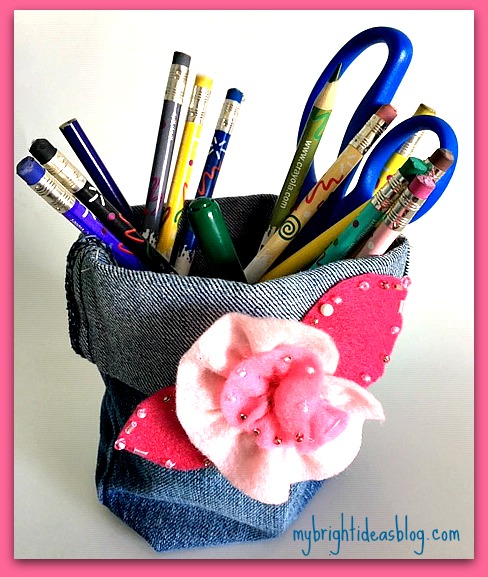
I pinned a bow on one but decided to add more color…. I added a felt flower left over from coffee cup warmers (see the link below).
Then I thought of some trim…maybe with some pompoms. The kind sold in the drapery part of the fabric store. Yes!
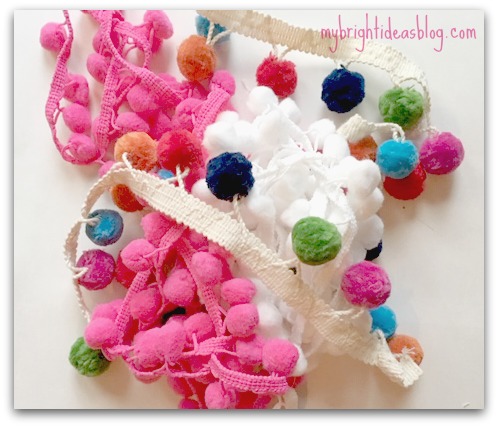
The solid white and pink trims cost approx. $2 per yard but the colourful larger trim was $8.99 per yard. Ouch! Fortunately it was on sale for 50% off so I got a yard.
Turn the basket inside out to pin the trim in place.
Before sewing, turn the basket right side out again to check out how it will look.

Here is my colorful pompoms too. They make me so happy!
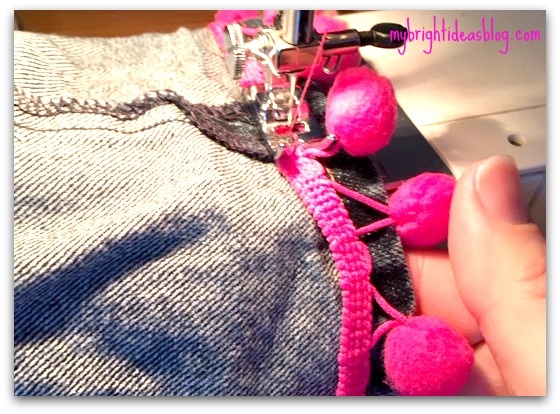
Take it slow while you are sewing on the trim. The pompoms keep trying to get in the way.
There you have it!
I used children’s jeans so that the basket would be small to hold a bunch of nail polish, sewing supplies, Lego or pens. If you use adult jeans and the area higher on the pant leg you could use it to hold magazines Fill the bin with craft supplies, bigger toys, or whatever things need gathering up to keep your place tidy!
Below I have put some more upcycle projects that I posted in the past year. Have a look!
Air Plant Display Ideas
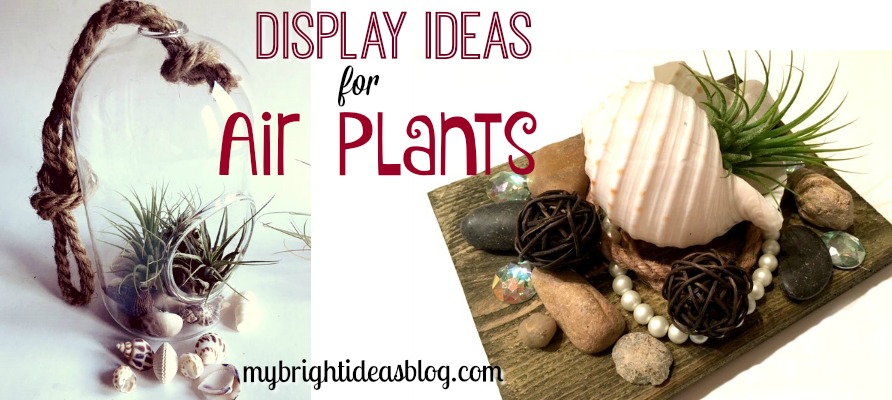
Have you gotten on board with the Air Plant craze? Air plants, are small aerophyte plants that do not need soil to grow. They absorb moisture from the air and indirect light for sustenance. The perfect plant!
Since air plants have no need to be in a pot of soil they can be put almost anywhere. Just so long as you remember to dip them in water once a week and allow the water to drain off.
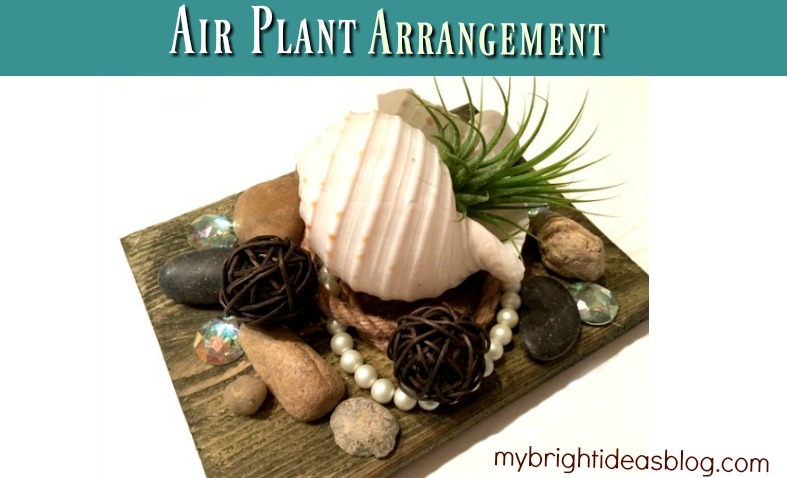
Today I’ll show you how to make an easy arrangement that looks a bit nautical by putting the air plant into a sea shell and accessories on wood or a plate.

I found my first air plants at the garden centre this past summer and then spotted a shop in the local mall selling them. The ones I have access to sell for $4-$10 each.
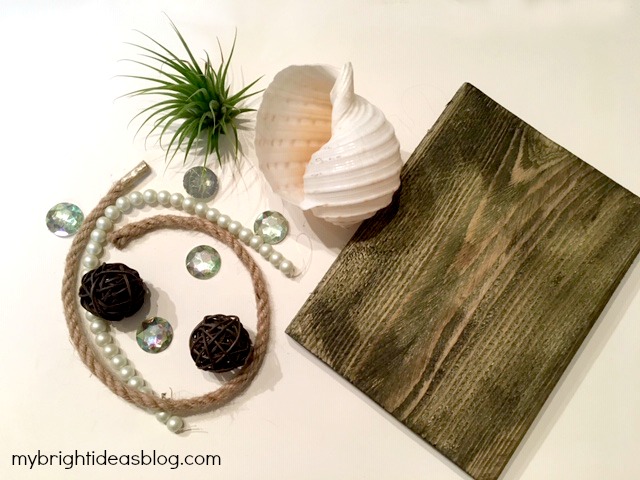
To make this you will need:
- an air plant
- a big shell
- nautical themed items: rope, glass gems, pearls, stones
- a block of wood, plaque or glass plate
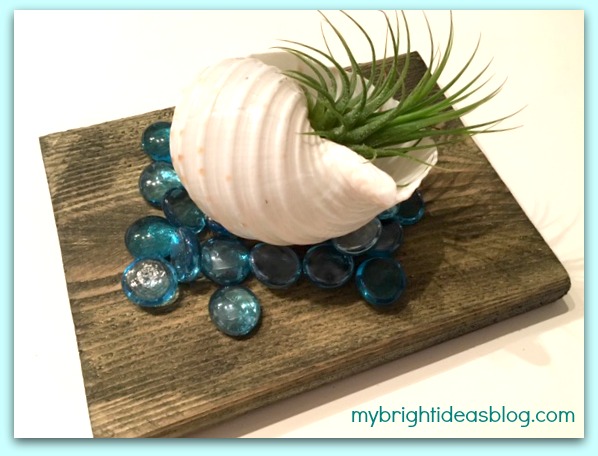
I always have scrap pieces of wood around in case of a sudden project inspiration. For this project I used a scrap approximately 6 inches by 6 inches. If you have a pretty plate you could easily use that too. I am tempted to check the thrift store for a beautiful, antique plate. For this first photo I just used turquoise glass gems.
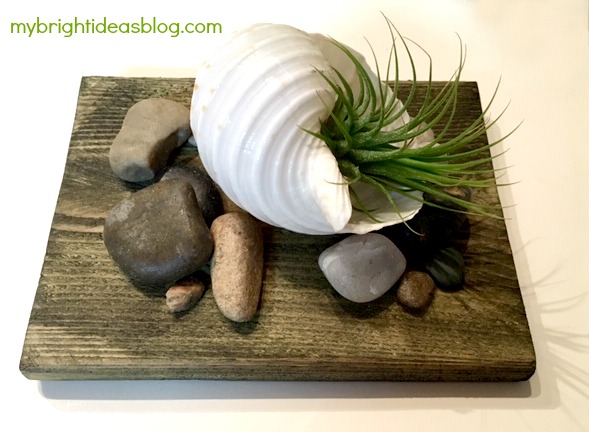
For this attempt I used river stones around the shell. I got them from the dollar store and the same with the gems.
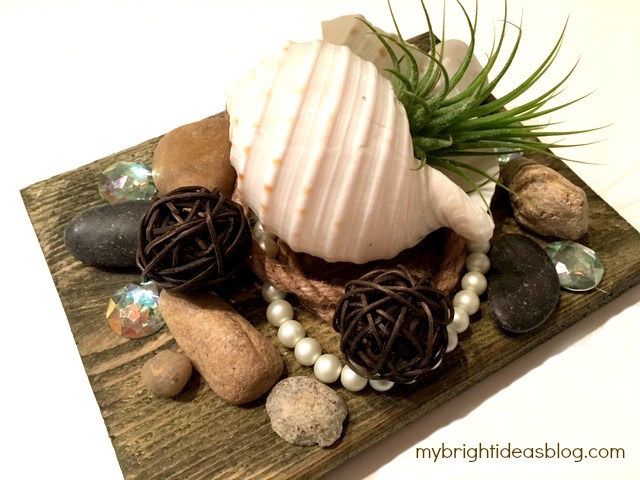
By adding pearls and rope with craft gems and stones I thought it turned out really nautical. Since none of these are attached to the board we can re-arrange them into another craft if I get tired of this one.
Here is another idea!

The photo above shows 2 popular air plant display options. The one on the left is plastic and from the dollar tree for $1. I wish I had bought 10 at that price since they were hard to find again. The one on the left is glass and from the garden centre for $8.99.
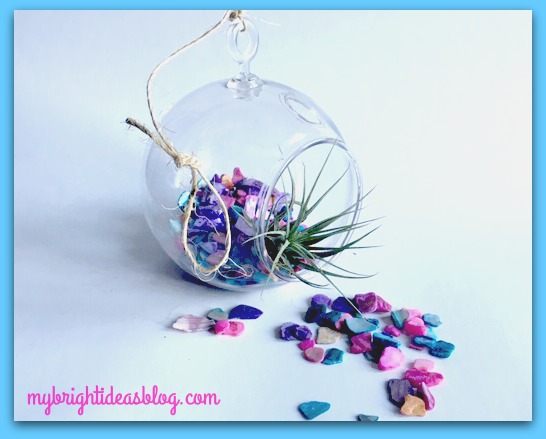
I used chips of shells that have been dyed for this one. Air plants make great gifts. Since this is plastic and needs very little care it would be easy for a child to care for or a friend in senior care.
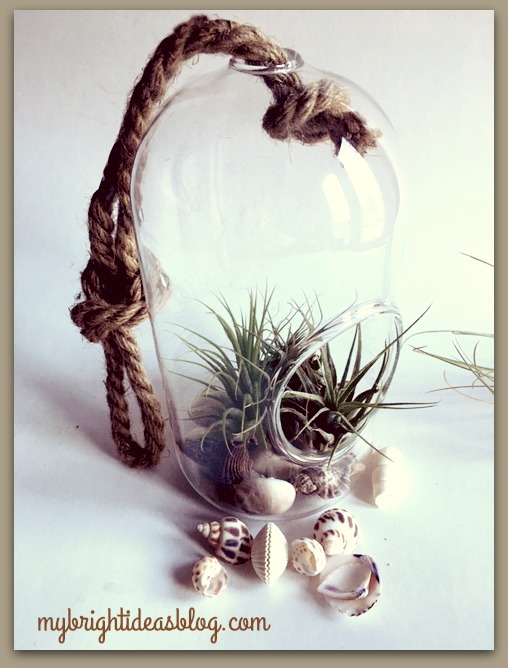
This one I used random shells in the base of the glass dome. I love the chunky rope and shells together-its very beachy.
I’m really excited to try some of the other plant ideas. I’ll let you know if they turn out well! Below are links to some of my other projects!
Nature Craft – Perfect for Earth Day Activity – Clay Imprints with Plants and Flowers
Plant Puns on Painted Potted Flower Pots – Adorable Gift Idea to Make Them Smile!