
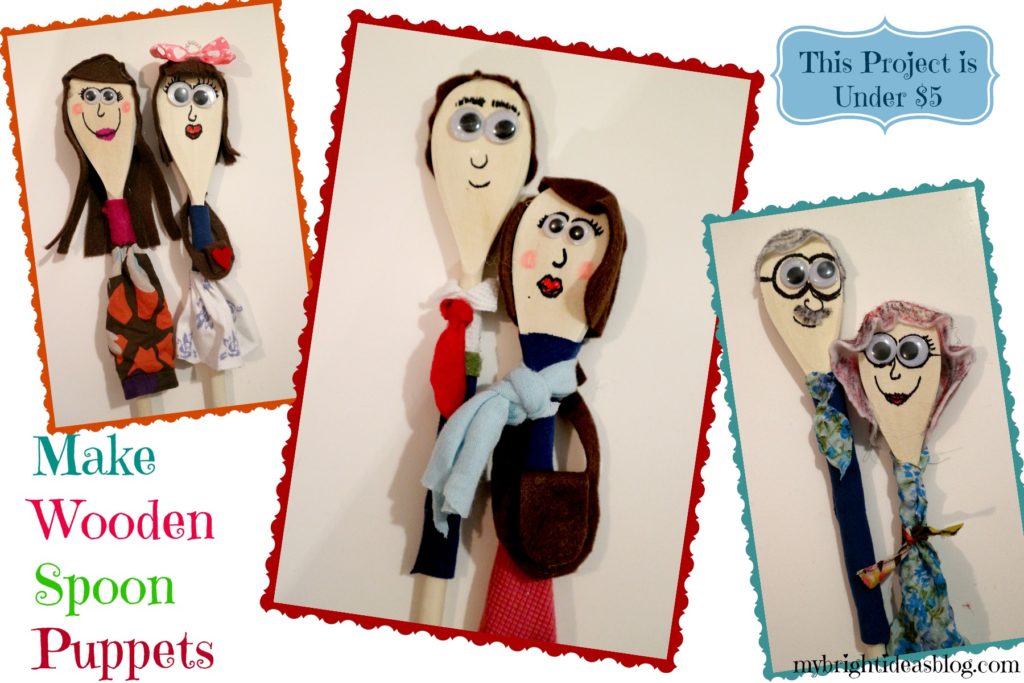
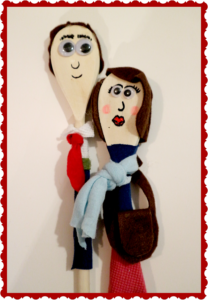
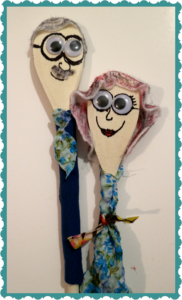
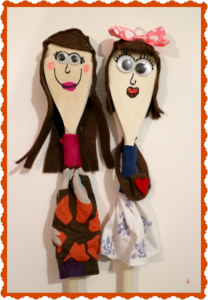
I was researching some puppet theatres to make and came across the easiest puppet idea ever! All you need is some wooden spoons, a sharpie, scraps of fabric, googly eyes and your hot glue gun.
 The wooden spoons I used were 3/ $1.50 making this an inexpensive craft. The shape of the spoon makes a perfect head shape. Some spoons have wide handles too that would be great for drawing on the clothing but these cheap and cheerful spoons were very skinny.
First I added googly eyes and then I drew on the rest of their faces. The hair was a bit tricky. I used pieces of felt for it although you could use yarn or sewing trims.
Clothes are pretty easy just cover up the spoon with a scrap of fabric and hot glue it in place. Its actually easier than you might think to make a shirt and tie.
This is the sort of craft that will actually stick around a long time after you make it. You have made an actual toy. I was thinking this is the sort of thing you could take on a camping trip instead of Barbie’s or dolls with all the little bits and pieces that you might lose.

..


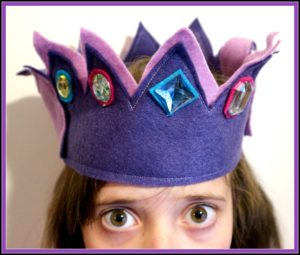
Sew a Super Easy to Make Felt Crown – Add to your dress up clothes!
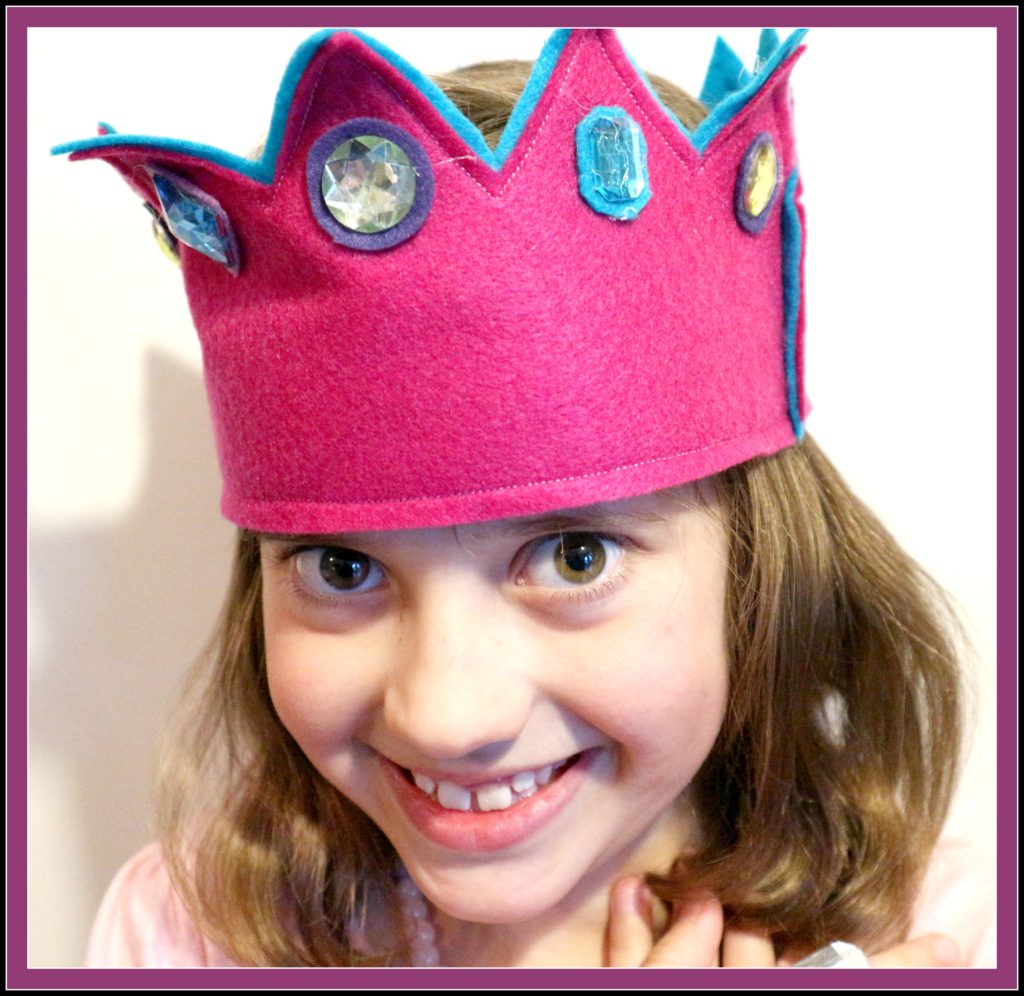
How to Make an Easy Felt Crown!
I went to Dollar Tree this time to get a few time things and got these vibrant colours of pink, 2 shades of purple and turquoise. They charged $1.25 which is a lot more than Michael’s $.59 each. But I was there and the colours were so appealing….A piece of craft felt can cost $.50-1.25 depending on where you are buying it. For each crown you will only need 2 rectangles of felt-I used different bright colors. You will need some gems, scraps of felt and your hot glue gun, This time we are going to use the sewing machine.
If you would like to use do this project without sewing follow this link….http://mybrightideasblog.com/make-no-sew-felt-crown/
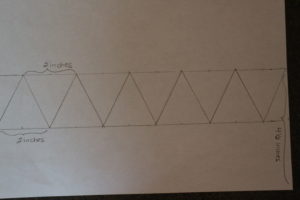

Make a template using an 8 1/2 by 11 standard piece of paper. Measure 4 1/2 inches from the bottom and draw a line. Draw another line 2 inches below that. Put a mark every inch along both lines. Then using your ruler create a zig zag. This measurement should make it possible to do this twice on a felt rectangle that measures 9′ x 11 1/2″. To make sure you don’t cut into the other half you could cut the felt in half lengthwise before you cut the zig zag, If your felt isn’t as wide as mine just shorten the bottom portion of the template…it doesn’t need to be that thick. Do the same with the second color that you have. This extra layer will stiffen the project so it can support the gems. It also makes it really pop with the extra color.
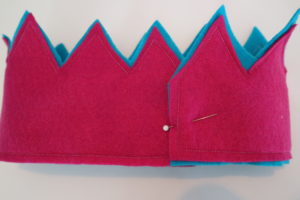
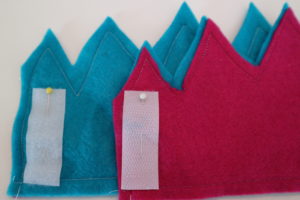
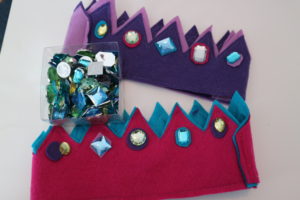
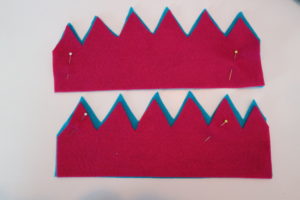
Next overlap the two colors a bit and pin them together. Sew all the way around the bottom, side, zig zag and other side. Overlap one side to the other and sew a seam to connect them. The other seam will be open so pin Velcro strips so the size is adjustable and easy to get on and off. If you don’t have Velcro you could just fit the crown to the child’s head and sew that seam too. Cut pieces of felt out of scraps to place under the gems. Using the hot glue gun, glue the felt to the crown and the gem on top.I only put gems on the front of the crown, but you could put them all the way around. You could also add a strip of ribbon or gold trim around the bottom to decorate it further.


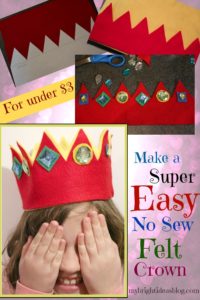
How to Make a No Sew Felt Crown for under $3
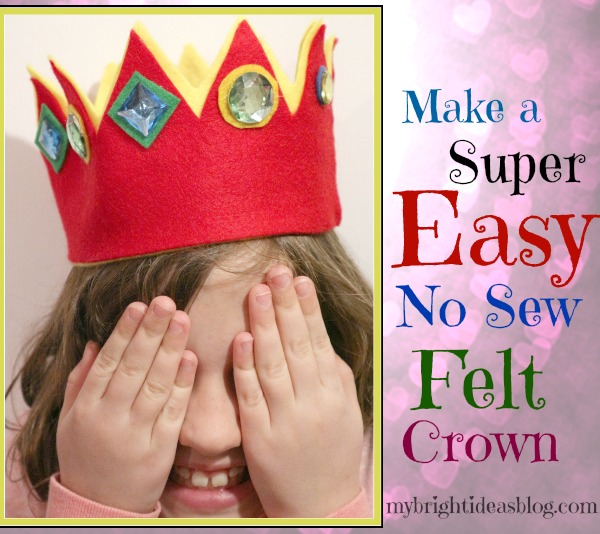
Today we are making a “no sew” felt crown. I tried to be mindful of the cost and simplicity of this project in case you need to make 10 of these for a children’s princess party.
Here is what you need:
A piece of craft felt can cost $.50-1.25 depending on where you are buying it. For each crown you will only need 2 rectangles of felt-I used different bright colors. You will need some gems, scraps of felt and your hot glue gun.
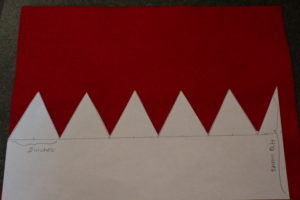
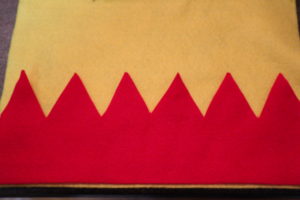
Make a template using a 8 1/2 by 11 standard piece of paper. Measure 4 1/2 inches from the bottom and draw a line. Draw another line 2 inches below that. Put a mark every inch along both lines. Then using your ruler create a zig zag. This measurement should make it possible to do this twice on a felt rectangle that measures 9′ x 11 1/2″. To make sure you don’t cut into the other half you could cut the felt in half lengthwise before you cut the zig zag, If your felt isn’t as wide as mine just shorten the bottom portion of the template. Do the same with the second color that you have. This extra layer will stiffen the project so it can support the gems. It also makes it really pop with the extra color.
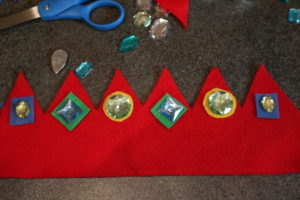
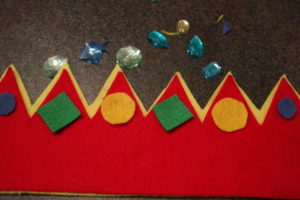
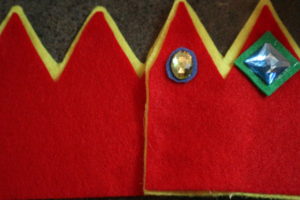
Now comes the fun part! Sort out how you would like to place your gems. Cut pieces of felt out of scraps to place under the gems. Using the hot glue gun, glue the layers together. Then glue on the felt circles and triangles into place, and followed by the gems. This is when I borrowed my daughter’s head for a sizing. Overlap the edges and glue in place. I only put gems on the front of the crown, if you were going to put them all around its important to not have glue gems on the part that is going to be under this over lap. So if I were going to put gems all around I would only put it on the 4 middle zig zags for the back part of the crown.
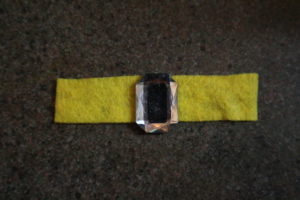

While you have the felt and gems out and the hot glue gun is still hot…you might as well make a ring and bracelet too.


…Here is a link to another post with identical looking crowns but using the sewing machine to sew the felt together and add a Velcro closure.http://mybrightideasblog.com/sew-a-super-easy-to-make-felt-crown/
Sewing Diy- Extend the Length of a Short Top with Lace

Have you got a great shirt that has gotten too small and you aren’t ready to say good-bye to it? Adding a bit of lace to the bottom is so easy and will make all the difference on how much longer it will work for you. Great for growing girls….also helpful for adults…I have a 100% cotton tank top that is going to have a similar extension as it now is a crop top…just from regular laundering it shrunk inches!
For this project you will need:
An awesome shirt you want to save
A piece of stretchy lace that will be as wide as the top
Sewing machine, thread, tape measure etc etc
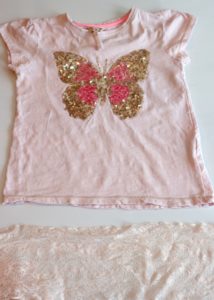
Iron the t-shirt and the lace before you start. This lovely, shimmery, sequin butterfly top is 14 inches wide (36 cms) along the bottom seam when laying flat. So the lace would need to be 28 inches (73 cms) wide plus one extra inch (2.5 cms) for a seam allowance. Check to make sure this will be a good match in width.
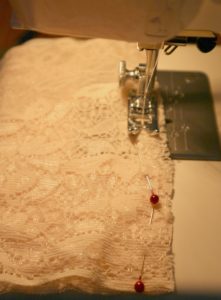 Fold the lace in half and sew the edges together. Turn it inside out.
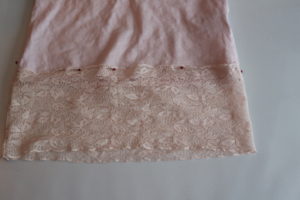
Lay the lace on the bottom of the t-shirt and decide if you would like to sew it on top of the bottom edge or underneath. My lace has a nice look to the top so it didn’t need to be hidden. Lay the lace down flat and put a pin on each end…this will help you to line up the pin to the side seams.
I pinned the lace on top of it all around the top. After I took this photo I decided that the t-shirt would be on the left of the sewing machine so all the pins needed to be turned around. Since the t-shirt and the lace have some stretch you can pull and stretch it a bit if things aren’t lining up well. After you sewed all the way around you are done. Try it on. Can you believe that only took you 10 minutes!?!? Well done!
We love this sequin butterfly top enough that we would probably cut the butterfly off and sew it onto another shirt when its just too small.


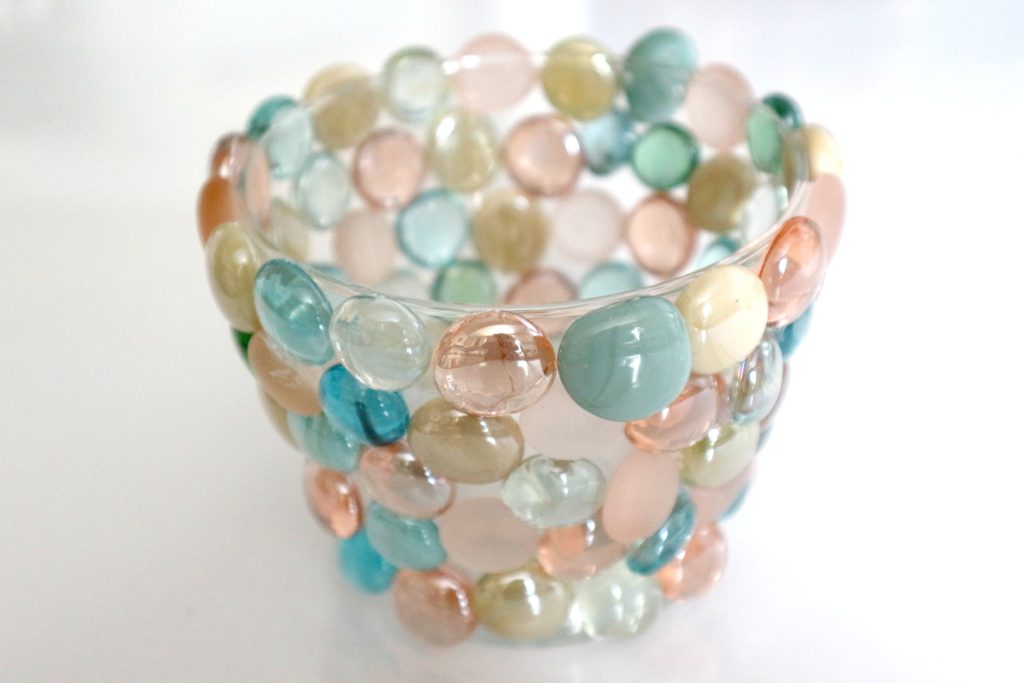
Jazz up a Vase or Candle Holder with Glass Gems and Hot Glue!
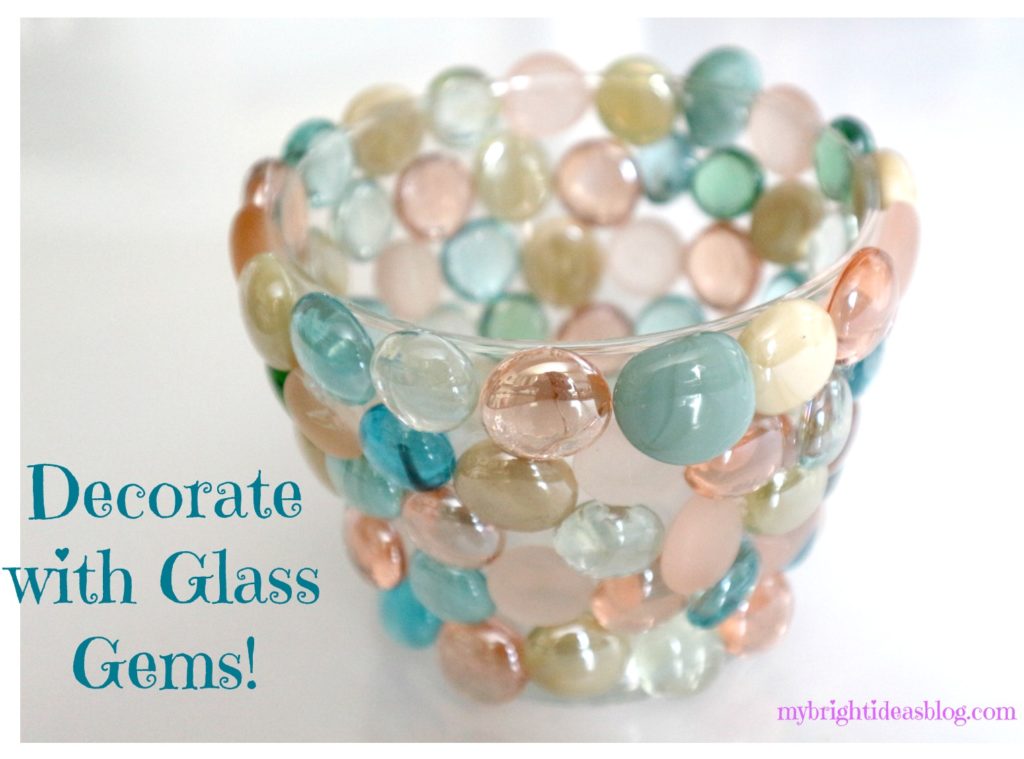
When I saw this bag of glass gems at Michael’s craft store I had to get it even though I didn’t know what project to use it for yet. The beads had pearl and pink and turquoise….so pretty!
The vase is small either for short cut flowers or its a candle holder…I’m not sure. One bag of gems was enough to cover this vase…candle holder…for simplicity lets call it a vase.
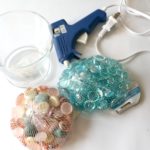
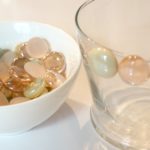
It doesn’t really require instructions its so easy. Alternate the gems for variety. Try to save some smaller ones so you can fit them into the small spots. I found the ones on the bottom wanted to pop off because the edge is a little rounded. So another glue might be better for a curvy vase. Or just put it in a place that won’t tempt your children to touch it.
…

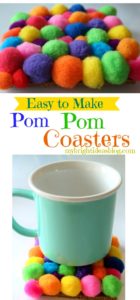
Easy Pom Pom and Cork Coasters
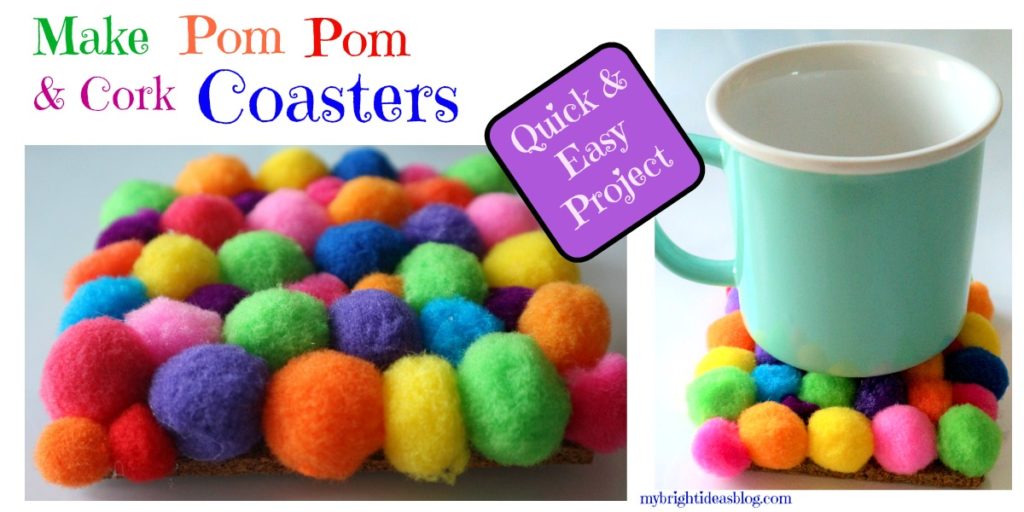
This project is bright and cheery and ridiculously easy to make! All the supplies can be purchased at a Dollar Store so its super inexpensive too!
You will need:
- cork
- bright pompoms (plan for 40 per coaster)
- ruler
- scissors
- hot glue gun
- hot glue sticks
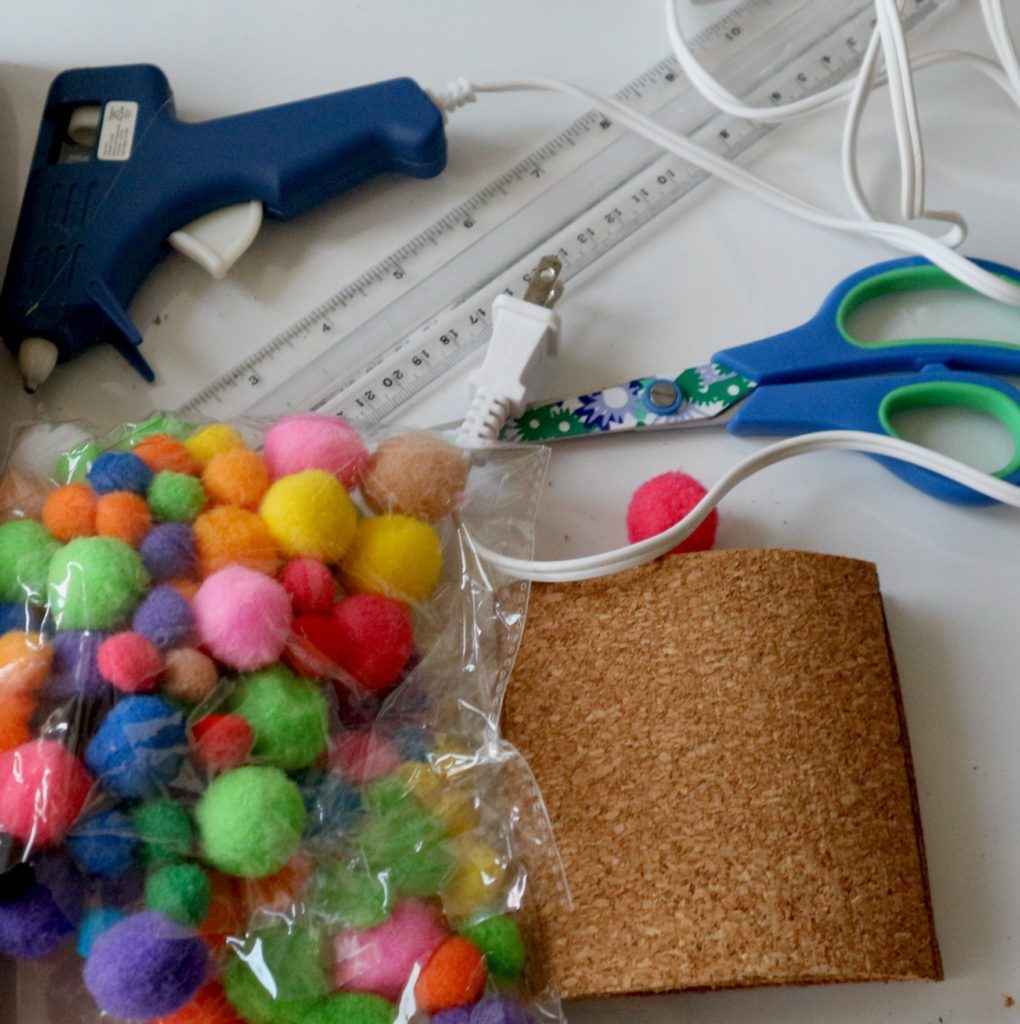
Gather your supplies!
Initially I used a roll of cork but its too light and curvy (you can see in the photo above that it doesn’t lie flat) so use the 12 inch by 12 inch cork square tiles and cut it to the size you like. I cut mine to 4 inches by 4 inches.
![]()
Attach the Pompoms with hot glue. Watch your fingers kids!
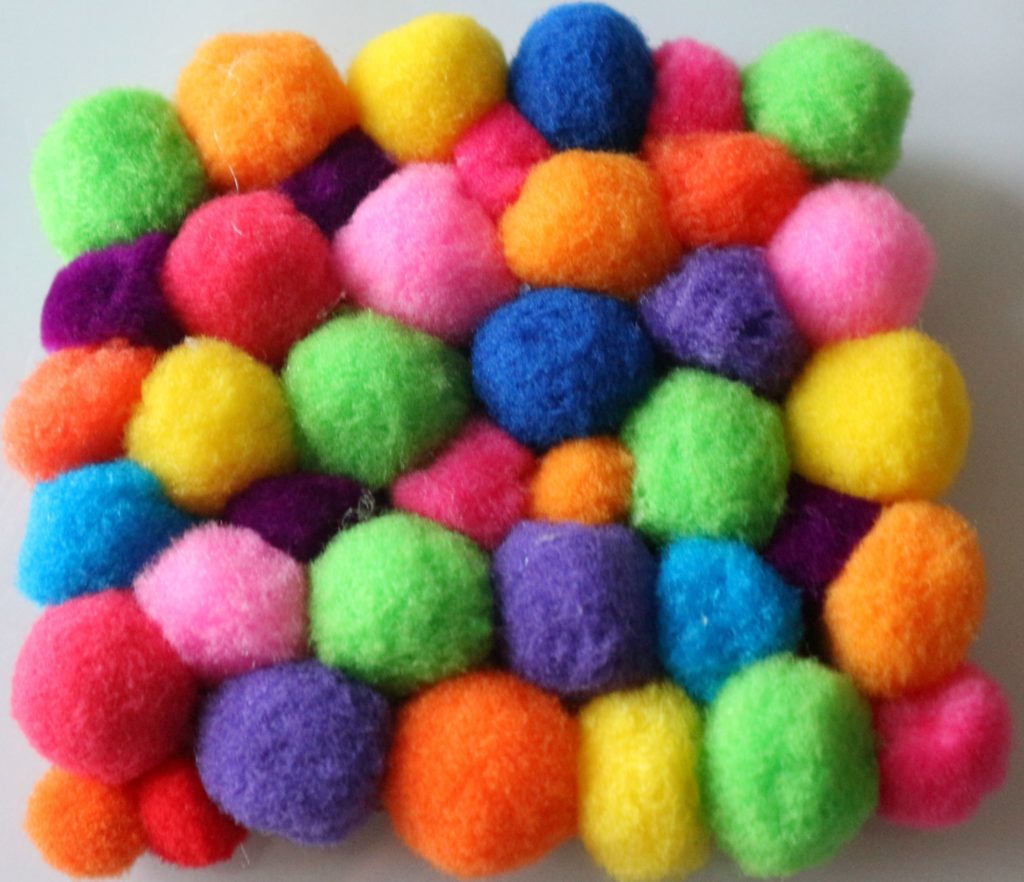
My coaster took nearly 40 pompoms and didn’t have enough the same size. You want them to be fairly consistent so your cup of coffee isn’t tippy on the coaster. Fill in any gaps with smaller ones so you can’t see the cork.
….
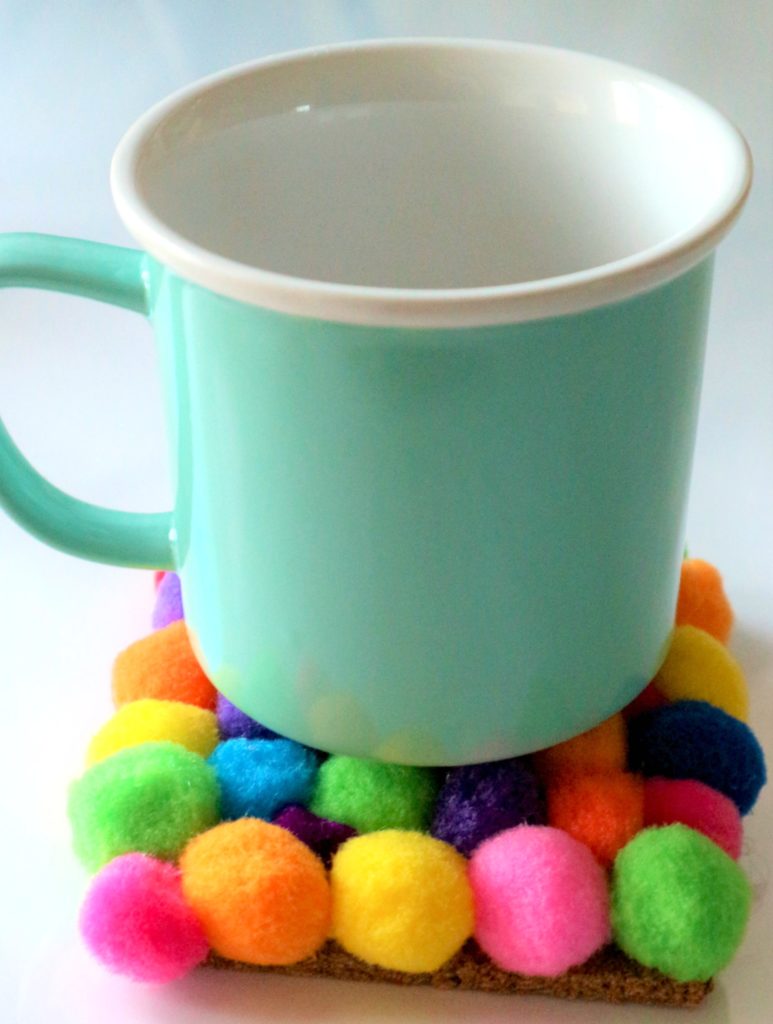

The colors are quite cheery on this grey February morning! It makes me smile every time I look at it!
This would make a great gift for your 10 year old to make and give. I hope you have had fun with color and this very jolly craft!
Remember to pin it on Pinterest or share it with your social media networks.
….
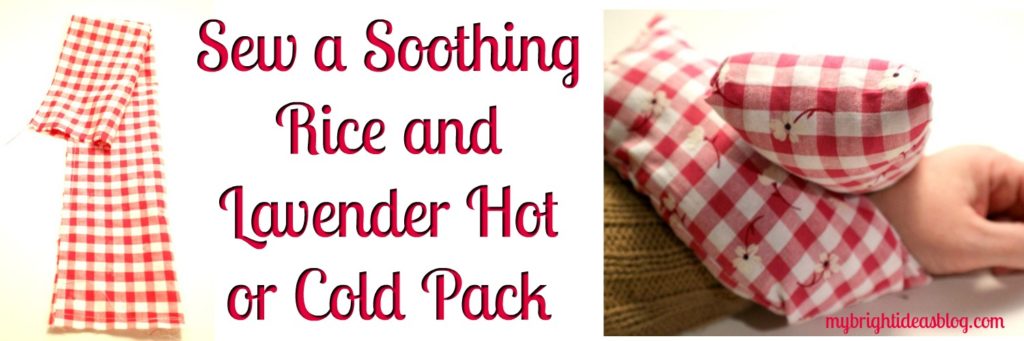
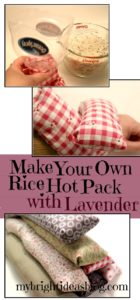
Easy to Make-Microwavable Hot / Cold Rice & Lavender Packs
Microwavable Rice and Lavender Hot or Cold Pad
Need to soothe aches and pain, bumps and bruises? Nothing brings comfort like a microwave rice hot pack! Add a hint of lavender to your hot pad for a calming effect.
If you are sporty with muscle aches or have bickering children that make a certain shoulder muscle tense you need a cloth bag of rice that you can microwave. Everyone needs a few of these in the house. Keep one in the freezer for when you need a cold one (great if a doozy of a headache is coming on) and another ready to go for the microwave when you need a hot one. Even if there are no muscle pains at the moment if you are feeling sick or can’t seem to shake off a chill its wonderful that in 3 minutes in the microwave you have a soothing warm compress…and don’t get me started about cramps….
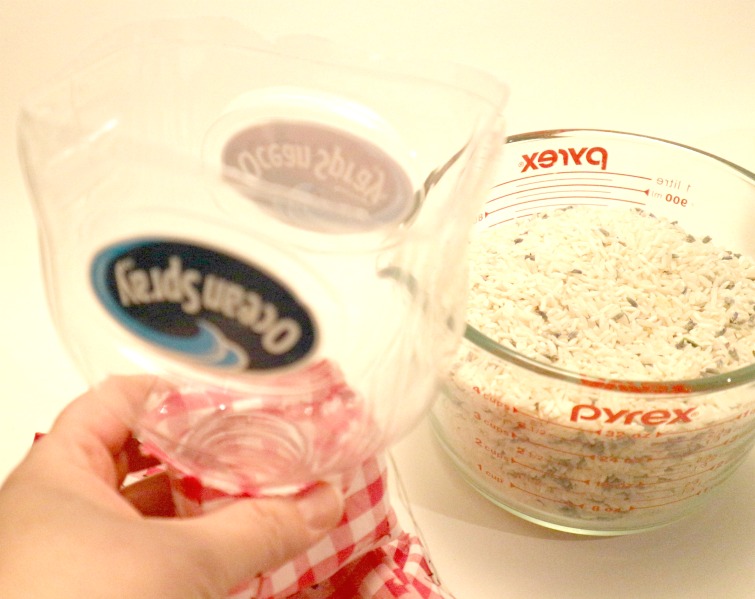
You will need:
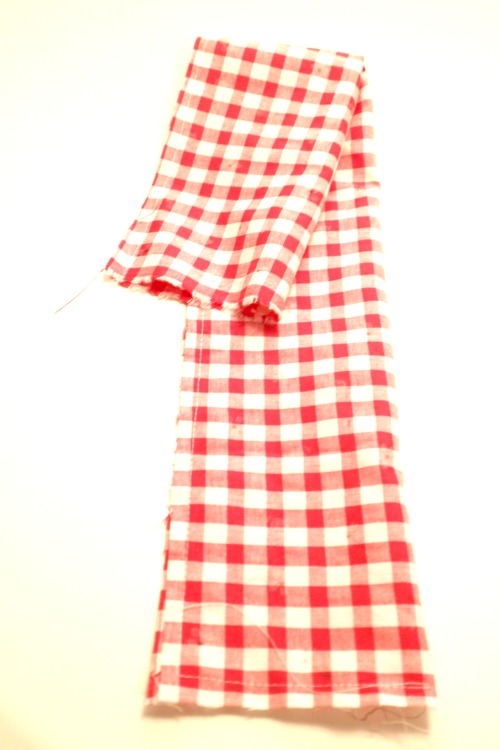
- A piece of cotton 12 x 20 inches (rather than buy new why not upcycle an old pillowcase or piece of clothing you don’t want-or something from the sewing scrap basket)
- Sewing machine
- Needle and thread
- Funnel or juice bottle turned into a funnel
- 3 lb bag of uncooked long grain rice
- 3 tablespoons of dried lavender (this is optional-if you are sensitive to smells start with 1tbsp-it should be subtle and soothing) you can buy lavender from the bulk store or health food store

Choose a calming fabric in 100% cotton. You only need 12 inches x 20 inches (30 cm by 51 cm) so its a great way to use up a scrap remnant from another sewing project.

I love this soothing pattern. Just looking at it calms my headache.
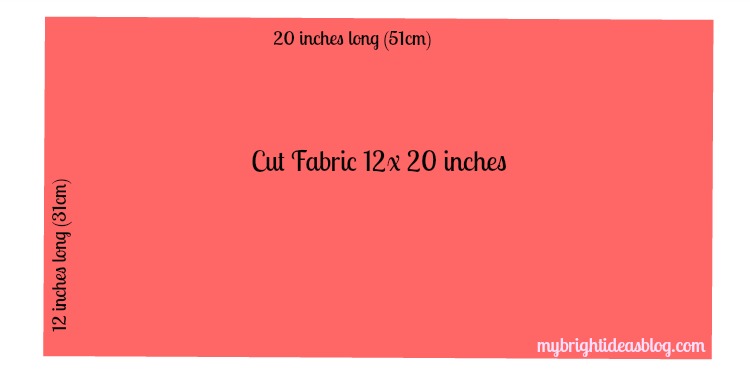
Cut the fabric to size and iron flat.
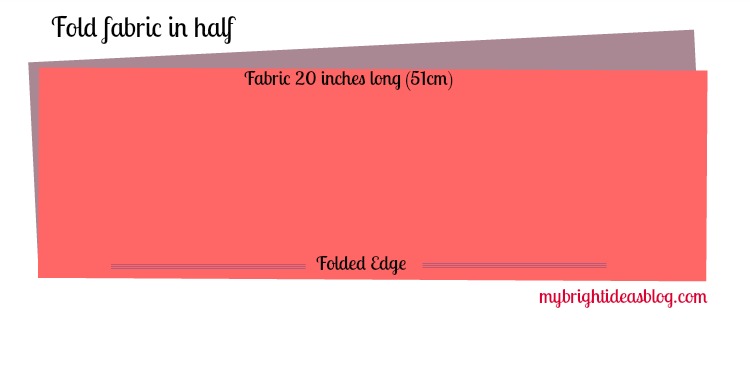
Fold in half.
 Sew around the edge.
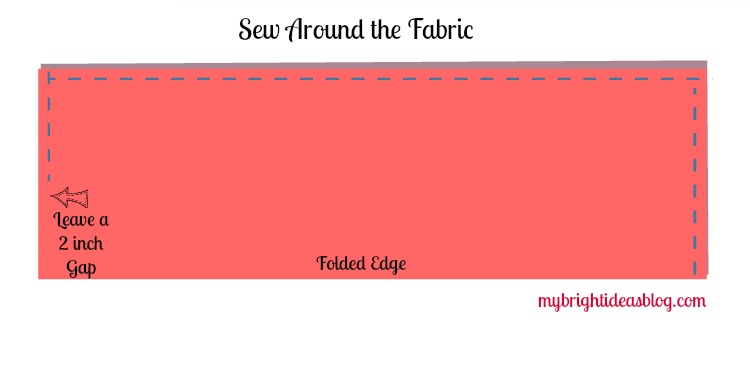
Sew around the fabric leaving a 2 inch opening.
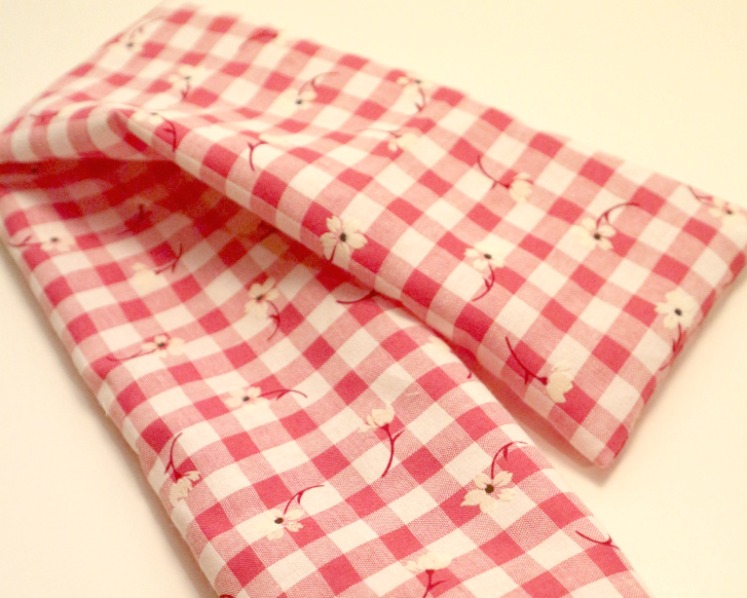
Turn the fabric inside out.
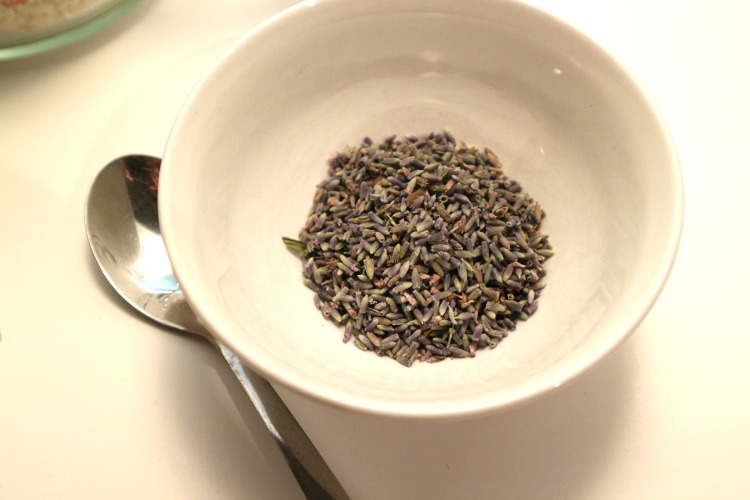
In a large bowl, combine 3 cups of rice and 3 tablespoons of lavender buds. Lavender is completely optional. I found that the lavender was very strong smelling when heated, so I decreased it to 1 tablespoon.
I picked up lavender at the health food store.
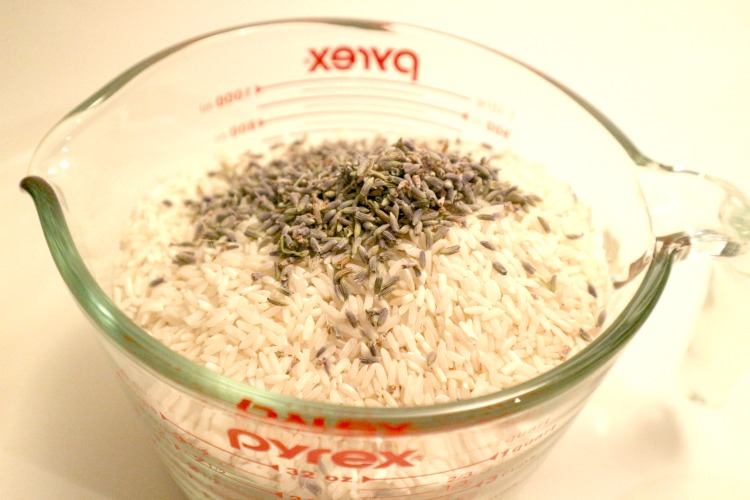
Using a funnel fill the bag with the rice and lavender mixture. Fill to approximately ¾ full.
I didn’t have a funnel with a wide enough neck so I pulled a big juice jug from the recycling bin and cut off the bottom half. It’s the perfect funnel for this project.
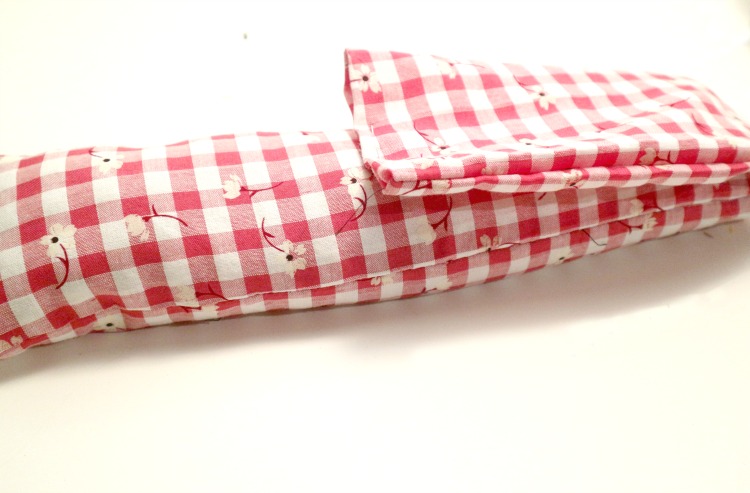
You don’t want it jammed full because its going to be wrapped around your neck or across your forehead so you need some flexibility. Leave 1/4 of the tube empty. Pin the end securely.
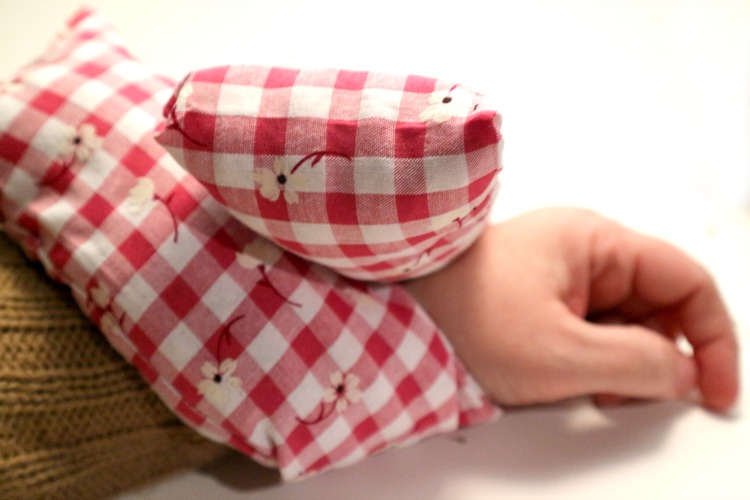
Try it out! How is the flexibility? See how comfortable it is with the current amount of rice. Add more or remove some to make it more to your liking.
If you are happy with it….Tuck the unfinished ends in and hand stitch it closed.
Hot Pack Instructions- To make it a hot pack just microwave for approximately 2 minutes depending on your microwave. It may need another 30 seconds but test it to see what is right for you. My sized rice pack and microwave seem to be perfect at 3 mins. Be careful not to make it too hot for skin. It should be lovely and soothing. (Not for children-Use at your own risk)
Cold Pack-Place the rice pack in a ziplock bag and put in the freezer. Amazing for headaches or bumps and bruises.
Mini Packs and Pocket Warmers-To make pocket warmers cut a piece of fabric 3 x 5 inches (or old lost sock) to be approx. 5 inches long. Follow the instructions above. For microwaving heat for 30 seconds to start and test out the perfect length of time for your hand warmers.
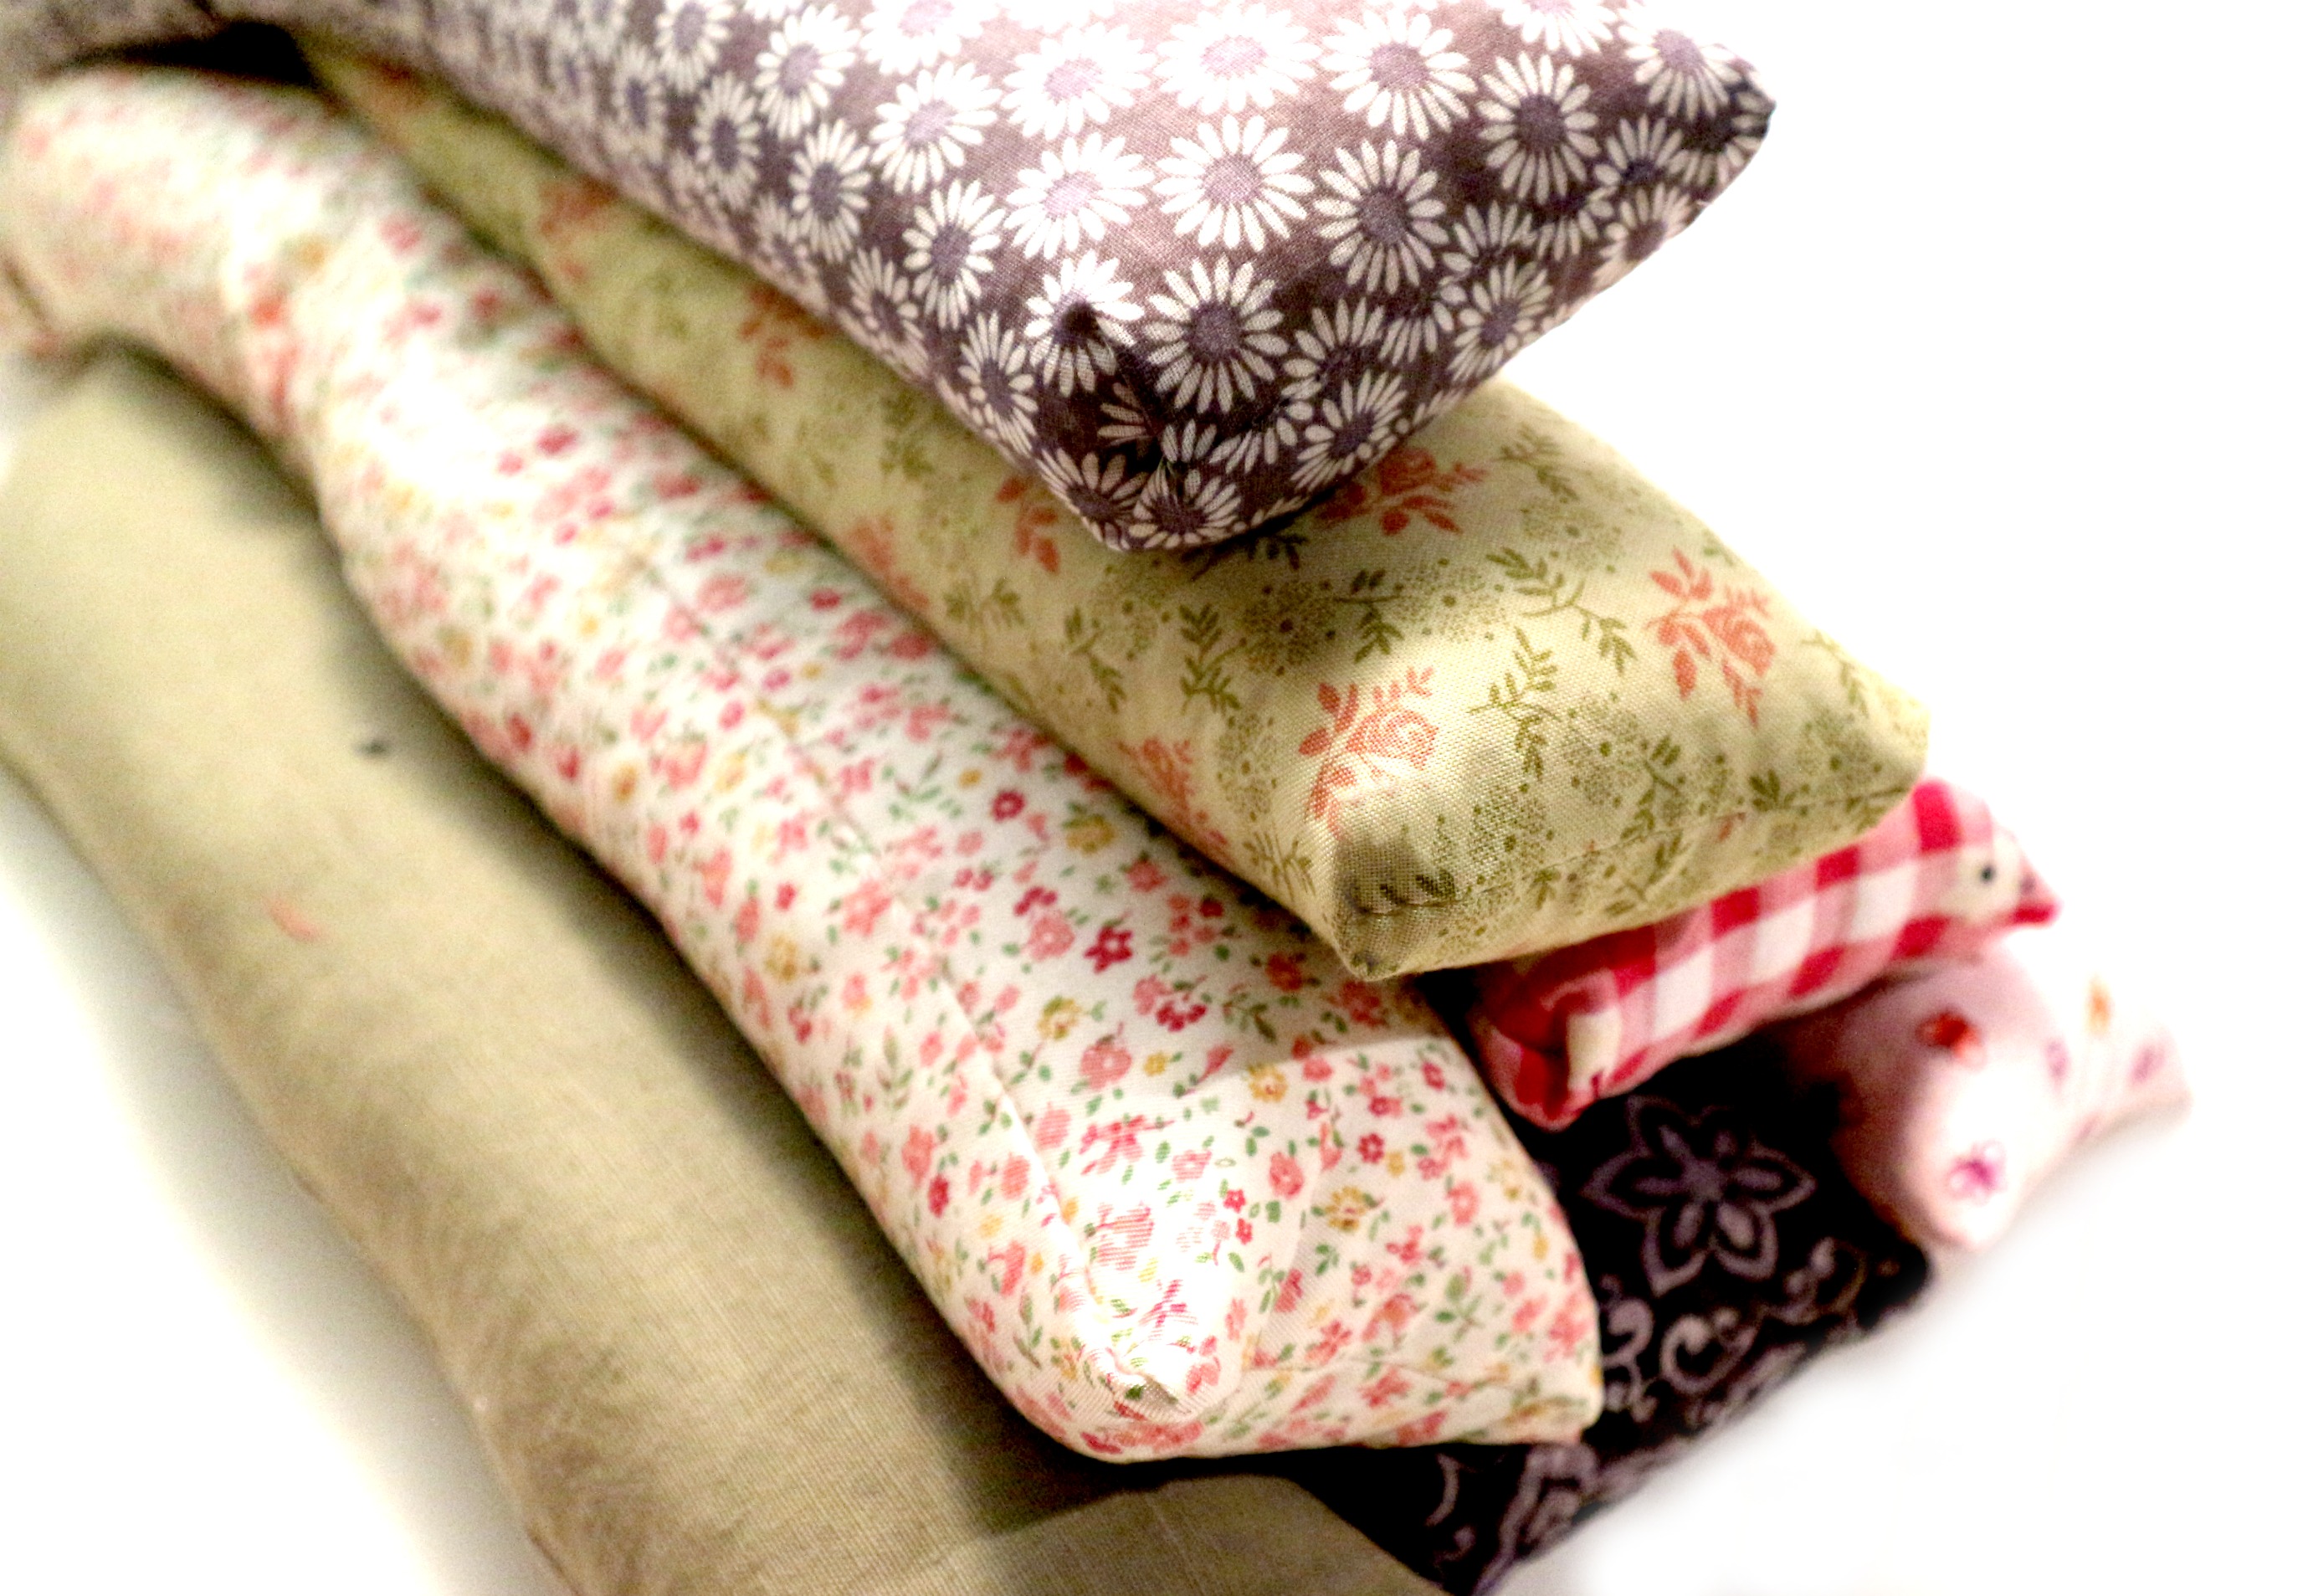
I always store my rice packs in a ziplock bag to keep the dust off. Do not microwave it in the plastic bag.
Remember to make a spare one for your desk at work and make a few extras to take to friends with the flu with some chicken soup. Ohhh, you’re such a good friend…

…


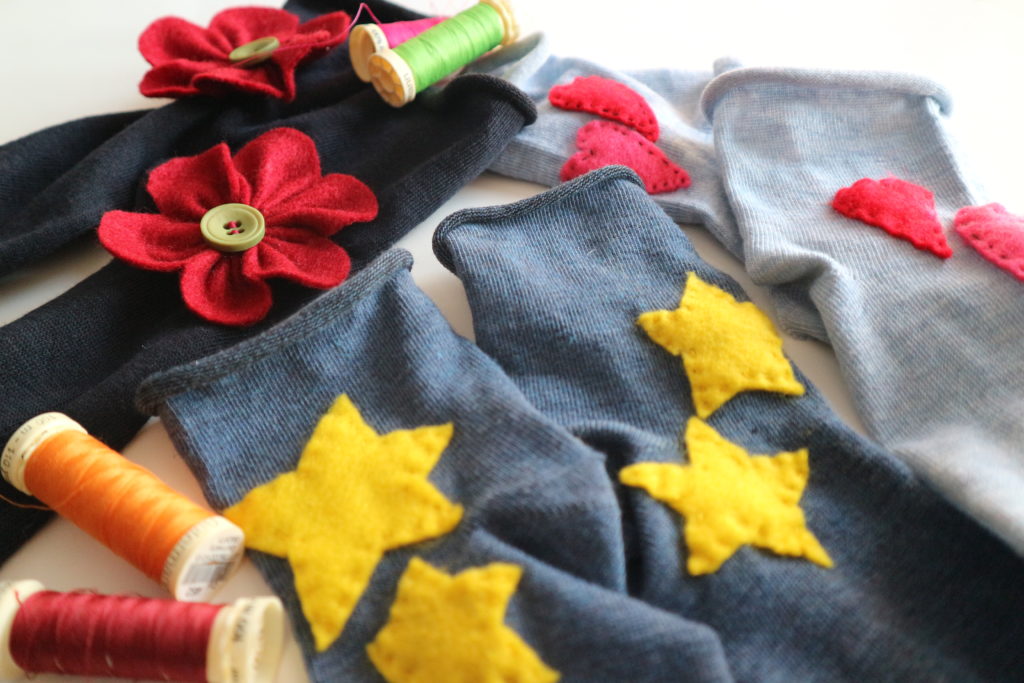
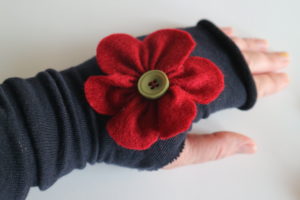
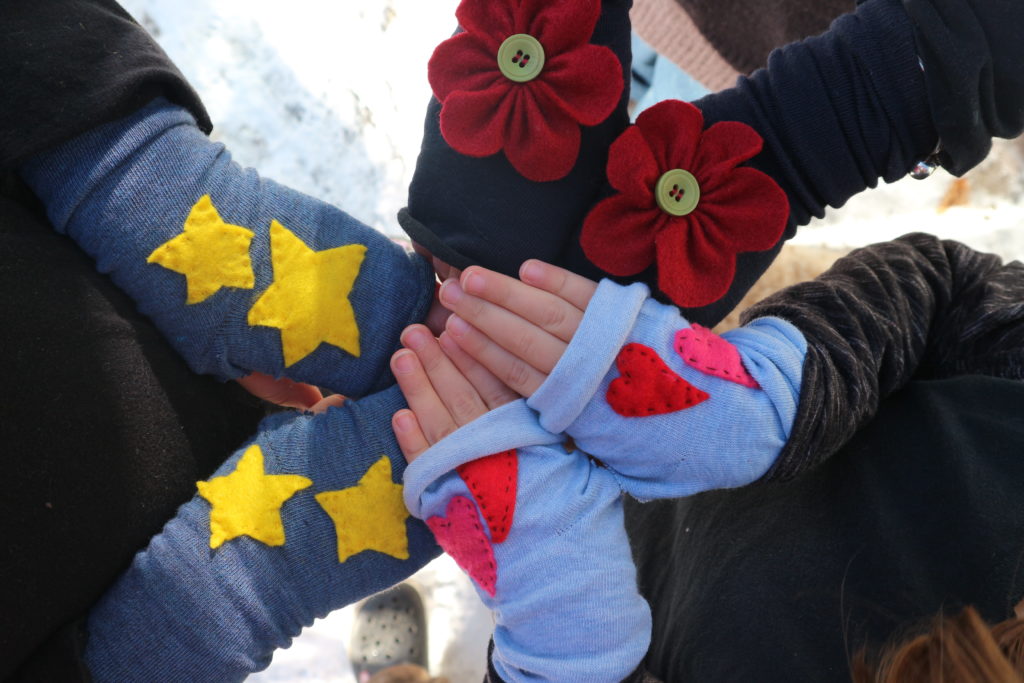
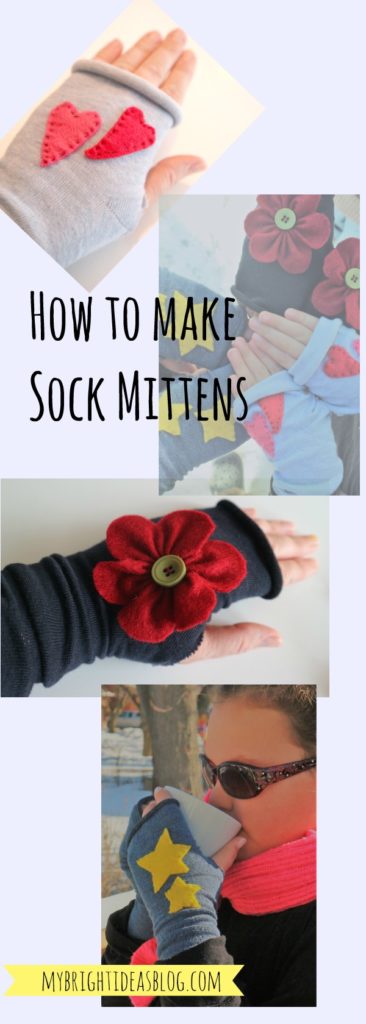
Fingerless Mittens from Socks? Super fun!


Have you noticed the weather is getting chilly again and your little fingers are getting cold. But where are last years mittens??? Don’t ask me….I have a drawer with 10 single mittens and gloves that I just can’t figure out where the partners have gone to.
Not to worry! It is so easy to make fingerless gloves/mittens from a pair of socks! Find yourself a clean pair of old socks that you can upcycle….or treat yourself to a new pair of socks.
You will need….
- socks
- scissors
- needle
- thread
- felt scraps
Start by resting your hand on the sock and seeing where your thumb will be and the length of your fingers compared to the end of the socks. Mark a little “o” where the thumb hole will be near the bend in the sock.
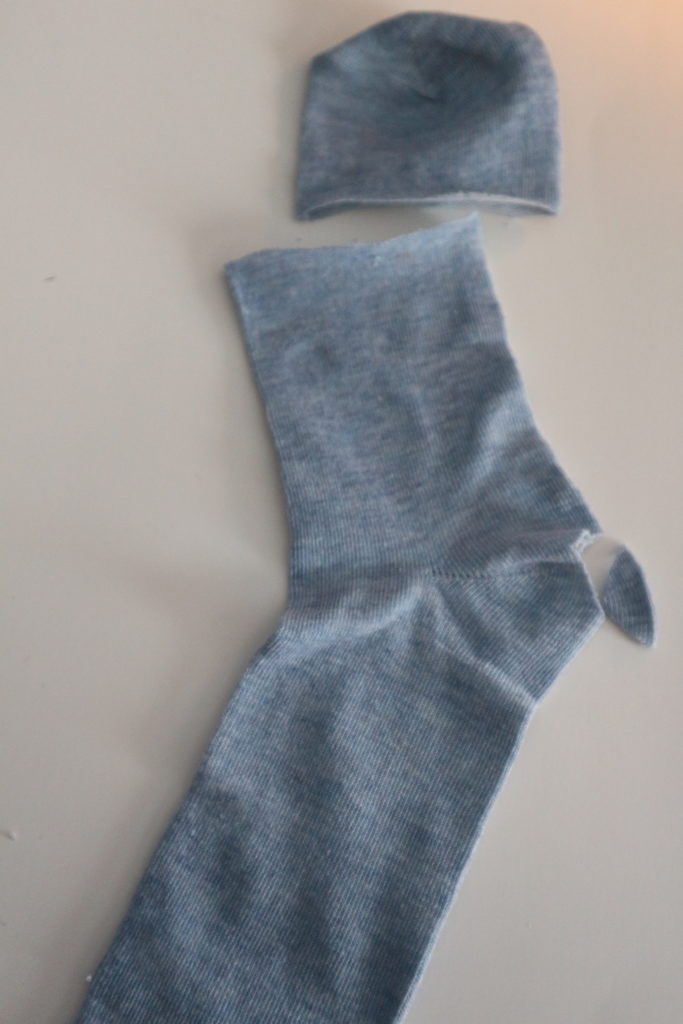
Cut a small hole at the bend in the sock heel for the thumb and across the top for the fingers.
Try the sock on your hand and see if you thumb fits comfortably. If it’s too small make it a bit bigger.
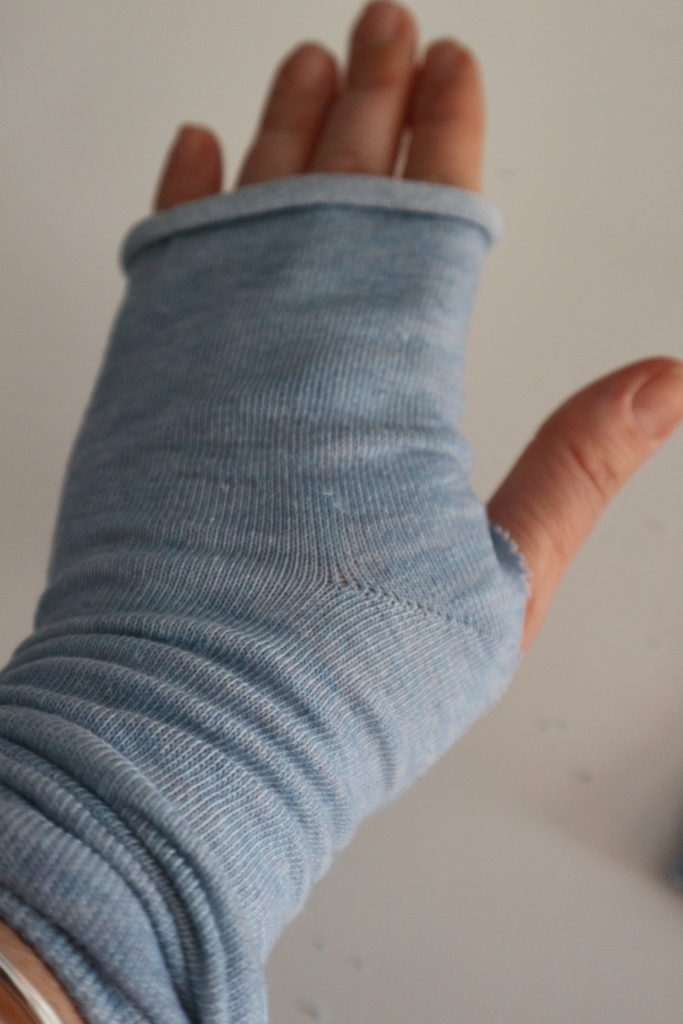
The lovely thing about socks. is they are stretchy and comfy. Having your finger tips free means you can type a text, count change for the parking metre and blow your nose without taking off your mitts. Gross…. I know but cold and flu season will be here soon!
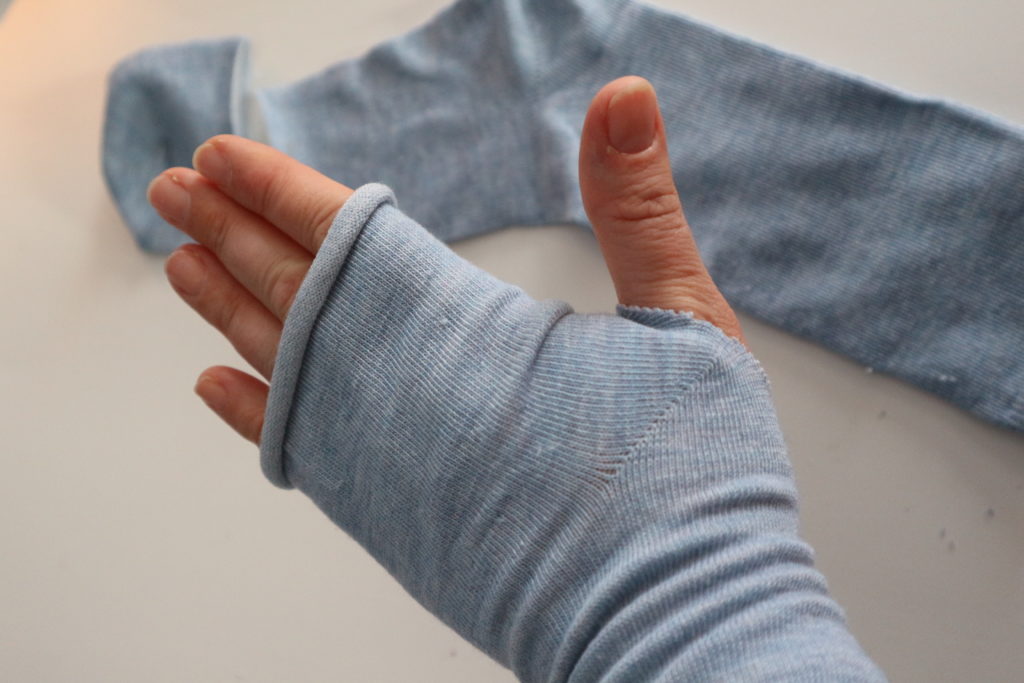
Hemming isn’t necessary, because it is knit fabric, so let it roll a bit. So literally, that is all you do to make the fingerless mitten or glove.
Now choose a little something to be the applique on the front of each hand.
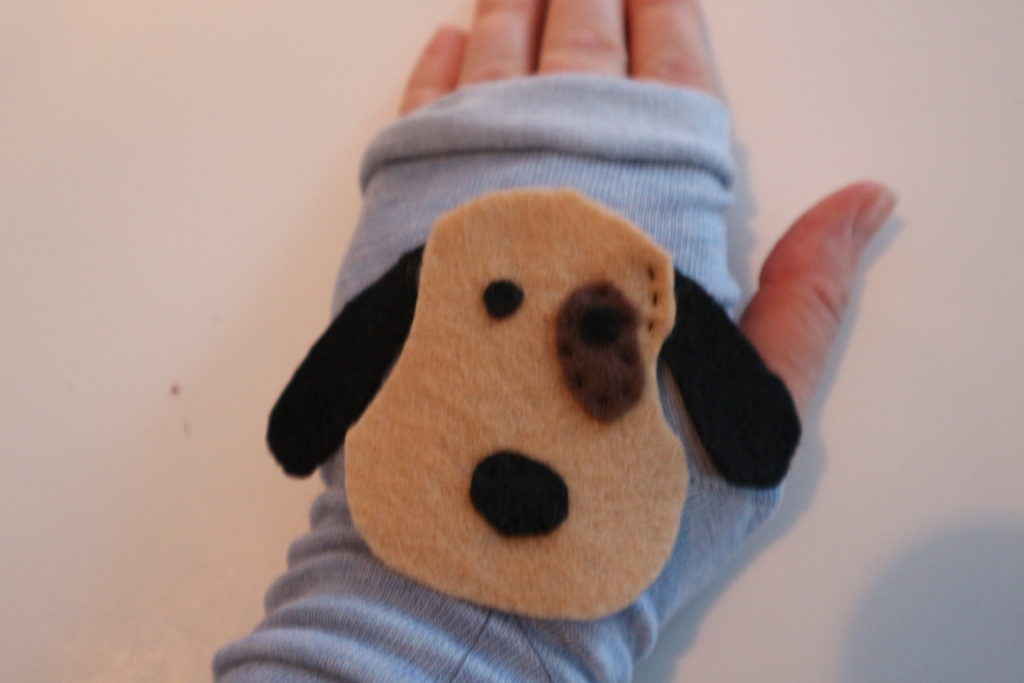
I tried this handsome dog but he was too big.
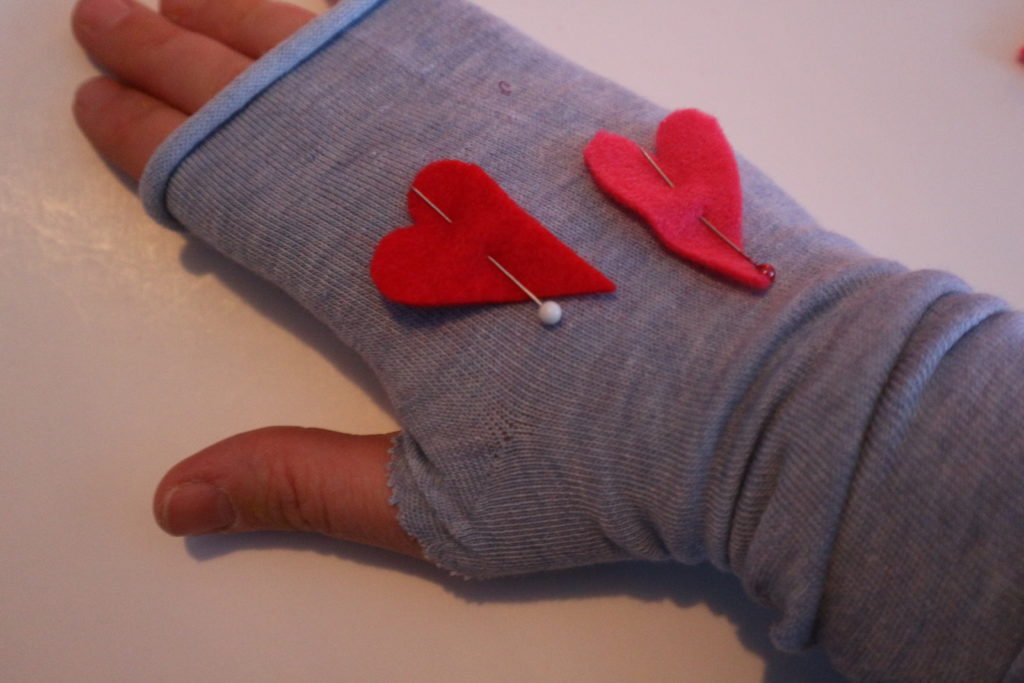
Decide where you want to put the applique and pin it in place.
A quick running stitch is all you need to attach the heart to the mitten.
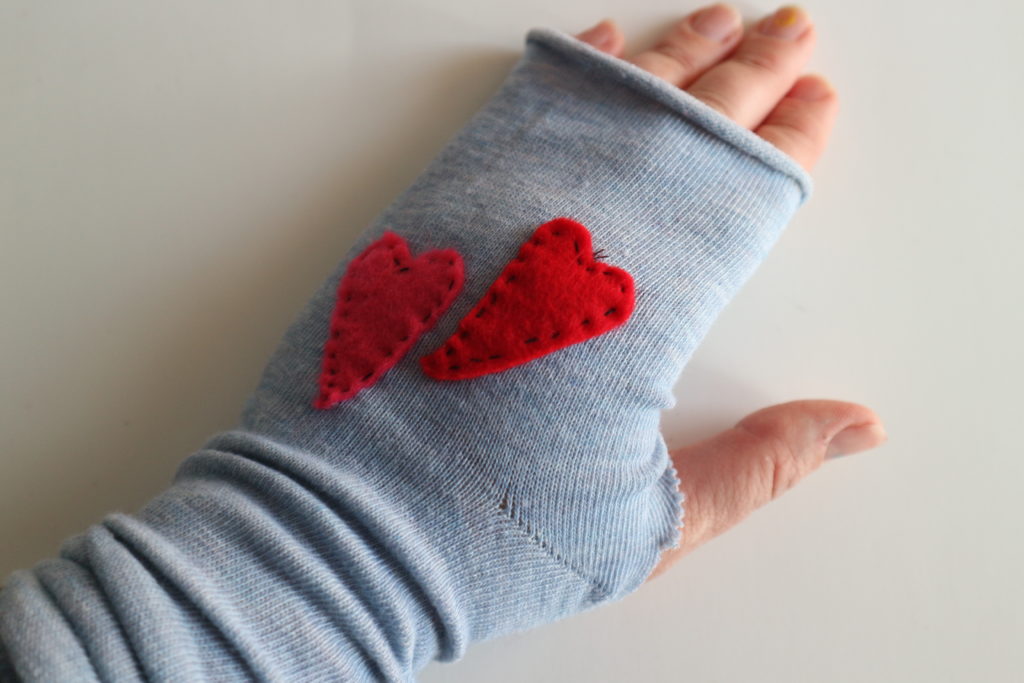
There, now the mitten applique is in place. You are done!

Easy to add a flower with a button.
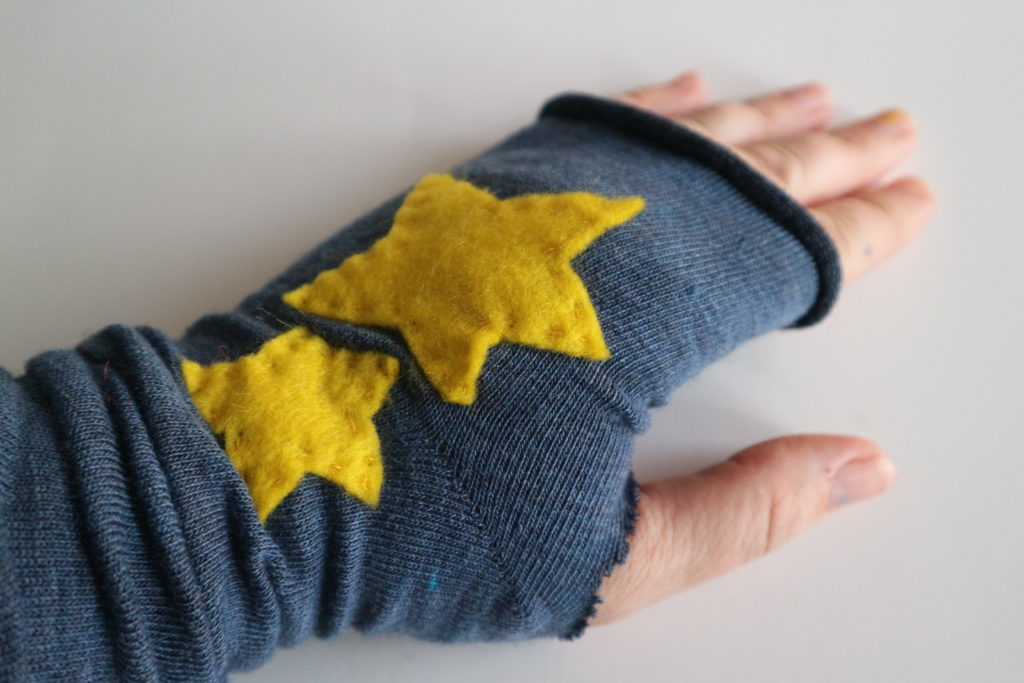
Stars are easy too.
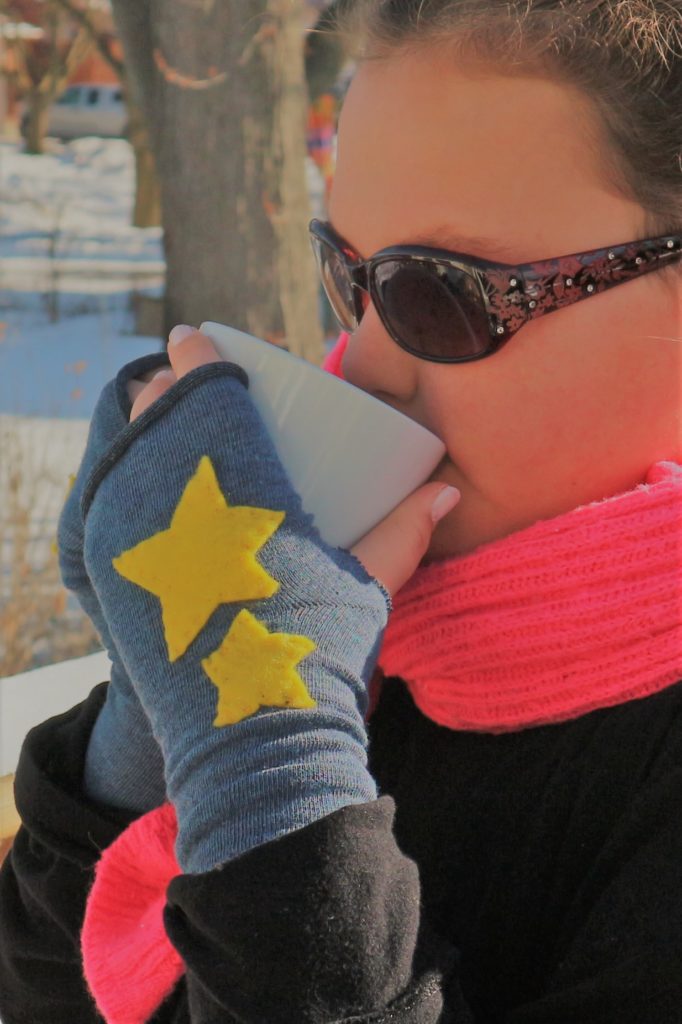
Brrr. That was a cold day! Hmmm…hot chocolate!
Sew a Super Easy to Make Felt Crown – Add to your dress up clothes!
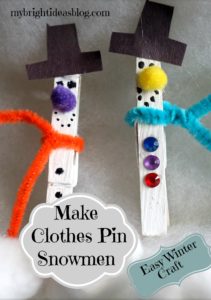
Clothes Pin Snowman – Make Easy Kids Craft
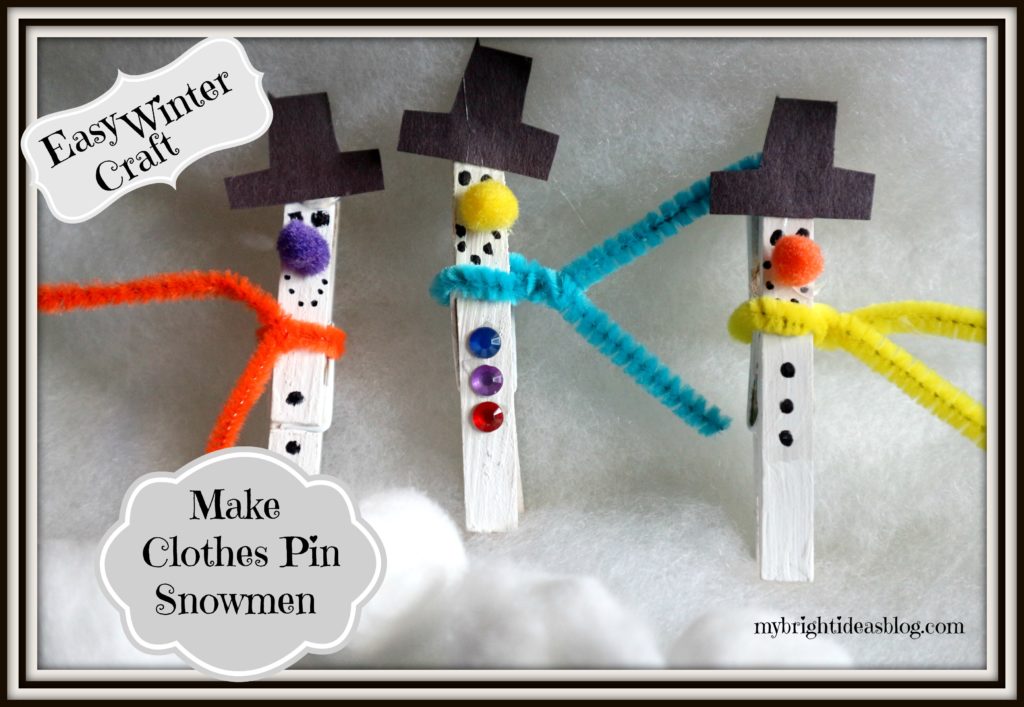
It’s the adorable pompom nose that really got me wanting to make this quick and easy children’s craft. Paint a clothes pin white and start building a snowman.
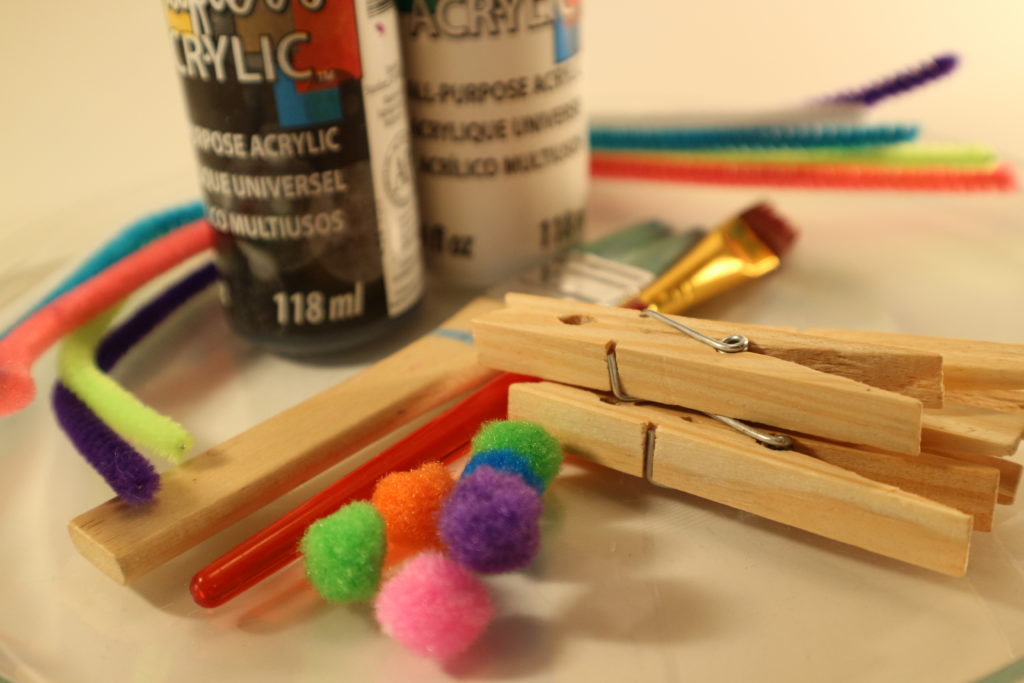
Gather up your usual basket of crafts. You’ll need pipe cleaners or a bit of yarn for the scarves. Clothes pegs, paint brushes, white paint, a black sharpie and little scraps of black paper or felt for the hat.
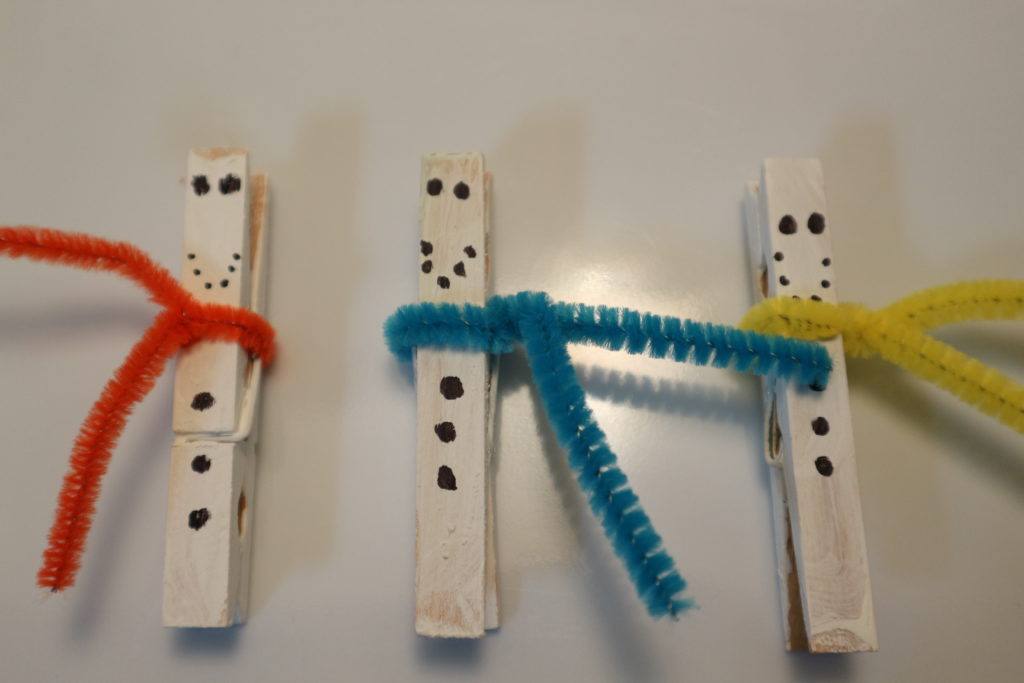
Paint your clothes pegs white and wait at least an hour for drying time.
Cut off a bit of yarn or half of a pipe cleaner and tie your snowmen a cozy scarf. Take your black marker and make his coal eyes , mouth and buttons.
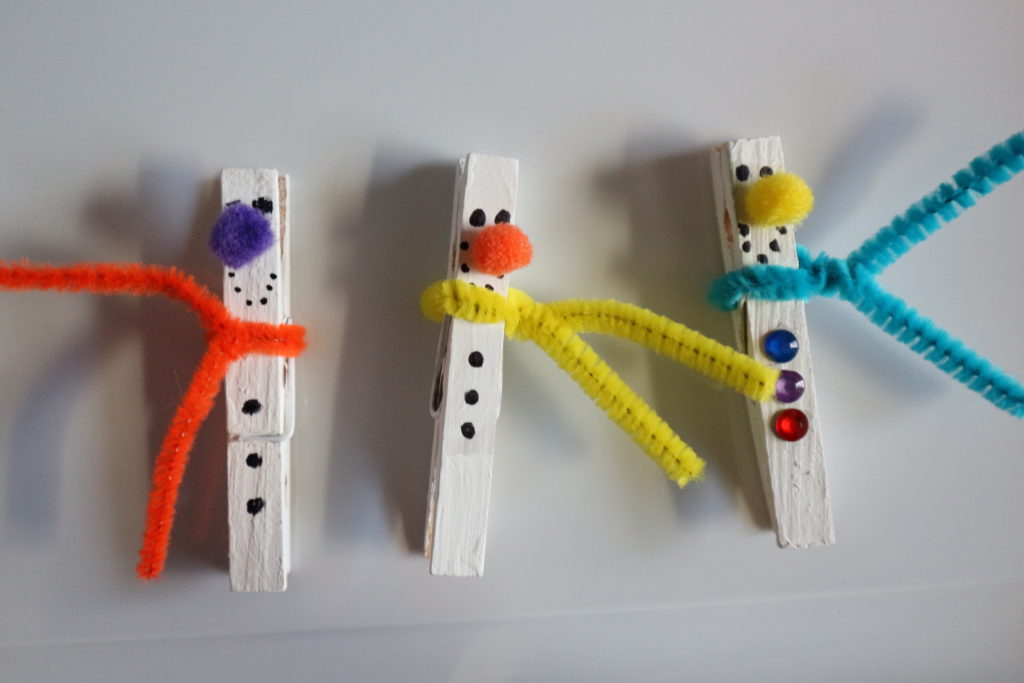
Take your black marker and make his coal eyes , mouth and buttons. One of my snow men felt he wanted to dress it up a bit and put on some small rhinestones. Glue on the pompom noses. I thought originally that they should be orange noses for a carrot but my craft kit only had one orange one left.
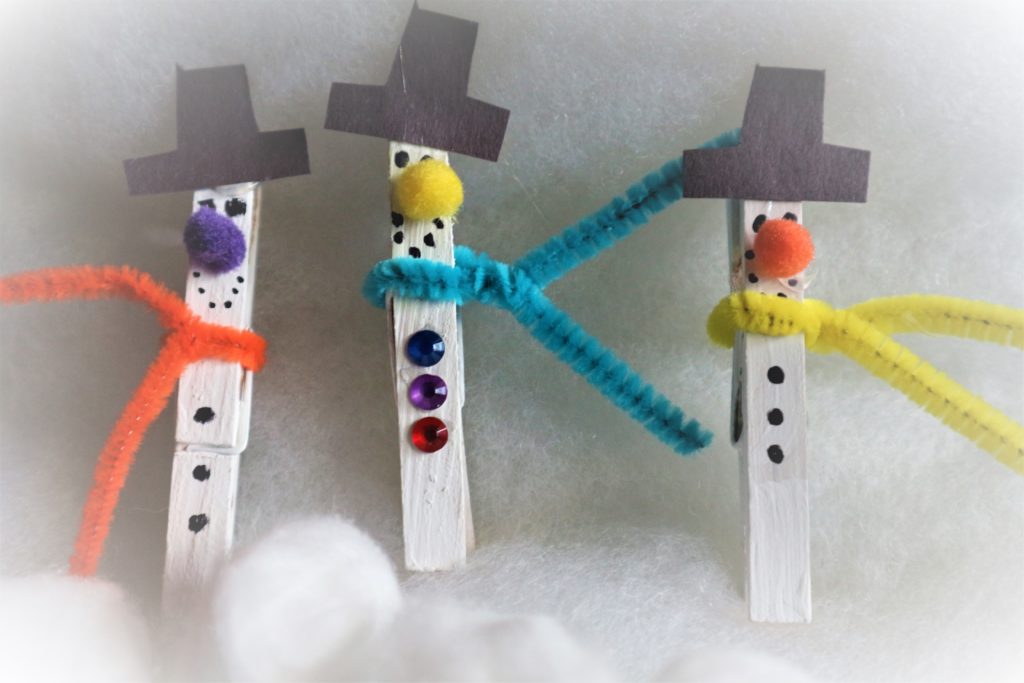
Finally I put on some little hats to finish off the outfit. Super cute kiddie craft!
Make a Felt Pizza Toy in minutes – No sew
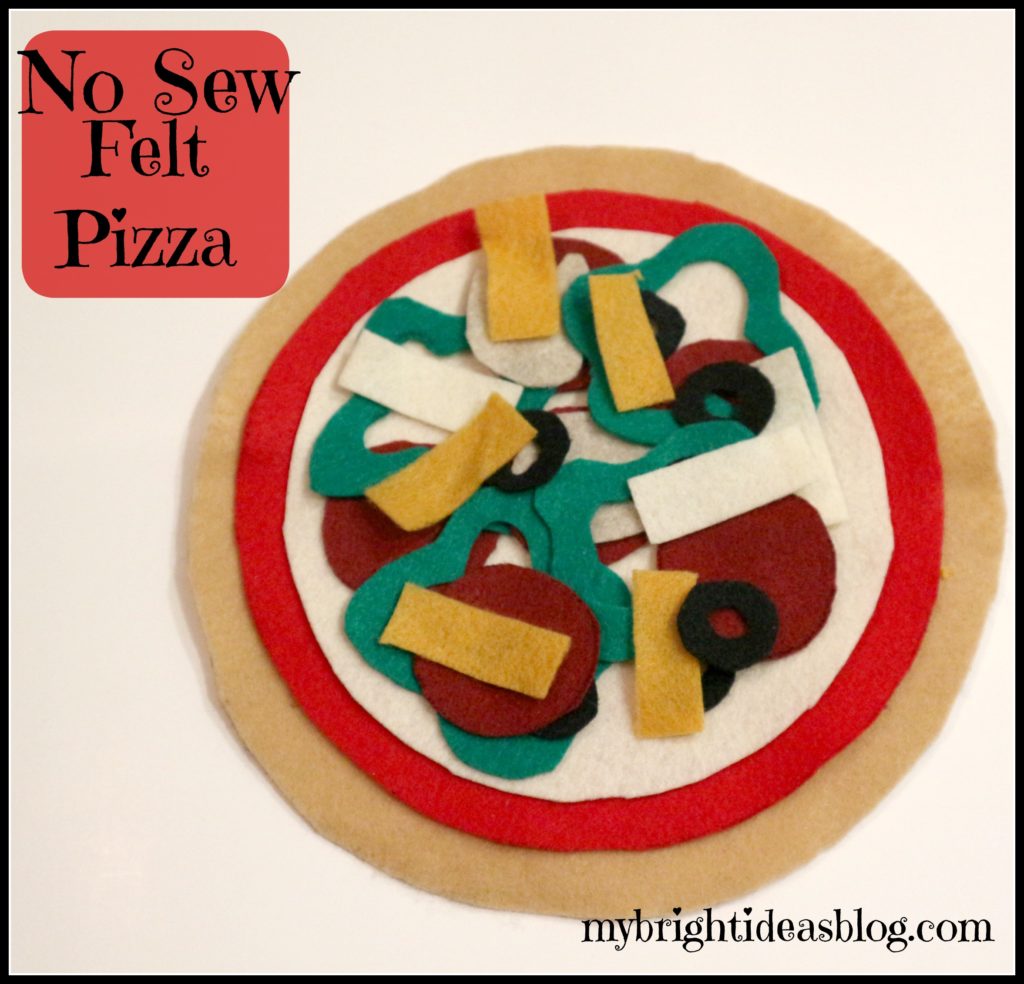 How to make an easy, no-sew felt pizza! It’s super easy and fun to make with very little skill needed. Since kids are always trying to imitate parents in the kitchen this will be a hit!
You will need felt in the following colours:
- 1 tan/light brown for the crust
- 1 red for pizza sauce
- 1 white/cream for mozzarella cheese
- dark red for pepperoni
- green for peppers
- grey for mushrooms
- pink for ham
- black for olives
- yellow for pineapple
- orange for extra cheese
- PLUS – bowls and plates to trace for big circles
- marker
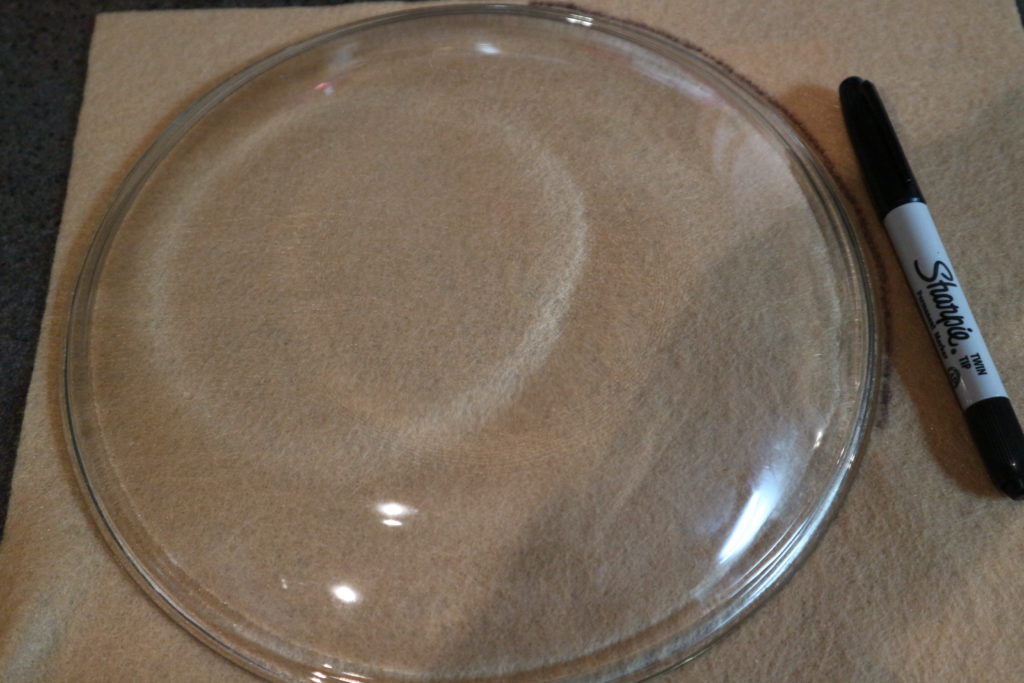
Cream Felt-Pizza Crust: Trace a large bowl or plate for your crust.
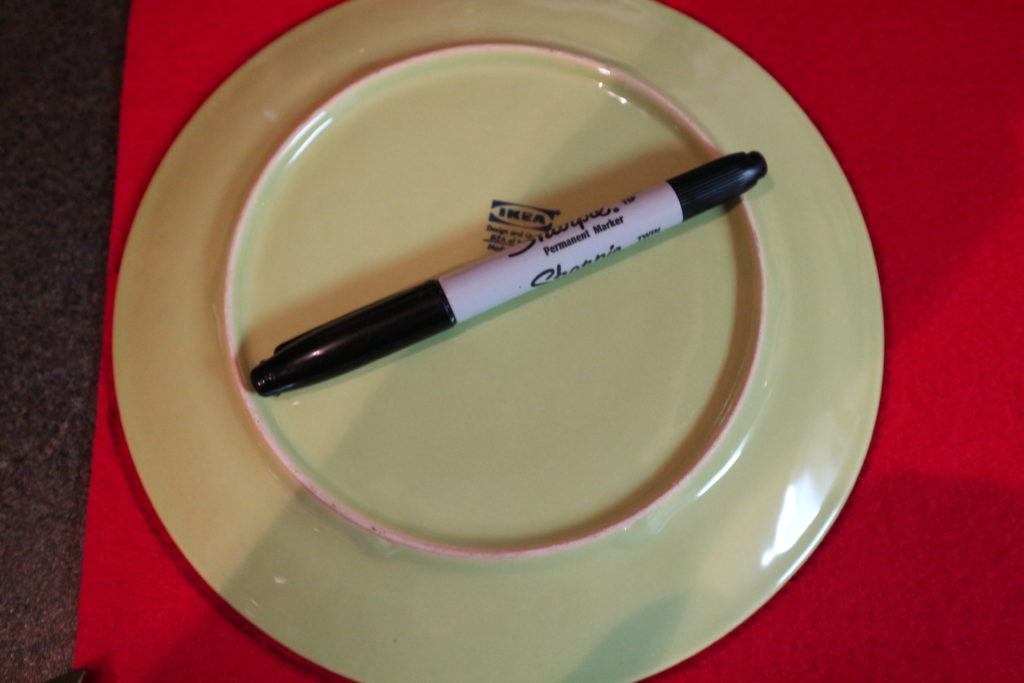
Bright Red Felt-Pizza Sauce: Using a plate or bowl slightly smaller than the last one, cut a slightly smaller circle.
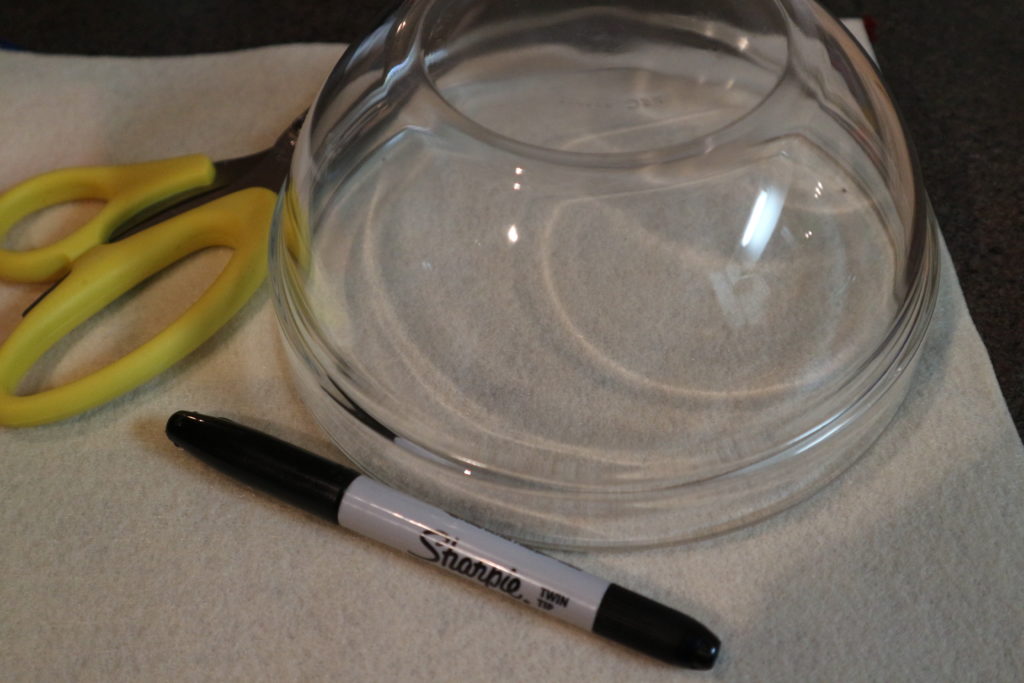
White Felt-Mozzerella Cheese: Cut the cheese…tee hee…out of a piece of white felt. Trace a slightly smaller plate or bowl than the piece of pizza sauce red felt.
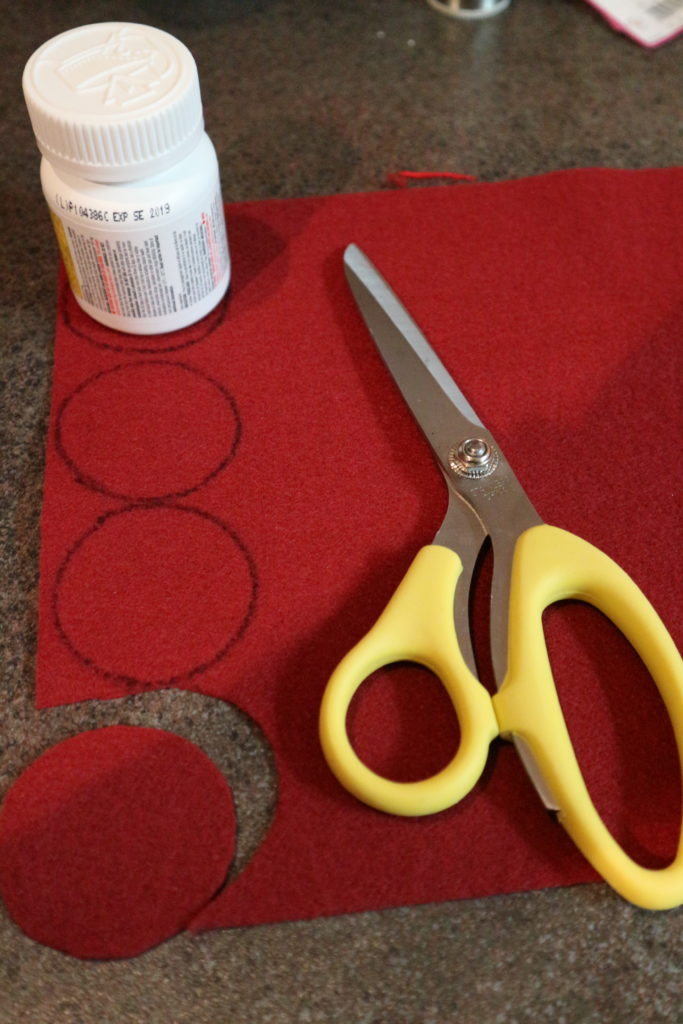
Dark Red Felt-Pepperoni: Cut 6 circles tracing something small like a vitamin bottle.
Grey/Beige Felt-Mushrooms: Draw a mushroom shape and cut it out. Cut 5 mushrooms.
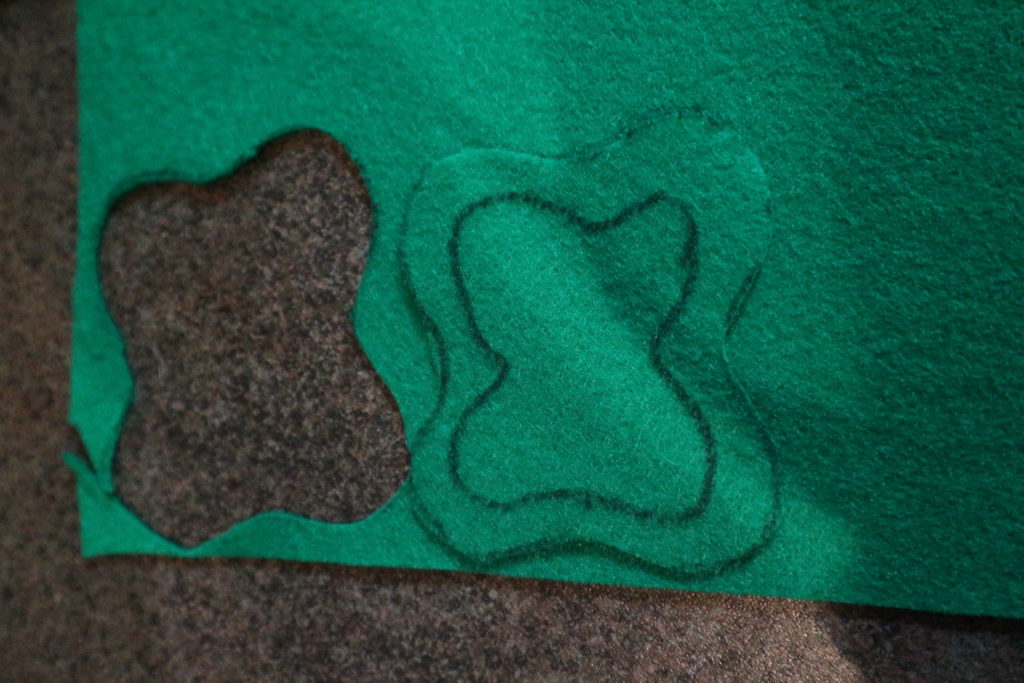
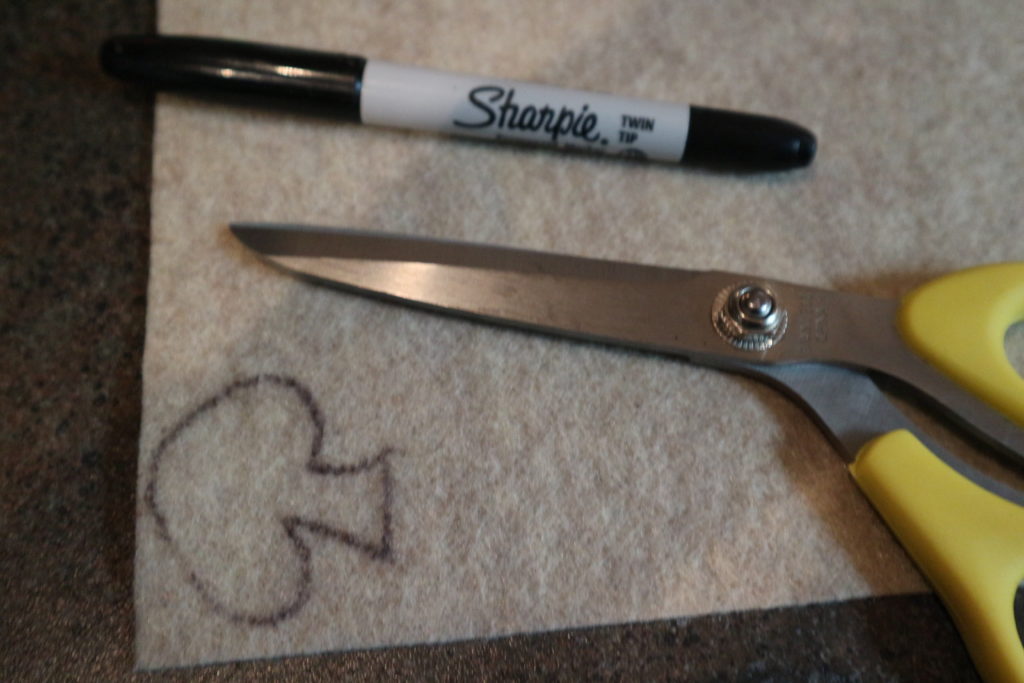
Green Felt-Peppers – It looks like a wiggly square, then outline it again and cut it out. Cut 4 peppers.
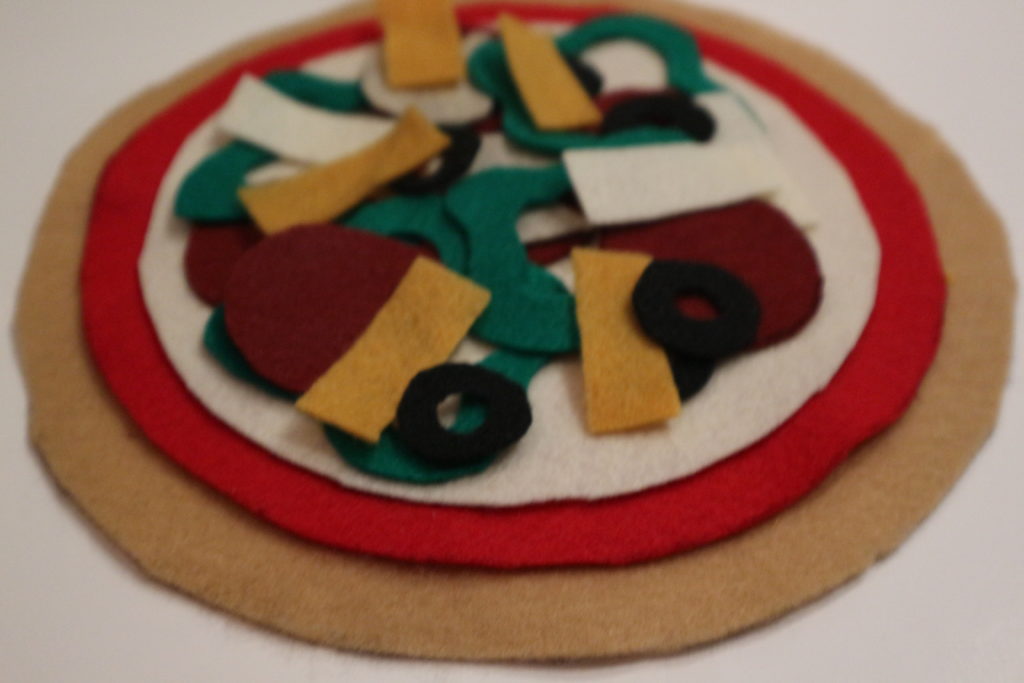
The rest of the toppings are up to you….
Black Felt-Olives: Cut a small circle and trace it a second time. Cut 8 olives.
Orange and White Felt-Grated Cheese: Cut long rectangles for some shredded cheese on top. Cut 6 of each.
Pink Felt Squares-Ham: Cut into squares-6 pink ham squares will be enough.
Orange/Yellow-Pineapple: This begins a great debate about whether you should have pineapple on a pizza. I’m for it! Hawaiian Pizza is my favorite. If you feel the same cut 6 pineapple pieces.
Store your pizza pieces in a large ziplock bag.