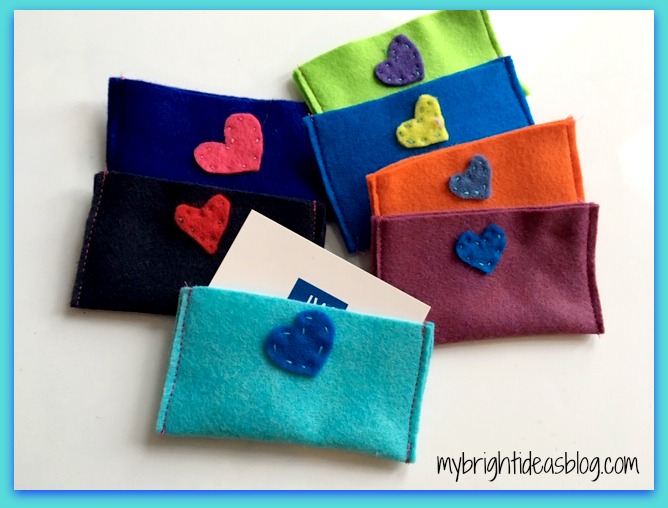
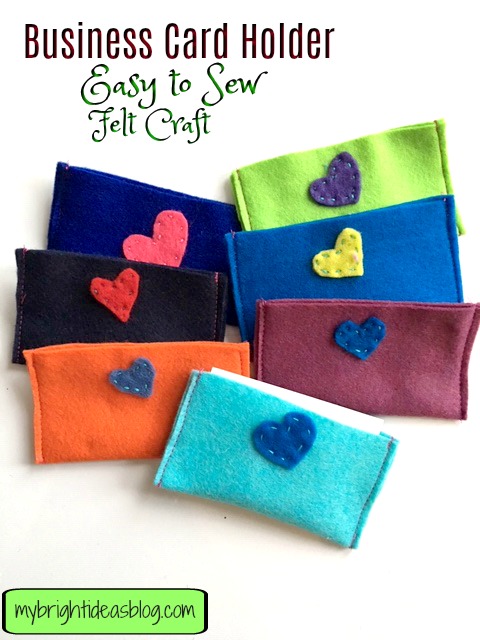
Learn how to make Business Card Holders out of Felt!
Looking for an Easy Sewing Project? Teach your child how to hand or machine sew with this quick gift idea. I’m going to show you how to make a felt business card holder with hearts or buttons for decoration and 3 ways to hand stitch.
We have a big event coming up where thousands of people from all over the world will be gathered and at the end swapping little gifts. So I have been searching for little homemade souvenirs for our family to give to the friends we meet. We might even get business cards printed-with our family email to put in the felt holder so we can become pen pals.
This seemed like an easy, fun, cute craft to make together. Plus teach some basic sewing skills…Brilliant!
You will need:
- 1 full piece of craft felt
- scrap pieces of felt for the heart
- scissors
- needle
- embroidery thread
- a business card
- sewing machine (optional)
- bright buttons (optional)
If you don’t already have felt and embroidery thread on hand you can get these from the dollar store, Walmart and craft stores.
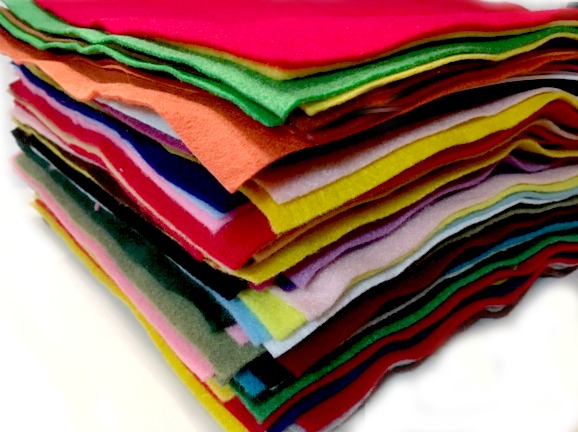
I must admit, I am a bit of a felt hoarder-so I have bought mine from several sources. I found the felt sold by Hobby Lobby for 33 cents was the best quality and value.
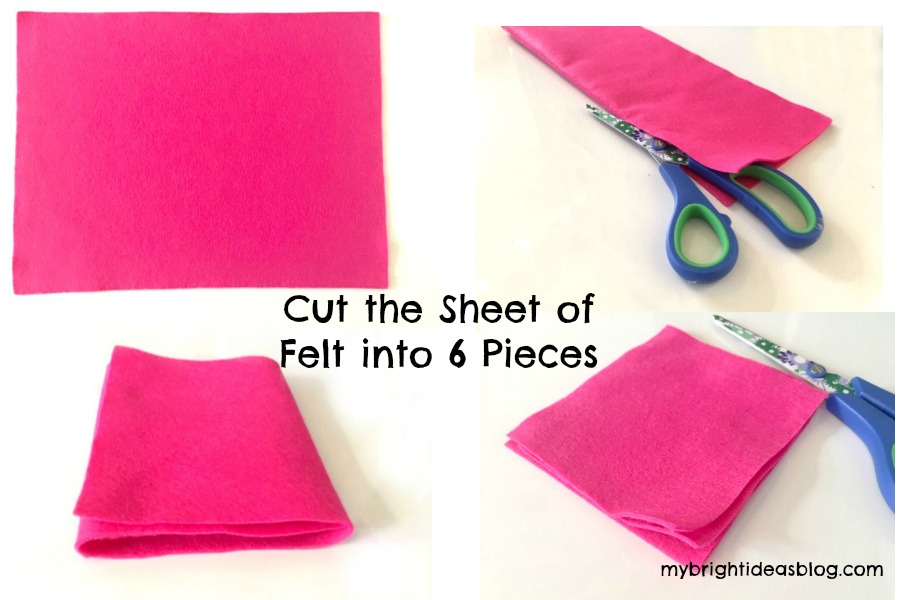
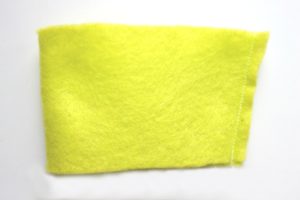
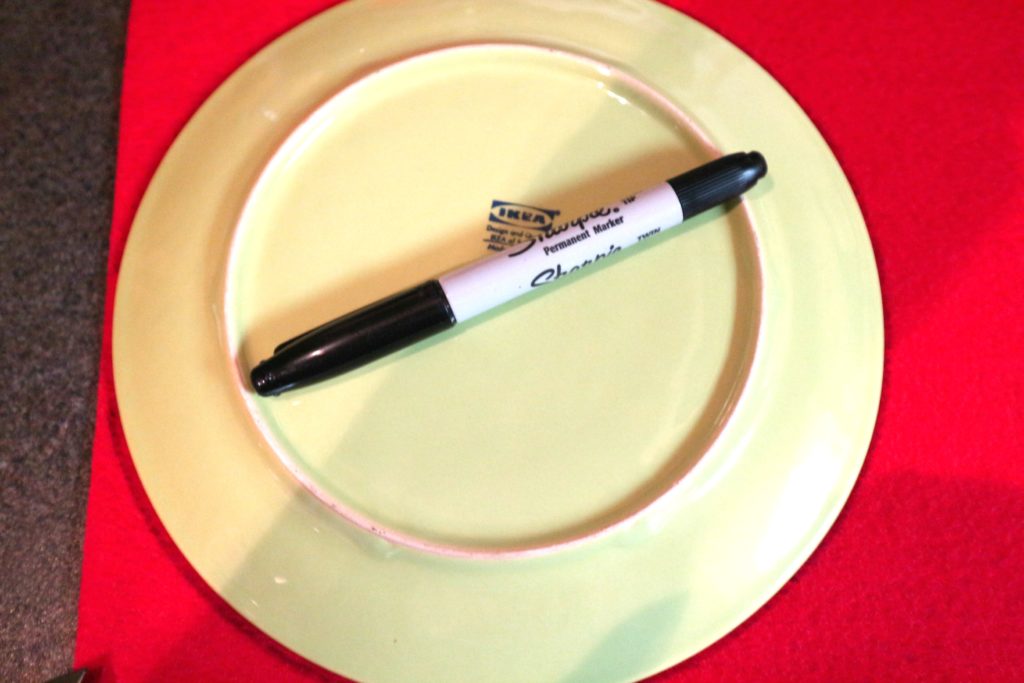
One sheet of felt is usually around 9 1/4 x 12 inches (24 x 30 cm). This is the perfect size to cut into 6 business card holders. Fold the sheet in half lengthwise and cut along the fold. Fold one of those pieces into thirds and cut on the fold. (bottom photos) In the end you should have 6 pieces 4 x 4 1/2 inches (10 x 12 cm).
Have a business card handy to make sure it fits.

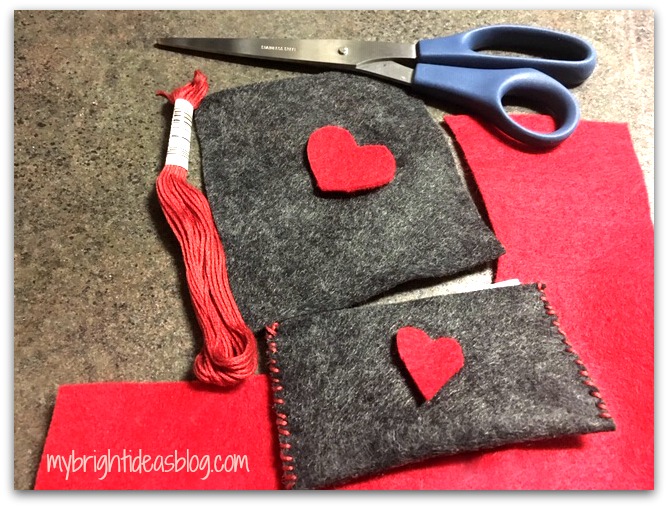
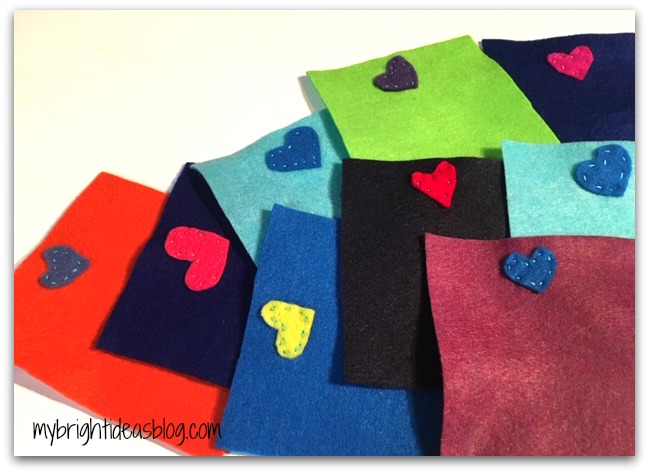
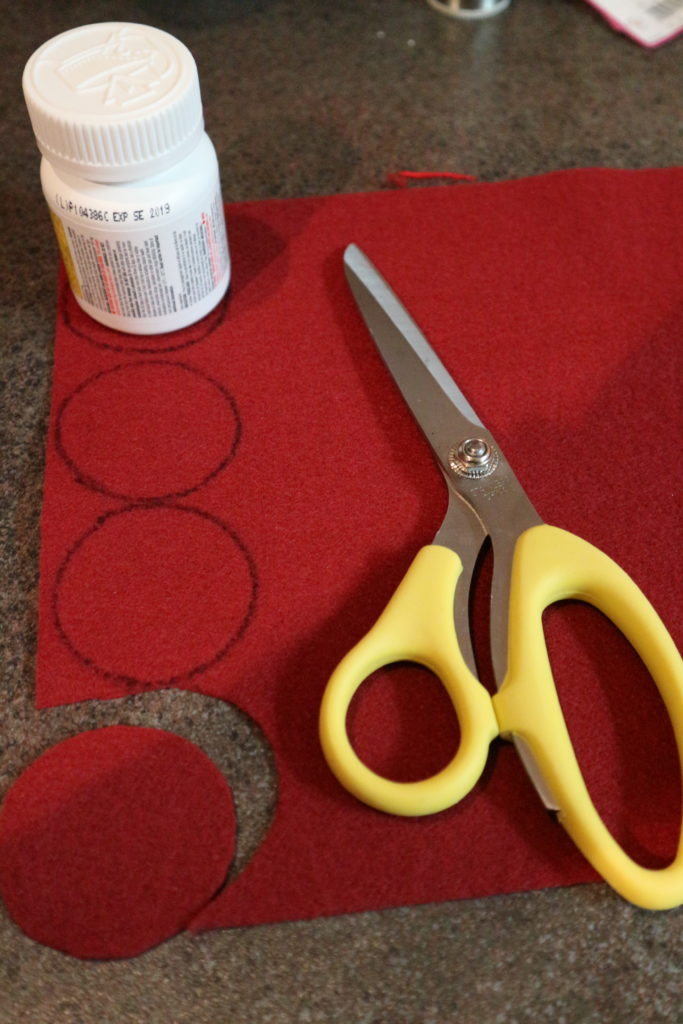
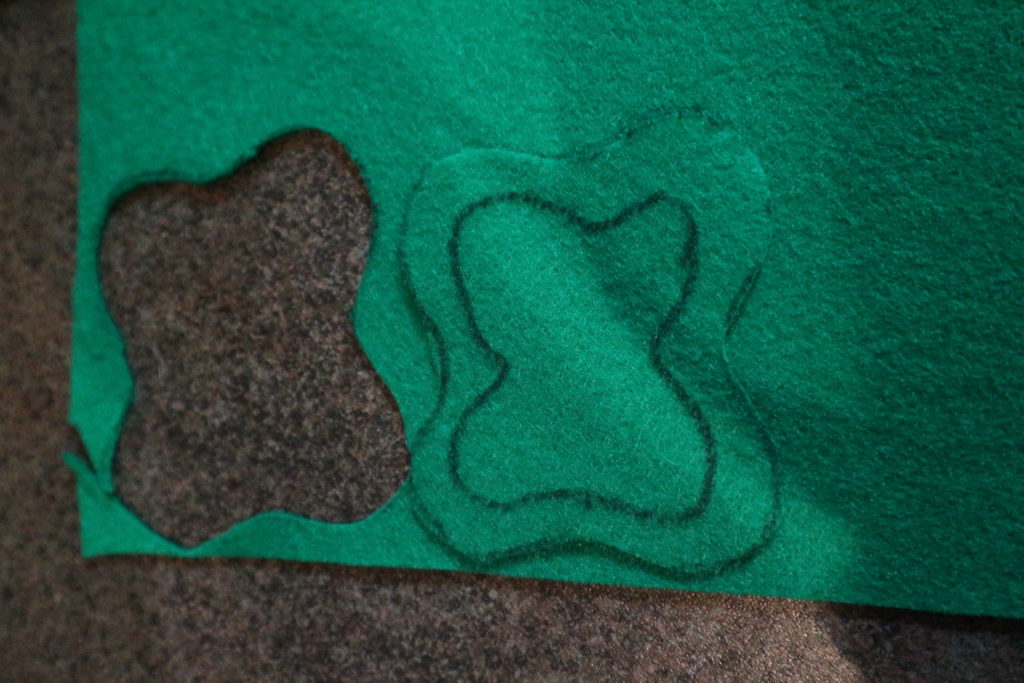
To get started cut small love hearts to decorate the outside of the card holder.
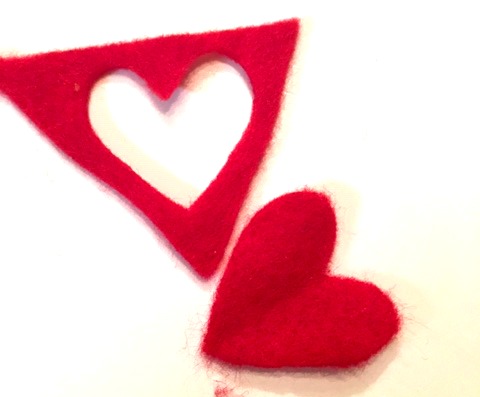
The easiest way to cut a heart is to fold the scrap of felt in half and then cut half the heart so both sides are the same.

Choose matching or contrast embroidery thread.
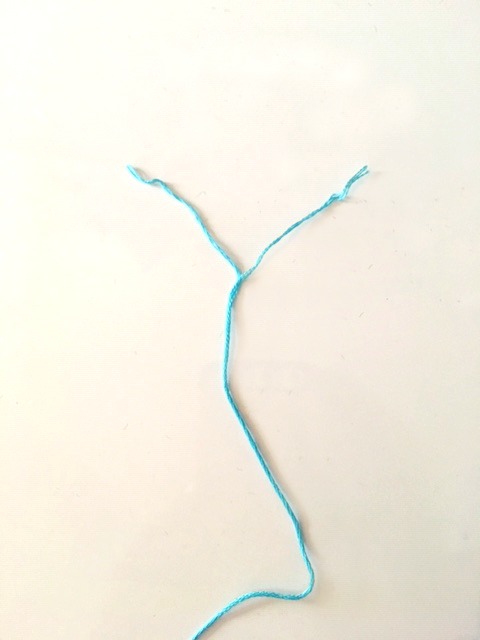
Divide regular embroidery thread into 2 sections of 3 strands each.
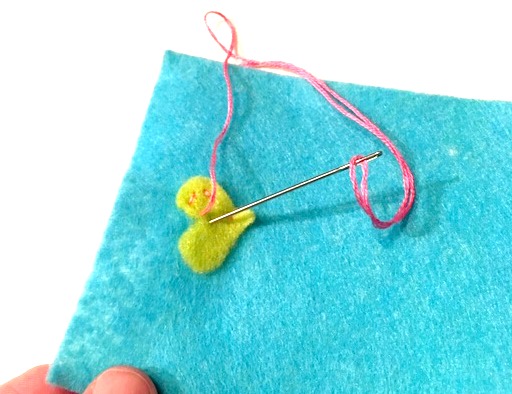
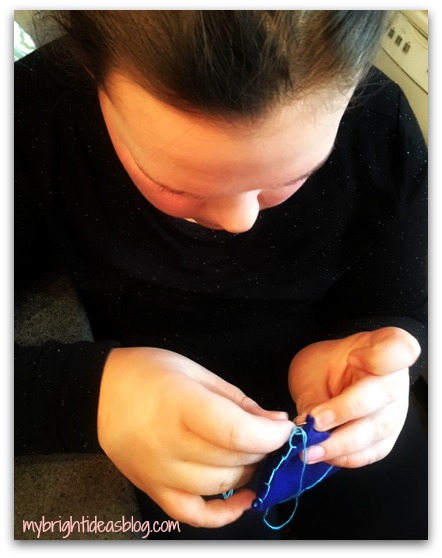
Knot the embroidery thread and begin sewing small stitches to attach the heart to the top of the felt.
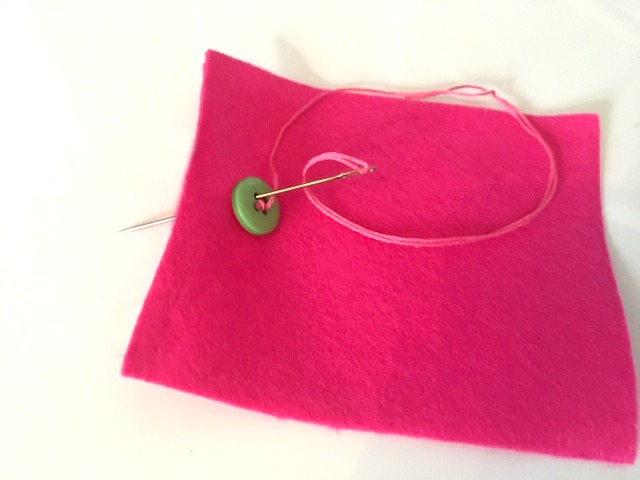
Another idea is just to sew a bright button on instead of a heart. Teaching your child how to sew a button on and a simple hand sewing could really be helpful later in life.
A side note: Would you believe that while I was proof reading this my hubby has handed me a pair of his work pants and a button that just fell off. That proves just my point-thanks dear!
Fold the felt in half to form the little folder to hold the business cards. Here are 3 options we tried for hand stitching.
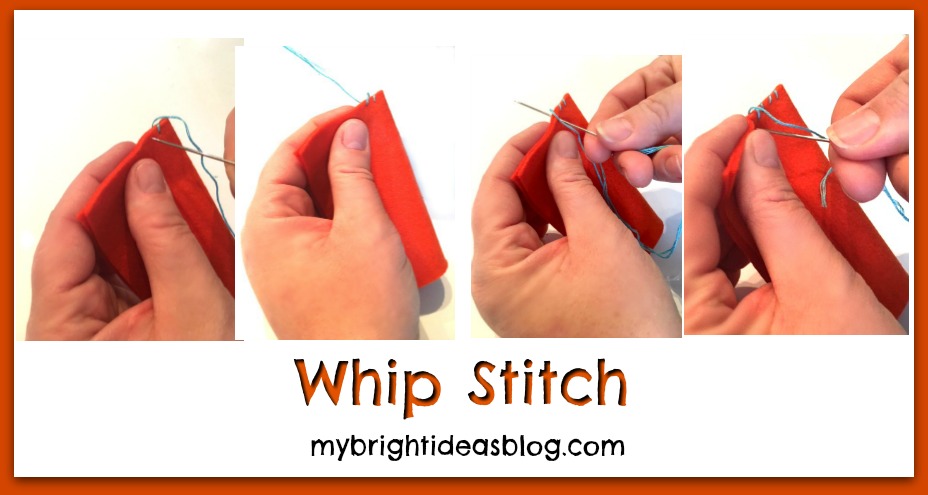
Whip Stitch: Knot the end of the thread and start on the inside of the fabric. Sewing in from the front and out the back and around. Back in the front a smidge to the left of the previous stitch.
![]()
Blanket Stitch: Start from the inside to hide the knotted end, then go through both layers. Stitches can be a bit further apart with the blanket stitch. Go in through the front of the fabric. As you pull the thread through, insert your needle through the loop and pull it securely to make your knot. Insert the needle into the front again the same distance from the previous stitches. At the final stitch go through a second time to make that knot and then insert your needle between the two layers of fabric and cut the thread.
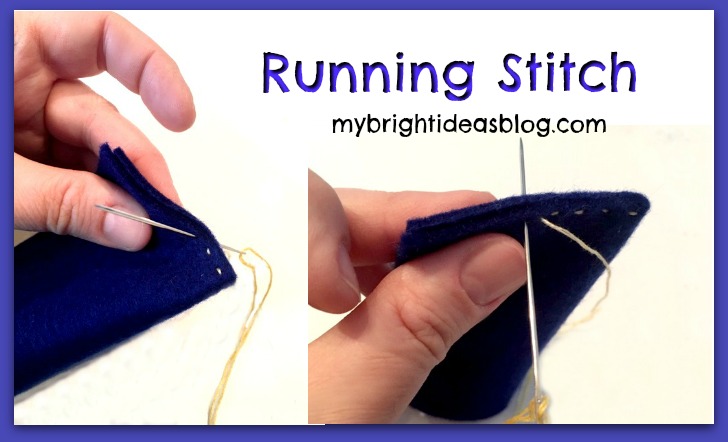
Running Stitch: Knot the embroidery floss and begin on the inside to hide the knotted end. Use a running stitch to go in and out all the way up both edges.
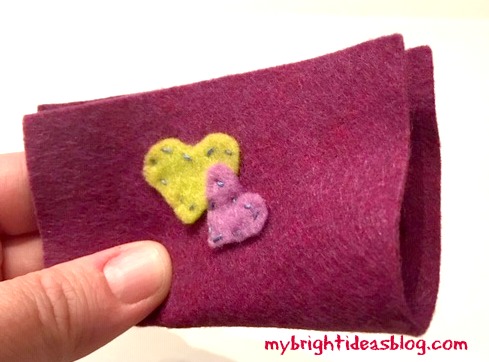
My 11 year old preferred the blanket stitch. Not bad for her first attempt.
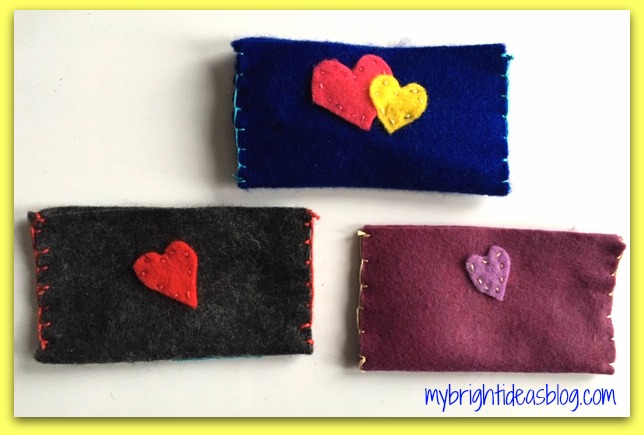
She also liked having one small heart over a larger heart.
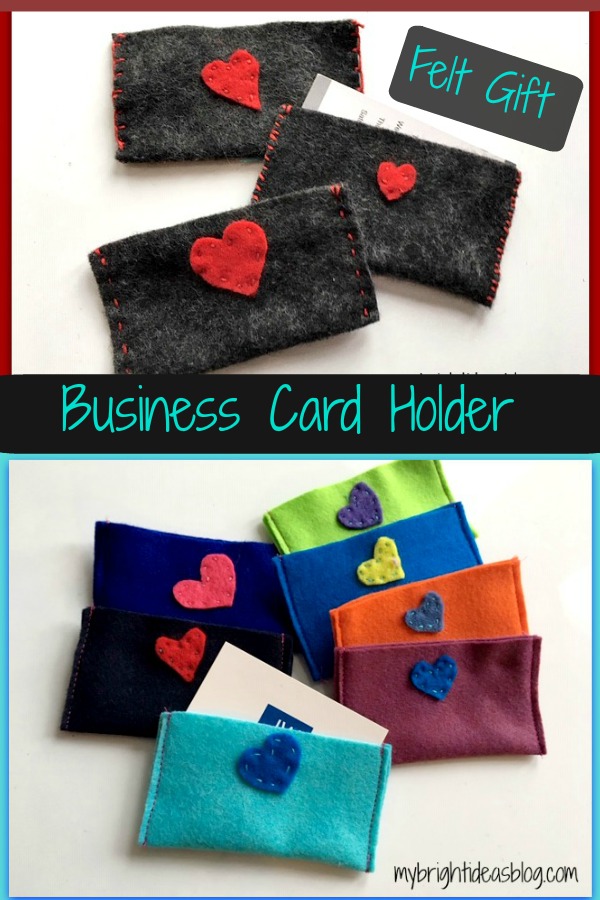
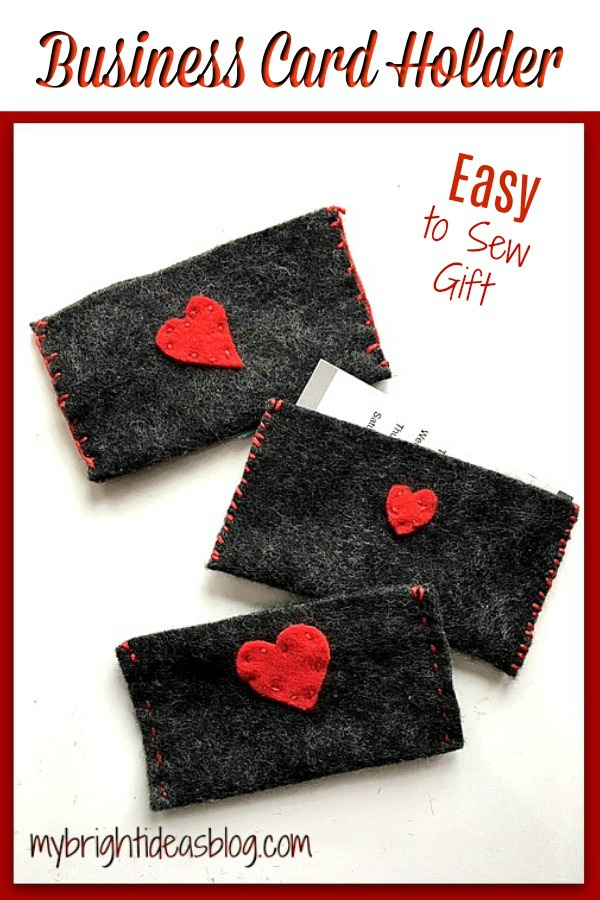
The grey felt with red hearts with red stitching looks pretty good!
Option 2
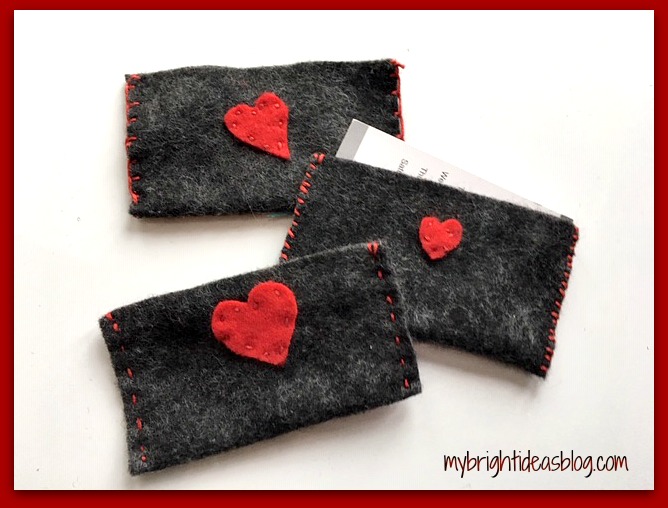
To make the process faster (as I mentioned we want to make a lot of them)…we sewed the hearts on first and got a little bit faster with each one.
We hand sewed 10 hearts onto squares of felt and ran them through the sewing machine to make a tidy edge.
Could this get any easier! What a great idea…I want to thank my friend Ashley for sparking this idea over dinner last week. Great food, lovely ladies and a bit of craft talk snuck into to the evening…my favorite!
On this blustery, winter day you might be inspired to work with felt too! I have added links to a few of my posts from last year for you skim through and see if an idea is sparked for you too.
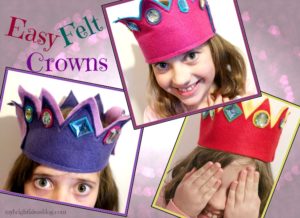
Sew a Super Easy to Make Felt Crown – Add to your dress up clothes!
100th Day of School Celebration-Glue Buttons on a shirt for a Gumball Machine
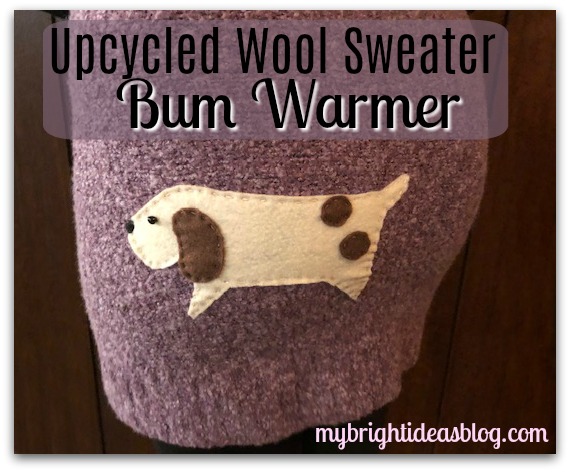
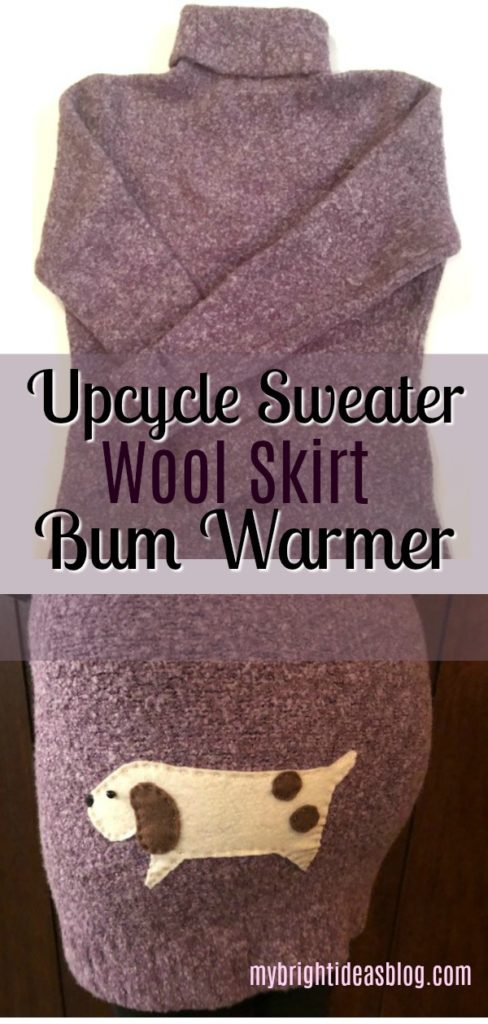
Upcycle Sweater into a Wool Skirt or Bum Warmer for Winter!
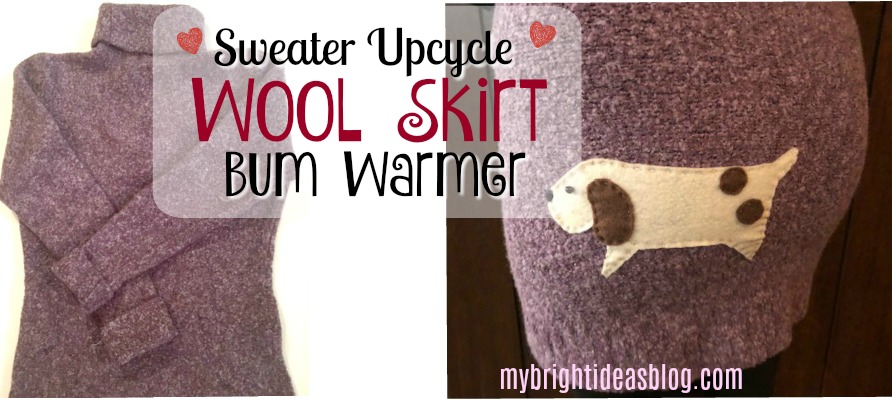
Have you been ice skating or waiting for the bus and felt a cold gust on your behind? Can you get your hands on a wool sweater you don’t mind chopping up for parts? Keep reading and I will tell you how to make an upcycled skirt or BUM WARMER and if you like…put a dog applique on it.
You will need:
- a wool sweater
- scissors
- sewing machine
- elastic
For the optional Dog Applique-you will need:
- embroidery floss (brown, black, cream)
- needle
- felt (cream and brown)
- paper and pencil
- scissors
- 1 black bead (optional, you can do with out a bead and sew a black dot on)

Do you remember the wool sweater above? It’s been upcycled before and now we are cutting it up for more parts! You might already know this but knit sweaters will unravel if you just cut them. So you need a sweater with wool in it. When you wash the sweater in hot water and put it in the dryer it will shrink and “felt”. This prevents it from unravelling. Now we can cut it like it’s fabric.

The sleeves are already gone to the dog, now we are going to use the best part! The area below the armpit could be made into so many things! A purse, tea cozy, slippers, mittens, big dog sweater….So many ideas so little time. If you would like to see what we did with the sleeves scroll to the bottom of the post.
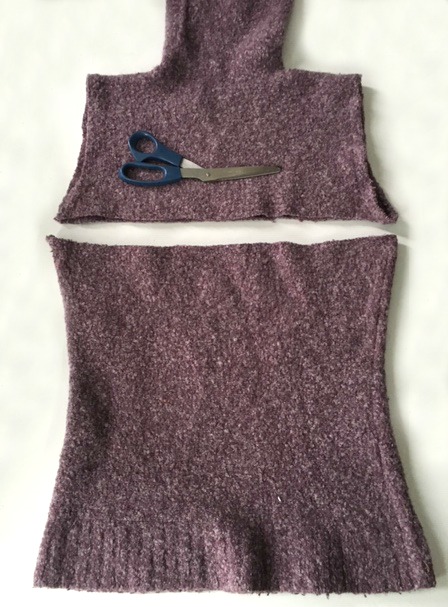
Cut straight across the sweater.
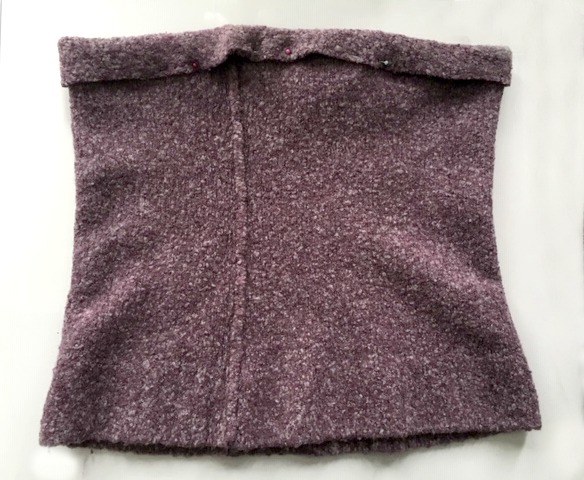
Fold over the top one inch (2 cm), and pin in place.
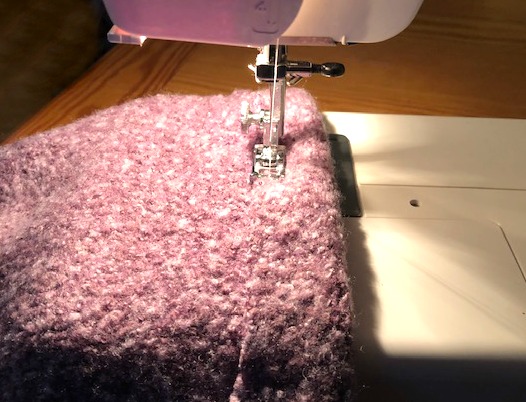
Sew almost all the way around to make a casing. Leave a 1 inch gap to slide the elastic inside.
If you don’t put on the applique and decorate it with felt then slide the elastic in now. However, since I wanted to add something fun to the booty of the bum warmer, I’m going to insert the elastic as the final step.
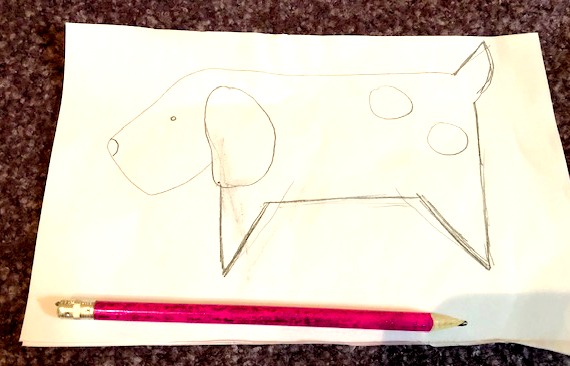
Cut a page in half. Find a photo of what you would like to applique on the bum. I recommend a flower or an animal that is really simple. This dog was found when I searched for dog felt projects or how to draw an easy dog. I tried to copy the simple dog I found.

Pin the page to your felt and cut out the dog applique.
Try on the bum warmer and pin the applique into the area you would like to have it. It can go on the front or the back.
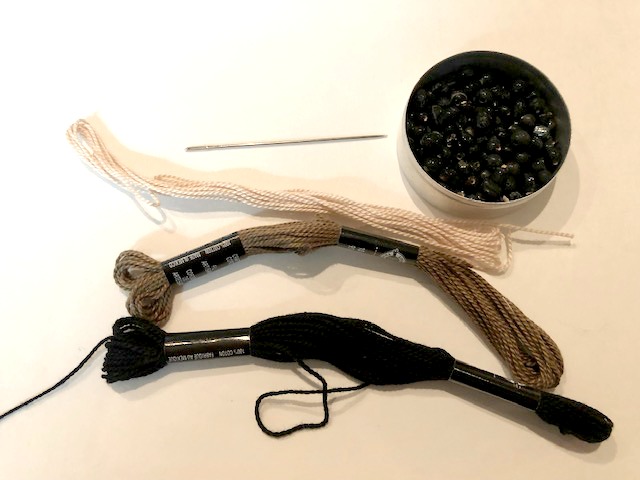
Grab your embroidery floss, needle, scissors and black bead.
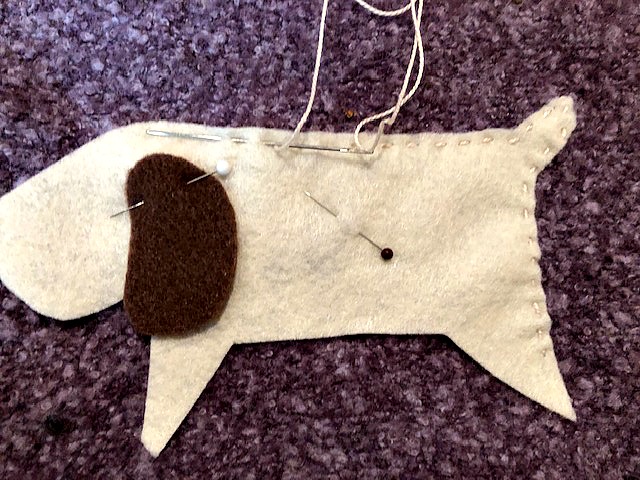
Hand sew the applique on using embroidery floss. I used matching thread but you could make it stand out by using a contrasting thread. I just did a very quick running stitch to attach the dog to the skirt.

Then I added the ear and too spots to his behind.

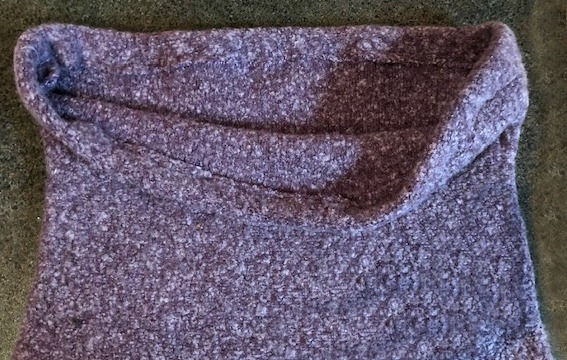
The last step is to insert your elastic. I like to put a huge pin on the end of the elastic and insert it into the 1-2 inch gap we left. Then wiggle it through the casing. When you get it all the way around the waist area and back to the gap, pin it to the other end. Check to make sure that the elastic didn’t get twisted. Adjust to the desired width. Try the skirt on again and test out the size. If you are happy sew the elastic together and remove the safety pin. Machine sew the casing closed.
This sweater will fit a preteen daughter to an adult XL woman. As long as the elastic is comfortable, the wool will stretch with your size. I could have tightened the elastic and made it a skirt for my 8 year old too. If you find its getting a bit stretched out just wash it again. Use warm water instead of hot and warm dryer so it doesn’t shrink too much.
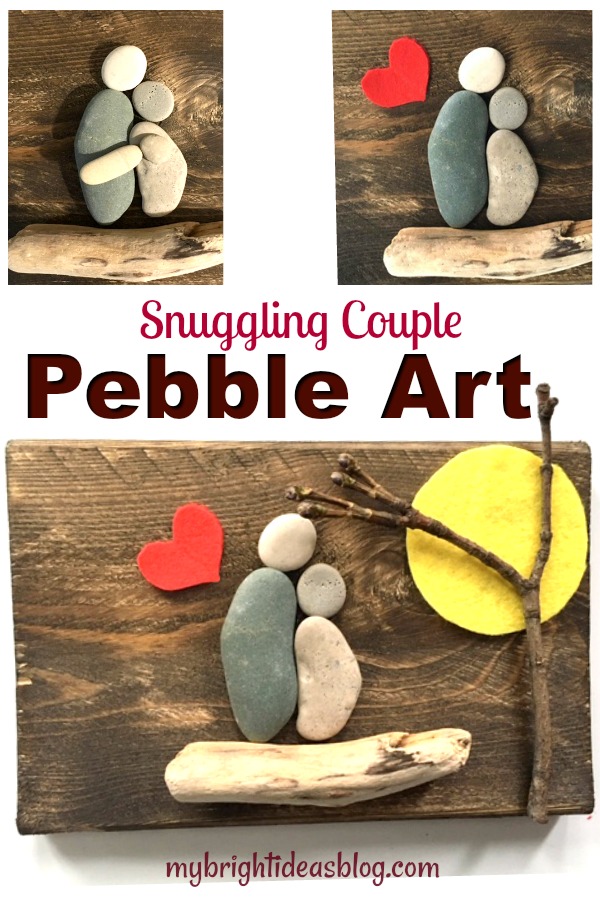
Pebble Art – A Snuggling Couple
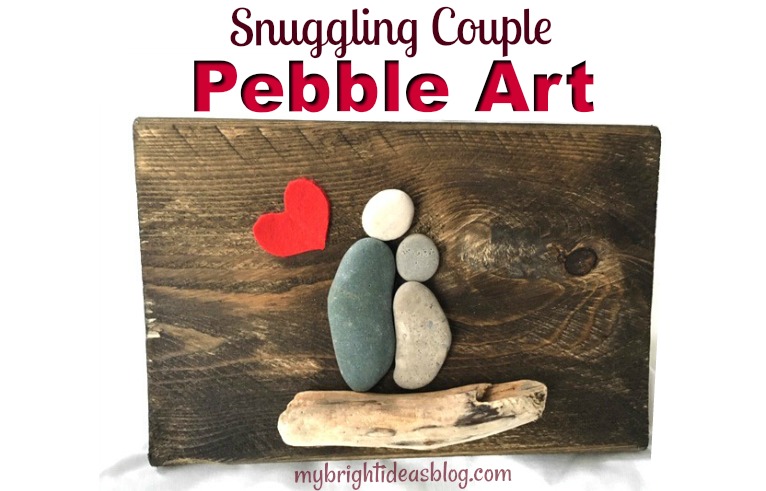
I got a nice collection of flat rocks when the weather was warmer. When you start becoming a beach pebble collector its hard to stop. Even now, although its freezing rain I still would love to escape to the beach…an hour drive away…to look for my favorite shapes of stones (hearts, ovals, circles). So I’ve stained a few small boards to turn them into Pebble Art.
I’ll show you what I made this time….
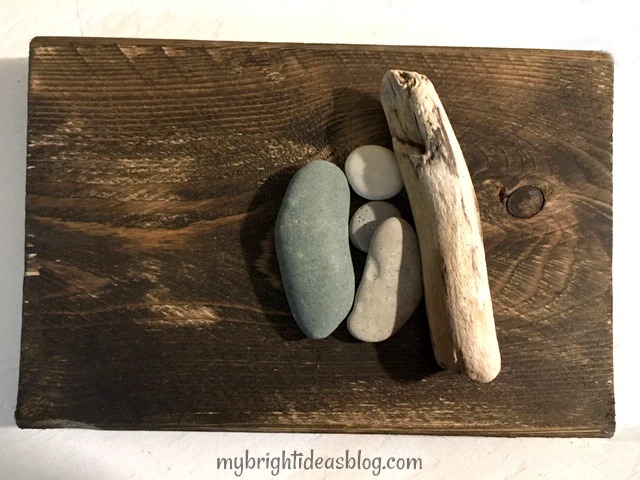
What you will need:
- 2 long pebbles
- 2 round pebbles
- small piece of drift wood
- red and yellow felt
- a twig
- a scrap of stained board or a plain canvas
- hot glue gun or E6000 glue
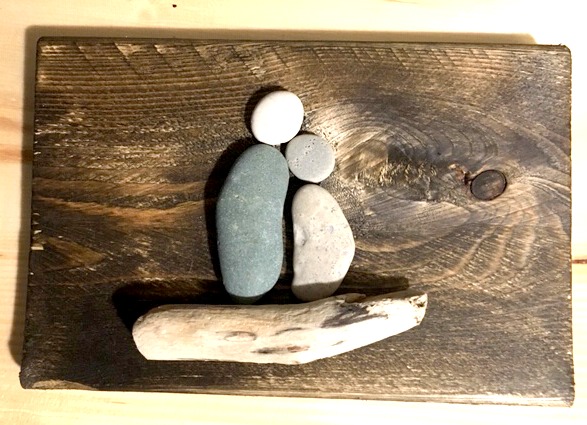
These two long rocks fit together perfectly for the bodies. Two round stones on top for the heads. A small piece of driftwood for them to sit on. Glue everything in place. You can stop with just these natural items or keep going to add some colour.
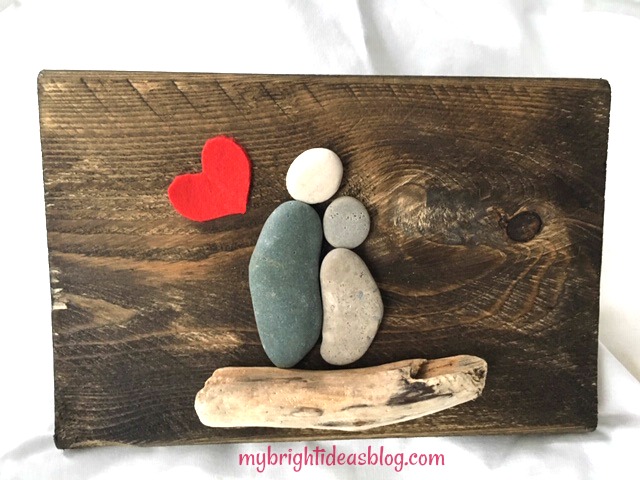
Here I took an inch of red felt and folded it in half and cut the shape of half a heart. I find this is the best way to get your heart shape. If I try to cut it freehand it turns out lopsided.
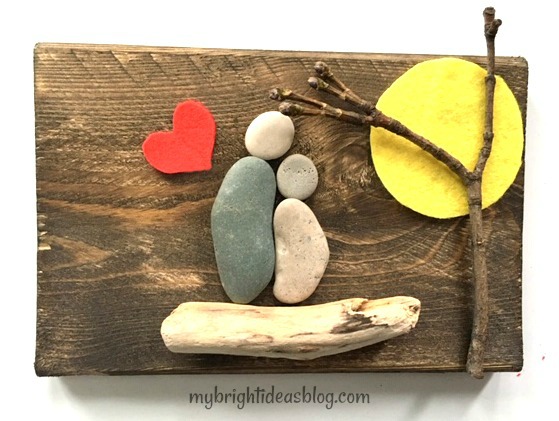
Trace a tin can from your pantry to make a felt round sun. Put a twig on the side and now its done.
Now it’s a couple having a snuggle at the beach, watching the sunset. Although, my 8 year old would like it to be a mother and daughter. Awe she is snuggler. I better make her one for her room!
Thanks for reading another one of my easy crafts….Have a look below for links to some of my other “Pebble Art” projects.
…
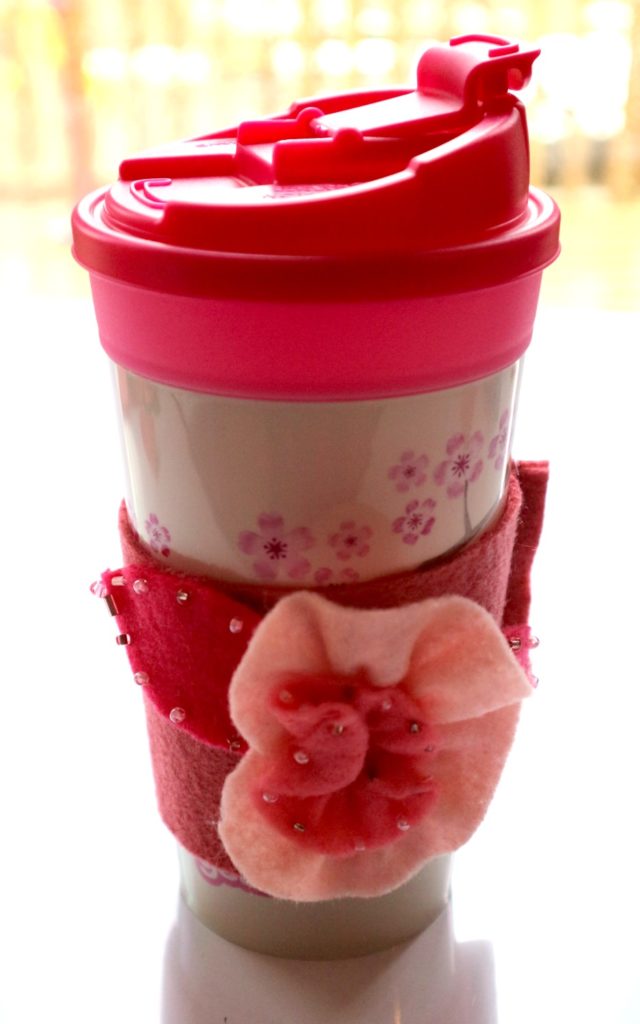
Easy to Make Felt Coffee Cup Cozy
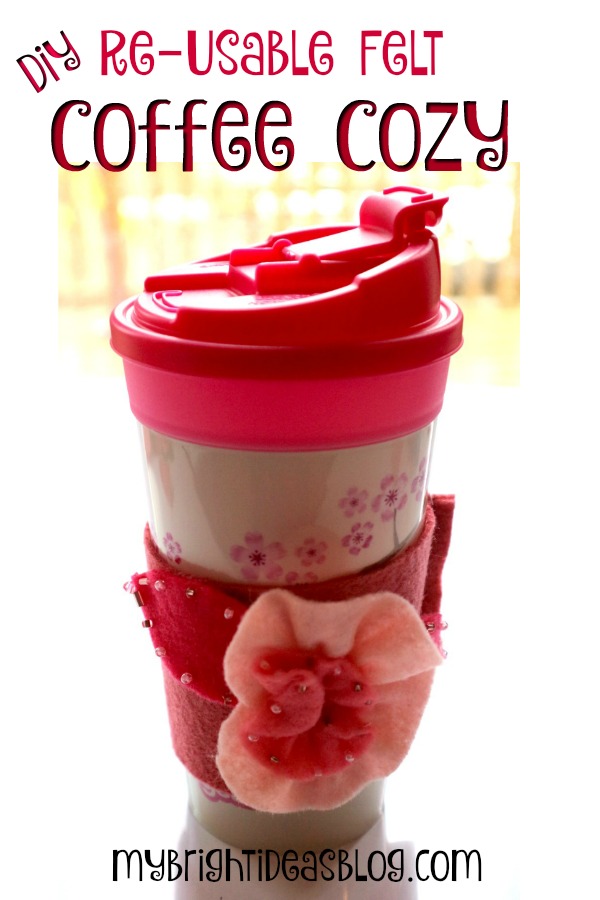
Have you heard of a coffee cup cozy? It’s an adorable name for a glamorous coffee cup sleeve. Often used to protect your fingertips from the hot beverage take out cup.
Today I will show you how to make a felt coffee cozy for either cups from home or a take-out cup. As the weather gets chilly that means ice skating and winter sports (or standing still watching other people do winter sports tee hee…) that will have you warming up with a nice hot chocolate, tea or coffee. You need a coffee cozy to keep the hot inside and protect your hands. They look cute too!
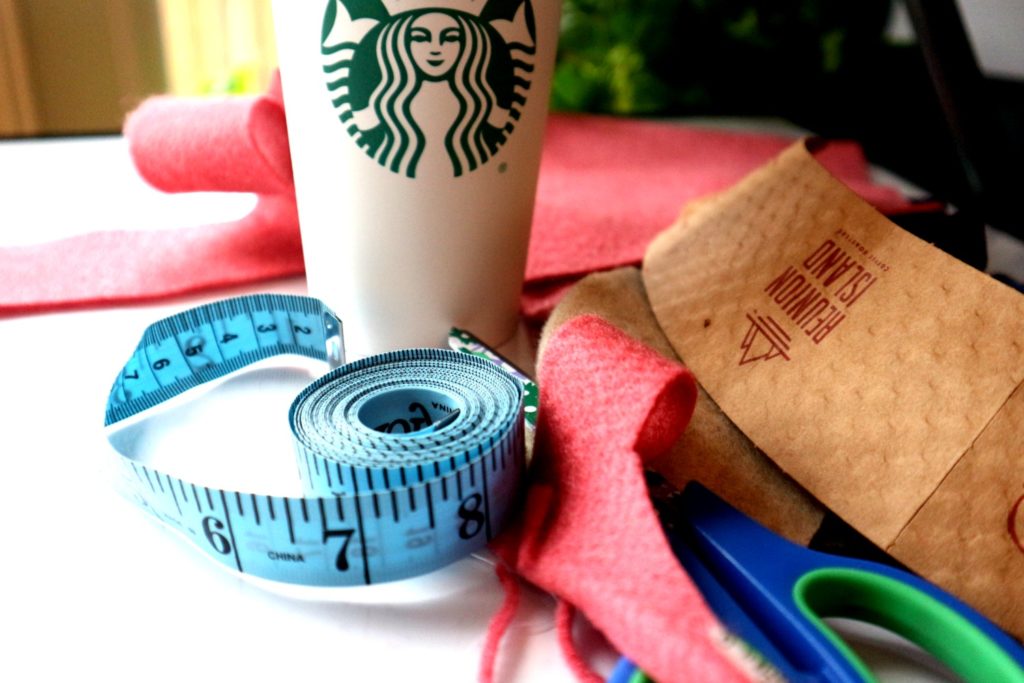
You will need:
- felt (3 inch strip plus scraps for the applique)
- scissors
- measuring tape or ruler
- take away coffee cup
- needle and thread or sewing machine
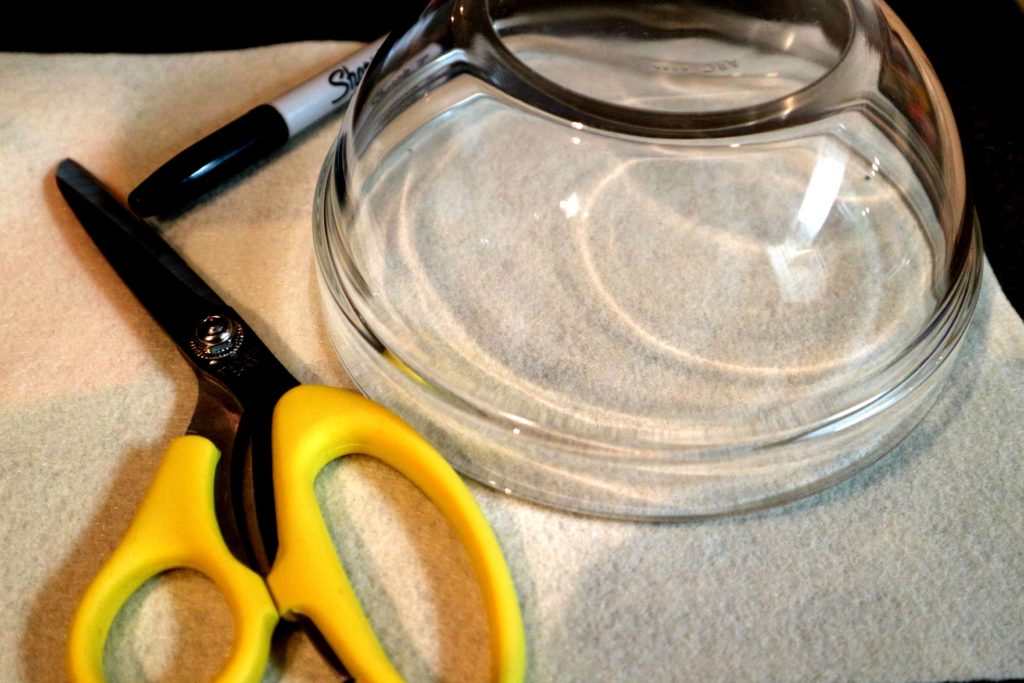
Every cup is different so I recommend that you start by cutting a strip of fleece 3 inches wide and wrap it around your cup. Pin your felt in place to gauge the size you will need.
My favorite take away cup is a Grande Decaf Coffee from Starbucks (with cream and sugar and cinnamon and chocolate sprinkled on top…mmmm). That is also the size of the cups that they made into reusable plastic cups. Yeah! For my friends who live near Tim Horton’s, it fits their medium cups.
Read on to see details to make it this size.
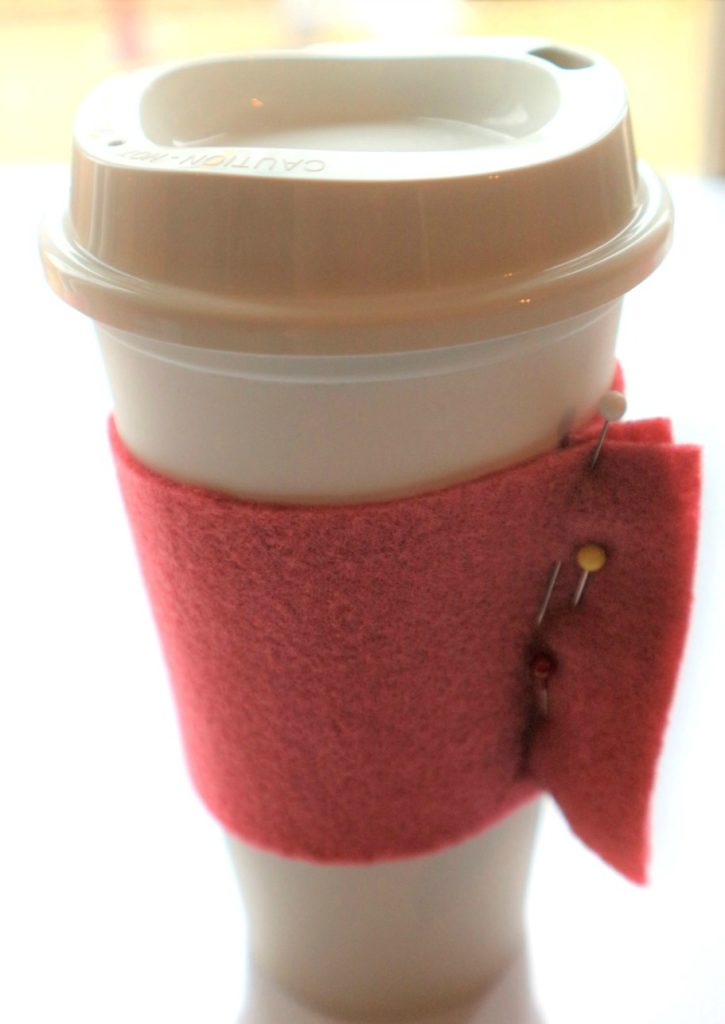
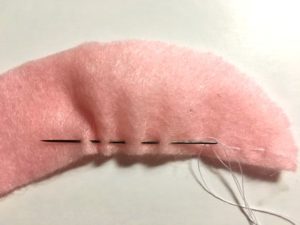
Measure your felt and cut a piece 9 inches long and 3 inches wide. (23cms by 7.5cms) Fold the strip of felt in half.
Wrap the strip of fabric around the cup to see how it fits. Trim a small amount of felt on an angle to adjust for the shape of the cup.
Hand sew or machine sew the edge. Stitch close to the edge…approx. 1/4 inch (or 1/2cm). Fortunately, felt does stretch a bit so if it fits snuggly at first, it will soon be fitting comfortably.
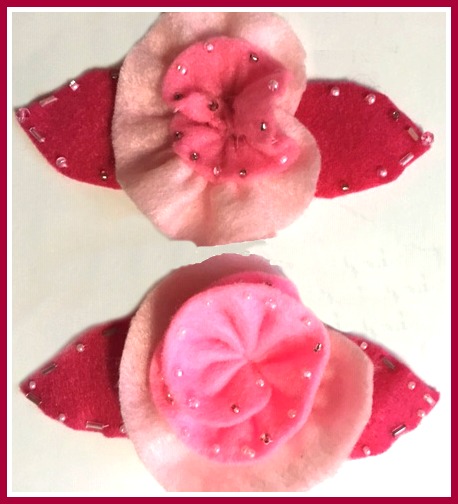
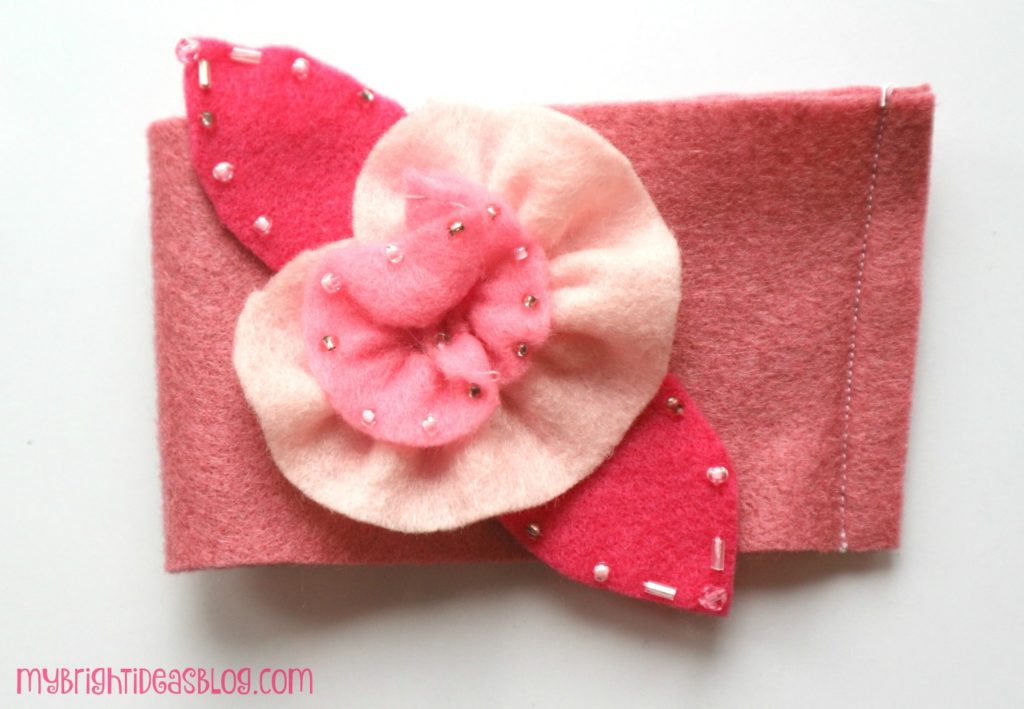
Making the Flower Applique
Sorry there is no pattern made for this. I “eyeball” most of the time instead of using patterns. Sometimes that makes my project a bit crooked but I don’t want it to look like its a perfect cookie cutter project that you can buy at Walmart.
So every project is an original!

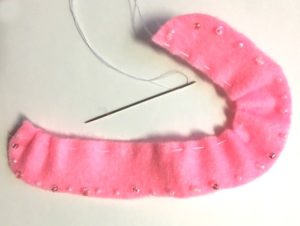
Cut 2 long strips with rounded corners. I used 3 shades of pink. The darkest is for behind the flower and cut into the shape of two leaves. The lightest pink is what I put for the middle of the flower. Cut 3/4 of an inch wide by 9 inches long. The centre pink was 1 1/4 inches by 8 inches. If you would like it to be fuller add another inch or two in the length to this piece.
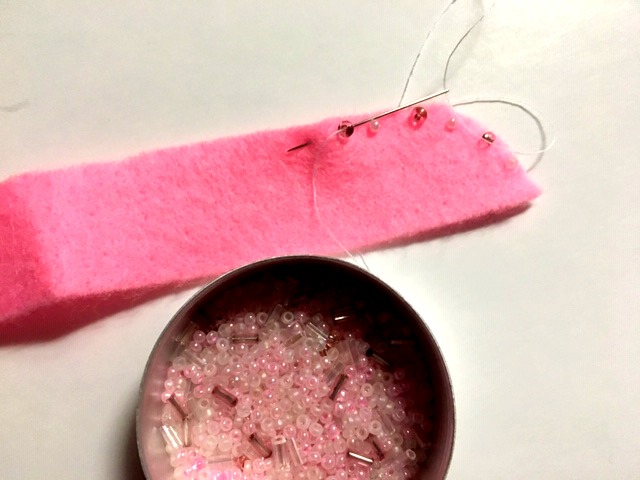
If you are going to add beads to the edges – do it first. Using seed beads add a bead to each stitch as the needle is up on the right side of the felt. Its so easy, we should sew beads onto everything! I added beads to the centre piece and the outside layer but left the middle layer without beads.
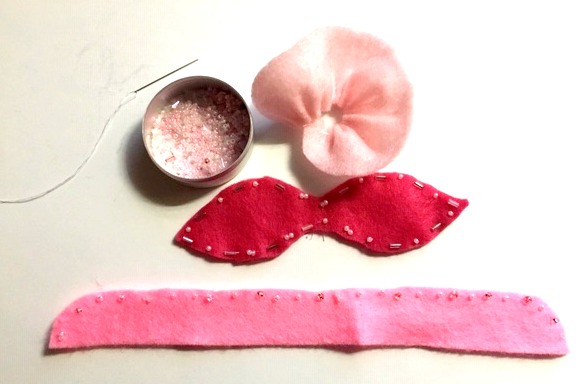
To begin putting the flower together. Slide the needle through the felt with a loose baste stitch. Gently pull the thread at the end to begin gathering.
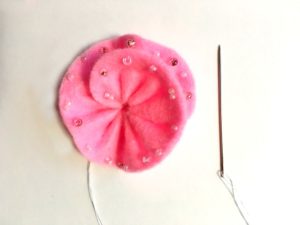
As the final step I put the flower together and sew them in pace. Then attached the entire flower to the sleeve.
 Here is the back side. Now I attached the flower to the cup sleeve.
OR
You could put the flower together by sewing the layers directly onto the sleeve. Which ever makes more sense to you.
TA DA! Don’t you just want to show it off.
Felt is so easy to work with it will get your creative juices flowing! Now that you see how easy it is you will be designing more for a friend who loves dogs and another flower one for the babysitter, the mailman, workmates….spreading them all over the kitchen table like me making more….and more….
…or is it just me who does this?
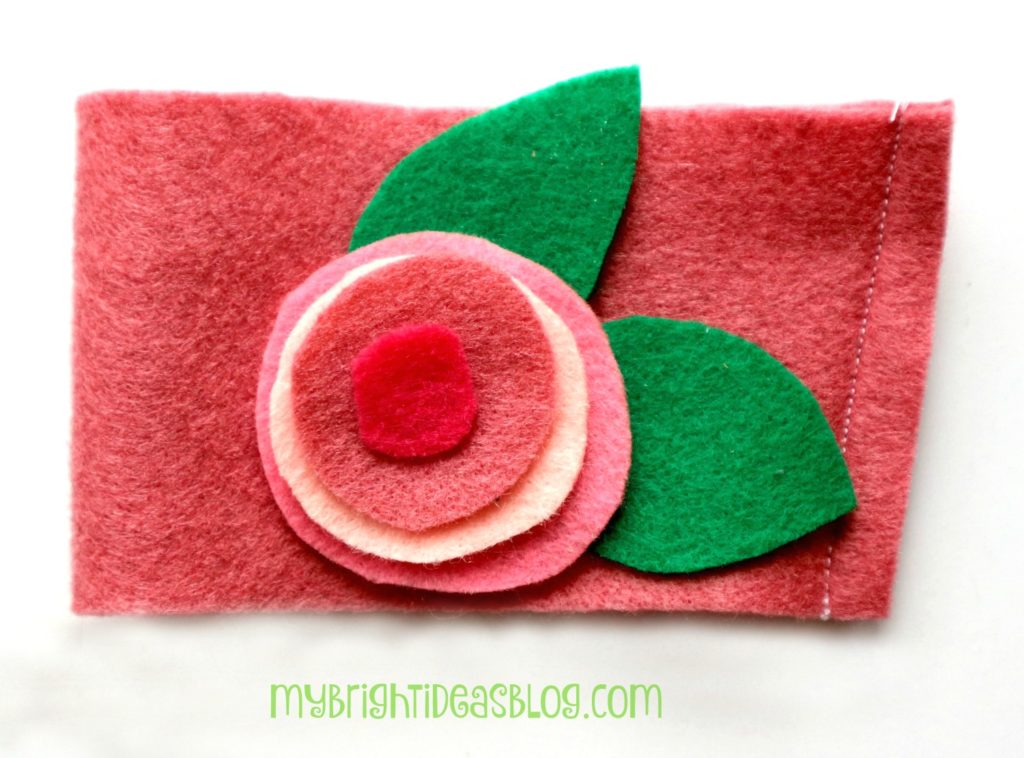
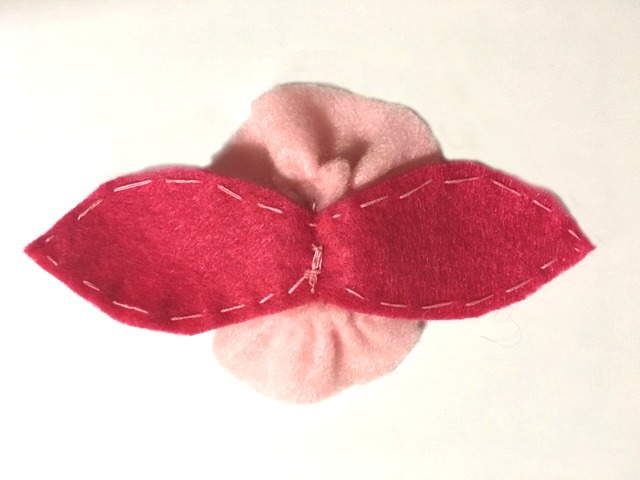
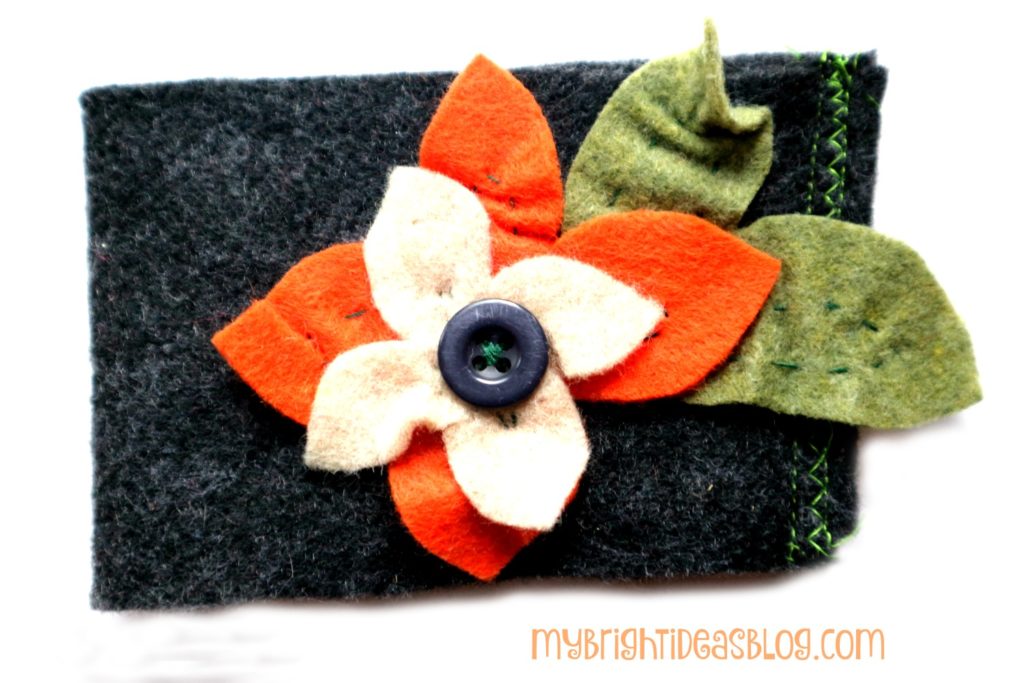
This flower is simply just stacking circles. If you don’t want to sew you could glue it on.
This one is nice for the autumn. I did a few stitches on this seam of this one in green and put a button on as the centre.
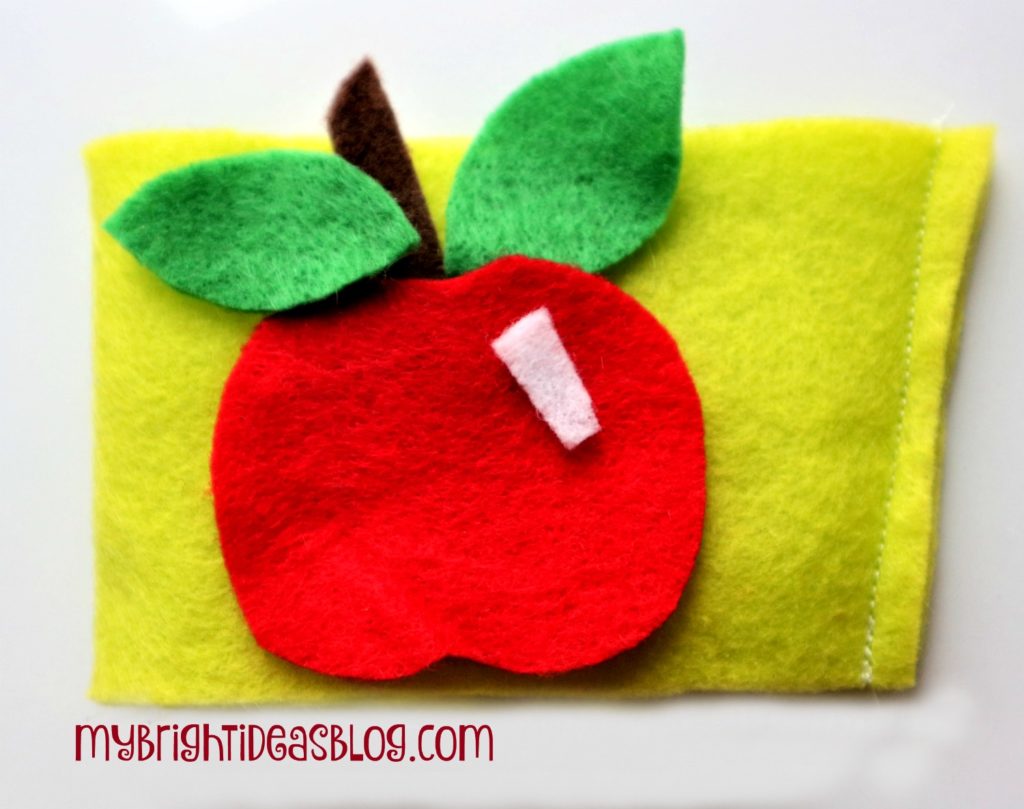
The apple coffee cozy would be great for a teacher gift! If the kids did their own hand sewing I think the teacher would love the personal touch of a child’s efforts to stitch it. Ask your kiddos if their teacher likes coffee and put a gift card with it. I read an article about giving teacher gifts and it is the hand written cards of thanks from the child that really touch their hearts.
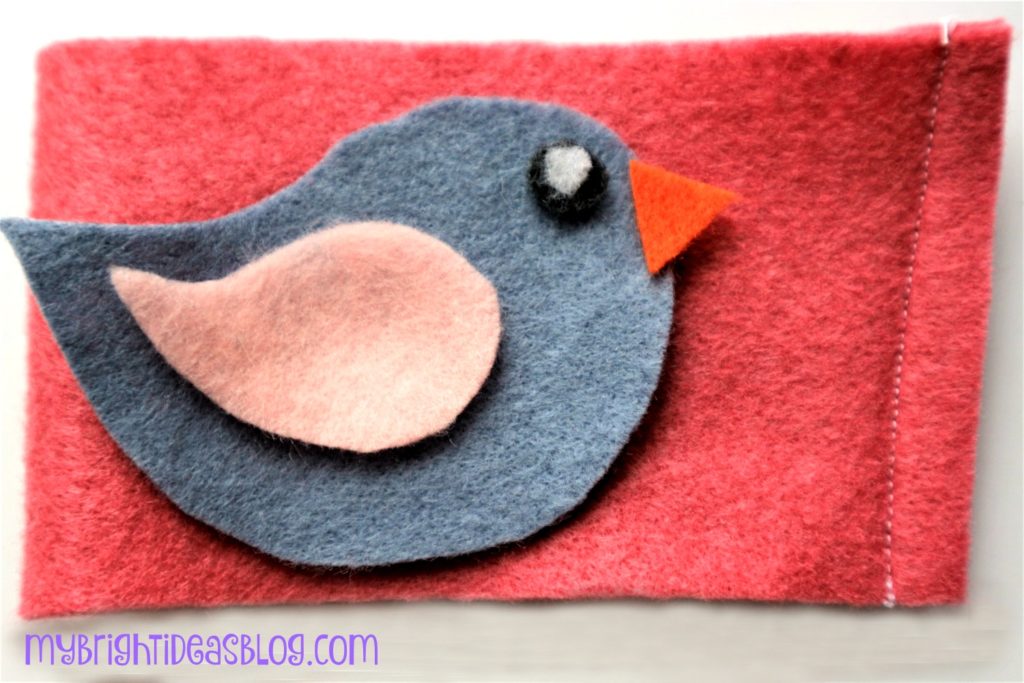
What about a sweet little bird. I had put some birds just like these on the knees of my daughters pants-to cover a hole. I’ll put the link below.
I hope you get a chance to make a coffee cozy! With felt costing around a dollar a piece you could make 3 from one piece and then personalize it with your scrap pieces. Now that is an inexpensive gift!
Felt is so easy to work with. Get your kids learning some hand sewing skills and give gifts they feel proud to give!
Here are a few more projects that we have tried to make with FELT!
Sew a Super Easy to Make Felt Crown – Add to your dress up clothes!
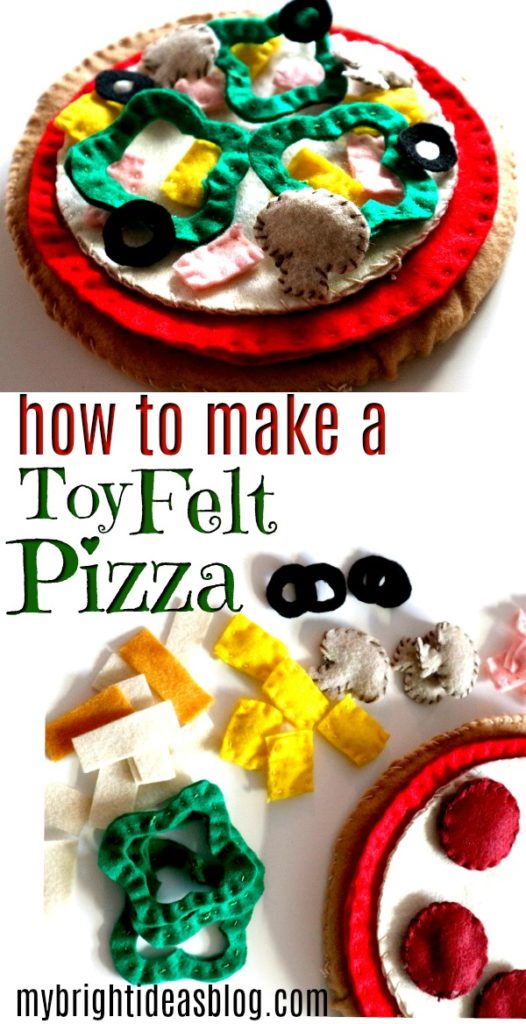
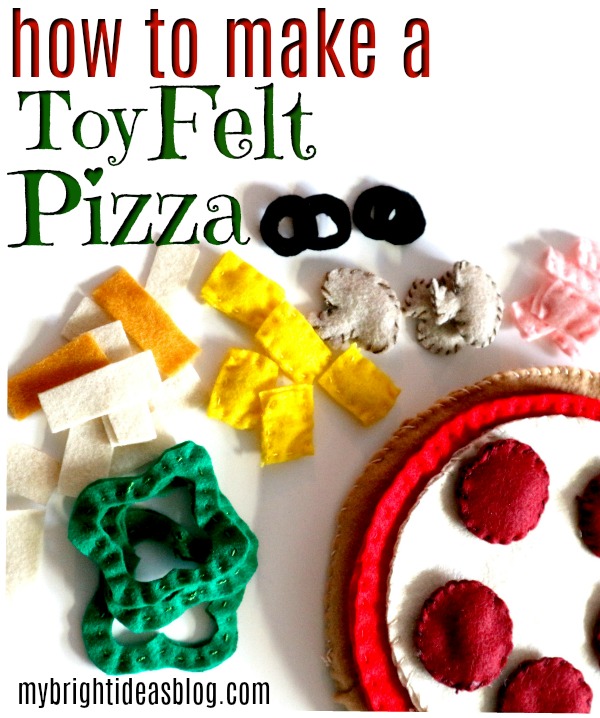
Cloth Pizza Toy Made From Felt
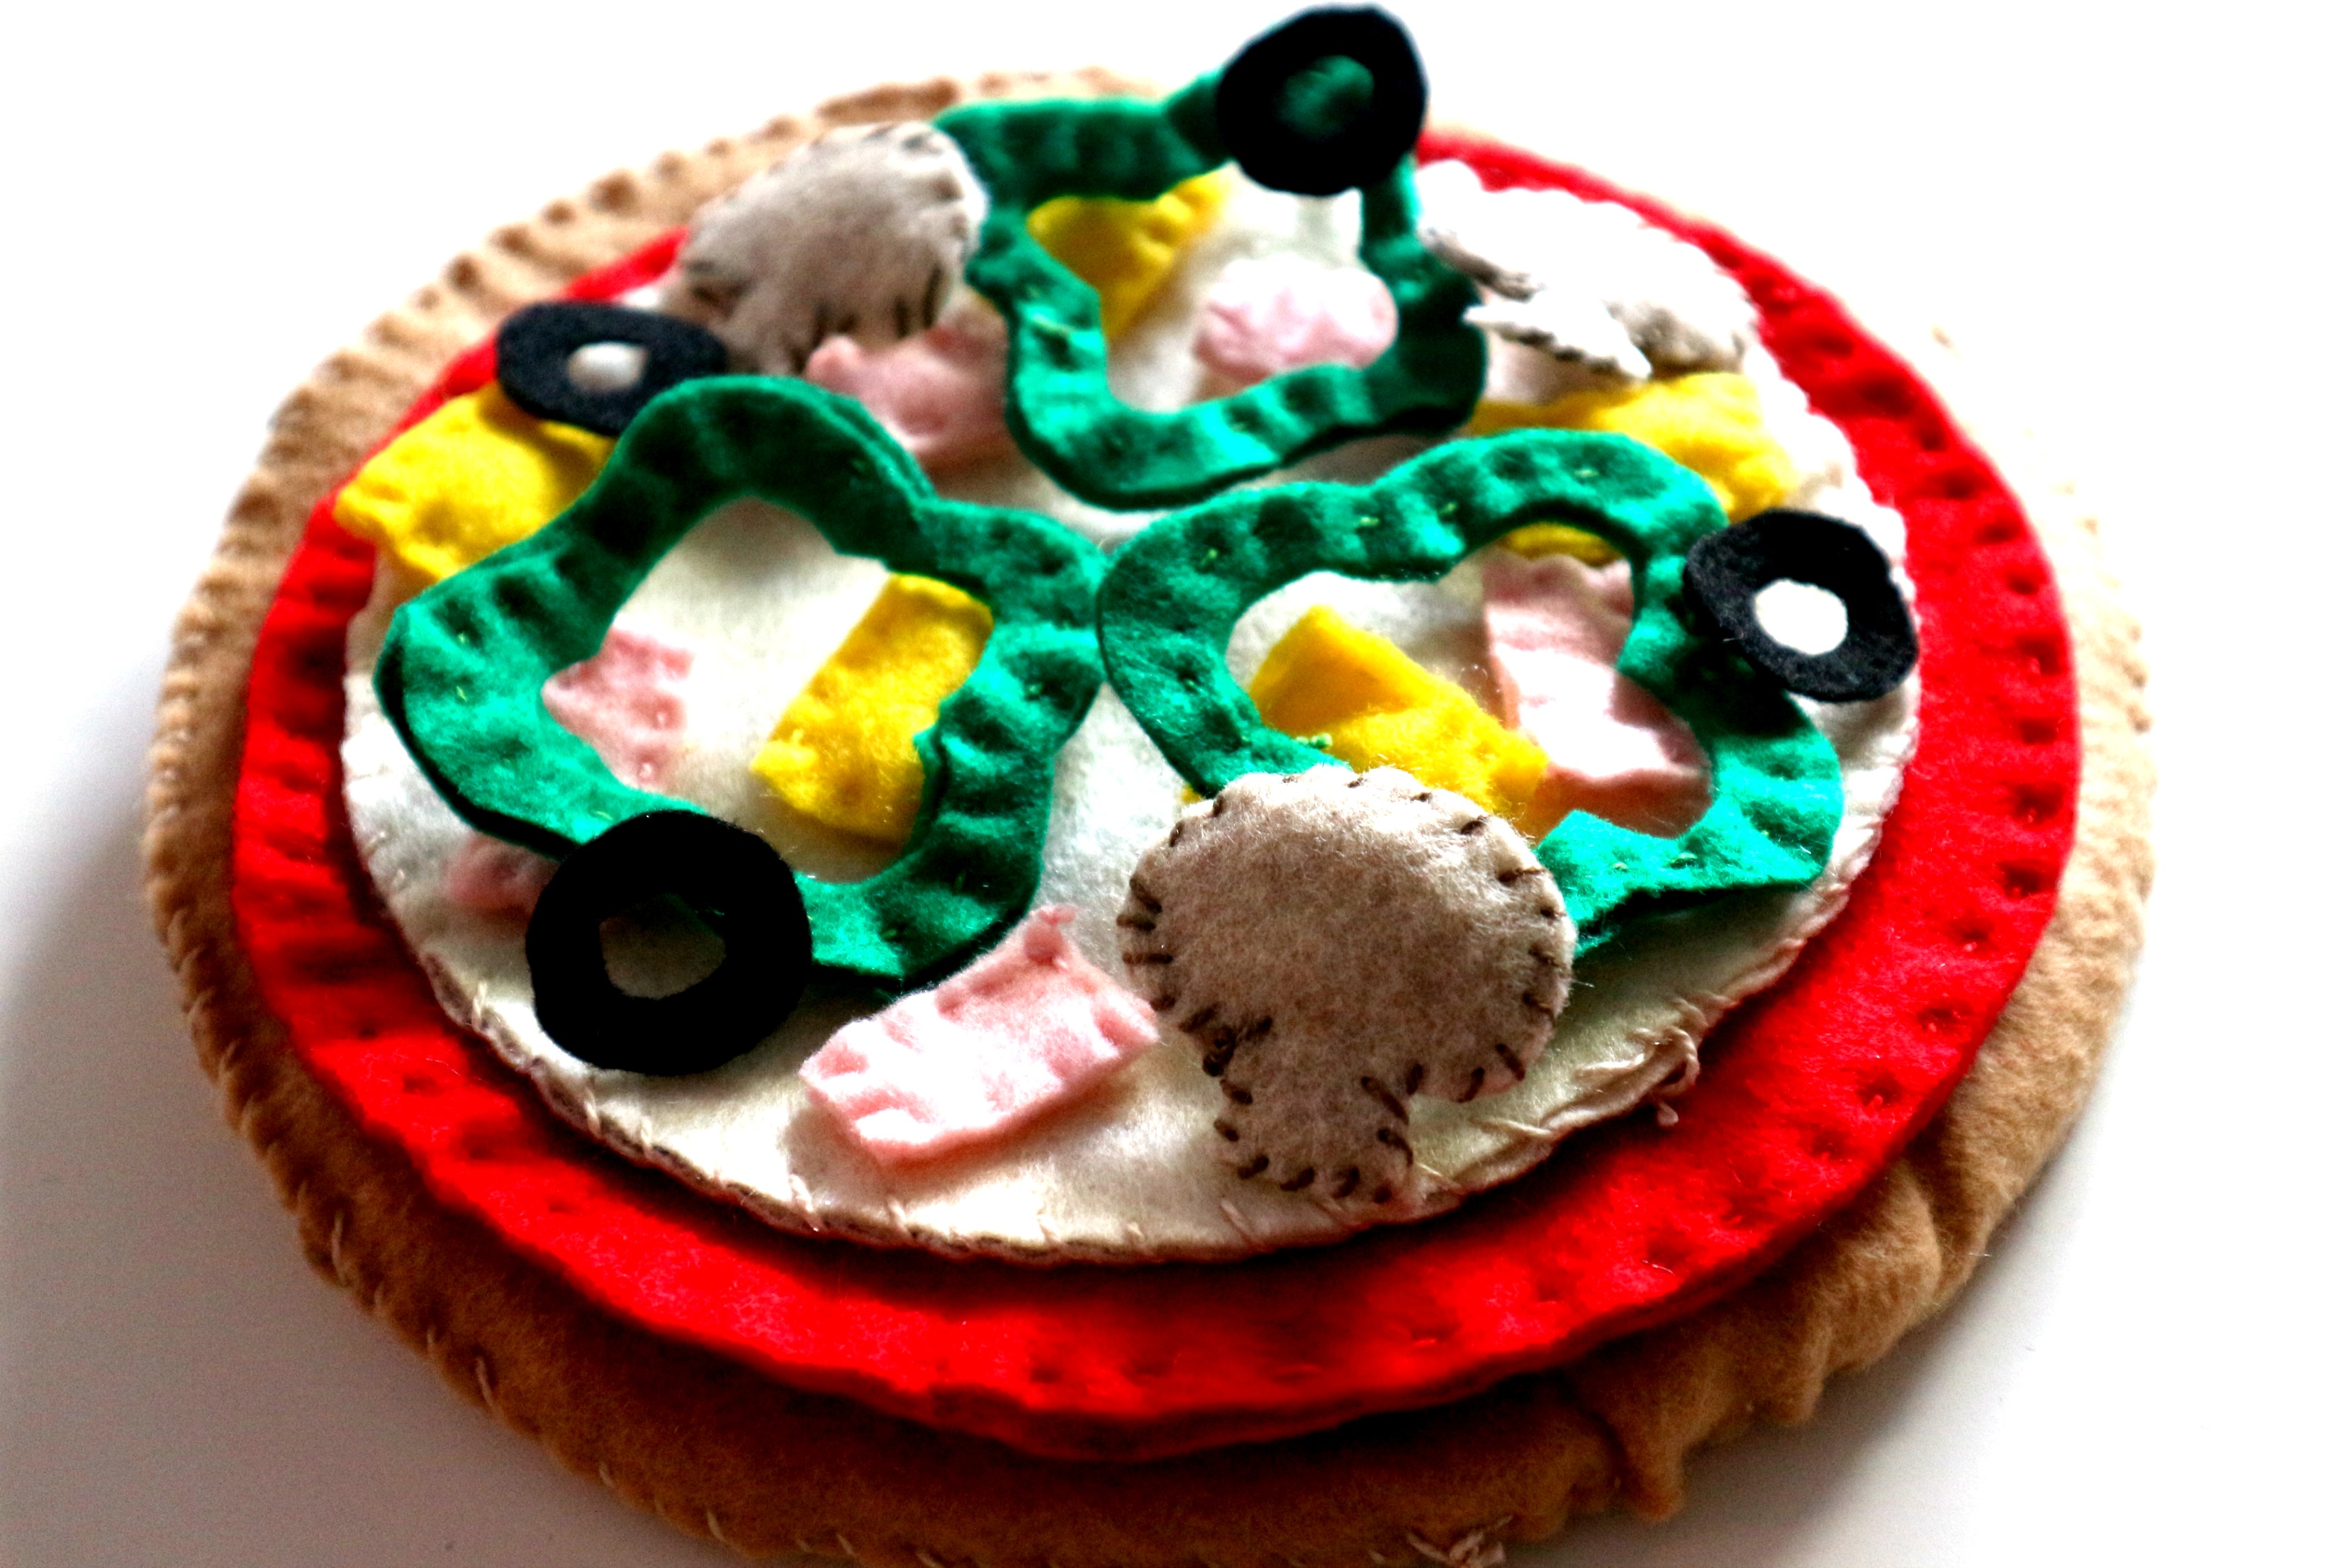
Kids love Pizza! Kids love to imitate their parents in the kitchen! Kids will love to play with this felt pizza.
This pizza toy/felt project can be made in 20 minutes with just scissors and felt or you can spend a few hours if you want to do a bit of hand sewing and add some stuffing.
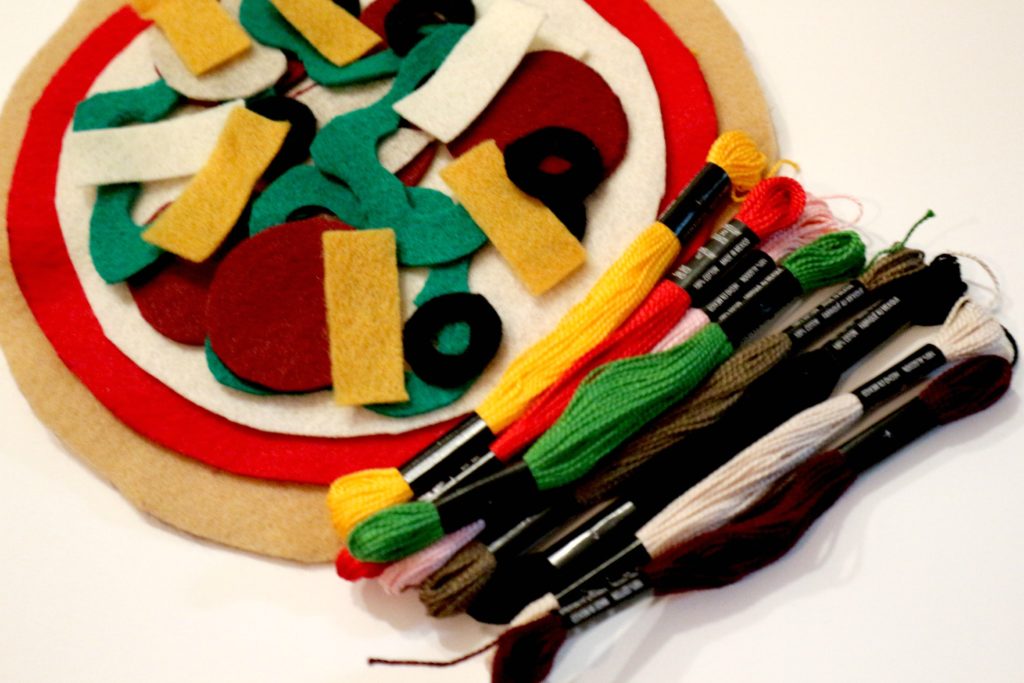
You will need felt in the following colours:
- 2 tan/light brown for the crust
- 2 red for pizza sauce
- 2 white/cream for mozzarella cheese
- 1 dark red for pepperoni
- 1 green for peppers
- 1 grey for mushrooms
- 1 pink for ham
- 1 black for olives
- 1 yellow for pineapple
- 1 orange for extra cheese
You will also need:
- bowls and plates to trace for big circles
- sewing needle
- embroidery floss (or thread)
- quilt batting or stuffing
Let’s Get This Pizza Party Started!
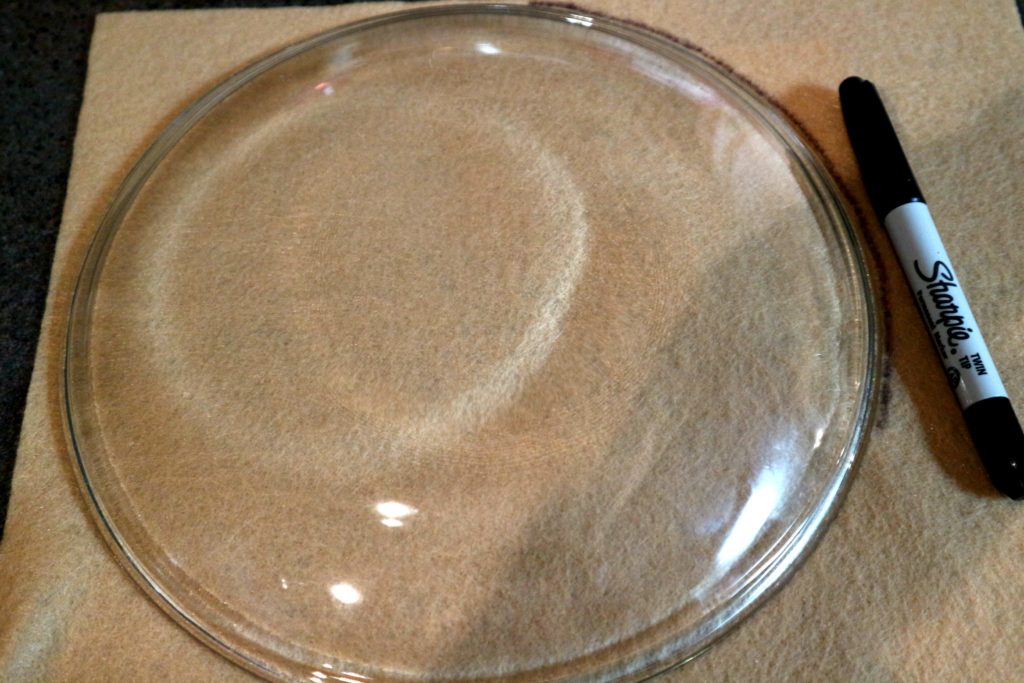
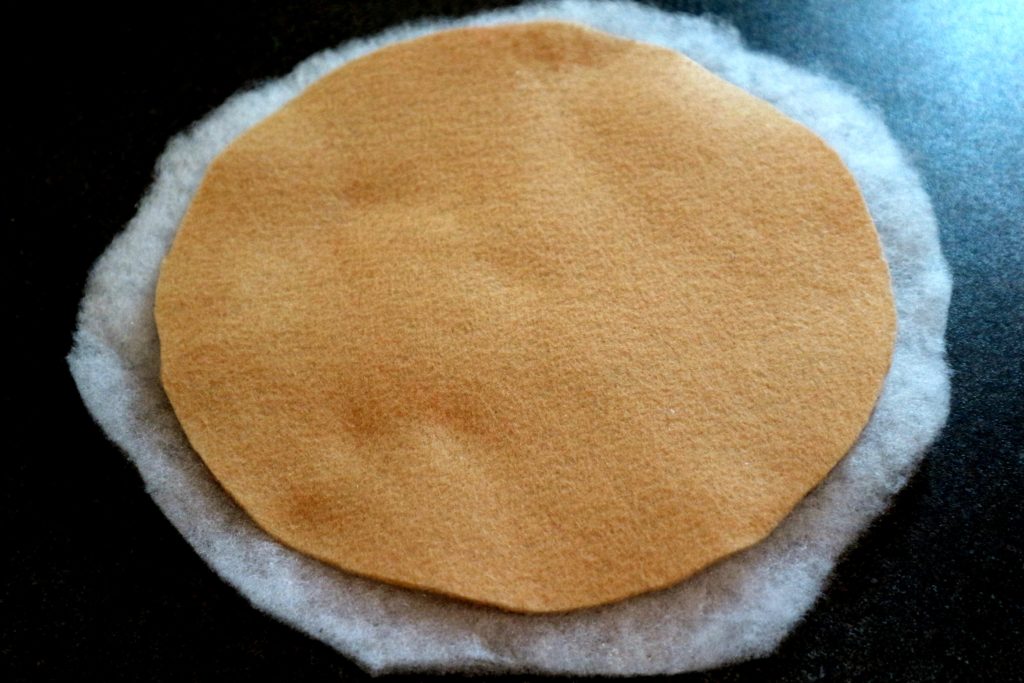
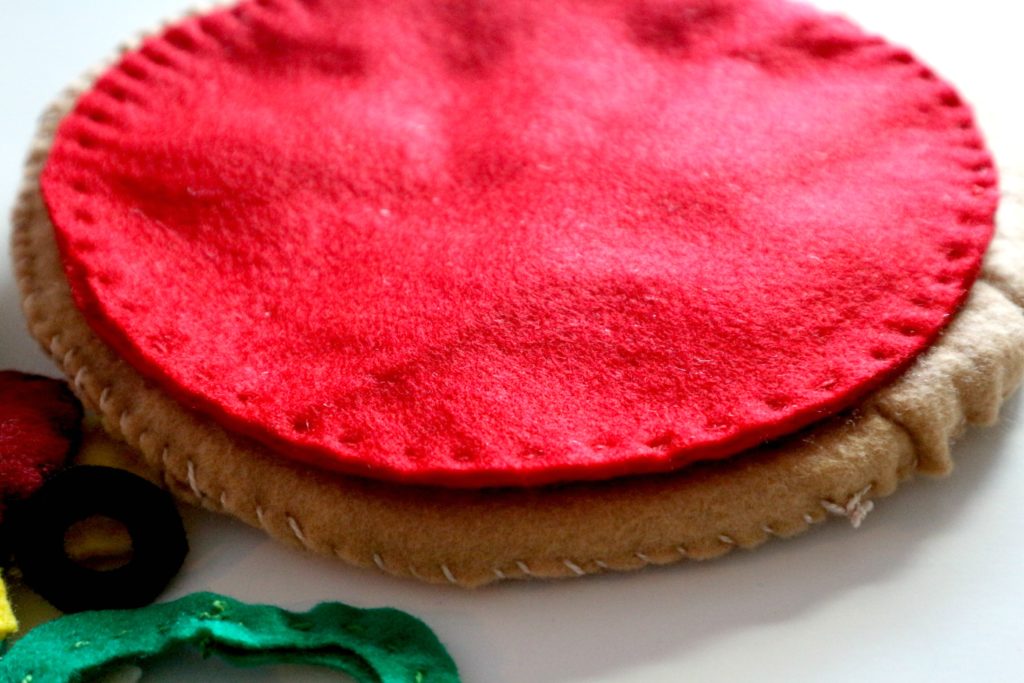
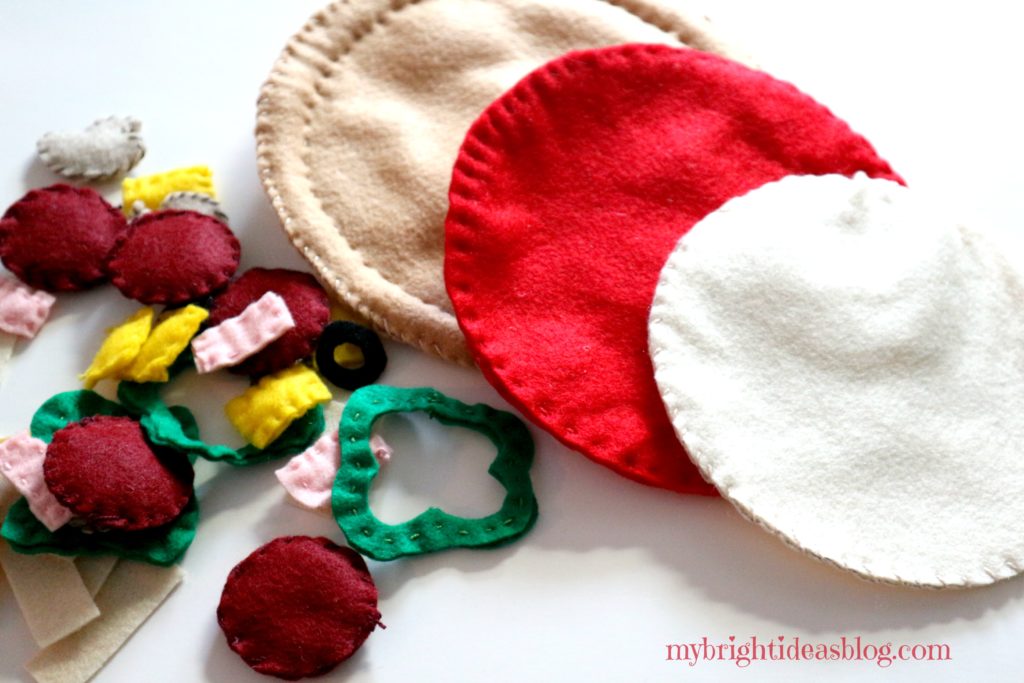
Beige Piece of Felt – Pizza Crust: Trace a large bowl or plate for your crust. Cut 2.
Piece of Bright Red Felt – Pizza Sauce: Using a plate or bowl slightly smaller than the last one, cut a slightly smaller circle than the crust pieces. Cut 2 red circles.
Cream or White Piece of Felt – Mozzerella Cheese: Cut the cheese…tee hee…out of a piece of white felt. Trace a slightly smaller plate or bowl than the piece of pizza sauce red felt. Cut 2 white circles.
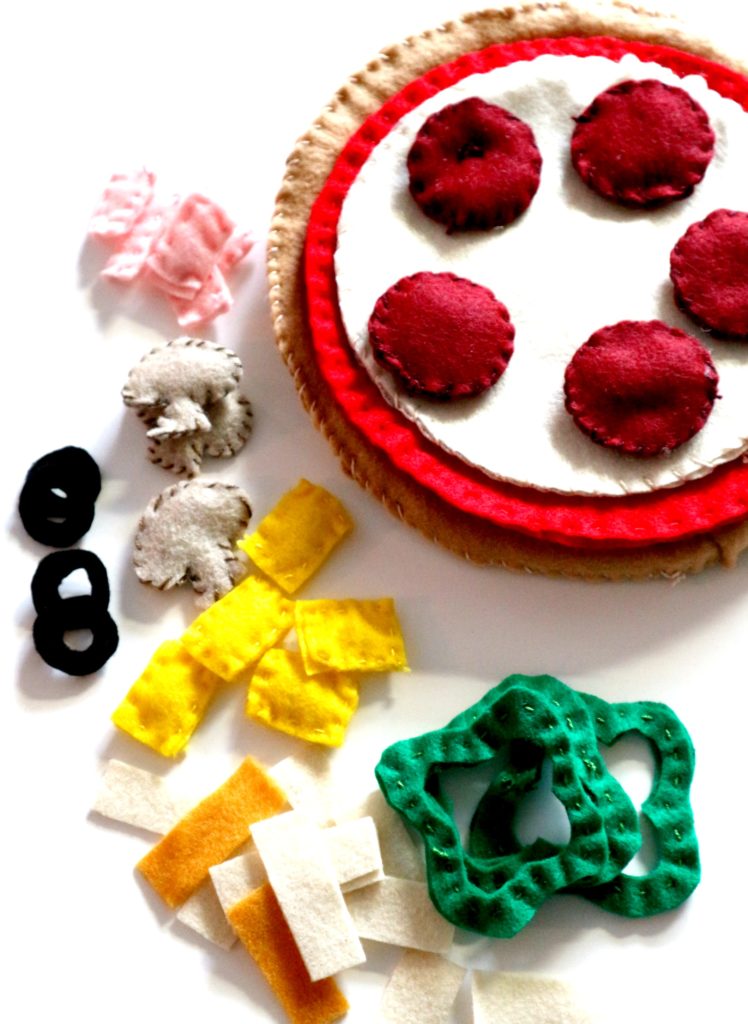
Dark Red Piece of Felt – Pepperoni: Cut 12 circles tracing something small like a vitamin bottle.
Grey/Beige piece of Felt – Mushrooms: Draw a mushroom shape and cut it out. Cut 10 mushrooms.
Green Piece of Felt – Peppers – It looks like a wiggly square, then outline it again and cut it out. Cut 8 peppers.
The rest of the toppings are up to you….
Black Felt – Olives: Cut a small circle and trace it a second time. Cut 8 olives.
Orange and White Felt – Grated Cheese: Cut long rectangles for some shredded cheese on top. Cut 6 of each.
Pink Felt Squares – Ham: Cut into squares-10 pink ham squares will be enough.
Orange/Yellow – Pineapple: This begins a great debate about whether you should have pineapple on a pizza. I’m for it! Hawaiian Pizza is my favorite. If you feel the same cut 10 pineapple pieces.
You aren’t a sewer? Then you could stop now and you can use this as a toy as it is. If you want to make it more 3 dimensional, find colors of embroidery floss that will closely match the colors of the felt.
Finishing the Pizza with Hand Sewing
Finish the pizza crust: Cut a piece of cotton batting an inch larger than the pieces of beige felt. Sandwich the batting between the two pieces of beige felt.
Hand sew around the outside folding and tucking the excess inside the pieces of fabric. I think I used a whip stitch but you could also do a blanket stitch for this part.
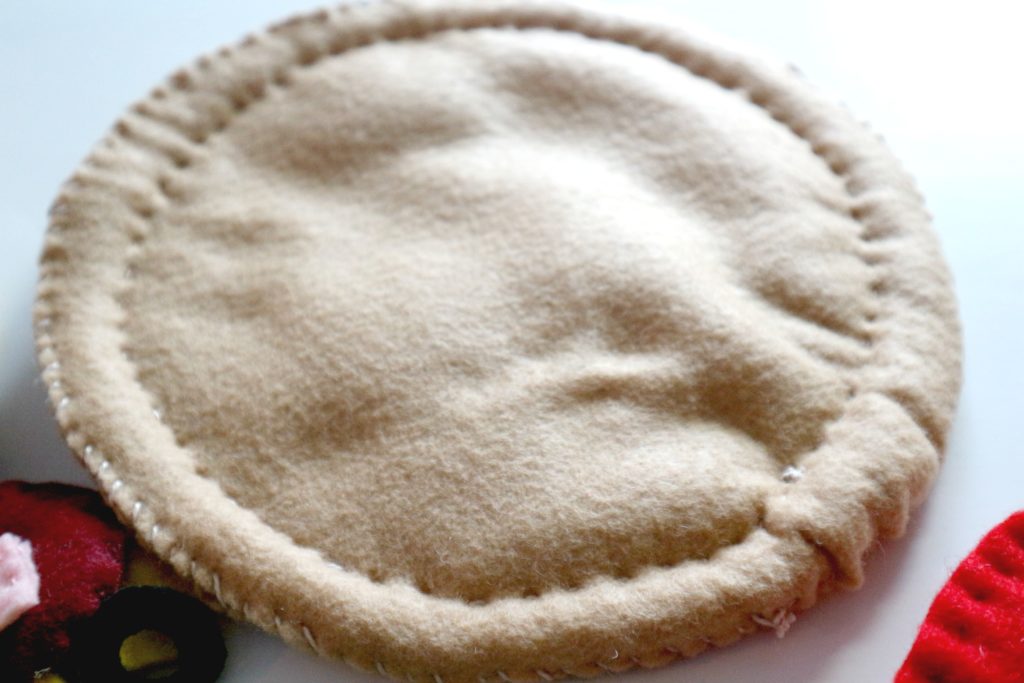
Sew around again an inch inside the seam to create the edge of the crust. For this I used a running stitch.
Stack the 2 pieces of red and sew around the edge with a running stich.
Next, put the two white pieces of mozzarella cheese pieces together and sew around the edge. Stitch each of the toppings together.
When sewing the pepperoni I added a little stuffing. The rest… mushrooms, ham, green peppers, pineapple were all sewn together….the olives and shredded cheese pieces I left as a single layer but you could double it and sew them together.
That’s all there is to it!
Store your pizza pieces in a large ziplock bag so you don’t lose the pieces. Have fun making this project for a little one in your life.
Here is the link to my previous post to make a no sew felt pizza.

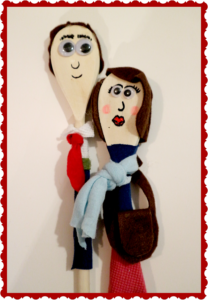
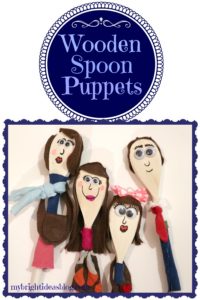
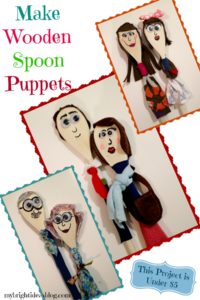
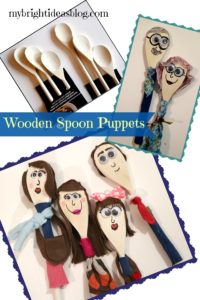
Wooden Spoon Puppets! Easy Fast Fun Inexpensive!
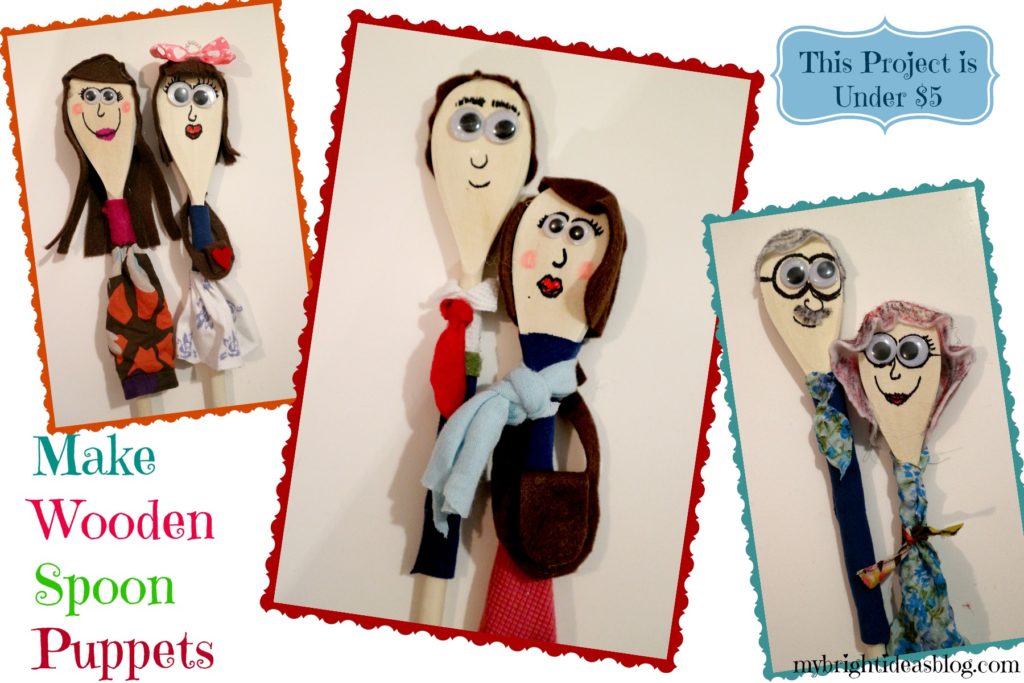
I was researching some puppet theatres to make and came across the easiest puppet idea ever! All you need is some wooden spoons, a sharpie, scraps of fabric, googly eyes and your hot glue gun.
 The wooden spoons I used were 3/ $1.50 making this an inexpensive craft. The shape of the spoon makes a perfect head shape. Some spoons have wide handles too that would be great for drawing on the clothing but these cheap and cheerful spoons were very skinny.
First I added googly eyes and then I drew on the rest of their faces. The hair was a bit tricky. I used pieces of felt for it although you could use yarn or sewing trims.
Clothes are pretty easy just cover up the spoon with a scrap of fabric and hot glue it in place. Its actually easier than you might think to make a shirt and tie.
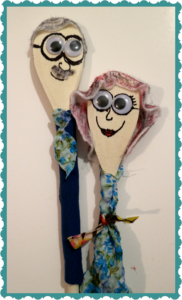
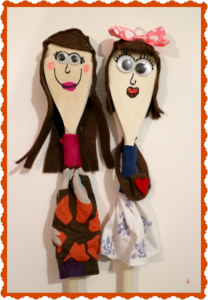
This is the sort of craft that will actually stick around a long time after you make it. You have made an actual toy. I was thinking this is the sort of thing you could take on a camping trip instead of Barbie’s or dolls with all the little bits and pieces that you might lose.

..
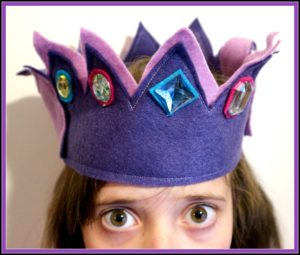
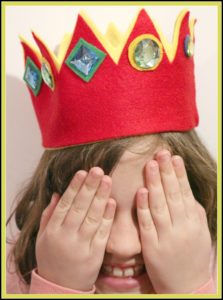
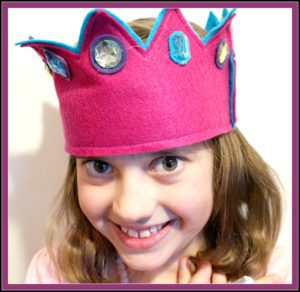
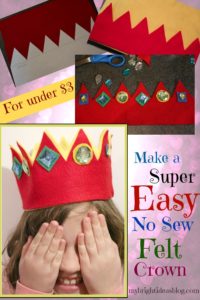
How to Make a No Sew Felt Crown for under $3
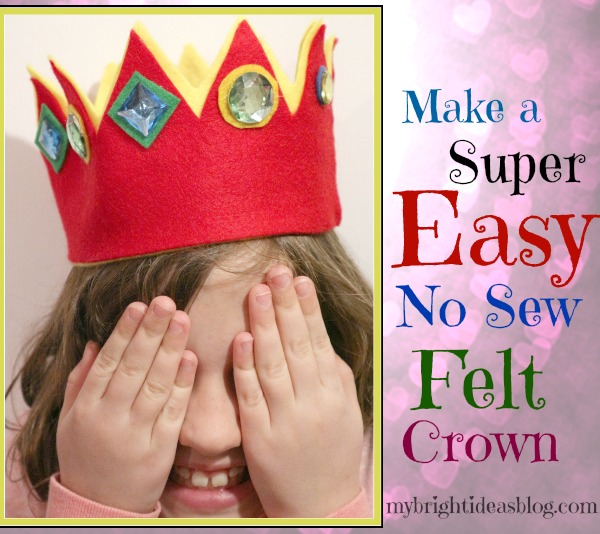
Today we are making a “no sew” felt crown. I tried to be mindful of the cost and simplicity of this project in case you need to make 10 of these for a children’s princess party.
Here is what you need:
A piece of craft felt can cost $.50-1.25 depending on where you are buying it. For each crown you will only need 2 rectangles of felt-I used different bright colors. You will need some gems, scraps of felt and your hot glue gun.
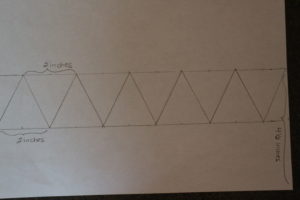
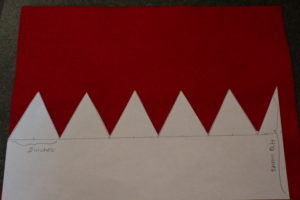
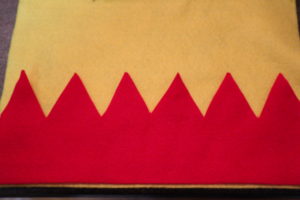
Make a template using a 8 1/2 by 11 standard piece of paper. Measure 4 1/2 inches from the bottom and draw a line. Draw another line 2 inches below that. Put a mark every inch along both lines. Then using your ruler create a zig zag. This measurement should make it possible to do this twice on a felt rectangle that measures 9′ x 11 1/2″. To make sure you don’t cut into the other half you could cut the felt in half lengthwise before you cut the zig zag, If your felt isn’t as wide as mine just shorten the bottom portion of the template. Do the same with the second color that you have. This extra layer will stiffen the project so it can support the gems. It also makes it really pop with the extra color.
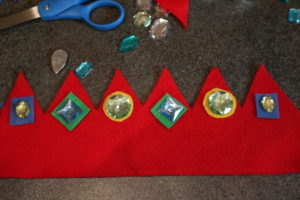
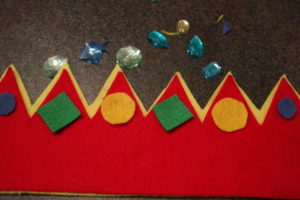
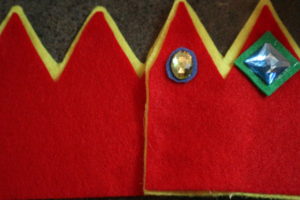
Now comes the fun part! Sort out how you would like to place your gems. Cut pieces of felt out of scraps to place under the gems. Using the hot glue gun, glue the layers together. Then glue on the felt circles and triangles into place, and followed by the gems. This is when I borrowed my daughter’s head for a sizing. Overlap the edges and glue in place. I only put gems on the front of the crown, if you were going to put them all around its important to not have glue gems on the part that is going to be under this over lap. So if I were going to put gems all around I would only put it on the 4 middle zig zags for the back part of the crown.

While you have the felt and gems out and the hot glue gun is still hot…you might as well make a ring and bracelet too.
…Here is a link to another post with identical looking crowns but using the sewing machine to sew the felt together and add a Velcro closure.http://mybrightideasblog.com/sew-a-super-easy-to-make-felt-crown/
100th Day of School Celebration-Glue Buttons on a shirt for a Gumball Machine
It looks like next Monday will be the 100th school day for 2018! Where has the time gone?!?!
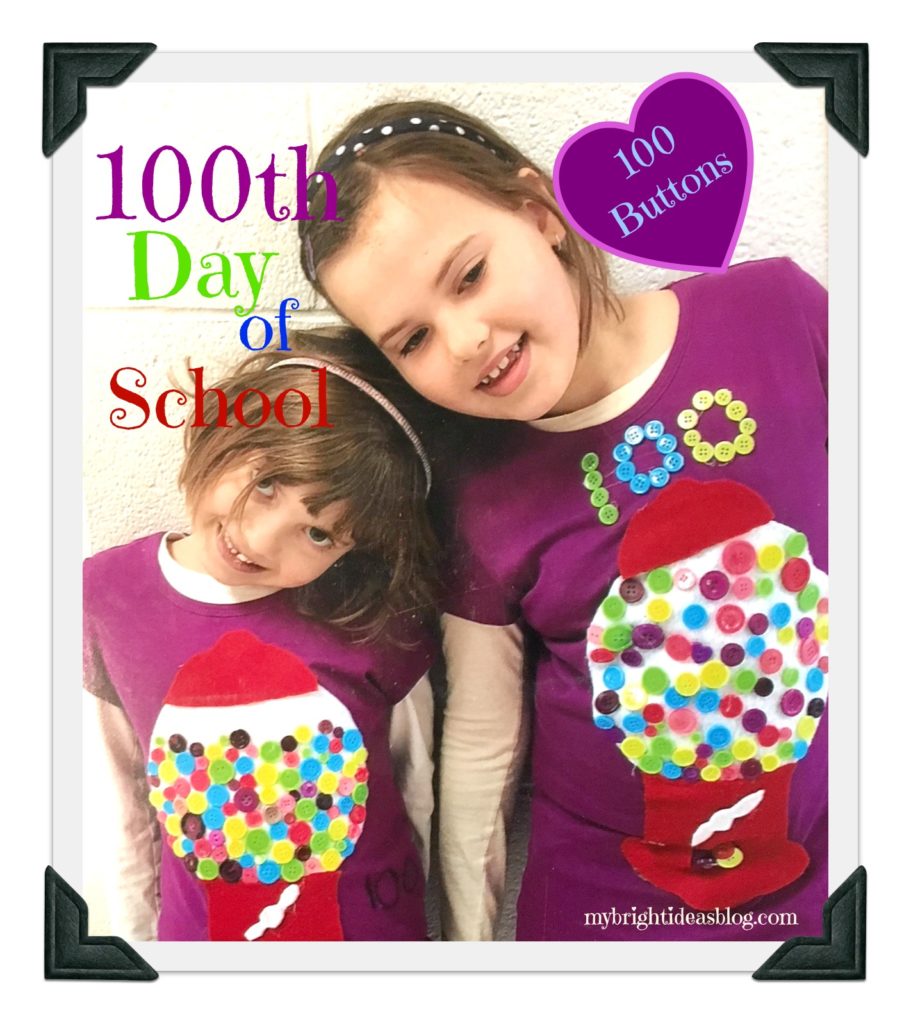
Once a year the school has a nice way to spice up a dreary February by celebrating the 100th day of school. Its a great excuse for extra math too as they find all sorts of ways to come up with the number 100. Teachers from Kindergarten to Grade 2 seem to get into it the most with assignments for parents to help their children glue 100 cheerios to a page or 100 googly eyes to a t-shirt. What we did for the girls a few years ago was put 100 buttons on a t-shirt looking like gum balls in a gumball machine.
Simply take a piece of in-expensive white felt and cut a circle (trace a plate). Take a piece of red felt and cut out the bottom and top of the gum ball machines. We didn’t realize the date had snuck up and with one night to do this I hot glued everything in place. I could have sewed on the felt and buttons but that would have taken some time but made them more wearable. We put it on plain purple t-shirts from the craft store….purple is always a great choice and the bright colours pop! Their teachers were really delighted by the effort we put into making t-shirts for the theme.
COST
The cost to make this…$5 t-shirts….$2 felt…..$4 for buttons in 4 colors from the dollarstore which was enough for both girls tops. So less than $20 for both girls. You could cut the cost in half if you use t-shirts that you already have. Use one that they are just about to outgrow anyway! The photo was taken by the teachers and emailed to me-how sweet!

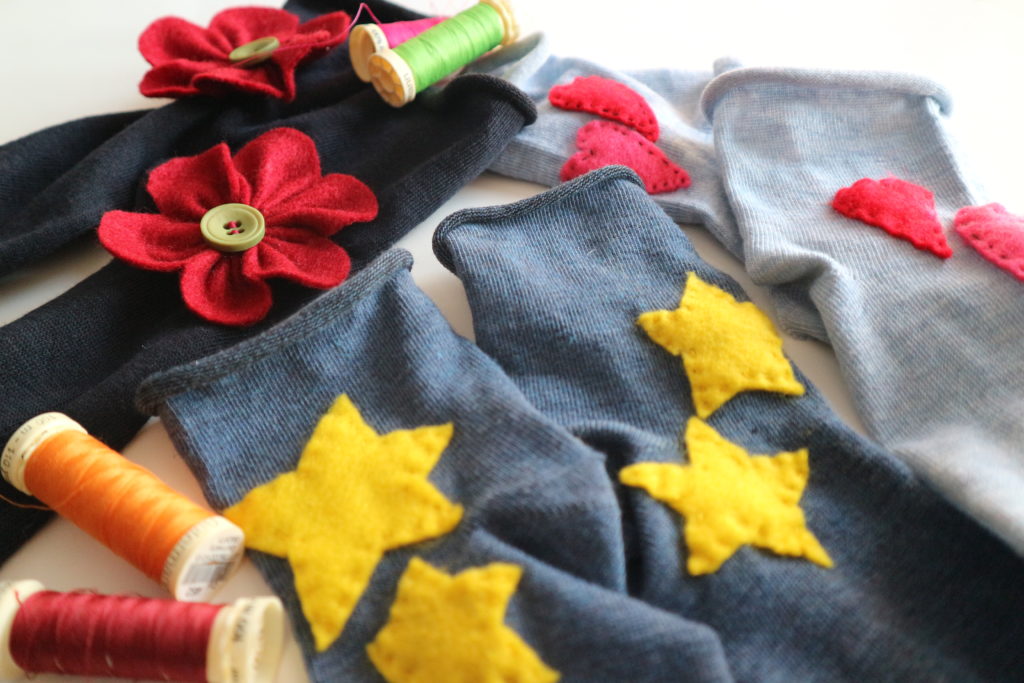
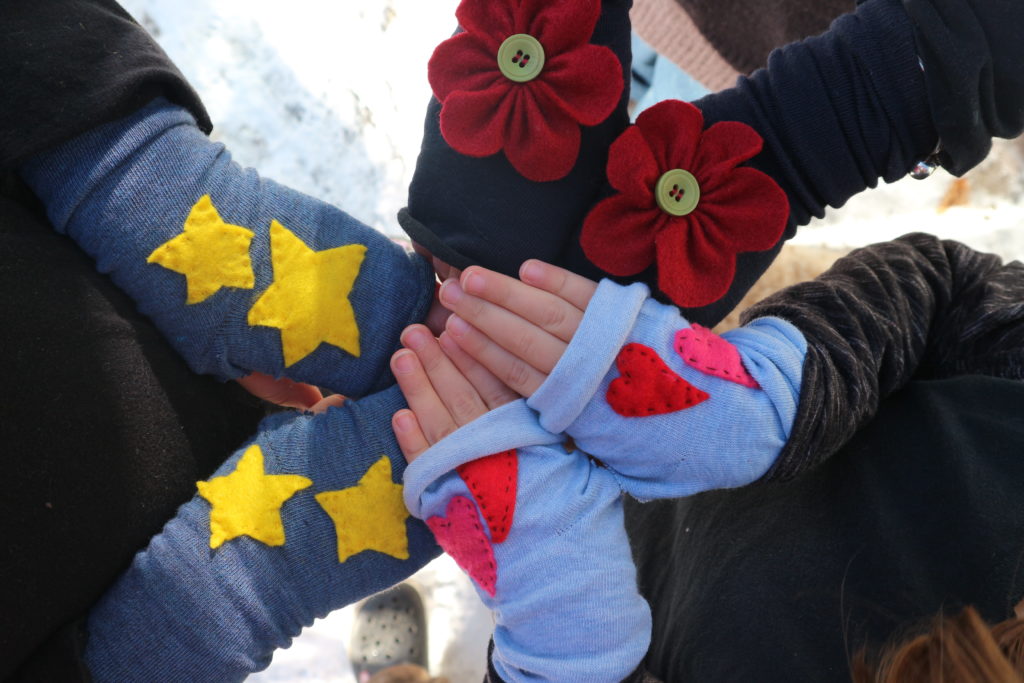
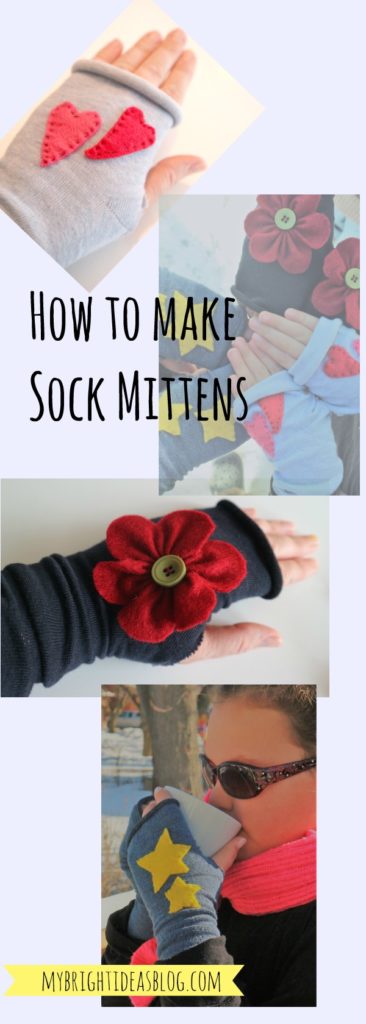
Fingerless Mittens from Socks? Super fun!
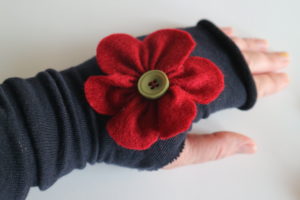


Have you noticed the weather is getting chilly again and your little fingers are getting cold. But where are last years mittens??? Don’t ask me….I have a drawer with 10 single mittens and gloves that I just can’t figure out where the partners have gone to.
Not to worry! It is so easy to make fingerless gloves/mittens from a pair of socks! Find yourself a clean pair of old socks that you can upcycle….or treat yourself to a new pair of socks.
You will need….
- socks
- scissors
- needle
- thread
- felt scraps
Start by resting your hand on the sock and seeing where your thumb will be and the length of your fingers compared to the end of the socks. Mark a little “o” where the thumb hole will be near the bend in the sock.
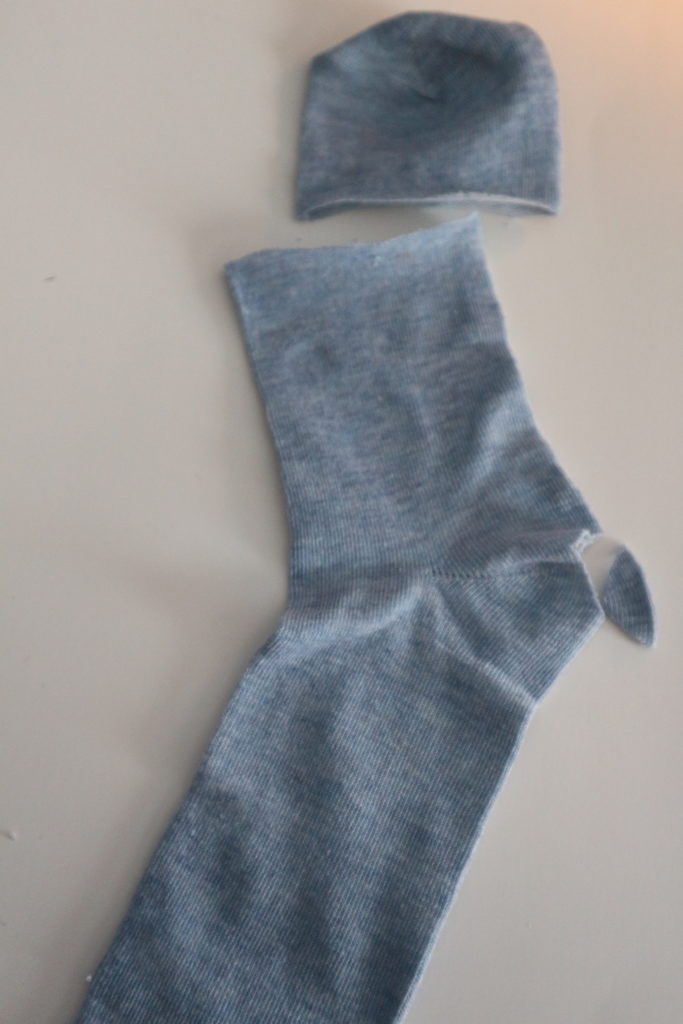
Cut a small hole at the bend in the sock heel for the thumb and across the top for the fingers.
Try the sock on your hand and see if you thumb fits comfortably. If it’s too small make it a bit bigger.
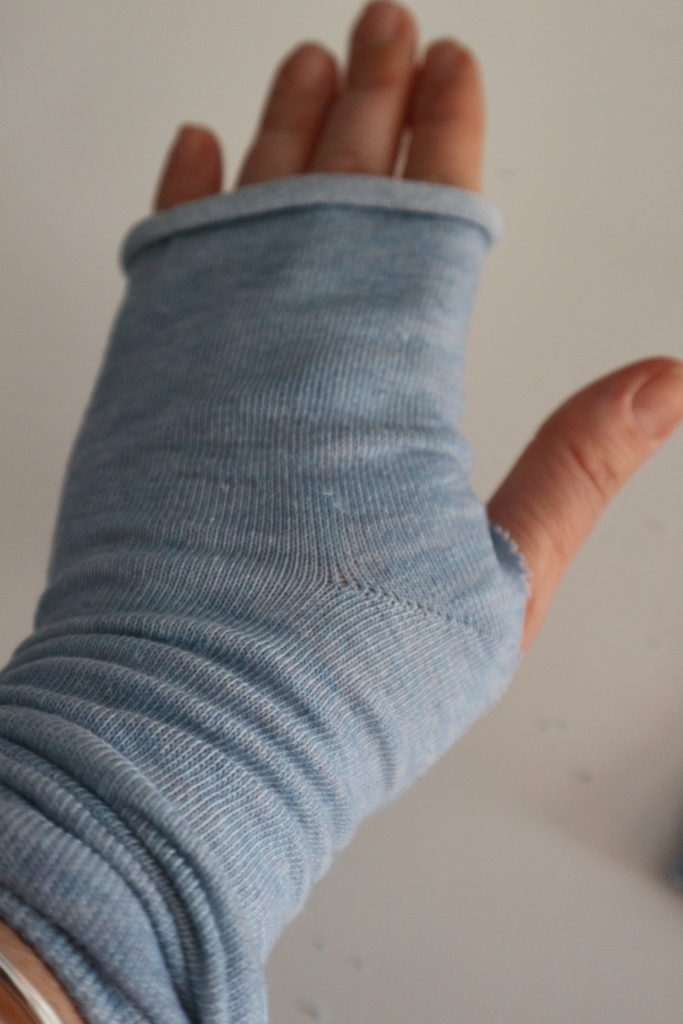
The lovely thing about socks. is they are stretchy and comfy. Having your finger tips free means you can type a text, count change for the parking metre and blow your nose without taking off your mitts. Gross…. I know but cold and flu season will be here soon!
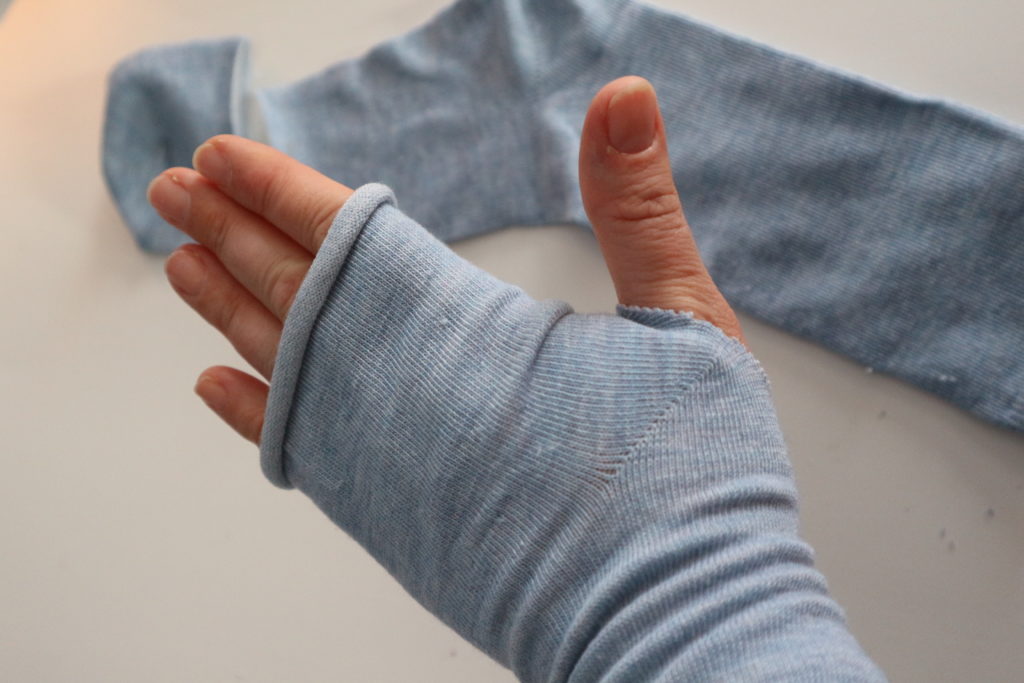
Hemming isn’t necessary, because it is knit fabric, so let it roll a bit. So literally, that is all you do to make the fingerless mitten or glove.
Now choose a little something to be the applique on the front of each hand.
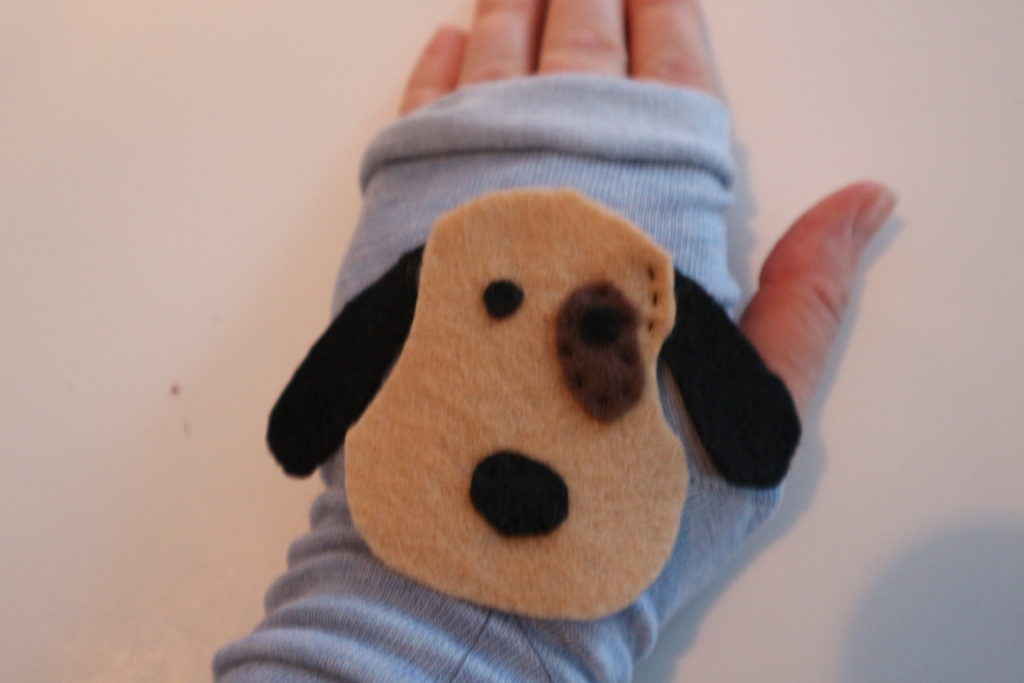
I tried this handsome dog but he was too big.
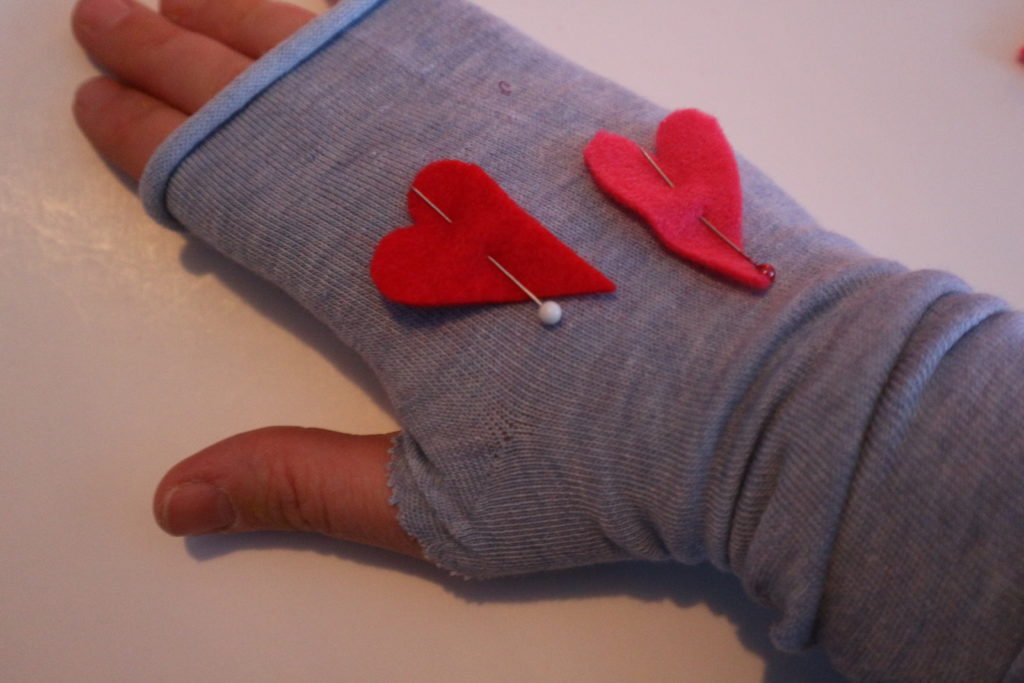
Decide where you want to put the applique and pin it in place.
A quick running stitch is all you need to attach the heart to the mitten.
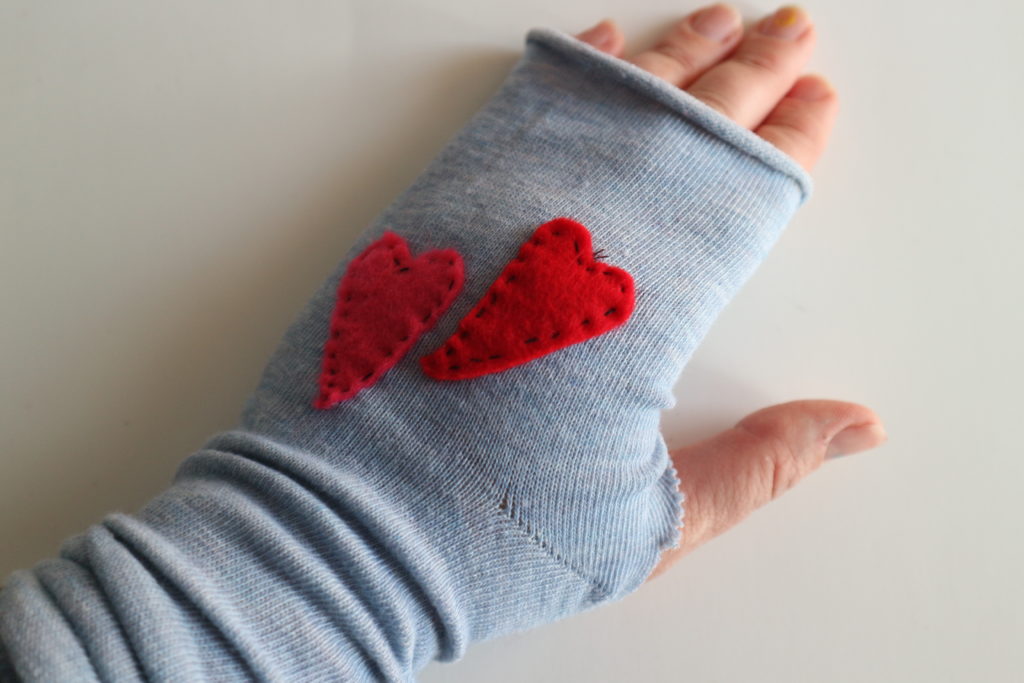
There, now the mitten applique is in place. You are done!

Easy to add a flower with a button.
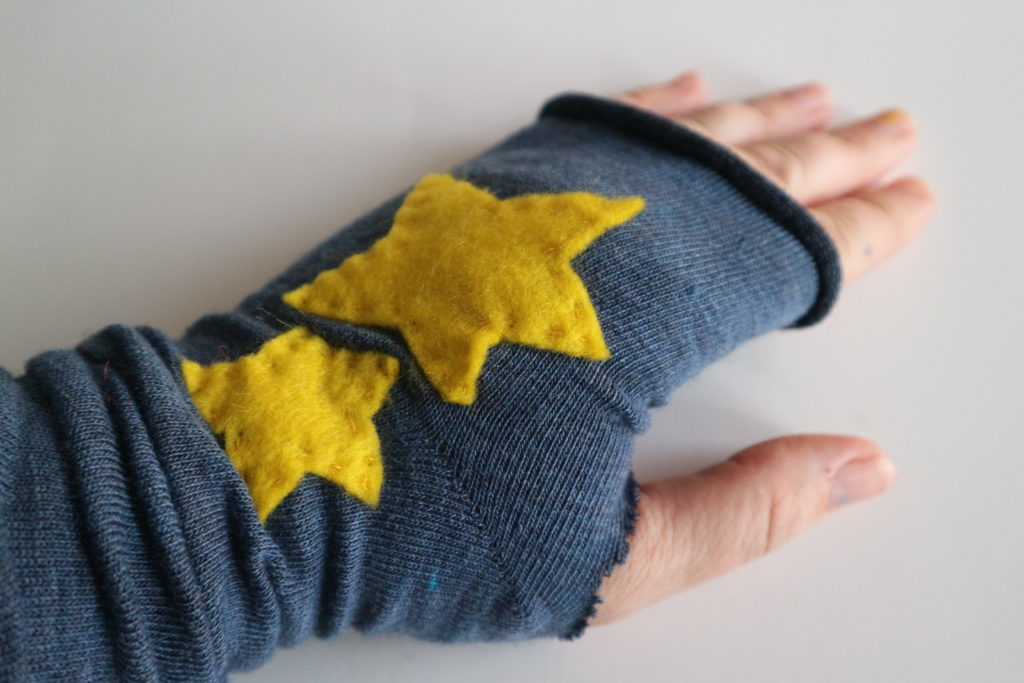
Stars are easy too.
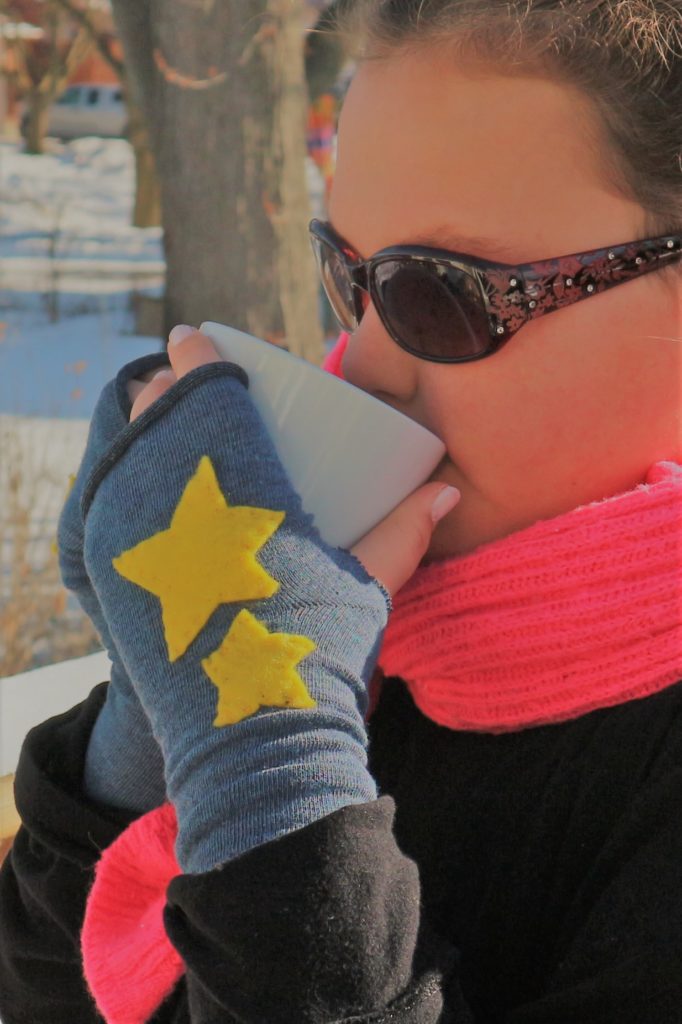
Brrr. That was a cold day! Hmmm…hot chocolate!
Sew a Super Easy to Make Felt Crown – Add to your dress up clothes!
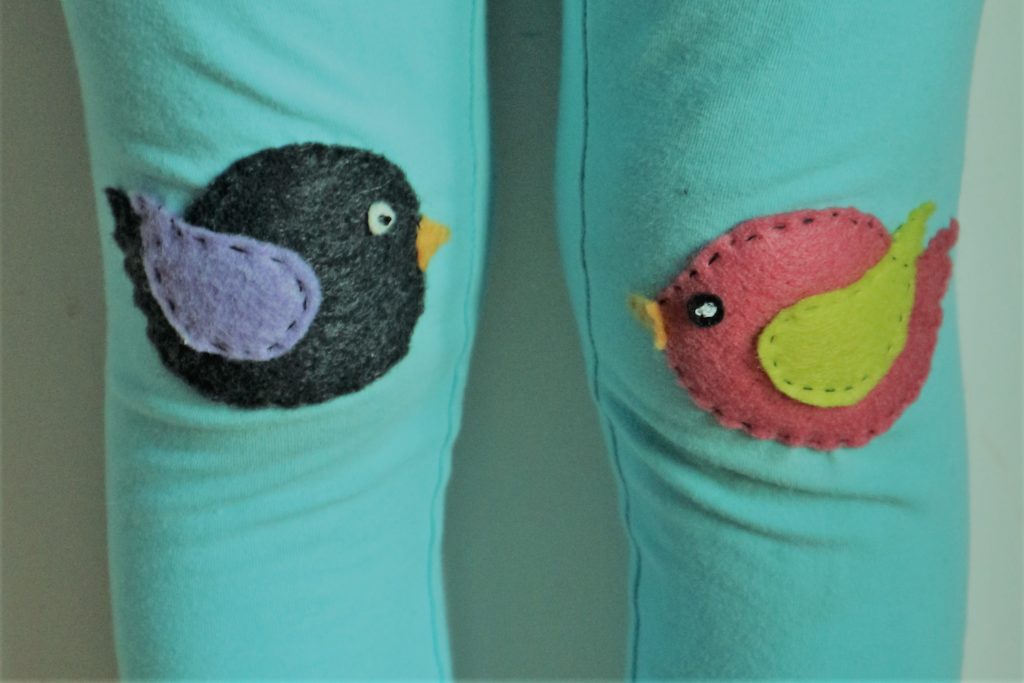
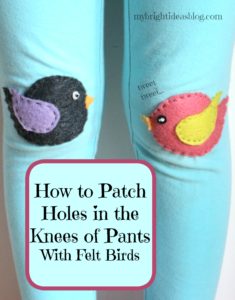
Felt Knee Patch – Little birds Cover Holes in Pants
 These are way cuter than the big rectangle patches I had to patch up the holes in my pants when I was a kid. Trust me! In my frugal family, growing up with 4 sisters, holes were mended, socks were darned…things were not thrown out if they got a hole they were put in the mending basket-next to the sewing machine. Every item of clothing was in the process of being a hand-me-down and would be again as soon as we had outgrown it.
I love felt! Its so easy to create an applique just for fun but if your kiddo has a hole in her pants its a fast way to patch it up. Choose a shape and colour and sew it on. Yellow stars, red hearts are classic but if you want to get more complicated then do so. Layers of flowers tempted me on this project but then I remembered she might be in gym class on her hands and knees and be wishing I didn’t put little beads on it.
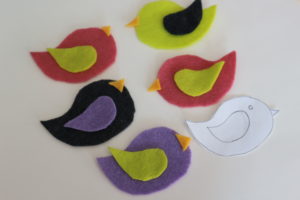
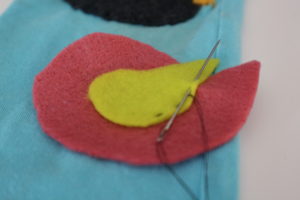
So I chose a simple bird for these leggings. There was only a hole in one knee but I thought they should match. One looked lonely.
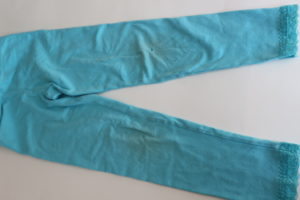
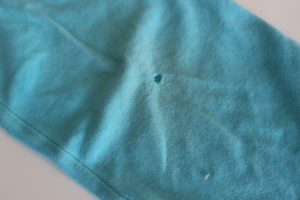
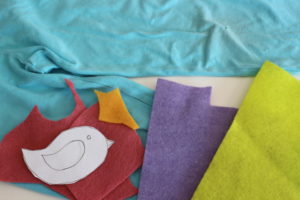
I drew a very easy bird on paper so I could cut out the pattern easily. It looks like a big paisley with a small paisley for a wing and a triangle beak. Normally a little bead would make a great little eye for the bird but I was thinking of her crawling on her knees and that could hurt so I just cut a little circle and used a knot in the thread to make it look like an eye.
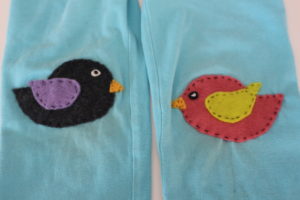
As soon as I had Miss M put the freshly mended pants on she noticed there was still a hole on her bum. Hmm….I hadn’t noticed that…good thing I made extra birds… This would look really cute on the back pocket of some jeans!