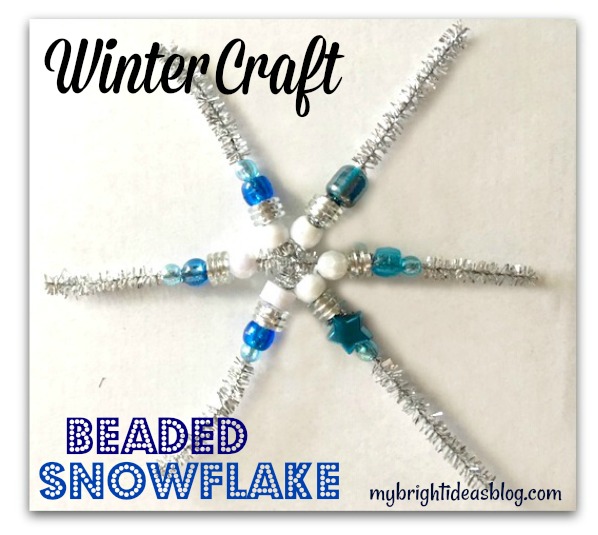
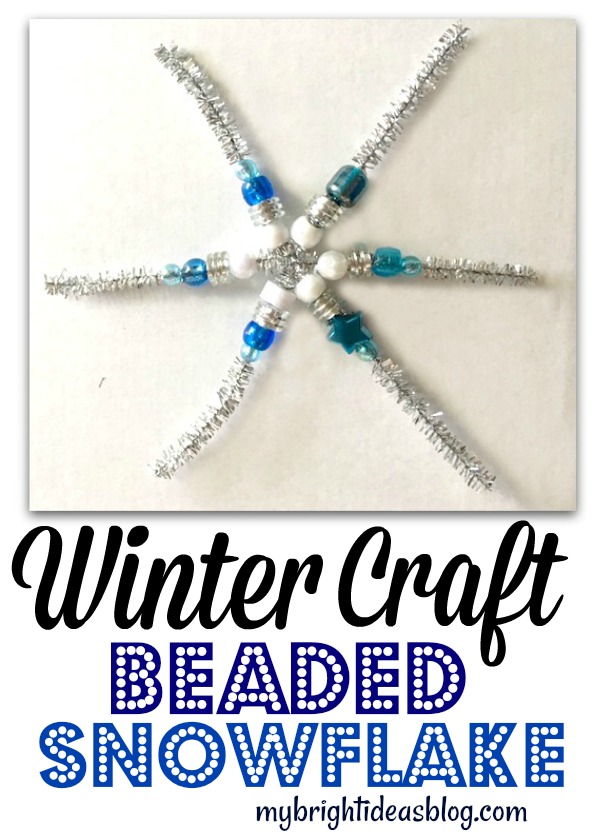
 Make an Easy Winter Kids Craft – Snowflakes made with Pipe Cleaners and Beads!
I attempted a post on this exact craft last year but I had a look at it and they turned out a bit ugly in the end. LOL. So I’m trying it again for a do-over.
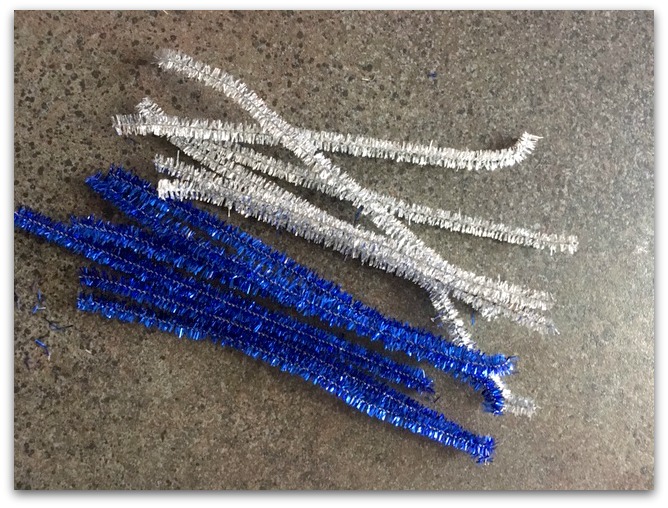
You will need:
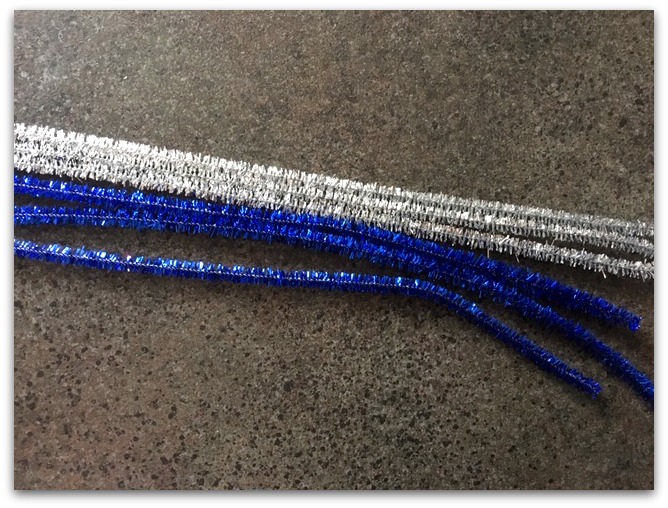
- sparkly pipe cleaners
- beads and pony beads
That’s it!
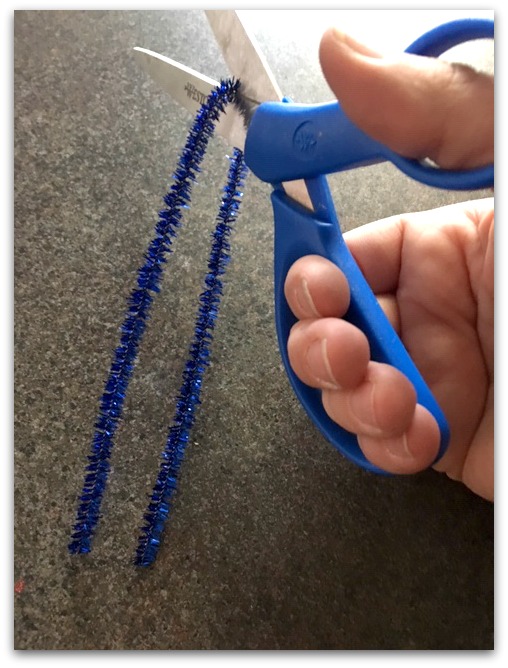
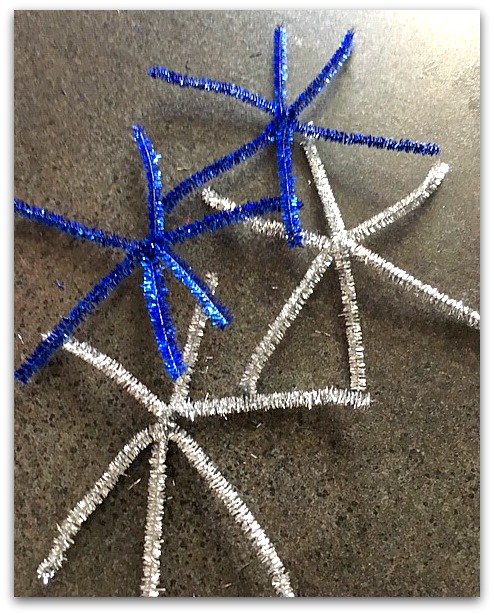
Each snowflake takes 1 and 1/2 pipe cleaners. Cut 2 standard length pipe cleaners in half (so you have 3 pieces 6 inches long).
This time I’m using sparkly pipe cleaners. They really stand out. But I’ll warn you the beads didn’t slide on it quite so easily.
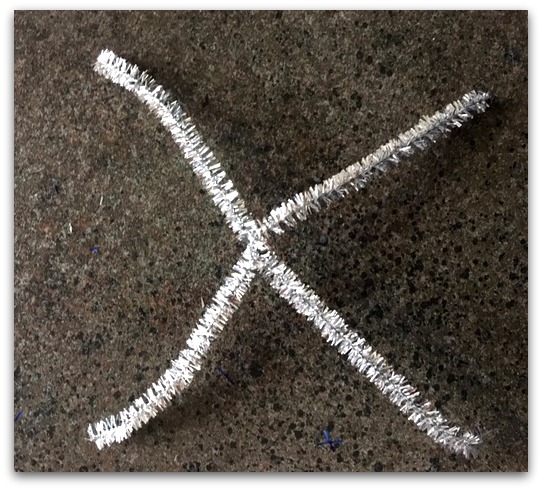
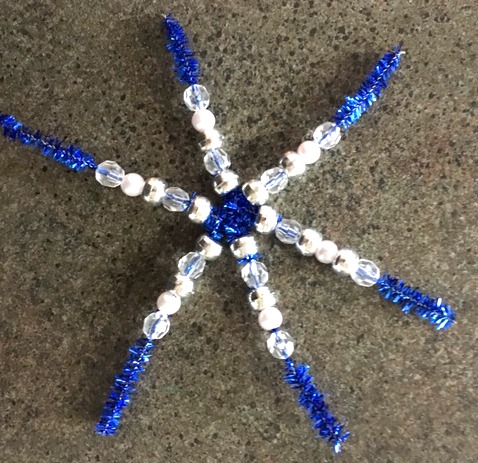
Take 2 pieces of pipe cleaner and overlap them in the middle. Bend them around each other to make an X.
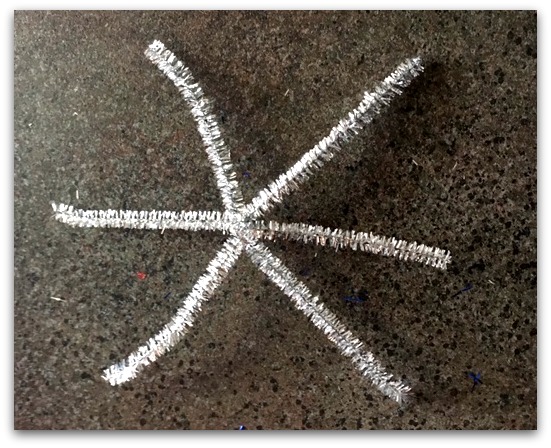
Add a third one to the middle of the X and bend it to make a star.
This is a great craft to teach young ones about making patterns. They also will develop fine motor skills sliding the beads onto the pipe cleaners.
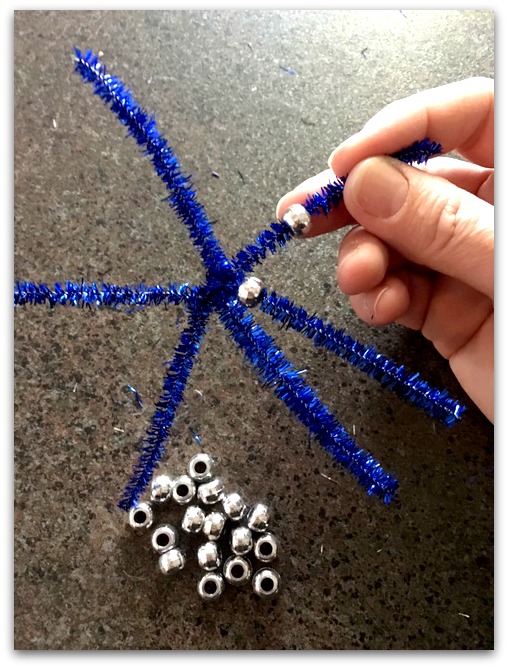 Start with 6 pony beads and slide them onto the pipe cleaners. The dollar tree has a lot of color choices for pony beads. You can also purchase them at Walmart or the craft store.
Push them right up to the centre of the snowflake star.
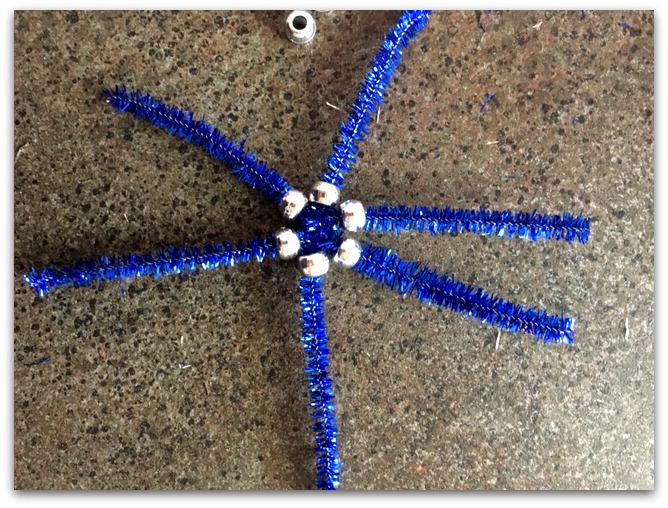
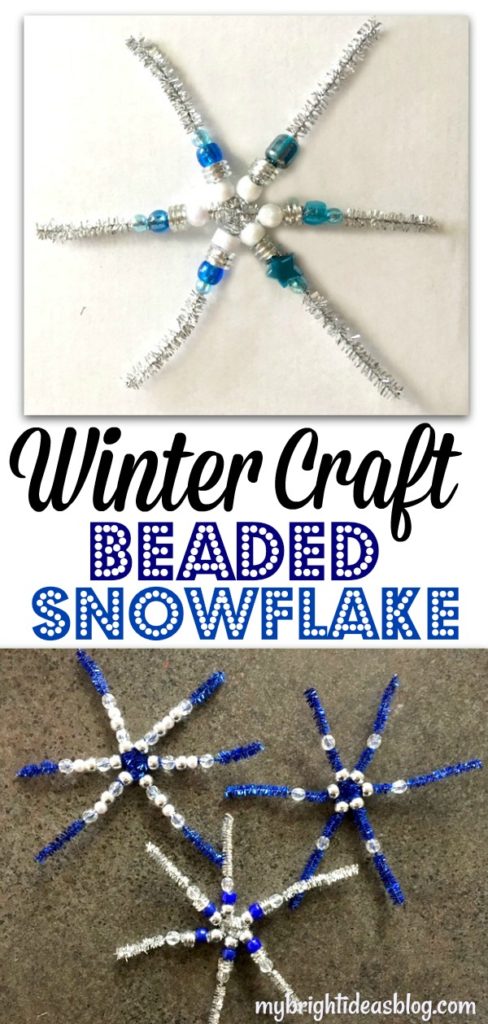
 I found sticking with a pattern looks better than going freestyle with your beads. See if you agree.
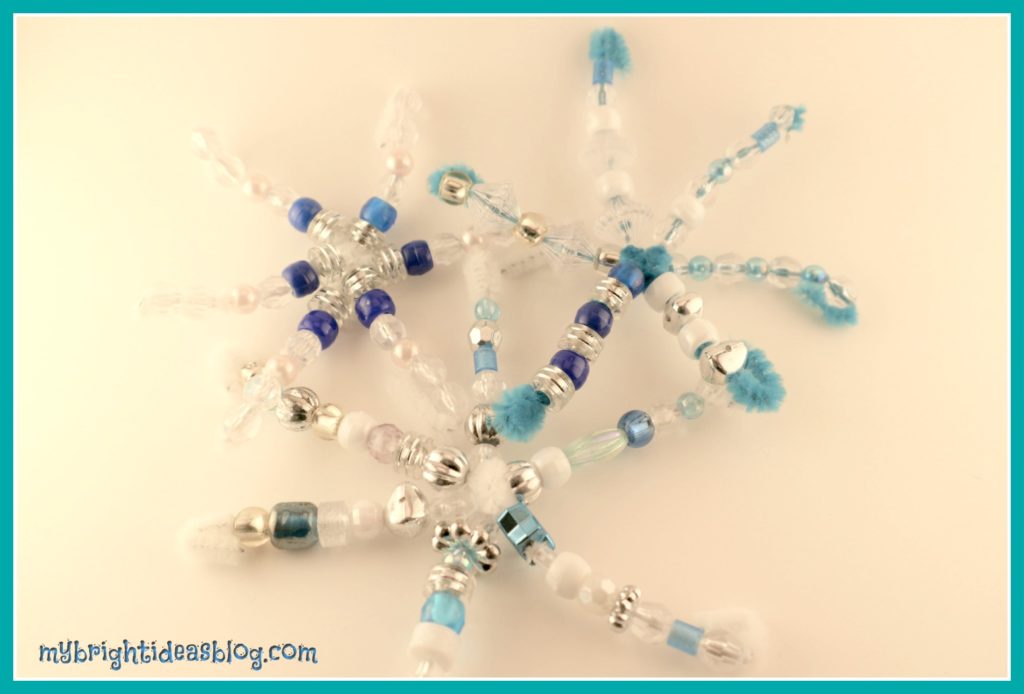
Last year my daughter and I made the examples above with random silver, white, blue and clear beads.
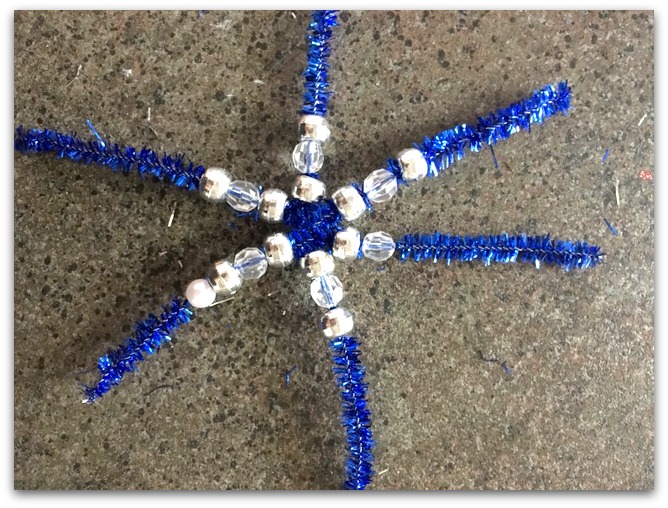
Since the sparkly pipe cleaners are stiff I found if I put the order so that the last bead has a slightly smaller hole as the end-everything stayed in place. If your beads are threatening to shift and might fall off then simply bend the end into a loop.
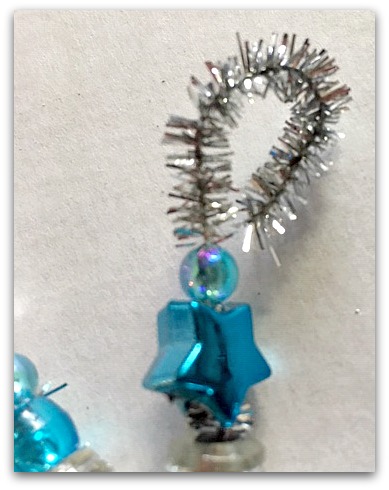
The loop is also perfect for hanging a ribbon. Hang it from a door knob or a curtain rod for a wintery snowflake sun catcher.
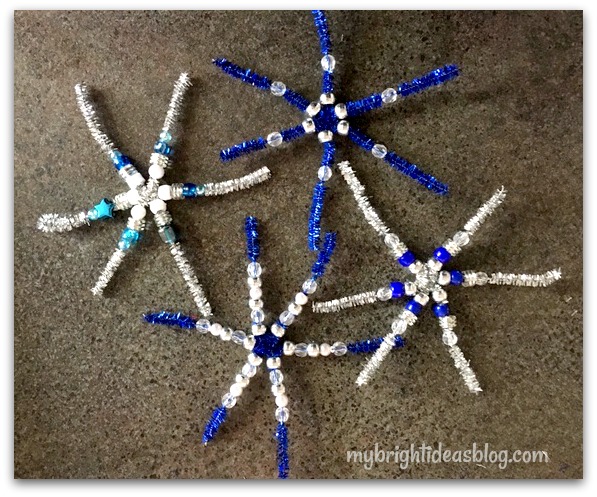 Have fun making these beaded snowflakes. Below are a few more easy winter kids crafts and projects we have done in the past.
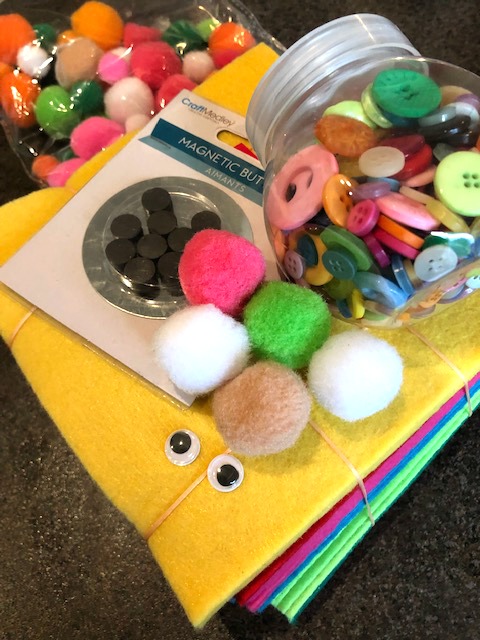
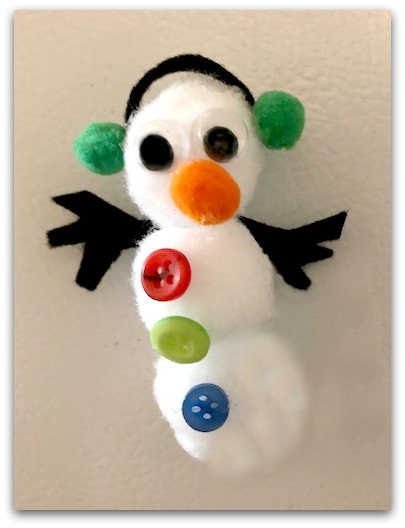
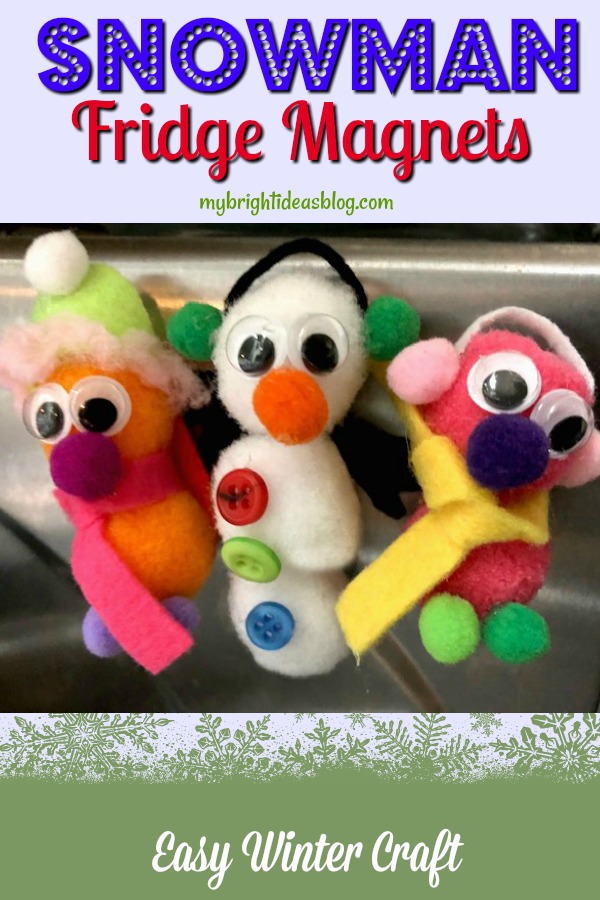
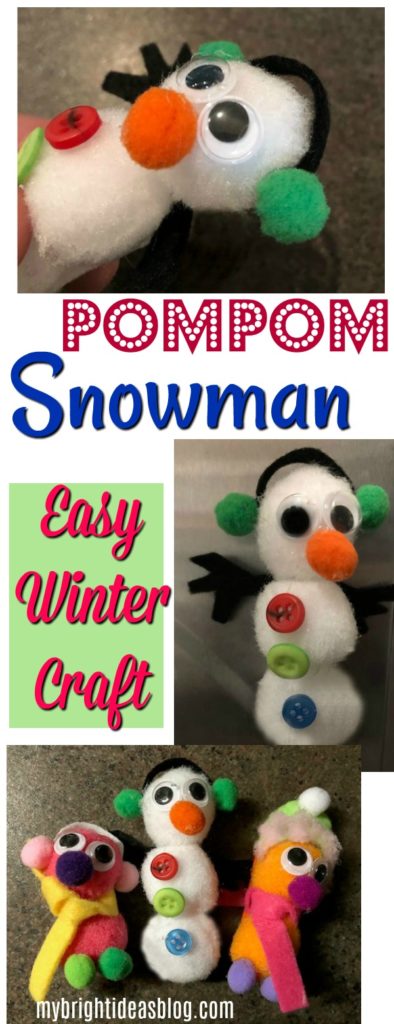
PomPom Fridge Magnets – Easy Winter Crafts!

There is something wonderful about pompom crafts. They are bright and there is so much you can do with them. This post is how to make a snowman out of pompoms for fridge magnets. This is such an easy winter craft-perfect for a snow day or winter break!
Let me tell you about my inspiration….introducing Henry and Henrietta!
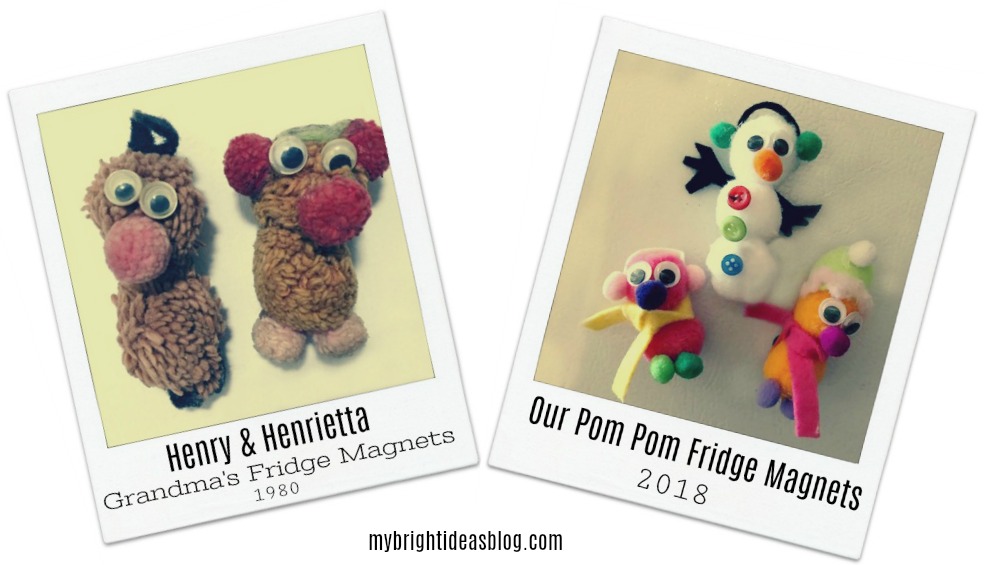
I was brainstorming winter craft ideas when I suddenly had a childhood flashback to my Grandmother’s fridge magnets. I texted my sister to ask if she could remember them. Ten minutes later she texted this photo of them. These scruffy fridge magnets are a sight of beauty to a few of us with childhood memories of when they were in our grandparents camper fridge and later on their home fridge. I love my Grandma and Grampa memories…..sigh…
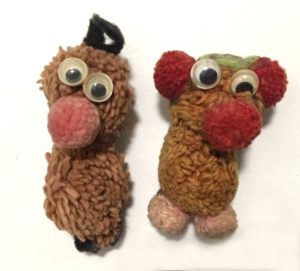
My eldest sister tells me the story that Grandma had Henry a lonely fridge magnet on her camper fridge over the years possibly going back to the late 1970’s. At some point in the 80’s the family went on a camping trip waaaaaay up north near Kirkland Lake, Ontario. While at this Provincial Park my sister remembers spotting Henrietta lying on the ground! Can you imagine finding a pompom fridge magnet in the dirt, the exact female version of Grandma’s pompom Henry. Well they were soon introduced back at the campsite and they have been a happy couple ever since…..ahhh amour….
Well that was a nostalgic walk down memory lane. Now back to the craft!
This is really fun to make! Go grab your supplies.
You will need:
- googly eyes
- pompoms
- felt
- hot glue gun
- magnets
- scissors
- tiny buttons (optional)
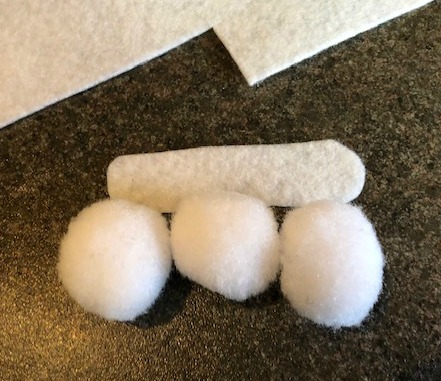
Cut a piece of white felt for the backing for the 3 white pompoms. Try to co-ordinate the back with what ever color pompoms you are using for the project.
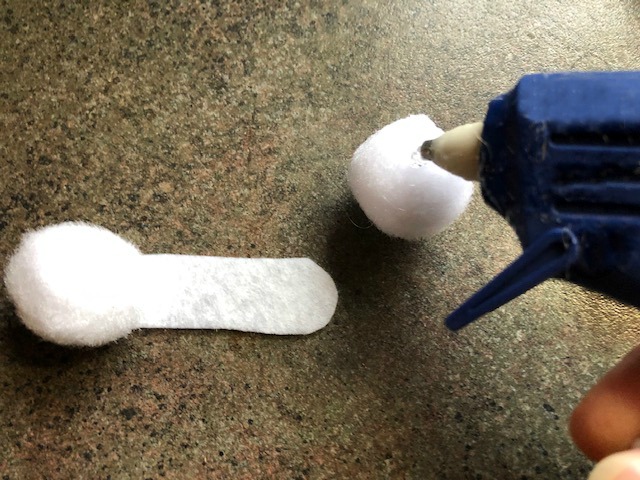
Hot glue the 3 pompoms onto the backing piece of felt.
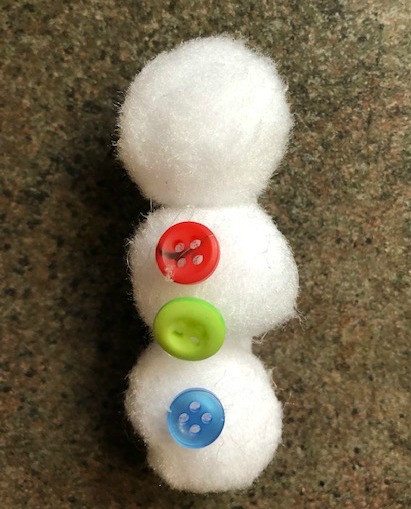
Add very small buttons to the top of the lower 2 pompoms.
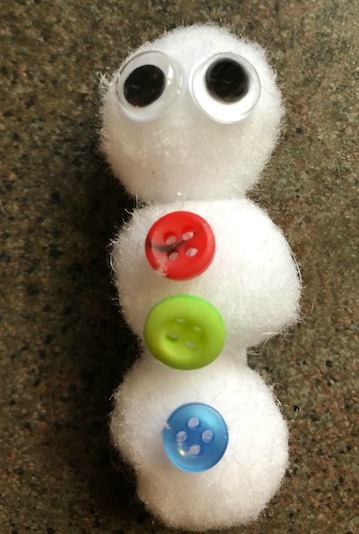
Add your googly eyes and then a little orange pompom nose. If you don’t have an orange one you could use a piece of orange felt instead.
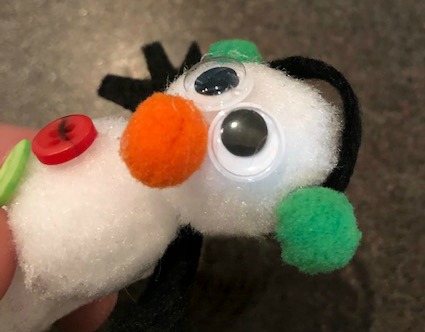
This is optional but I added ear muffs. Just a thin strip of felt with a dab of glue on each side and stick a pompom on each side to cover the end of the felt cut into a triangle carrot shape. I personally like the pompom nose on Henry and Henrietta so I’m sticking with a pompom nose on my snowman.
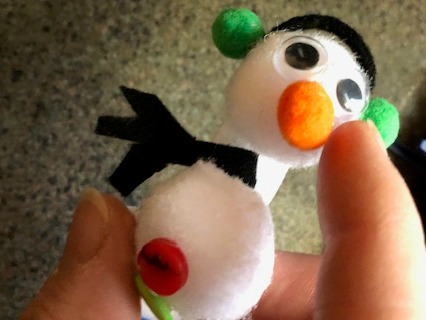
Gently bend back the felt behind the top pompoms and add a few dabs of glue to attach branch arms. Put a big dollop of glue between the pompoms so that they won’t flip backwards anymore.
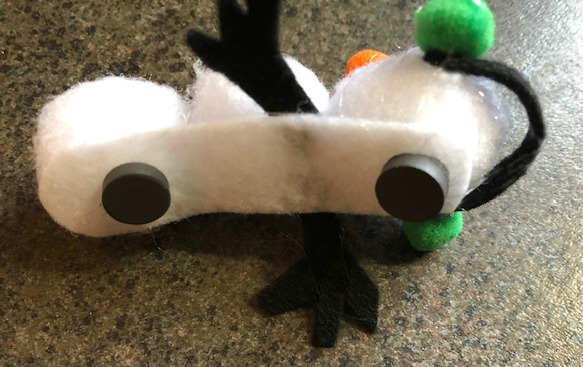
Add 2 dabs of hot glue to the backing and add magnets to the top and bottom.
While you have your pompoms handy why not make some other winter friends to go on the fridge. I would like to figure out how to make a little toboggan out of felt.
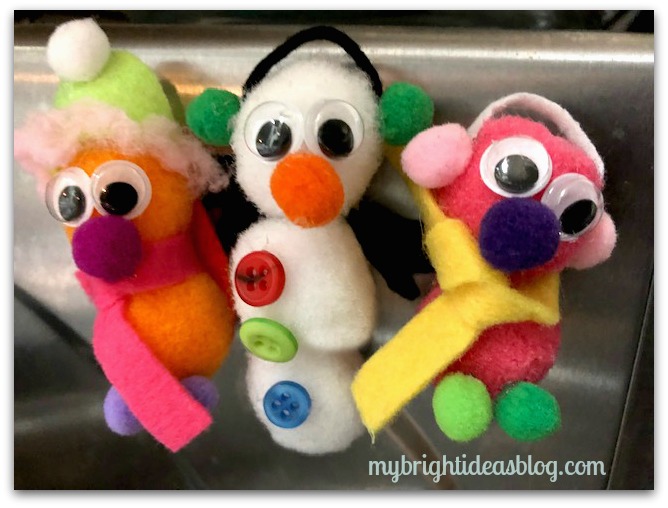
Check out these other projects that we used pompoms and hot glue!
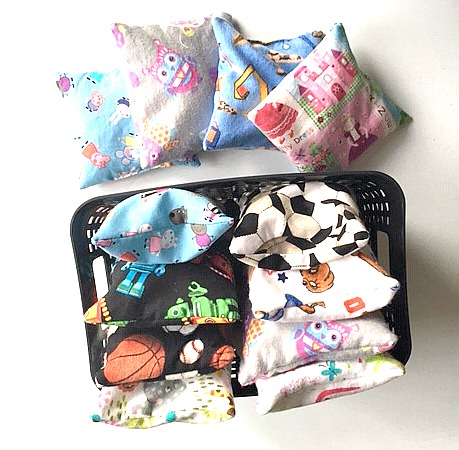
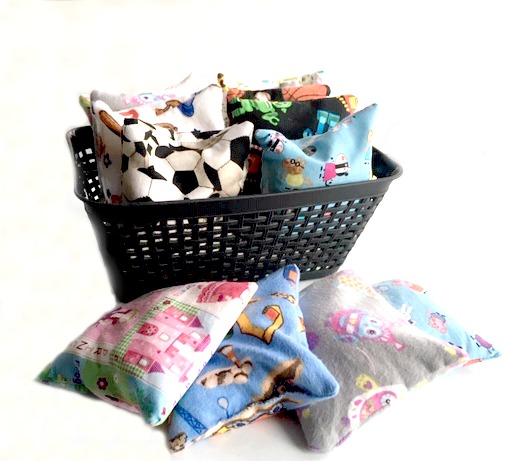
Make Hand Warmers or Ice Packs
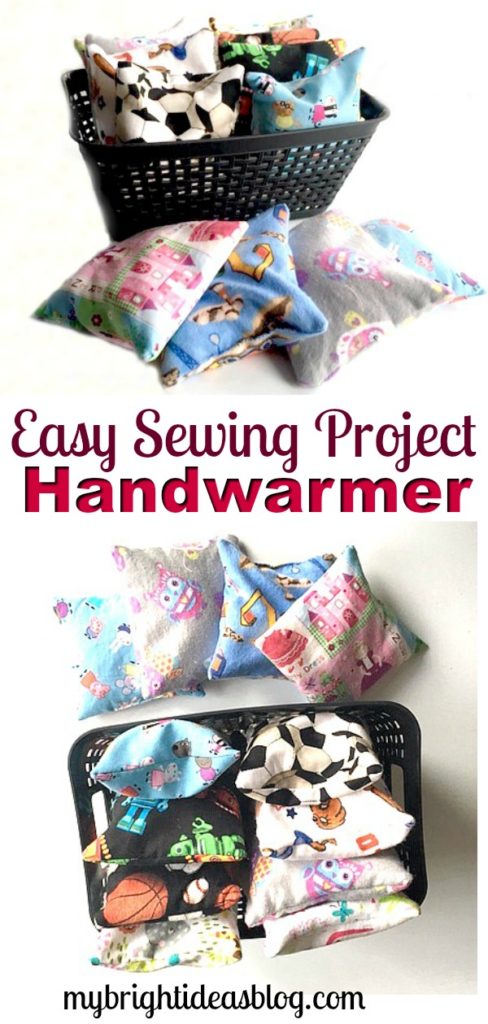
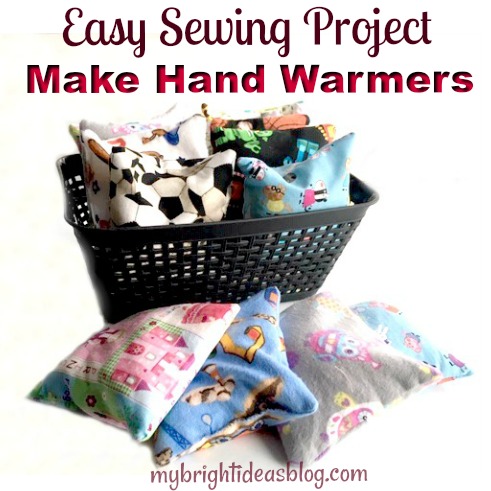
Easy to Make Hand Warmers or Ice Packs
Last year I tried my hand at making a long soothing lavender/rice pack and I LOVED IT! Perfect for sore muscles, tense shoulders or out of the freezer when you need a cold pack. (Link Below)
When summer came I thought how nice it would be to have an ice pack when you hurt yourself. So I put the rice/lavender pack into a Ziploc bag and left it in the freezer to cool. Since its winter, and cold, I’m posting this time a smaller one to warm up your mittens or socks.
What you will need:
- cotton fabric scraps
- scissors
- sewing machine
- needle and thread
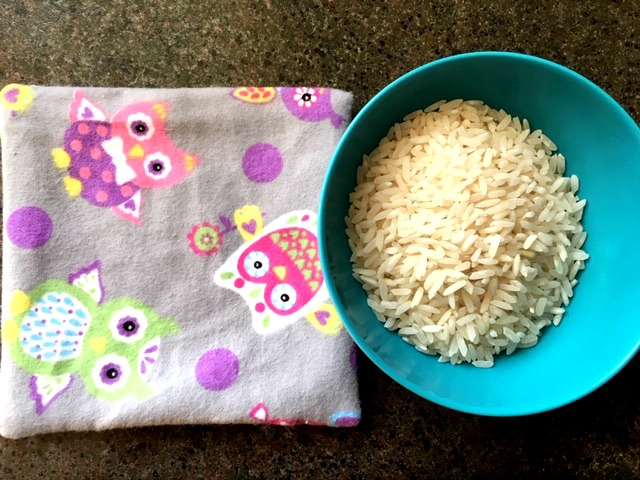
- uncooked white rice
- lavender (optional)
- essential oils-lavender, peppermint, citrus etc (optional)
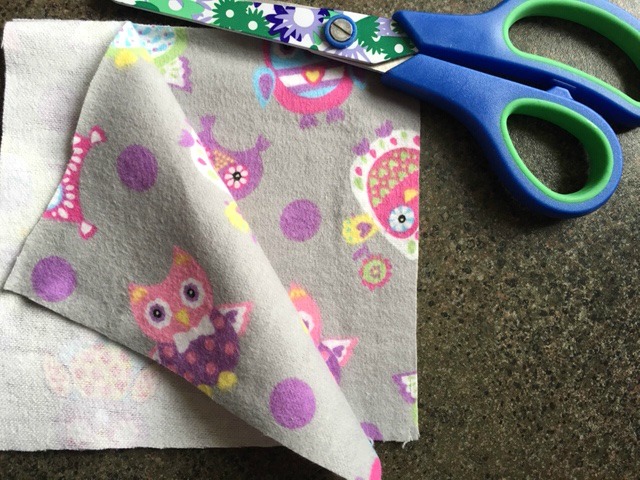
Cut fabric to the size. 3 x 3, 4 x 4 or 5 x 5inches. (I chose to make mine 5×5)
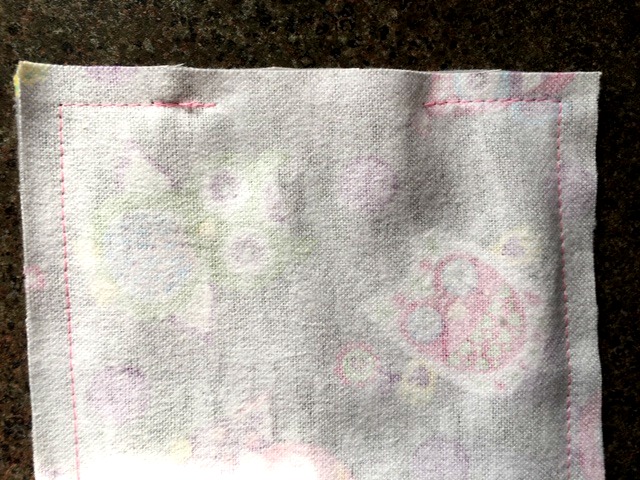
Sew all the way around the fabric leaving a 2 inch gap.
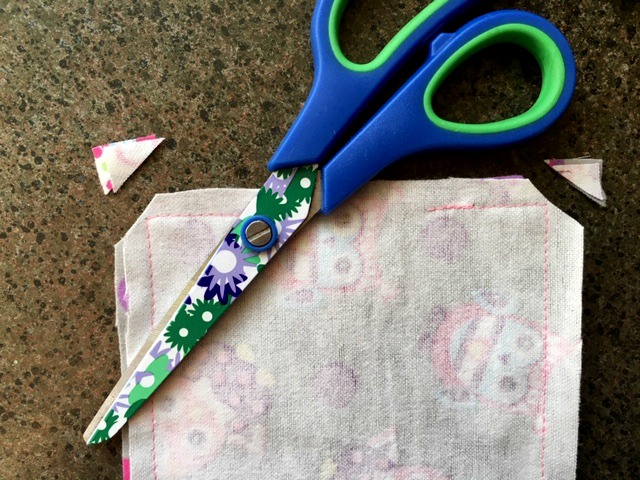
Trim the corners off.
Turn the square inside out by pulling it through the 2 inch gap.
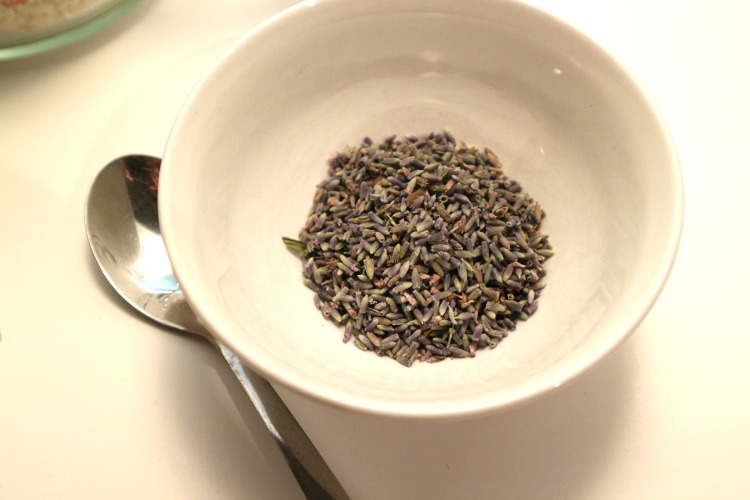
If you like the smell of lavender add a pinch to the uncooked rice. When it is warmed in the microwave the lavender smell will get stronger.
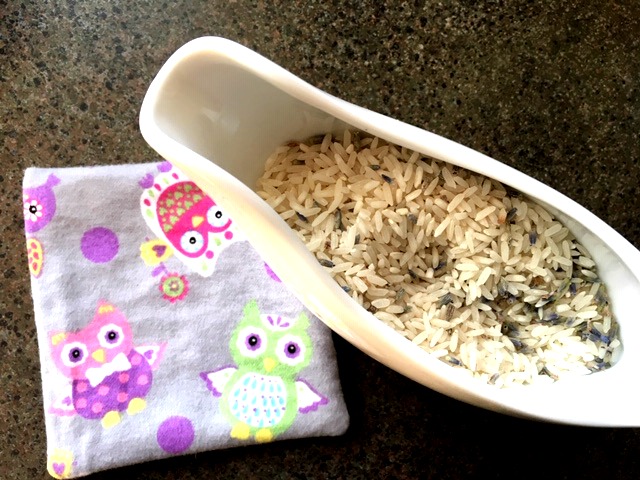
I used my gravy boat to help pour the rice and lavender into the hole.

Fill the square fairly full but not rock hard. Fold over the edge and sew the 2 inch seam closed with a needle and thread.
To keep it away from my ice cubes I keep the rice packs in a ziplock bag in the freezer for ouchies.
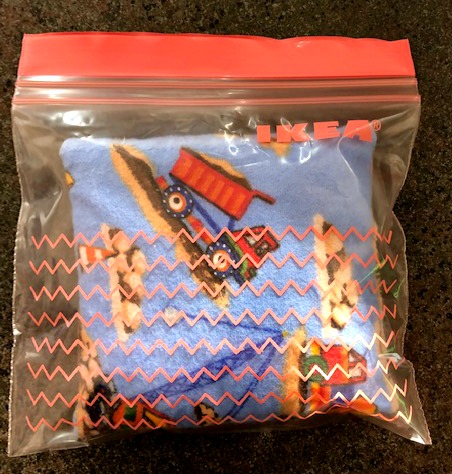
As a warm pack I still store them in ziplock bags while not in use. Microwave for 30 seconds each and hold onto it or pop into your mittens to warm up you hands.
Easy to Make Fleece Hat with Flowers – Simple Sewing Project
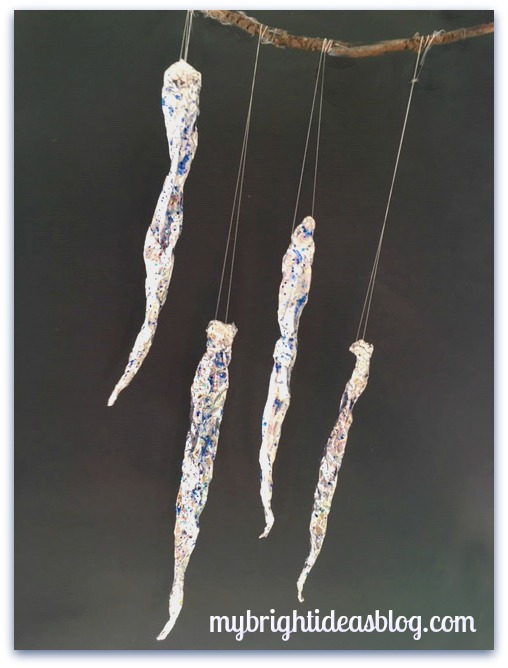
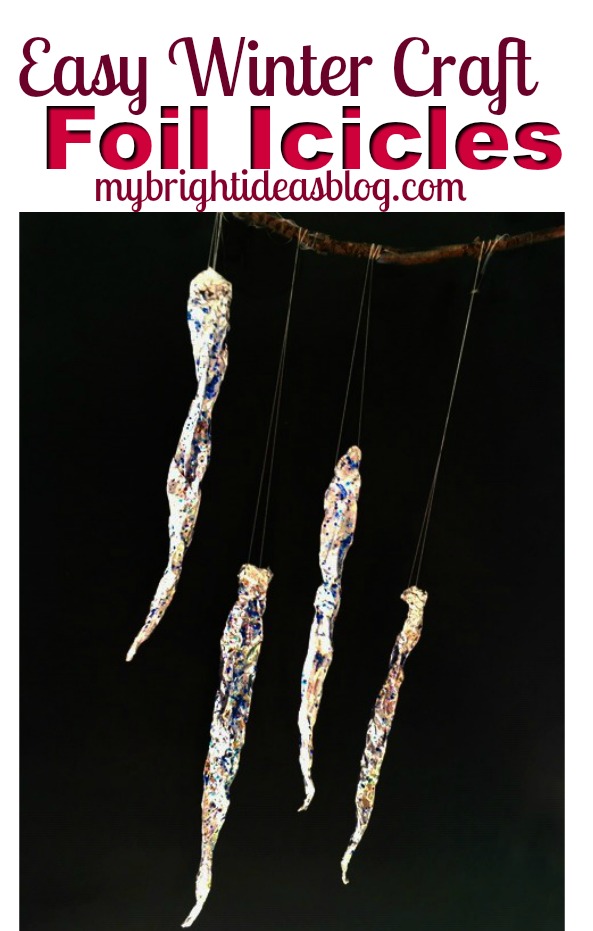
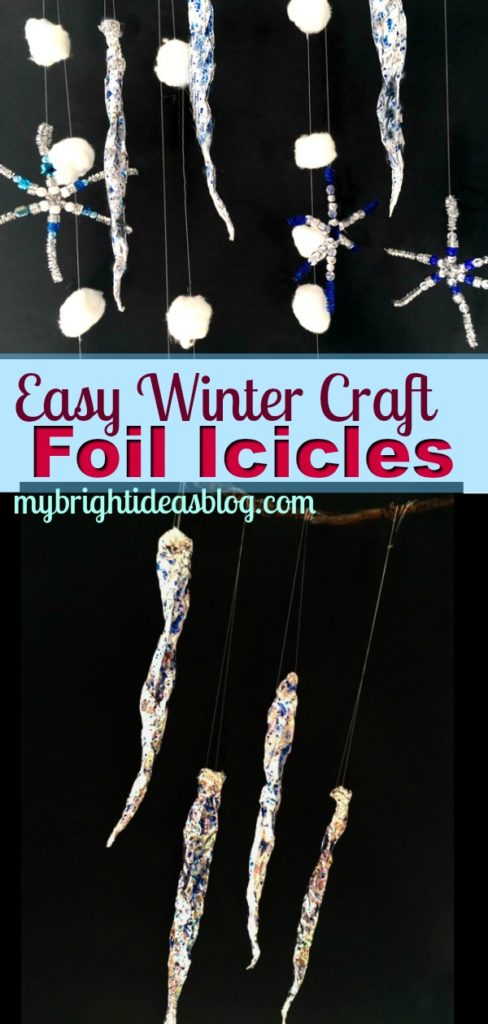
Tin Foil Icicles – Super Easy Winter Craft!
Easy Winter Crafts – Make Glitter Tin Foil Icicles
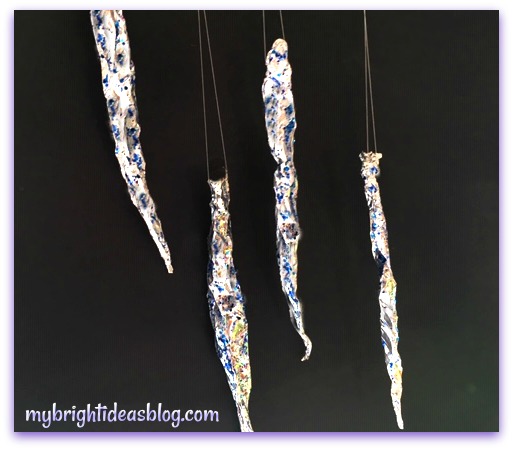 Making sparkly icicles is a great winter craft for kids of all ages! You probably already have the supplies you need to make them.
You will need:
- tin foil
- glue and glitter or combined glitter-glue
- needle and thread
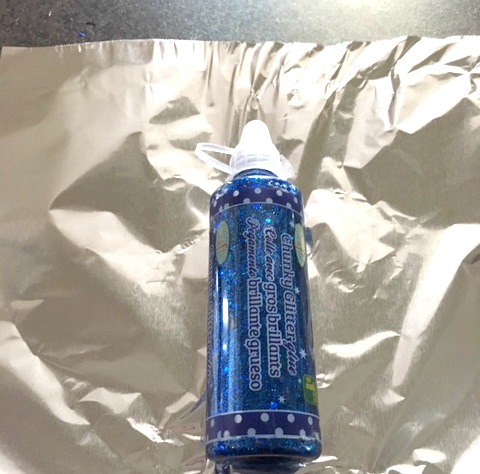
I love when things sparkle but I don’t like it when crafts trickle out a trail of glitter on everything that touches it. So my solution is to use glitter glue that is already mixed together.
The alternative is to spread glue all over the project and then sprinkle loose glitter on top. It’s messy but has great coverage.
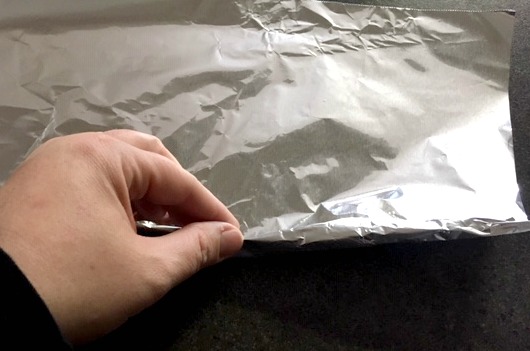
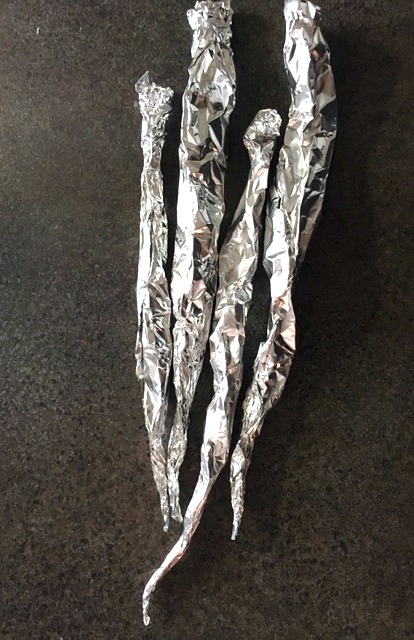
Start with the tin foil. Cut the foil 6 inches wide. Begin to roll the foil pinching one end as you roll it.
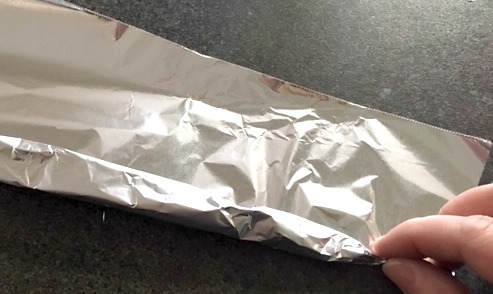
Keep rolling and scrunching as you go. Loose and wide on one end, tight on the end that will come to a point.
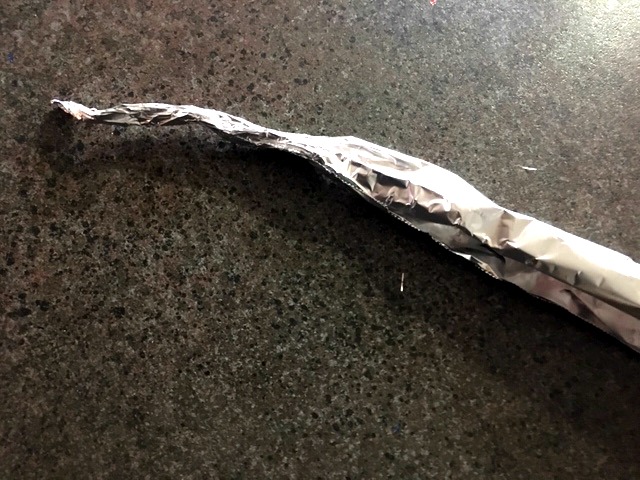
I should find more crafts that involve tin foil. It always helps the craft really stand out!
Make a bunch of tin foil icicles. Place them on a piece of paper towel.
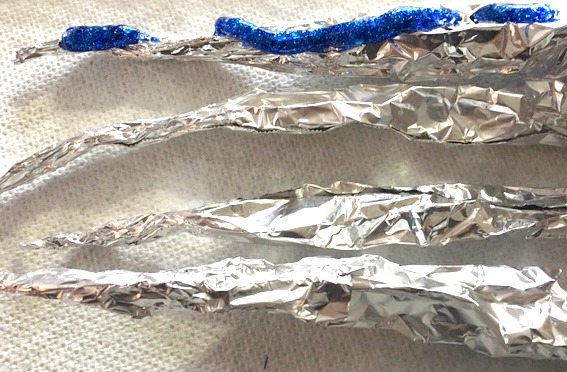
Squeeze out the glitter glue onto the foil icicles.
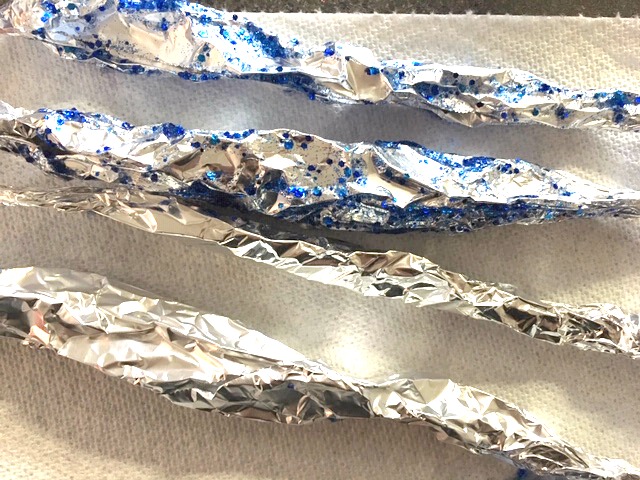
Take a piece of paper towel (or use your fingers if you don’t mind getting sticky) and smear that glitter glue all up and down the icicle.
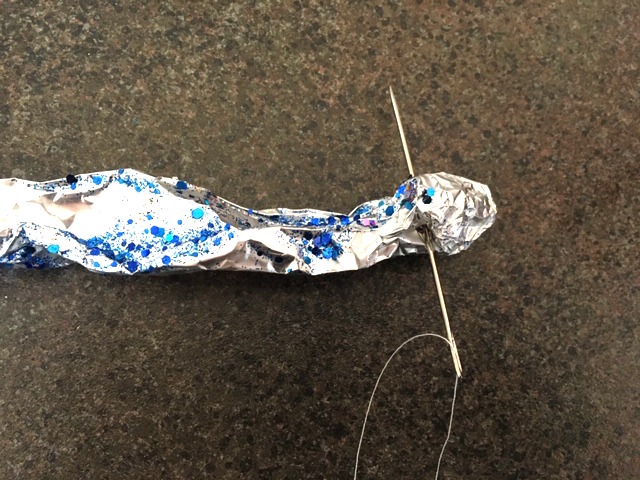
Take an arm’s length of thread and thread your biggest needle. Do not knot it. Push the needle through the tin foil.

Pull the ends of the thread together and tie a knot.
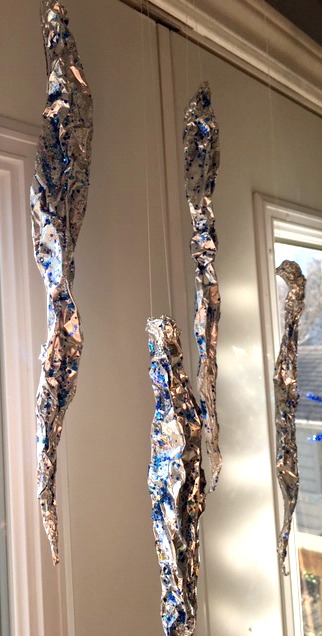
Tie onto a curtain rod or tape to the window trim. Or as below you can tape it to a twig or stick and hang it from a huge vase. When the sun hits it there is an amazing sparkly effect reflected everywhere because of the crinkles in the tinfoil and the sparkles.
Have a look at some other winter crafts we have done.
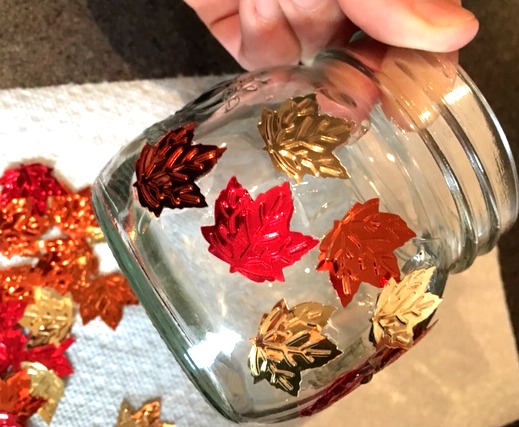
Make a Pencil Jar for Autumn
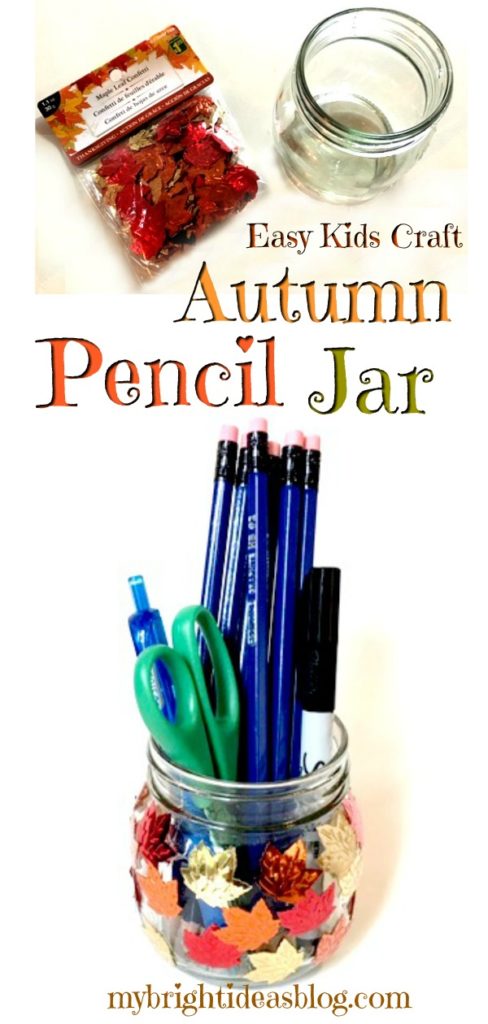
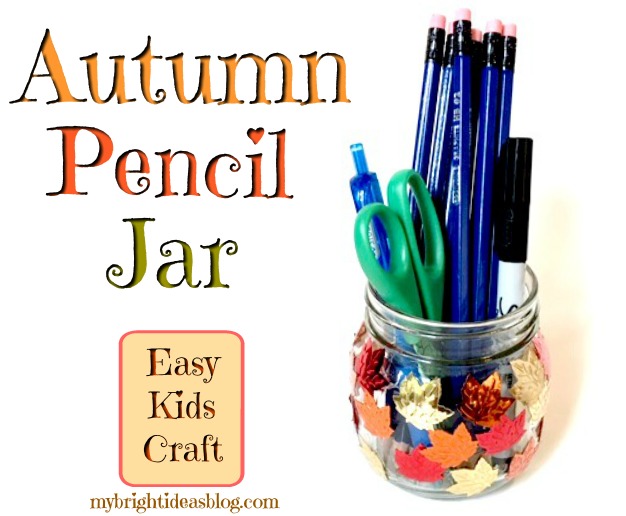

You will need:
- a short mason jar (or a jam or pickle jar from your recycle bin)
- clear glue
- leaf confetti (if you have a leaf punch make your own)
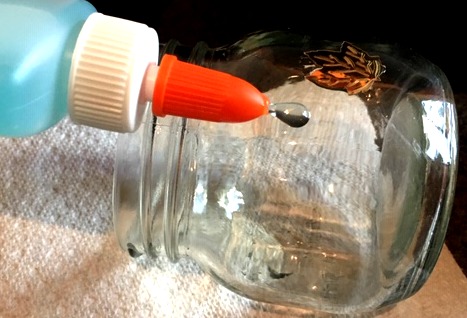
Glue!
Using clear glue is important. Originally, I used white craft glue and it dried very white and milky looking. So that was a craft fail. Meh!
Fortunately, I could pull off the leaves and wash off the old glue and start again.
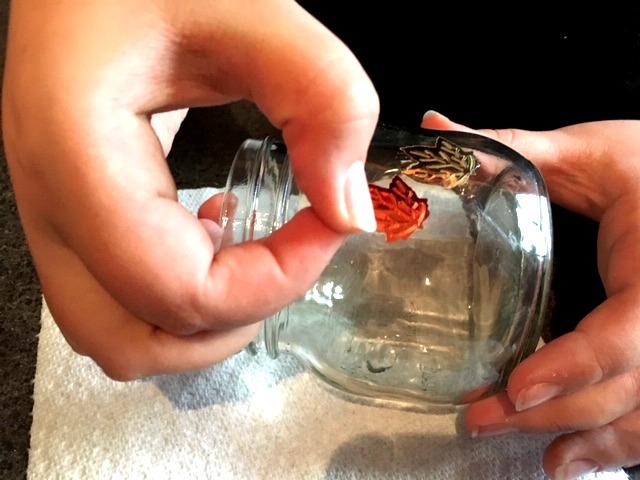
Glue and stick. Glue and stick. Repeat…repeat…repeat.
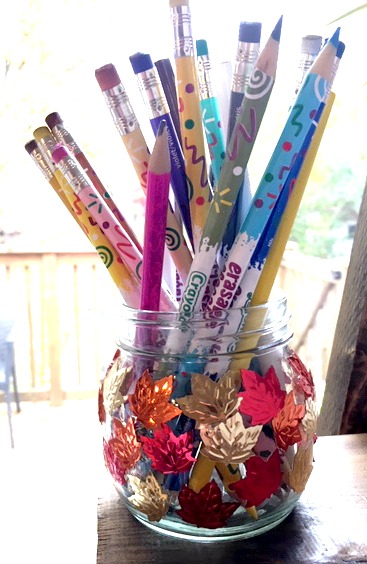
My 11 year old worked with me on this. She loves candles so she wanted to make this a candle holder.
Easy gift idea for the kids to make, right?!
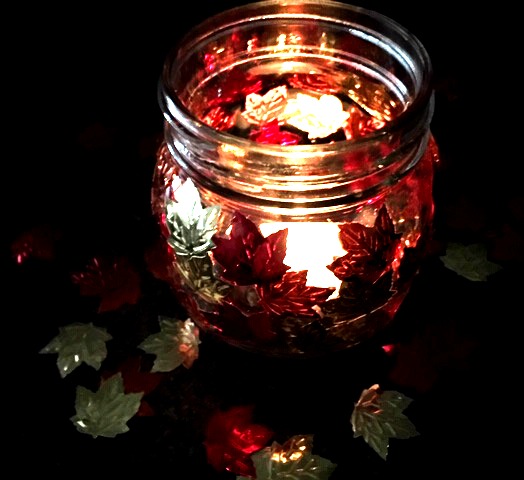
She was right it did look great with a candle light. Unfortunately, we are still in “keep the kids from setting the house on fire” protective parent mode – so we only use candles on very special occasions. So in the meantime, this gorgeous jar is going to be a pencil holder.
Thanks for checking out this post. I hope you enjoy Autumn before its gone.
Below are a few more kids crafts I’ve done over the past few weeks.
Post them on Pinterest or share them on your social media.
See you again soon!
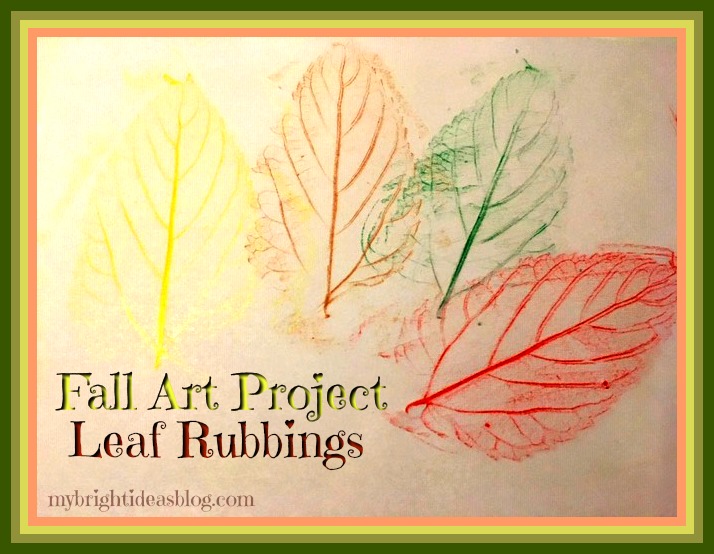
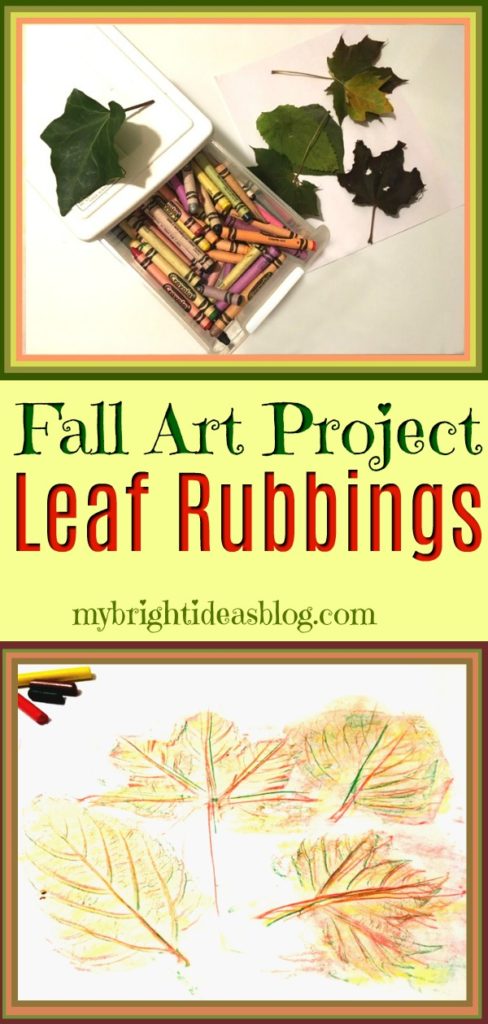
Fall Leaf Rubbing – Super Easy Kids Craft!
Remember doing Leaf Rubbings in the Fall when you were a kid? Well, Autumn is here again and its time for a nature walk to collect some leaves for this wonderful classic nature craft.
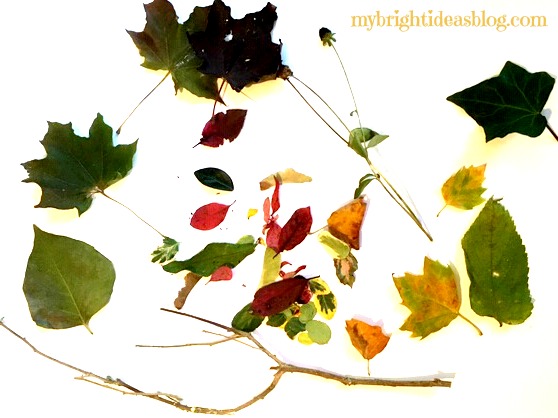
On your nature walk give the children (even young toddlers) a paper bag or large zip lock to collect their treasures.
Just in case they should ask the question…. Why do the leaves change color and fall off the trees?
Here is a quick answer….The leaves collect sunlight to feed the tree in the spring and summer. During the fall the tree goes into resting mode for the Winter. So the leaves turning color is the their way of getting ready for Winter.
There is much more to learn about it but that is the toddler explanation. If the kids are older why not do a research project to learn more. It’s quite interesting. For example, an oak tree’s leaves turn brown for a different reason then a maple tree’s leaves turning red. Chlorophyll and photosynthesis, glucose, oxygen and carbon dioxide-there is a whole factory in every tree we haven’t even noticed. Have a read through this website for a little lesson my 8 year old could handle..
https://www.sciencemadesimple.com/leaves.html
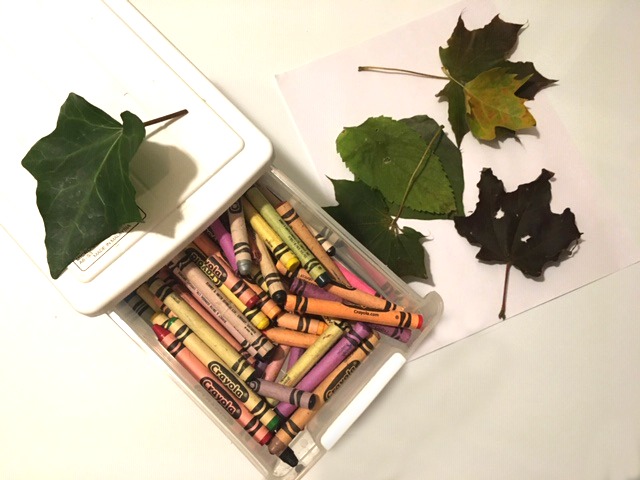
For this project you will need:
- Crayons…green, brown, orange, red, yellow
- Leaves
- Plain paper
Grab your crayons and paper and leaves. Peel the paper off your green, brown, orange and red crayons.
We have a nice collection of treasures from our nature hike-including stones, sticks and petals from my mums. For today’s project we just used the larger leaves. I’m setting the rest of the little treasures aside for another project.
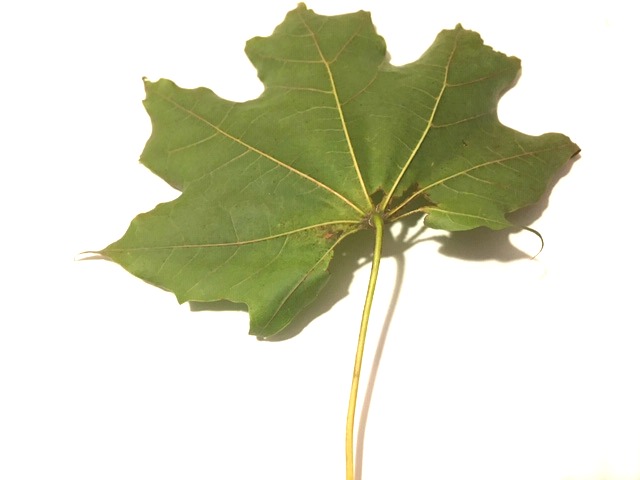
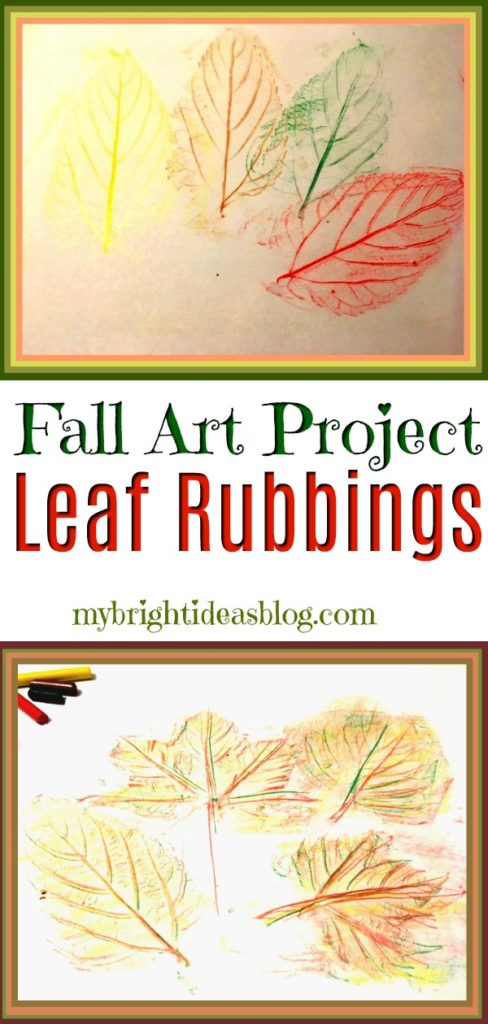
Take your leaf and turn it face down. Lay a blank page on top of the leaf. Turn your crayon on its side and rub on the leaf.
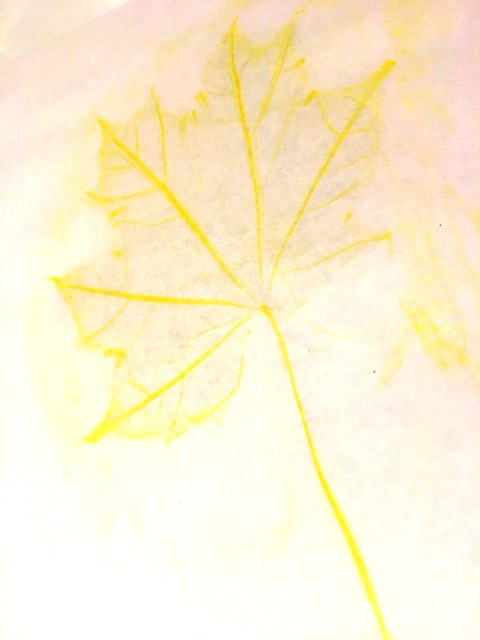
Yellow was one of my favorite colors to do rubbing but it doesn’t show up quite as well on photos.
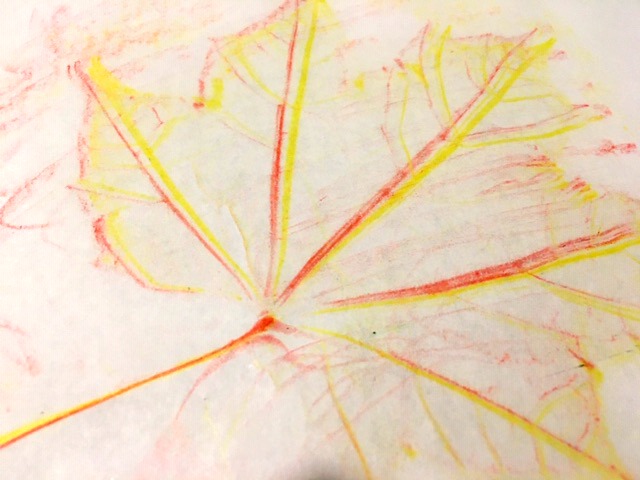
On this one we tried to layer red after the yellow but the leaf had moved a bit. It still looks cool though.
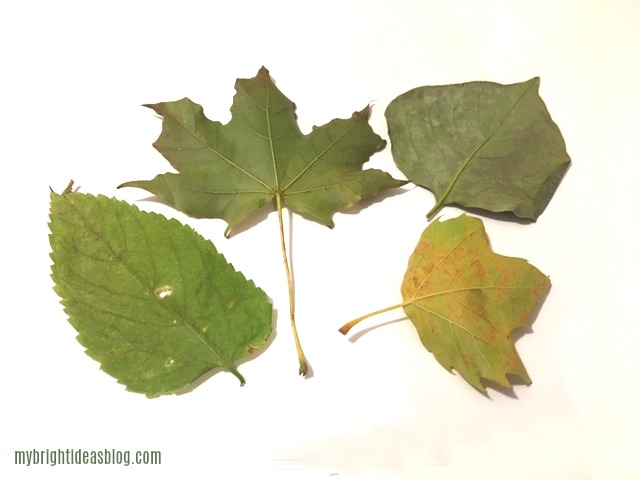
Were you able to collect a variety of leaves? If the weather didn’t work out for a proper nature hike in the woods, look around your yard and take a leaf sample of nearby shrubs and garden plants. They definitely have interesting leaves worth doing a leaf rubbing with too.
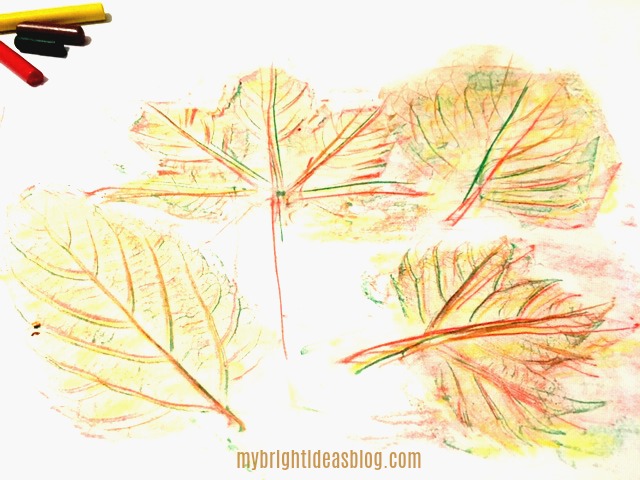
Here we tried all the crayon colors on each leaf.
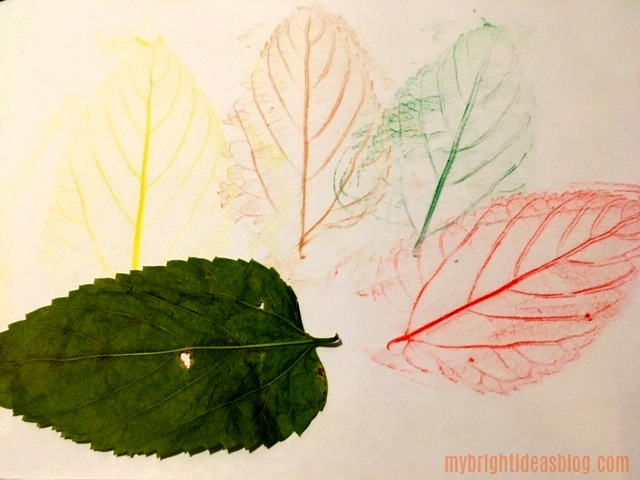
For this lovely art piece, we used only one colour on the leaf and then moved the leaf over and tried the next colour.
This is such a quick and easy autumn activity-it could be part of a yearly autumn tradition. If you have little ones in your life, I hope you can find a few moments to enjoy the Autumn changes of season and make some Fall art together.

Check out this post for a great nature craft using inexpensive clay!
Nature Craft – Perfect for Earth Day Activity – Clay Imprints with Plants and Flowers
…
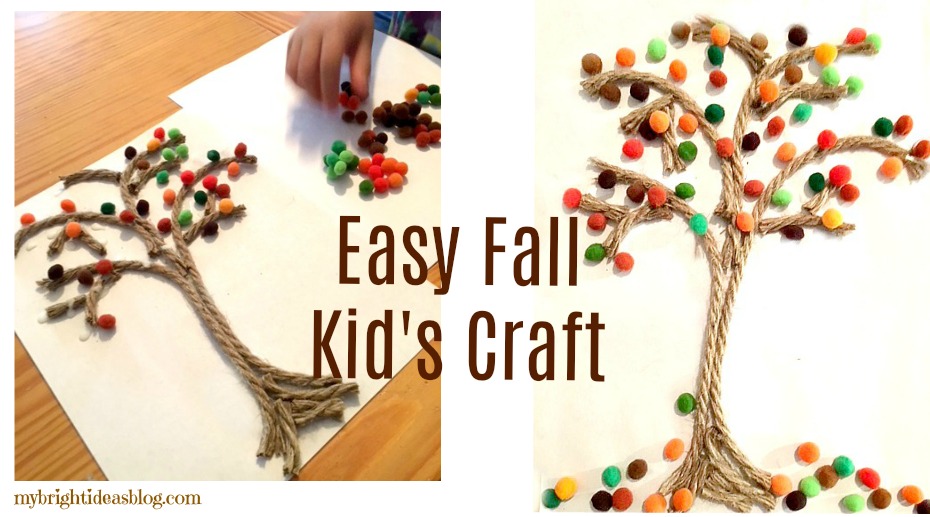
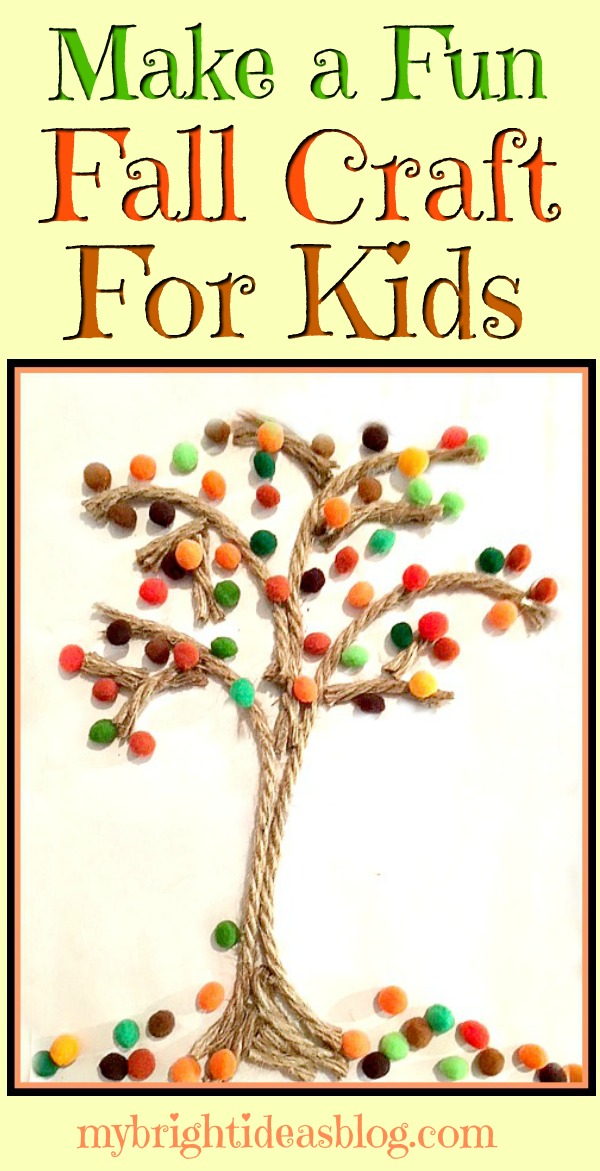
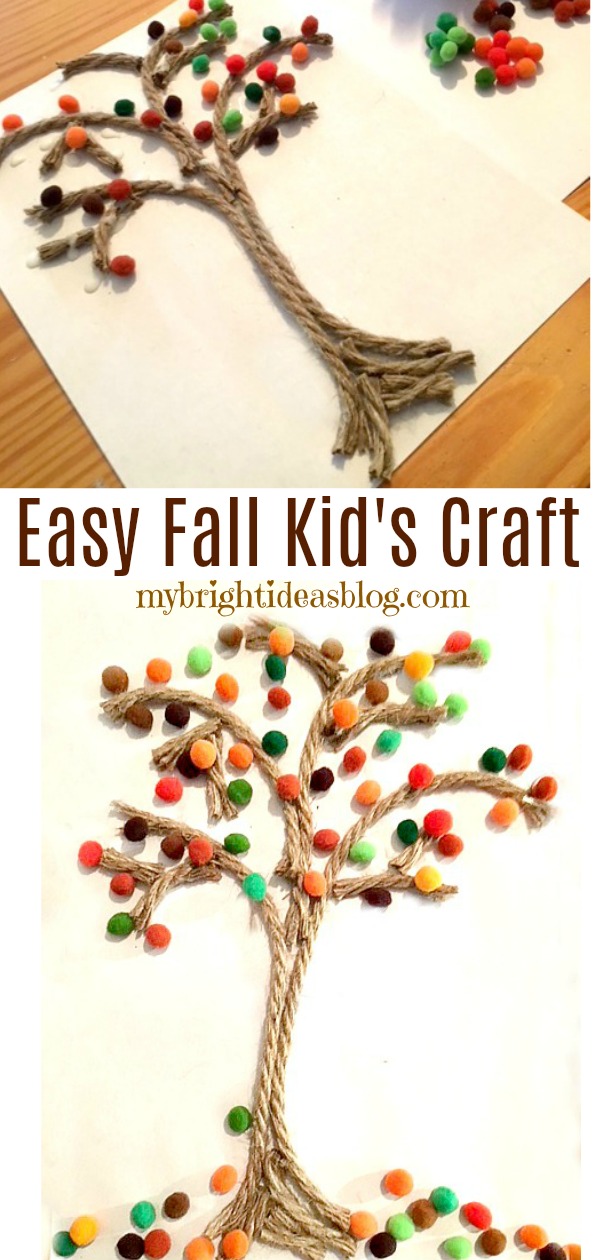
Easy Fall Kids Craft – Rope and Pompom Trees
Today I was rolling through the dollar store….I only needed to pick up one item…but my shopping cart was full of crafts. As I perused the craft aisle, I stopped in my tracks when I saw the pompoms. Gasp! Packages of all sorts of colours! I got 6 packages…some for now and some for later. When I saw the package of multicoloured orange and yellow pompoms… I thought Fall Tree Craft! Whooohoo Start the Car!
I have neglected the kids crafts in favor of my DIY projects over the summer. So I’m brainstorming some kids projects for autumn before you know it winter will be here!
After my 8 year old got home from school we worked together on this easy kids craft. This is perfect for this time of year. Autumn colours of greens, browns, oranges and yellow.
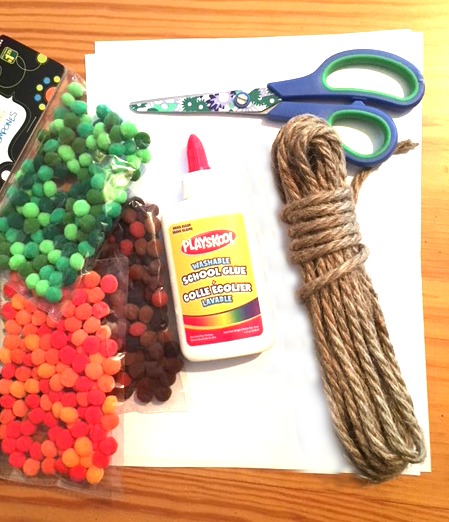
You will need:
-
- rope or natural jute
- small pompoms in fall colours
- white glue
- cardstock or a blank white canvas
I mention using cardstock or a white canvas because this ends up being quite heavy and regular paper will be floppy from the weight.
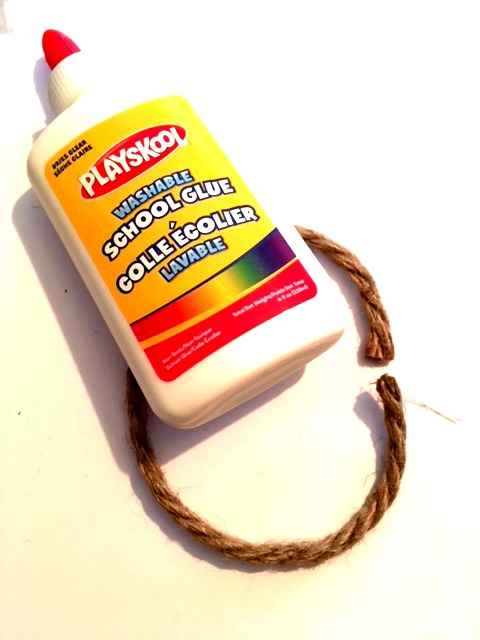
Start by cutting a piece of rope the length of your page or canvas.
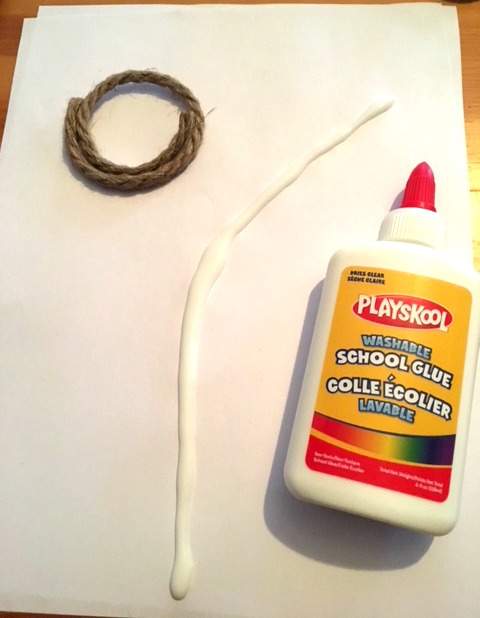
Make a line of glue starting from the middle bottom of your page or canvas running upwards and to the right to begin a branch.
The ends of the rope seemed to pop up at first so I rested my glue and scissors for a few minutes until it began to stay flat.
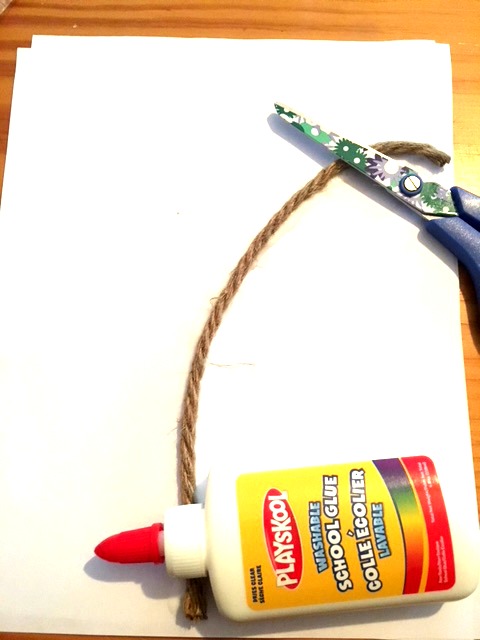
Add a second piece of rope that is the same length. Have that one turn to the left for another branch.
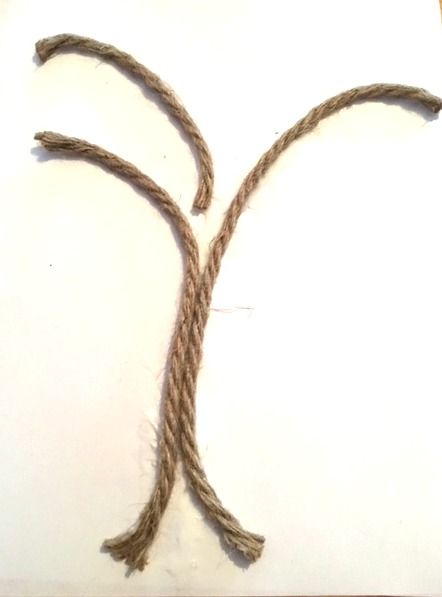
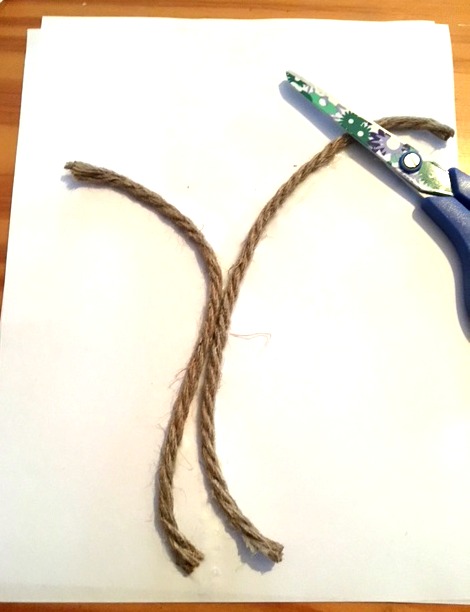
Begin cutting a few pieces to fill in some additional branches. Fill in the top of the tree by adding more 1 inch pieces of rope as smaller branches.
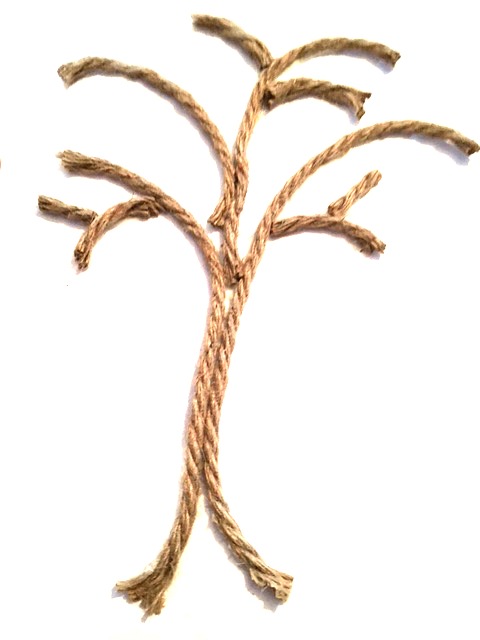
Next add small pieces of rope to thicken the bottom of the tree trunk.
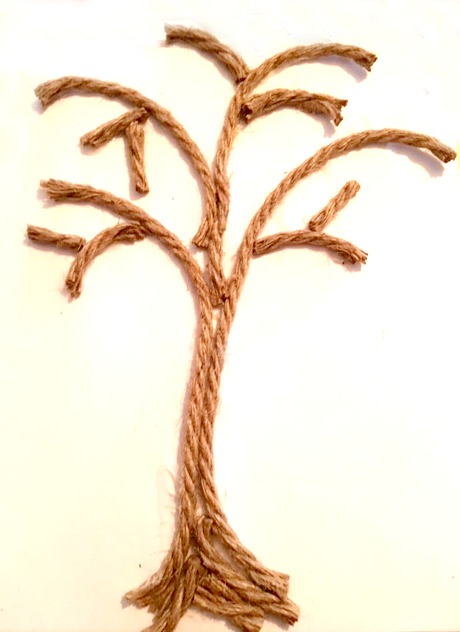
We were pretty happy with our tree trunk so we moved on to the pompoms.

Add a few dabs of glue on the rope and around the rope. Then add orange, yellow, brown and green pompoms.
Is it just me or do the colours of these pompoms make you think of Reese’s Pieces….is anyone else getting wondering if they have any chocolate hiding anywhere? Maybe its just me…focus on the craft…

I suggested we put some on the bottom of the trunk and on the ground. Miss M didn’t understand why we would want to do that. Um, darling look out the window. The wind has picked up and the leaves are swirling. By tomorrow the wind will have moved all the leaves from our lawn onto our neighbours lawn. Sorry about that sir.

Mother/Daughter craft time is good fun! This girl is always crafting something out of our recycling bin. She is just like me…always planning a project.
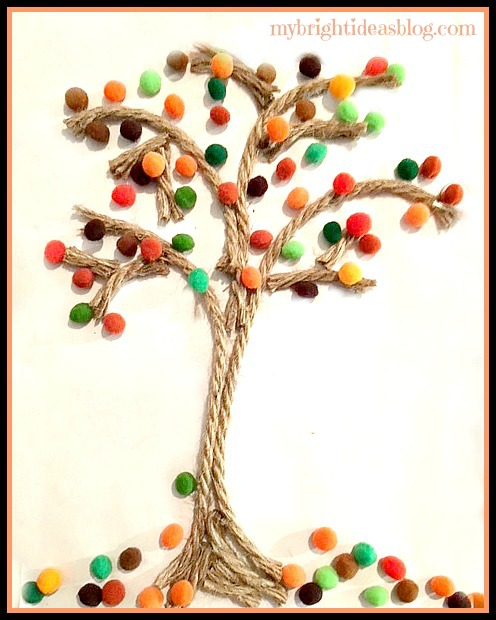
So there you have it! A super easy autumn craft perfect for this season. Beautiful fall colours in your tree art. Now maybe we should grab our rakes and head out to deal with the real leaves.
Thanks for popping by to see this fall craft! Pin it on Pinterest or share it with your favourite social media platform.
…
Plant Puns on Painted Potted Flower Pots – Adorable Gift Idea to Make Them Smile!
Nature Craft – Perfect for Earth Day Activity – Clay Imprints with Plants and Flowers
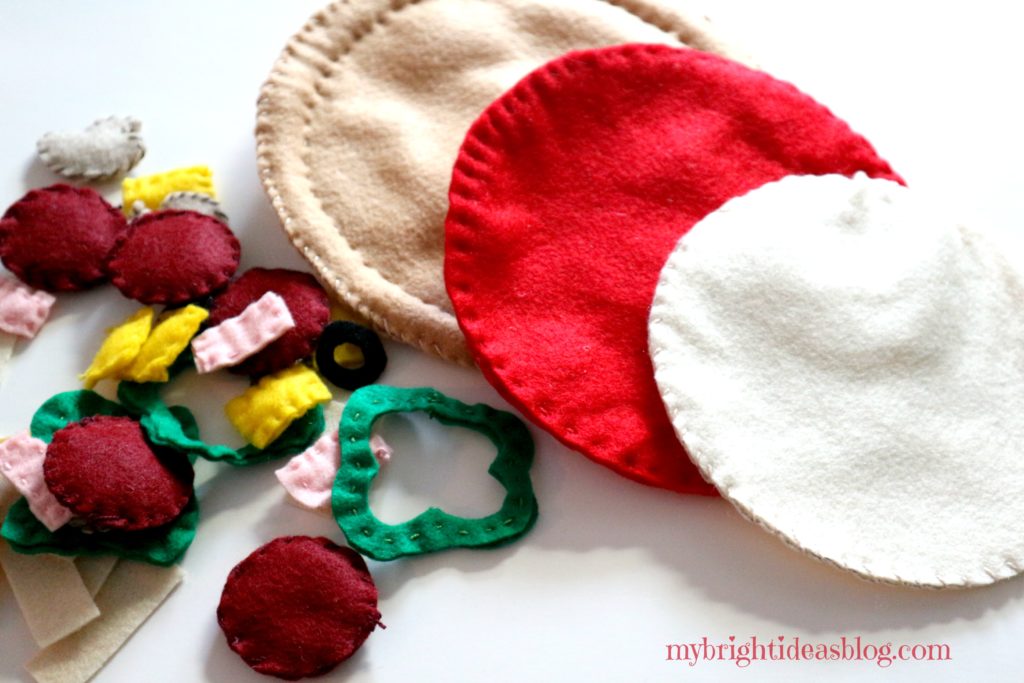
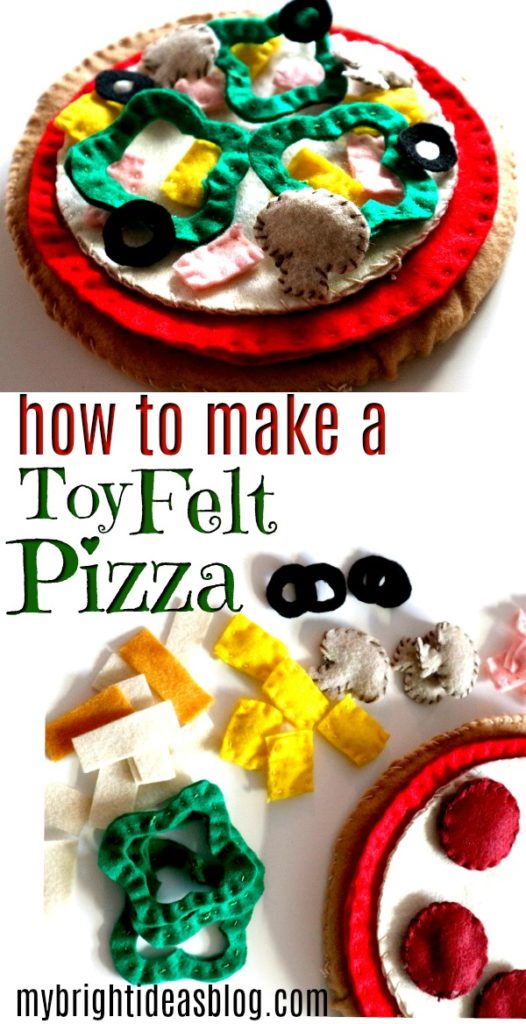
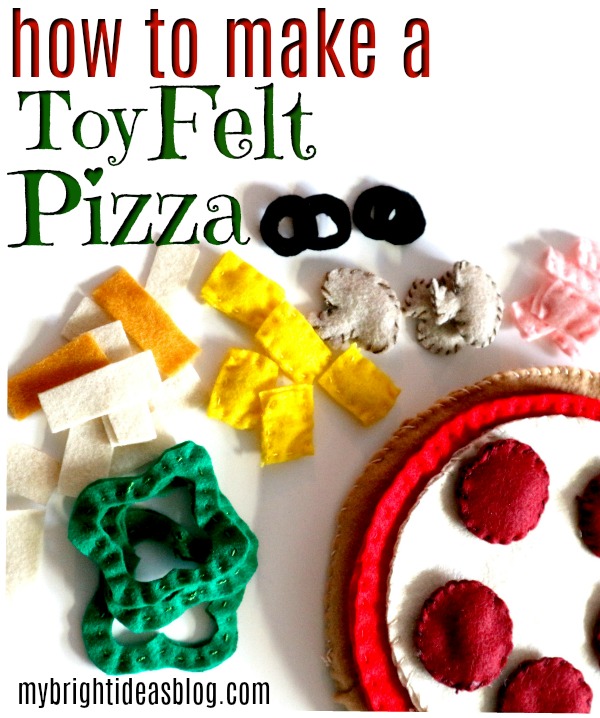
Cloth Pizza Toy Made From Felt
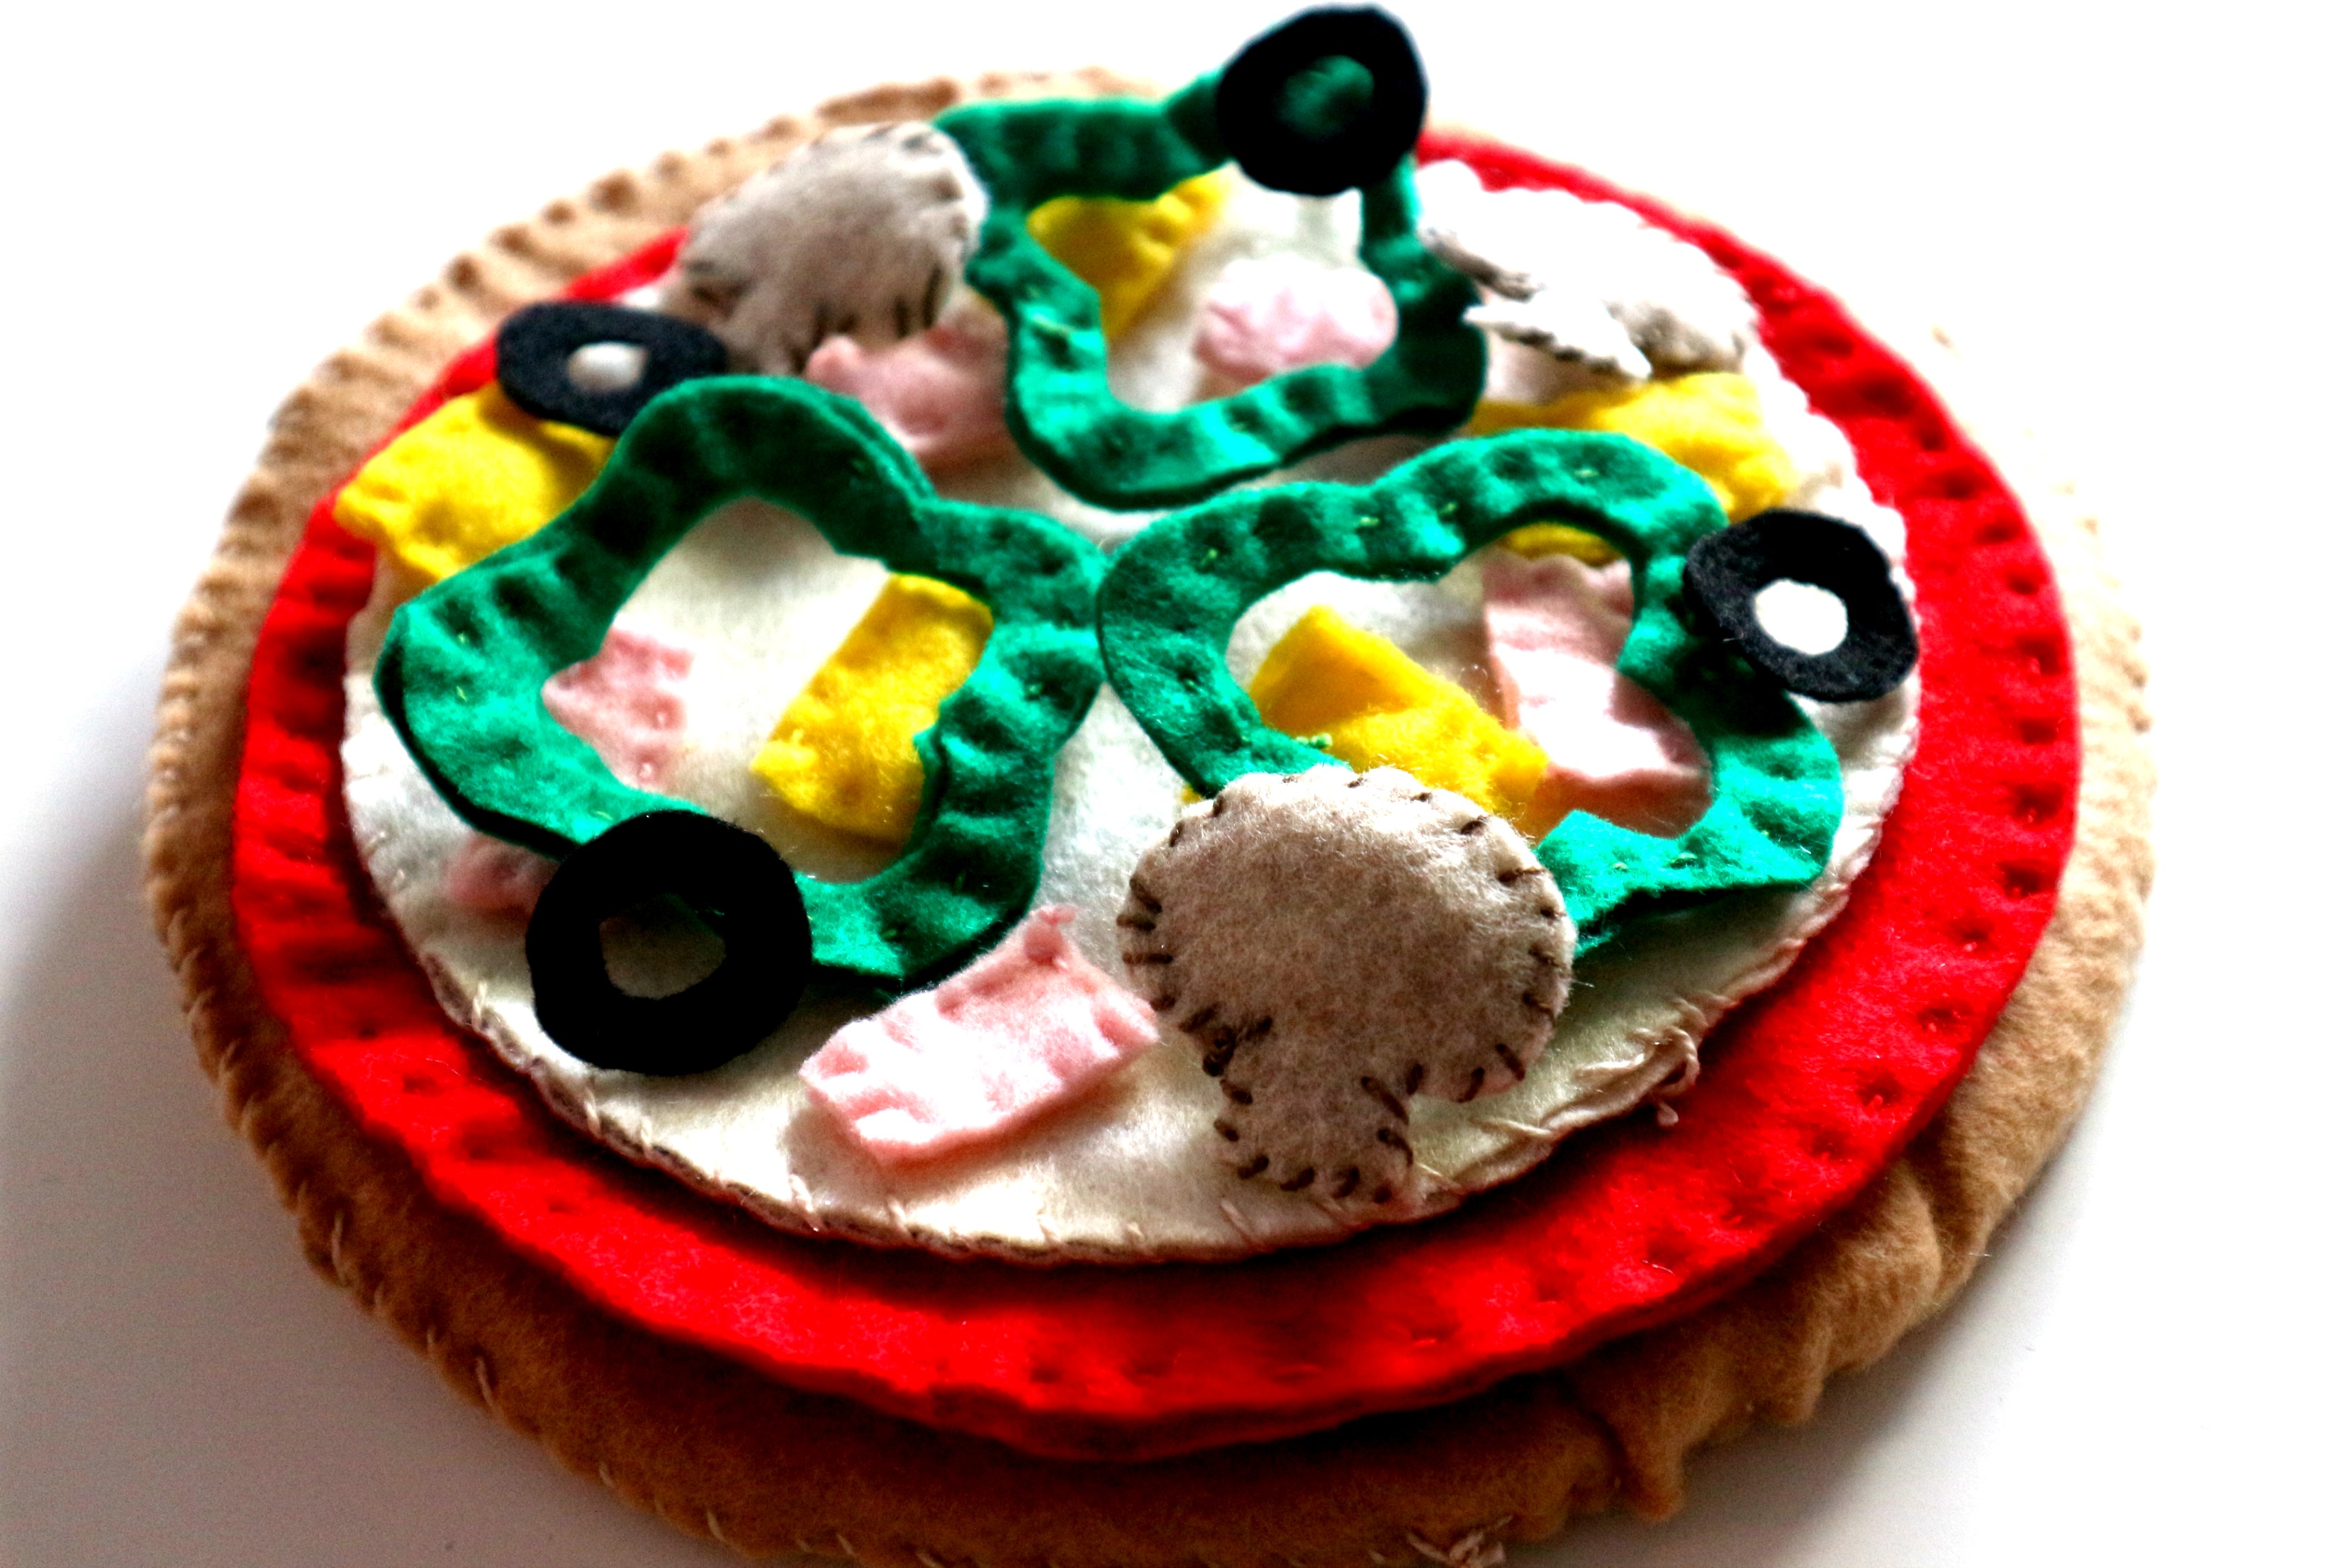
Kids love Pizza! Kids love to imitate their parents in the kitchen! Kids will love to play with this felt pizza.
This pizza toy/felt project can be made in 20 minutes with just scissors and felt or you can spend a few hours if you want to do a bit of hand sewing and add some stuffing.
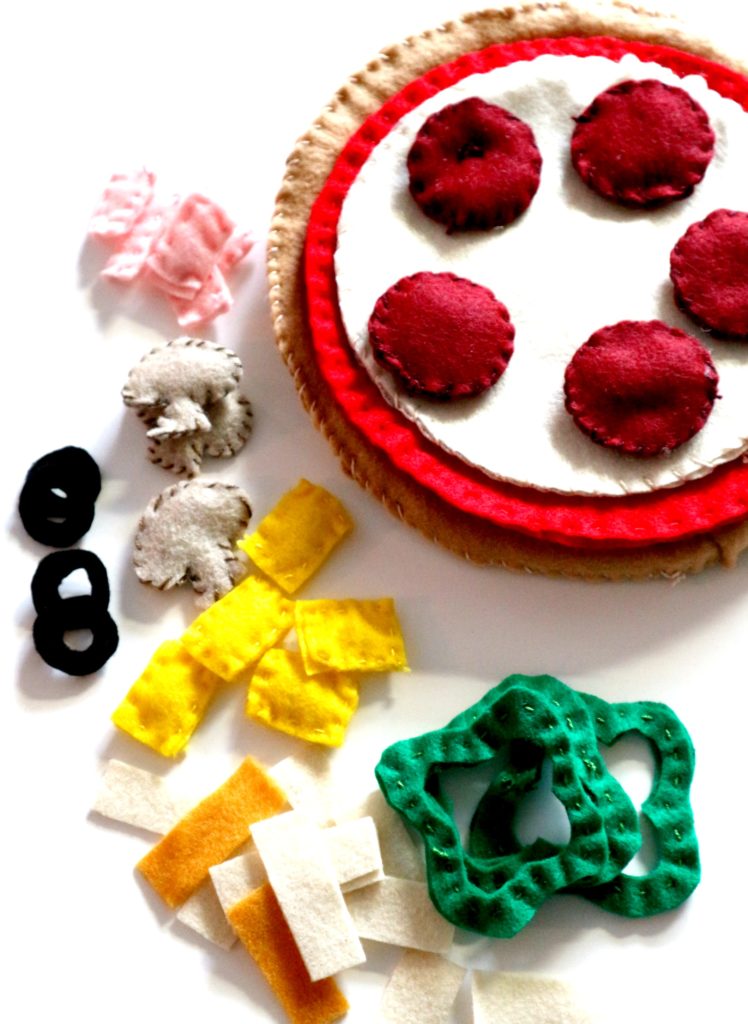
You will need felt in the following colours:
- 2 tan/light brown for the crust
- 2 red for pizza sauce
- 2 white/cream for mozzarella cheese
- 1 dark red for pepperoni
- 1 green for peppers
- 1 grey for mushrooms
- 1 pink for ham
- 1 black for olives
- 1 yellow for pineapple
- 1 orange for extra cheese
You will also need:
- bowls and plates to trace for big circles
- sewing needle
- embroidery floss (or thread)
- quilt batting or stuffing
Let’s Get This Pizza Party Started!
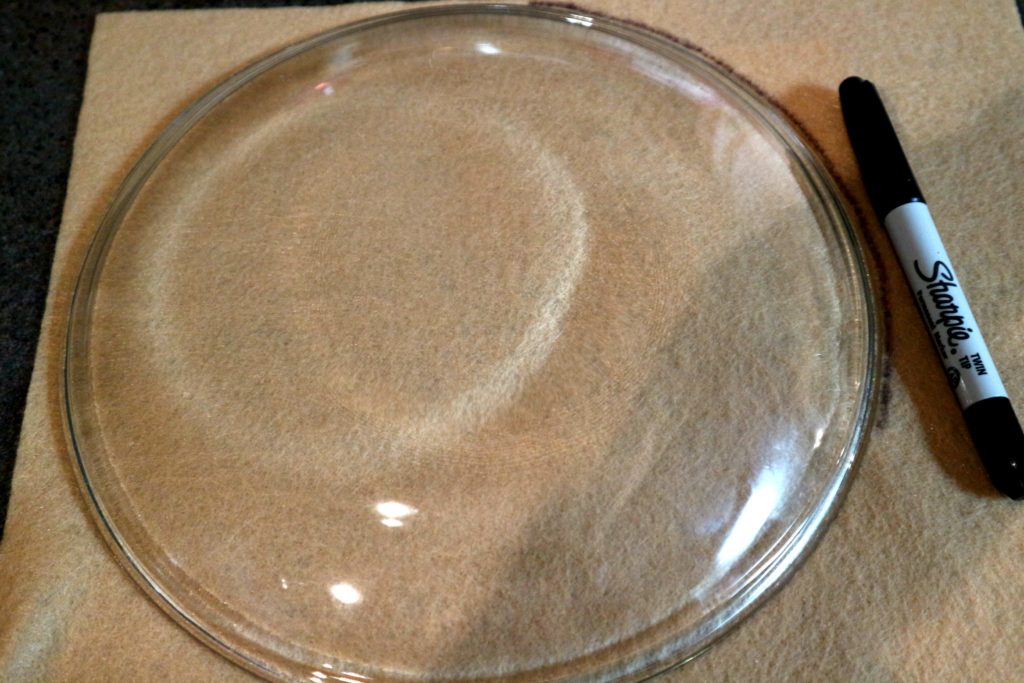
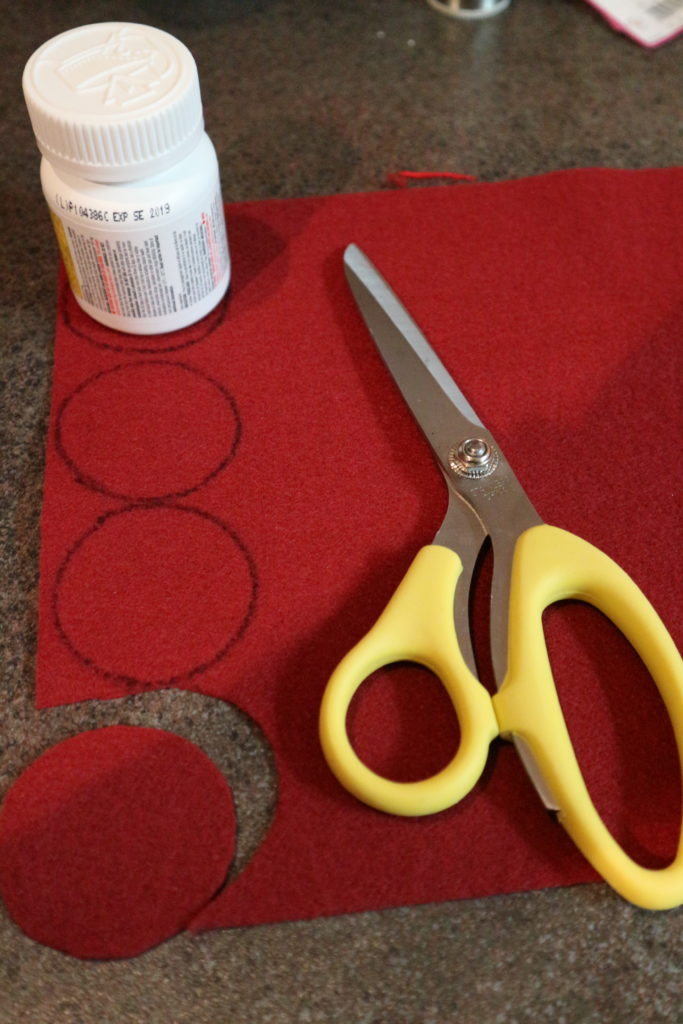
Beige Piece of Felt – Pizza Crust: Trace a large bowl or plate for your crust. Cut 2.
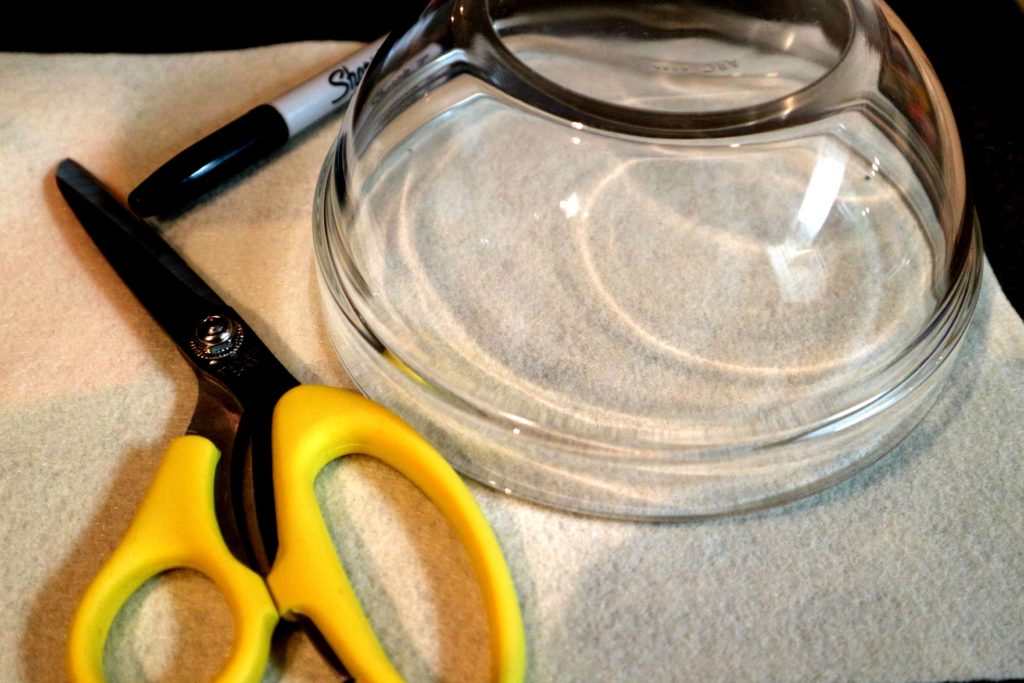
Piece of Bright Red Felt – Pizza Sauce: Using a plate or bowl slightly smaller than the last one, cut a slightly smaller circle than the crust pieces. Cut 2 red circles.
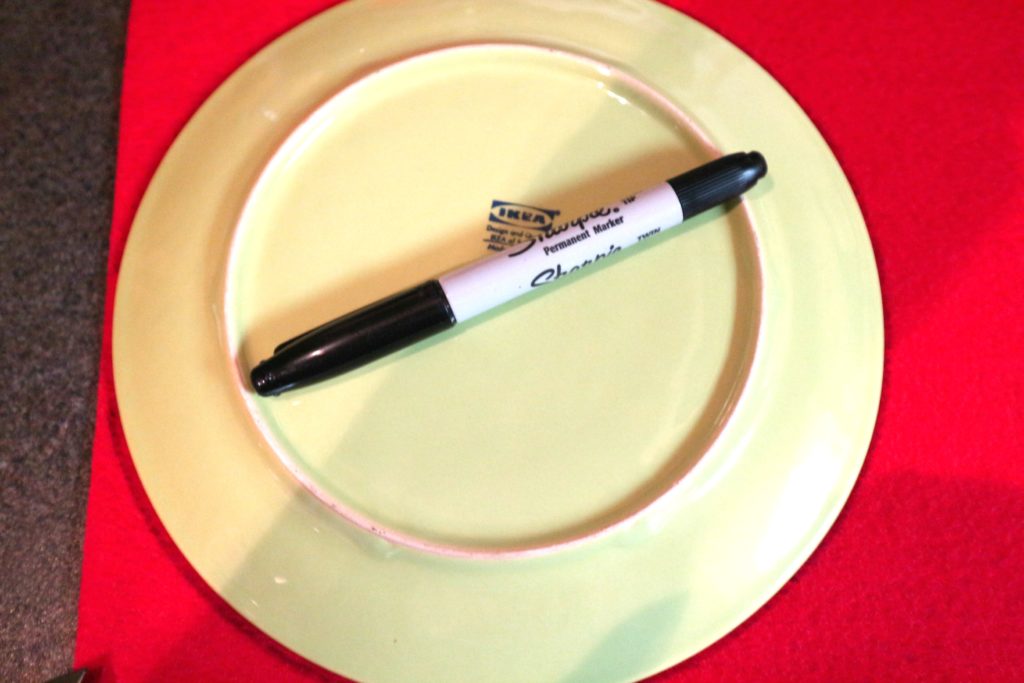
Cream or White Piece of Felt – Mozzerella Cheese: Cut the cheese…tee hee…out of a piece of white felt. Trace a slightly smaller plate or bowl than the piece of pizza sauce red felt. Cut 2 white circles.
Dark Red Piece of Felt – Pepperoni: Cut 12 circles tracing something small like a vitamin bottle.
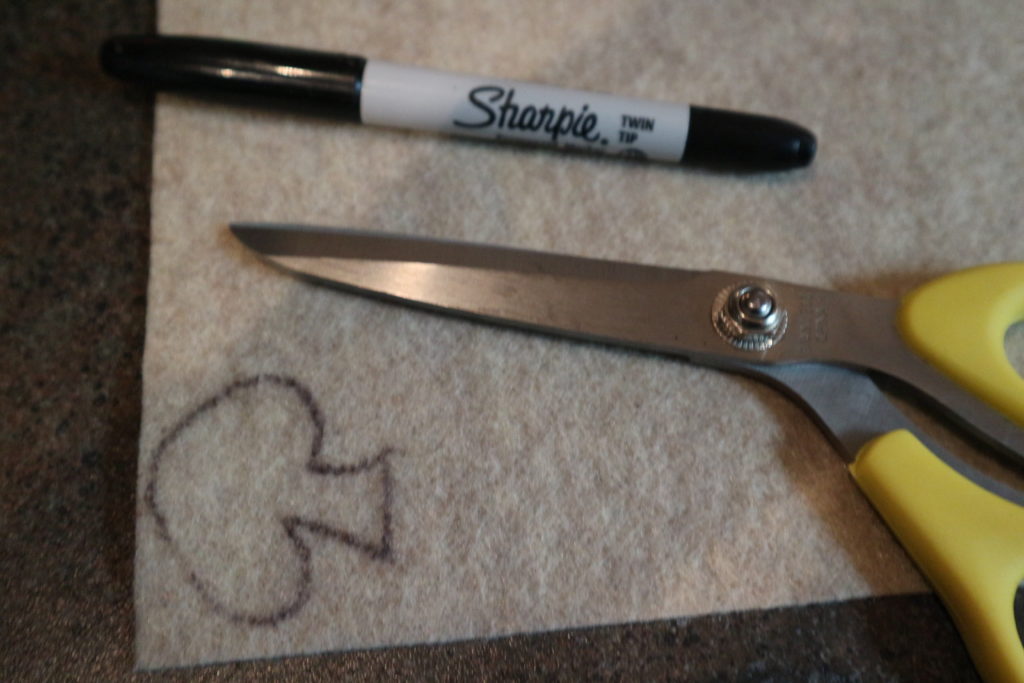
Grey/Beige piece of Felt – Mushrooms: Draw a mushroom shape and cut it out. Cut 10 mushrooms.
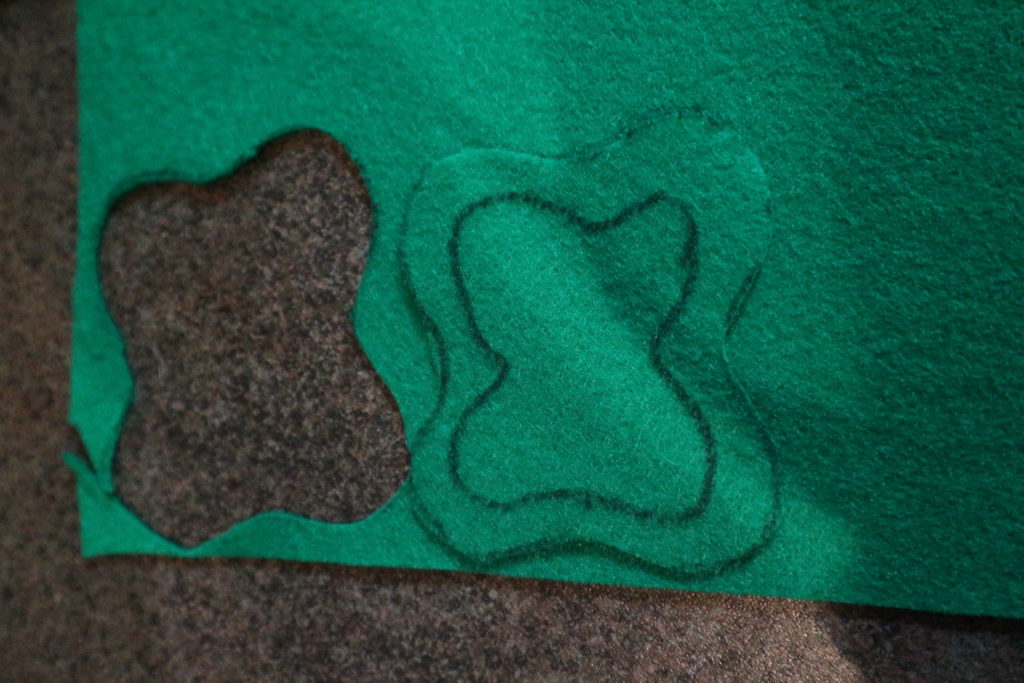
Green Piece of Felt – Peppers – It looks like a wiggly square, then outline it again and cut it out. Cut 8 peppers.
The rest of the toppings are up to you….
Black Felt – Olives: Cut a small circle and trace it a second time. Cut 8 olives.
Orange and White Felt – Grated Cheese: Cut long rectangles for some shredded cheese on top. Cut 6 of each.
Pink Felt Squares – Ham: Cut into squares-10 pink ham squares will be enough.
Orange/Yellow – Pineapple: This begins a great debate about whether you should have pineapple on a pizza. I’m for it! Hawaiian Pizza is my favorite. If you feel the same cut 10 pineapple pieces.
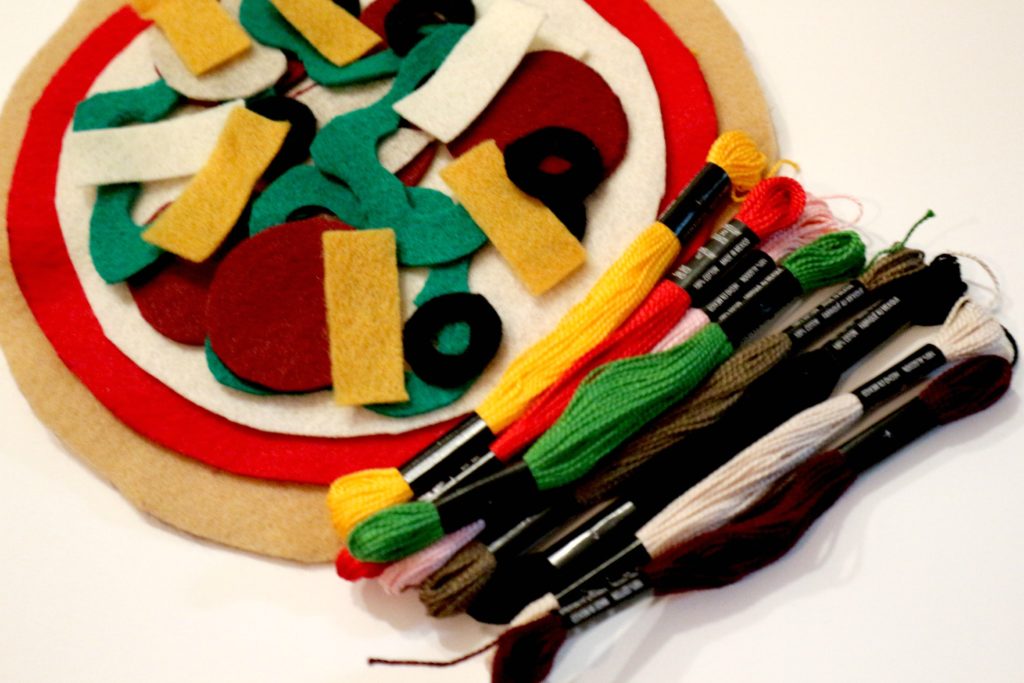
You aren’t a sewer? Then you could stop now and you can use this as a toy as it is. If you want to make it more 3 dimensional, find colors of embroidery floss that will closely match the colors of the felt.
Finishing the Pizza with Hand Sewing
Finish the pizza crust: Cut a piece of cotton batting an inch larger than the pieces of beige felt. Sandwich the batting between the two pieces of beige felt.
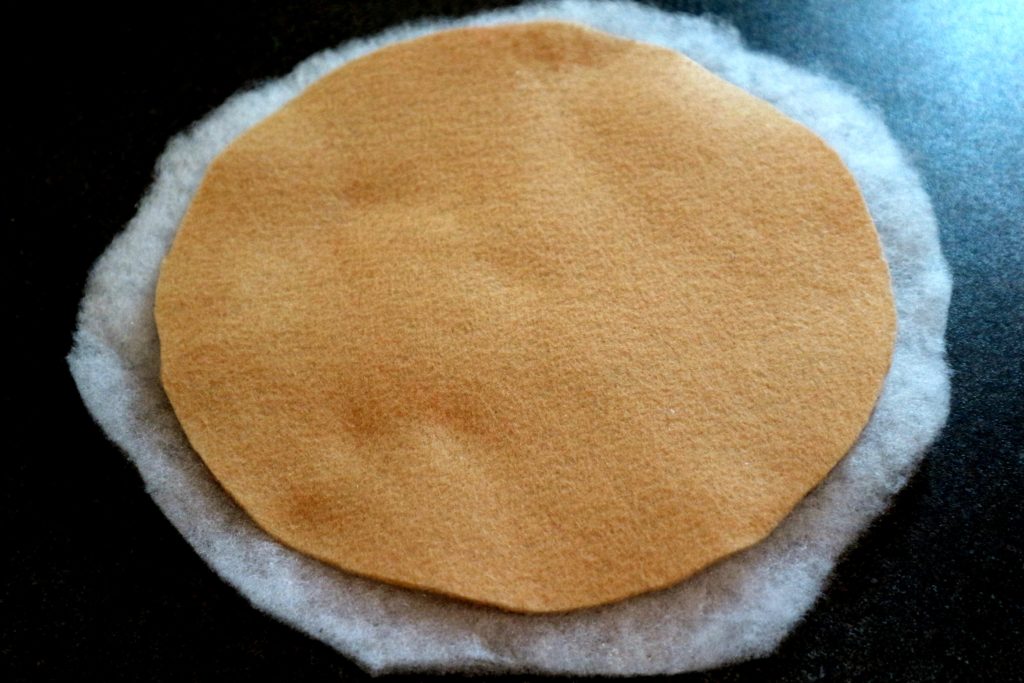
Hand sew around the outside folding and tucking the excess inside the pieces of fabric. I think I used a whip stitch but you could also do a blanket stitch for this part.
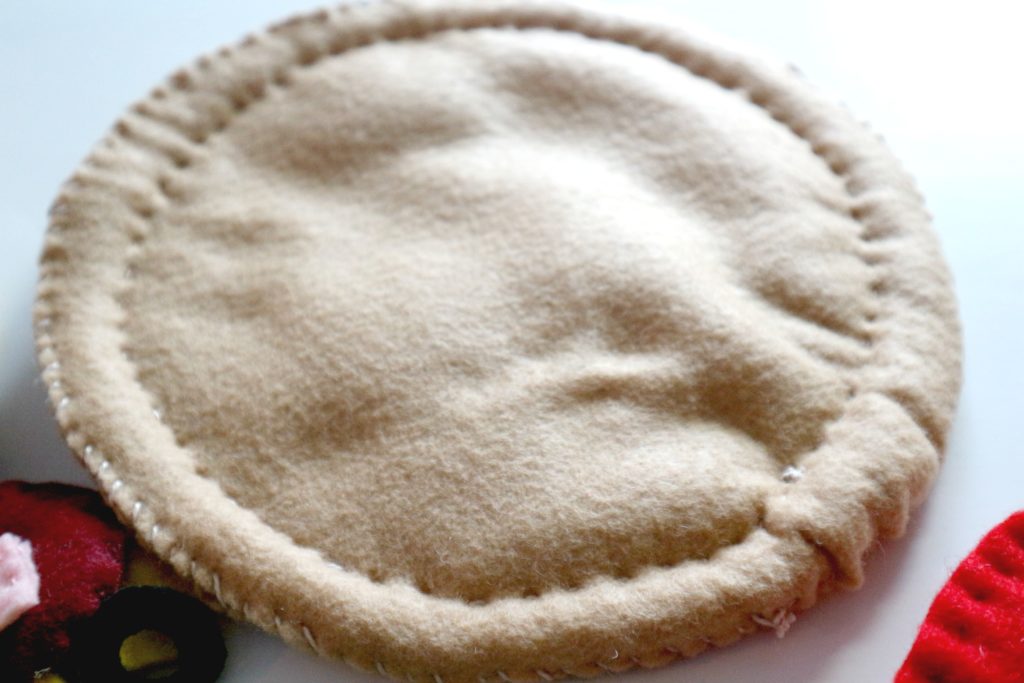
Sew around again an inch inside the seam to create the edge of the crust. For this I used a running stitch.
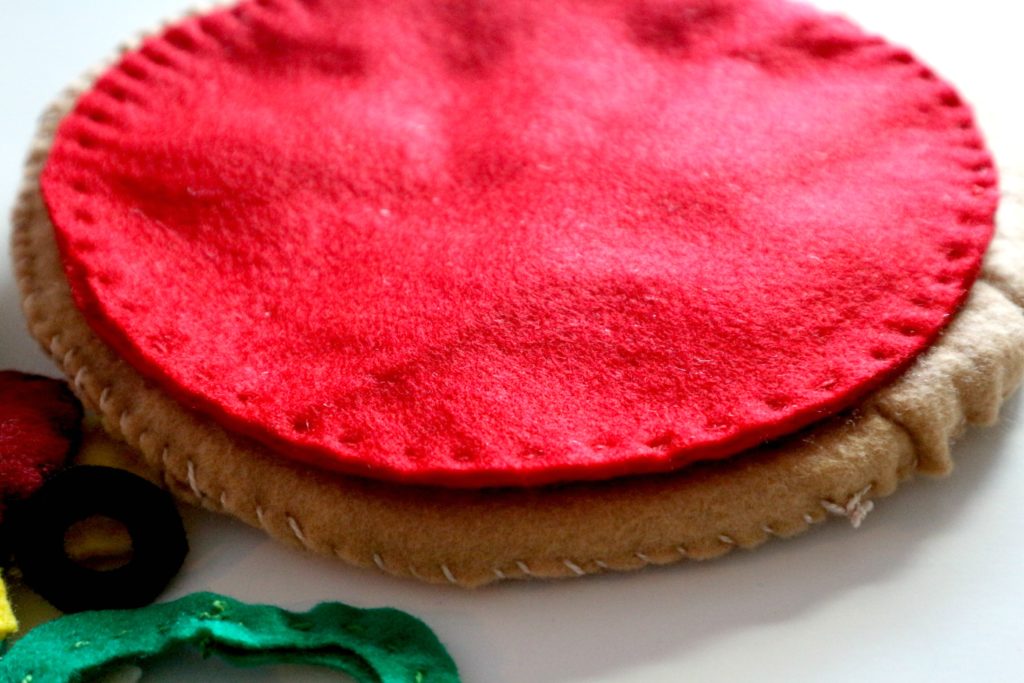
Stack the 2 pieces of red and sew around the edge with a running stich.
Next, put the two white pieces of mozzarella cheese pieces together and sew around the edge. Stitch each of the toppings together.
When sewing the pepperoni I added a little stuffing. The rest… mushrooms, ham, green peppers, pineapple were all sewn together….the olives and shredded cheese pieces I left as a single layer but you could double it and sew them together.
That’s all there is to it!
Store your pizza pieces in a large ziplock bag so you don’t lose the pieces. Have fun making this project for a little one in your life.
Here is the link to my previous post to make a no sew felt pizza.

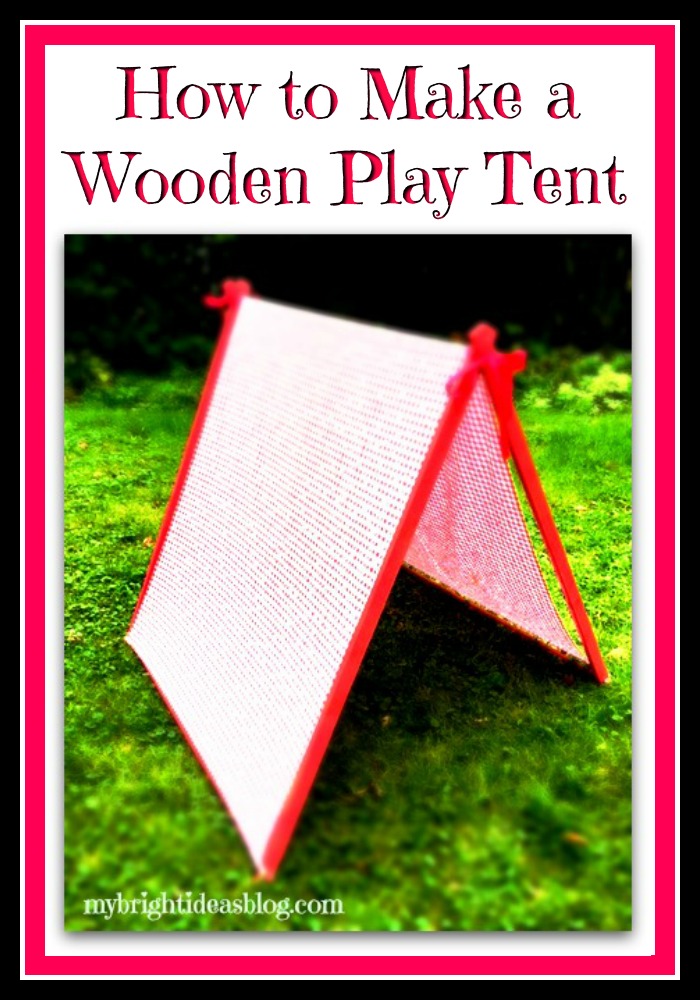
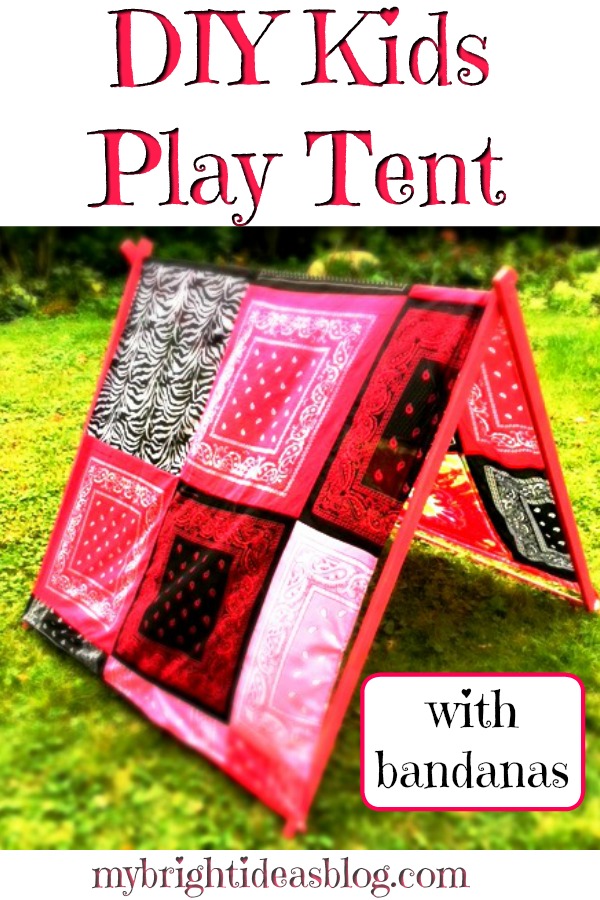
Make a Wooden Play Tent for the Kids!
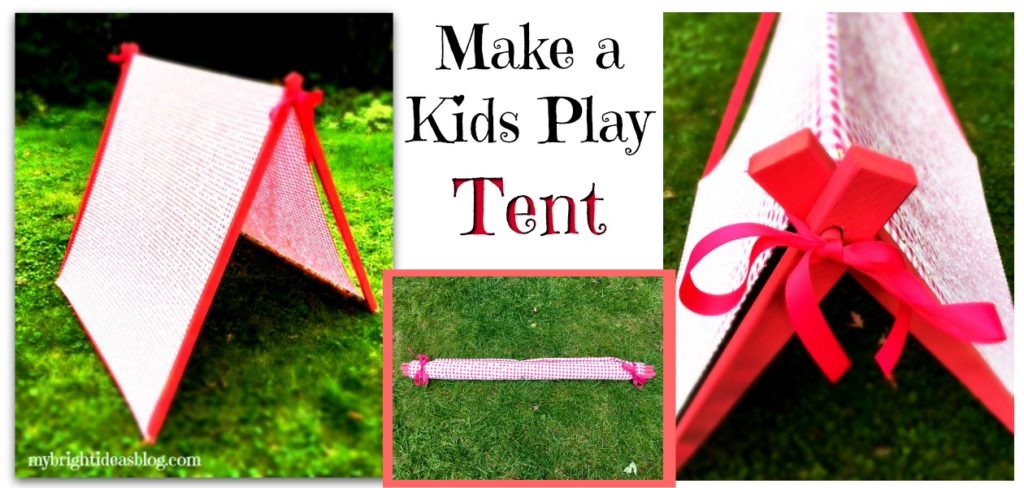
Here is a tutorial for a DIY Kids Play Tent! This won’t take much time or money to build. It would be an easy woodworking and sewing project for kids to help with. Why did I wait so long to make this!?!? The kids love it!
My daughters have always loved building tents. It’s fun for kids to steal the cushions and blankets and chairs to build a tent….sometimes even begging to fall asleep in it. I just wish they would put the cushions and blankets back when they are done….but that’s another story.
For the tent frame, you will need:
- 3 – 1/2 inch wide dowel (4 ft long) (approx. $8)
- 2 1x2x8 wood boards (cut in half) (approx. $5)
- power drill
- 1/2 inch drill bit
- tape measure
- pencil
- paint (optional)
For the tent fabric, you will need:
- fabric 45 inches wide x 90 inches long (115 cms wide by 230cms)
- scissors
- ribbon (2 pieces 30-40 inches/75-100cms long)
- thin elastic (4 pieces 5 inches/13cms long)
- safety pins (6)
- needle and thread or sewing machine (optional)
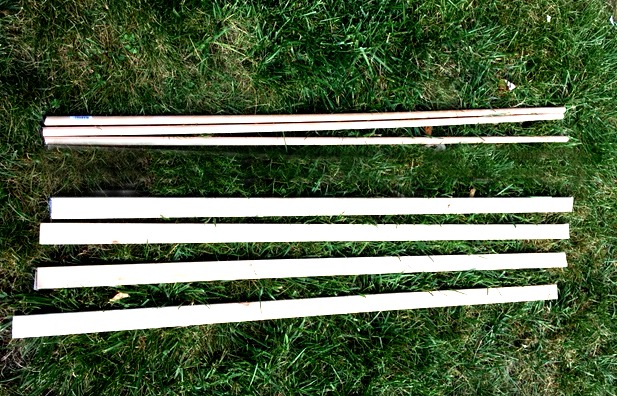
This is literally all you need, 3 x 1/2 inch dowels. They come from the store 4 feet long so there is no cutting here. Also, 2 boards 1×2 cut in half-so you have 4 pieces of 1×2. You can ask them to make this cut at the hardware store if you don’t have a handsaw or mitre saw.
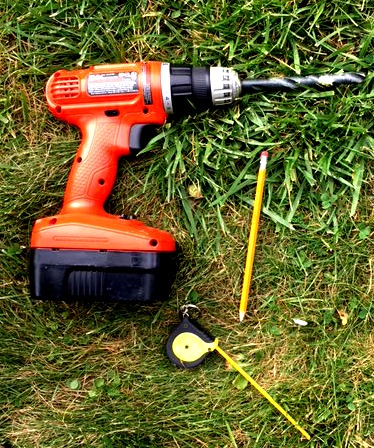
Gather your drill, tape measure and pencil.
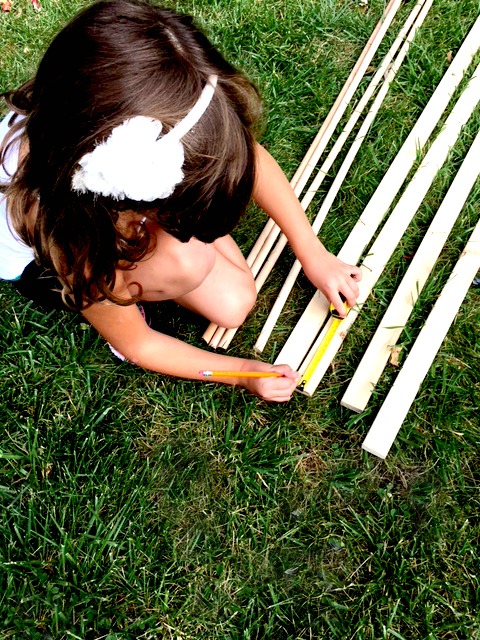
Measure and mark 2 inches from one end and 1 inch from the other end.
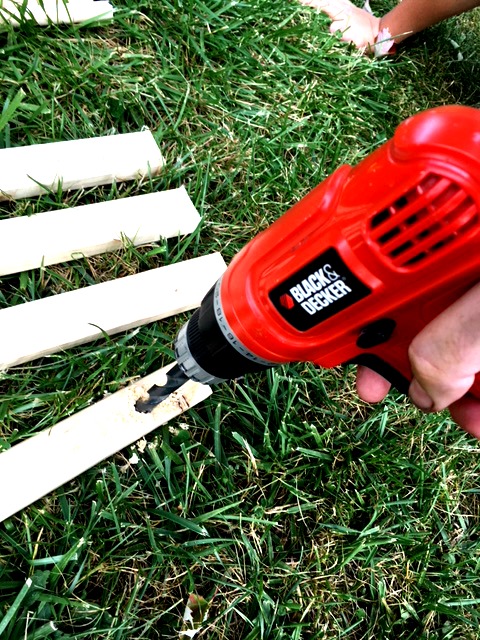
Drill the hole with a 1/2 inch drill bit. Test to see if your dowel will fit through the hole. You need it to be able to slide in fairly easily. I found it too tight and frustrating to put together when tight fitting so I ran the drill through the hole again in and out, in and out, to make it slightly bigger.
The top is the end that has a hole 2 inches from the top. The bottom has a hole 1 inch from the end.

Slide the first piece of dowel through the top holes of two of the 1×2’s The second piece of dowel can be inserted into the bottom holes.
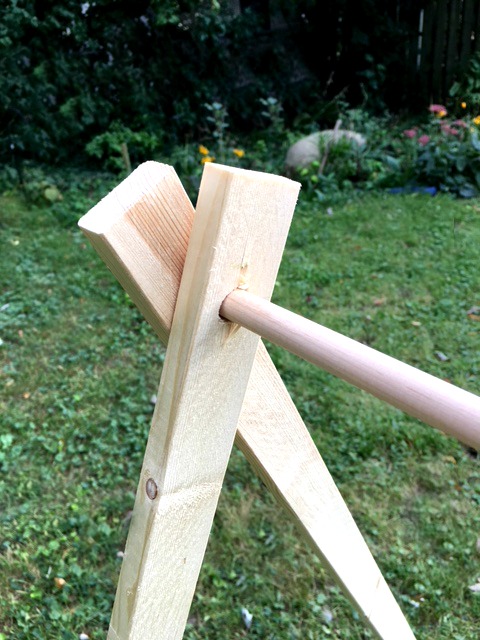
Add the next piece of 1×2 onto the top dowels to make an A.
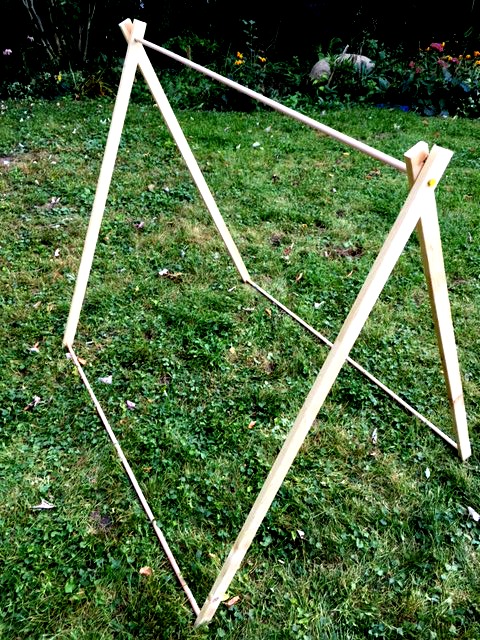
Slide the third dowel into the bottom end of the 1×2’s.

That’s it for the tent frame. Now for the tent fabric.…
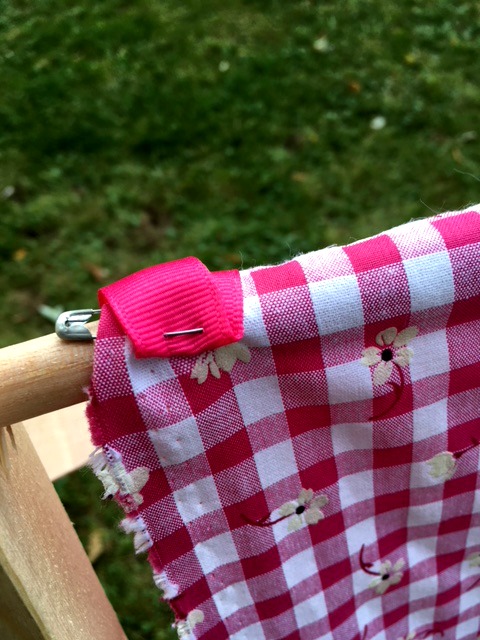
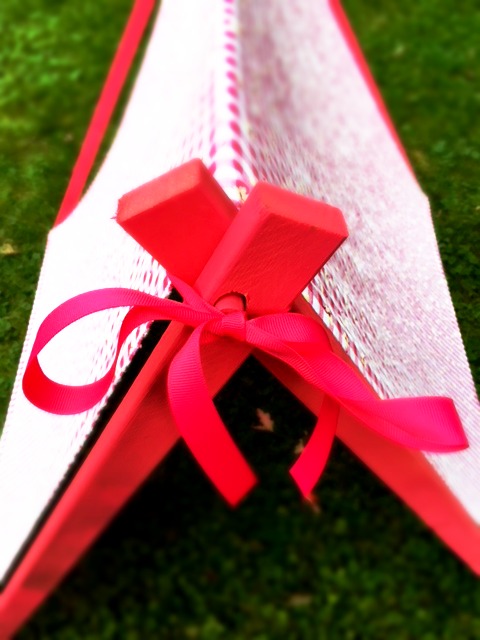
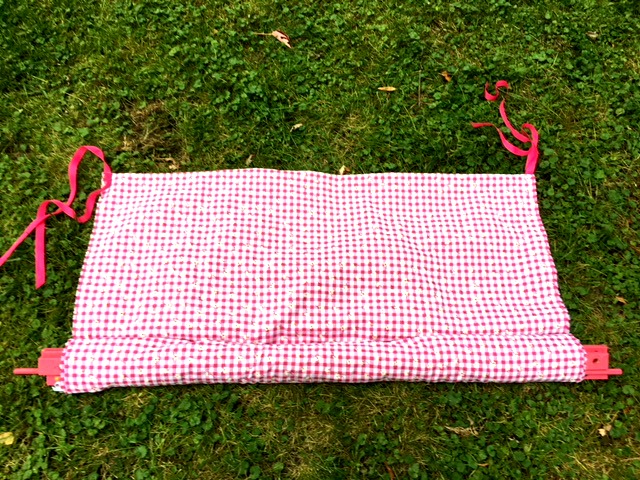
Slide your fabric over the top of the A frame. Pin a ribbon to the front and back ends.
This ribbon isn’t essential but it does look nice and it will be helpful ties when you are storing the tent away.
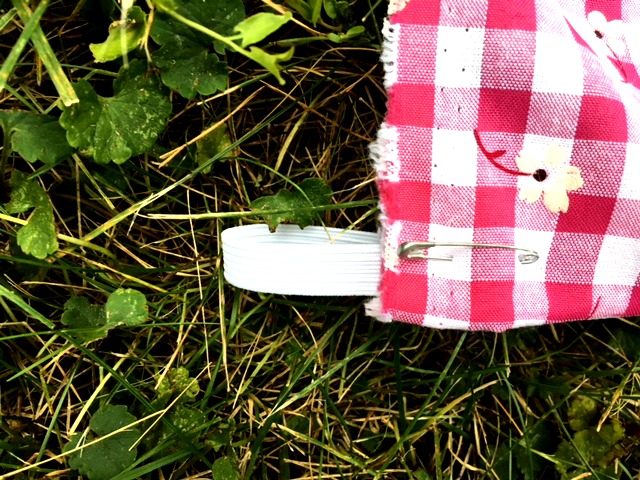
Pin a small piece of folded elastic onto all 4 of the bottom corners of the tent fabric.
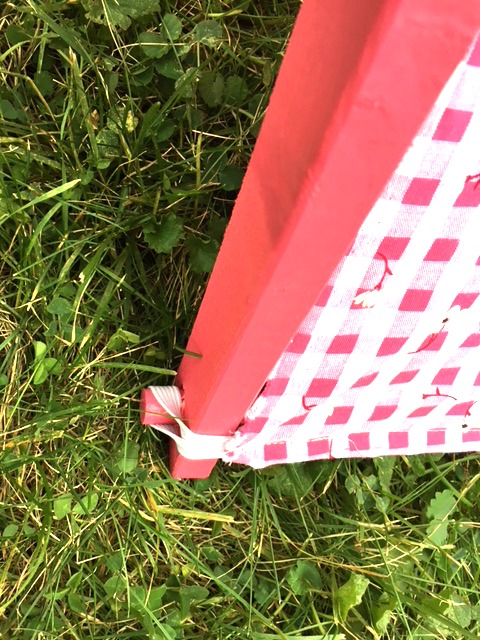
Hook the elastics over the ends of the bottom dowels.
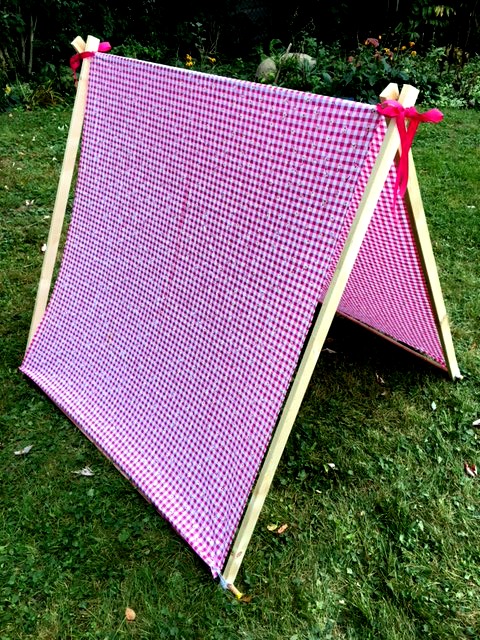
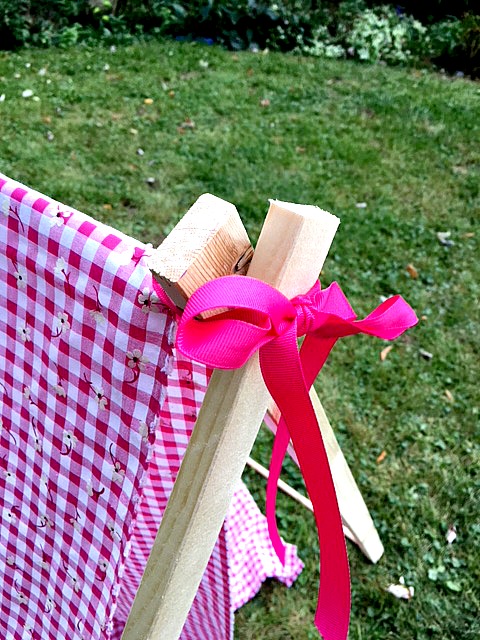
It looks fine with just pins holding everything in place. You may want to hand or machine sew the ribbon and elastics in place. I did sew those in permanently and also hemmed the bottom of the fabric. It’s looking good enough to give away as a gift!
After this sweet picture was taken we decided the only thing to make it better is to paint it pink.
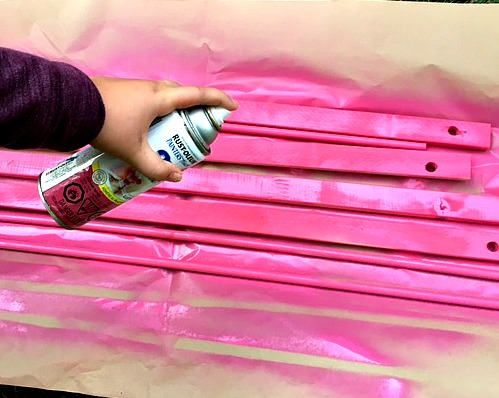
I already have loads of spray paint….because I love to change the color of things. See my previous posts and you will find I used a lot of spray paint this summer. This project doesn’t take much paint so its a great way to use up leftovers.
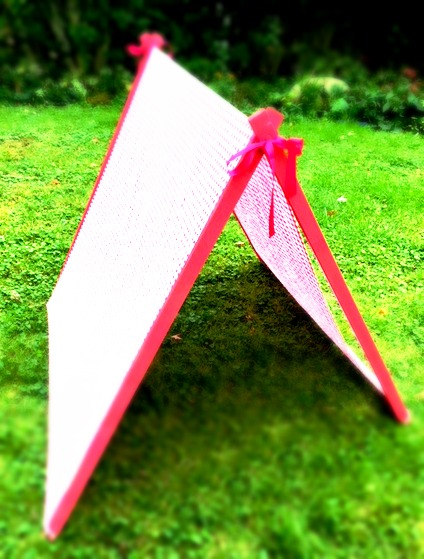
After allowing it to dry put it all together. Admire your handy work!
Did I mention that this is super easy to pack up?
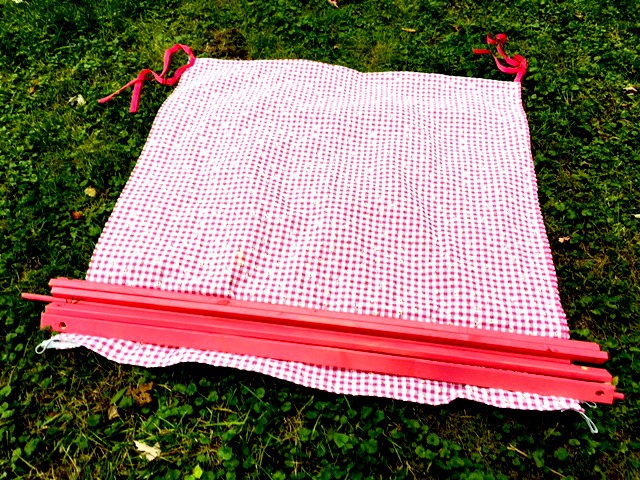
Fold the tent fabric in half. Next, place all the wooden tent parts on the end of the fabric.
Roll up the fabric into a tube to hold the wood pieces together.
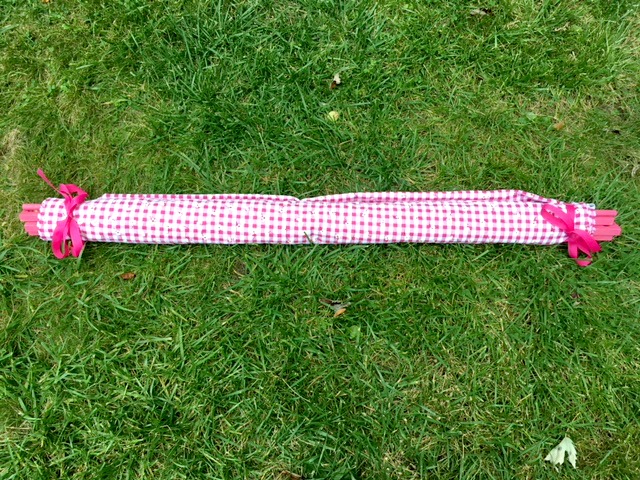
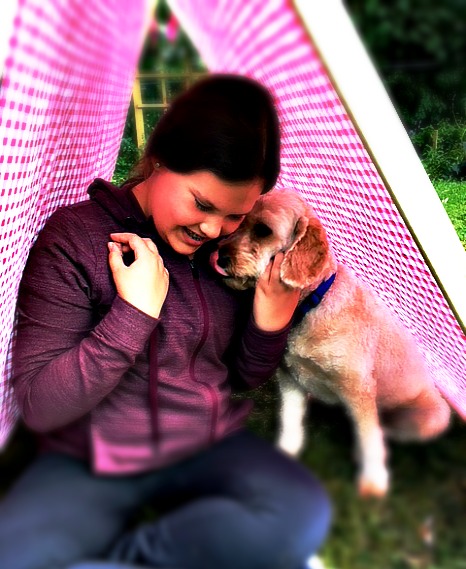
Lastly, tie the ribbons to keep it compact for storing or travelling. Remember when the babies were tiny and you wanted a place for them to nap that was in the shade at the park or beach? This would have solved the problem!
This was so easy to make. I can’t believe I didn’t do it when my kids were smaller.
Please pin or post this to facebook and share this easy DIY with your friends!
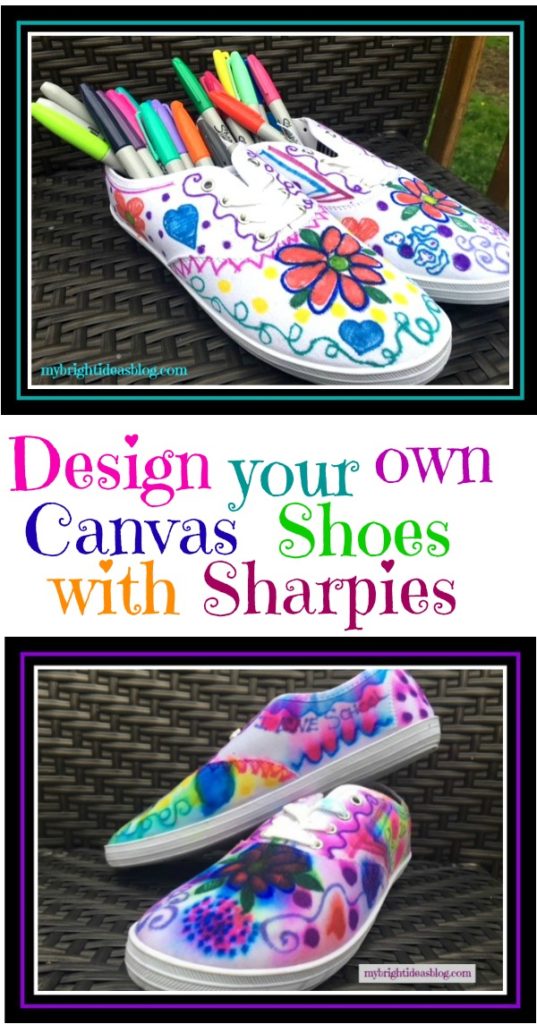
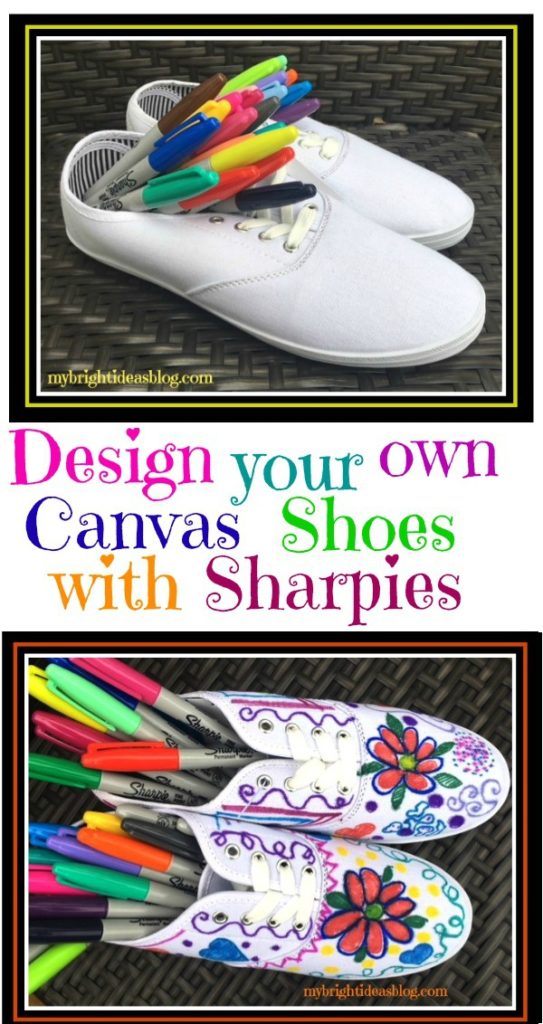
Design your canvas running shoes with a Sharpie Tie Dye Effect

It’s back to school time! Why not send the kids back to school with some personalized canvas running shoes!
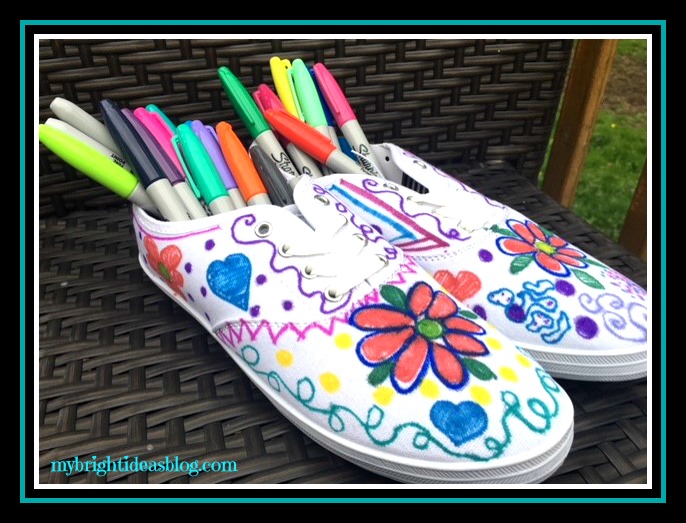
You will need:
- Permanent Markers (like Sharpies)
- Canvas Runners
- Rubbing alcohol
- Medicine dropper (if you don’t have one you can use a straw with your finger on the end)
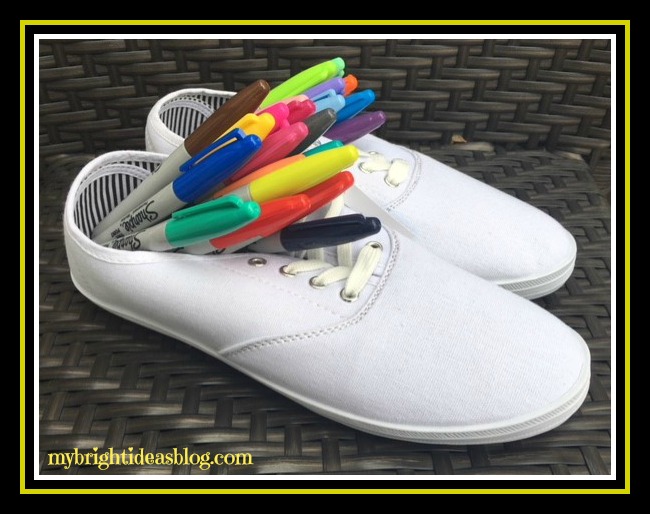
These white canvas shoes came from Michael’s craft store. I am pretty sure that you can pick them up at Walmart and maybe even a dollar store. These are likely going to cost $5-7. The price gives you an idea of the quality of the shoes….these will look cute but have no arch support or cushion so not recommended for gym class or hiking across the country. Cheap and cheerful!
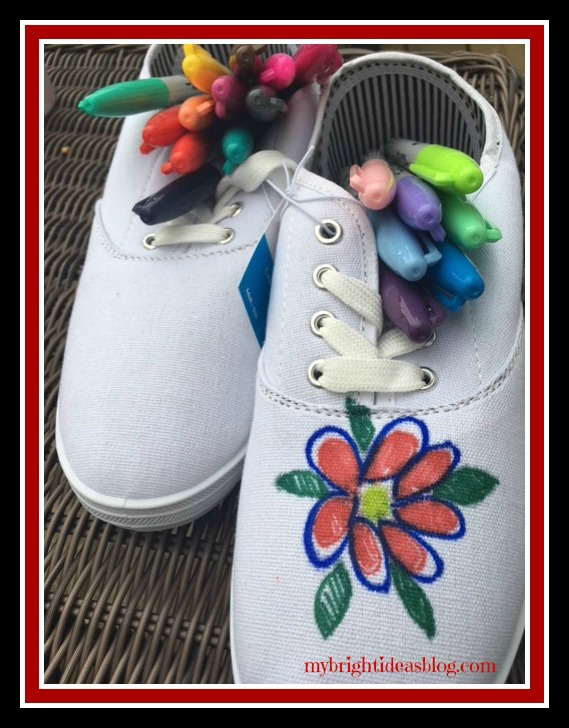
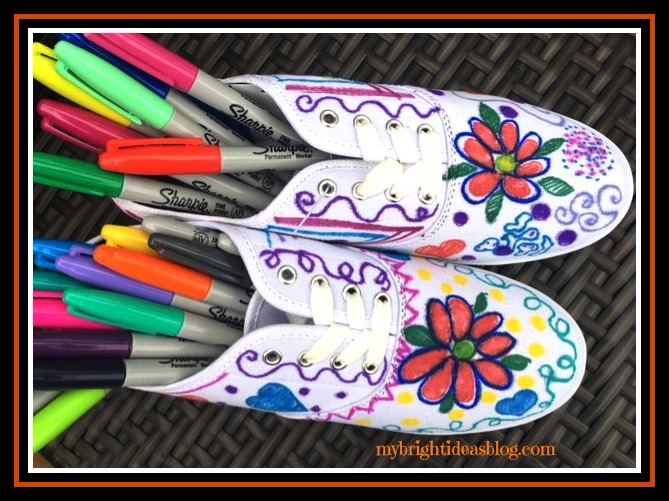
Next begin your design work. I like flowers and squiggles what does your kiddo like? Maybe a message written on the shoe. A+ or “Don’t Give Up” something that will make them smile through the day.
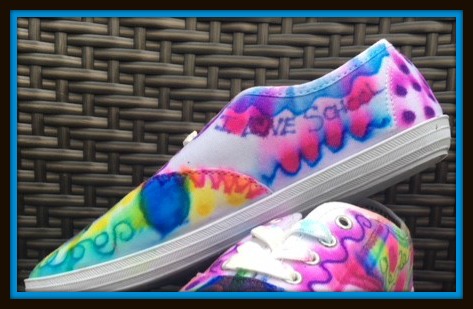
Very subtly I put “I love School”…tee hee… positive subliminal messaging.
Open the Windows or Go Outside!
When you’re happy with your design its time for the stinky part. Open the windows! Or better yet, go outside in the fresh air. The rubbing alcohol fumes will give you and your family a headache. We don’t want a cranky family….
Begin with just a drop or two to see how the color begins to bleed, blend and soften. Here you can see the difference between one shoe that is done and one that is not.
If you don’t have a medicine dropper just use a straw. Dip it into the rubbing alcohol and then put your finger on the end to capture a few drops. Drop onto the canvas to begin the process.
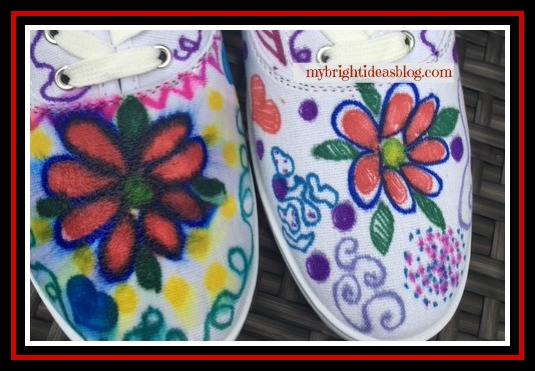
See the difference? Watching the design change is the best part of this project.
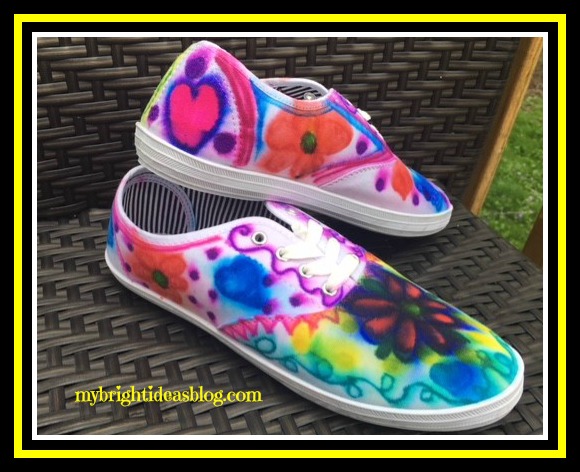
The more rubbing alcohol you use the more it will bleed so just use a bit on areas with a lot of color. Dark colors may end up being much bolder than the lighter ones. Once you start the bleeding process you can’t undo it….so this is why a medicine dropper is recommended. I put way too much on the front blue flower, so its much darker than I planned. As the French say….C’est la vie! Oh well, such is life…and crafts.
You might like the sharpie drawings “as is” and not even want to add rubbing alcohol. That’s cool too. It’s wearable art.
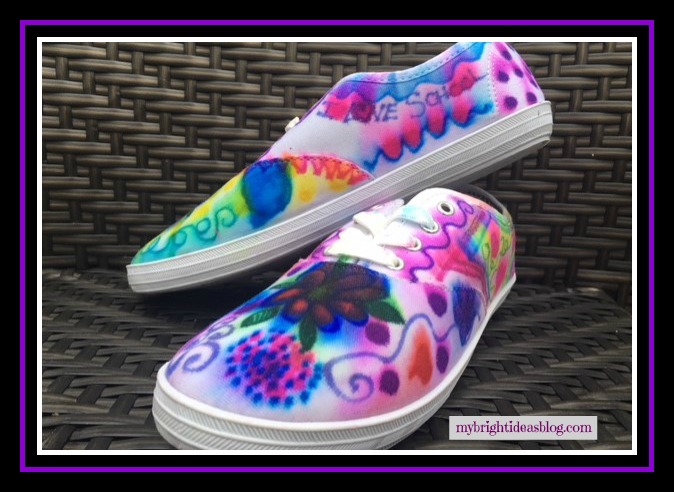
This is my second or third time with sharpies and rubbing alcohol. I will include a link to the t-shirts at the bottom of this post. I love the vibrant colors and funky designs. It looks bright even as the colors were blurred together. This would be very cool on a cotton throw pillow cover or curtains made from cotton or drop cloths.
This is a pretty cool way for kids to express themselves and show off their art work everyday on their feet.