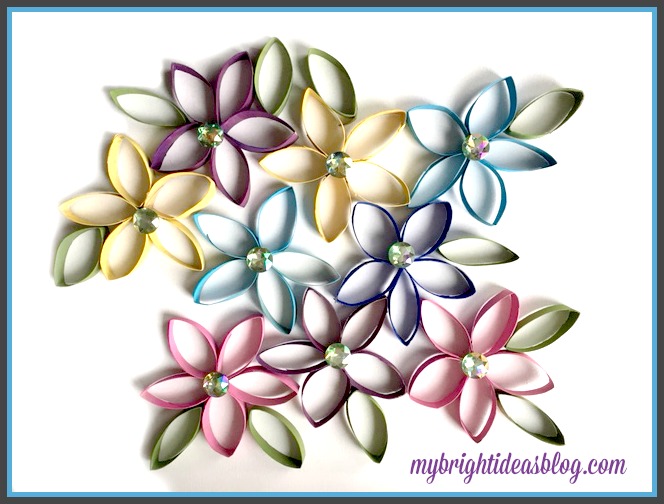
Last year I did a post on making daisy flowers out of toilet paper rolls. I do love to save my toilet paper rolls for crafts so I had plenty more to continue on with more flowers. So this time we are gluing the flowers to a canvas and making a picture to hang in a little girls bedroom.
You will need:
- large white canvas
- 9 toilet paper rolls
- hot glue gun and glue sticks
- craft paint and paint brush
- big gems
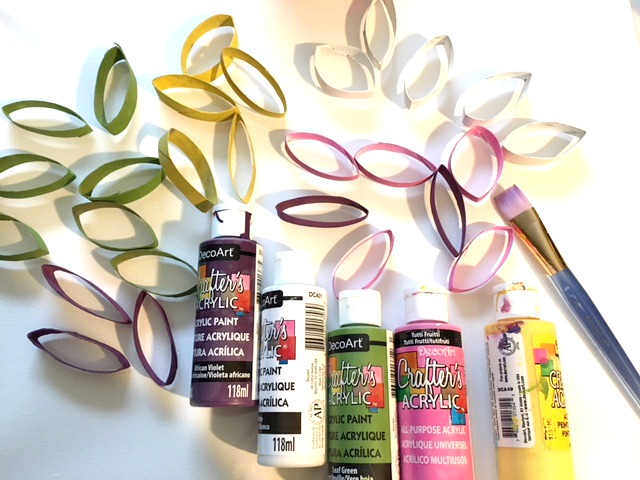
For this project you need a plain white canvas from the dollar store ($4). Everything else you likely have in your craft cupboards. I followed the same instructions from the previous daisy toilet paper project. Each daisy makes 1 flower plus 2 leaves.
To make this I used 9 toilet paper rolls. I painted: 2 purple, 2 pink, 2 yellow, 2 turquoise and 1 royal blue. I cut the rolls first and painted after. But you might think its more efficient to paint first and then cut and then touch up the edges afterward. Fortunately , the paint will dry quickly.
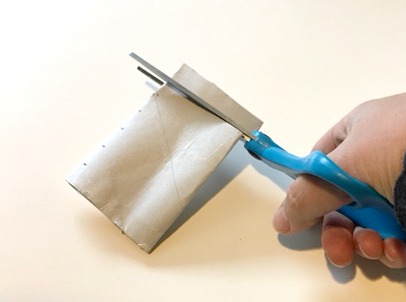
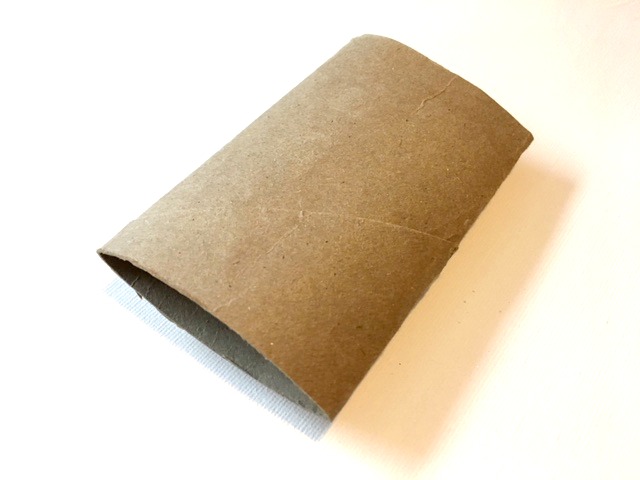 Flatten your toilet paper roll.
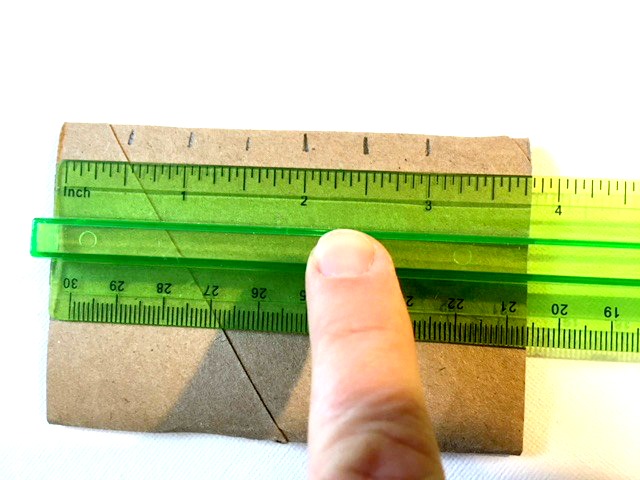 Mark cutting lines 1/2 inch apart.
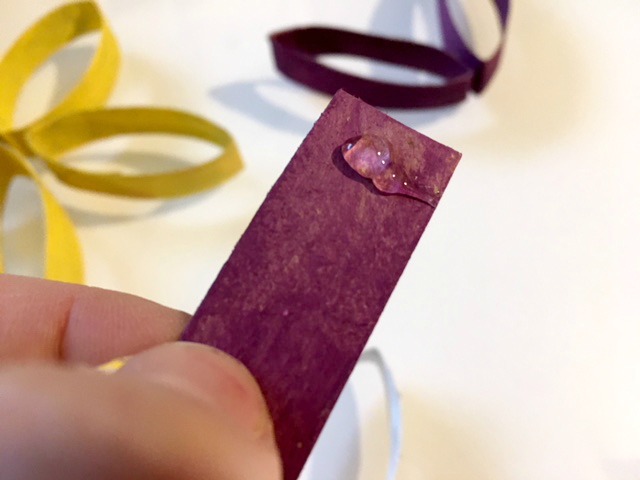
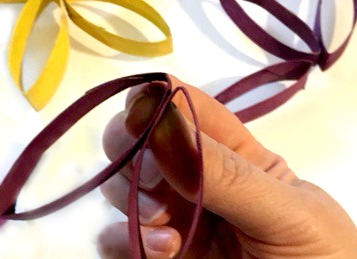
Pinch two petals together. Hold a few seconds while the hot glue dries.
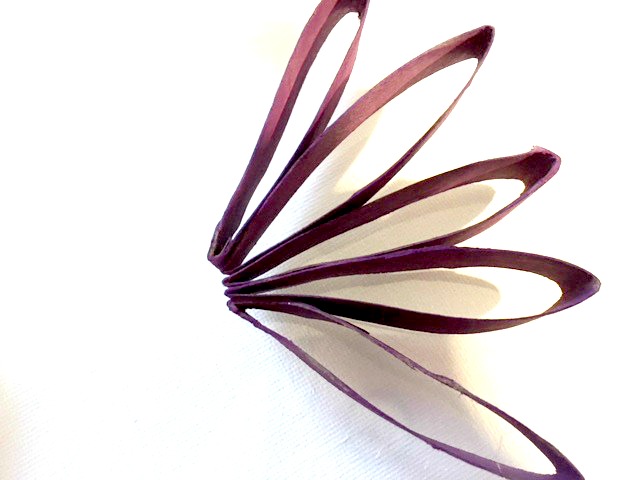
Glue and pinch all 5 petals together. Pull the two outside petals toward each other and glue them together.
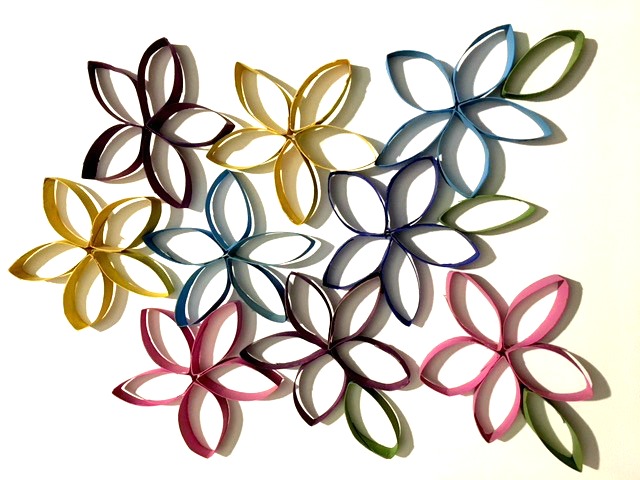 Lay out your flowers and leaves and add a dab of glue to attach them to your canvas.
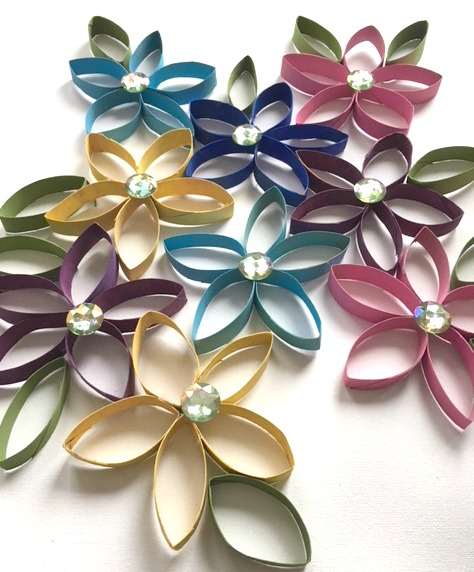
Add a big gem to the centre and attach with hot glue.
Hang your canvas on the wall. Super easy! If your young child is going to do this, please help with the hot glue gun or use white glue.
Look below for more toilet paper roll and Springtime craft ideas!
How to Make Spring Flowers Craft From Painted Toilet Paper Rolls
Toilet Paper Roll Crafts-Use your loo roll tube for easy Crafts!

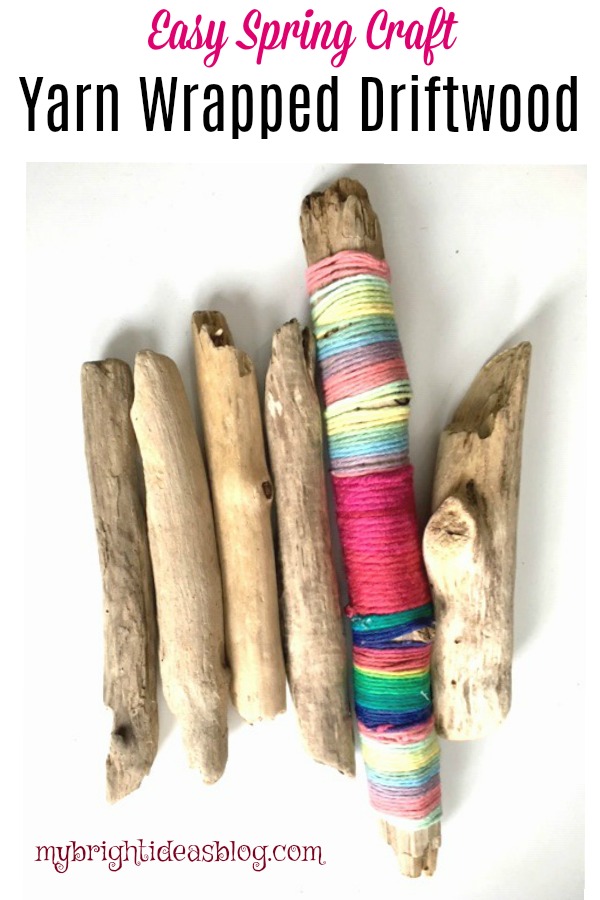
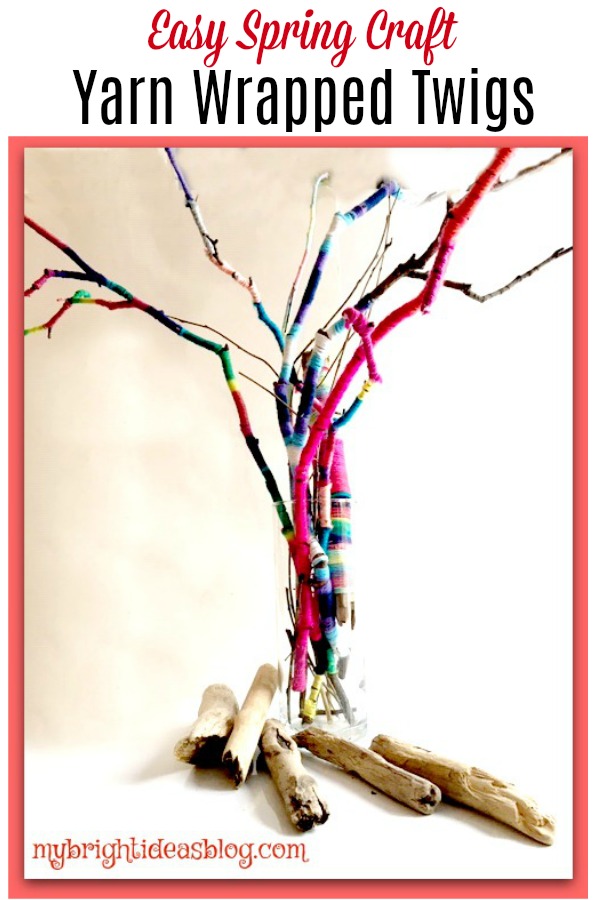
Yarn Wrapped Sticks – Easy Spring Craft
Want to add some spring colours to your home? Why not try wrapping yarn around some sticks?
Part of my inspiration:
Have you heard of yarn bombing? If you haven’t you really should google it. It’s hilariously amazing! People are knitting or crocheting a sort of non permanent graffiti. You might find a park bench, bike, phone booth or a tree that is literally wearing a perfectly fitting, bright coloured sweater! Sometimes the crafter that does it wants to make a point and sometimes it just adding color to something grey and sterile like a light post.
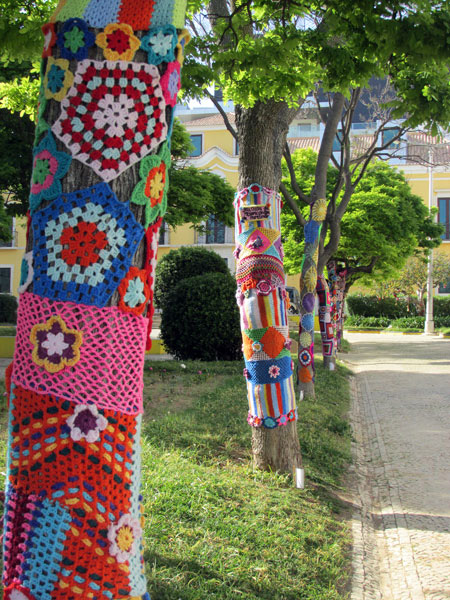
https://algarveblog.net/2014/05/05/yarn-bombing-in-portimao/
Here is just one cheery photo so you can see what I mean!
Anyhoo the photos people have posted make me so happy but I can’t knit or crochet ask my friends Lana and Gen who just attempted to teach me how-they were patient but it didn’t take I’m afraid. Someday I will give it another try but for now here is my happy alternative.
It’s so easy and cheerful you are going to love this craft idea!
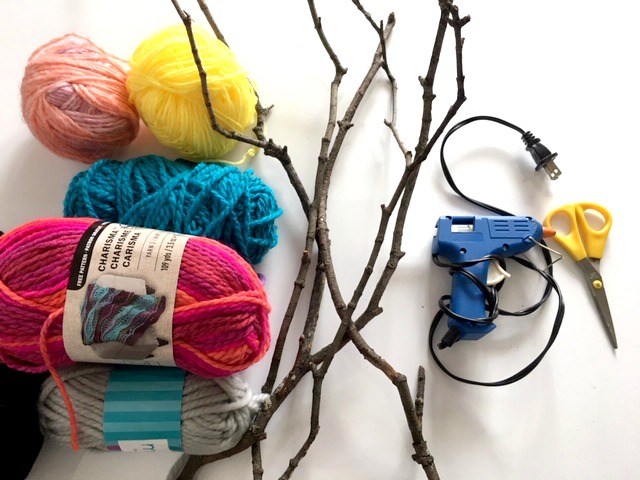
You will need:
- sticks
- yarn
- hot glue (optional)
- scissors
- vase
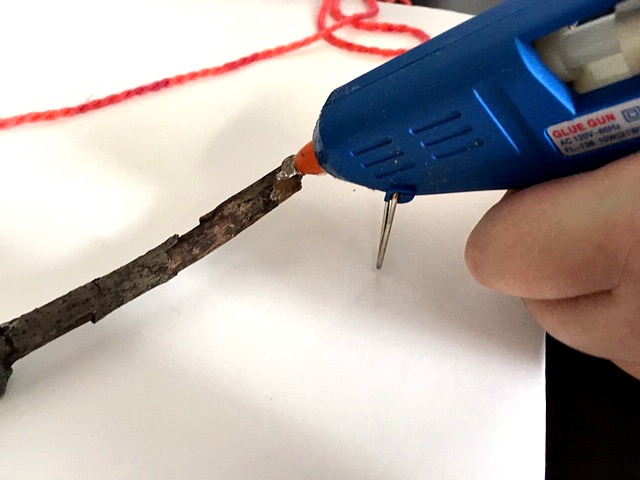
If you love your hot glue gun (as much as I do) start by adding a dab of glue to secure the end of the yarn.
If you don’t want to use hot glue then just tie a loop around the end of the stick and tuck the tail in-as you wind the yarn around the stick.
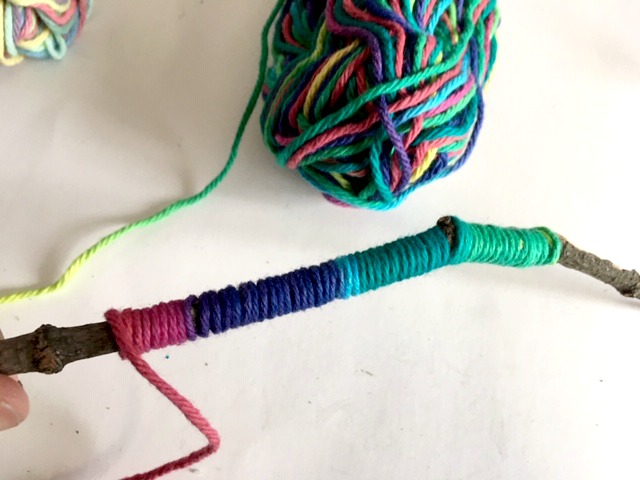
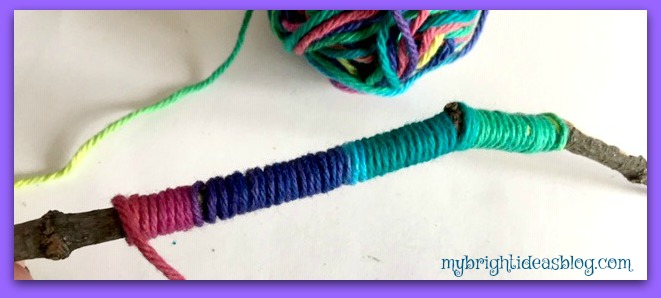
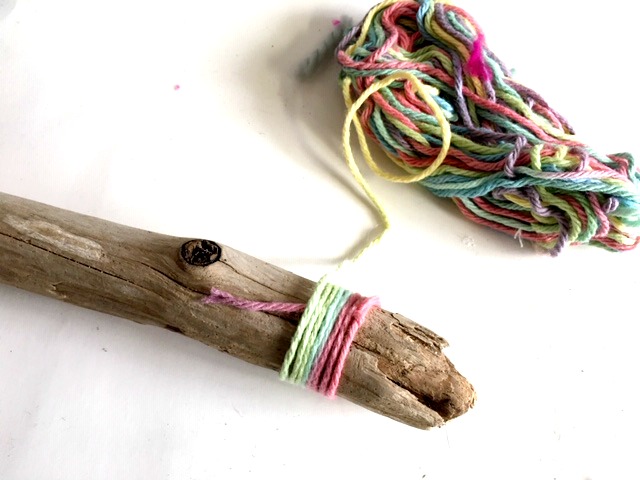
I really love the yarn that transitions the colours as you go. Its very smooth looking and only need to deal with the end at the beginning and the end.
If you don’t have yarn on hand that transitions you can use several colors and just change them as you get an inch down the branch.
When you are done just snip the stray ends.
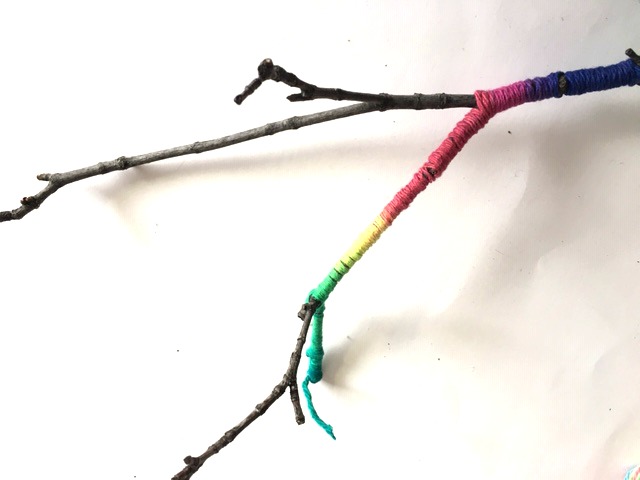
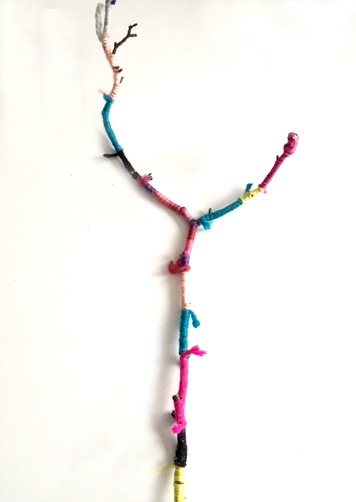
When you get to a split in the twig’s branches continue down one side and then go back to complete the other stems.
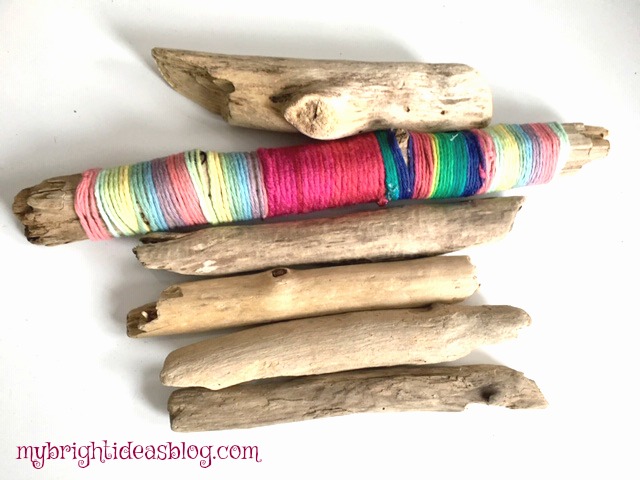
Using drift wood is even easier to manage.
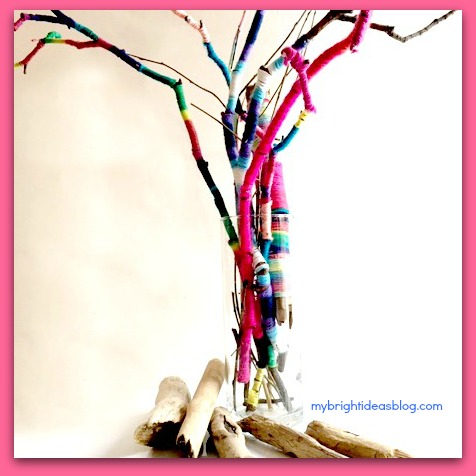
This took my 11 year old daughter and I an hour to do all of the sticks in the vase. We both enjoyed doing this. It was kind of an easy, soothing craft. It made a great mother daughter moment to stop and talk about things on our minds.
The results are very cheery decorative sticks with springtime colors that will go on a shelf or mantle.
Have a look at the other crafts linked below. I seem to enjoy the stick/twig projects. Mostly because they are free-out of the garden and something always need trimming.
Happy crafting!
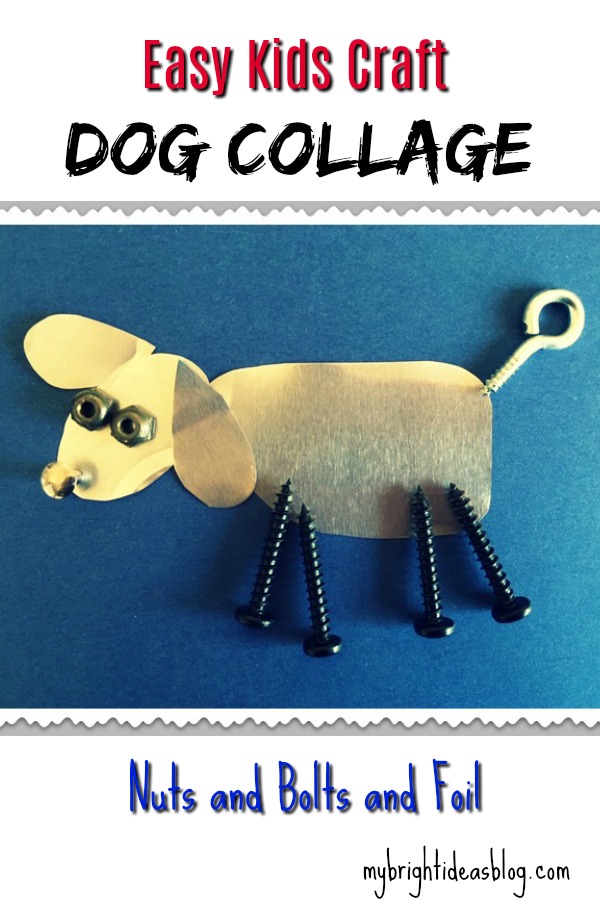
Easy Kids Craft – Foil, Nuts and Bolts Art
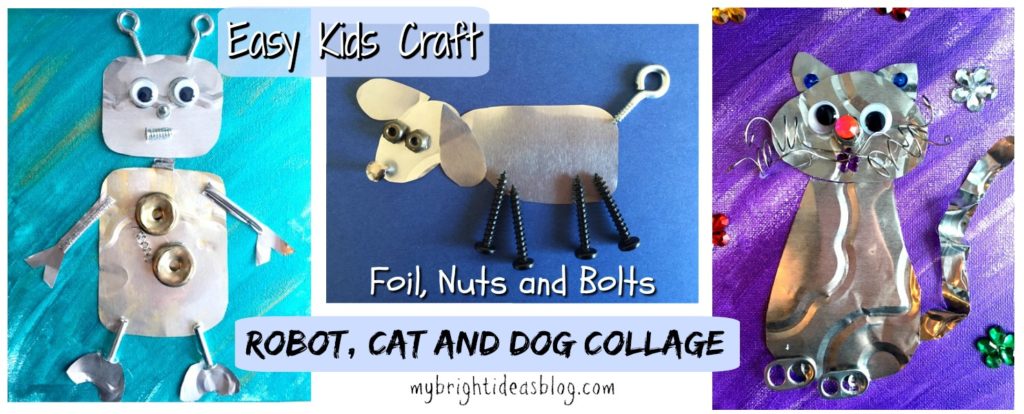
Today’s craft goal is create something fabulous but only use things you already have. Nuts, bolts, a foil cake pan… all of these things can be turned into a super cool craft and wall art for a kids room. We made a robot, a cat and a dog for our examples. But you feel free to let your imagination run wild.
You will need:
- an 8×10 canvas or piece of cardboard
- nuts and bolts and odds and ends
- a foil cake dish
- metallic craft paint and paint brush
- googly eyes (optional)
- scissors
- hot glue gun (or regular glue)
- a sharpie
Warning: This project is intended for older children not toddlers who might put these things in their mouths. Keep an eye on the little parts used for this. It could be sharp or a choking hazard for babies and pets.
Be safe lovely crafters!
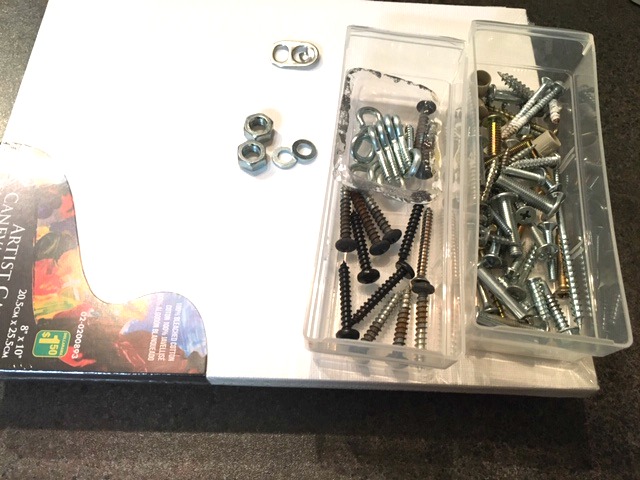
I’m just assuming that everyone out there has a few little miscellaneous drawers of screws from old projects and furniture that won’t be missed if we use them for a random craft project.
The canvas iwas a dollar store purchase. You can get the foil cake pan there too. Or you could just buy a cake or food in one of these pans and do the craft after you’ve licked it clean! :o)
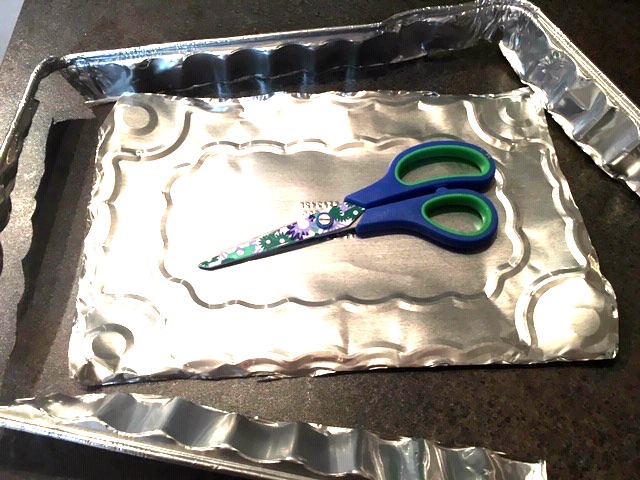
To prepare for this craft, cut out the bottom of the cake pan.
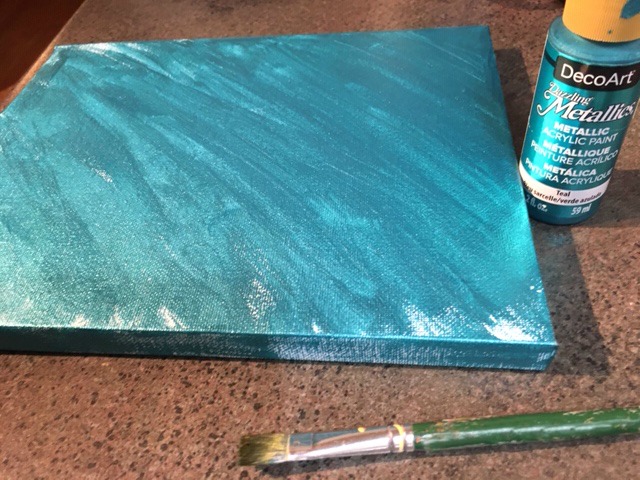
Paint your base canvas. I used metallic paint colours. If you don’t have a canvas just cut a piece of thick carboard to size and paint it.
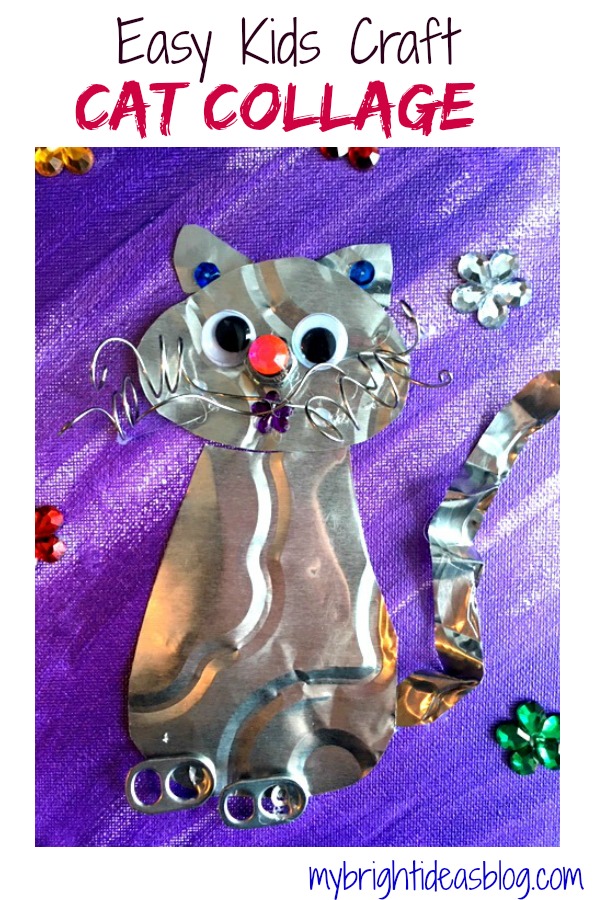
Cat
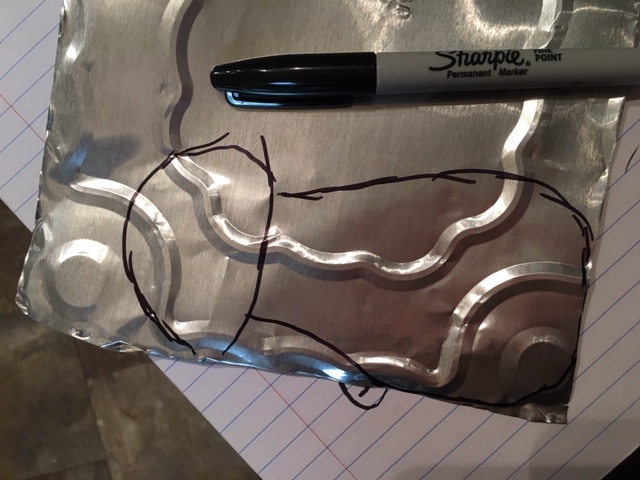
Draw the shape onto the foil with a sharpie. It doesn’t stay permanent on the cake pan foil right away so you can wipe it off if you make a mistake.
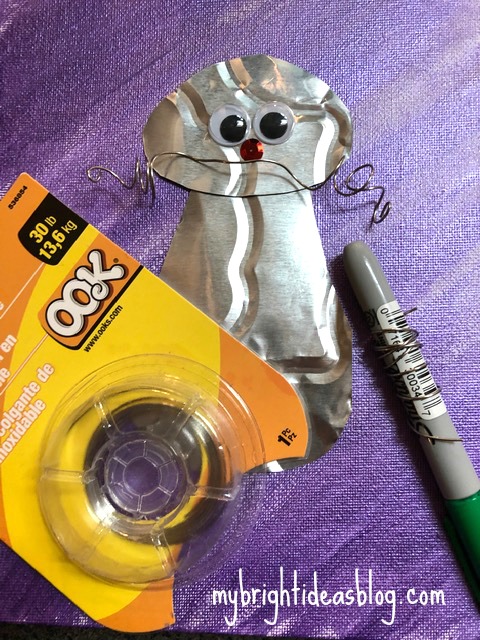
Lay out the pieces before you hot glue them to the canvas. To make the spiral for the cat’s whiskers I wrapped a wire around a pen. Then I stretched the wire out a bit so it looked a bit crazy. Wire is a bit hard to glue on. Find some points that will be touching the canvas and add a drop of hot glue to just those spots.
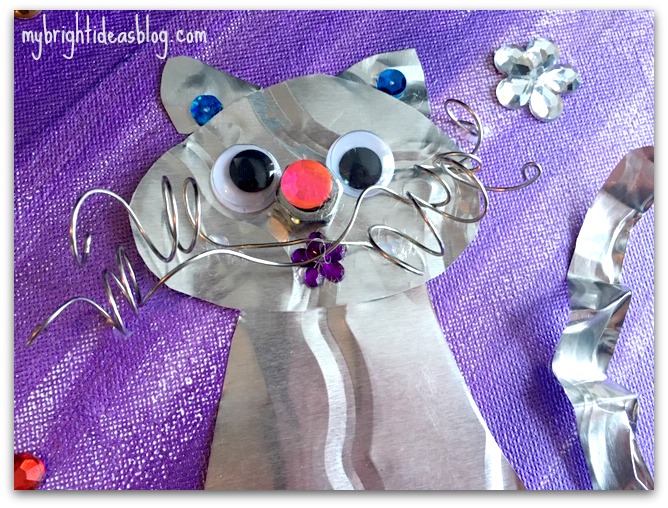
I used a bolt for the cat’s nose and then put a gem on top. For the tail I took a part of the edge of the pan and scrunched it a bit to give it extra wave. Secure it with a few dots of glue to the canvas.
The one gem on her nose looked so nice-I added one for the mouth, 2 for the ears and some big ones randomly around the cat.
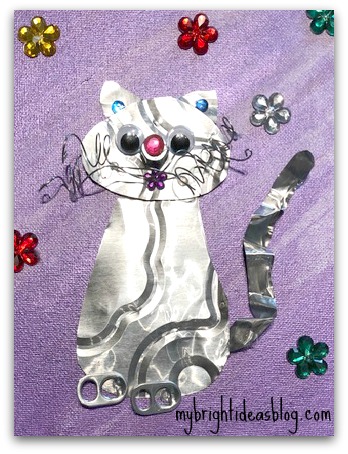
I almost forgot to mention the two pop can tabs were added for feet!
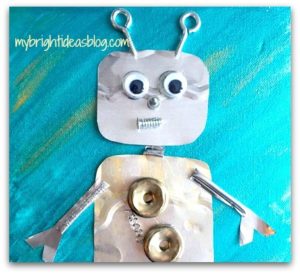
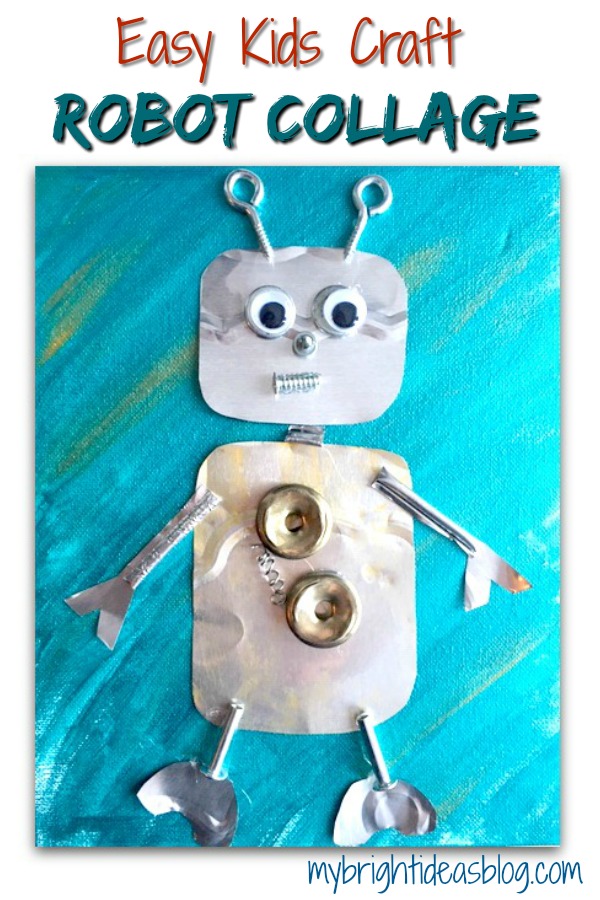
Robot
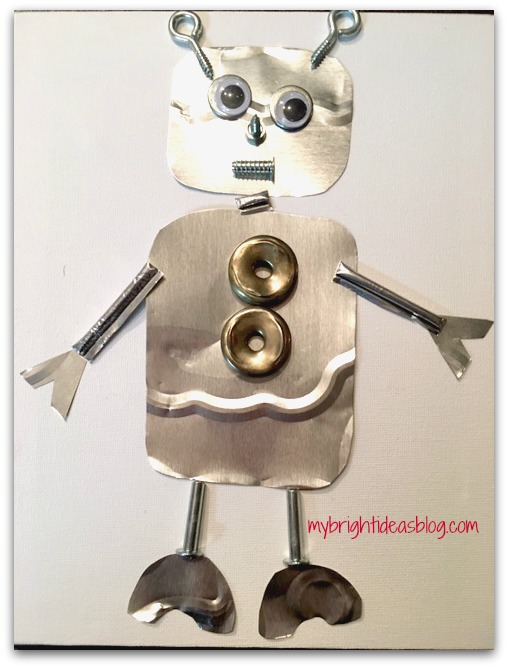
Again for the Robot, lay out your materials and arrange them together for the collage.
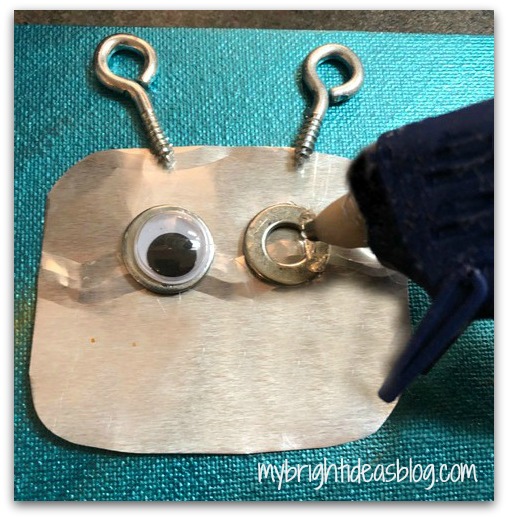
Secure each item with glue to the pre-painted canvas.
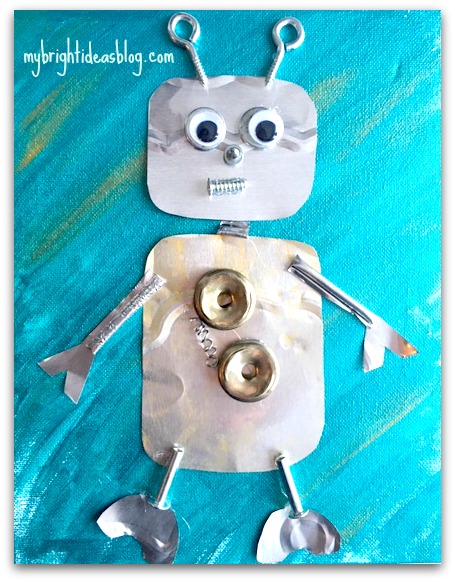
The robot is made of 2 squares with rounded corners. A few miscellaneous items from the junk drawer and cut up scraps from the foil cake pan. The wire on the middle of the robot is the same wire from the cat project but it looks smaller because I wound around a smaller object. If you have a spring from an old pen it would be similar.
This robot turned out great! You’ll love how the metal of the foil reflects the light.
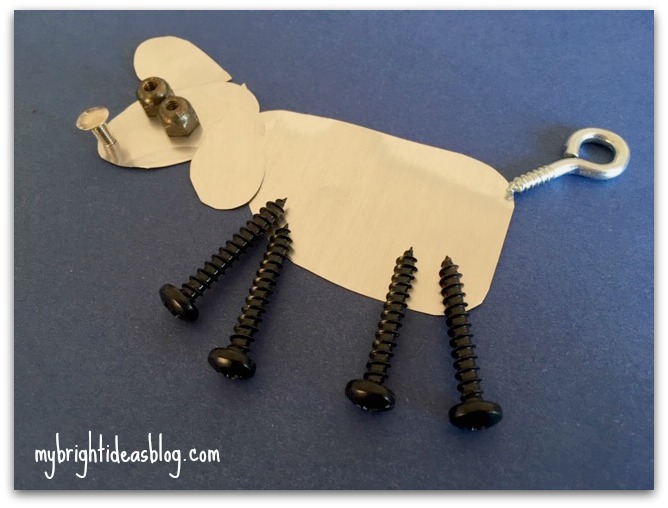
Dog
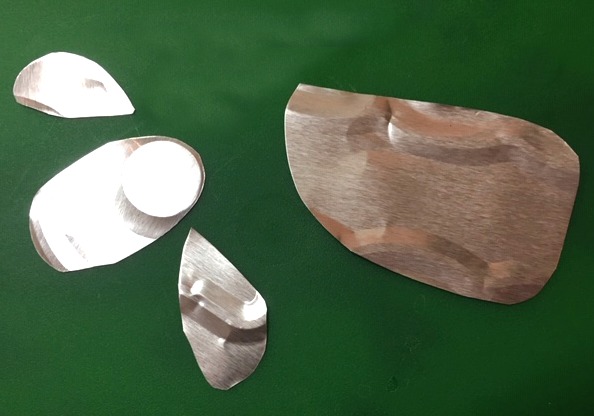
The dog is simply 4 pieces cut out of the cake pan.
I made one on a white canvas so I colored it in with black sharpie.
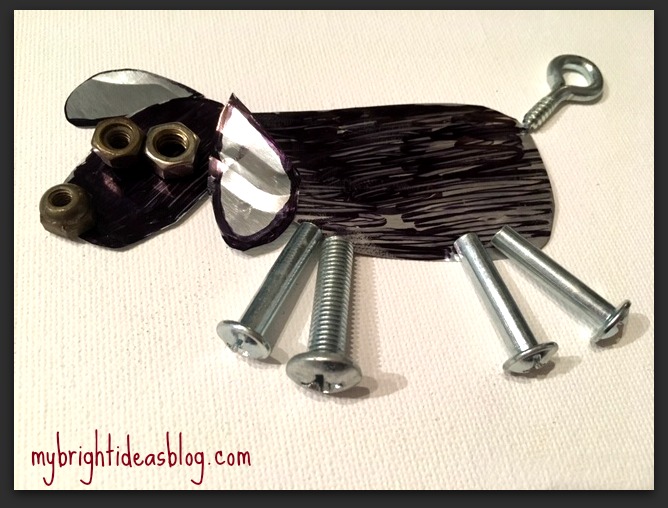
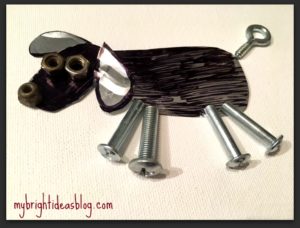
I also make another one on a piece of dark blue cardstock. The foil cake pan looks white in this photo but its still metallic silver. I think it looks like a sheep! Bahhhhh.
This was a super easy and fun craft to make!

Here are some previous blog posts with simple fun projects for the kids!

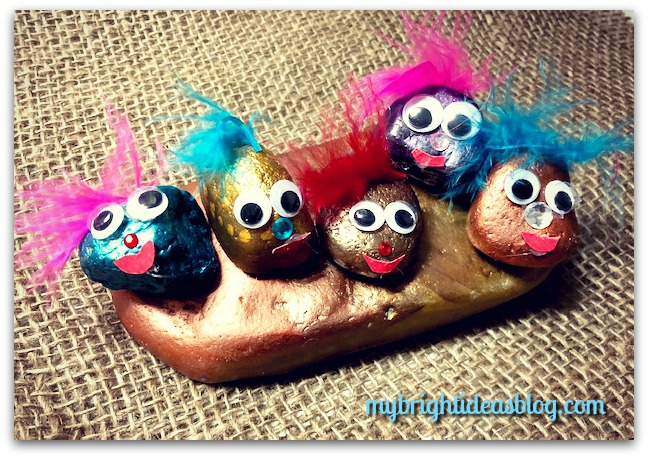
Make Adorable Pet Rocks – Easy Kids Craft!
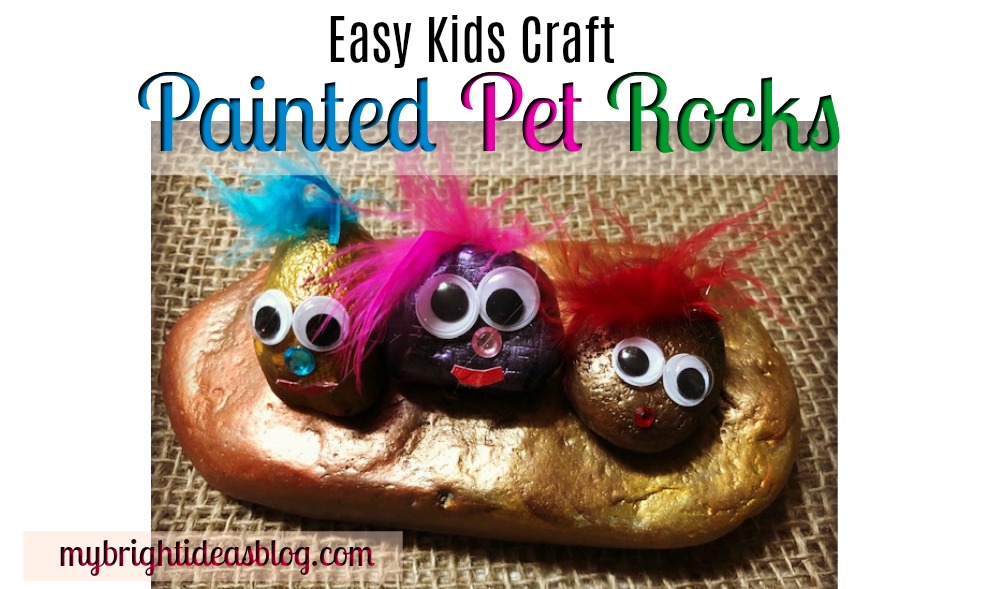
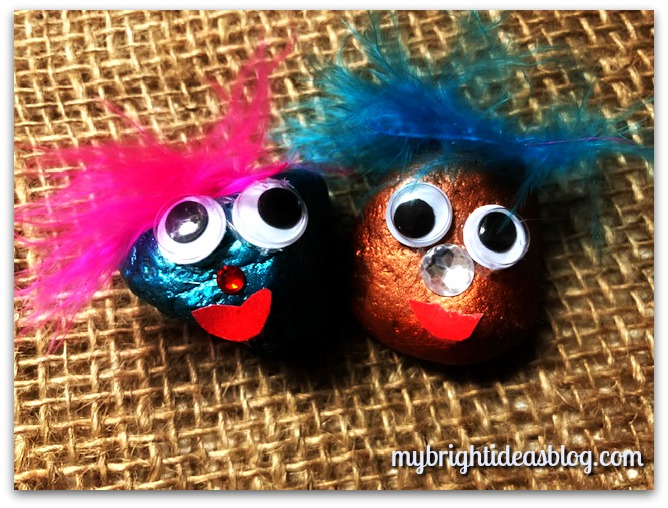
Okay so we have a few more days until the kids are back to school. Is anyone getting stir crazy yet? Not to worry I have a craft idea for their entertainment. Grab a few stones and basic craft supplies and turn them into PET ROCKS! It turns out quite cute actually, the grown ups might want to join in for this project.
You will need:
- rocks
- paint preferably glossy (or better yet metallic!)
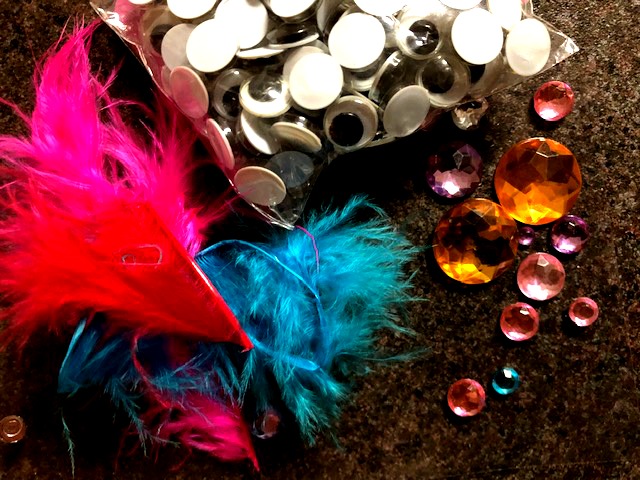
- gems
- glue (hot glue or white craft glue)
- feathers
- a scrap of red paper or felt
- googly eyes
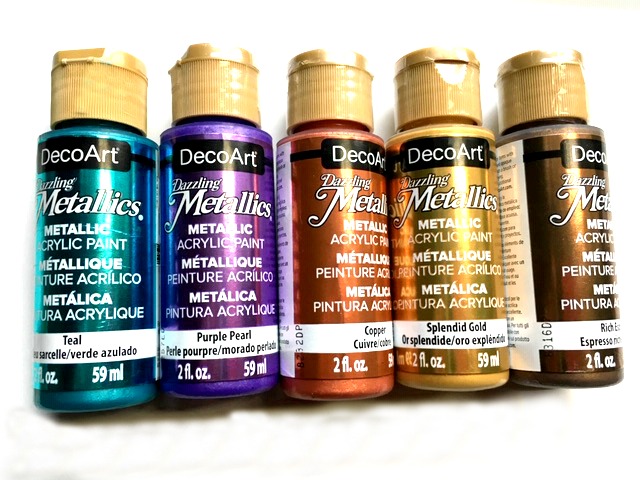
I’m in love with these metallic paints. They look great on rocks!
For today’s project you can use any craft paint but I prefer glossy!
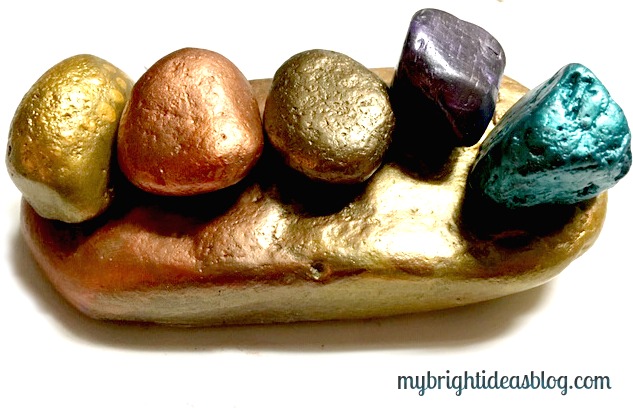
I found this huge flat stone in our rock collection and painted it gold. Then I painted each stone a different colour.
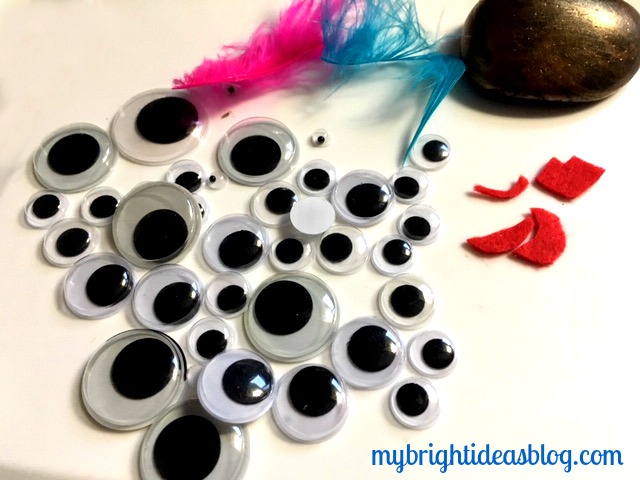
Googly eyes! I have probably over a thousand googly eyes in my craft cupboard. I have no idea why there is so many….today I will use another 10. LOL!

I’m impatient for white glue to dry so I use hot glue to attach the googly eyes on.
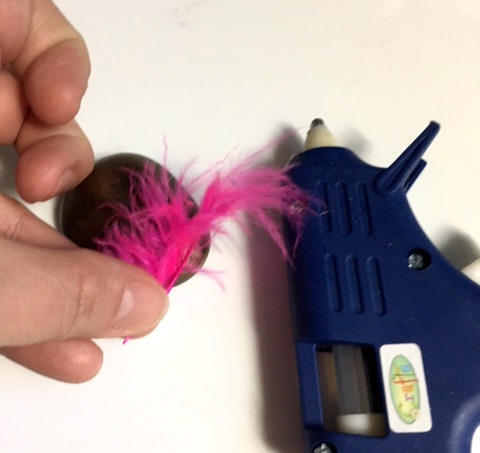
The feathers that I used are just small scraps that had fallen out of feather boas. You just need a tiny bit of something for the hair. Yarn or twine could work if you don’t have feathers. Look around your craft cupboards and see what you already have to embellish your pet rocks.
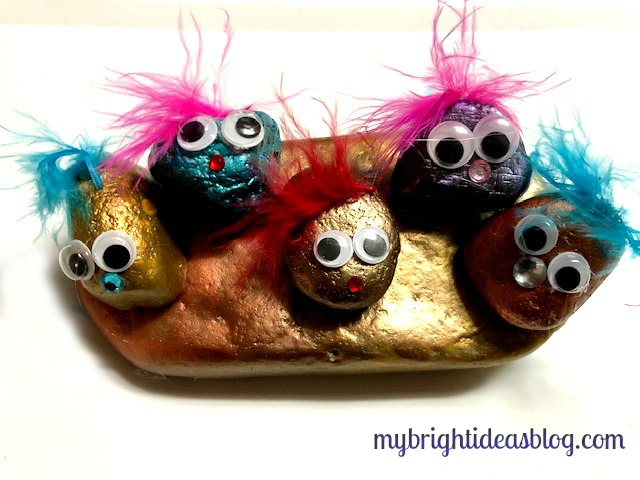
Add a gem for the nose. Or try a pompom nose…they make cute noses too.
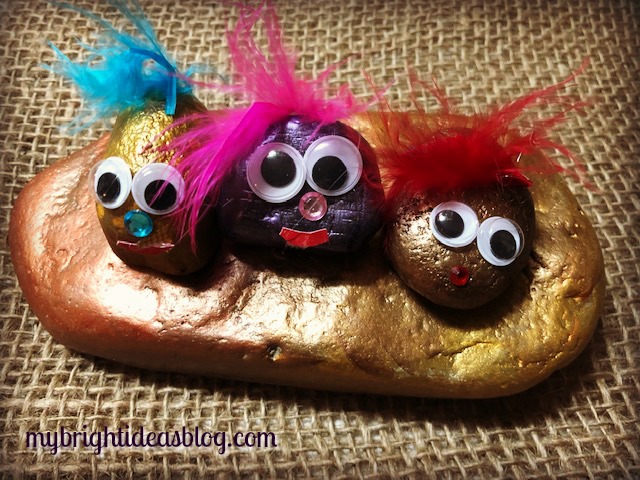
For the mouths you could draw on a smile with a sharpie or if you can’t find where you put your permanent marker….like me. You could just cut out a tiny smile on red paper or felt and glue it on.
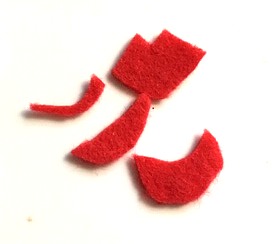
Felt is tricky to cut something so small. You may need to help your little ones with the mouth using small sharp scissors. Or just use paper.
I get a kick out of gluing googly eyes on things. Suddenly they become a little person.
I hope you enjoy making Pet Rocks. Have a look below at a few links to previous posts I have done for crafts with personality!

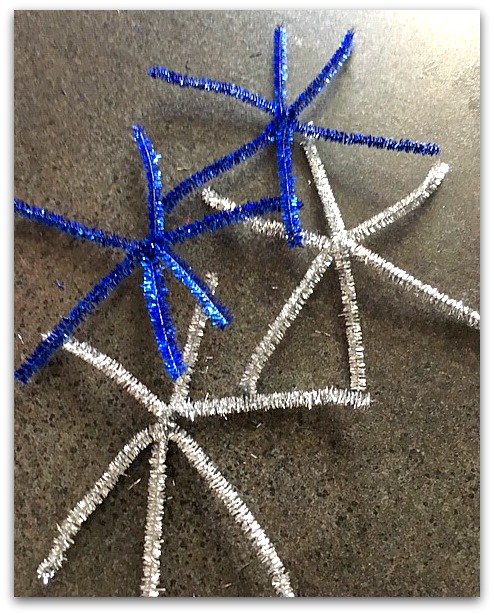
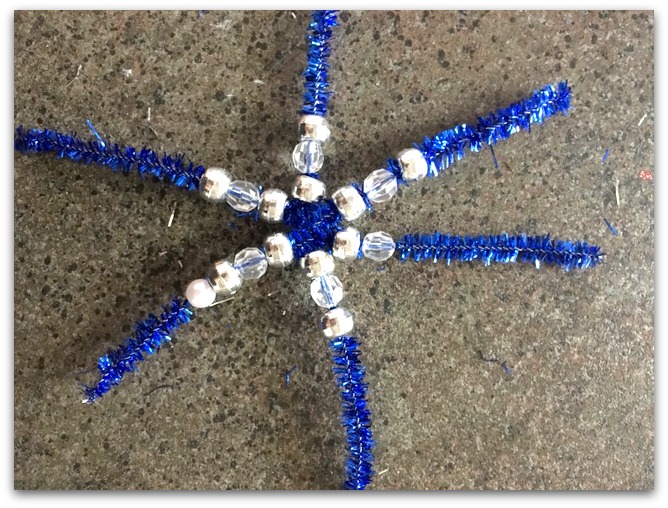
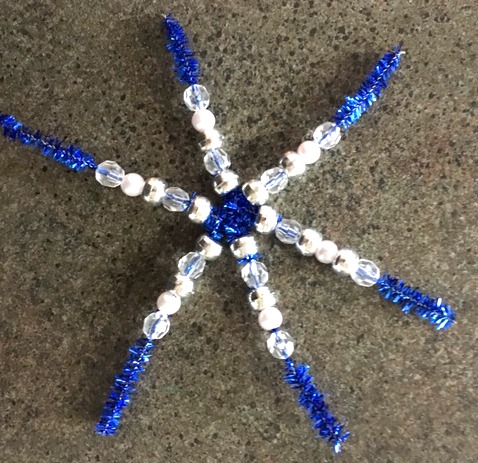
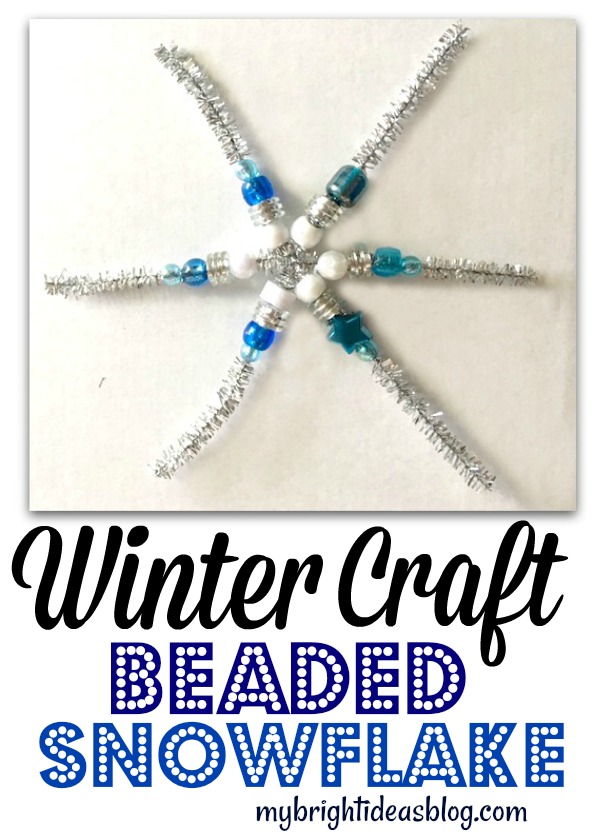
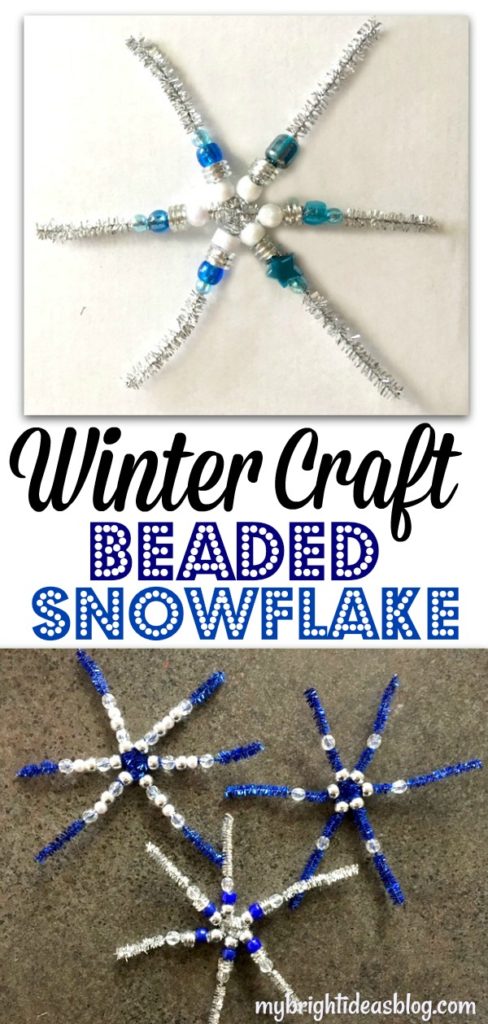
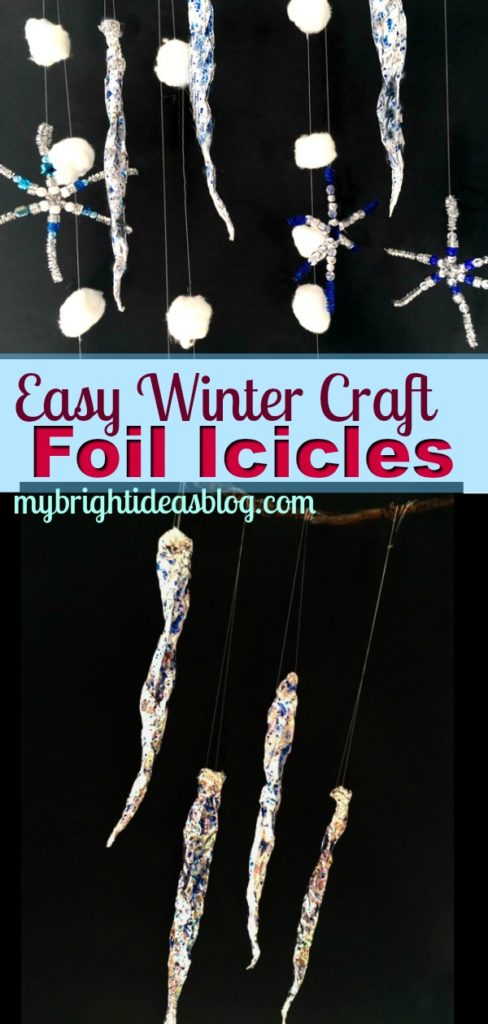
Beaded Pipe Cleaner Snowflakes – Easy Winter Craft!
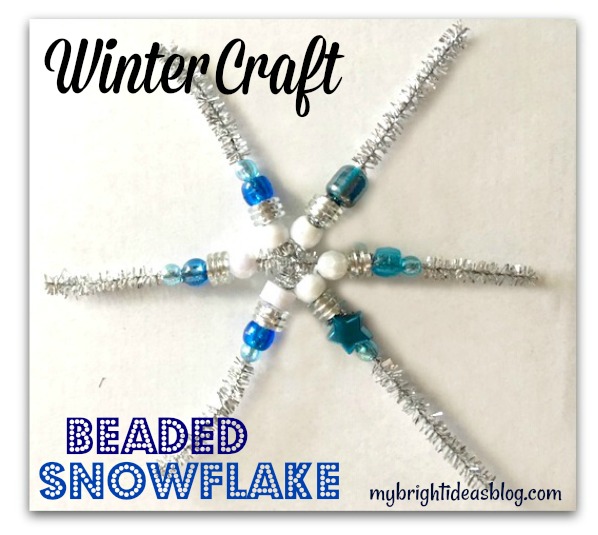 Make an Easy Winter Kids Craft – Snowflakes made with Pipe Cleaners and Beads!
I attempted a post on this exact craft last year but I had a look at it and they turned out a bit ugly in the end. LOL. So I’m trying it again for a do-over.
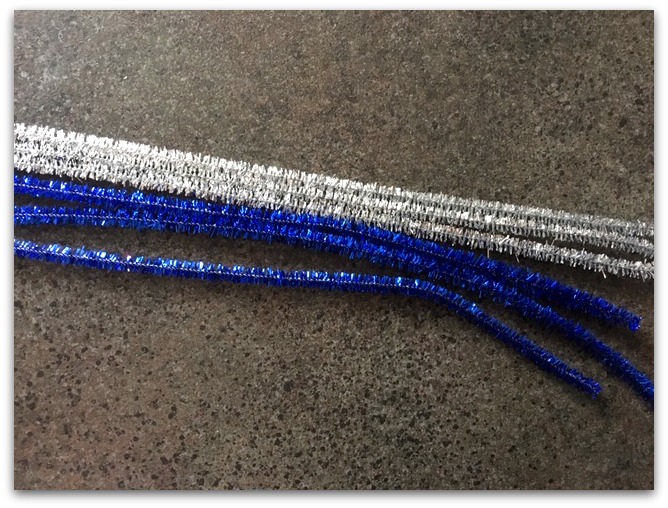
You will need:
- sparkly pipe cleaners
- beads and pony beads
That’s it!
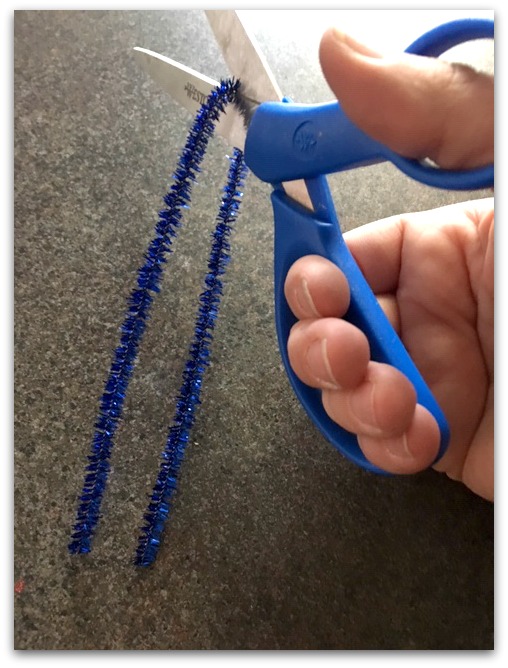
Each snowflake takes 1 and 1/2 pipe cleaners. Cut 2 standard length pipe cleaners in half (so you have 3 pieces 6 inches long).
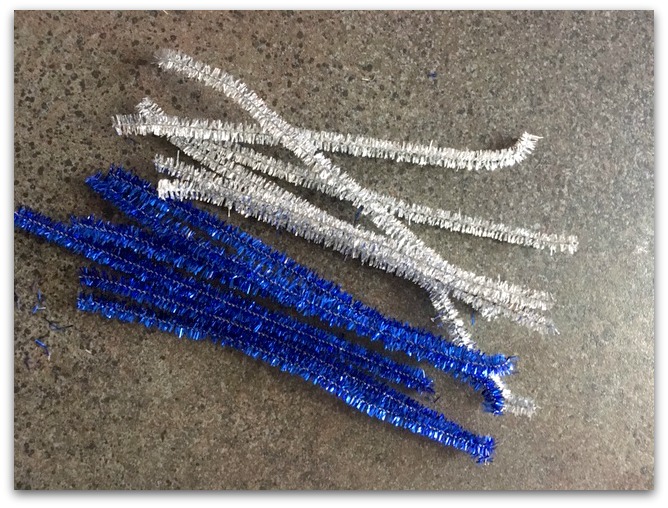
This time I’m using sparkly pipe cleaners. They really stand out. But I’ll warn you the beads didn’t slide on it quite so easily.
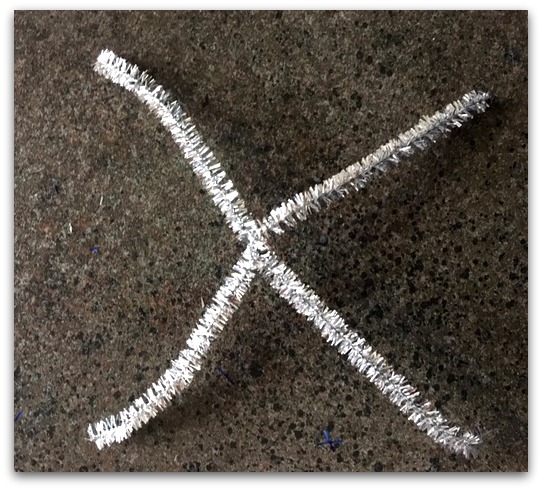
Take 2 pieces of pipe cleaner and overlap them in the middle. Bend them around each other to make an X.
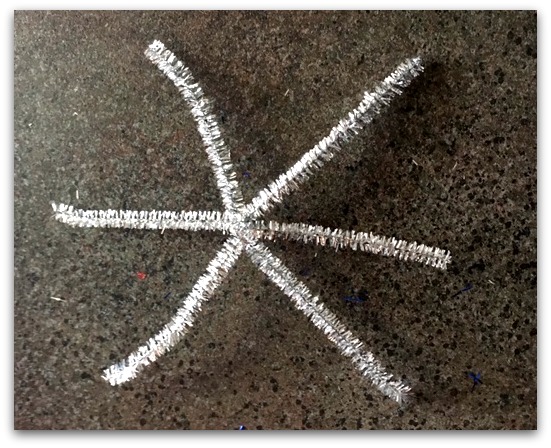
Add a third one to the middle of the X and bend it to make a star.
This is a great craft to teach young ones about making patterns. They also will develop fine motor skills sliding the beads onto the pipe cleaners.
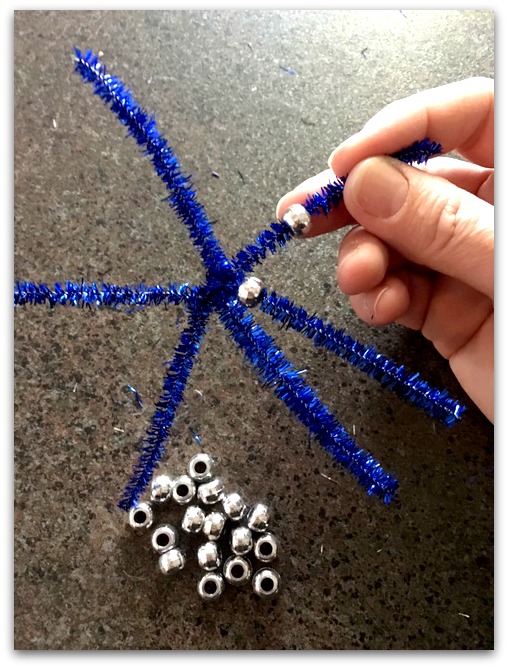 Start with 6 pony beads and slide them onto the pipe cleaners. The dollar tree has a lot of color choices for pony beads. You can also purchase them at Walmart or the craft store.
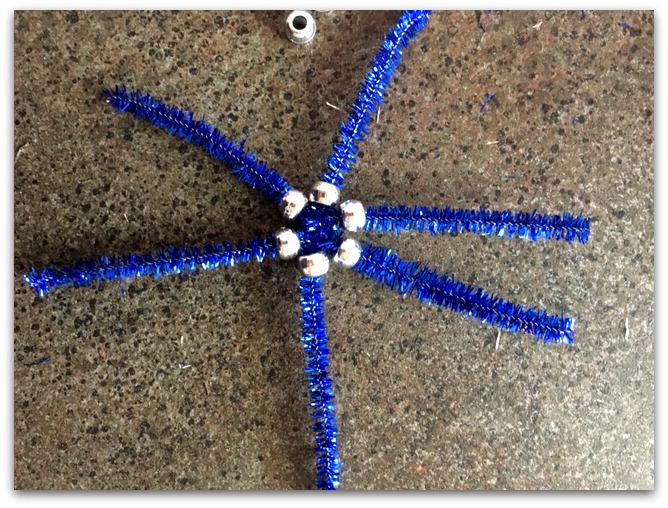
Push them right up to the centre of the snowflake star.
 I found sticking with a pattern looks better than going freestyle with your beads. See if you agree.
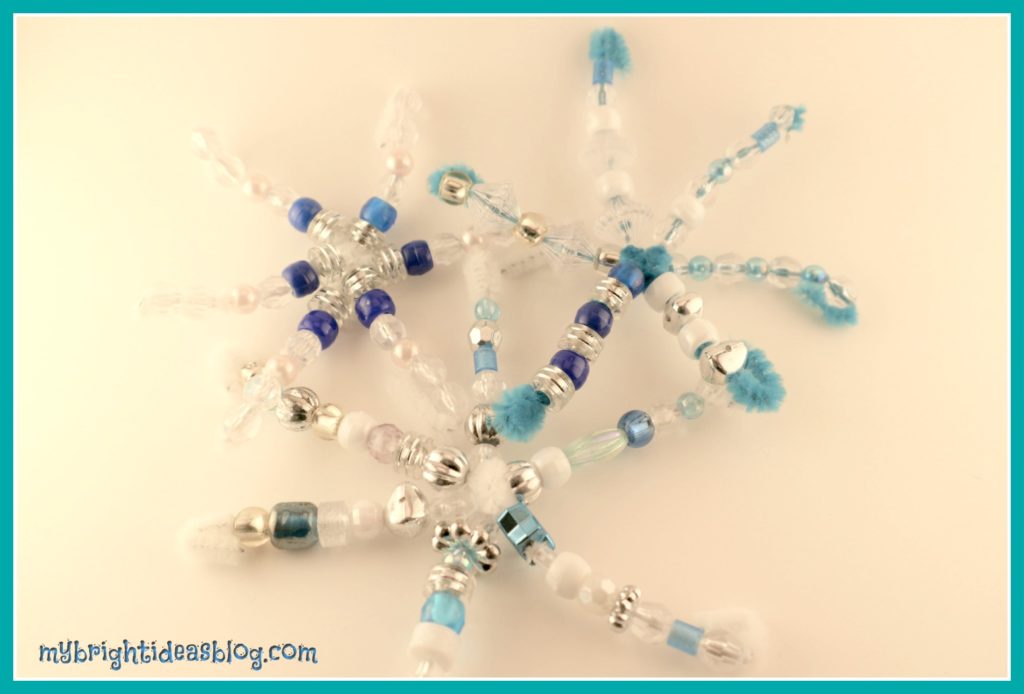
Last year my daughter and I made the examples above with random silver, white, blue and clear beads.
Since the sparkly pipe cleaners are stiff I found if I put the order so that the last bead has a slightly smaller hole as the end-everything stayed in place. If your beads are threatening to shift and might fall off then simply bend the end into a loop.
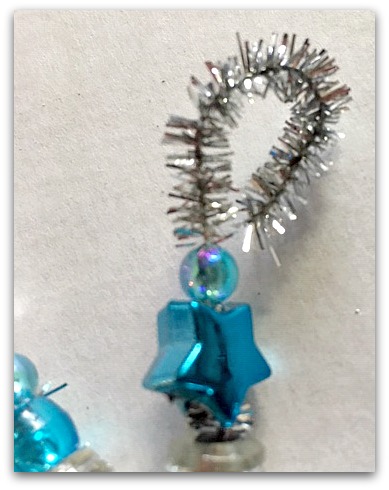
The loop is also perfect for hanging a ribbon. Hang it from a door knob or a curtain rod for a wintery snowflake sun catcher.
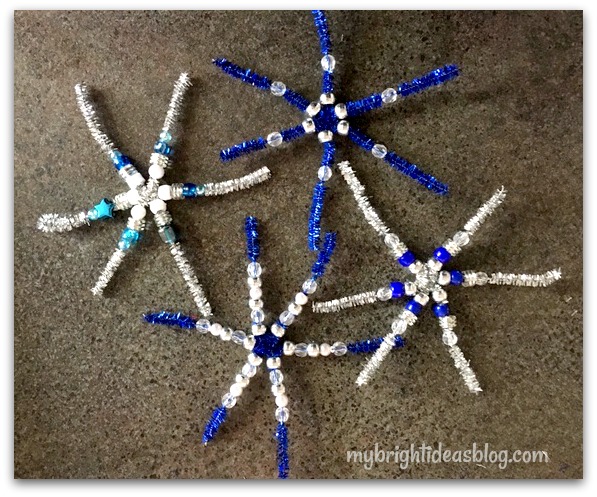 Have fun making these beaded snowflakes. Below are a few more easy winter kids crafts and projects we have done in the past.
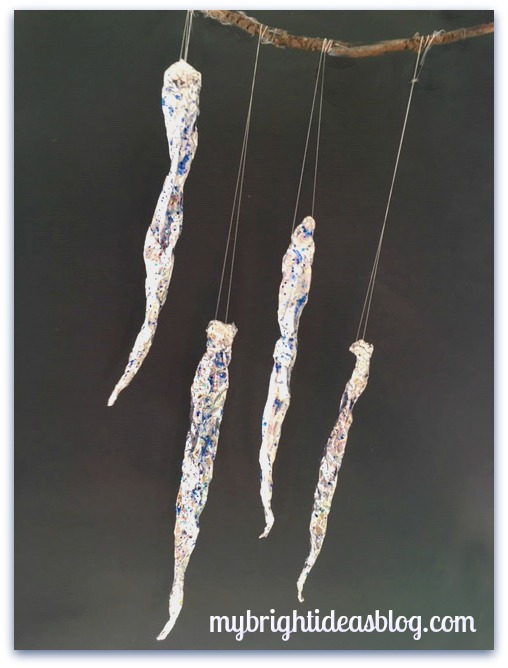
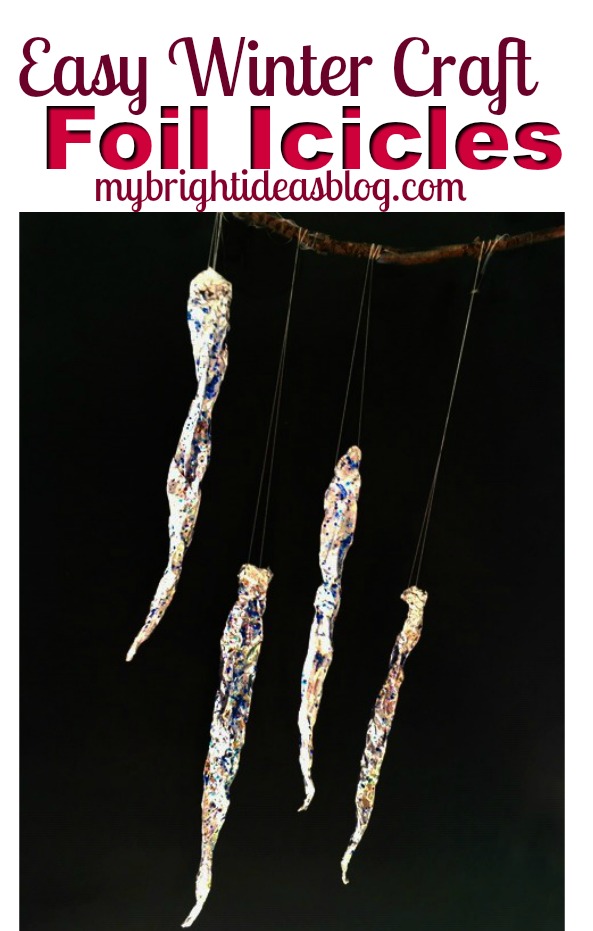
Tin Foil Icicles – Super Easy Winter Craft!
Easy Winter Crafts – Make Glitter Tin Foil Icicles
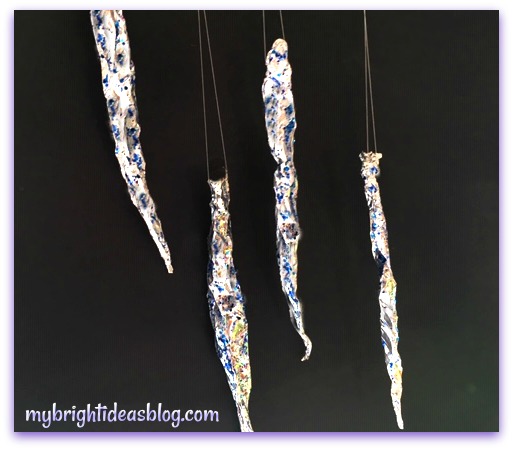 Making sparkly icicles is a great winter craft for kids of all ages! You probably already have the supplies you need to make them.
You will need:
- tin foil
- glue and glitter or combined glitter-glue
- needle and thread
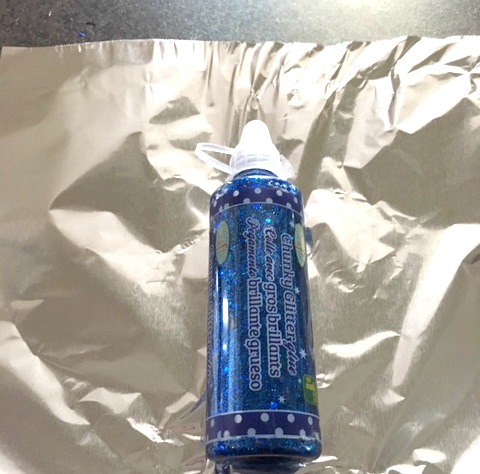
I love when things sparkle but I don’t like it when crafts trickle out a trail of glitter on everything that touches it. So my solution is to use glitter glue that is already mixed together.
The alternative is to spread glue all over the project and then sprinkle loose glitter on top. It’s messy but has great coverage.
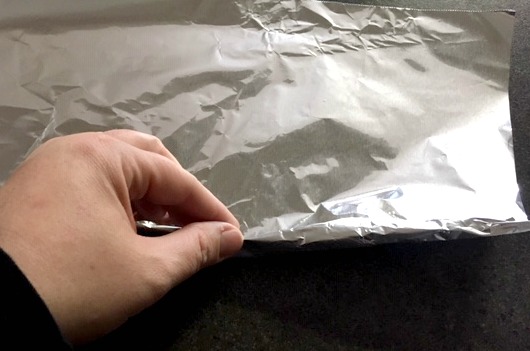
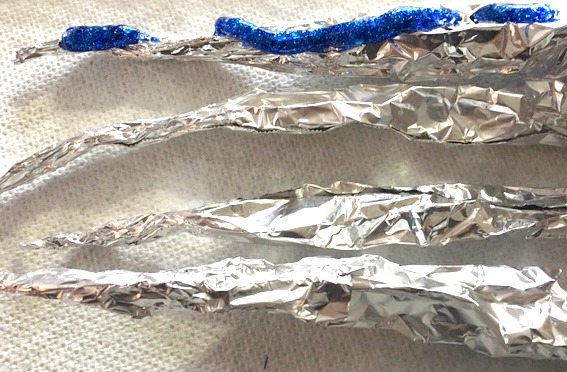
Start with the tin foil. Cut the foil 6 inches wide. Begin to roll the foil pinching one end as you roll it.
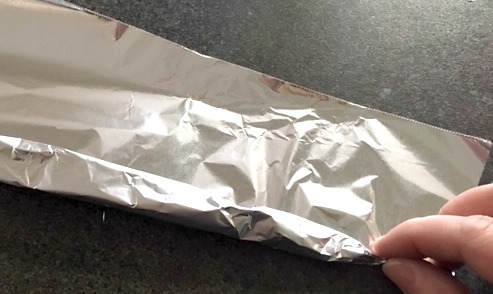
Keep rolling and scrunching as you go. Loose and wide on one end, tight on the end that will come to a point.
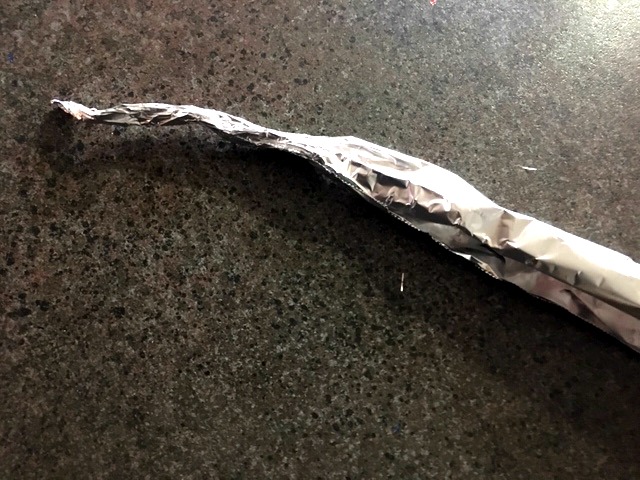
I should find more crafts that involve tin foil. It always helps the craft really stand out!
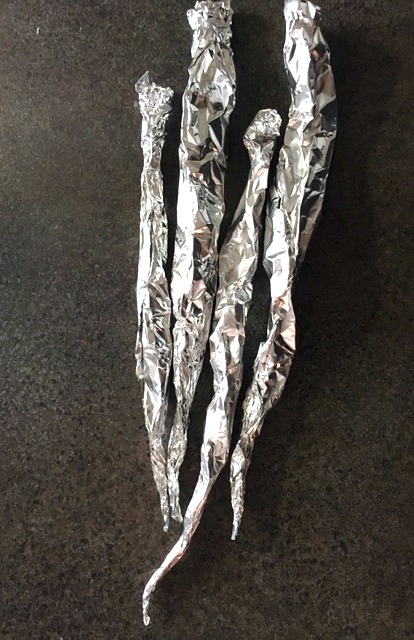
Make a bunch of tin foil icicles. Place them on a piece of paper towel.
Squeeze out the glitter glue onto the foil icicles.
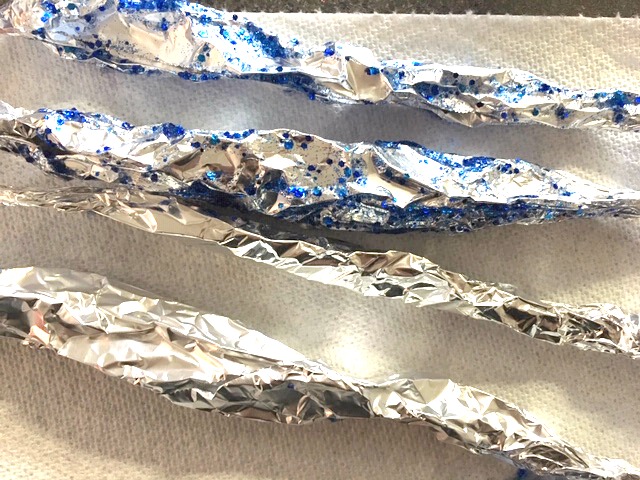
Take a piece of paper towel (or use your fingers if you don’t mind getting sticky) and smear that glitter glue all up and down the icicle.
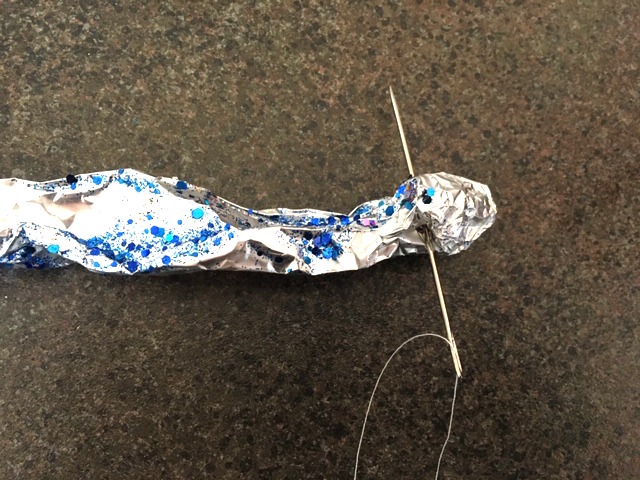
Take an arm’s length of thread and thread your biggest needle. Do not knot it. Push the needle through the tin foil.

Pull the ends of the thread together and tie a knot.
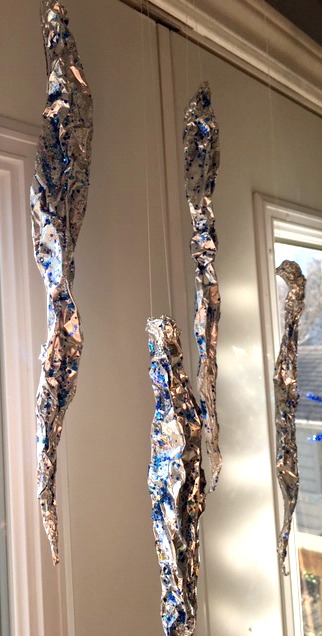
Tie onto a curtain rod or tape to the window trim. Or as below you can tape it to a twig or stick and hang it from a huge vase. When the sun hits it there is an amazing sparkly effect reflected everywhere because of the crinkles in the tinfoil and the sparkles.
Have a look at some other winter crafts we have done.
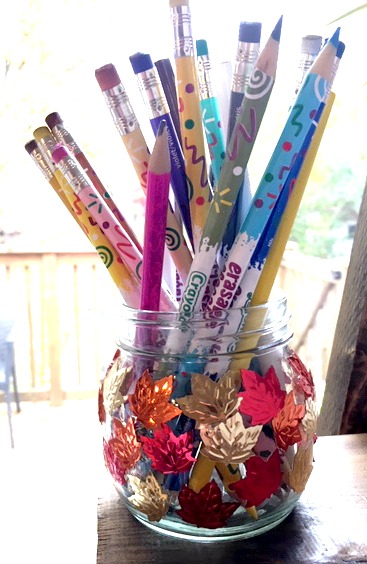
Make a Pencil Jar for Autumn
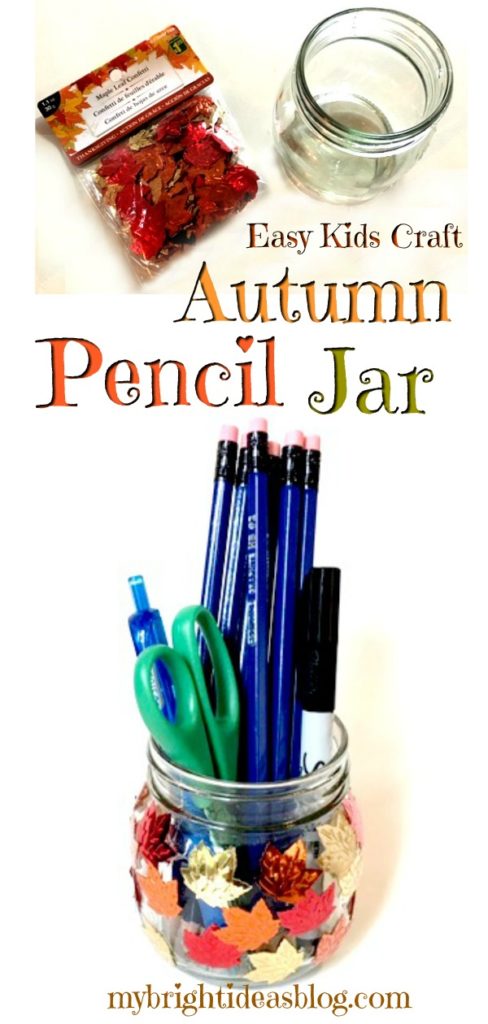
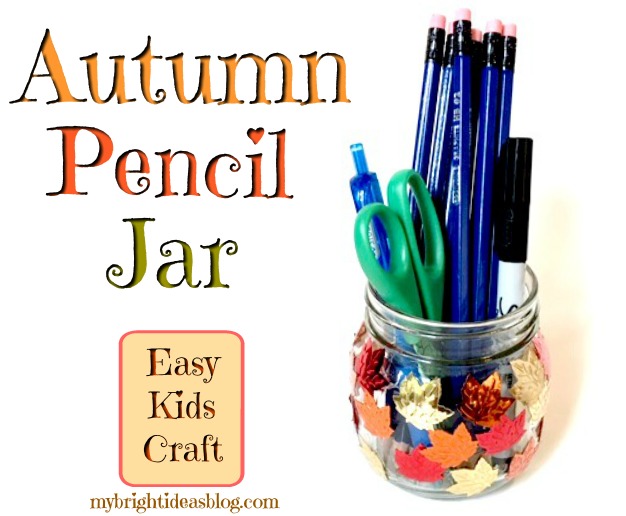

You will need:
- a short mason jar (or a jam or pickle jar from your recycle bin)
- clear glue
- leaf confetti (if you have a leaf punch make your own)
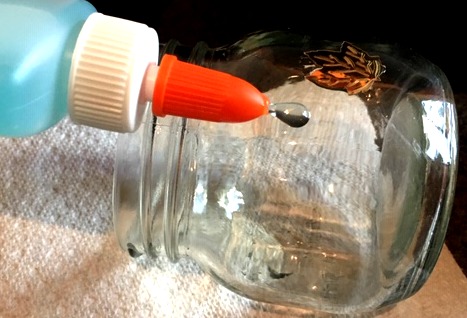
Glue!
Using clear glue is important. Originally, I used white craft glue and it dried very white and milky looking. So that was a craft fail. Meh!
Fortunately, I could pull off the leaves and wash off the old glue and start again.
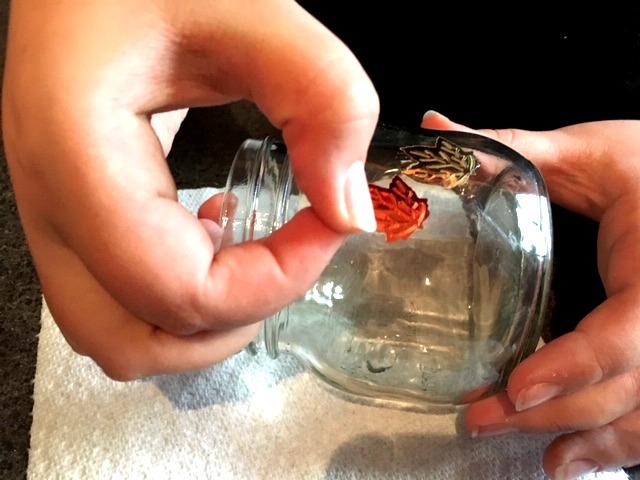
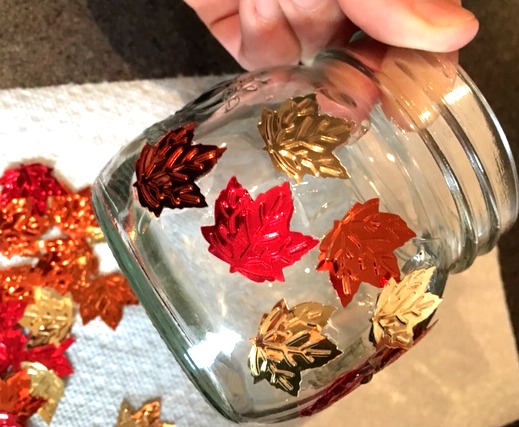
Glue and stick. Glue and stick. Repeat…repeat…repeat.
My 11 year old worked with me on this. She loves candles so she wanted to make this a candle holder.
Easy gift idea for the kids to make, right?!
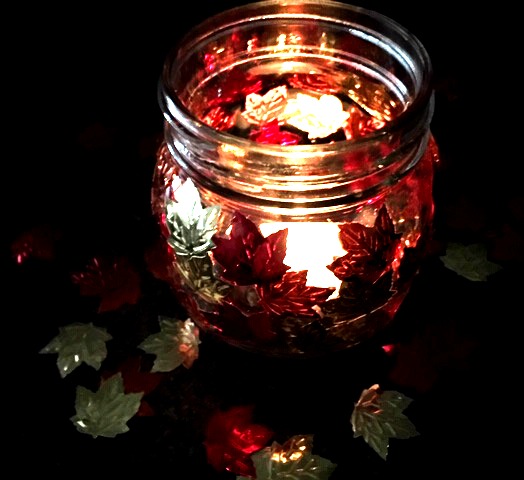
She was right it did look great with a candle light. Unfortunately, we are still in “keep the kids from setting the house on fire” protective parent mode – so we only use candles on very special occasions. So in the meantime, this gorgeous jar is going to be a pencil holder.
Thanks for checking out this post. I hope you enjoy Autumn before its gone.
Below are a few more kids crafts I’ve done over the past few weeks.
Post them on Pinterest or share them on your social media.
See you again soon!
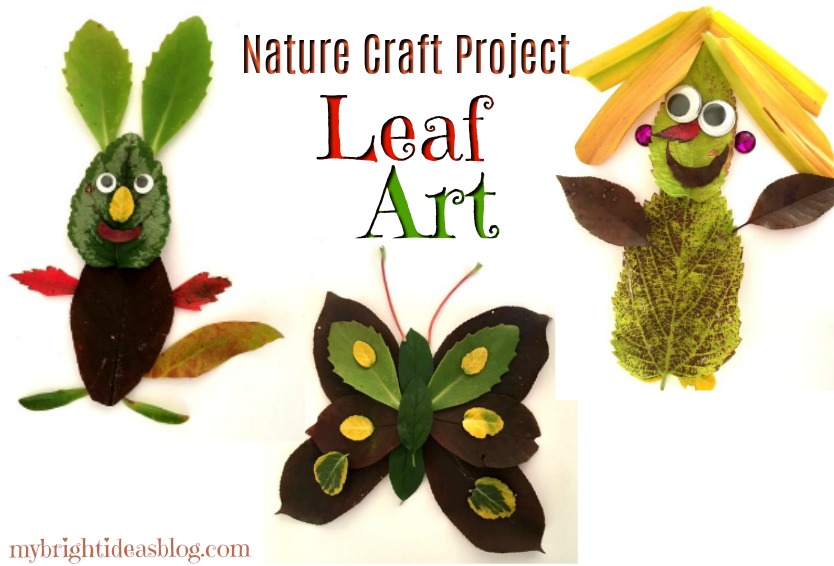
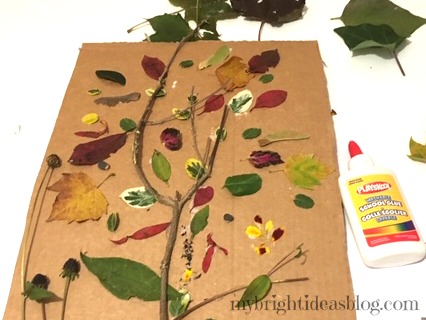
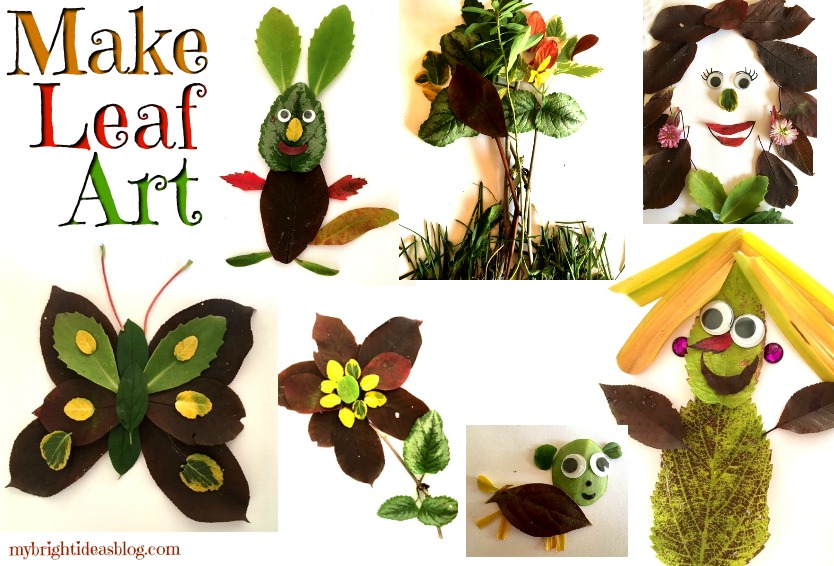
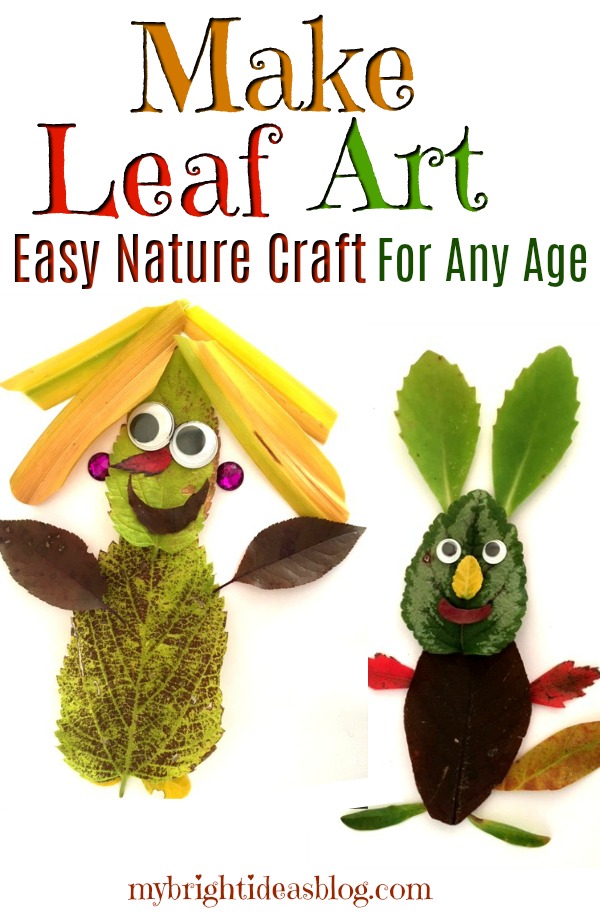
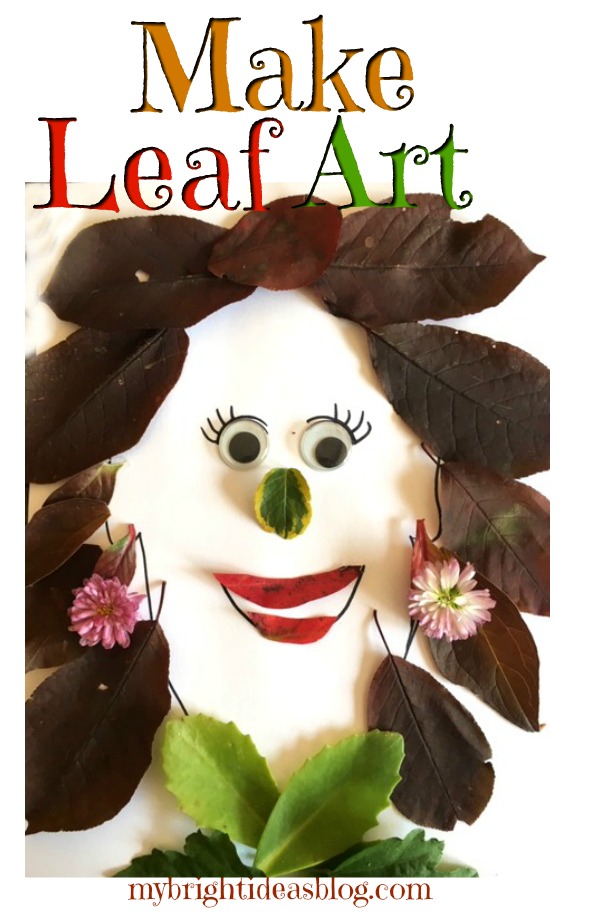
Make Leaf Art – Easy Nature Project!
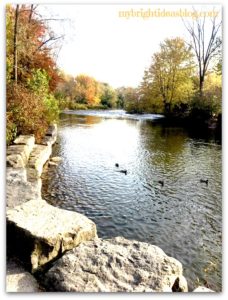
The Autumn season is here and the leaves are changing color and falling. This is a great time for a nature walk to collect and examine and reflect on the beauty of this season. Leaf Art!
Start with some friends…any age will love this. Take a large clear bag and start to collect samples of nature.
What to look for:
- a variety of leaves
- pine cones
- pine needles
- acorns
- stones
- twigs
- a handful of grass
- small flowers
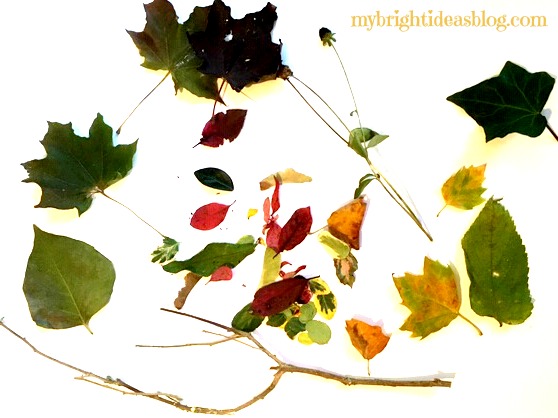
If your friends are little you might just want to use a piece of cardboard and glue your collection to the board. Puncture 2 holes near the top and add a string to hang it on the wall.
For Older Kids!
I think the older kids could do better. If you are over 5 you can make some really cool art from your nature walk.
Pressing the leaves in books: If the kiddies or you need a nap after the big nature hike-don’t feel bad its the fresh cool autumn air! If you want to work on the crafting stage on a different day….You could put the leaves between book pages for a couple of days to make them flat and a bit dryer. If you just leave them out til tomorrow they will begin to dry up and curl.
We decided to make our crafts immediately before they shrivelled. I took pictures of each leaf masterpiece to print out an autumn nature photo album later.
We took some great photos of vibrant orange and red leaves as the sun hit them.
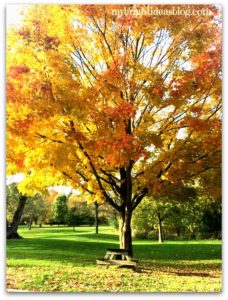
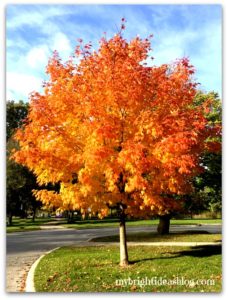
I love this time of year! Now let’s make some leaf art!
Making Trees!
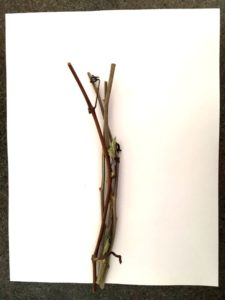


Put a few twigs as a trunk. Then add leaves to form a tree. You can glue the leaves or use double sided tape.
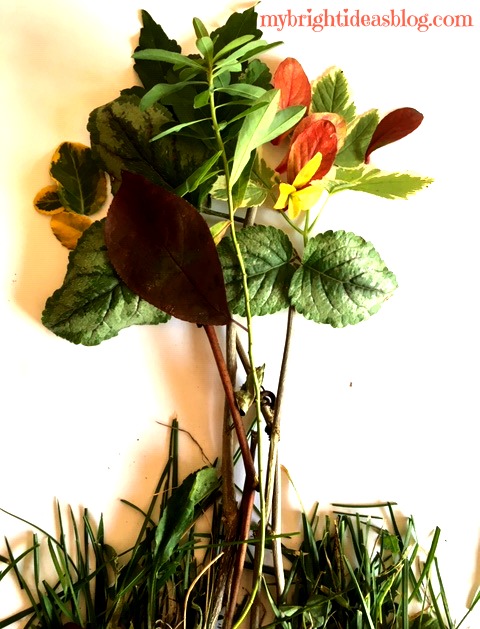
A collage of twigs and leaves make an easy tree picture. Change your leaves and your tree will look completely different.
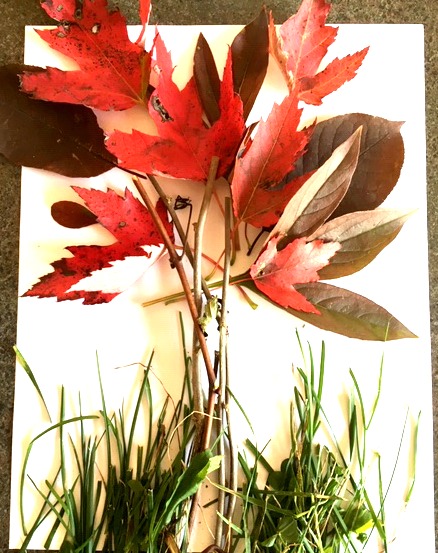
The grass can be trimmed with scissors.
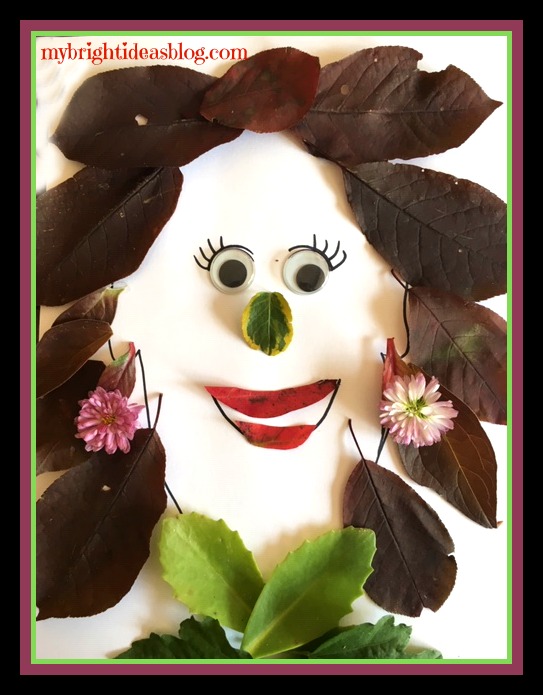
Making People!
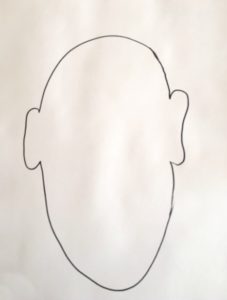
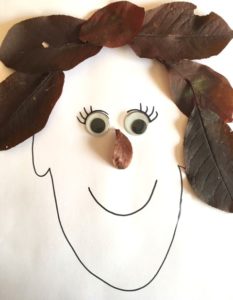
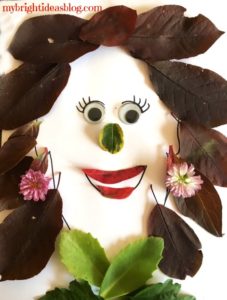
Draw a head on a page and then start making a self portrait. Huge googly eyes and flower earrings make this face stand out from the crowd.
Oh my days! It’s like looking in the mirror!
This one is for my 11 year older daughter who has lovely blonde hair and likes to have some sparkling earrings.
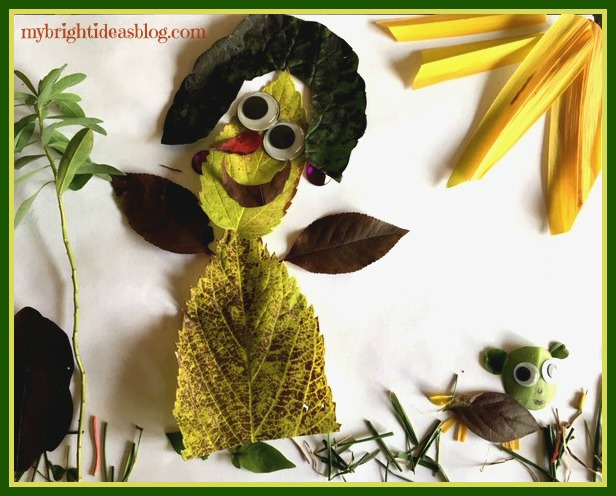
This one is for the youngest daughter. This is a picture of her and our little dog Gemma.
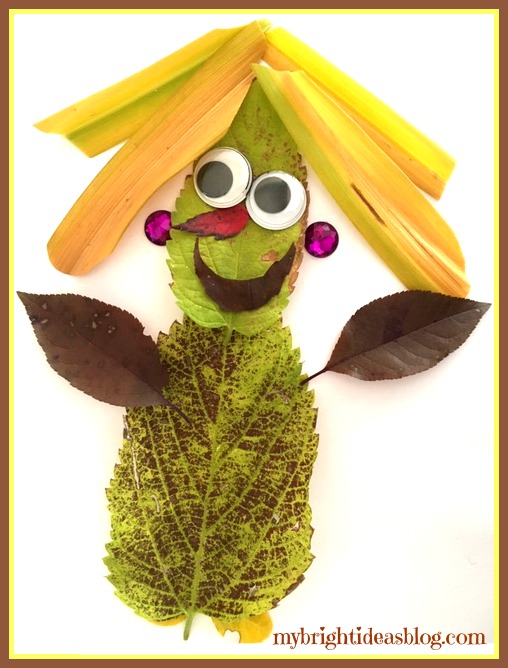
Making Animals!
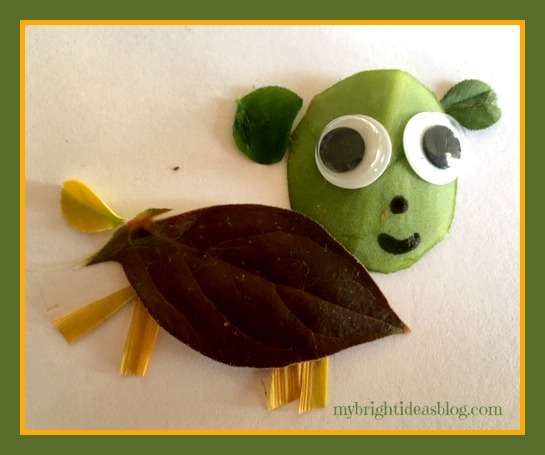
This is Gemma our little dog. Made by my younger daughter. I love the dog’s little round ears. That is made out of clover leaves. Notice that we used a sharpie (permanent marker) to make the mouth and nose. I also used scissors to make a the little legs.
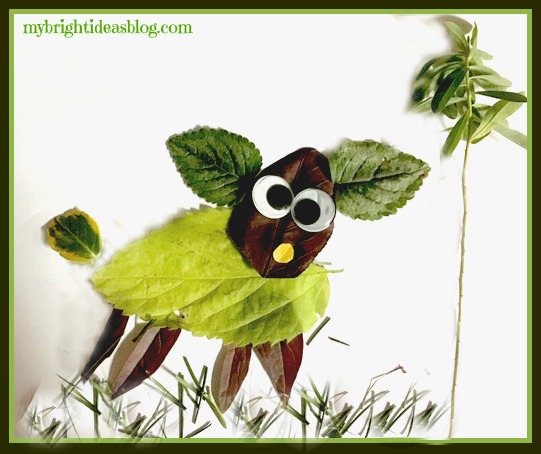
Our 11 year old made up this bit of art. It’s Gus our other dog. He looks like a surprised sheep! LOL!
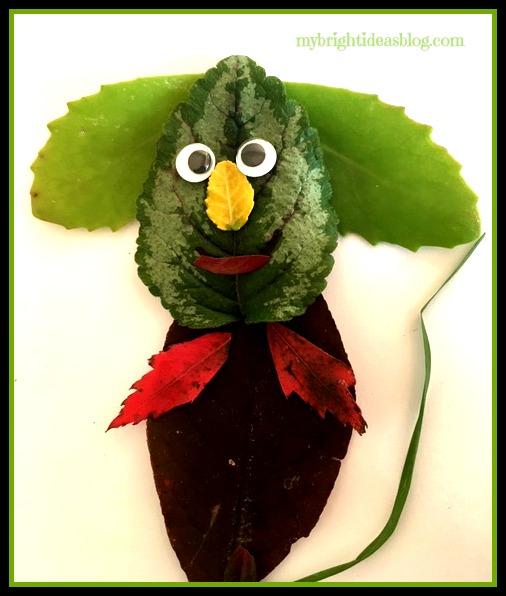
I think I thought this looked like a mouse but now he looks like a koala bear. Its the nose.
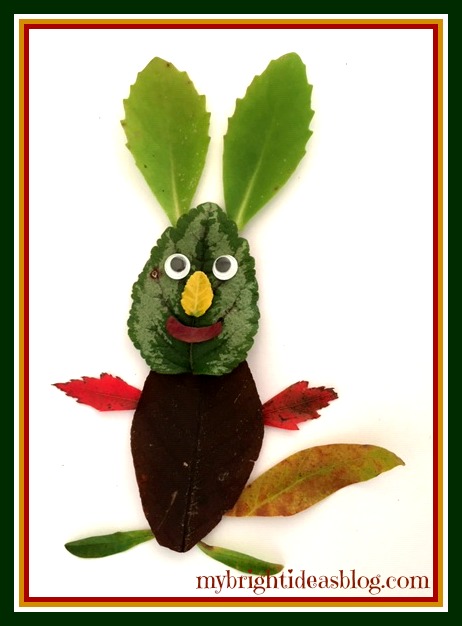
Turn the ears and it looks like a rabbit.
That is the highlights of today’s Leaf Art-Now to clear up the kitchen counter from these bits of nature so we can make lunch.
I hope you enjoyed this post. I had a great time making it.
If you are feeling stressed, get outside for a walk in nature and then craft with the leaves and twigs and grass you find. It’s my cure to melt away stress and have a blast with my family.
Have fun and see what you can make!
Here are some other NATURE craft projects!
Nature Craft – Perfect for Earth Day Activity – Clay Imprints with Plants and Flowers
…


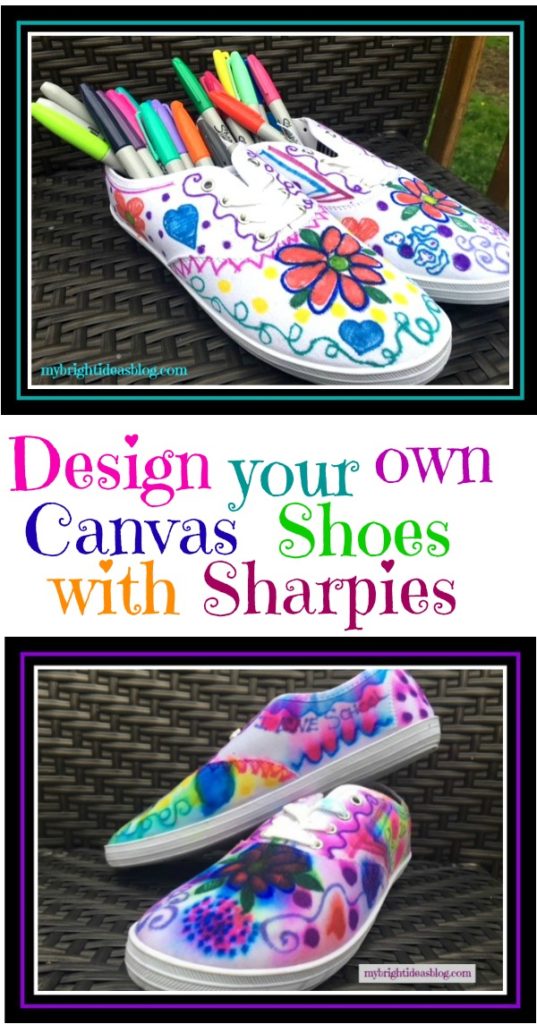
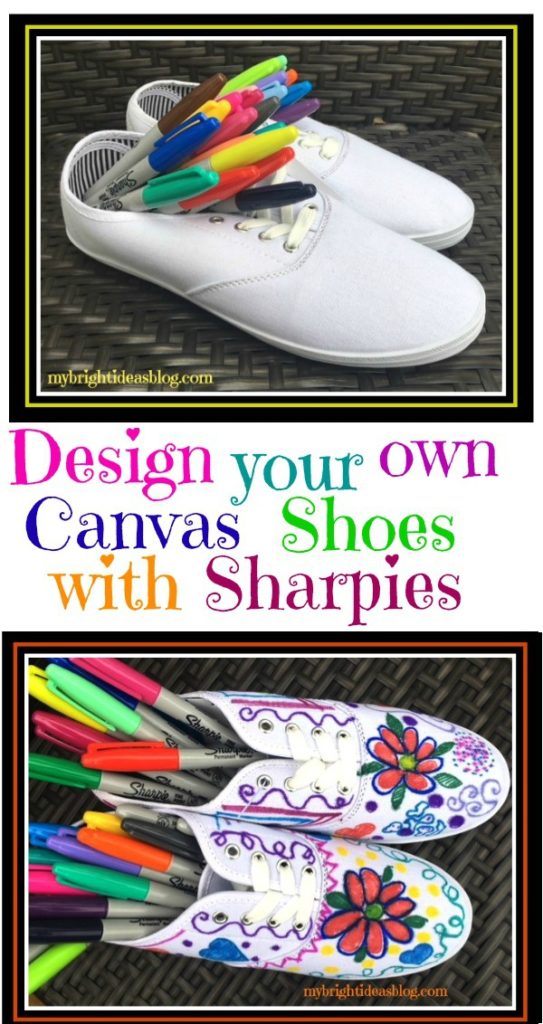
Design your canvas running shoes with a Sharpie Tie Dye Effect

It’s back to school time! Why not send the kids back to school with some personalized canvas running shoes!
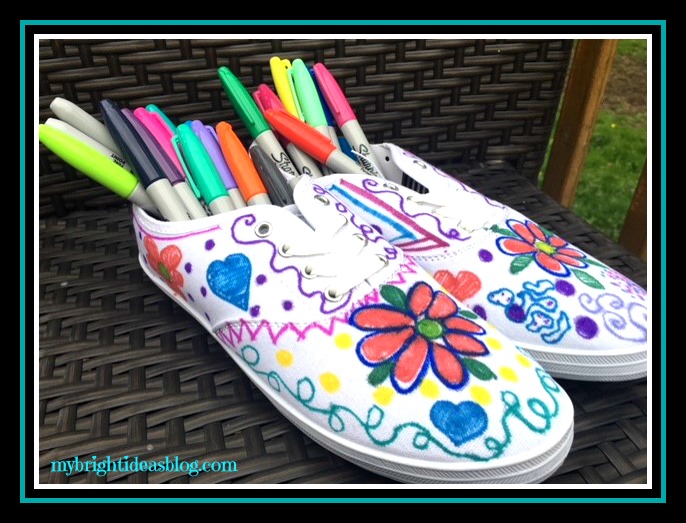
You will need:
- Permanent Markers (like Sharpies)
- Canvas Runners
- Rubbing alcohol
- Medicine dropper (if you don’t have one you can use a straw with your finger on the end)
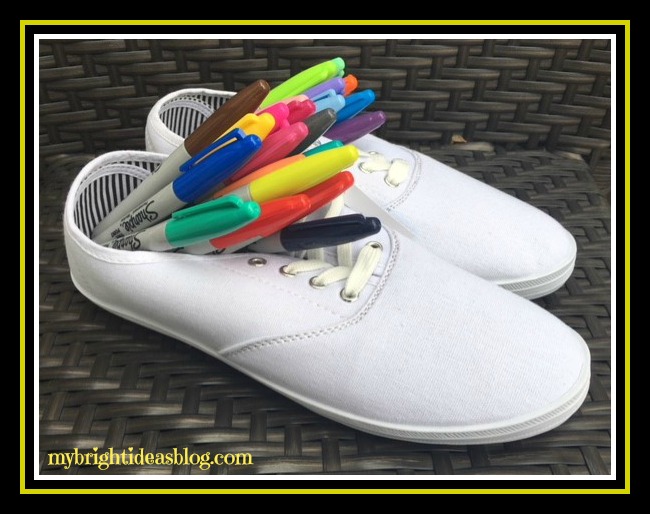
These white canvas shoes came from Michael’s craft store. I am pretty sure that you can pick them up at Walmart and maybe even a dollar store. These are likely going to cost $5-7. The price gives you an idea of the quality of the shoes….these will look cute but have no arch support or cushion so not recommended for gym class or hiking across the country. Cheap and cheerful!
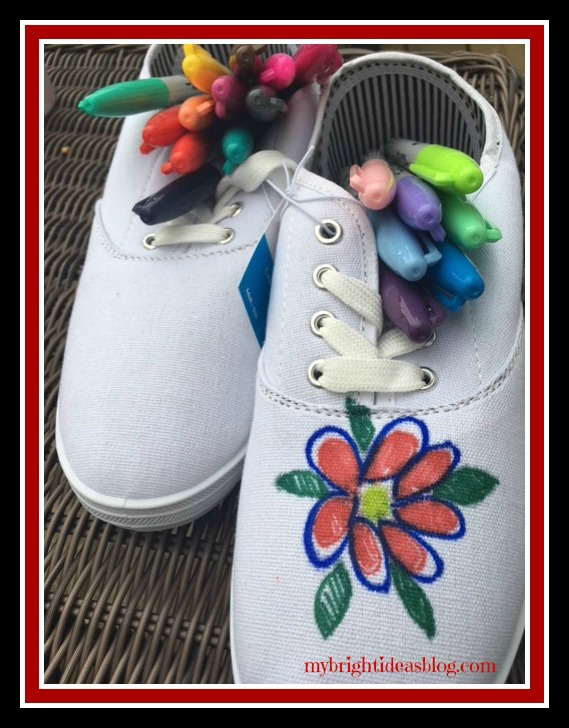
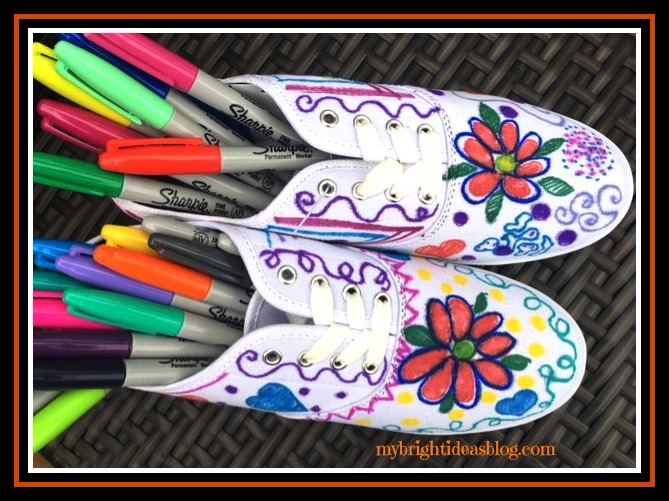
Next begin your design work. I like flowers and squiggles what does your kiddo like? Maybe a message written on the shoe. A+ or “Don’t Give Up” something that will make them smile through the day.
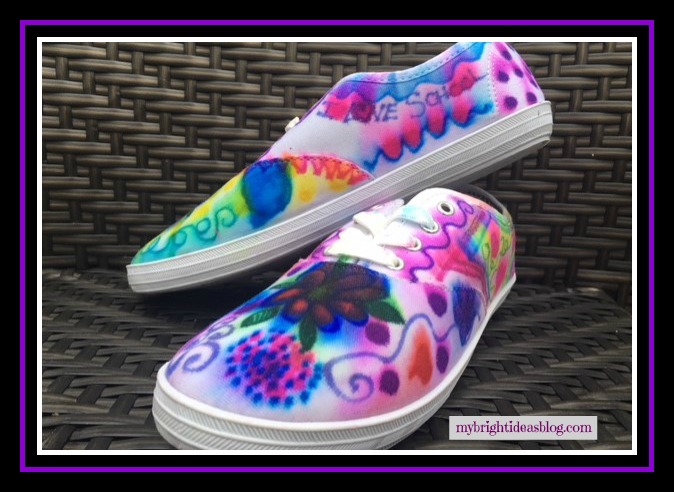
Very subtly I put “I love School”…tee hee… positive subliminal messaging.
Open the Windows or Go Outside!
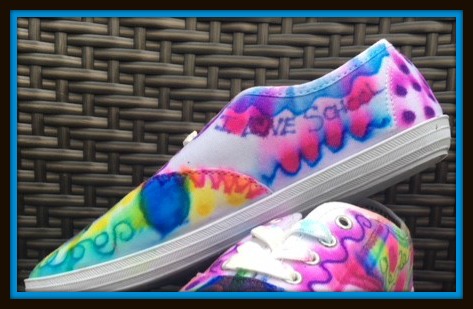
When you’re happy with your design its time for the stinky part. Open the windows! Or better yet, go outside in the fresh air. The rubbing alcohol fumes will give you and your family a headache. We don’t want a cranky family….
Begin with just a drop or two to see how the color begins to bleed, blend and soften. Here you can see the difference between one shoe that is done and one that is not.
If you don’t have a medicine dropper just use a straw. Dip it into the rubbing alcohol and then put your finger on the end to capture a few drops. Drop onto the canvas to begin the process.
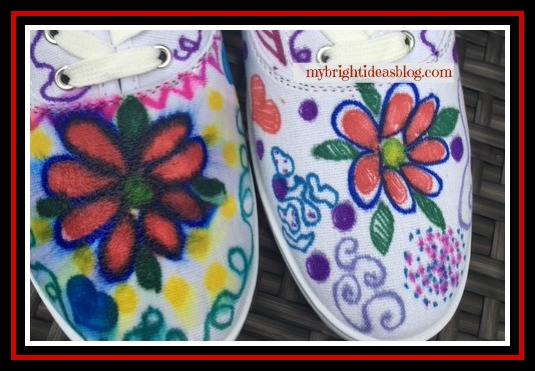
See the difference? Watching the design change is the best part of this project.
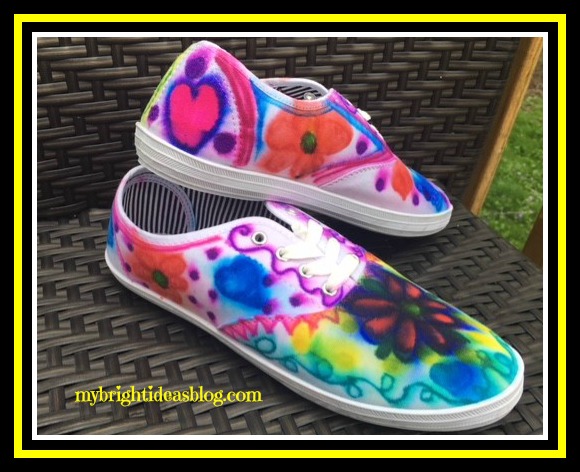
The more rubbing alcohol you use the more it will bleed so just use a bit on areas with a lot of color. Dark colors may end up being much bolder than the lighter ones. Once you start the bleeding process you can’t undo it….so this is why a medicine dropper is recommended. I put way too much on the front blue flower, so its much darker than I planned. As the French say….C’est la vie! Oh well, such is life…and crafts.
You might like the sharpie drawings “as is” and not even want to add rubbing alcohol. That’s cool too. It’s wearable art.
This is my second or third time with sharpies and rubbing alcohol. I will include a link to the t-shirts at the bottom of this post. I love the vibrant colors and funky designs. It looks bright even as the colors were blurred together. This would be very cool on a cotton throw pillow cover or curtains made from cotton or drop cloths.
This is a pretty cool way for kids to express themselves and show off their art work everyday on their feet.

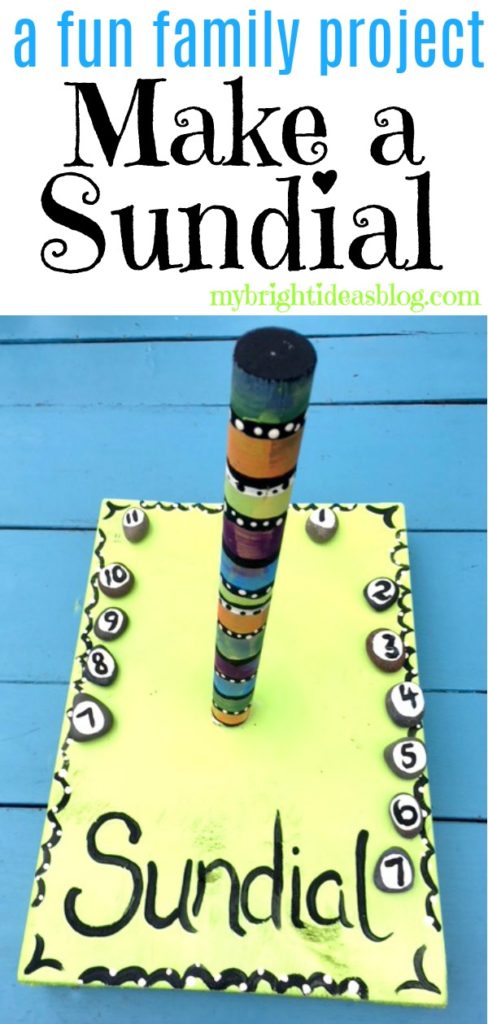
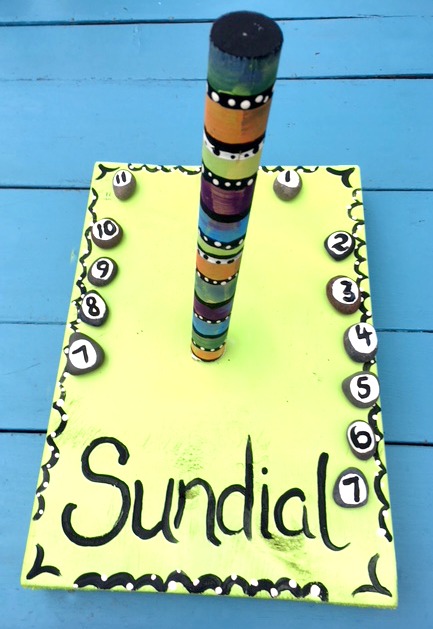
How to Make a Sundial
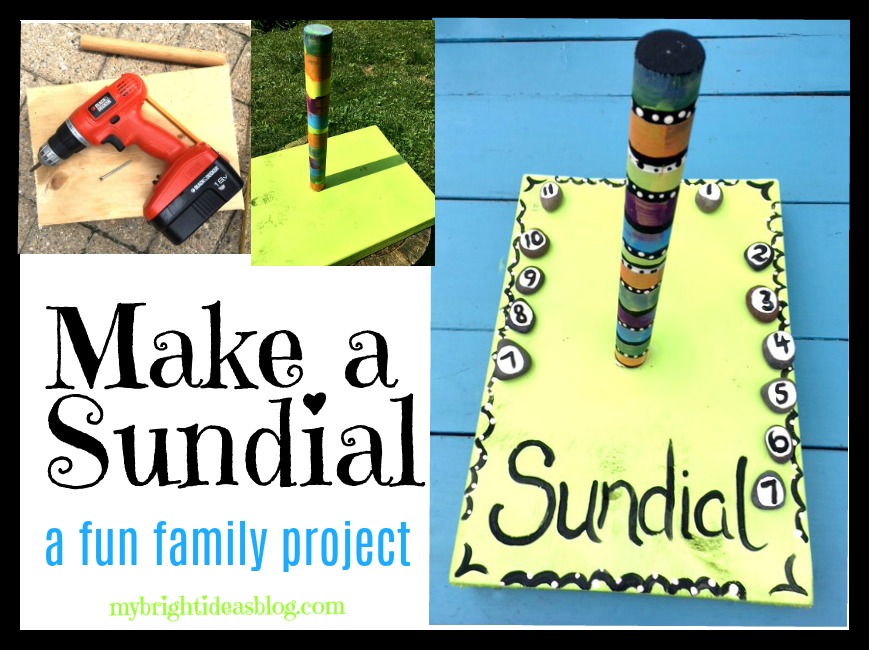
Are you looking for an outdoor family nature project? Here is a cool idea for a sunny day. Make a SUNDIAL.
A sundial is a device that uses the position of the sun to cast a shadow to tell the time. As the sun moves across the sky the shadow moves. According to Wikipedia the oldest sundial found by archeologists is dated around 1500 BCE. https://en.wikipedia.org/wiki/Sundial
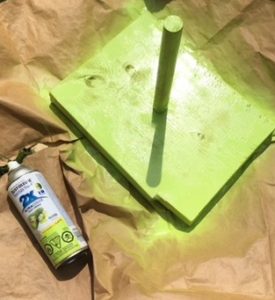
When I started my project it was very cloudy so it got more decoration than I intended. It was going to be bare wood with a light clear coat. Our weather was cloudy and rainy for several days so I had to postpone it repeatedly. Grrr.
Technically you could make a quick sundial using a stick in the ground. Or you could use paper and a pencil stuck in playdough to make a sundial in a pinch. But if you want to make one like mine, here is the scoop.
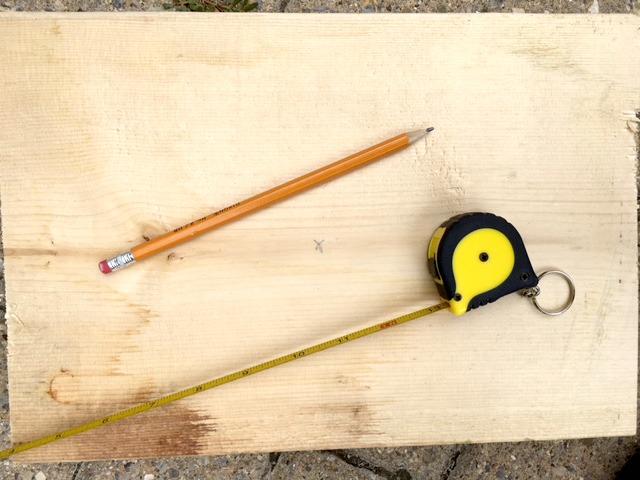
You will need:
- a scrap of wood (mine was 9 x 13 inches)
- dowel (mine was 10 inches)
- drill
- tape measure or ruler
- 12 rocks or gems
- 1 screw 2 1/2 inches long
- hot glue gun or other glue (optional)
- watch or clock with an alarm
- pencil
- spray paint or varnish
- craft paints and brush
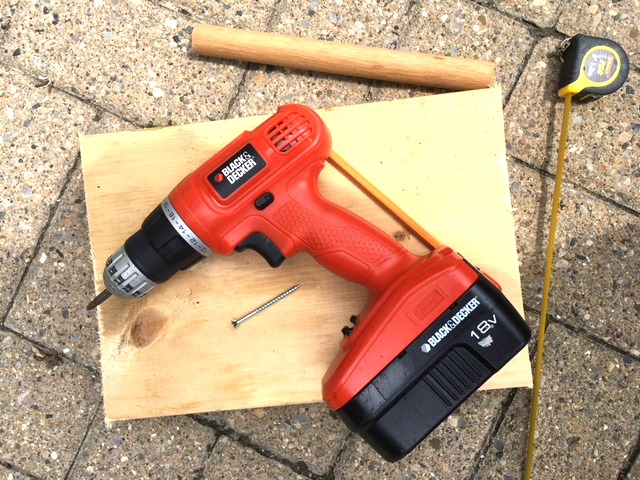
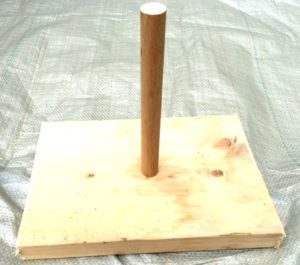
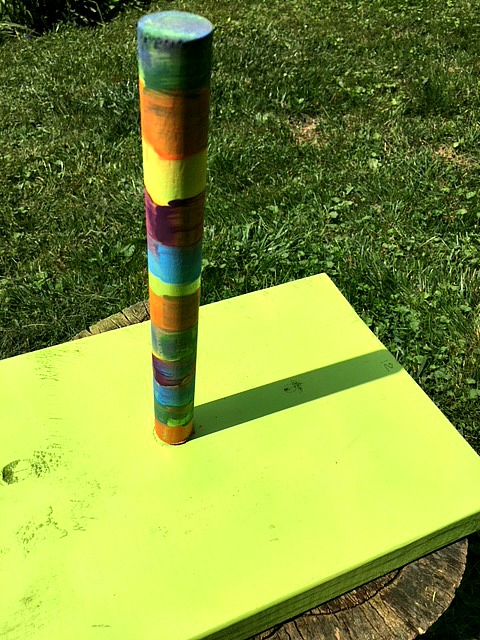
Cut the wood to a size you choose. I would have preferred a 12 x12 square but I had this scrap 9 x 13 left over so we used it. I also had this dowel that was a leftover and already 10 inches long.
Measure and mark the centre of your board.
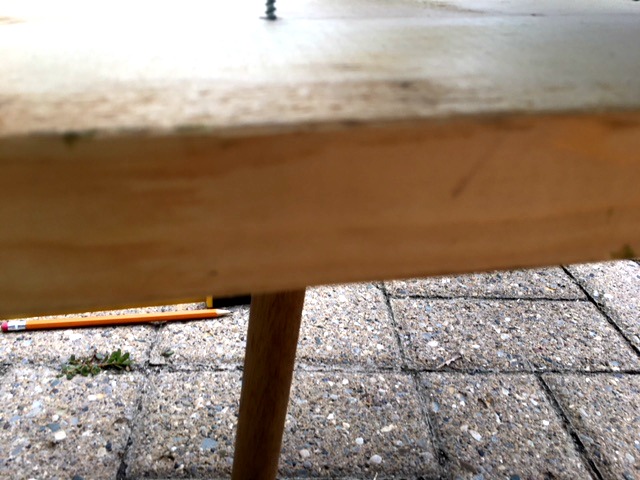
Screw the dowel into the centre of the wood. This was hard to take a photo of. Put the dowel on the ground, place the block of wood on top. Ensure the x marking the centre on the wood is right over top of the dowel. Drill the screw through both pieces.
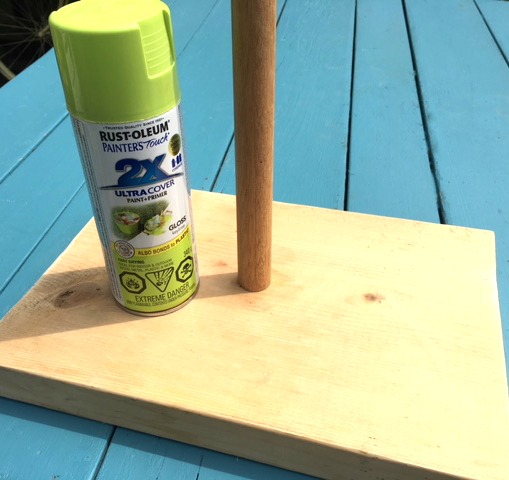
We could see the clouds coming, so we decided to start the time markings the next day and for now paint the sundial to help it last longer outdoors. If you have a partial can of spray paint or wood protector…this project won’t take much.

Spray the board and allow to dry. Tip over to paint the bottom and allow the bottom side to dry.
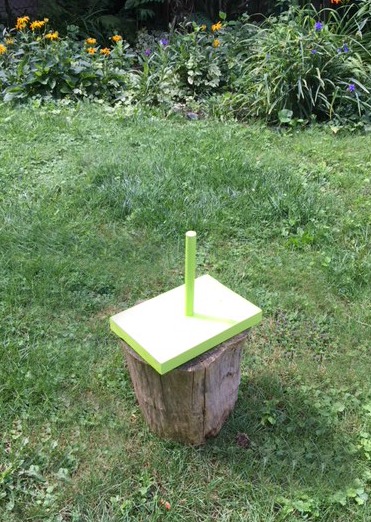
Once it is dry you can decide where you will have the most sun in your day. You could raise it up with bricks or a tree stump. We have a lot of shade in our backyard which normally we appreciate. But for this project it made things difficult.
Now seeing the giant rain clouds moving in. We decided to post pone and begin again tomorrow. In the meantime, we could jazz it up a bit.
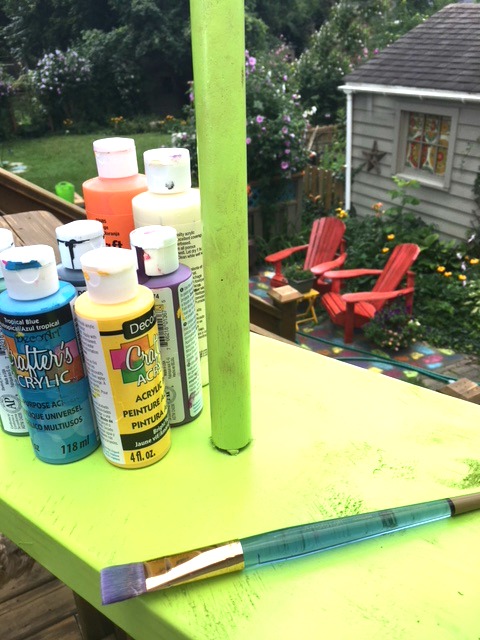
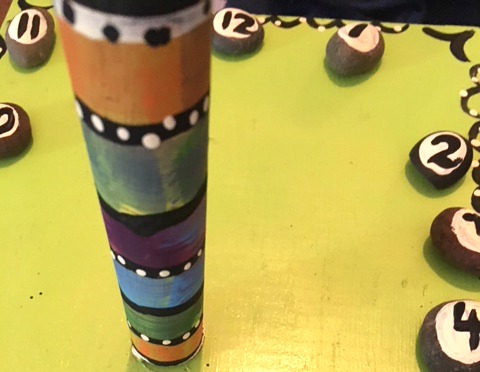
Using craft paint we put wide stripes on the dowel part of the sundial.
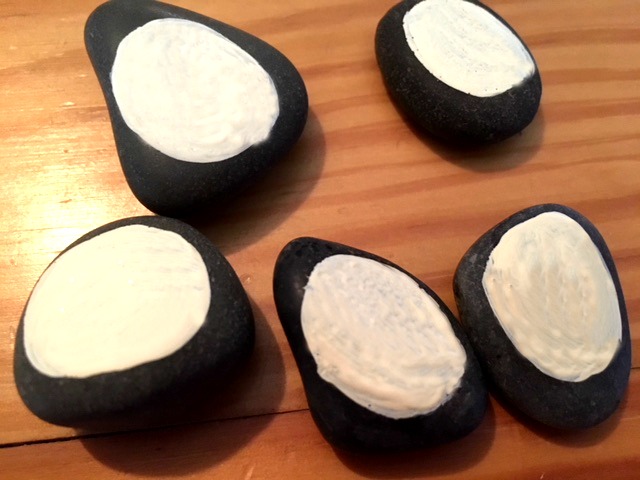
We had a package of dollar store polished rocks so we painted a white circle on each one. This will be our pretty markers for hours. Print the numbers: 7, 8, 9, 10, 11, 12, 1, 2, 3, 4, 5, 6, 7.
A SUNNY DAY FINALLY ARRIVES
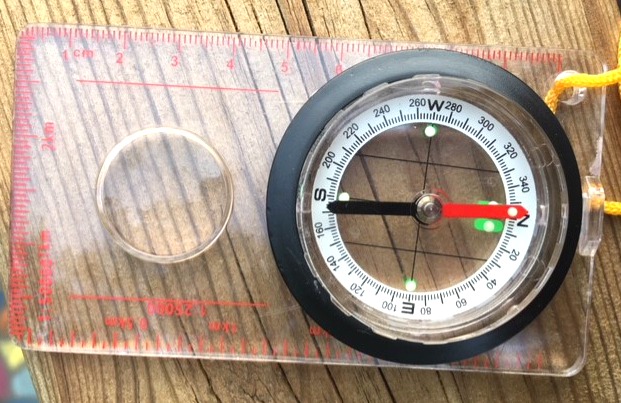
We did follow some of rules for making a sundial. Such as the pole needs to tilt slightly to the north. Use a compass to determine the north pole. I twisted the dowel to loosen it and put a tiny rock in that space to tilt it. If you are in the southern hemisphere you will need to use the compass to find the south pole and tilt the dowel to the south.
Just before noon put your sundial in a sunny place. The shadow of the dowel will be your first mark to write in the number “12”. I wanted that to be right at the top like a regular clock.
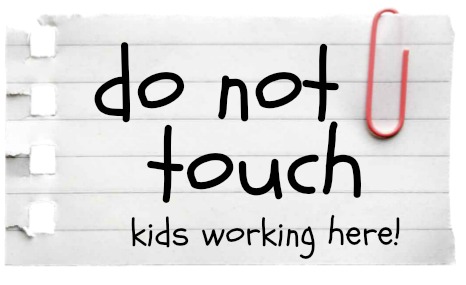
This is going to take more than one day to complete so make sure that no one moves it. Maybe add a note that says “do not touch” so it doesn’t move.
Next, set the alarm for 1’oclock and come back to write on the number where the shadow hits for 1pm. Write “1”. Set the alarm for 2pm and then 3pm and continue to repeat every hour until the sun sets.
After sundown, set the alarm for 7am so you can begin recording the morning time marks.
If you are going to leave your sundial outside and you haven’t already painted or varnished the sundial you should do that next to water proof it. A clear coat on the rocks is a good idea too. You don’t want the paint to shift off the stones. That can happen on polished stones.
After the times are all marked, you might want to secure the rocks so they don’t get carried away. You can use a hot glue gun (fast and easy) or E6000 glue (slow, stinky but stronger).
Our finished project does not look like a clock like other sundials. Maybe it was moved. If your kids are older you might want to do more research and see how the impact of the tilt of the earth’s access. It’s August now, will the shadows still line up in September? This project has the potential to be quite educational. Telling time, shadows, the earths axis, the solar system, using a compass,
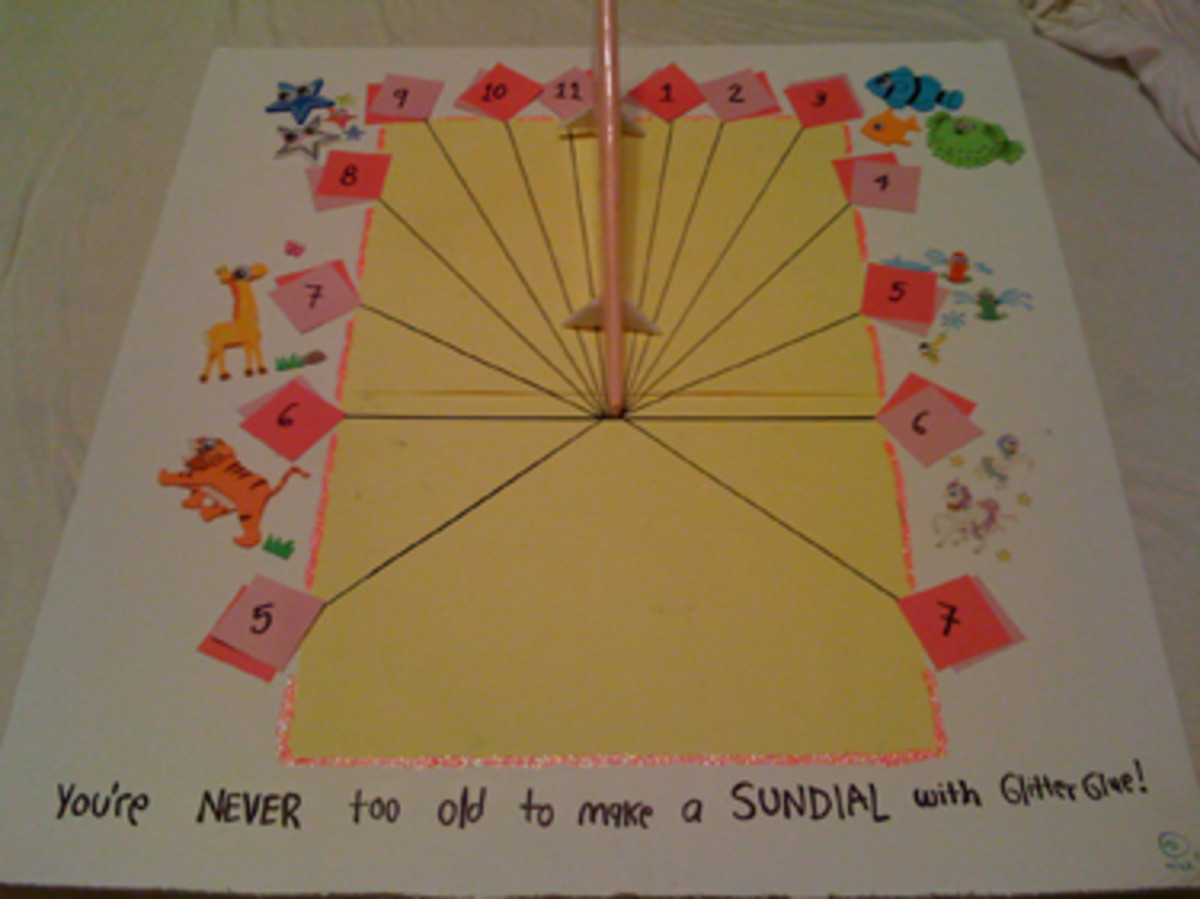
This picture is linked to a nice pencil and paper sundial blog.
Children who spend time outdoors are more likely to be happier, healthier, problems solvers and more creative. Check out this blog post about a paper sundial. https://hubpages.com/education/Reconnecting-Children-With–Nature

https://otherwiseeducating.blogspot.com.au/2010/12/sundial.html

https://www.kcedventures.com/blog/how-to-make-a-sundial-for-kids
Here are some other posts of my projects you might enjoy!
Nature Craft – Perfect for Earth Day Activity – Clay Imprints with Plants and Flowers