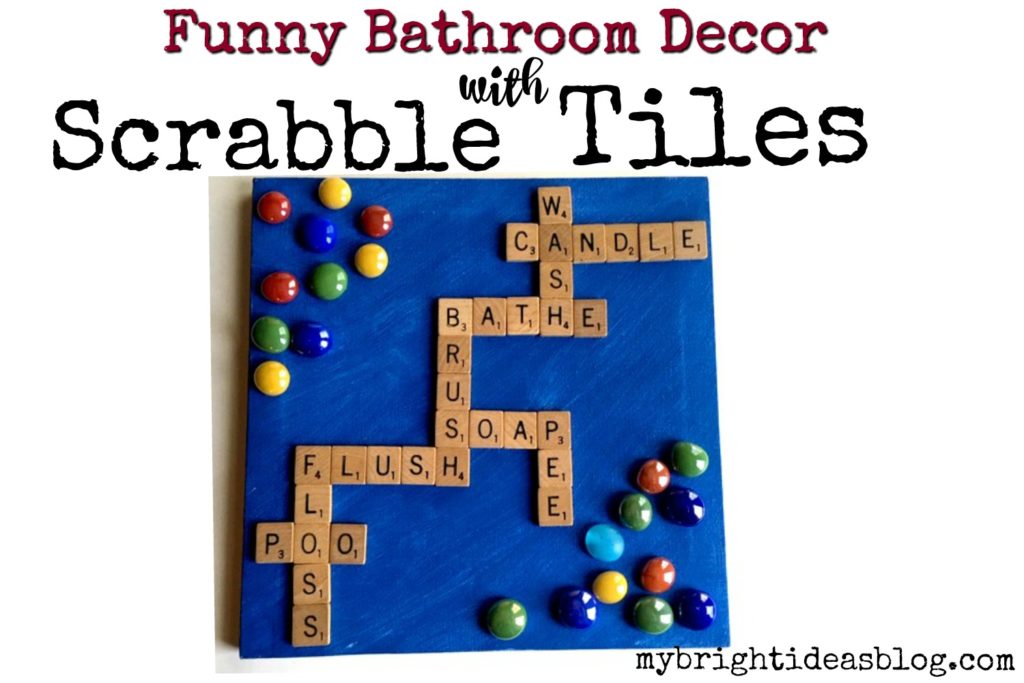
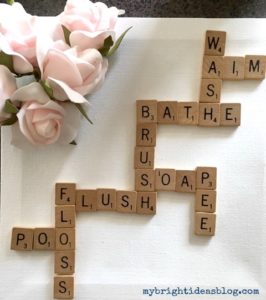
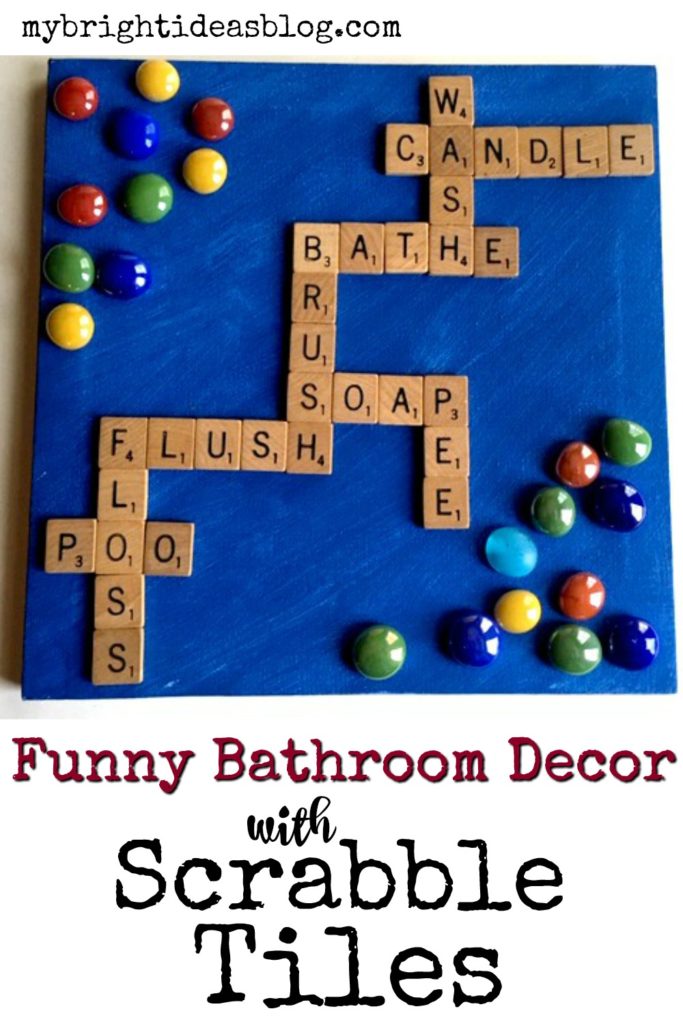
Here is a fun idea for using scrabble tiles to make a bathroom sign that will make your guests chuckle!
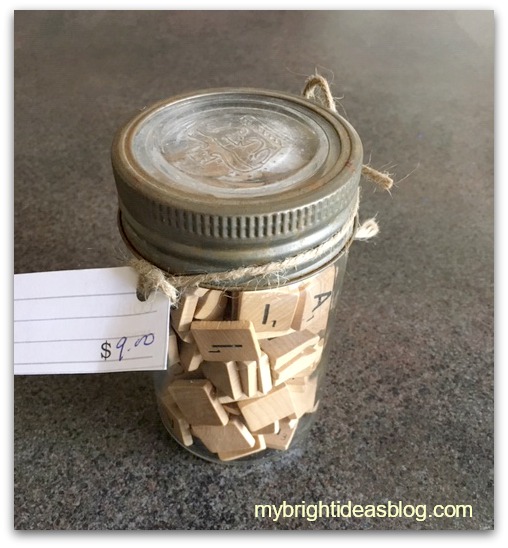
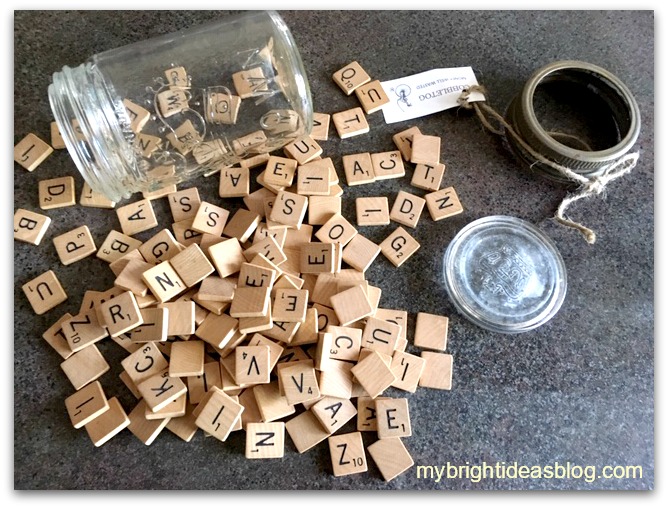
A while ago, I found this jar of scrabble tiles at an antique store. I could probably find scrabble tiles for a cheaper price in an old board game box at a thrift store but this cool old jar reminded me of my mom’s canned peaches…so I bought it.
For this craft you will need:
- scrabble tiles
- blank canvas
- craft paint and paint brush
- hot glue gun
- glass stones or other decorative items
![]()
I used a 12×12 blank artist canvas from the dollar store. Nothing but the best! Tee hee.
It would be sensible to paint your canvas right away so that it’s got time to dry.
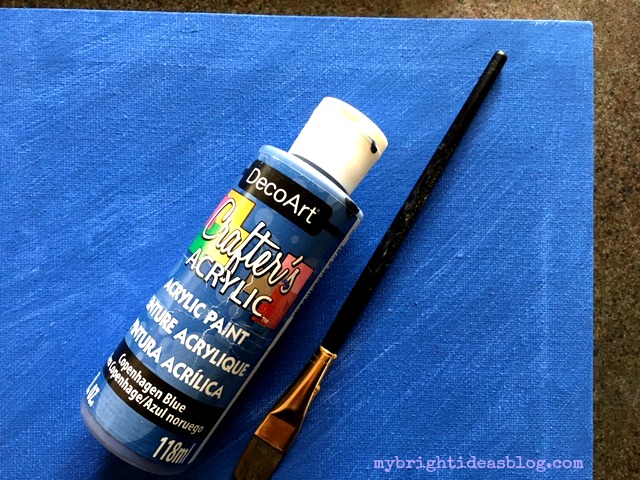
“Copenhagen Blue” craft paint, my brush, canvas, hot glue gun and glue are all dollar store supplies. I was really tempted to leave mine white so I didn’t paint it right away. But later I changed my mind. This meant that I needed to slide all the tiles off and paint it before I could glue it on.
Now for the fun part!
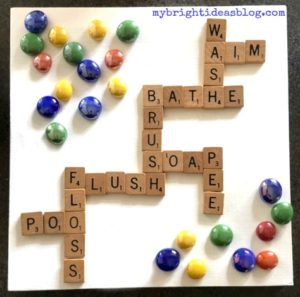
Spread out your tiles and see what sort of bathroom words you can find.
Pee, poo, aim and flush are my best toilet words. Shower, wash, bathe (or bath), soap, bubbles, shampoo, tub etc. for the bathtub words. Brush, floss, gargle, spit for the dental hygiene words.
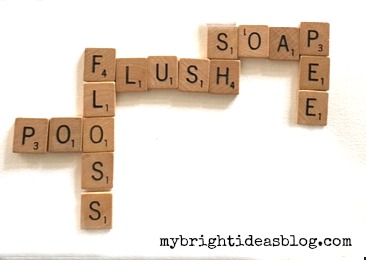
After you have found the letters to your favorite words you need to make them line up with other words on your canvas or board. This can be a bit frustrating.
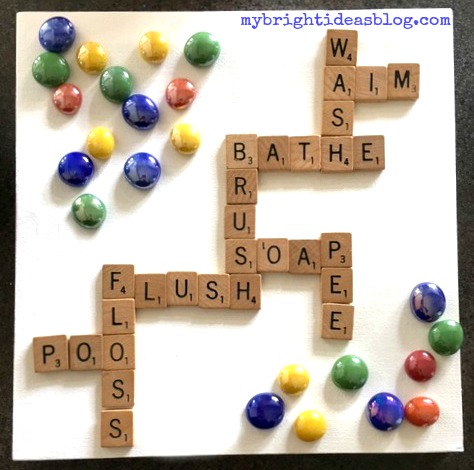
I tried some random craft supplies before I settled on the bright glass stones and blue paint.

Since I hadn’t painted it yet I needed to carefully remove the tiles and set them aside while I painted my canvas blue. It dries very quickly.
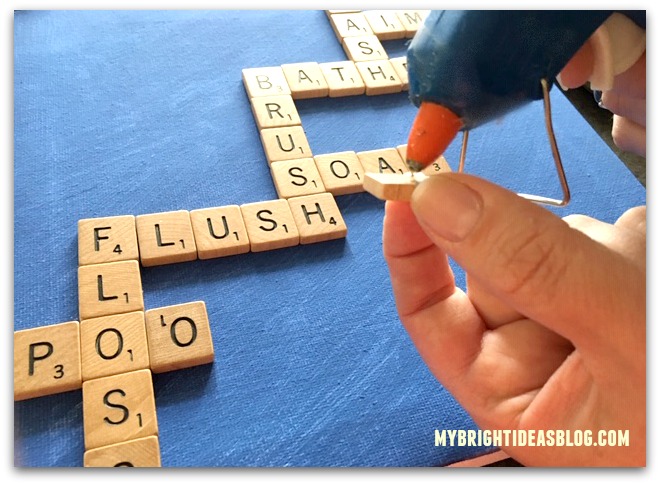
Then I recreated the words in the right order and using a hot glue gun, glue each peice into place.
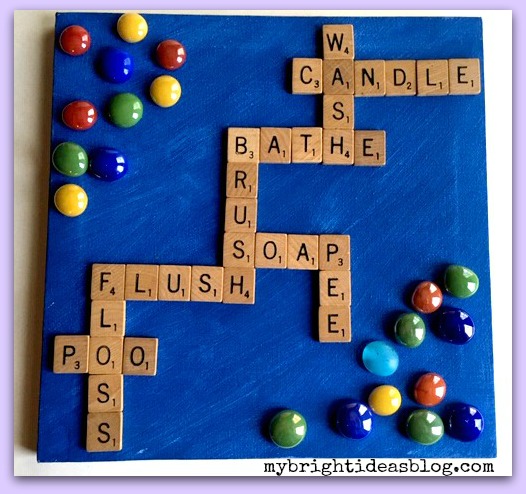
And there you have the final product! I thought the blue represented water and the glass stones were bubbles.
…
Easy Kids Craft – Foil, Nuts and Bolts Art
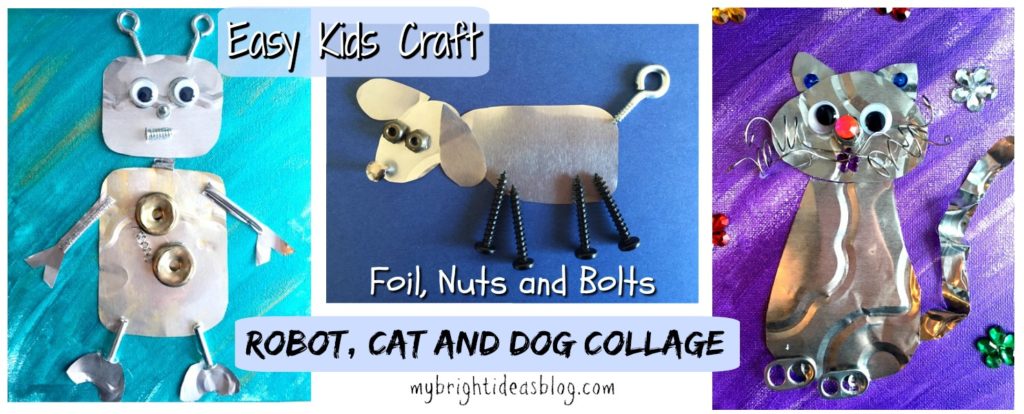
Today’s craft goal is create something fabulous but only use things you already have. Nuts, bolts, a foil cake pan… all of these things can be turned into a super cool craft and wall art for a kids room. We made a robot, a cat and a dog for our examples. But you feel free to let your imagination run wild.
You will need:
- an 8×10 canvas or piece of cardboard
- nuts and bolts and odds and ends
- a foil cake dish
- metallic craft paint and paint brush
- googly eyes (optional)
- scissors
- hot glue gun (or regular glue)
- a sharpie
Warning: This project is intended for older children not toddlers who might put these things in their mouths. Keep an eye on the little parts used for this. It could be sharp or a choking hazard for babies and pets.
Be safe lovely crafters!
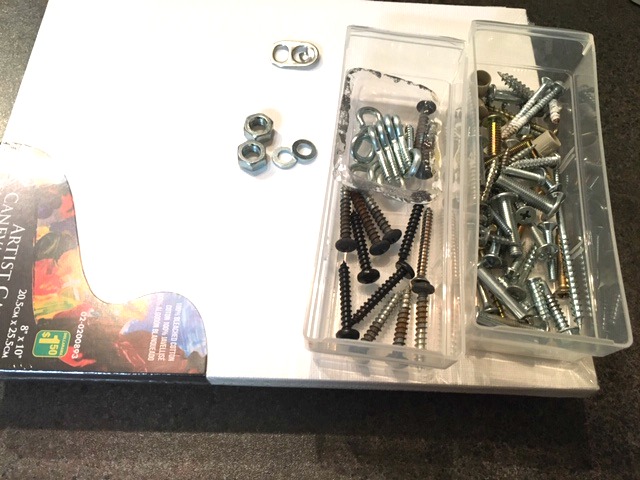
I’m just assuming that everyone out there has a few little miscellaneous drawers of screws from old projects and furniture that won’t be missed if we use them for a random craft project.
The canvas iwas a dollar store purchase. You can get the foil cake pan there too. Or you could just buy a cake or food in one of these pans and do the craft after you’ve licked it clean! :o)
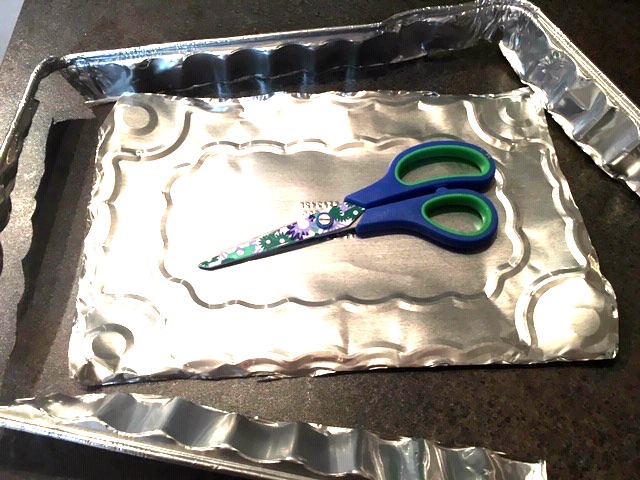
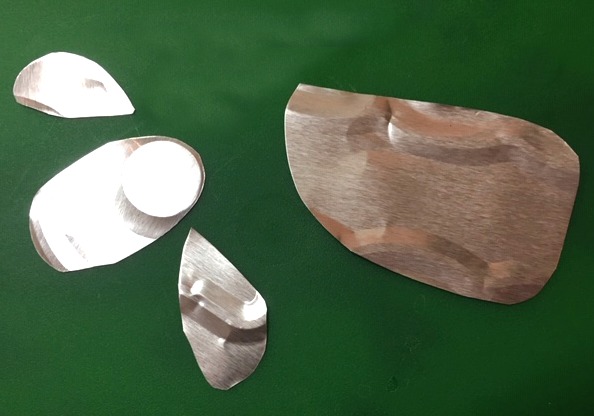
To prepare for this craft, cut out the bottom of the cake pan.
Paint your base canvas. I used metallic paint colours. If you don’t have a canvas just cut a piece of thick carboard to size and paint it.
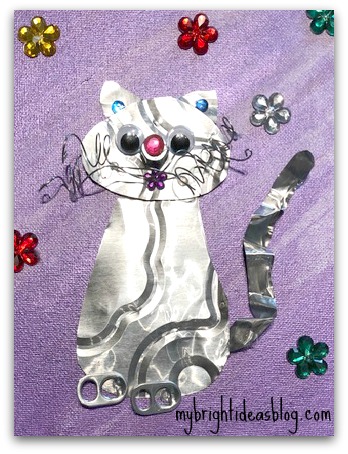
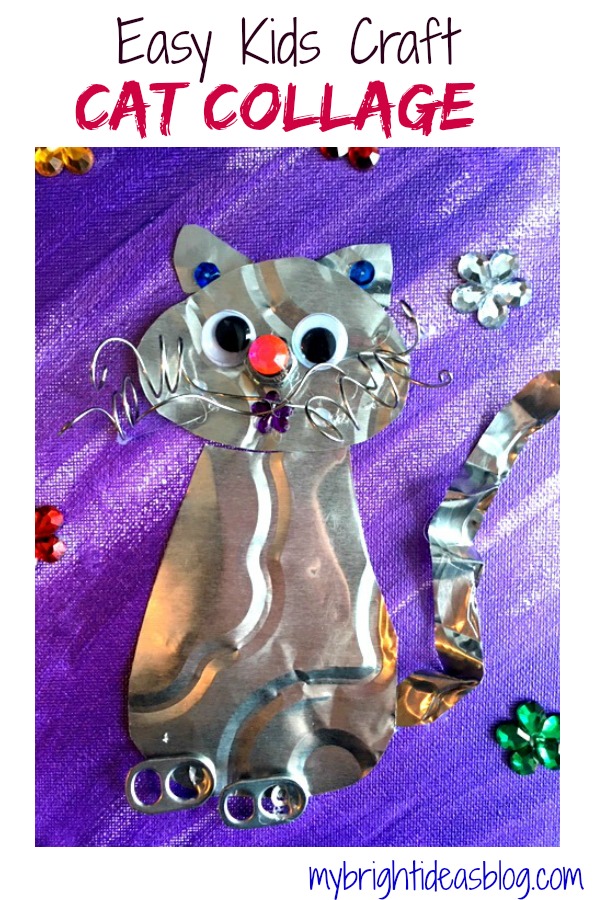
Cat
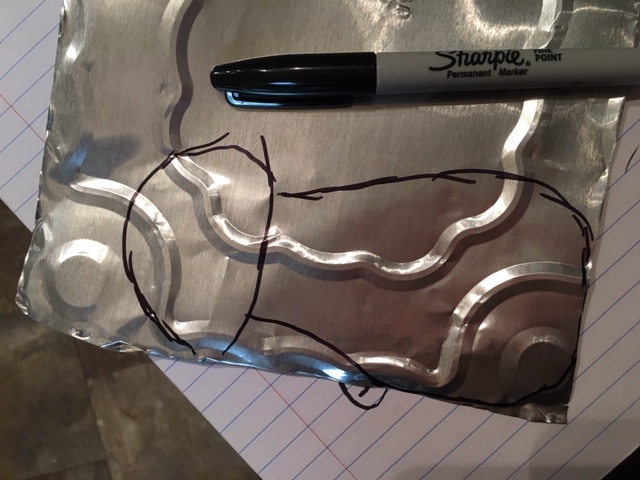
Draw the shape onto the foil with a sharpie. It doesn’t stay permanent on the cake pan foil right away so you can wipe it off if you make a mistake.
Lay out the pieces before you hot glue them to the canvas. To make the spiral for the cat’s whiskers I wrapped a wire around a pen. Then I stretched the wire out a bit so it looked a bit crazy. Wire is a bit hard to glue on. Find some points that will be touching the canvas and add a drop of hot glue to just those spots.
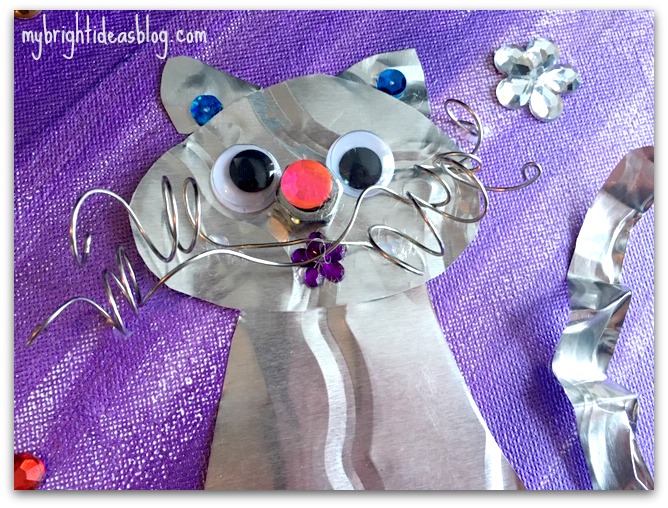
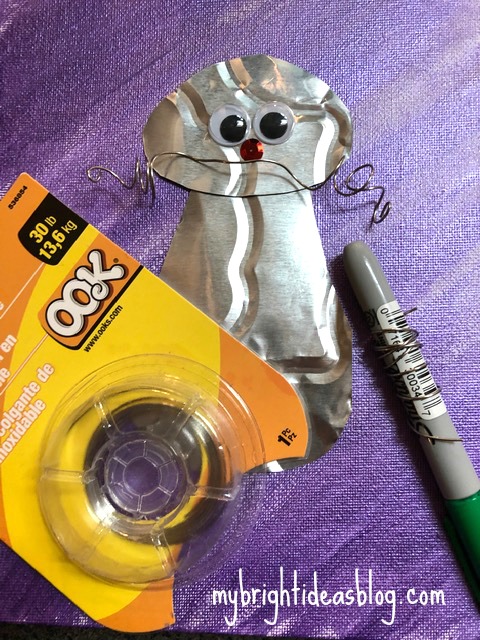
I used a bolt for the cat’s nose and then put a gem on top. For the tail I took a part of the edge of the pan and scrunched it a bit to give it extra wave. Secure it with a few dots of glue to the canvas.
The one gem on her nose looked so nice-I added one for the mouth, 2 for the ears and some big ones randomly around the cat.
I almost forgot to mention the two pop can tabs were added for feet!
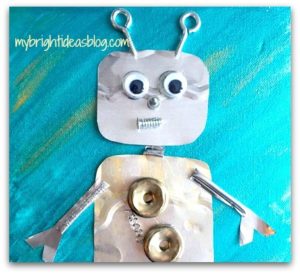
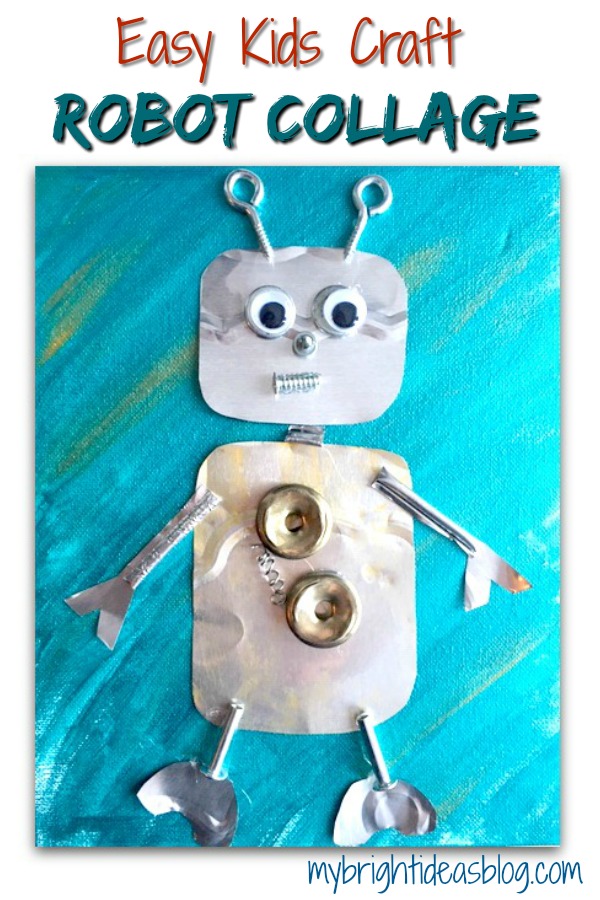
Robot
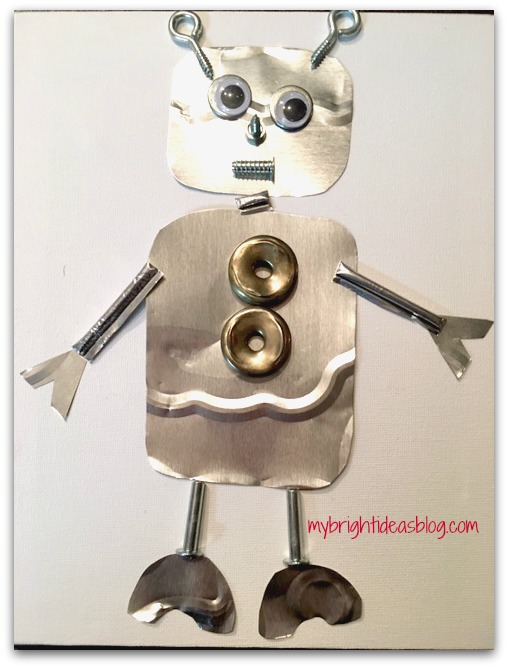
Again for the Robot, lay out your materials and arrange them together for the collage.
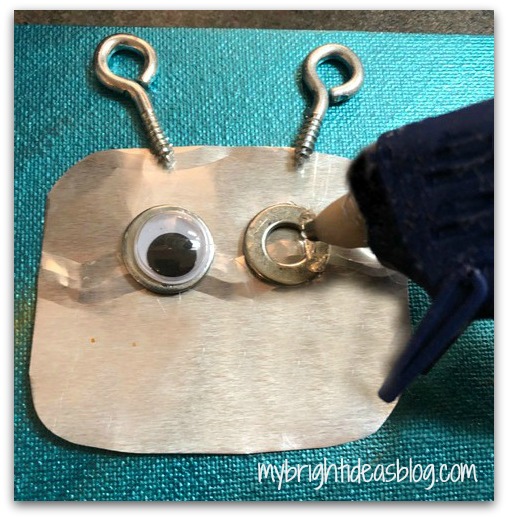
Secure each item with glue to the pre-painted canvas.
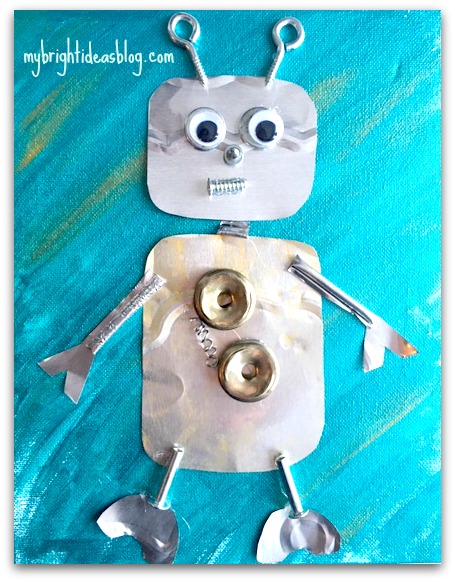
The robot is made of 2 squares with rounded corners. A few miscellaneous items from the junk drawer and cut up scraps from the foil cake pan. The wire on the middle of the robot is the same wire from the cat project but it looks smaller because I wound around a smaller object. If you have a spring from an old pen it would be similar.
This robot turned out great! You’ll love how the metal of the foil reflects the light.
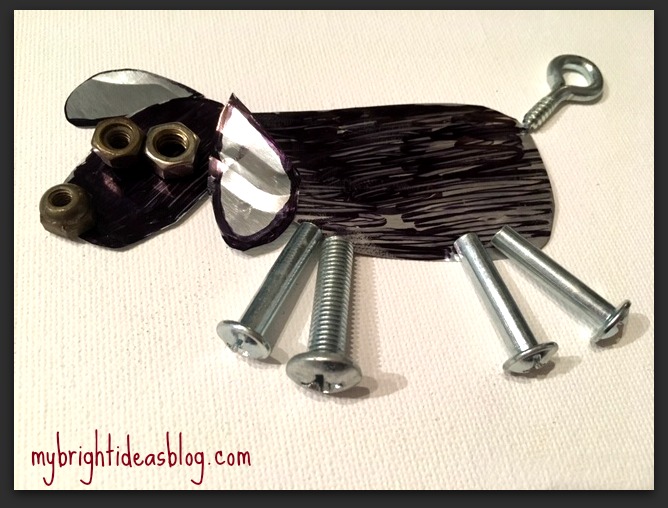
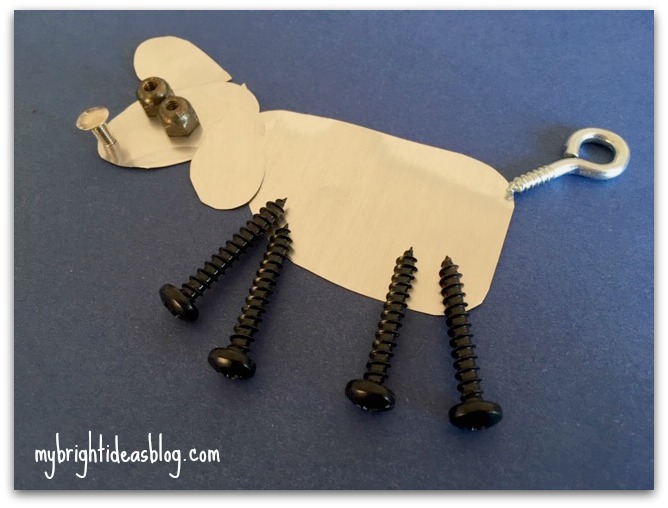
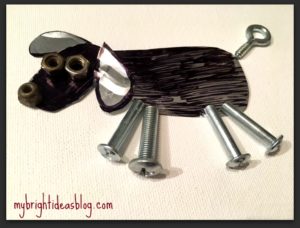
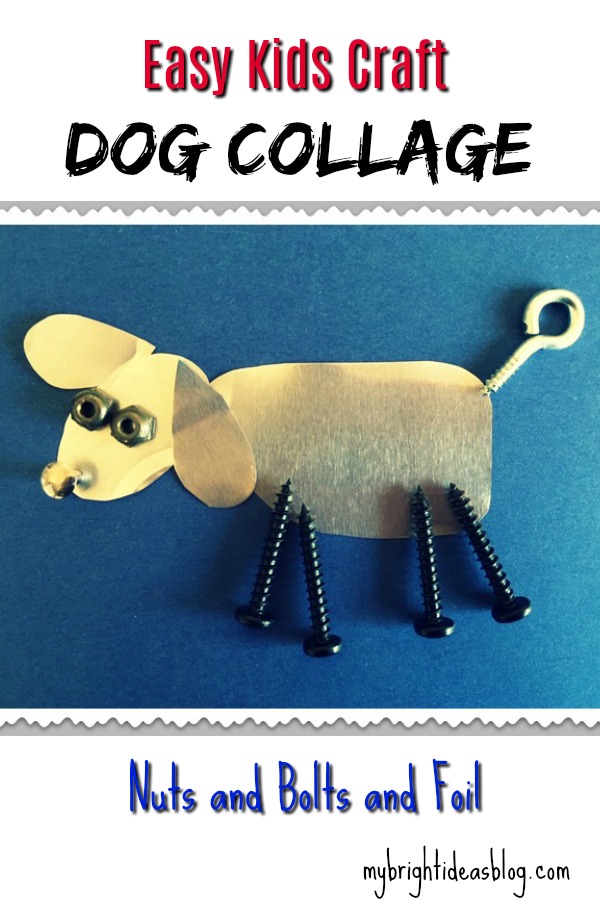
Dog
The dog is simply 4 pieces cut out of the cake pan.
I made one on a white canvas so I colored it in with black sharpie.
I also make another one on a piece of dark blue cardstock. The foil cake pan looks white in this photo but its still metallic silver. I think it looks like a sheep! Bahhhhh.
This was a super easy and fun craft to make!

Here are some previous blog posts with simple fun projects for the kids!

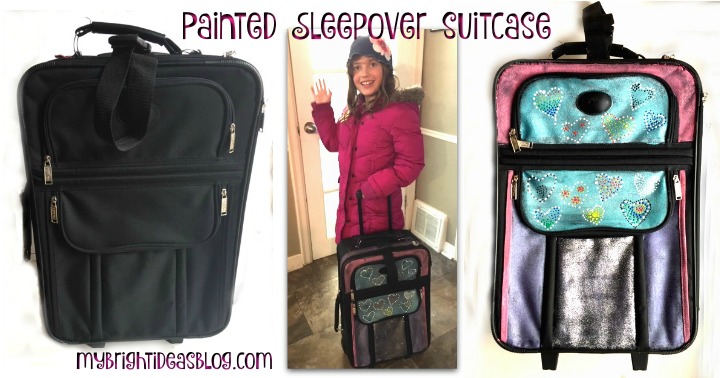
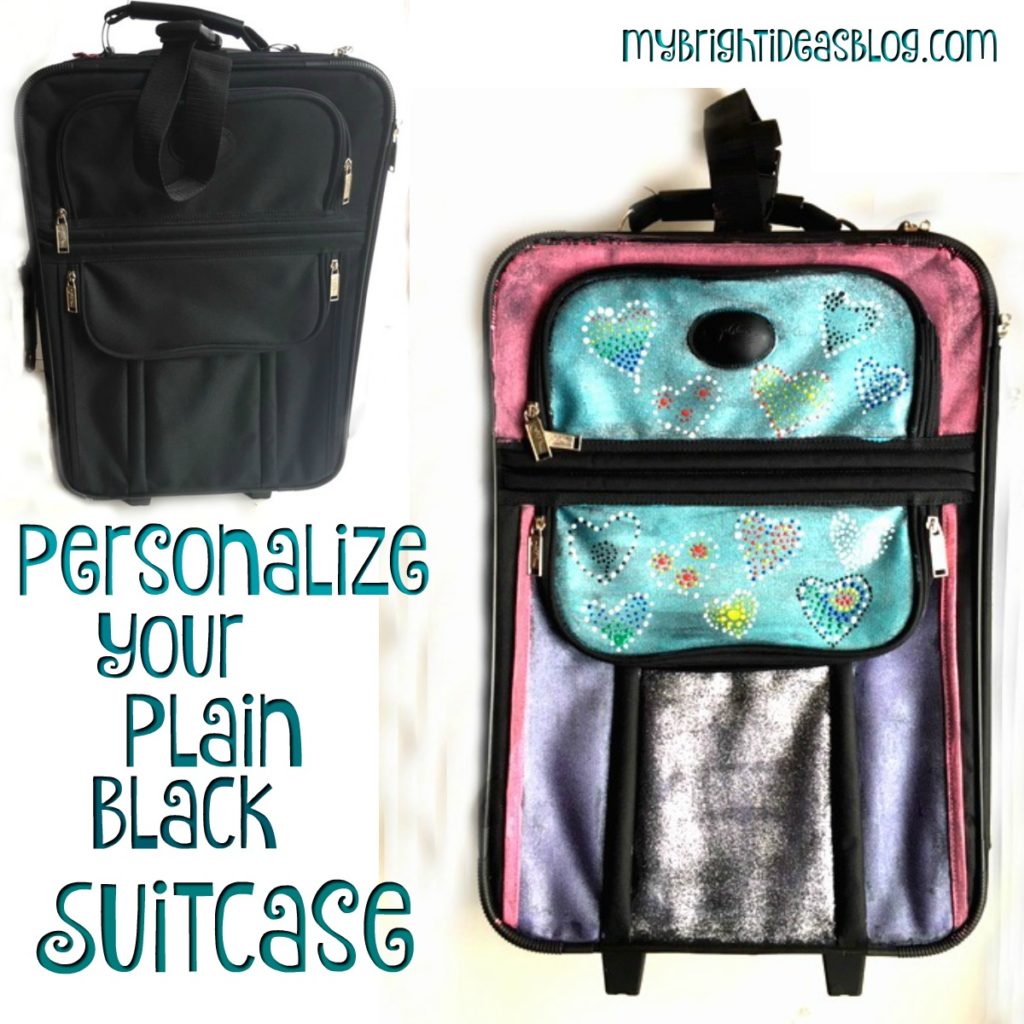
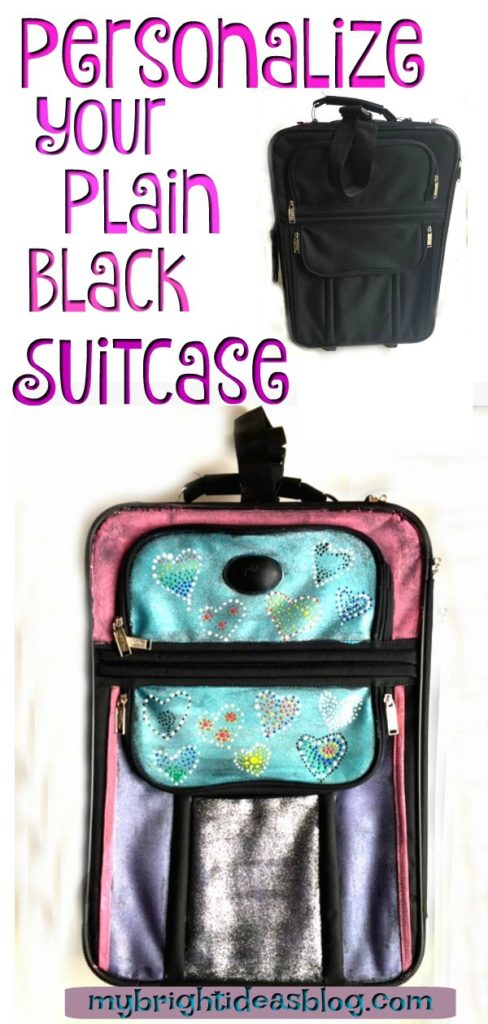
Personalize Your Suitcase or Craft Bag with Paint
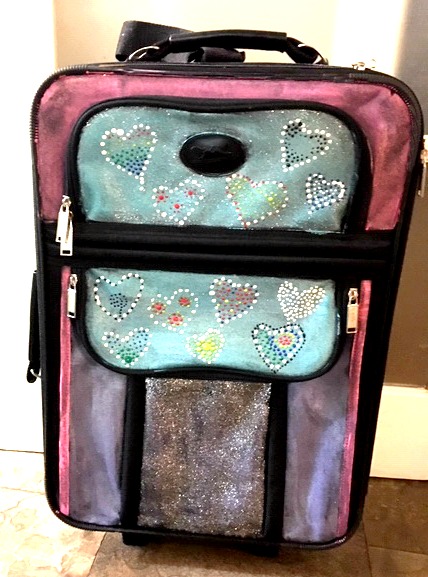
Today we personalized a boring black suitcase with craft and fabric paint! It turned out amazing.
If you have ever been to the airport you will know that the classic black suitcase is still the most popular. This makes it difficult to determine which suitcase is yours, there could be dozens of black suitcases on the carousel. If all you have on it, to identify your bag is your address, you are going to be there a while.
Let’s save you some time and make your bag stand out from the crowd and get you on your way.
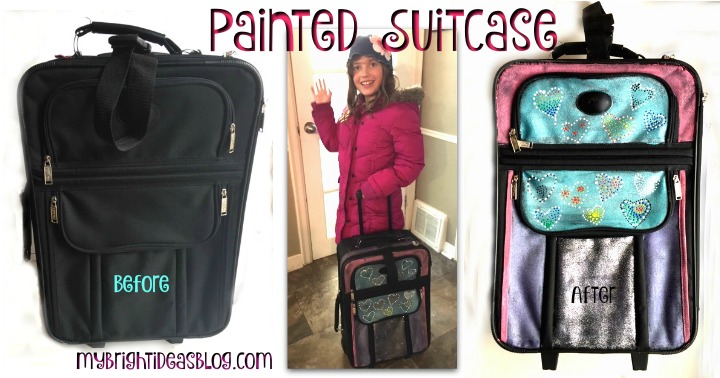
 Introducing the black suitcase. Zzzzz boring…. Zero personality. Why not turn it into something really special. Your own work of art.
If its your tween’s bag maybe its shouting for some glitter. I’ve even seen some funny messages painted on it like…”Going to Gramma’s, Where Life is Good!!” Sleep over at the grandparents house? or “Oh the places you’ll go” or “I love you to the moon and back” which I could totally see on a bag for a child going to camp. There are some really great ideas for vintage suitcases too.
 You will need:
- multi-surface craft paint
- paint brushes
- fabric dimensional paint (optional for details)
- clear spray sealer (optional for extra protection)
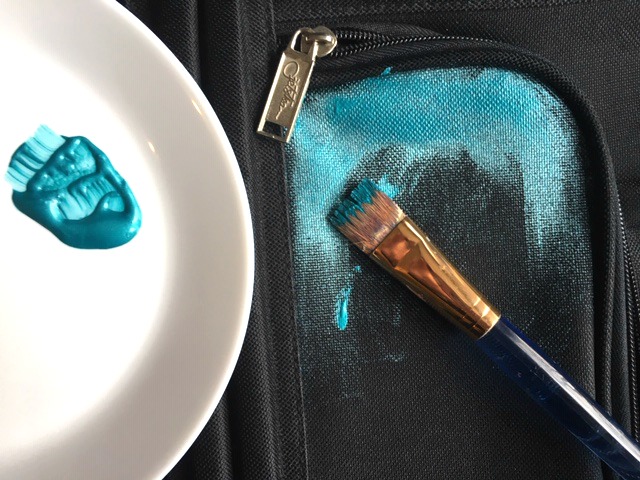
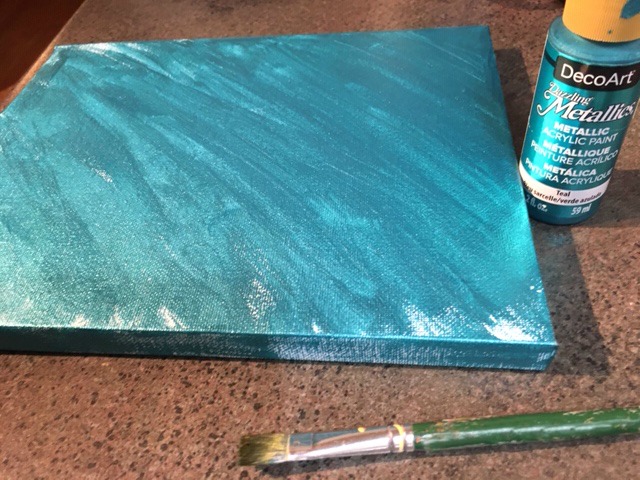
I started with metallic paint from Deco-Art in Teal. Its just a multi-surface craft paint from the craft store. Treat your suitcase like a canvas and start with your base colours for your design.
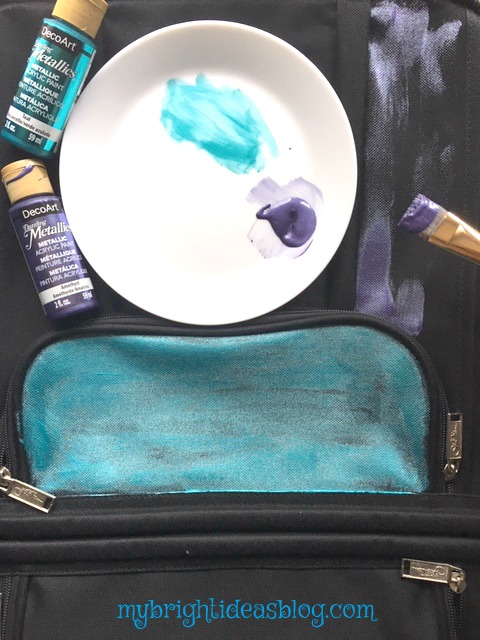
After I finished painting a pocket with “Metallic Teal” I moved on to painting the side panels with “Metallic Amethyst” purple from Deco-Art. I did go back and do another coat of these colours as needed.
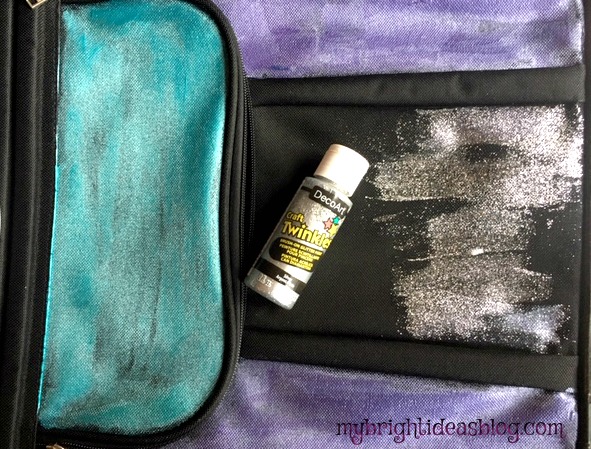
For the centre panel I used Deco-Art Silver Twinkles. The silver glitter paint really added some wow factor. Now my 8 year old would like it in her room to hold her stuffed animals.
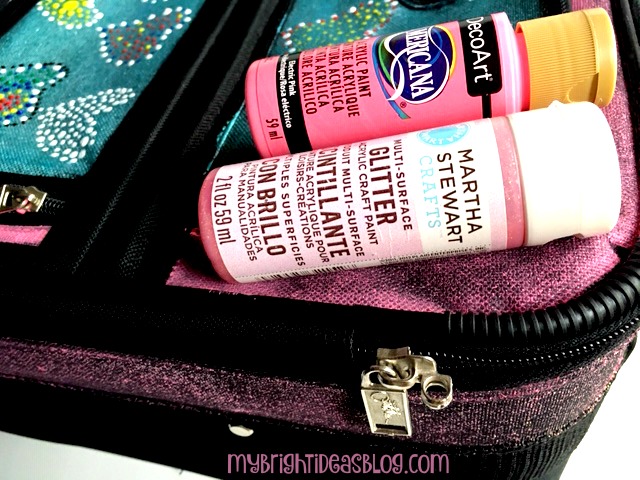
The edge was done with Martha Stewart Glitter paint by itself.
The front pink areas were done with a mixture of Martha Stewart Glitter paint mixed with DecoArt Electric Pink.
I should mention that if you get paint on the plastic parts of the suitcase you can wait until it dries and scrape it off with a finger nail. Having a damp piece of paper towel handy is good idea too.
![]() Now, it looks fabulous without going onto the next step. Already its a one of a kind suitcase that is unmistakably my own.
Now, it looks fabulous without going onto the next step. Already its a one of a kind suitcase that is unmistakably my own.
It’s at this point that you have to decide whether to keep going with embellishments or stop while your ahead.
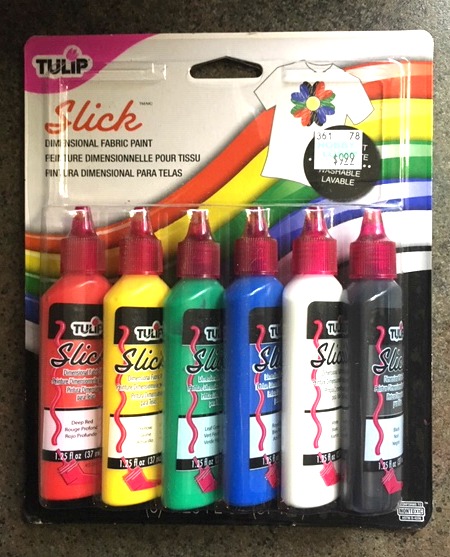
I carried on with some Tulip Slick fabric paint. This was $9.99 at Hobby Lobby but I had a coupon. This package has black, white, green, red, blue and yellow. You can purchase individual colours if you don’t need 6. I wish I had some metallic colours on hand for this but I used what I had.
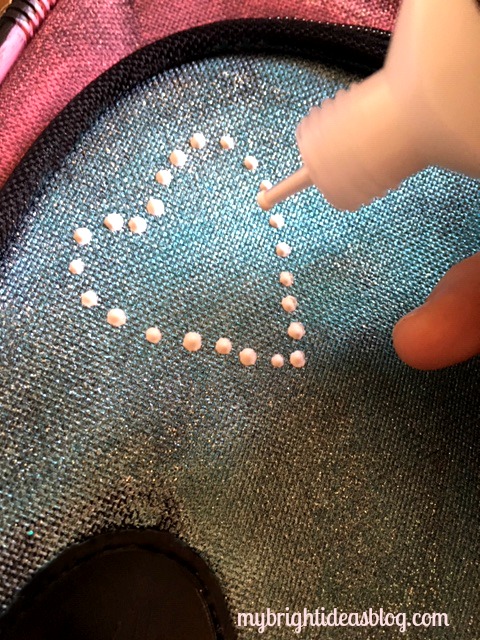
These fabric paint bottles are great for writing because of the fine tip. I like doing dots with them.
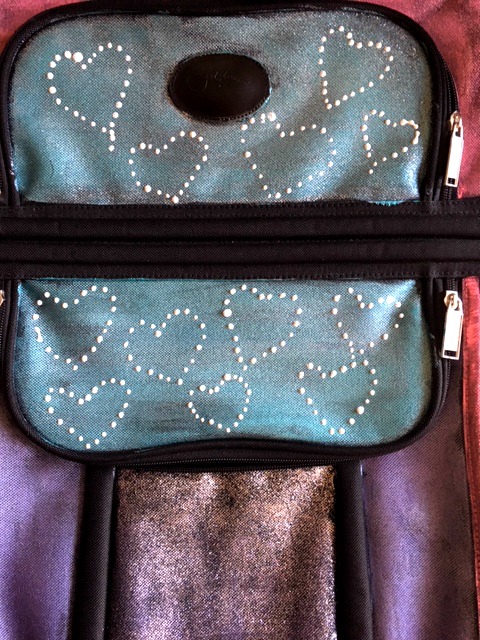
Should we stop with just white hearts or keep going? Decisions, decisions….
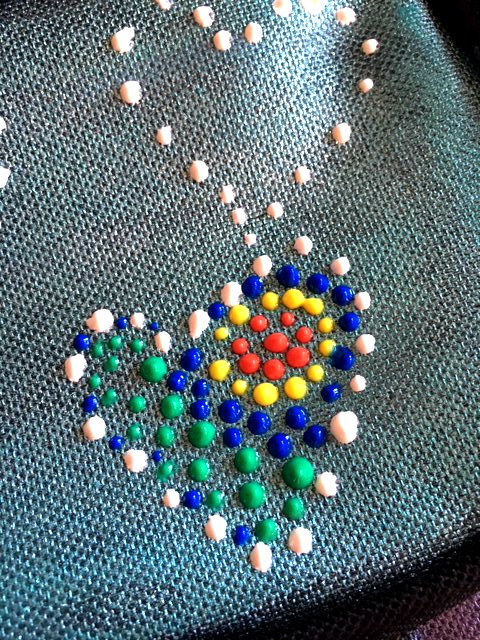
So of course, I kept going and filled in the hearts with more dot designs.
When you are finished, you may want to spray with a clear protective coat if you are going to using it a lot and its going to be tossed around in the airports.
The carry-on size suitcase would be perfect if you take your craft supplies with you to work with friends or classes.
I have seen where sewing pros have embroidered something onto fabric and then mod-podged the fabric onto their bags. Why not! If your using this for crafts you could put your name on it. But I wouldn’t write a name or phone number on it if you use it for travelling just for safety sake. Maybe a monogram though.
…
This goes to show you how you can make art out of anything.
Happy Crafting Friends! See you again soon!
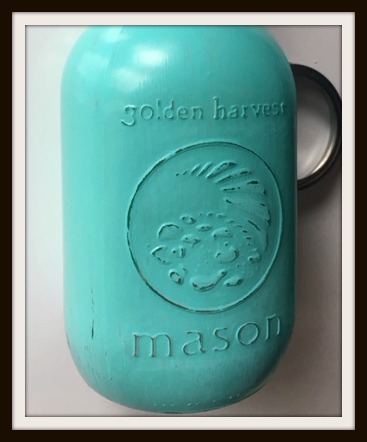
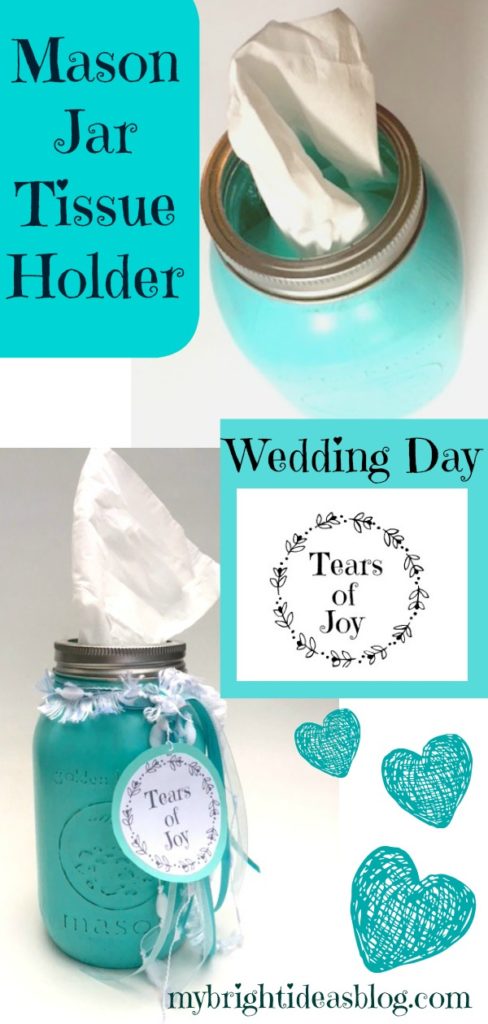
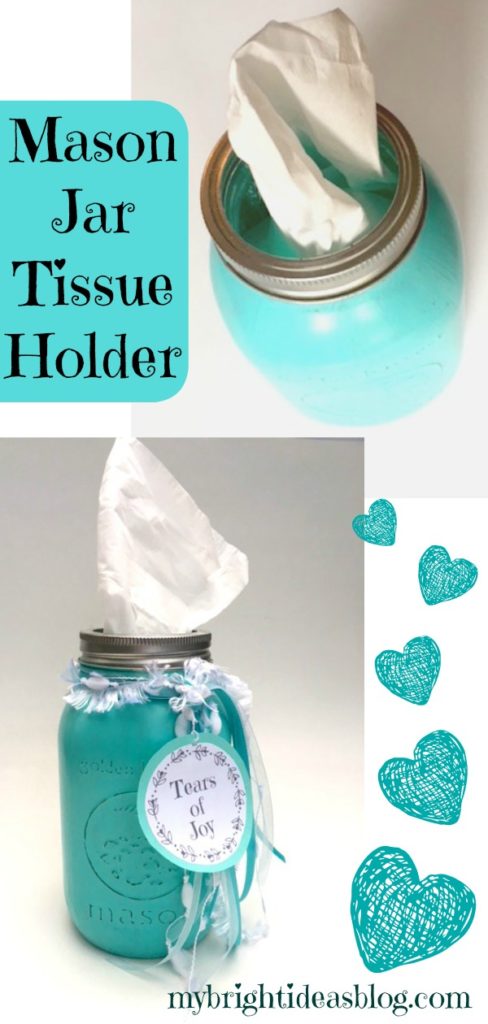
Mason Jar Tissue Holder

Tomorrow a friend’s daughter is getting married and I’m going to pop around to their house today to drop them of this mason jar tissue dispenser. Even for friends who aren’t prone to crying – weddings and daughters and stress and wedding parties and lack of sleep can bring out the tissues for anyone. Might as well be prepared with a jar of tissues that match the day!
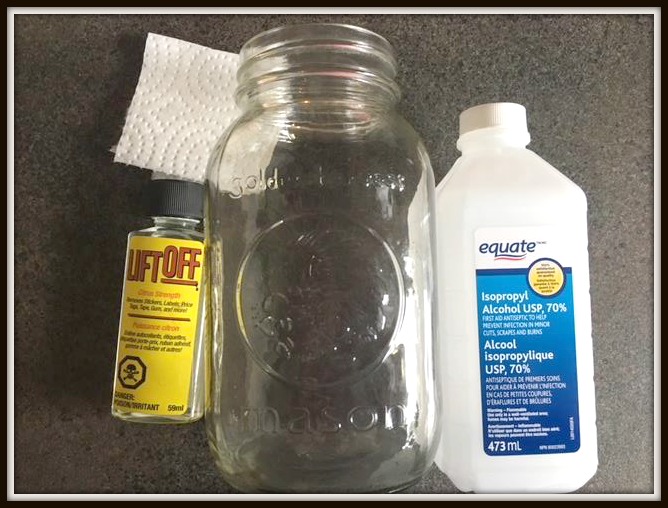
You will need:
- goo gone or lift off if there is any sticky label residue
- rubbing alcohol
- a mason jar
- multi-surface paint (or glass paint)
- paint brush or sponge
- sand paper or emery board
- box of tissues
- wide mouth jar band
First of all, we need to clean and dry the mason jar. If there is any sticky residue from previous labels take if off with goo gone or lift off – then wash with soap and water. Wipe the outside of the jar with rubbing alcohol.
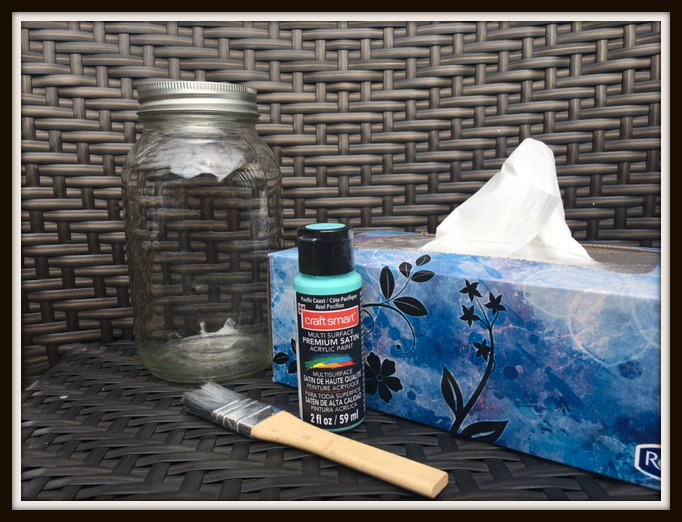
I used a multi-surface, acrylic craft paint from Michael’s-“Pacific Coast”. It was not expensive approx. $3.50. It can be used on fabric, glass, ceramics, wood, metal, plastic, terra cotta etc. 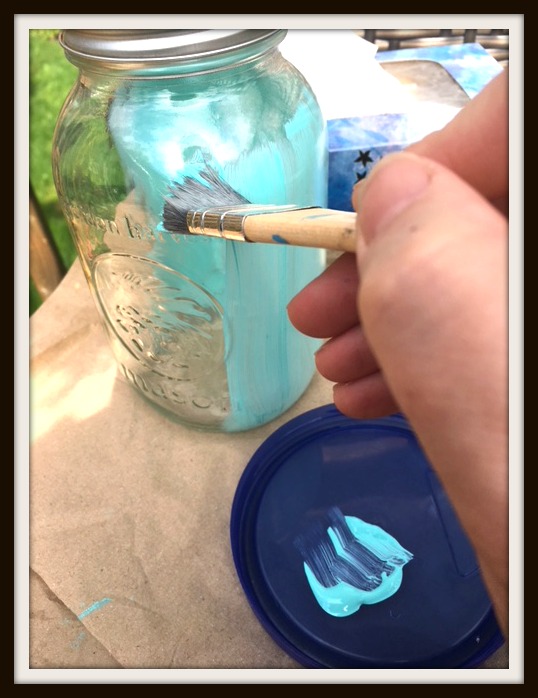
Using a paint brush or sponge, paint the jar and allow to dry. Most likely you will require another coat of paint. It dries fairly quickly. Leave over night to really allow the paint to dry thoroughly before moving on to the next step.
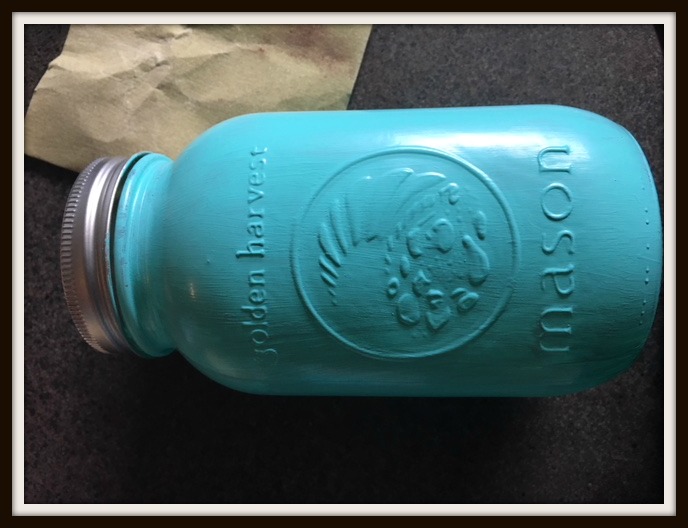
Using an emery board or sandpaper, gently rough up raised lettering.
Next we add the tissues!
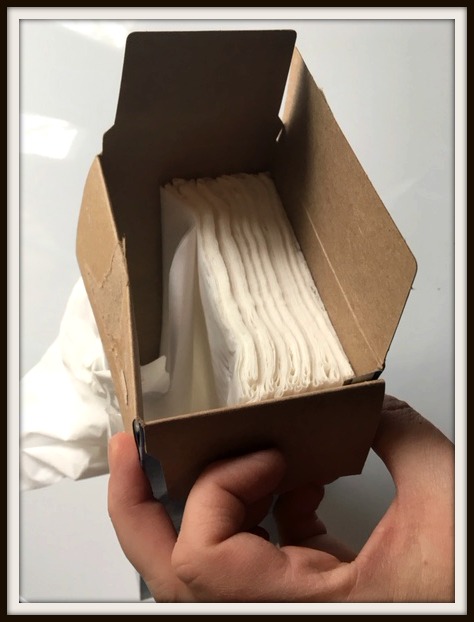
Open the box of tissues at one end. Remove half of the tissues, keeping them in a stack. Keep the top tissue slightly pulled up.
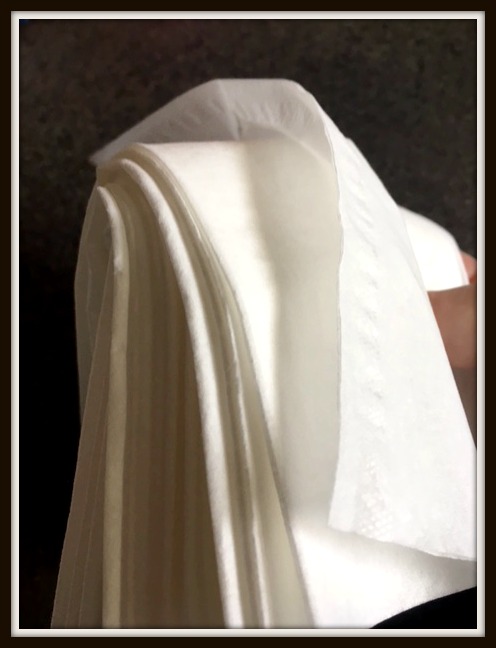
Fold the stack of tissues in half-keeping that top tissue easy to grab.
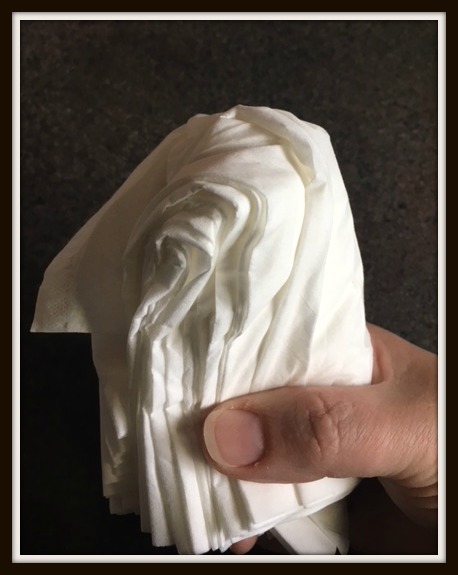
Fold it again so it will be slim enough to slide through the neck of your jar. Then gently wiggle the top tissue upwards. Test to see if the next one will follow.
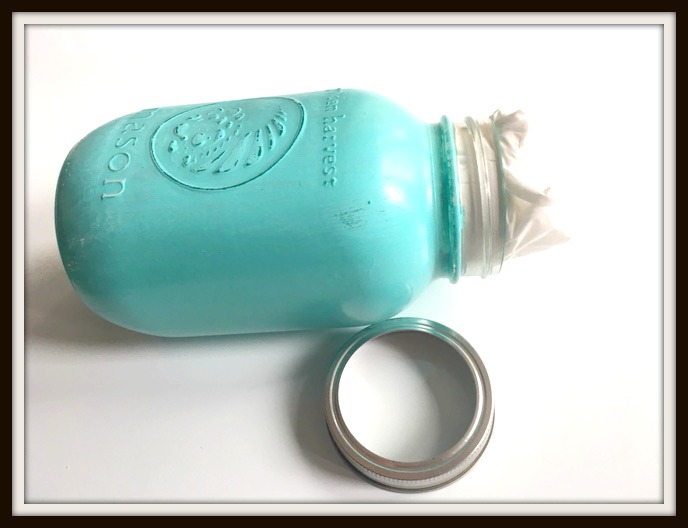
Screw the ring lid back onto the jar. I like the silver ring lids that come with new jars. If your ring is looking shabby or you want a dramatic look you could easily spray paint it black or soft white before screwing it back onto the jar.
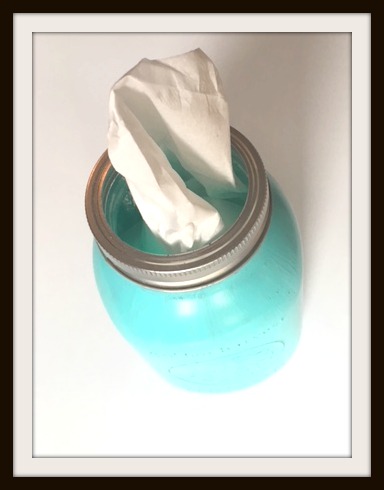
Looks good!

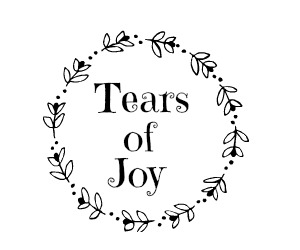
I added a little bit of random white and matching ribbons and simply tied a not around the neck of the jar. I also printed a little note that says “tears of joy”. Using a glue stick I pasted that onto a piece of coordinating cardstock. I punched a tiny hole in the papers and tied it into the ribbons.
Just a quick footnote!
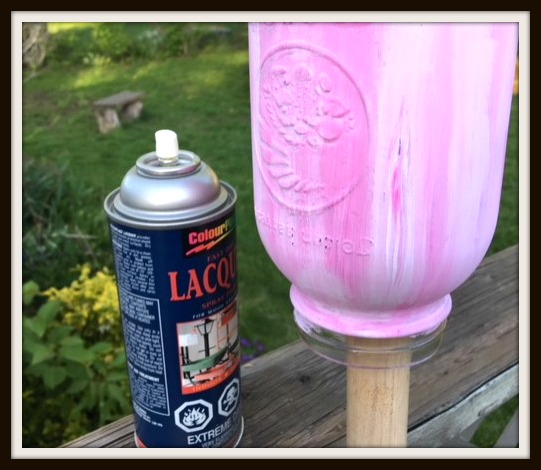
With this pink jar I tried painting with regular pink and white craft glue. It worked but it was a very mat finish so I put it on a broom handle and sprayed it with a clear topcoat. This had the desired finish and kept my hands free from the paint.
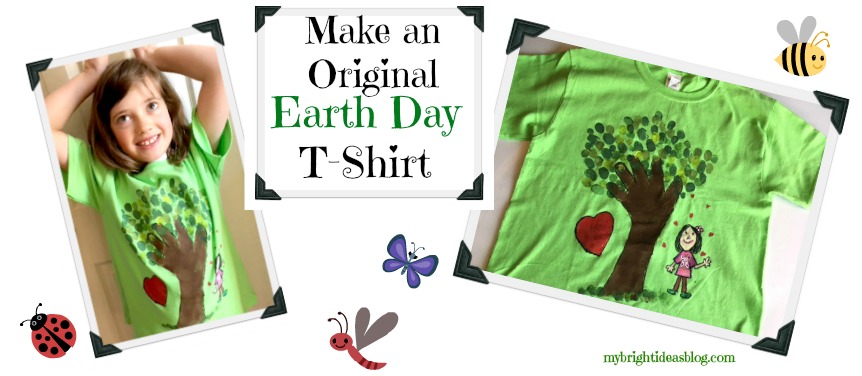
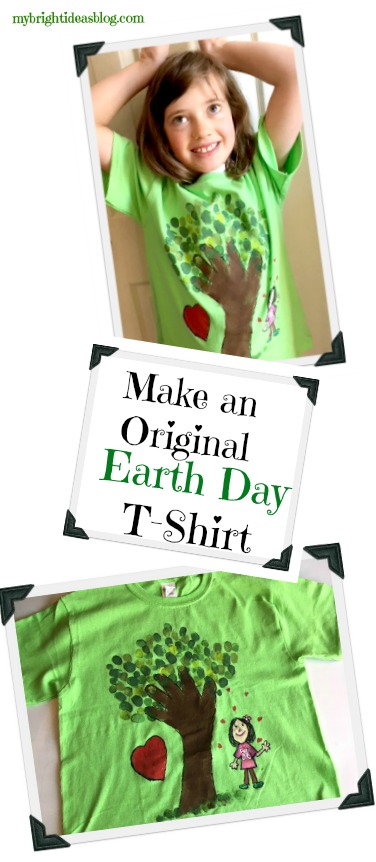
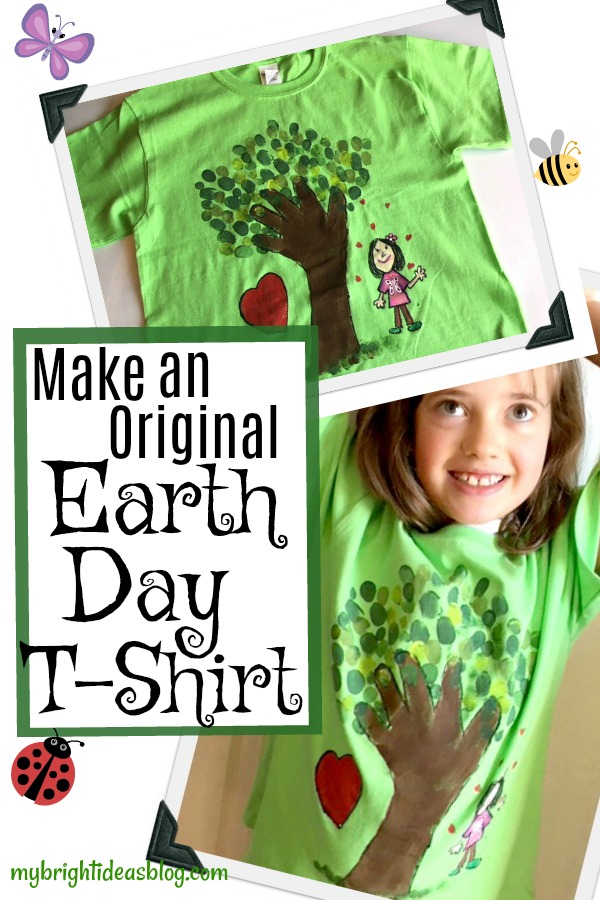
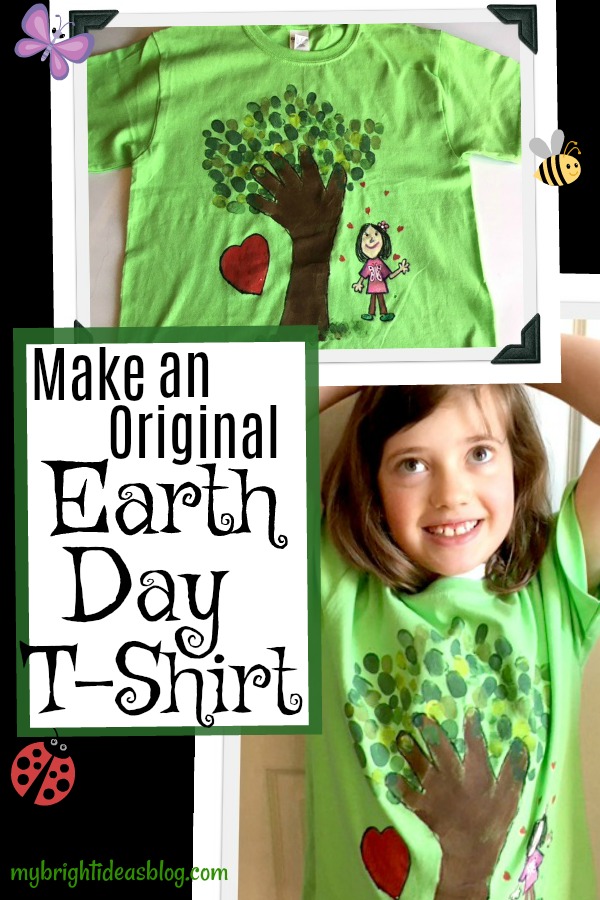
Make an Earth Day T-Shirt – Green Tree Hugger Easy Project

Another Earth Day T-Shirt Post!
For a while I have been eyeing making this Tree T-Shirt idea-you simply trace your child’s hand and a bit of their arm to make a tree and branches. Thumbprint in a few shades of green paint for the leaves. You could leave it there or keep going by drawing a picture or writing a “green” Earth Day message next to it.
For this one you just need:
- a sharpie (red and black)
- craft paint -browns and greens (optional more if you paint more on the shirt)
- paint brush
- your kids arm, hand and thumb!
I know this is easy enough to follow with just the photos but I’m not a woman of few words. :o)
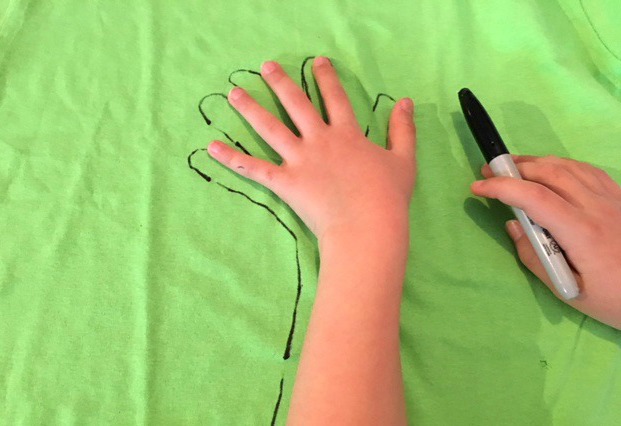
Trace your child’s hand.
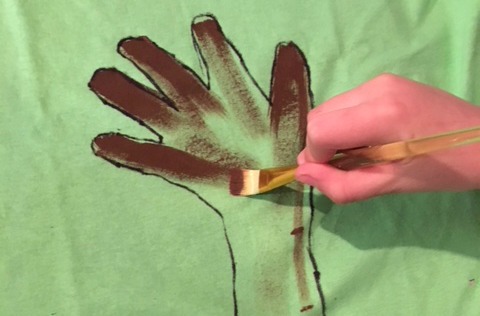
This is the tree trunk and branches so paint it brown.
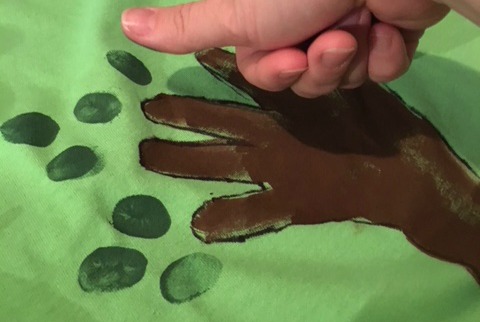
Use your thumb and dip it in green paint to make leaves.
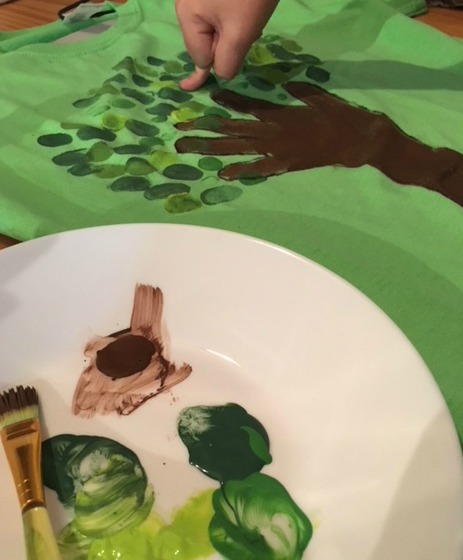
Next put a few shades of craft paint on a plate and dip your child’s thumb into it to make thumbprint leaves. I must admit I did a lot of this part as this darling kiddo didn’t want to get too messy. Of course, I didn’t mind, finger painting is good fun!
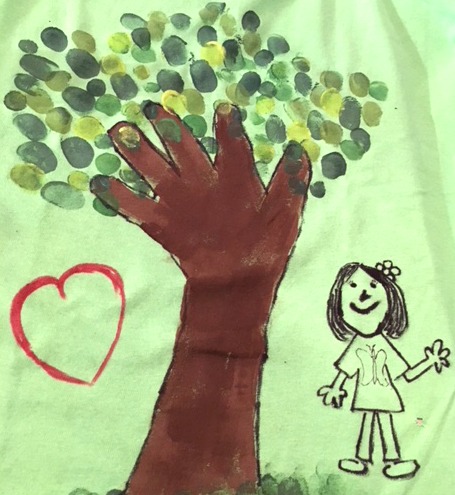
Add a few thumb prints at the base of the tree for grass. Miss M decided not to have words on this T-shirt but a self portrait and love hearts. We drew it on with a sharpie and then found the craft paints were best to color in the clothes and hair and heart etc.
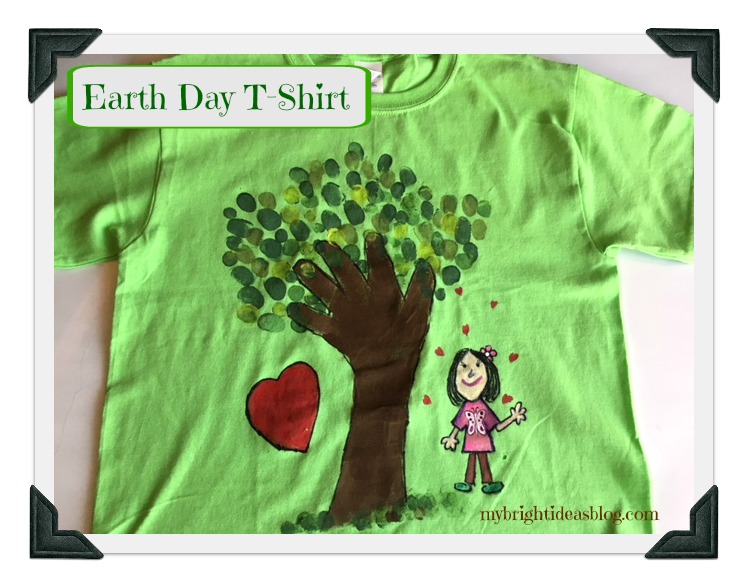 She was very pleased with the results and wore it to school the next day. The entire week was full of earth day activities so she was really into it. We love nature, we love the earth, we love hugging trees.
This shirt is big enough to wear again another year.
Below are some more nature crafts or earth day ideas! Have a look!
Did you see the earlier earth day shirt we made? It’s the planet earth made with blue and green sharpies-and it says “I care”. Check it out!
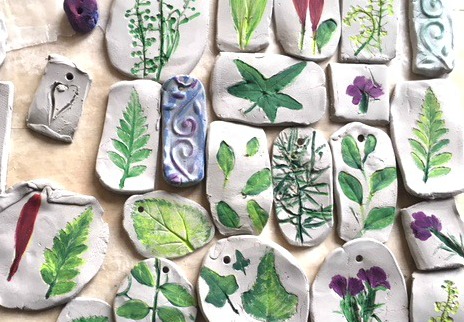
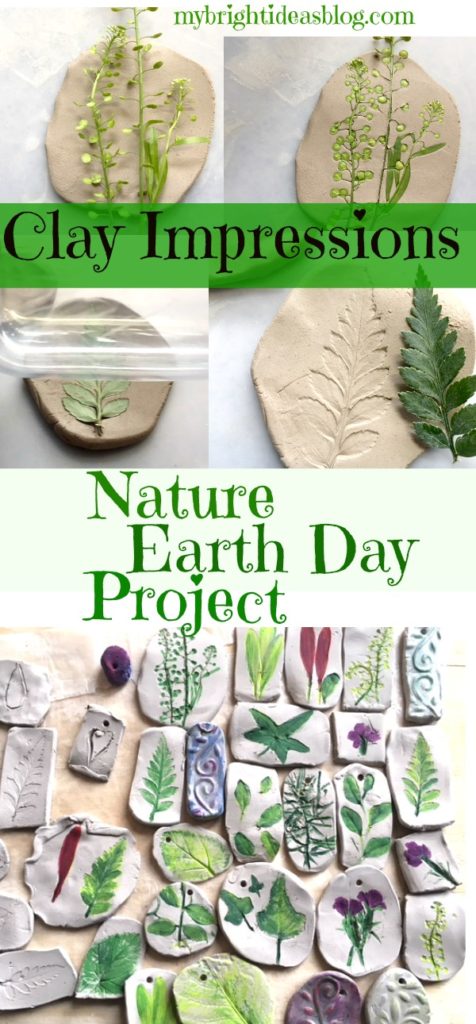
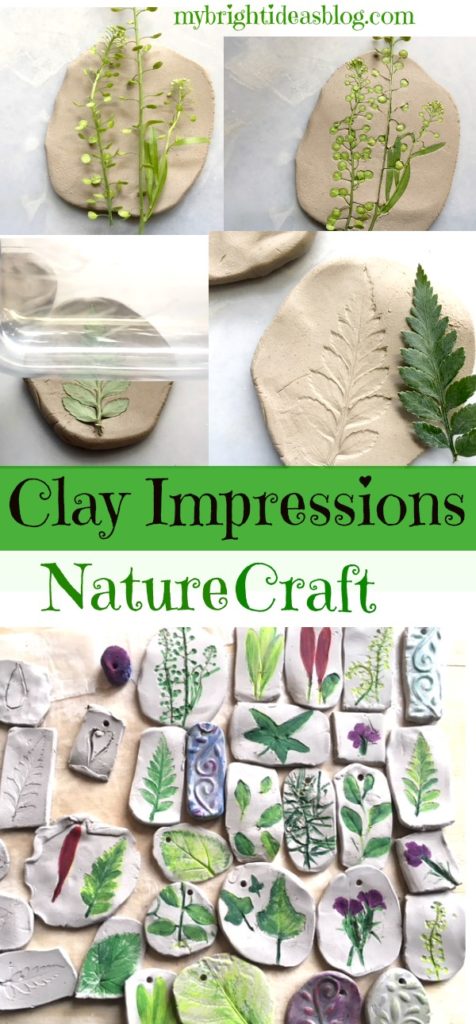
Nature Craft – Perfect for Earth Day Activity – Clay Imprints with Plants and Flowers
Easy Vermicomposting! How to start an indoor Worm Compost Bin!
…
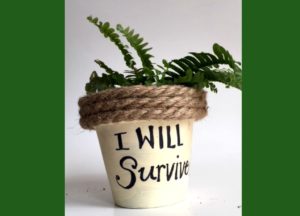
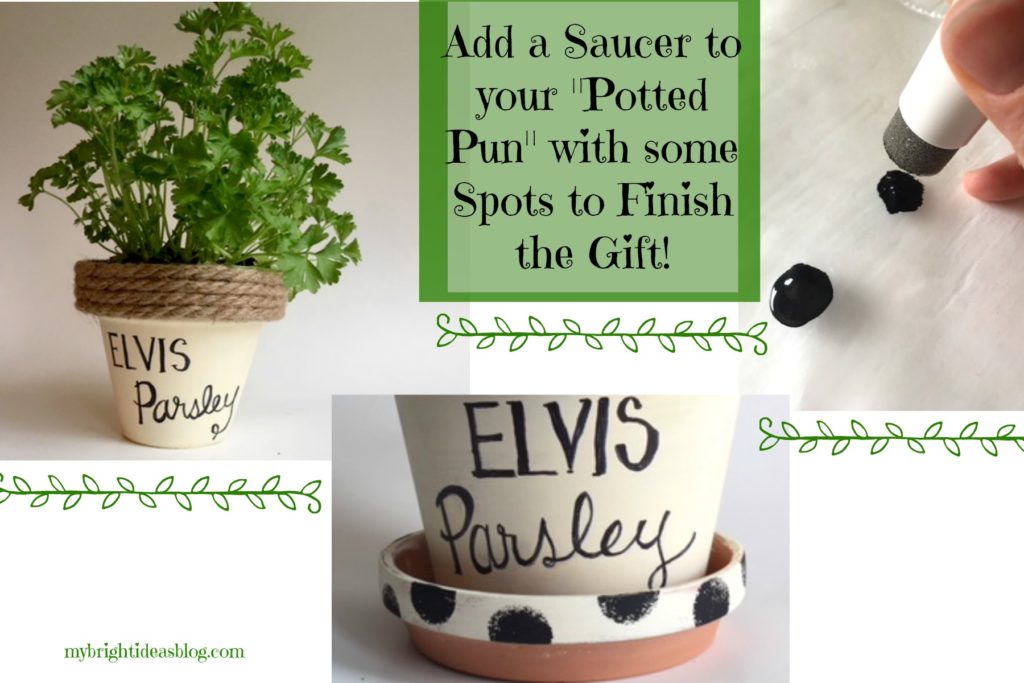
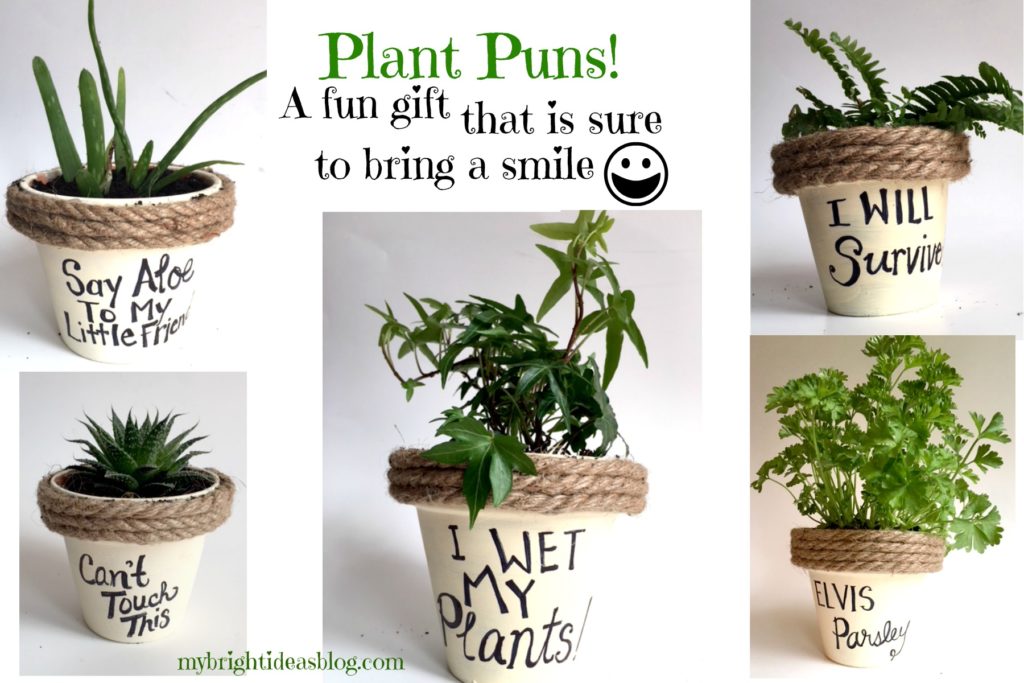
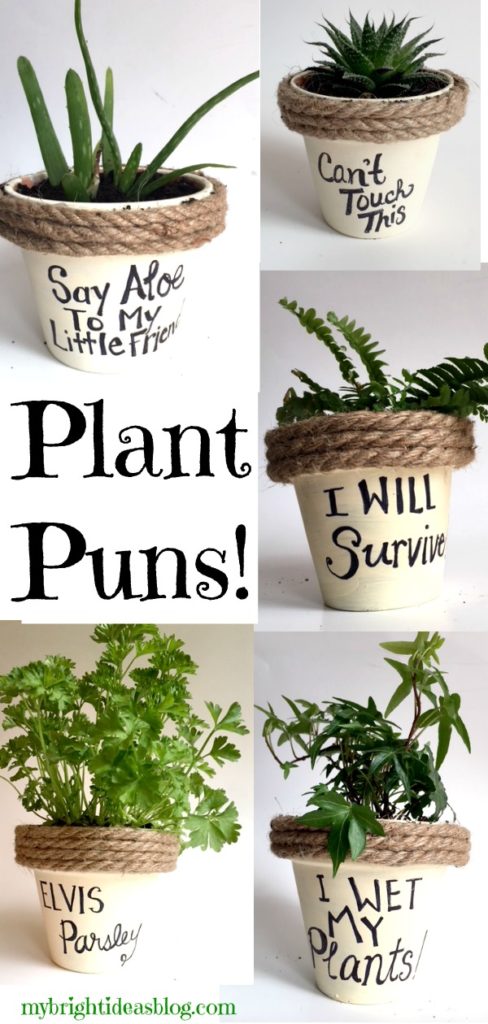
Plant Puns on Painted Potted Flower Pots – Adorable Gift Idea to Make Them Smile!
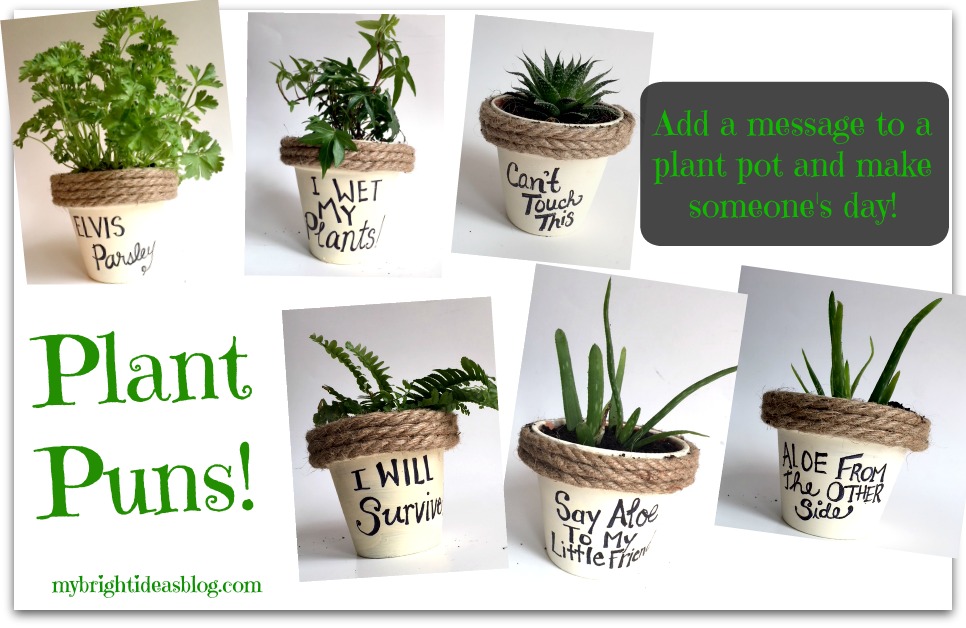
Say that title 4 times fast “Plant Puns on Painted Potted Planters”..now that is a tongue twister!
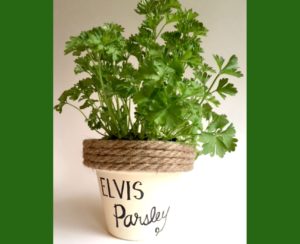
So I was talking crafts with a friend at the office and she showed me these painted terracotta plant pots. What a great gift for someone who is leaving the office or a friend who is down or recovering from illness. It’s an awesome gift that is guaranteed to put a smile on their face! :o) In fact that friend just had her final week at our office as she moves onto another part of the company and I surprised her with the Elvis Parsley flower pot. She loved it! Plus its edible so that is a gift that keeps on giving!
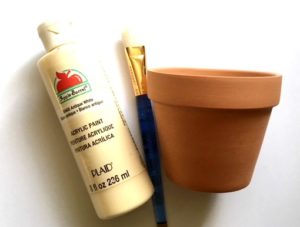
You will need:
Terracotta pots, white or cream paint and paint brush, natural jute rope, hot glue gun and 2 sticks of glue, pencil and Sharpie, a herb or plant and a catchy pun to write on it.
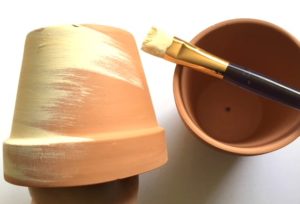
Start by painting the empty terracotta planter pot a white or cream color with a regular craft paint. Allow this to dry for several hours.
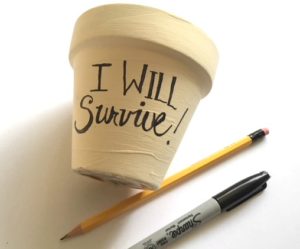
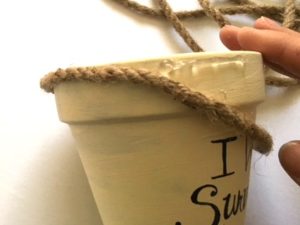
You can choose to write the message on now or after you hot glue the rope. Decide where you would like to write the message onto the pot. I recommend that you write it very lightly in pencil first. Also make sure that the ends of the rope don’t end up at the front of the planter. If you make a huge mistake-like miss a letter in a word. Try to save the project by painting over. If that doesn’t cover it you could change the colour to a dark blue, brown or black and use white paint for the lettering. Waste not!

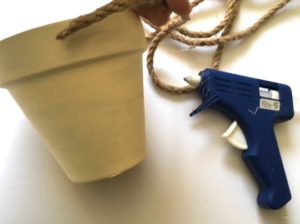
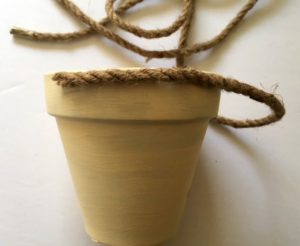
Trim the end of the rope on an angle. Begin by gluing the rope around the top of the flower pot. Since hot glue dries so quickly I would put a 2 inch line of glue and then press the rope into the glue for a few seconds. When this is cooled add another 2 inch line of hot glue and press the rope into the glue. Repeat all the way around the pot until you have filled the rim of the planter and the ends meet up. Trim the end of the rope on an angle and glue the ends down. Watch your fingers!


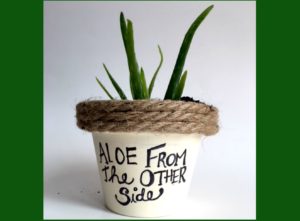
Lastly, you need to put your plant in the pot. Add a few pebbles in the bottom, then soil, then the plant and a bit more soil to fill the gaps. Awesome! Here are some more that I did this week.
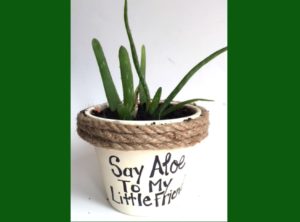
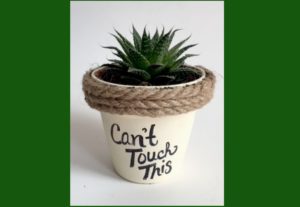
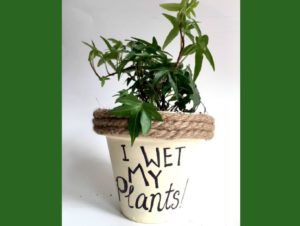
The planter that says “can’t touch this” is meant to be a cactus but there was wasn’t any available at the store so this succulent is acting as a stand in.
This has been a lot of fun. Last night we had a family dinner and I took an Elvis Parsley to my mom’s house. It got a laugh out of the group. If you are looking for a silly hostess gift or housewarming gift I highly recommend giving Elvis.
Have fun with your painted potted plants!
…
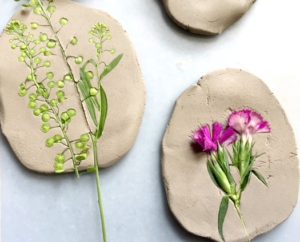
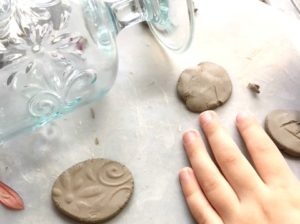
Nature Craft – Perfect for Earth Day Activity – Clay Imprints with Plants and Flowers
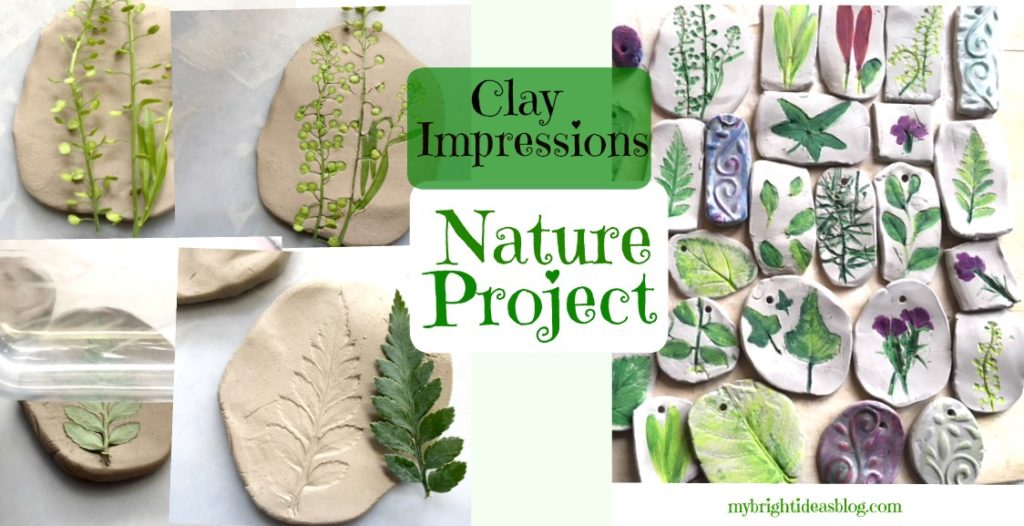
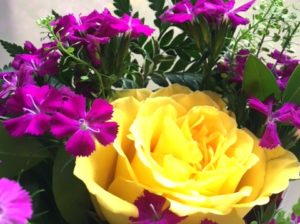
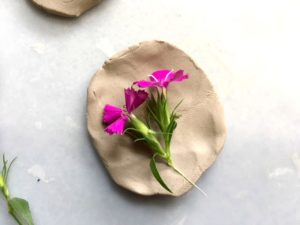
I wanted to blog about a natural craft for earth day and discovered clay impressions of plants and leaves and flowers. What a great idea! The only problem is that its just the very beginning of spring and the garden is ugly. Except for a few crocuses there is nothing nice around my home. I popped into the florist shop (Regency Florists) nearby and asked if they had any flower scraps like a bit of fern that we could use for this craft project. The lovely young lady made a little bouquet of scraps for free! How lovely is that! We are going to take her one of these lovely creations as a thank you gift.
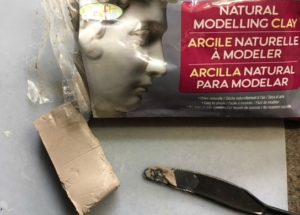
Supplies
So you will need CLAY and a very smooth surface to work on. If you have a clear bit of plastic table cloth or a very smooth kitchen cutting board-either will work. You also need some flowers or plants, a rolling pin or water bottle that has smooth sides. Later when the clay is dry you may want to use some craft paint to add the green or flower color. Also if you want to turn it into a mobile or wind chimes you might need a chopstick or skewer to poke a hole in it.
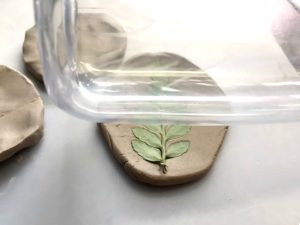
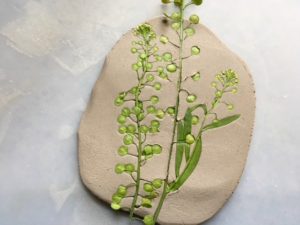
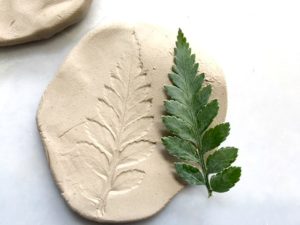
Our clay is from the dollar store craft aisle. We just slice off chunks and made different shapes with it. Then we rolled it flat. Next we place a bit of plant or flower onto the clay and rolled over it gently with a smooth water bottle. Pull the plant off the clay and admire the details now imprinted in the clay. If you want to add a hole-this is the time to grab your kebab skewer or chopstick.
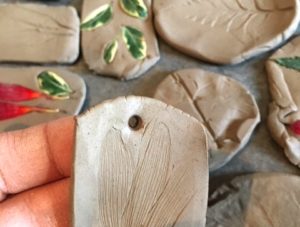
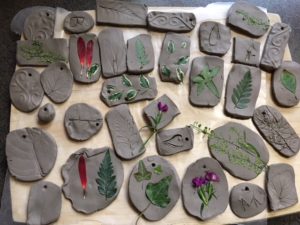
Allow the clay to dry overnight. It should feel completely dry before you paint it. I just used regular craft paint.
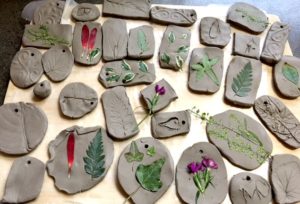
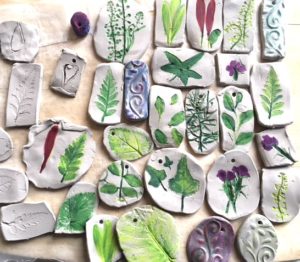
This would be a lovely gift from a child to a teacher or grandparent. Its a great craft for all ages though. I highly recommend for adults to give it a try. Its very therapeutic! This project has a lot of possibilities so let your imagine go wild. Find things around the house with interesting textures to imprint the clay.
Have fun!
…
Painted Ceramic Bowls – Paint Your Own Dishes Your Way!
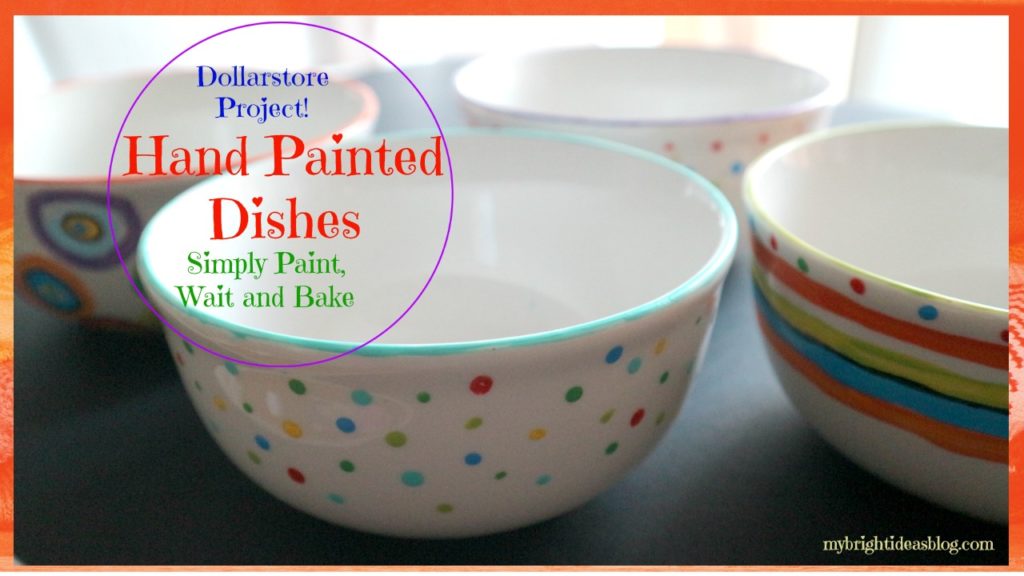
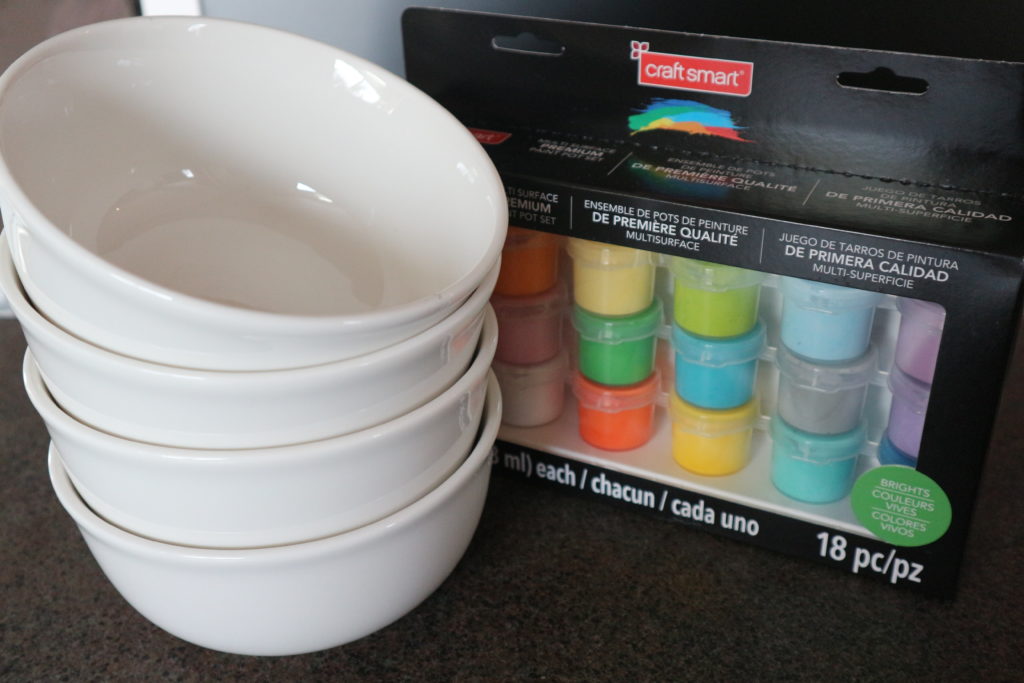
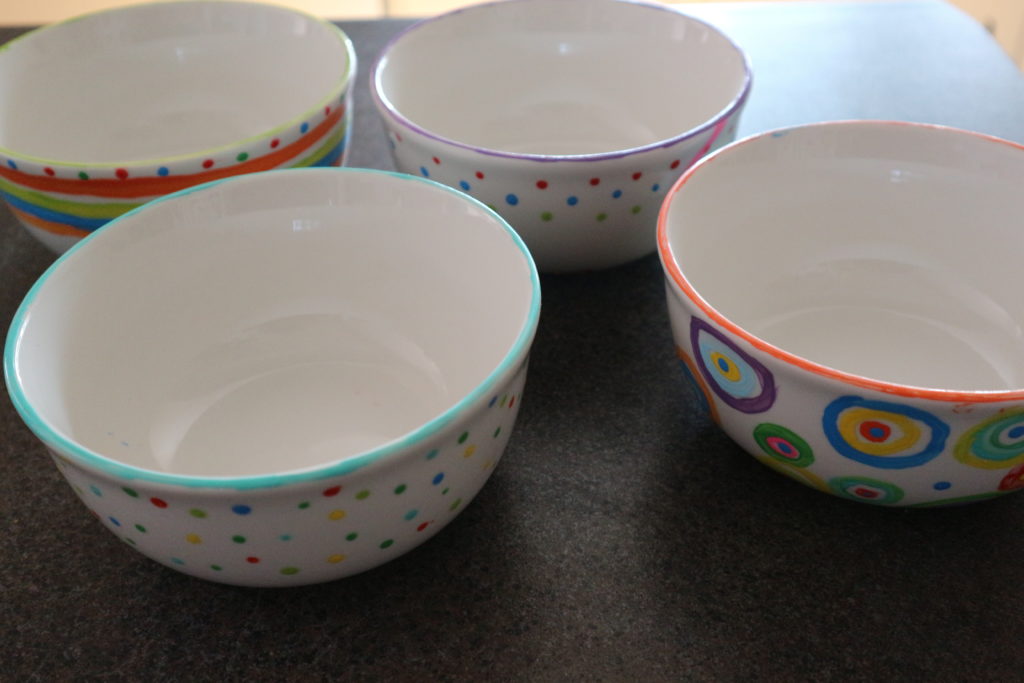
Hand Painting your own dishes is so easy! I had no idea you could just write or paint a message on a dish and bake it and you have a personalized dish, vase, mug… You can buy plain bowls and mugs anywhere. These were from Dollar Tree for $1.25.
I had so much fun painting the first 4 bright colored designs I sent out the hubby and kids to get us another 4 so we could all decorate our own!
In the paint section of your craft store there is several kinds of paints that can use on glass and ceramics. You can choose from pots of paint like the photo above or pens/markers.
Multi-surface pens are also found in the paint section. They can be used for writing on metal, ceramic, glass etc. The pens cost approximately $5.99. I purchased one black one.
The pots of paints cost more….$20 if I remember correctly. But I had a 40% off coupon so I got one that has 18 small pots of “Brights” paint in the kit by Craft Smart.
You will need:
- Multi-Surface Pens and Paint
- Art Paint Brush
- Plain Dishes
- Toothpicks
- Oven
I mentioned to have some toothpicks handy because each little pot will need to be stirred after opening.
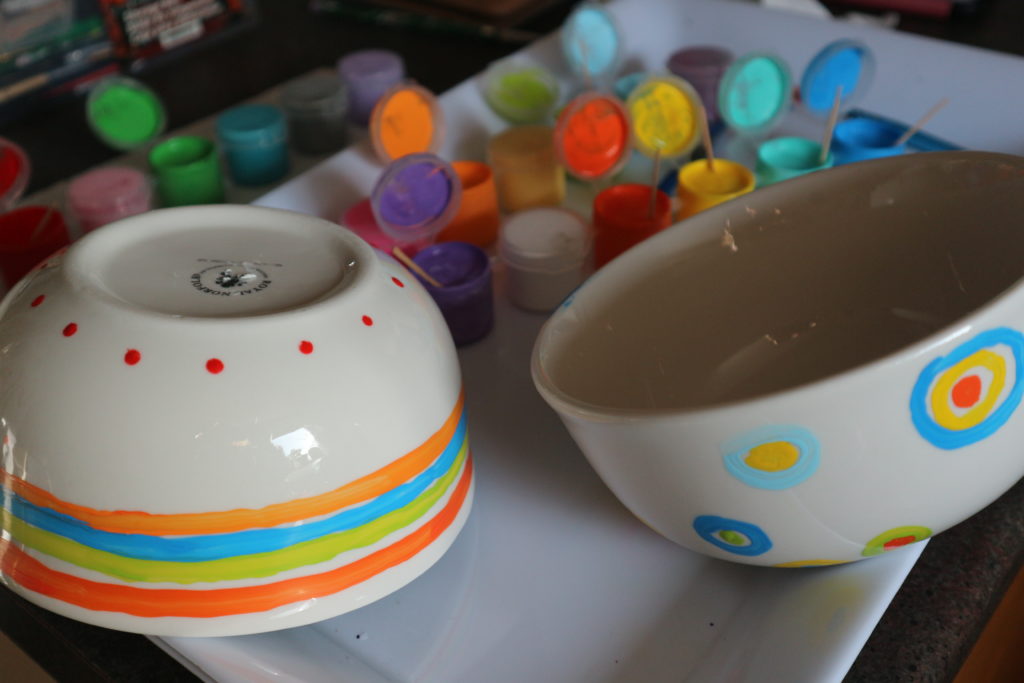
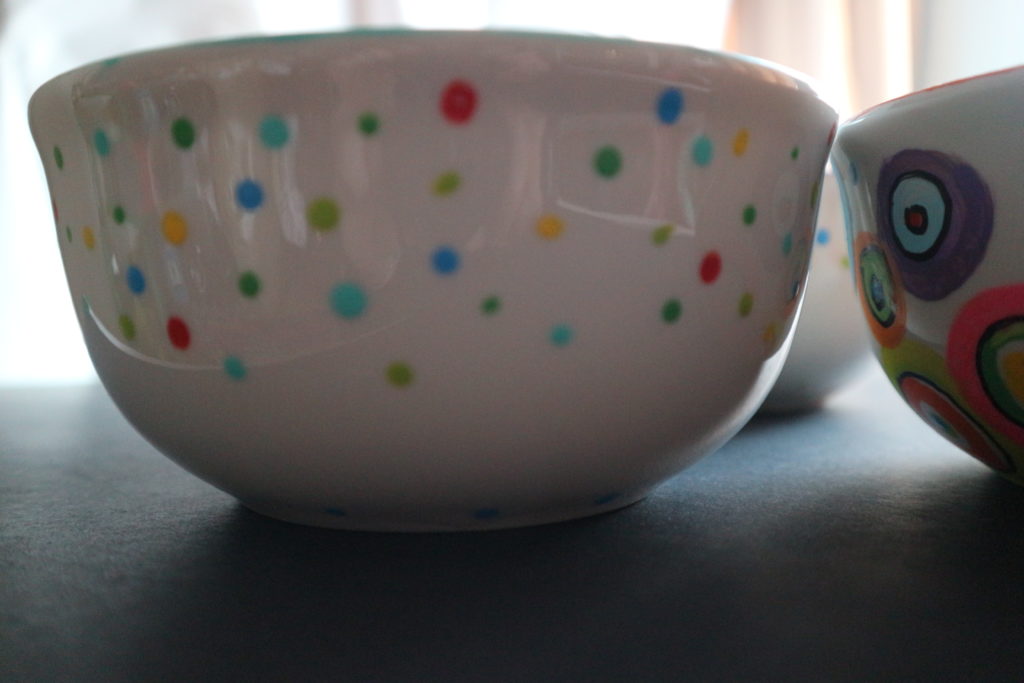
Decorate the bowls in whatever style you wish.
Just a word of caution, the marker dries immediately, where as, the paint in the pots could be wiped off if you realized you needed to fix it. Holding the bowl while painting is tricky-you really need to watch that you don’t smear it.
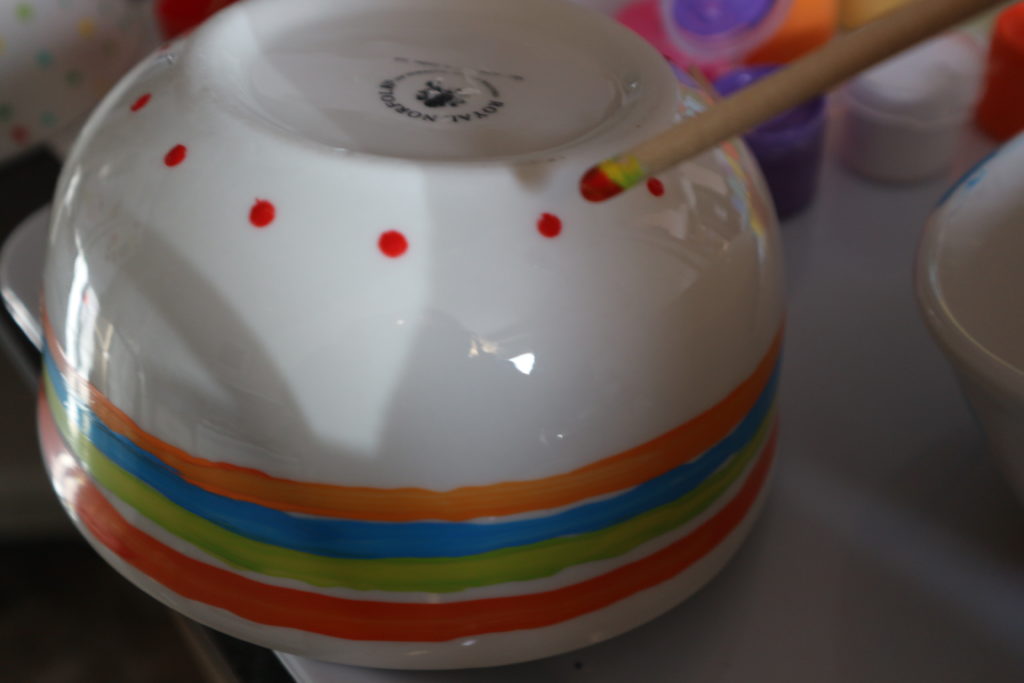
Here I am dipping the end of a paintbrush to make perfect dots.
“Craft Smart” Paint says:
Durable, weather-resistant satin paint. Excellent adhesion on glass ceramics, wood, metal, rigid plastic, fabric, canvas, paper and terra cotta. (Well doesn’t that just bring 100 projects on the to do list to your mind)
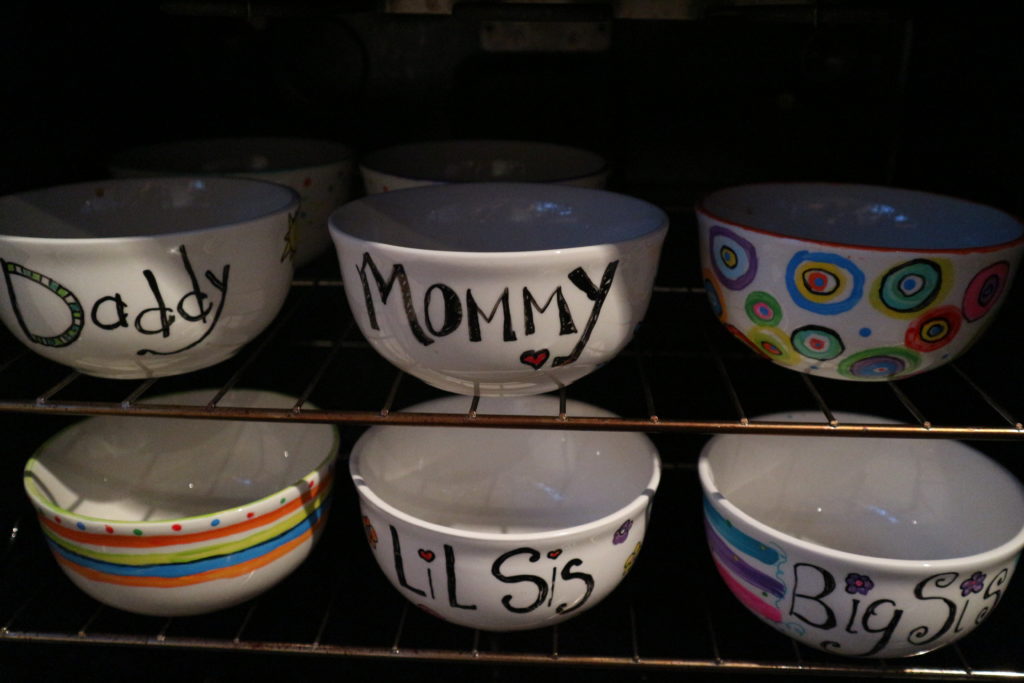
Directions: Water-base, apply 1-2 coats until desired coverage is achieved. For glass or ceramics, first clean surface with alcohol. For top rack dishwasher-safe finish: Let paint cure for 72 hours. Place in a cool oven, heat to 350 degrees F (176C) for 30 mins. Cool in oven.
So you waited 72 hours right?
Then you can put the bowls in the cool oven and turn on the stove to 350 degrees. After the 30 mins is done, turn off the oven and allow to cool in the stove before moving.
I know I’m being repetitive but you gotta follow the instructions. If your paint is another brand follow what it says to do.

This super cool project does require some time. If you are planning to put a message on a vase you are bringing flowers in to an anniversary party on Saturday you need to plan ahead and paint it by Wednesday to let it cure for 2 days and then bake…and cool.
Also, it doesn’t say this is “food safe”. So I wouldn’t put it on the inside of the bowls, mugs and middle of plates your eating off of. Maybe I’m being over cautious….I like to be on the safe side.
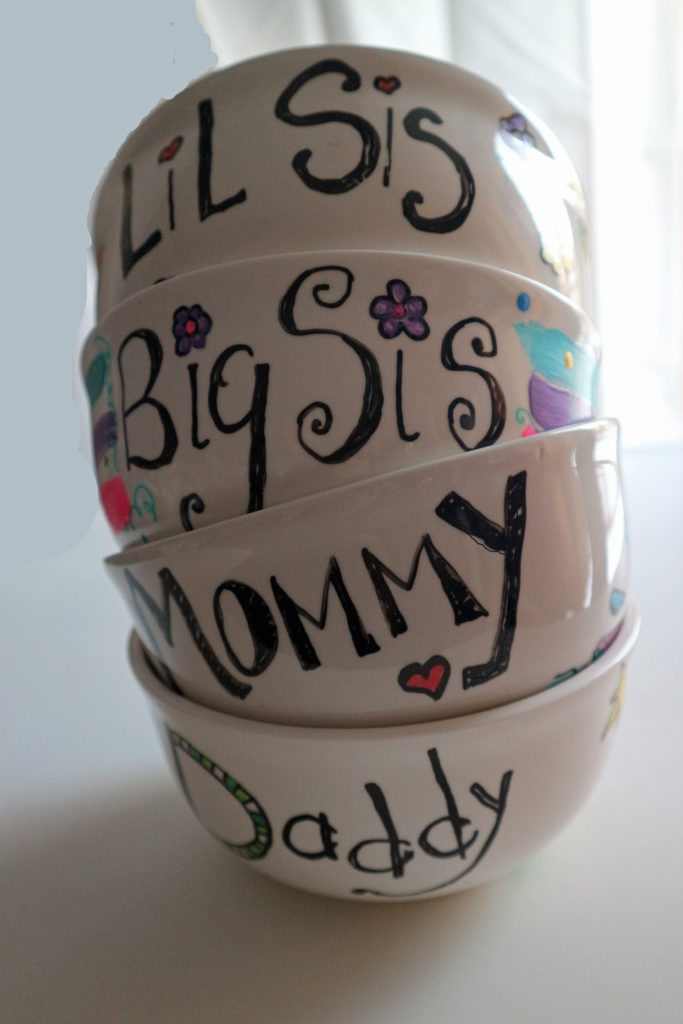
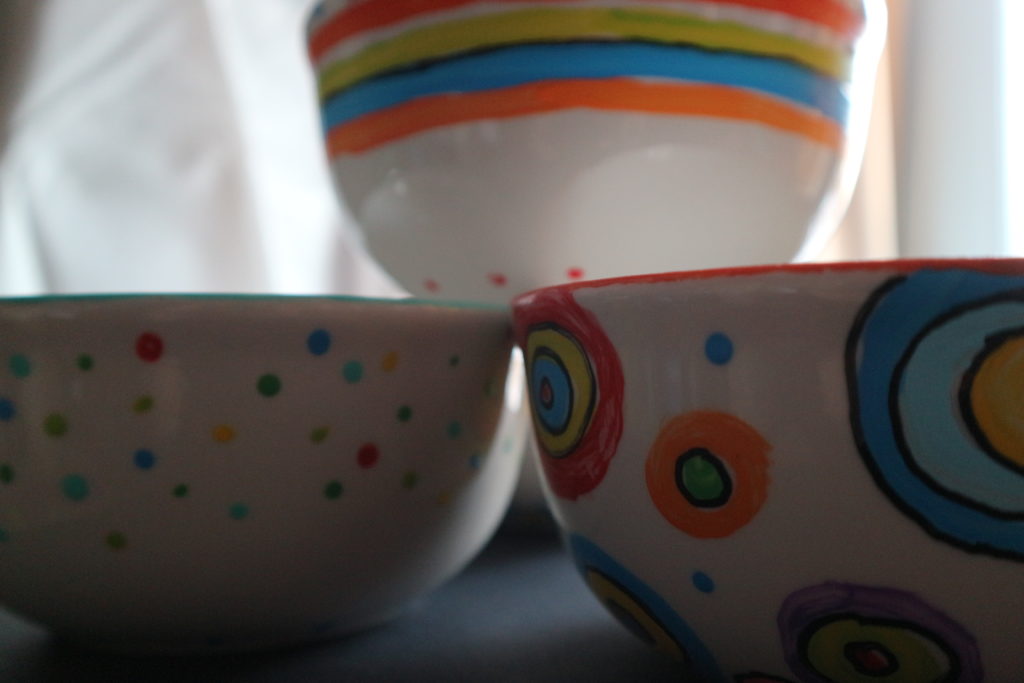
Now we have a cereal bowl personalized for everyone!
I loved this project and now I want to do more! Next Dog Bowls!
Please pin this or share it with your social media friends.

Decorating wooden memory or jewellry boxes. Easy Craft!

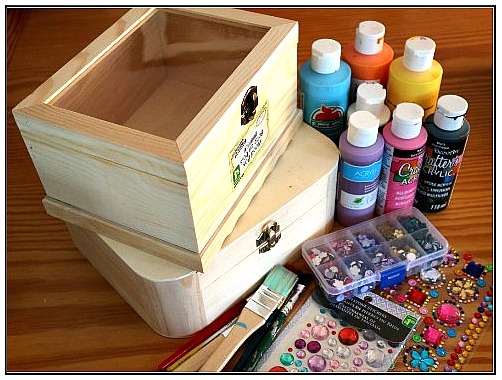
Pick up some plain wood boxes from the craft store or dollar store and paint gives it a make over! Jewelry box or memory box whatever you want to use it for!
You will need:
- A wooden box
- Craft Paint
- Paint Brushes
- Stick on Gems
- Clear Coat Polyurethane Spray or in a Paint Tin (Optional)
Start by peeling off all the price tags and labels. Choose the theme of your box. I love the cool whites but today we were feeling jazzy! My girls and I decided on bright colors…… pink, red, purple, navy blue and turquoise.
My box had a window to see the treasures inside so I painted the interior of the box also.
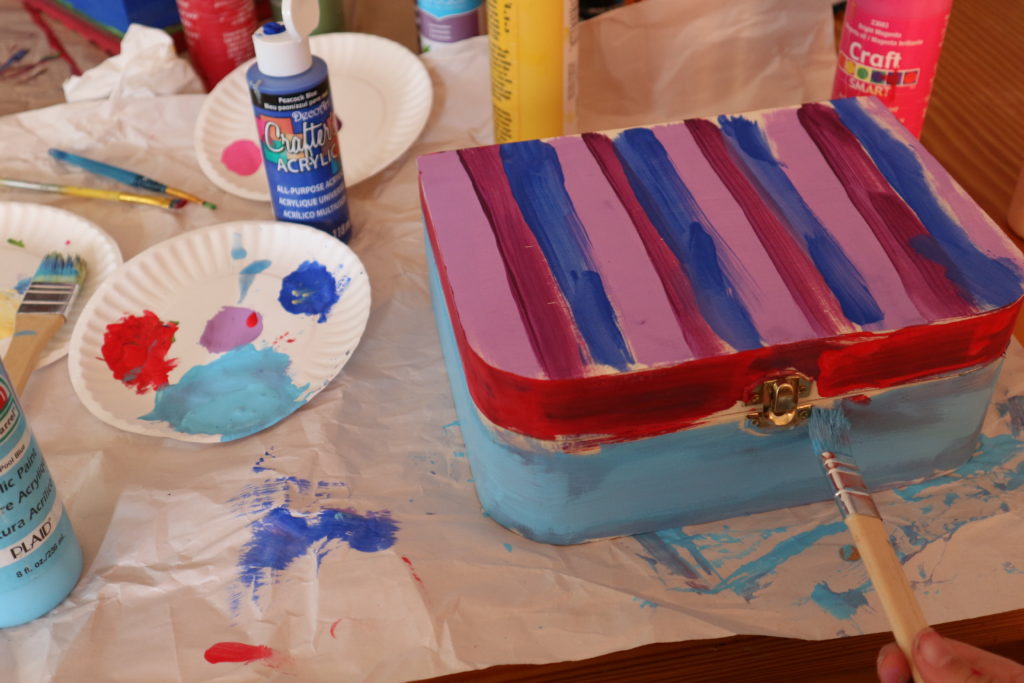 Protect your table because this can get messy!
This box got stripes on the top and color blocking for the bottom turquoise and the lid rim got a splash of red paint. Literally…LOL.
It looks a mess in the photo above but check out a sneak peak of her final results!
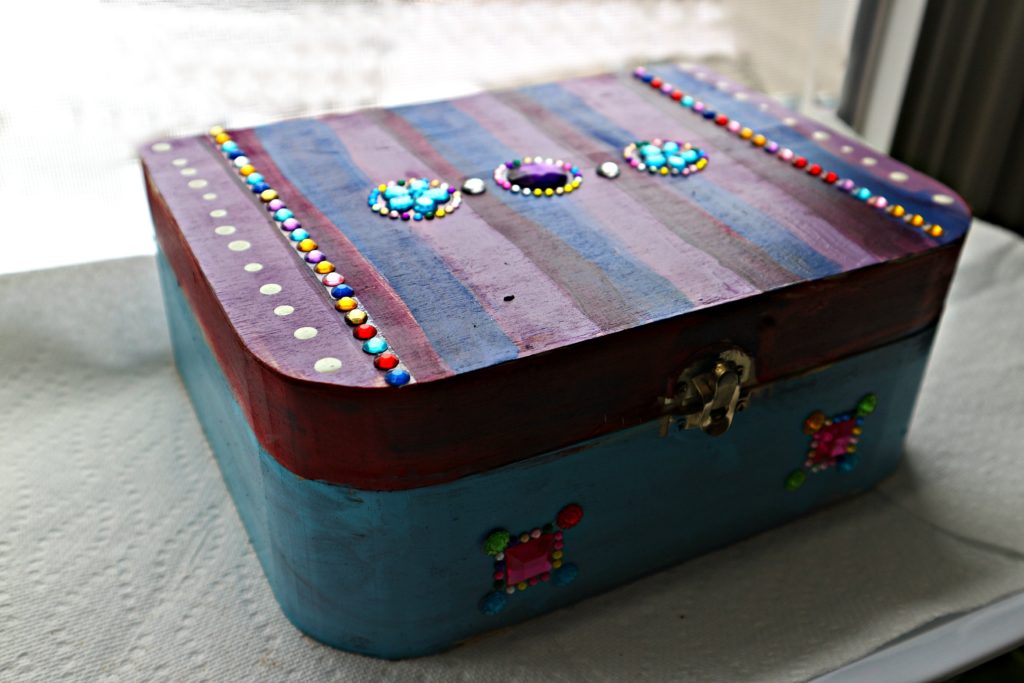
My 8 year old artist decorated this one. Using the gorgeous gem stickers (from the Dollarstore) distracts the eye from areas she colored outside the lines. But we are getting ahead of ourselves. Let’s get back to decorating it!
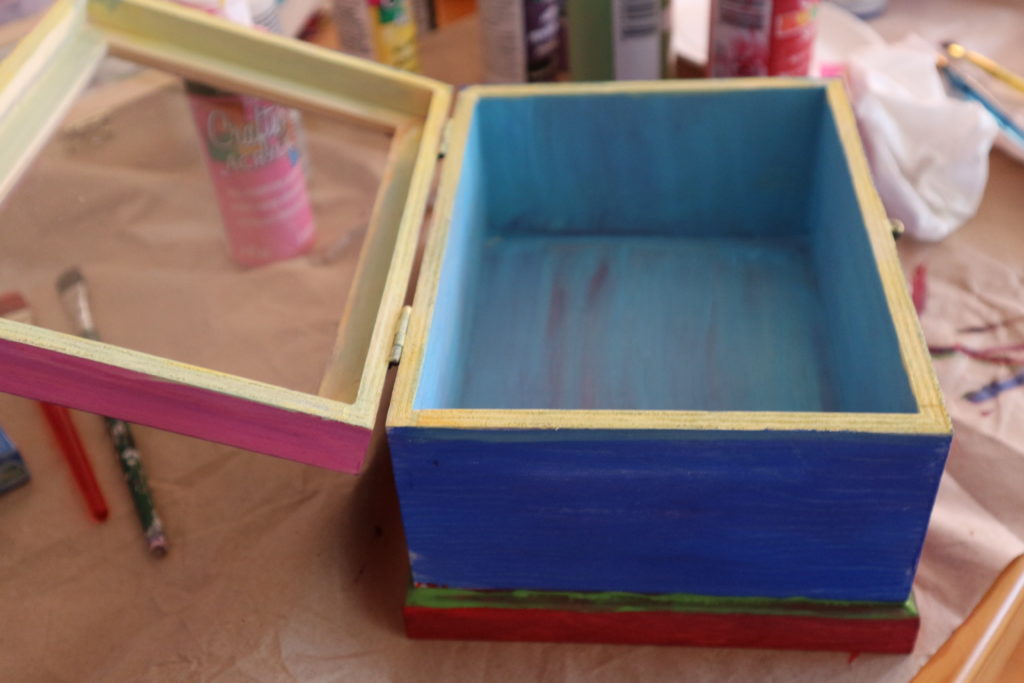
It’s completely up to you if you would like to pain the inside or not.
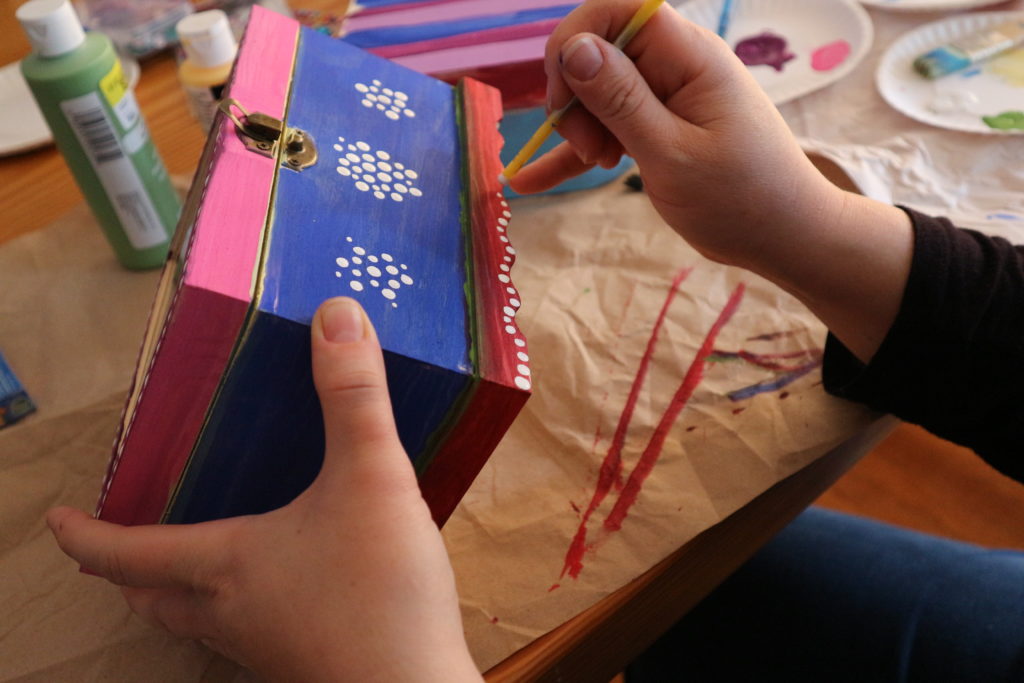
My favorite technique for adding dots is to dip the tip of the handle into the white paint and dot it on the box. Clusters of dots and curves of white dots.
After this dried I put a clear coat of polyurethane on the boxes just to make it a bit shiny and smoother for me to wipe and dust. You can skip this step if you don’t have it or put it on later. You can get it in a spray paint or a short tin of paint. If you decide to put on the clear coat it wont take much varnish or time since this project is small. You could do the inside of the box too while your at it.
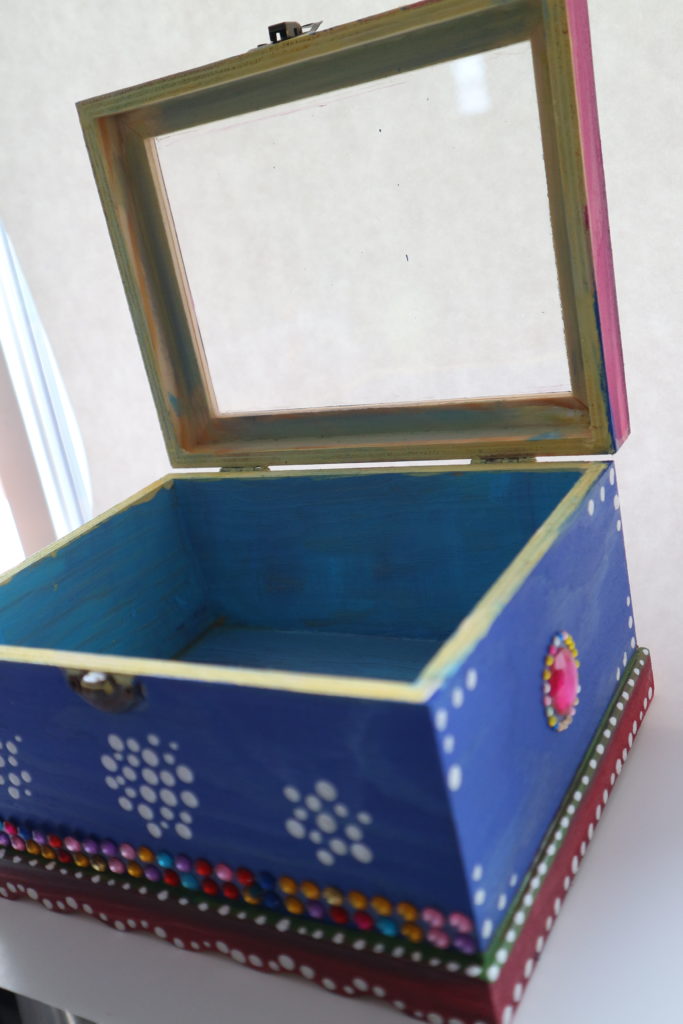
After the memory box is dry, we got out the sequins! These came as stickers with glue on the back. This is such a great cheat compared to gluing each one on.
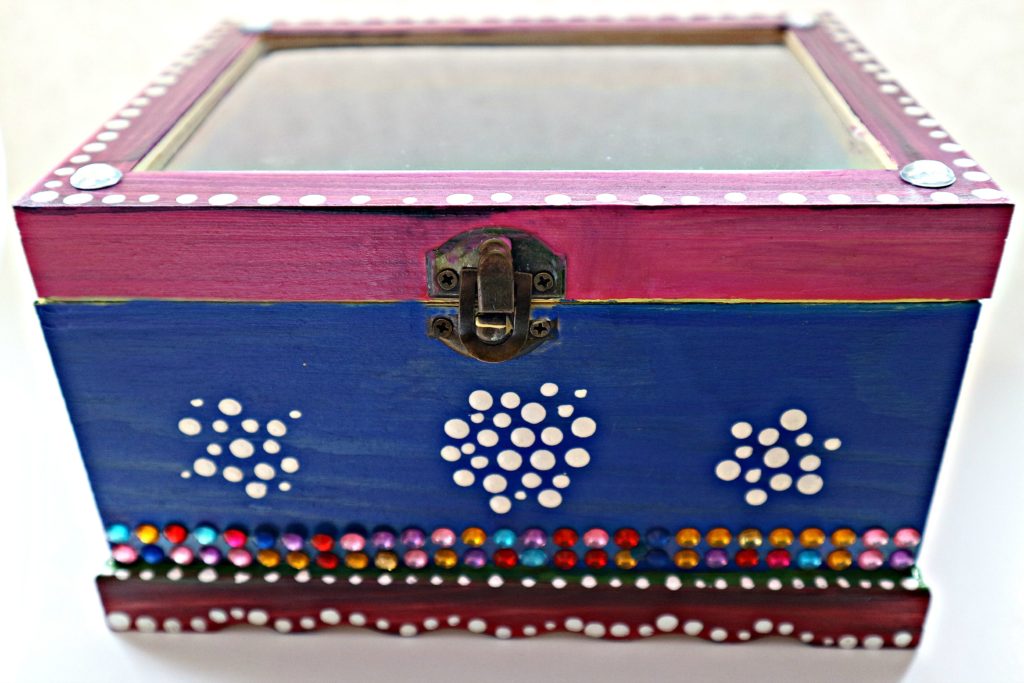
I was really pleased with how it turned out.
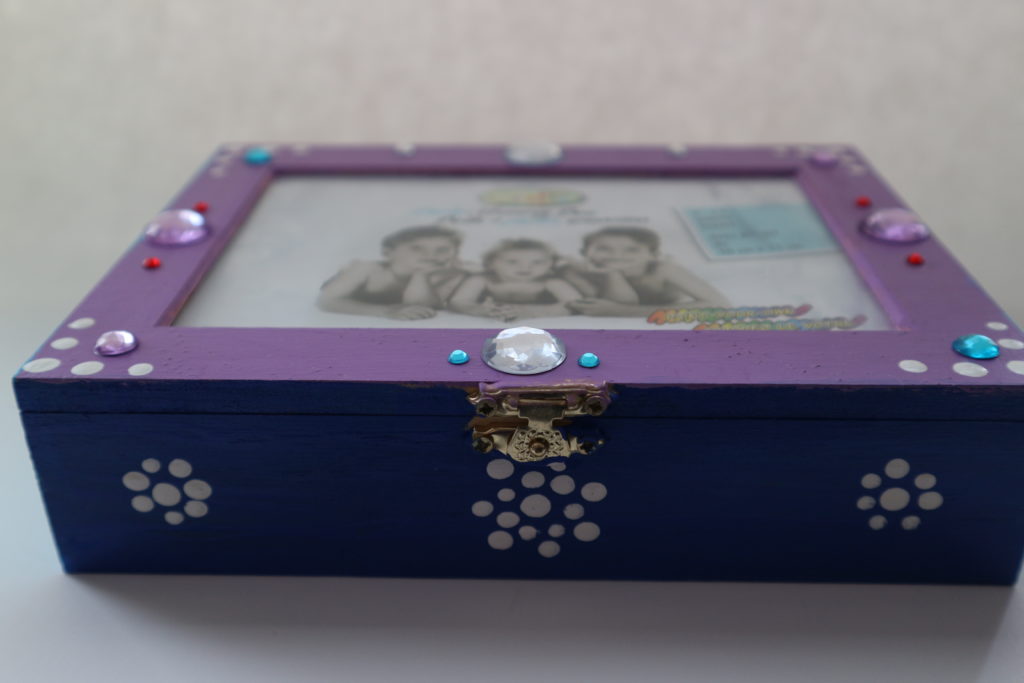
What a great time we 3 had decorating these!
Candy Box
My Miss M. plans to hide candy in her box. She is often given a treat by friends and not allowed to have it right away. Now she can put it in her box.
Treasure Box
Miss B. plans to keep special mementos in her box. She has photos and tickets and trinkets she wants to keep for happy memories.
Love Letter Box
I told them I planned to put love letters in mine and Miss B said “Mom no one writes letters anymore!” Shocking! Well fortunately my daughters do still write me love letters and their daddy does every now and again too.
Thanks for reading this! Leave a comment or pin this to pinterest.

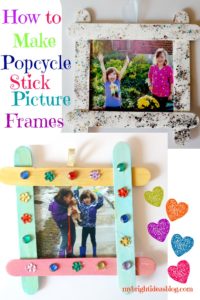
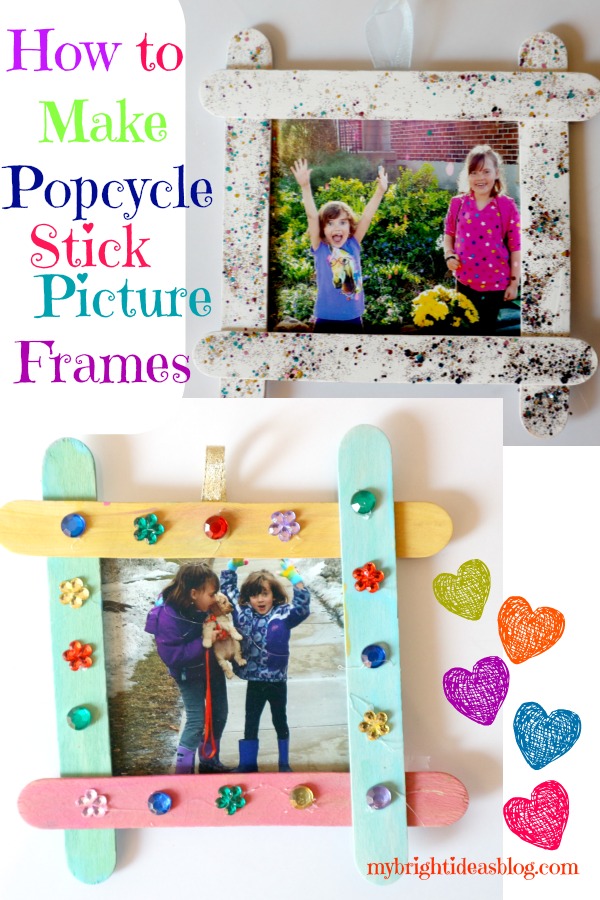
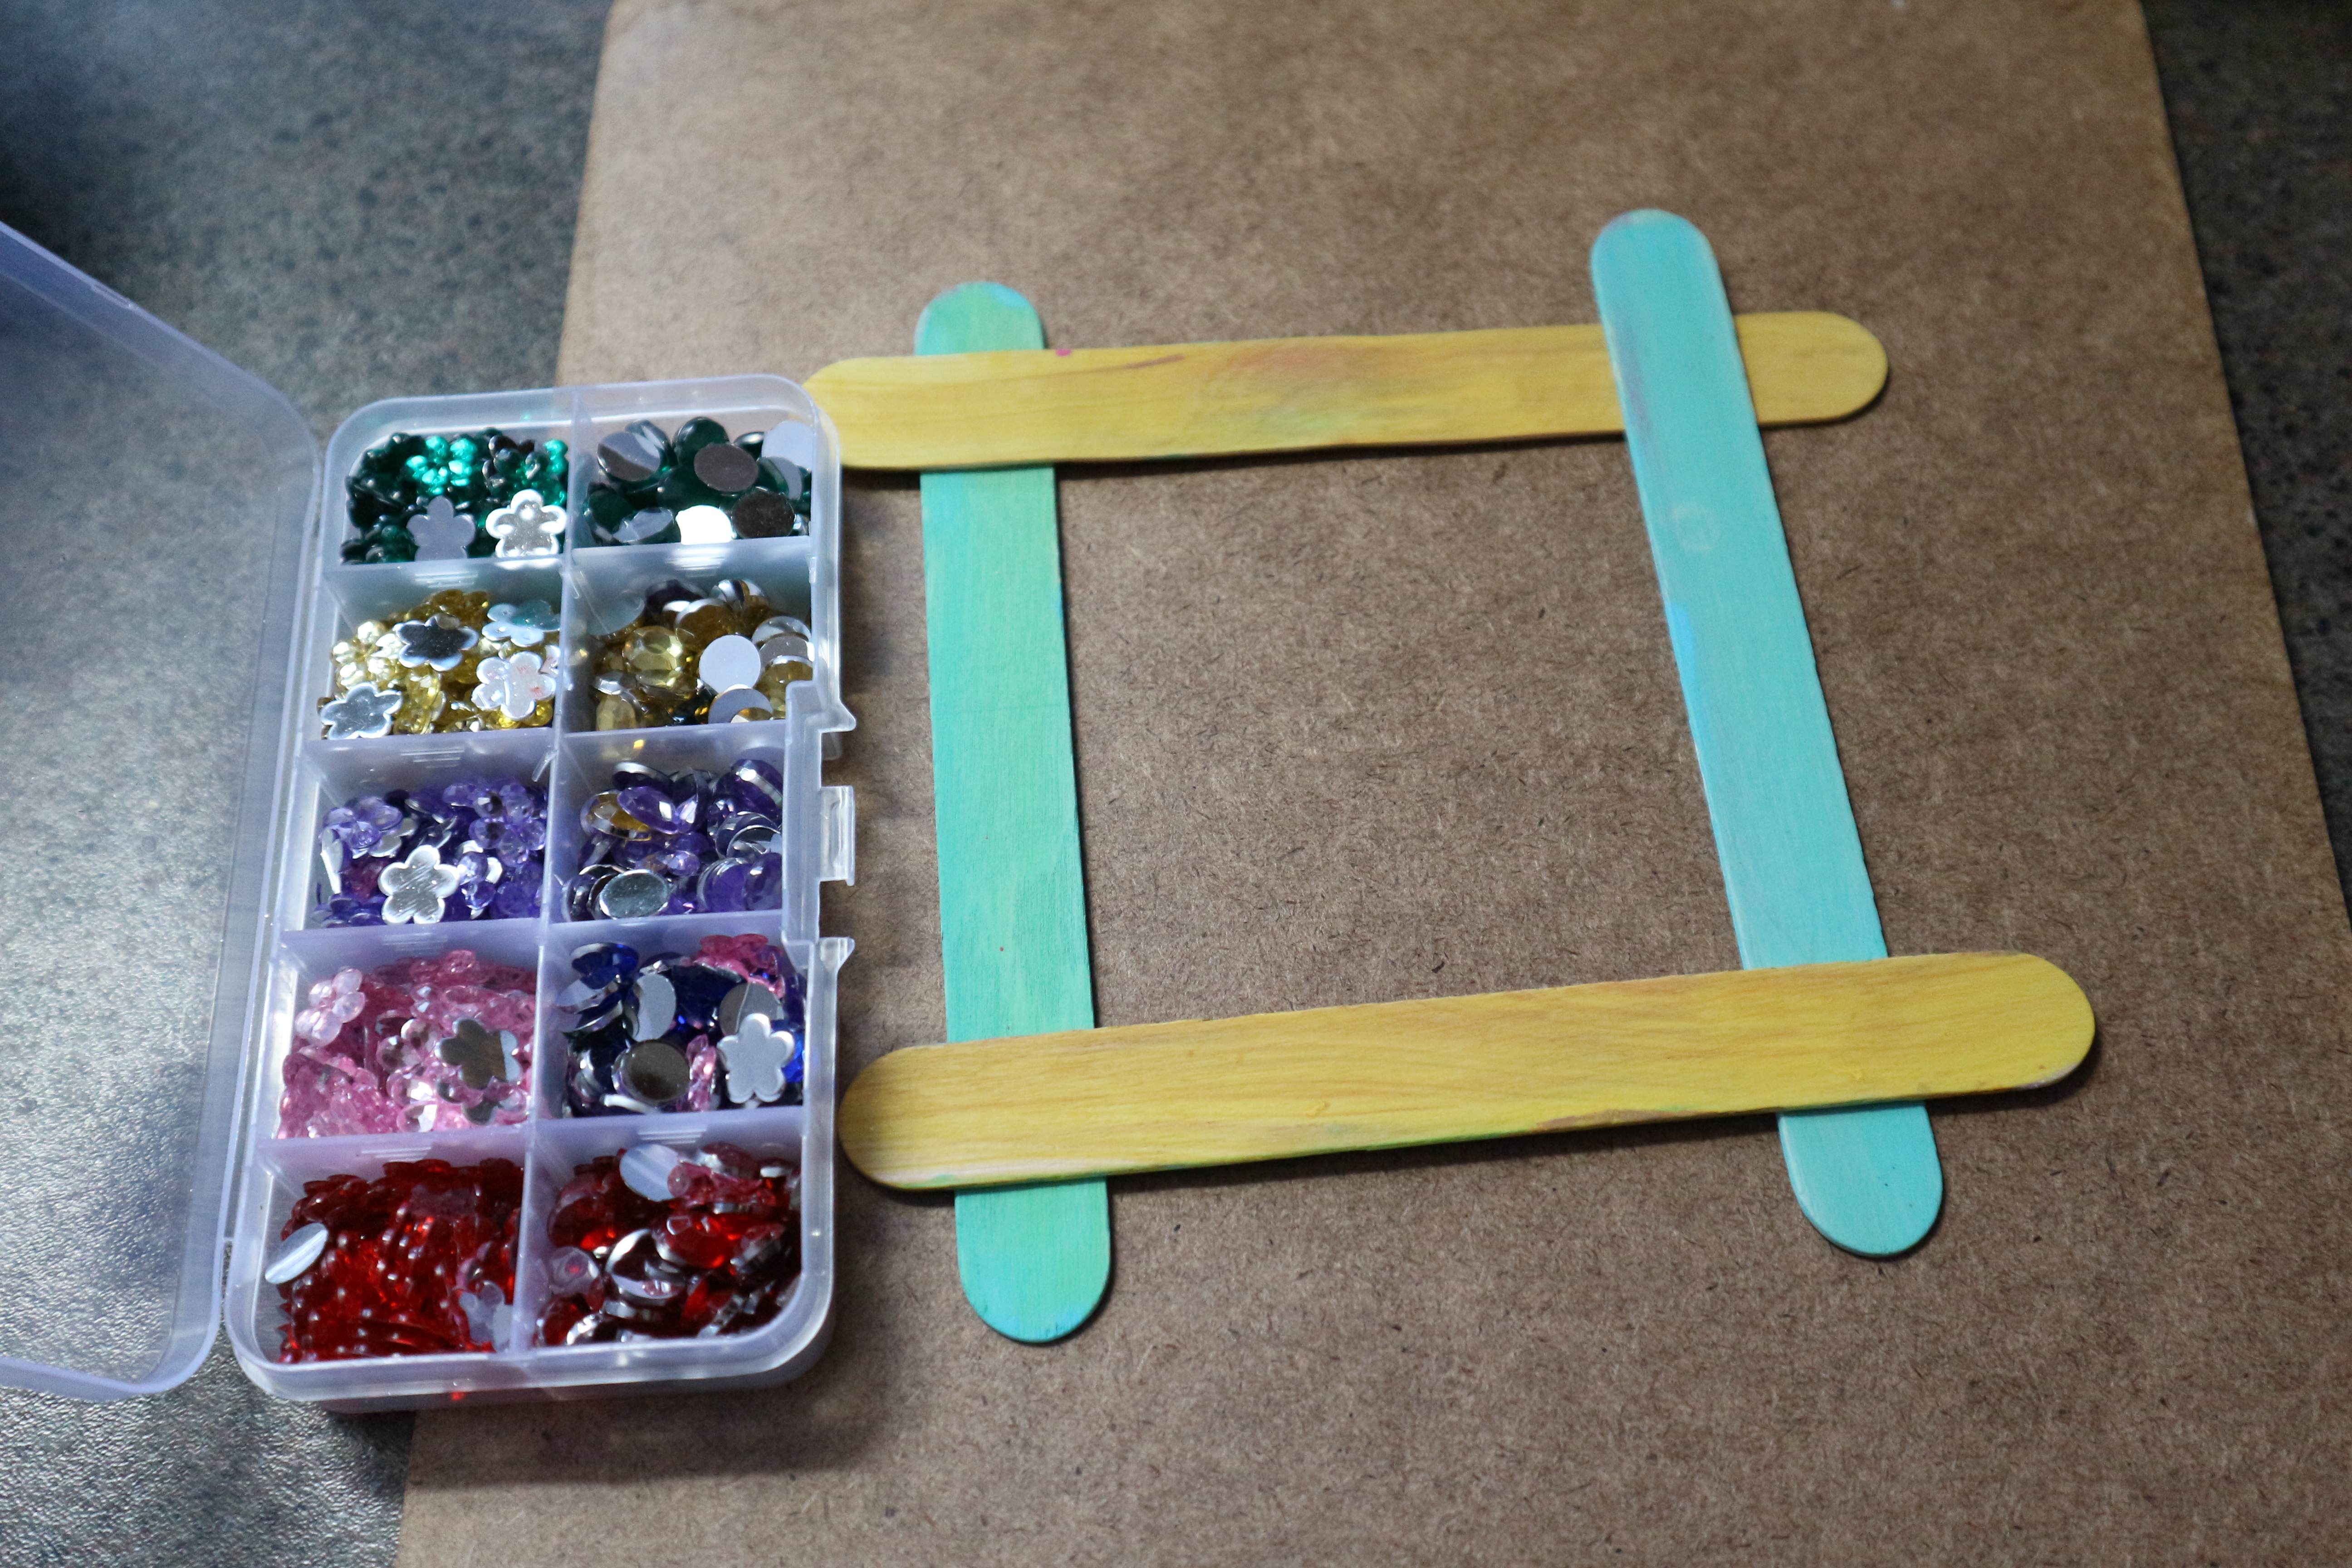
Popcycle Stick Picture Frames -Easy Kids Crafts
 What could be easier than this popcycle stick picture frame. Paint and decorate the popcycle sticks. Glue together to fit the photo you will use. Hot glue works quickly to attached the square of popcycle sticks. Hot glue a piece of ribbon on the back. OR strips of magnets if you would rather this be a fridge magnet.
You will need: wide popcycle sticks, glue or glue gun. Glitter glue, gems depending on how decretive you want to get-you could just let a toddler finger paint it.
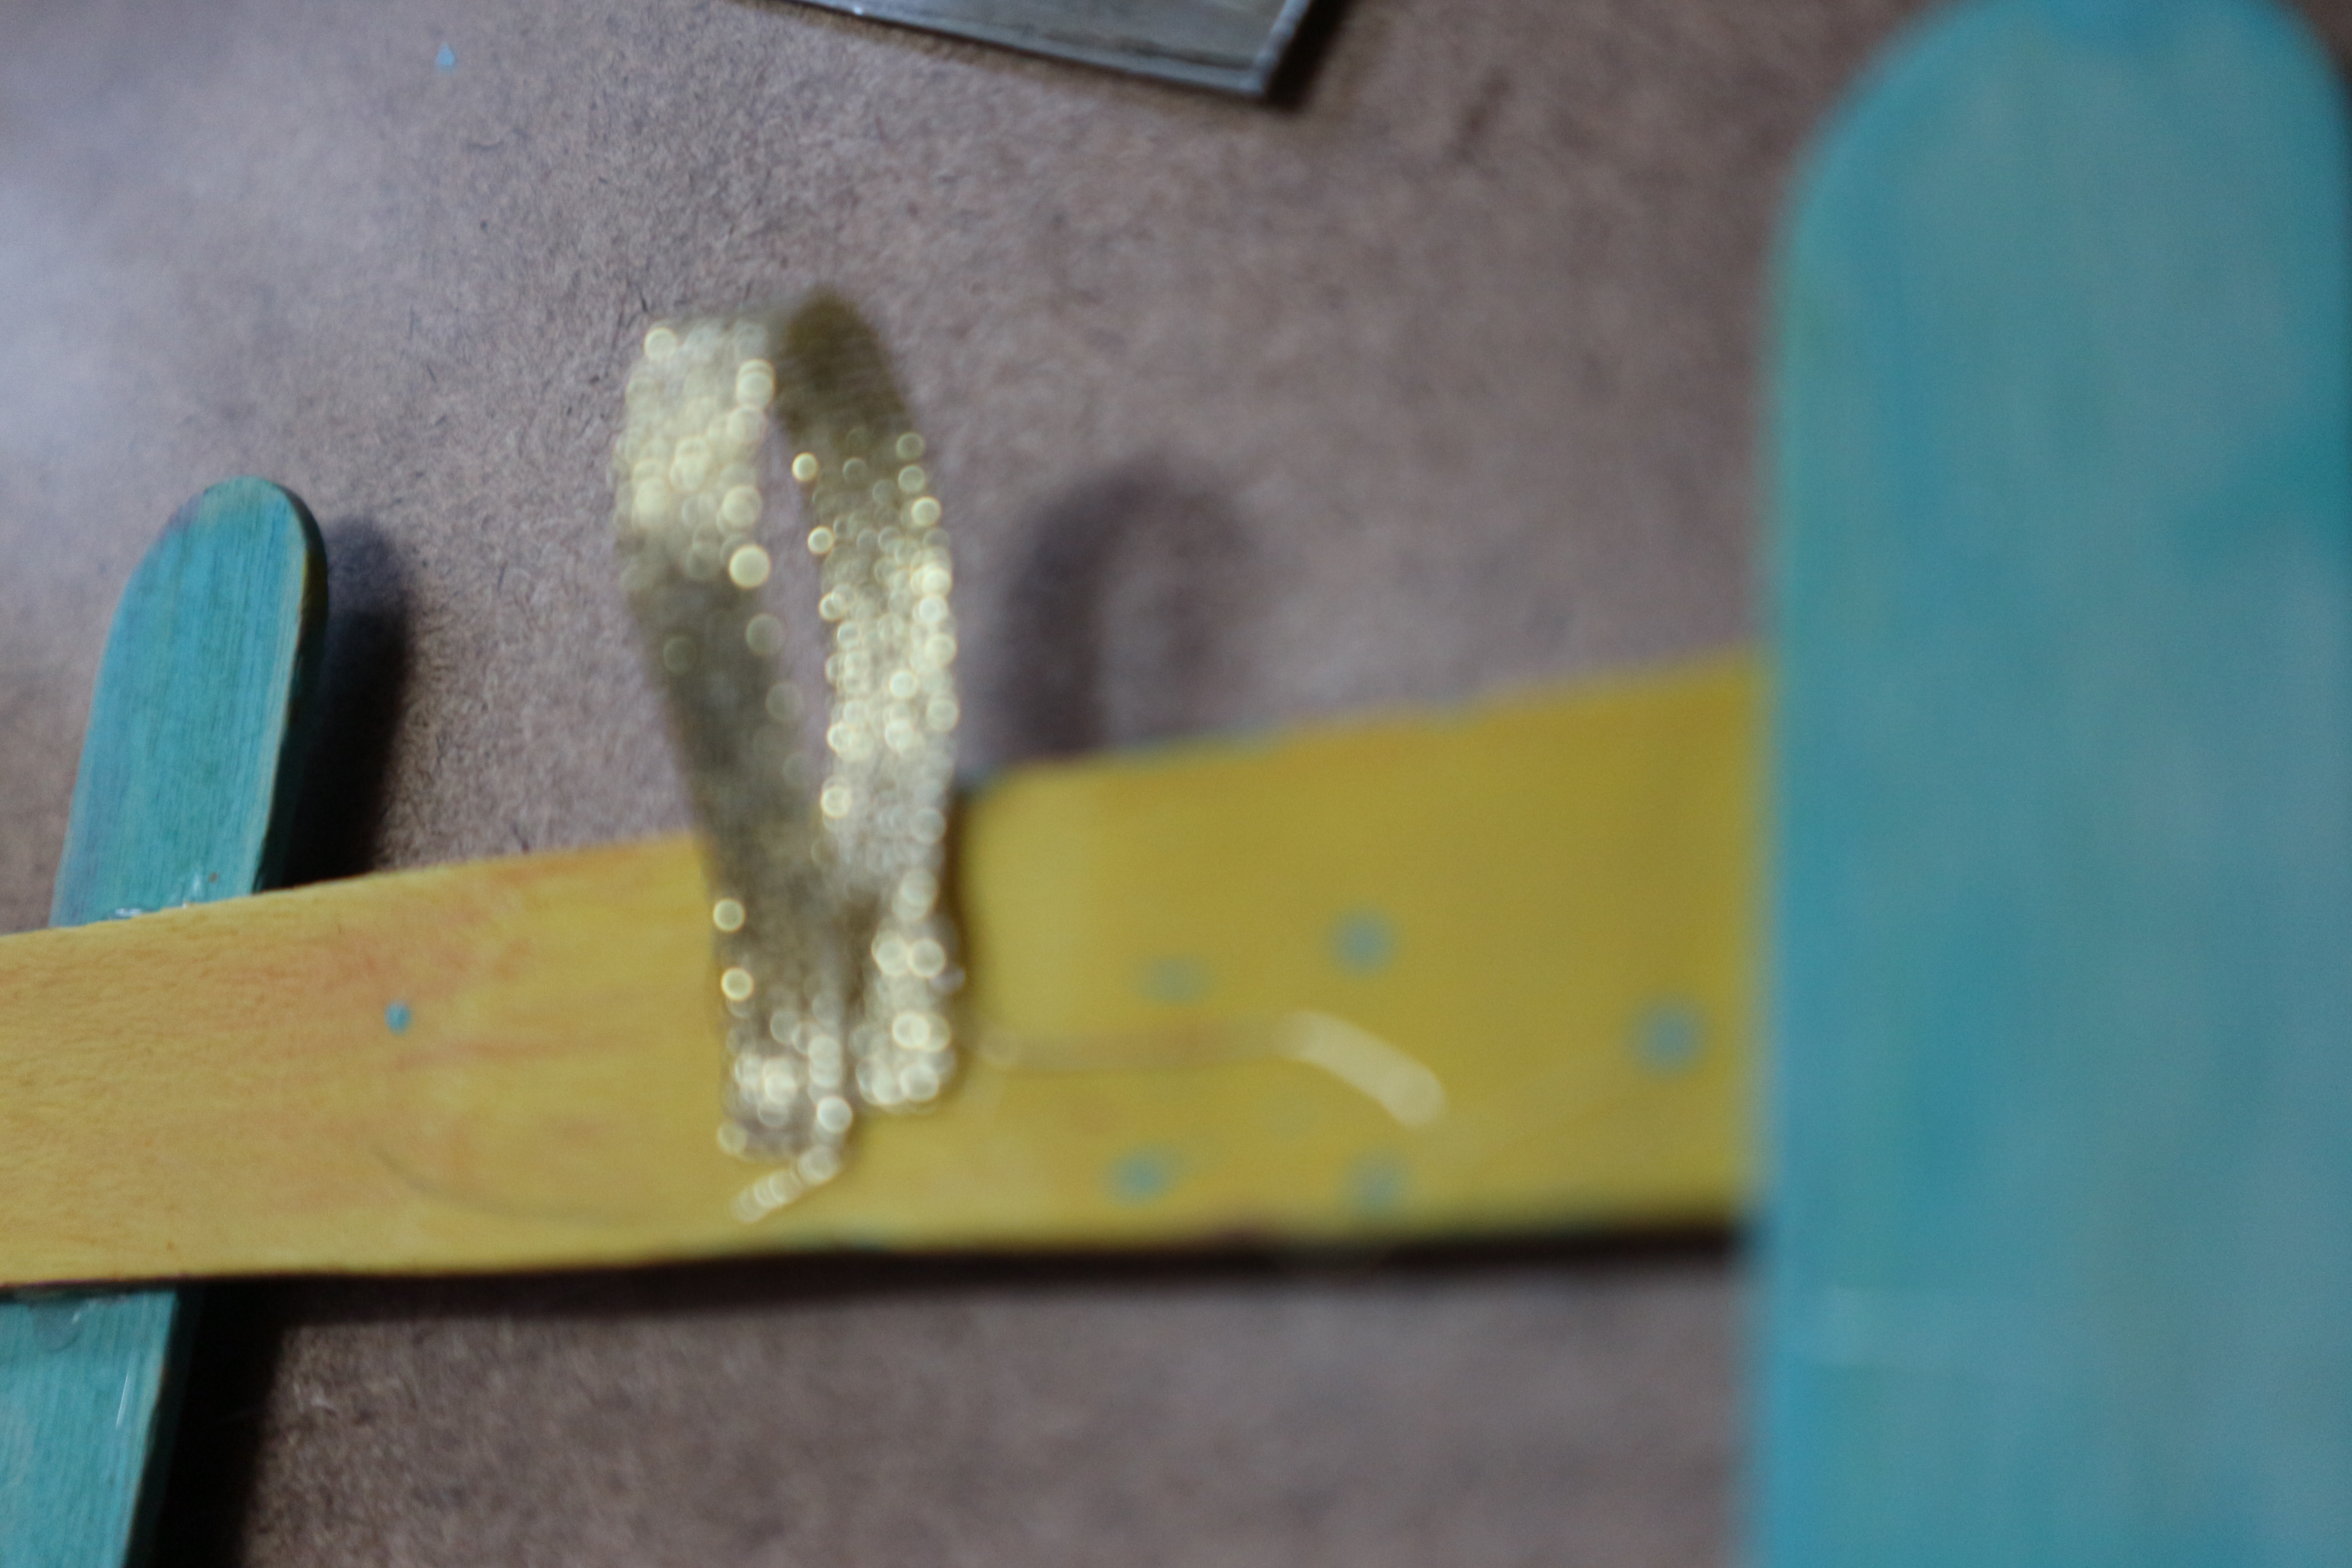
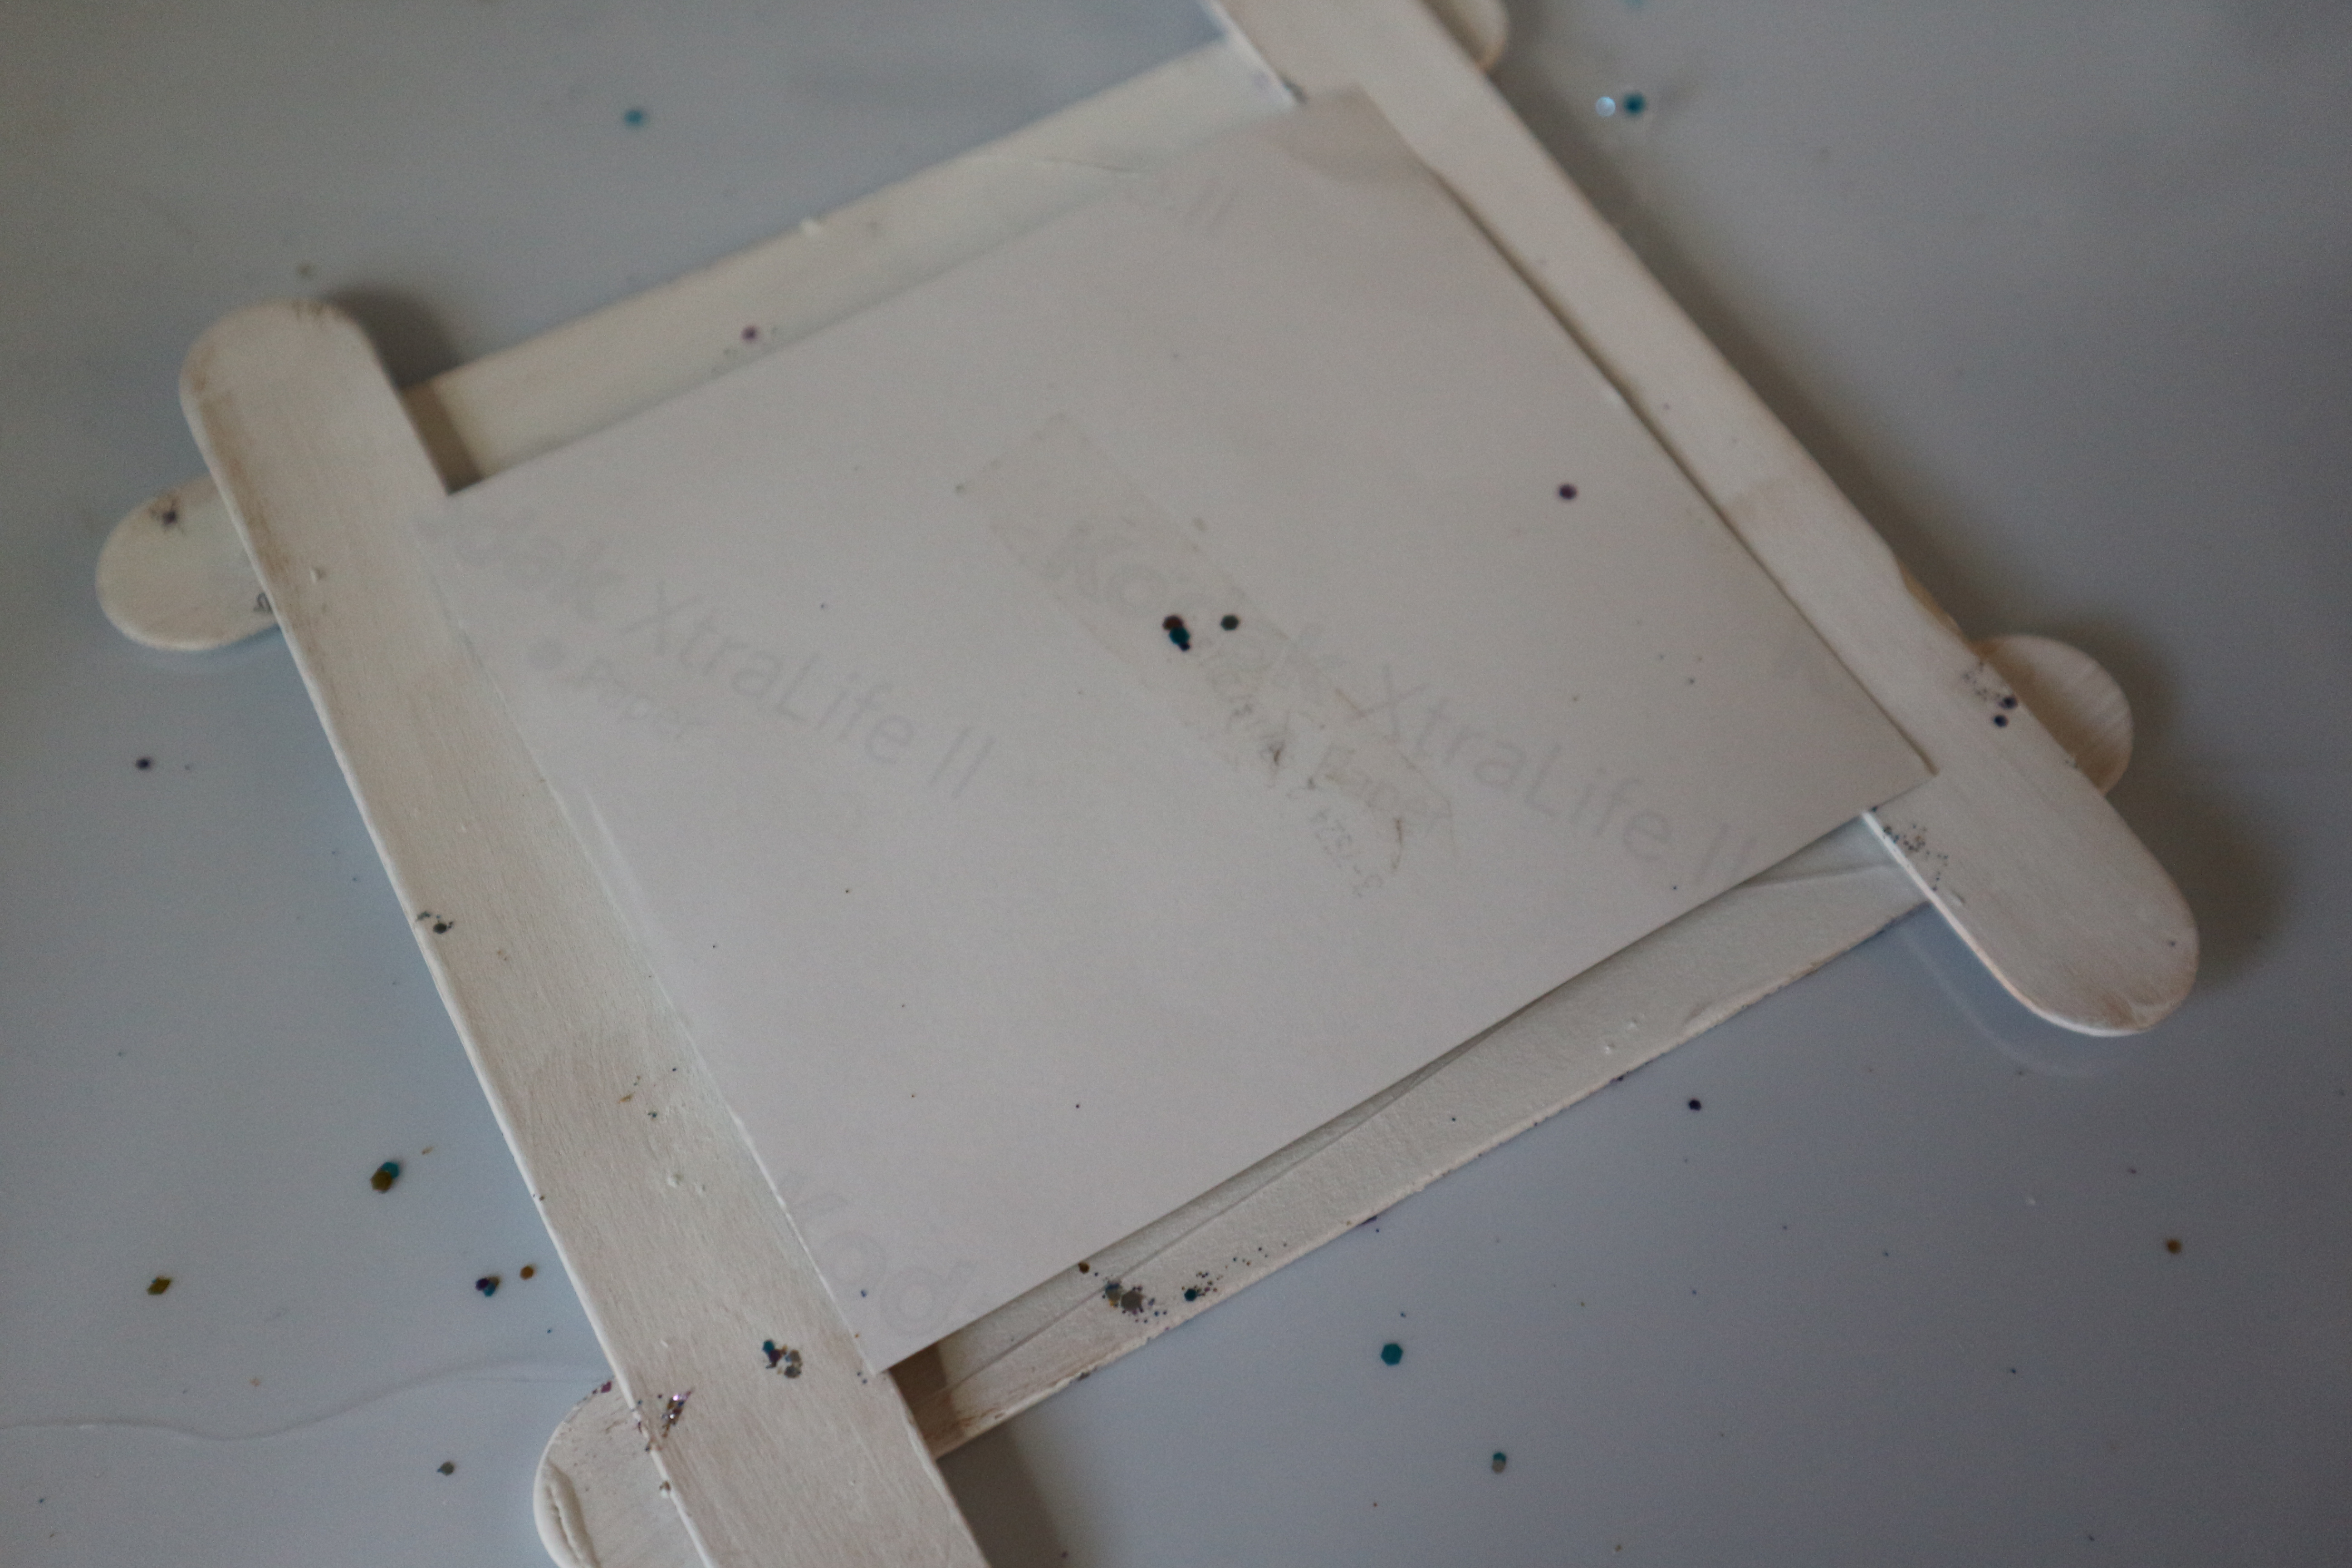
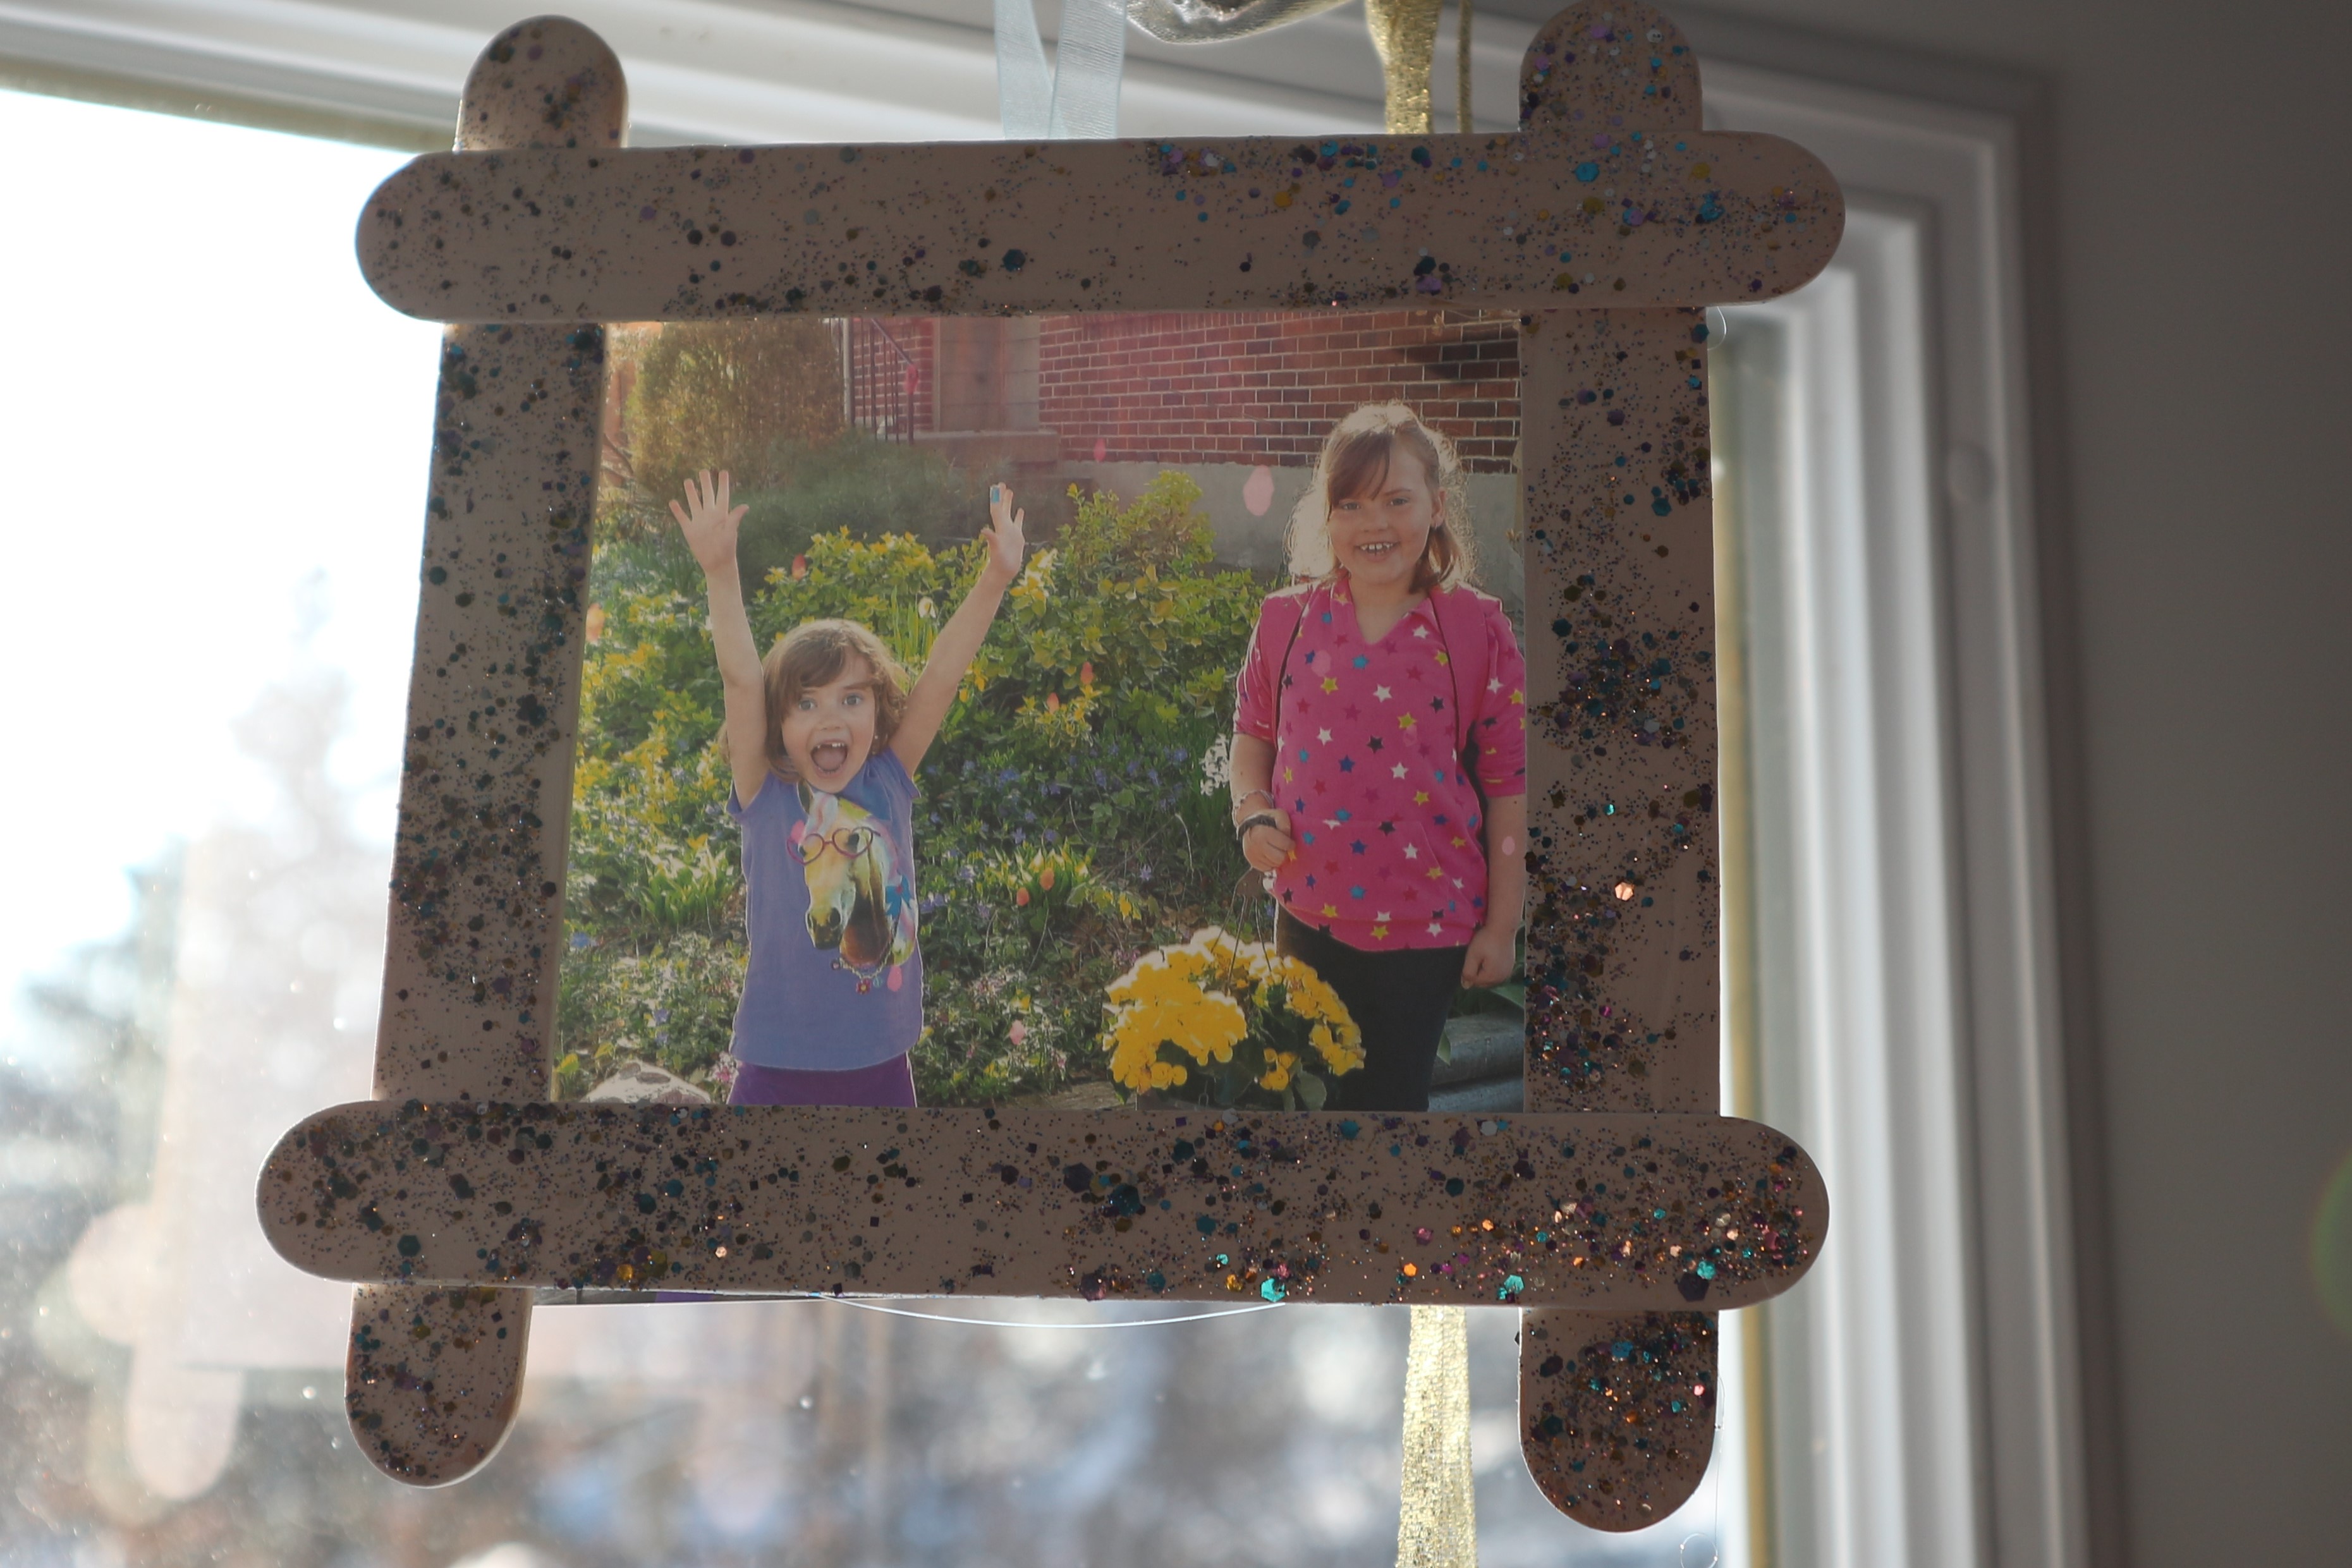
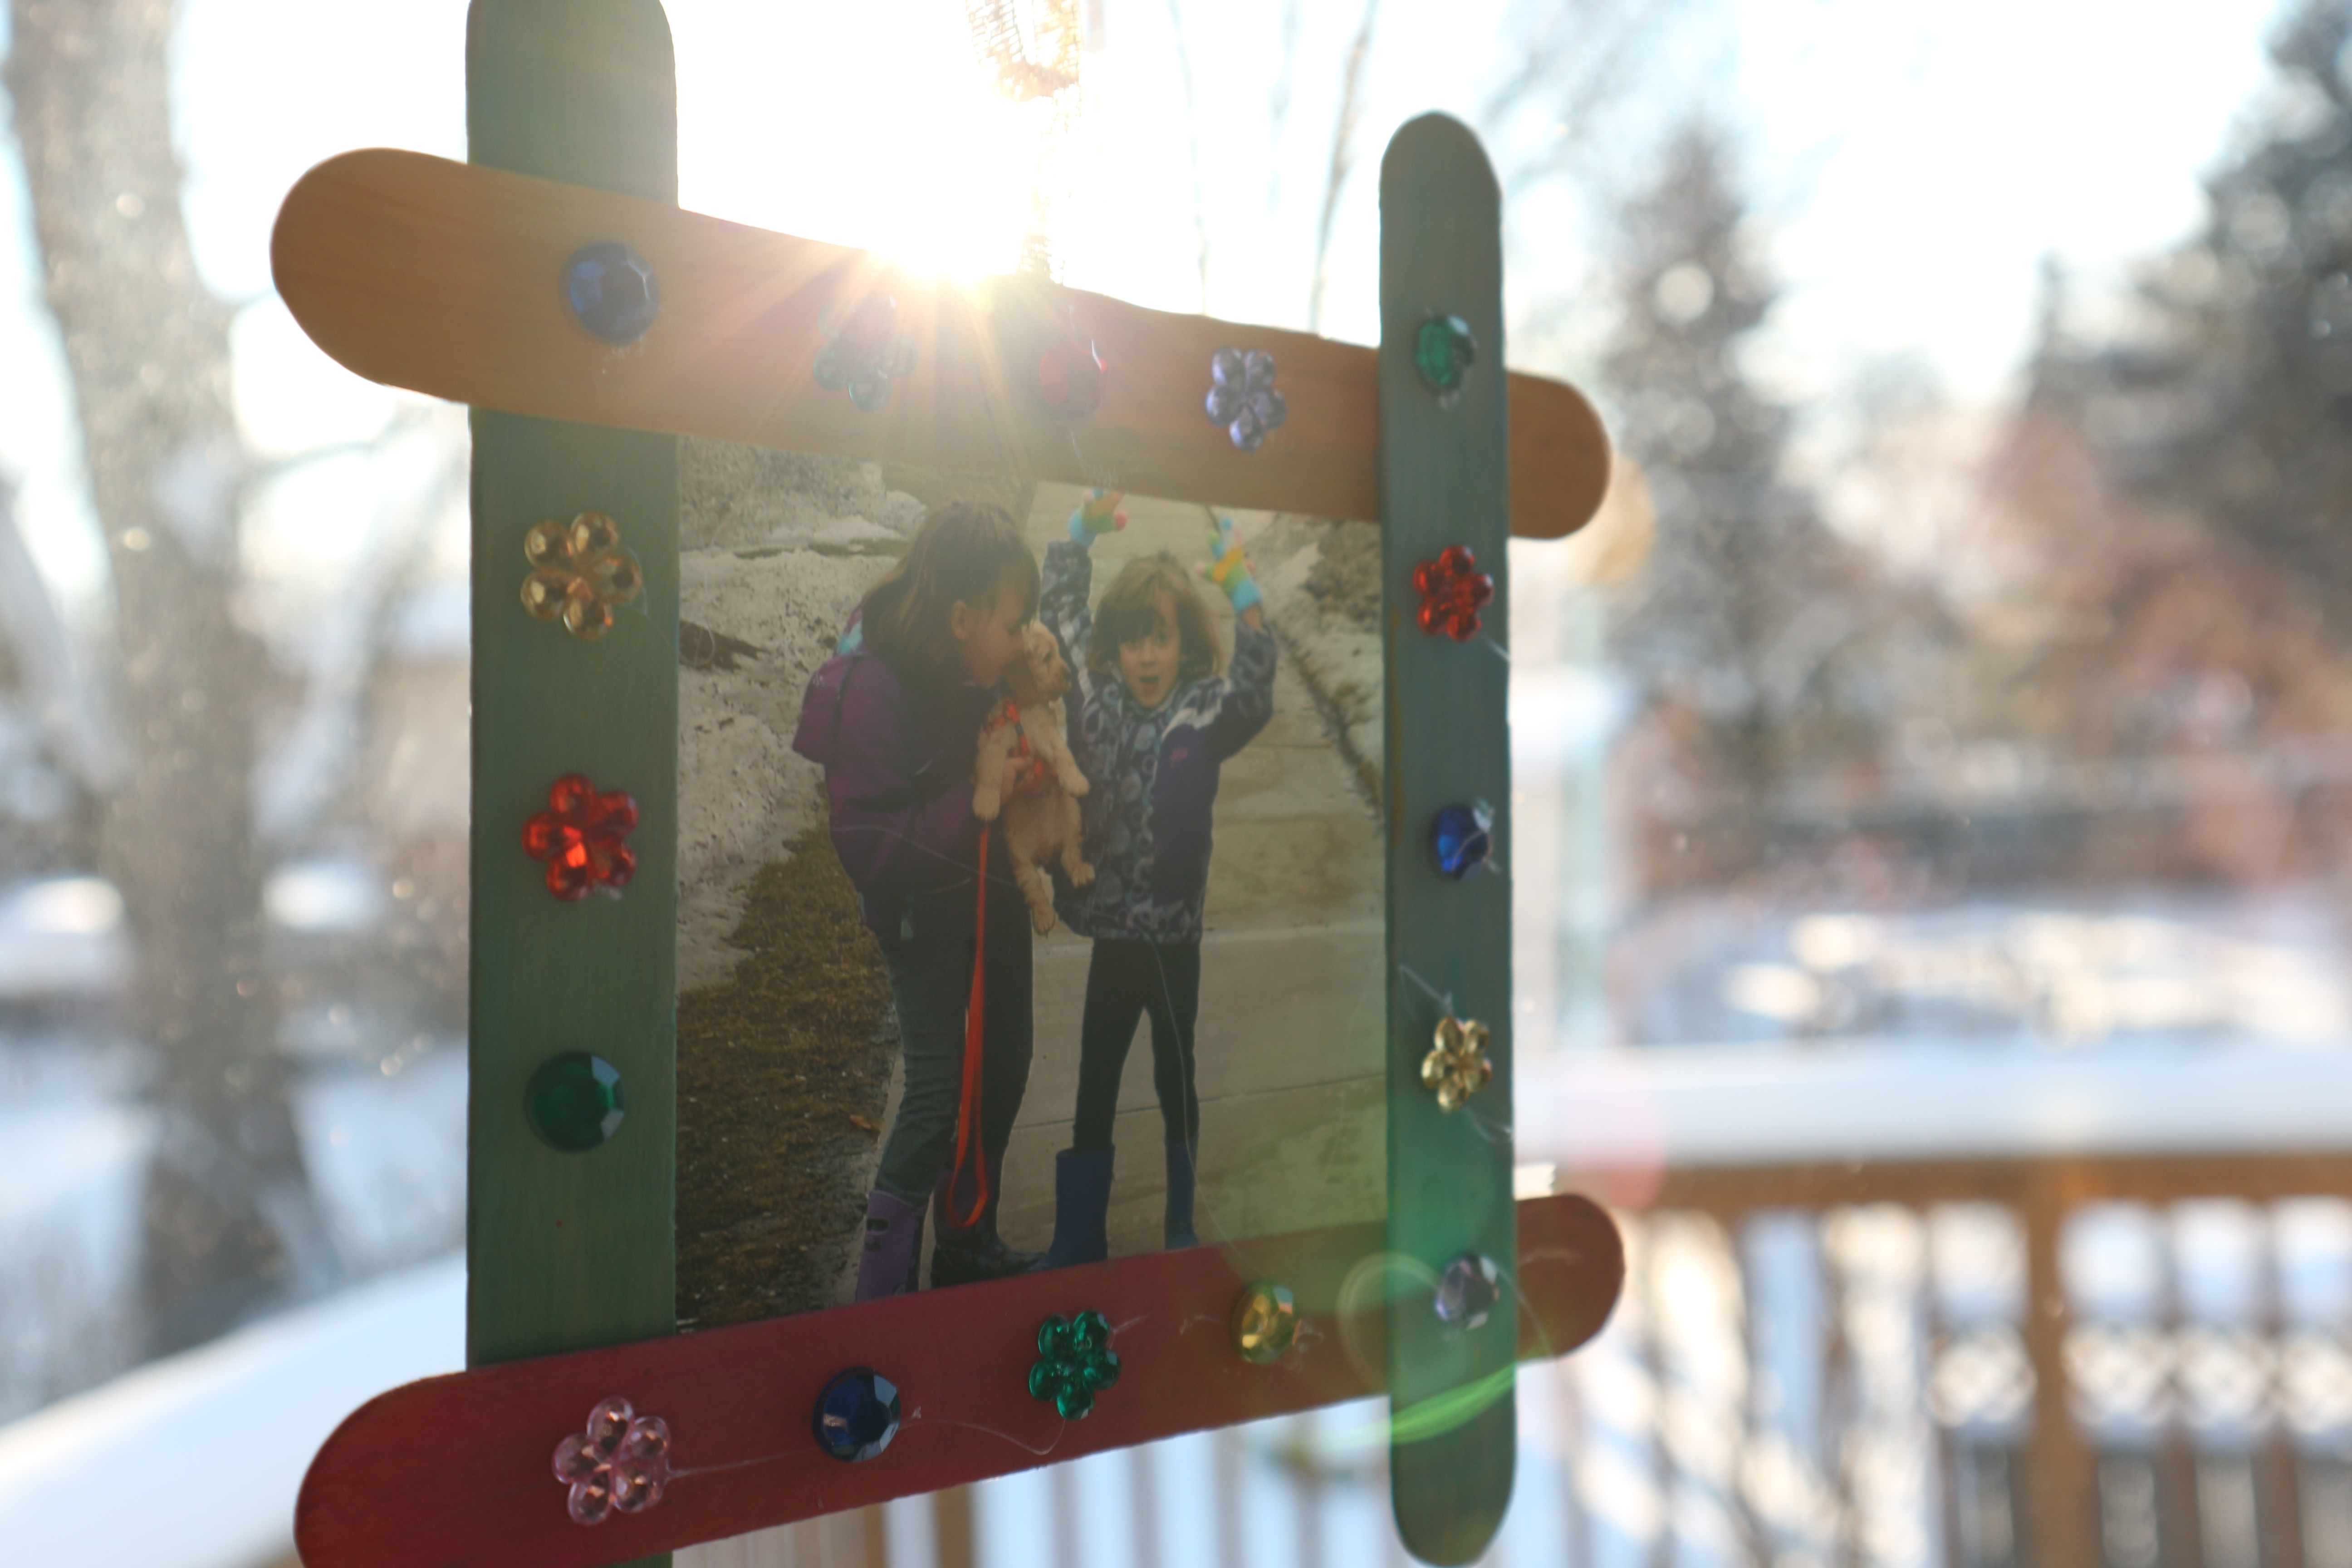
Secure the photo in place with a few pieces of tape. Hang it up and enjoy!
I did this for all of my daycare children back when I ran a home daycare. I strung them all across a string that was fastened to 2 screws so it looks like a bit of a clothes line. It had a really sweet effect. The kids all worked on their own frame and when it was time for them to leave my care and become school kids they took it with them and a scrap book of art I had saved. Ohhh…sentimental pause….. I wonder how my little friends are growing up…..sniff sniff…
…