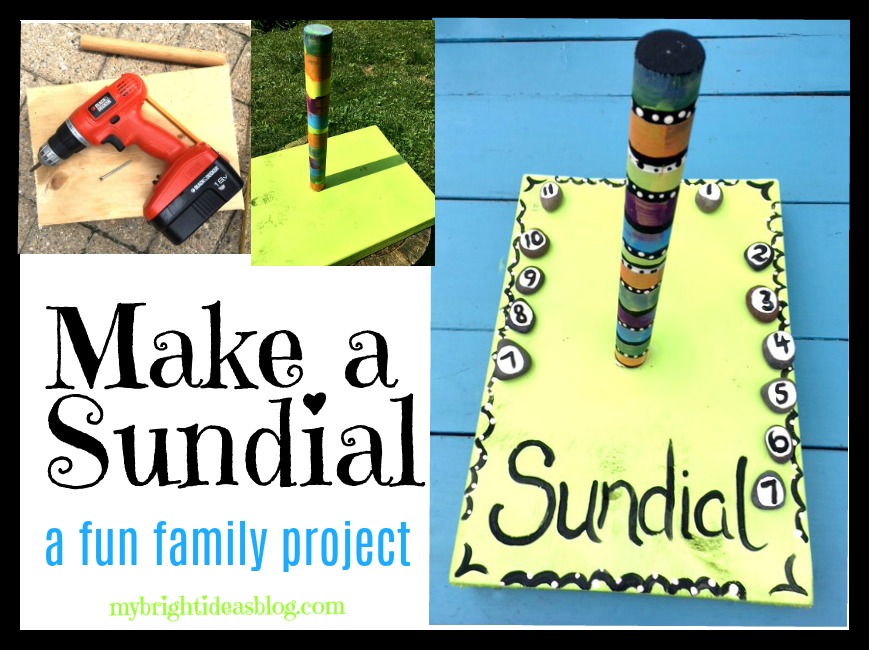
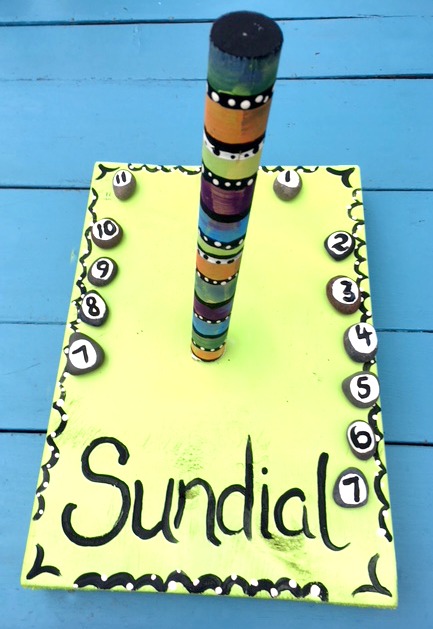
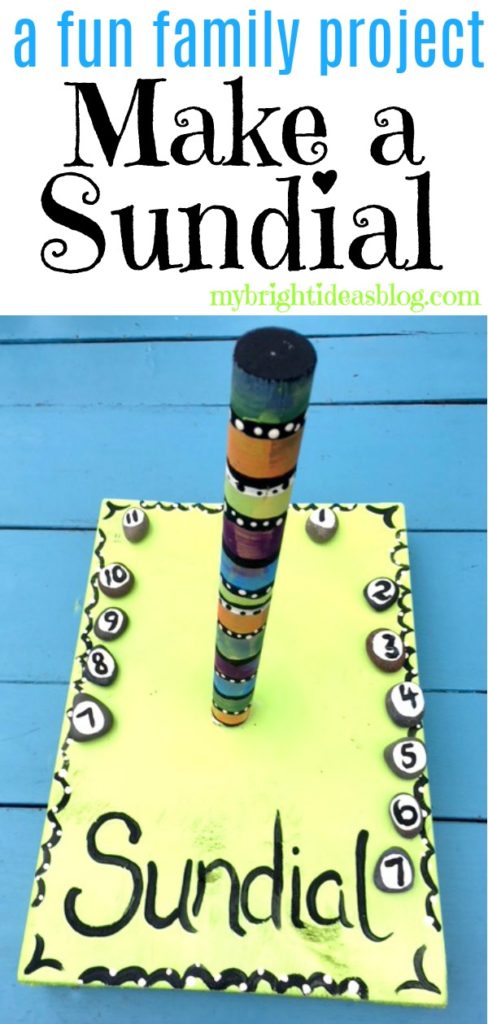
Are you looking for an outdoor family nature project? Here is a cool idea for a sunny day. Make a SUNDIAL.
A sundial is a device that uses the position of the sun to cast a shadow to tell the time. As the sun moves across the sky the shadow moves. According to Wikipedia the oldest sundial found by archeologists is dated around 1500 BCE. https://en.wikipedia.org/wiki/Sundial
When I started my project it was very cloudy so it got more decoration than I intended. It was going to be bare wood with a light clear coat. Our weather was cloudy and rainy for several days so I had to postpone it repeatedly. Grrr.
Technically you could make a quick sundial using a stick in the ground. Or you could use paper and a pencil stuck in playdough to make a sundial in a pinch. But if you want to make one like mine, here is the scoop.
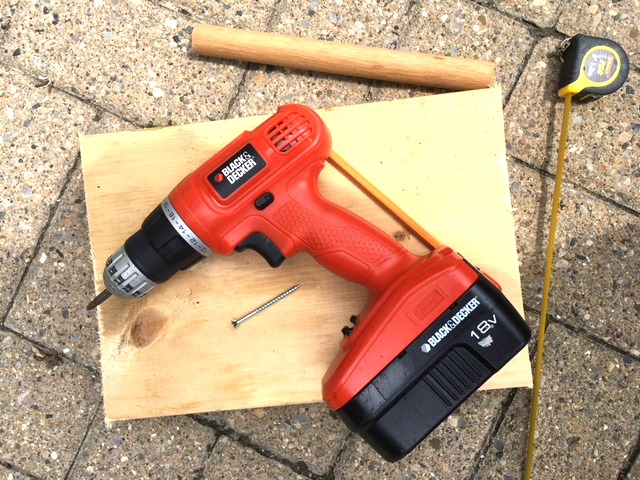
You will need:
- a scrap of wood (mine was 9 x 13 inches)
- dowel (mine was 10 inches)
- drill
- tape measure or ruler
- 12 rocks or gems
- 1 screw 2 1/2 inches long
- hot glue gun or other glue (optional)
- watch or clock with an alarm
- pencil
- spray paint or varnish
- craft paints and brush
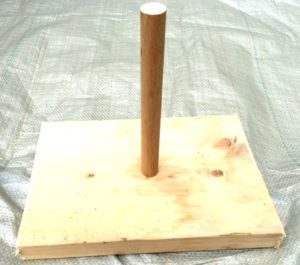
Cut the wood to a size you choose. I would have preferred a 12 x12 square but I had this scrap 9 x 13 left over so we used it. I also had this dowel that was a leftover and already 10 inches long.
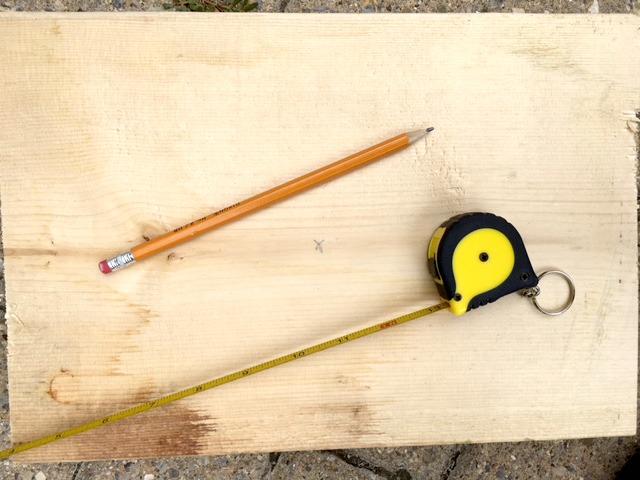
Measure and mark the centre of your board.
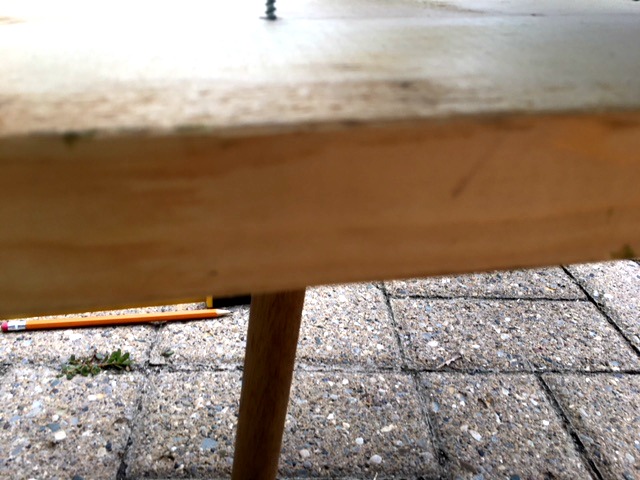
Screw the dowel into the centre of the wood. This was hard to take a photo of. Put the dowel on the ground, place the block of wood on top. Ensure the x marking the centre on the wood is right over top of the dowel. Drill the screw through both pieces.
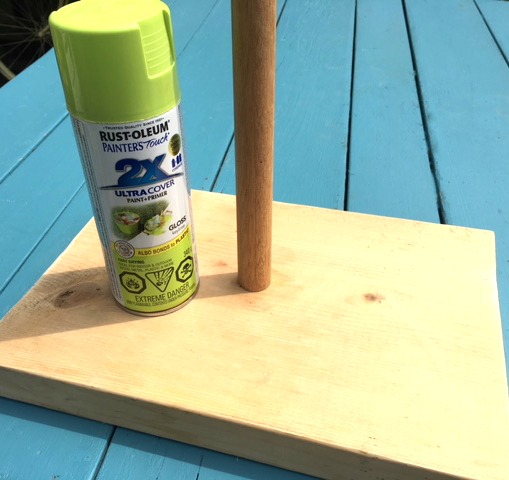
We could see the clouds coming, so we decided to start the time markings the next day and for now paint the sundial to help it last longer outdoors. If you have a partial can of spray paint or wood protector…this project won’t take much.
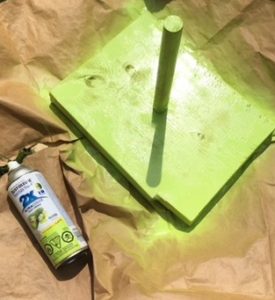

Spray the board and allow to dry. Tip over to paint the bottom and allow the bottom side to dry.
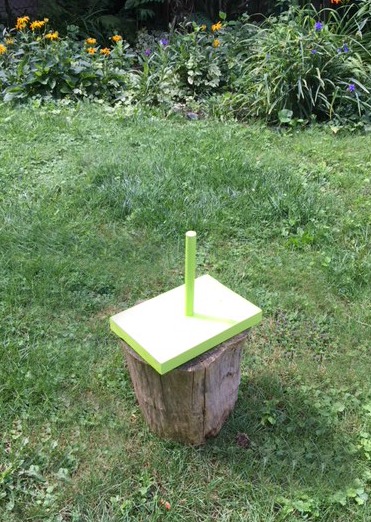
Once it is dry you can decide where you will have the most sun in your day. You could raise it up with bricks or a tree stump. We have a lot of shade in our backyard which normally we appreciate. But for this project it made things difficult.
Now seeing the giant rain clouds moving in. We decided to post pone and begin again tomorrow. In the meantime, we could jazz it up a bit.
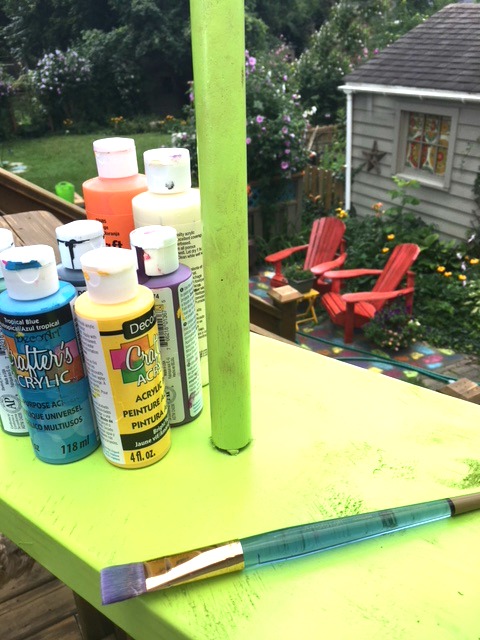
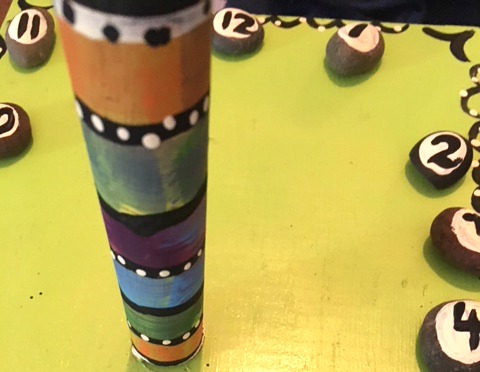
Using craft paint we put wide stripes on the dowel part of the sundial.
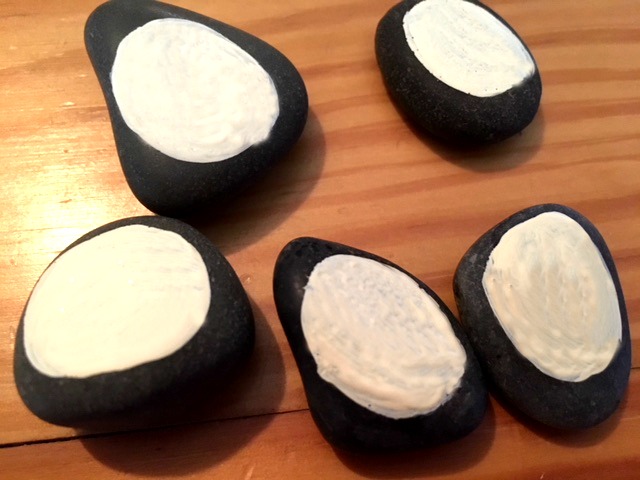
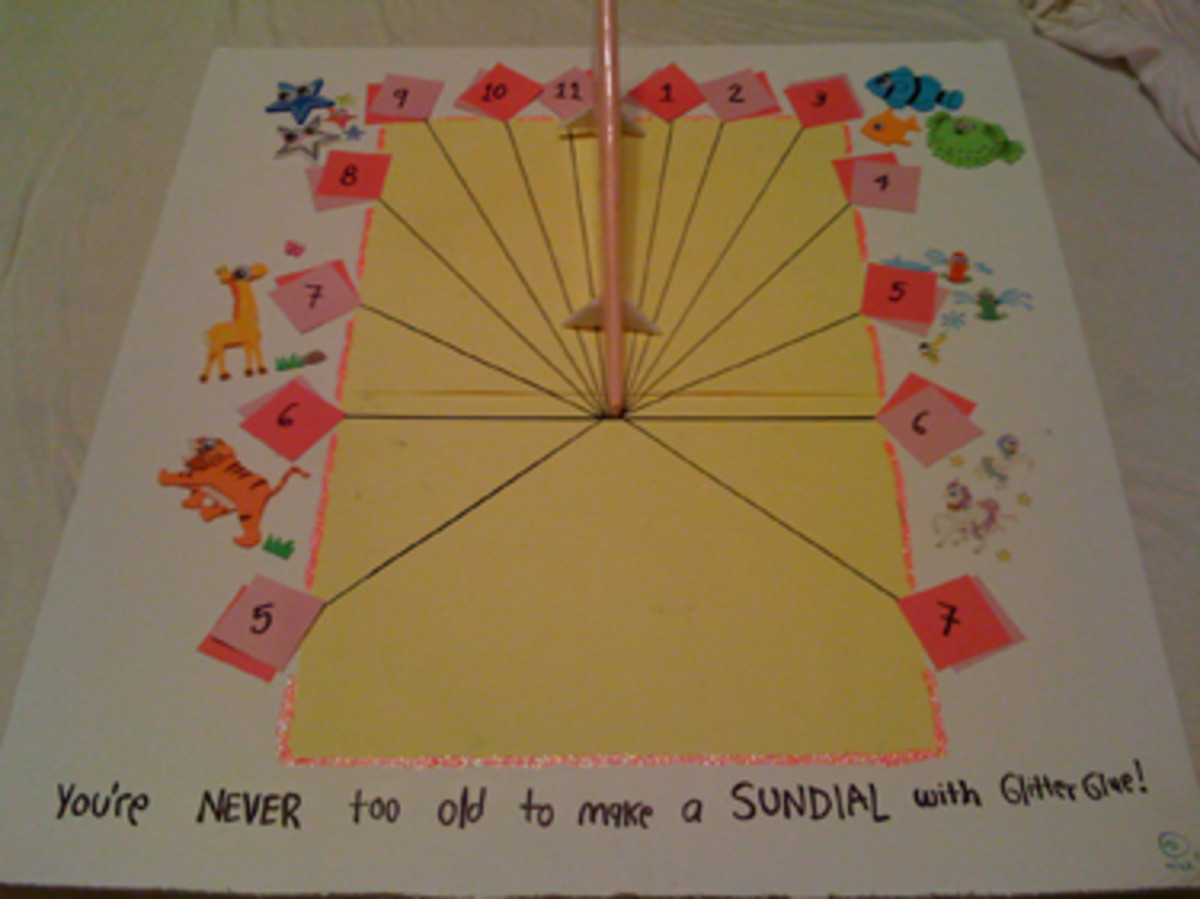
We had a package of dollar store polished rocks so we painted a white circle on each one. This will be our pretty markers for hours. Print the numbers: 7, 8, 9, 10, 11, 12, 1, 2, 3, 4, 5, 6, 7.
A SUNNY DAY FINALLY ARRIVES
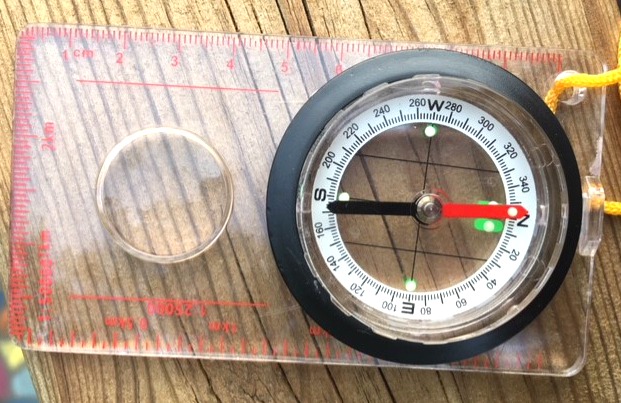
We did follow some of rules for making a sundial. Such as the pole needs to tilt slightly to the north. Use a compass to determine the north pole. I twisted the dowel to loosen it and put a tiny rock in that space to tilt it. If you are in the southern hemisphere you will need to use the compass to find the south pole and tilt the dowel to the south.
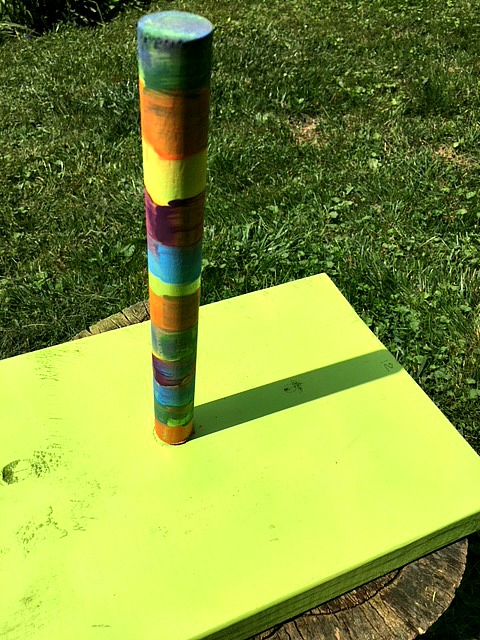
Just before noon put your sundial in a sunny place. The shadow of the dowel will be your first mark to write in the number “12”. I wanted that to be right at the top like a regular clock.

This is going to take more than one day to complete so make sure that no one moves it. Maybe add a note that says “do not touch” so it doesn’t move.
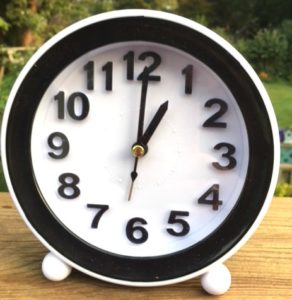
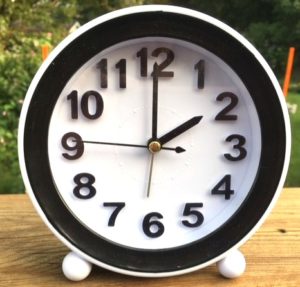
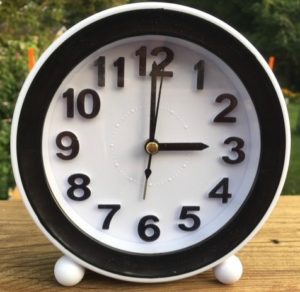
Next, set the alarm for 1’oclock and come back to write on the number where the shadow hits for 1pm. Write “1”. Set the alarm for 2pm and then 3pm and continue to repeat every hour until the sun sets.
After sundown, set the alarm for 7am so you can begin recording the morning time marks.
If you are going to leave your sundial outside and you haven’t already painted or varnished the sundial you should do that next to water proof it. A clear coat on the rocks is a good idea too. You don’t want the paint to shift off the stones. That can happen on polished stones.
After the times are all marked, you might want to secure the rocks so they don’t get carried away. You can use a hot glue gun (fast and easy) or E6000 glue (slow, stinky but stronger).
Our finished project does not look like a clock like other sundials. Maybe it was moved. If your kids are older you might want to do more research and see how the impact of the tilt of the earth’s access. It’s August now, will the shadows still line up in September? This project has the potential to be quite educational. Telling time, shadows, the earths axis, the solar system, using a compass,
This picture is linked to a nice pencil and paper sundial blog.
Children who spend time outdoors are more likely to be happier, healthier, problems solvers and more creative. Check out this blog post about a paper sundial. https://hubpages.com/education/Reconnecting-Children-With–Nature

https://otherwiseeducating.blogspot.com.au/2010/12/sundial.html

https://www.kcedventures.com/blog/how-to-make-a-sundial-for-kids
Here are some other posts of my projects you might enjoy!
Nature Craft – Perfect for Earth Day Activity – Clay Imprints with Plants and Flowers
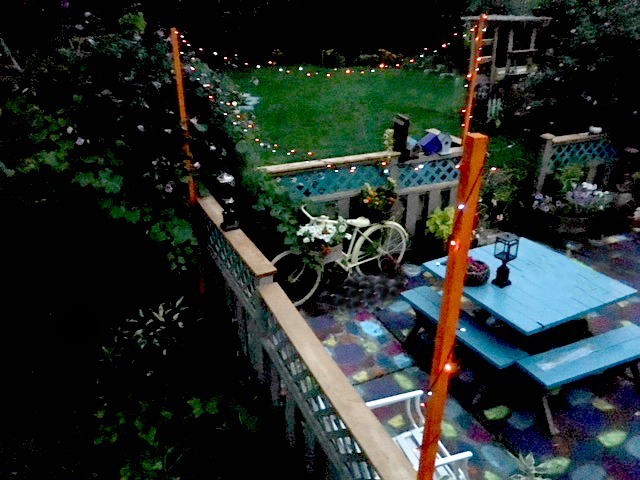
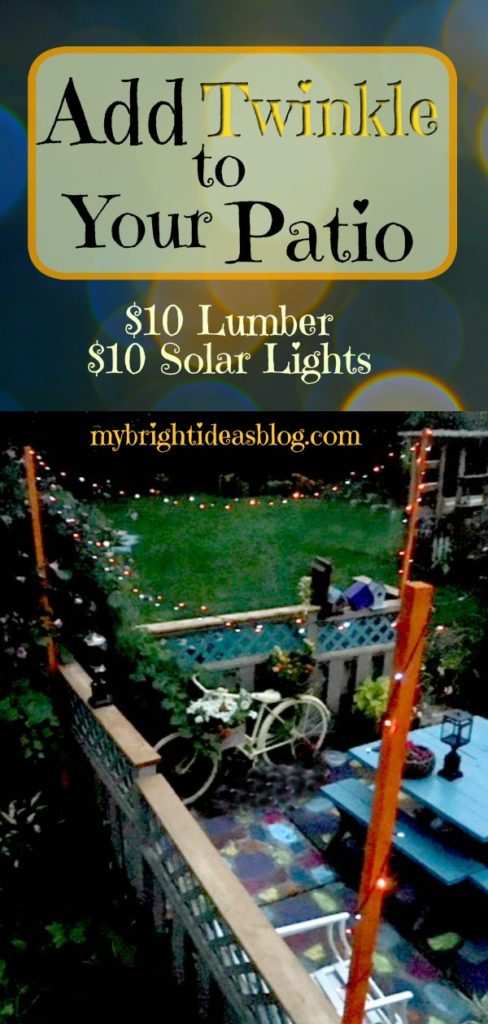
Add Twinkle to Your Patio with a String of Solar Lights
$20 Solar Twinkle Light Project – No Tools Needed
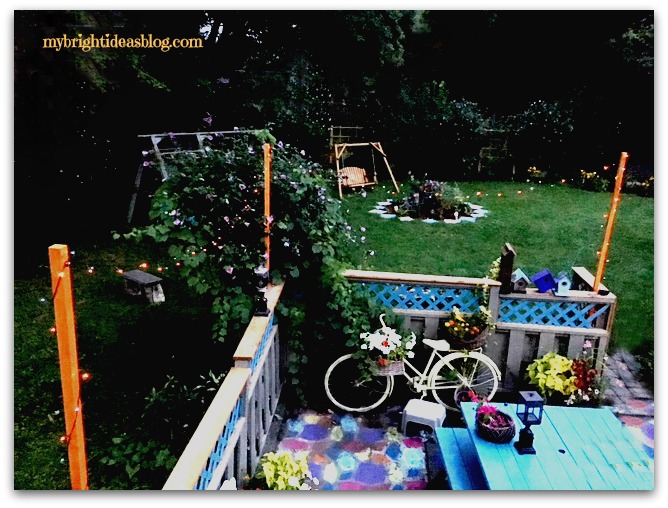
Usually by this time of the summer I have had enough of the heat and let the weeds take over and the vegetable garden dry up. But this year has been different! This year I have been adding colour to the backyard patio. I have painted the old picnic table and parts of the fence turquoise, the white Muskoka chairs are now red, an old bike is now yellow with plants attached and the entire patio a multi color design.
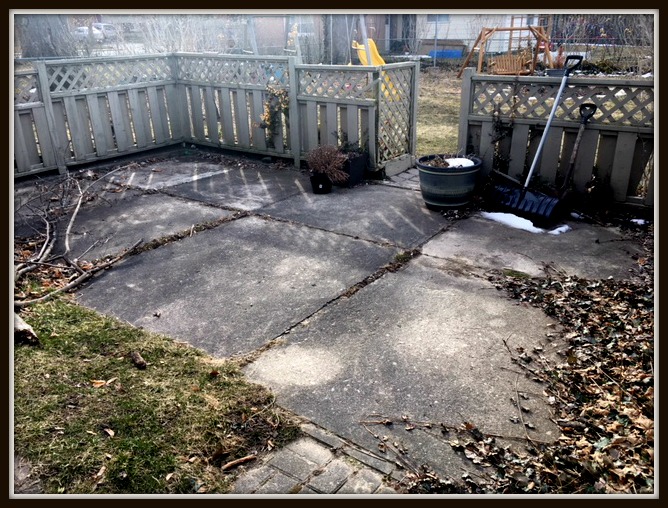
This is what it looked like as the final bit of winter melted away. So dismal! In the summer our garden is lush and private but everything is bare naked in the winter. Grey and bleak….
We have a lattice privacy fence around the patio area that needed a bit of repair and some paint touch ups battered by the winter. This is the going to be the support for the 2×2 pieces of lumber.
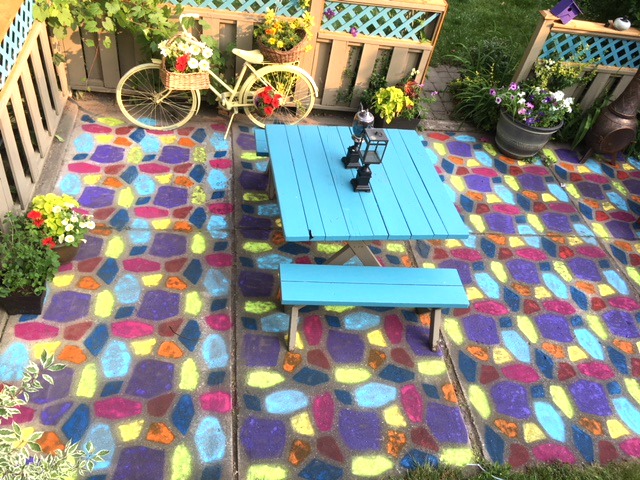
Below is a pic of the other half of the patio and garage area after I finished painting the patio.
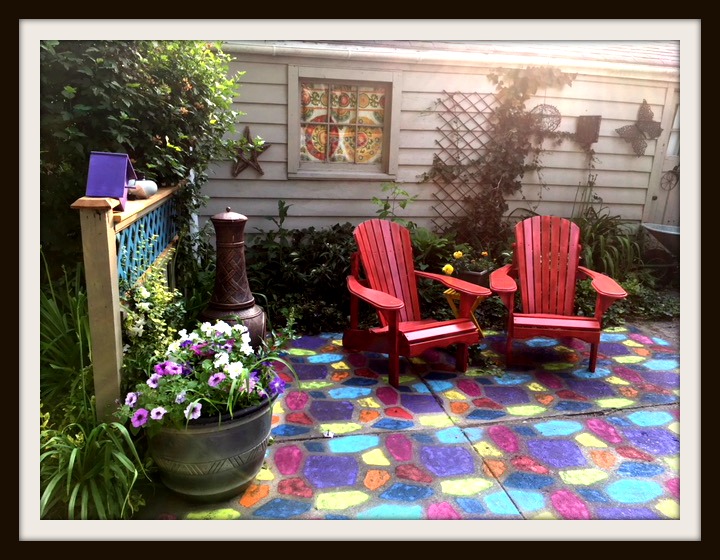
Have a look at the painted patio blog post from July.
So the next logical step for this backyard makeover is to add some twinkle lights. Being the frugal person that I am-I must brag that I did this project for $20!
First stop – the hardware store….
 You will need:
- 2×2 lumber (3 for $2.70 each)
- string of solar power lights (sale $9.99)
- left over deck stain or spray paint (it costs $6.99 usually but I had this left over from the patio project)
- zip ties (dollar store)
- cup hooks (dollar store)
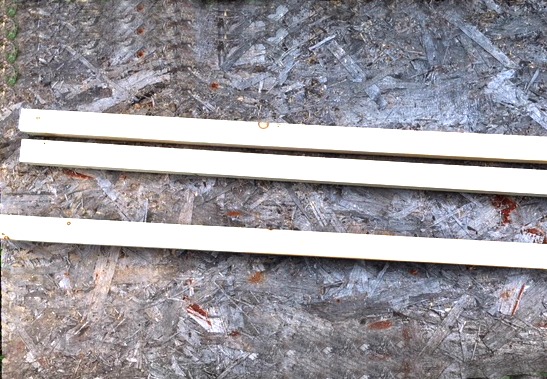
Step 1 Spray Paint The Boards
The great news is we use the full pieces so no power tools are needed. Just choose a paint color and get started.
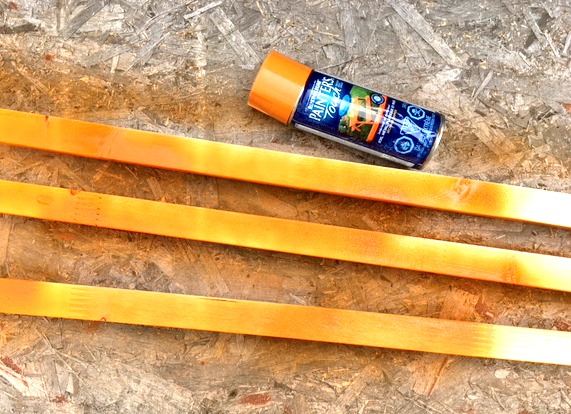
I wanted to make a splash of color so I chose to use my bright orange. I could have used a dark green or left over deck stain or fence paint if I was feeling subtle. But I wasn’t….
Spray the 3 2×2 boards on two sides then allow to dry before flipping them over and doing the other two sides.
Step 2 Add The Hooks
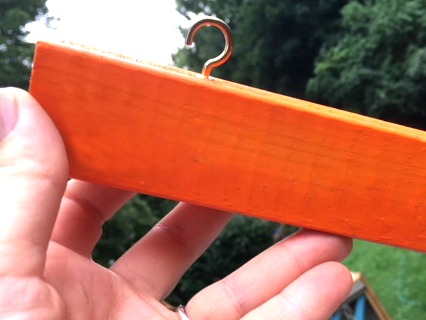
I used mug hooks because you simply screw it into the wood. The hook is twisted into the wood a few inches from the top.
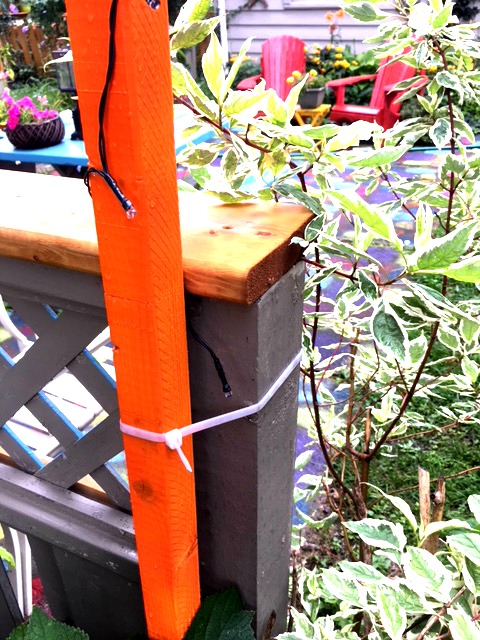
Step 3 Tie The Supports To The Fence
Securing the 2×2 to the fence was easy with zip ties. When we are putting everything away before the snow comes these zip ties will be cut off and my orange light supports will be put away in the garage.
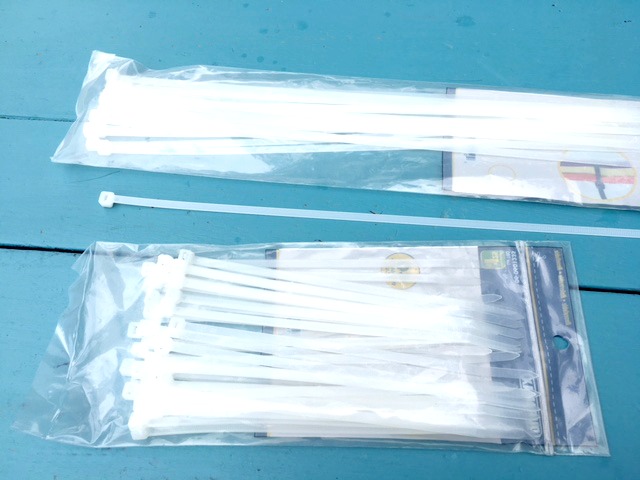
The dollar store or hardware stores have these for super cheep I used the 14 inch zip ties.
If you don’t have a handy fence or deck to secure the wood to, you can find others who have put them in cement in a bucket to create a portable pole. Some use 2×2’s or 2×4’s and even 4×4’s.
Check out this link to a tutorial using barrels and concrete and then turning it into a planter. Its great if you have no walls, deck or fence to secure it to. https://www.diynetwork.com/how-to/outdoors/patios-and-decks/how-to-make-planter-posts-for-string-lights

Step 4 Adding The Lights
It’s August, so now is the perfect time to find clearance solar powered lights. Lets give a shout out to solar lights! What a wonderful invention this solar power is. No extension cords to plug it in. No batteries. Just leave the little solar panel out facing the sky.
![]()
Turn the light on so it has a chance to charge up with solar energy before sunset. F means flashing, S means static so the lights will be still.
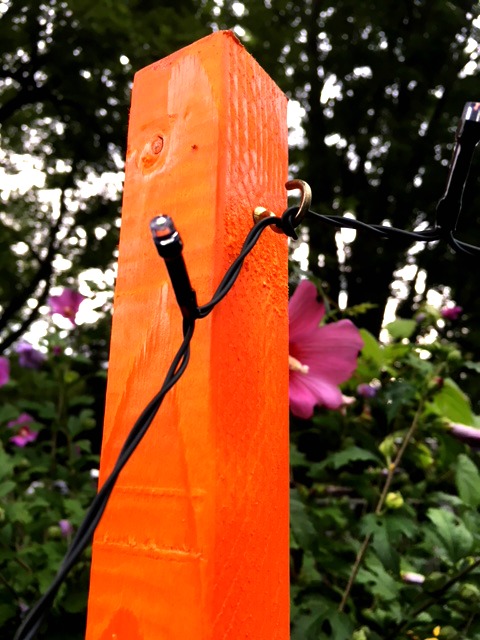
Wrap the solar light cord around the 2×2 support. At the top wrap it around the hook a few times. Next drape it over to the next support. We simply wrapped it around that hook and over to the third hook. Finally wrap it down the third pole and its done.
Next to the bird houses you can see the solar power part. I need to think of how to put it more out of sight since it does need the sunlight to charge it for after the sun sets.
 As the sun begins to set, I can see they are lighting up perfectly. Twinkle lights are such a simple pleasure!
Now I feel like calling some friends to come over for a root beer float and having a little party under the lights!
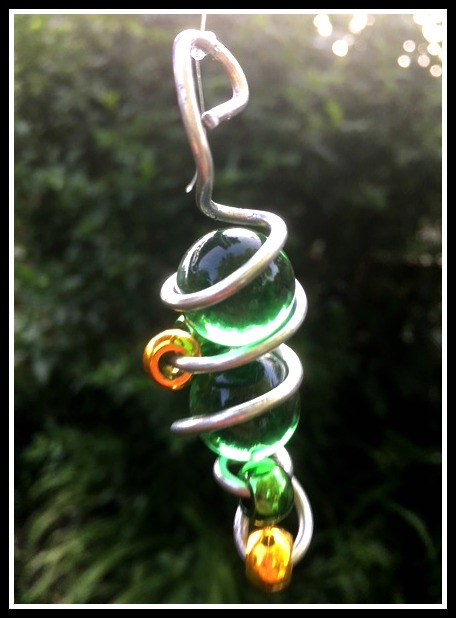
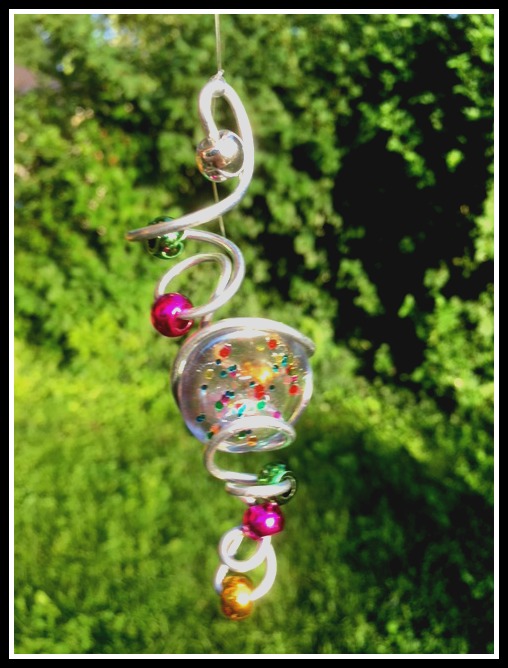
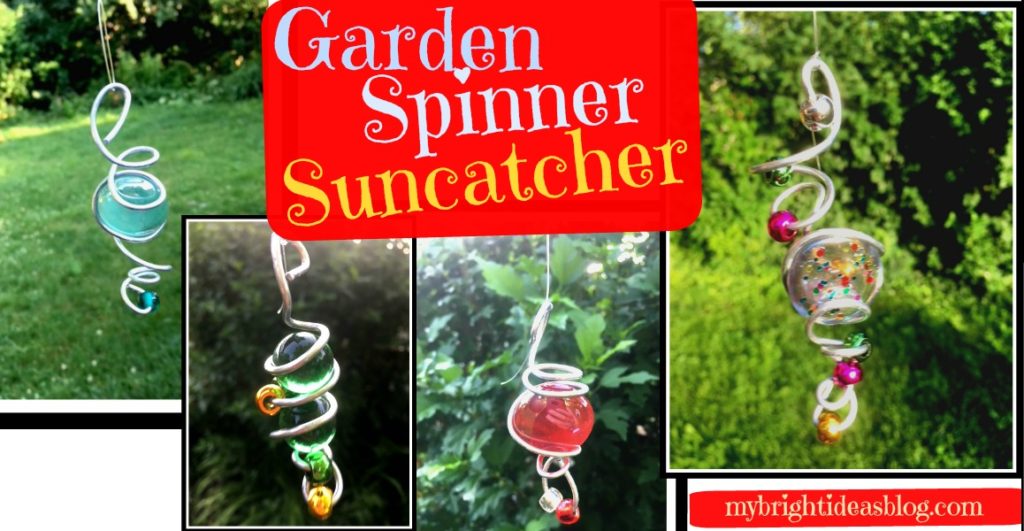
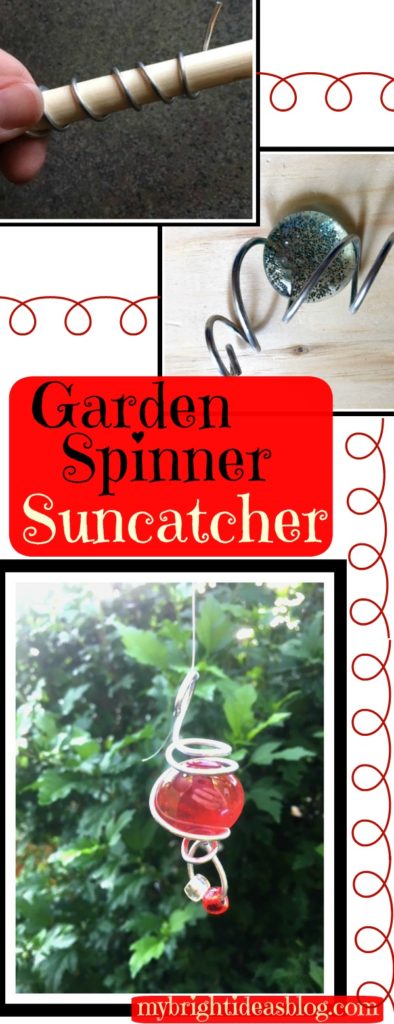
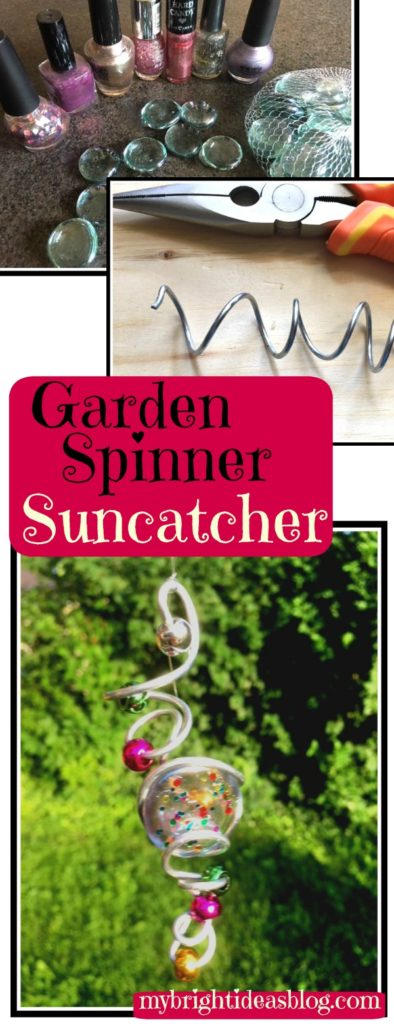
Make an EASY Garden Decoration From Wire, Marbles and Beads
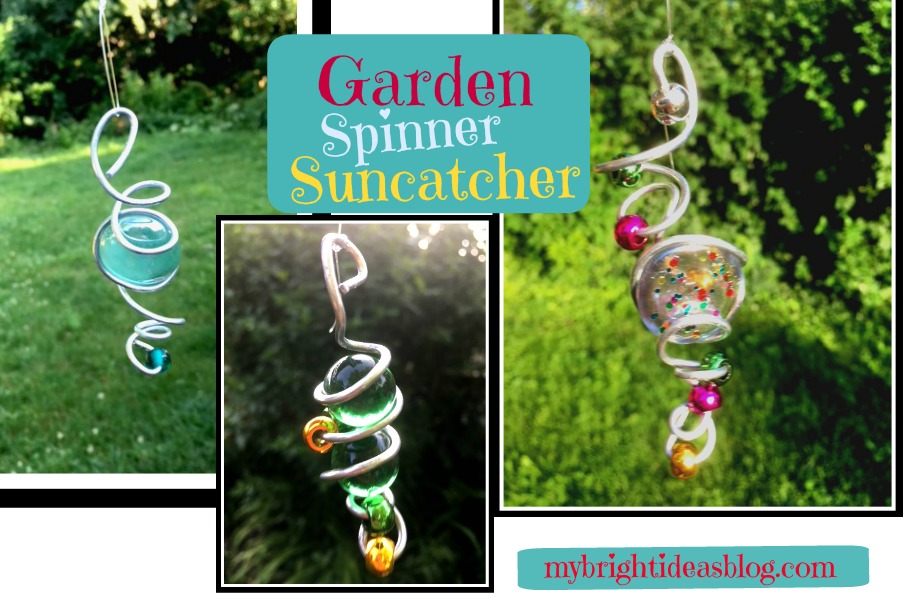 Wire Art – Suncatcher / Wind Spinner
This gorgeous craft will make you feel like an artist and is easily made in just 15 mins! Make it in the summer for the outdoors to spin in the breeze or in the winter hang it in the window as a sun catcher.
You will need:
- marbles, beads, glass stones
- sparkly nail polish
- Galvanized Steel Wire 14 Gauge
- 2 pairs of pliers, one with wire cutting edge or wire cutters
- clear fishing line
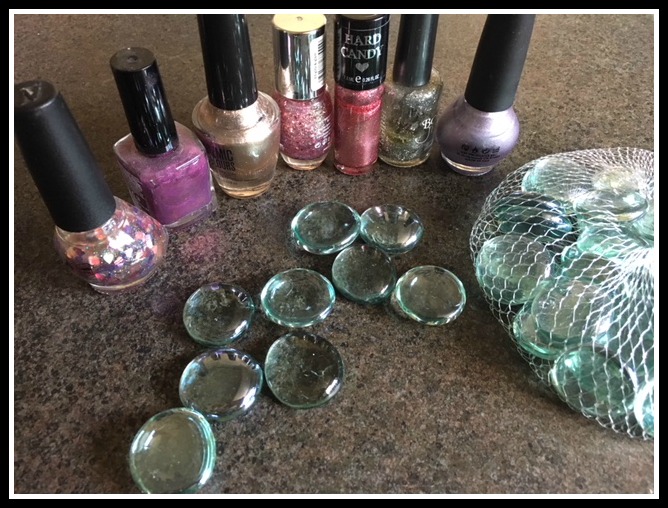
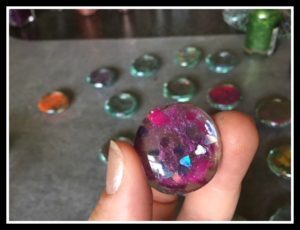
Simply get started with a bag of medium sized flat glass stones from the dollar store. Put a piece of newspaper or wax paper down to protect your work space.
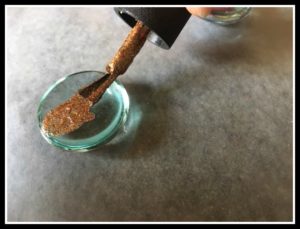
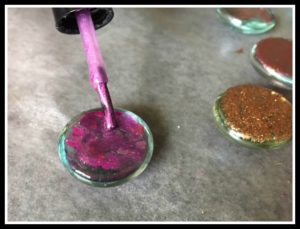
Paint one side of the stone with sparkly nail polish. Allow to dry.
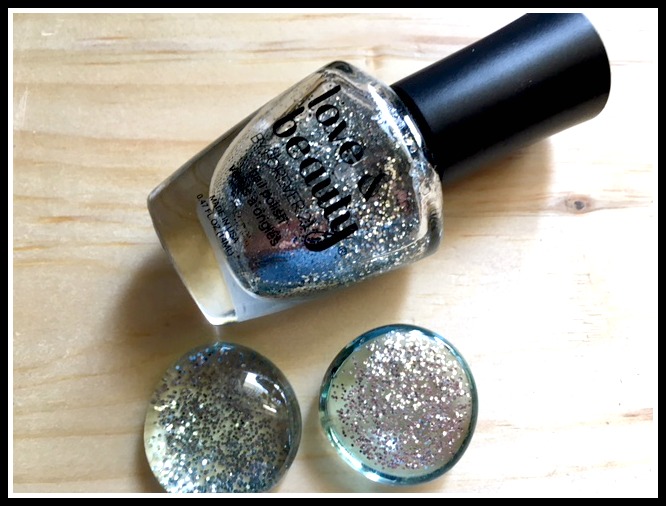
If you paint the flat bottom side of the stone the glitter shines through so you only need to paint one side. You could do a similar effect by putting glue on the stone and dipping it in a bowl of glitter. We went with nail polish which dries so quickly and we have lots!
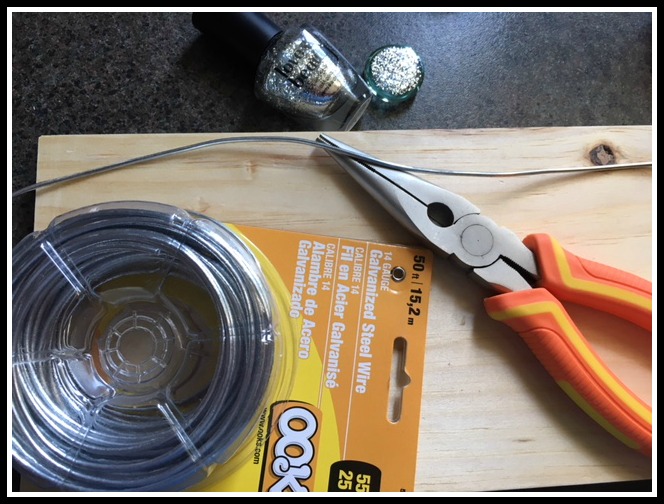
After your stones or marbles are ready, cut a 12 inch length of wire. We used 14 Gauge Galvanized Steel Wire. You can cut your sizes longer or shorter depending on your own preference. At times the ends can be a bit sharp so protect your surface by using a scrap of wood or a cutting board.
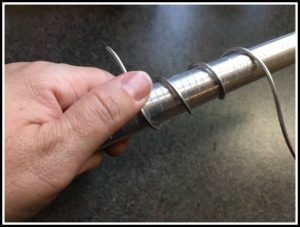

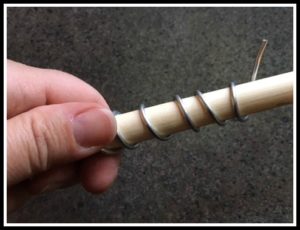
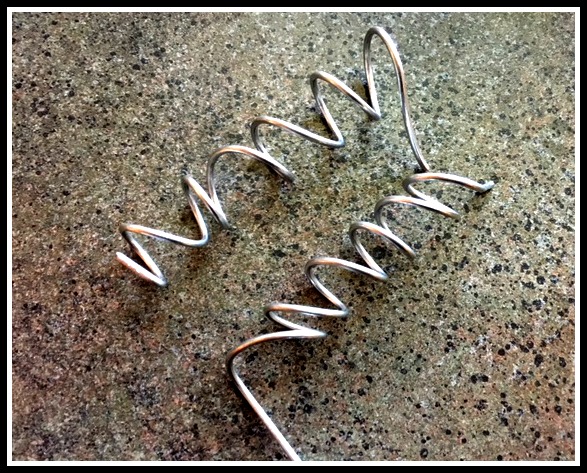
If you don’t have a jewellers mandrel you can look around the house for something similar. I had a wooden dowel that looks just like the handle of a wooden spoon. Find something to wrap the wire around and use the pliers to further twist and squeeze the wire into the desired shape.
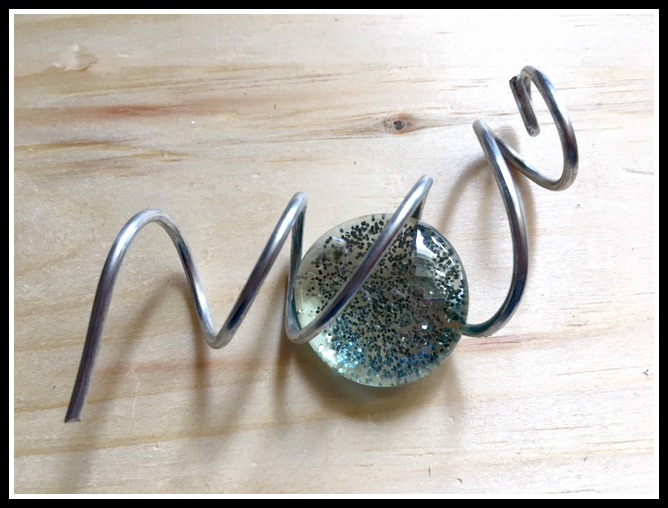
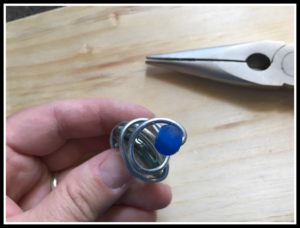
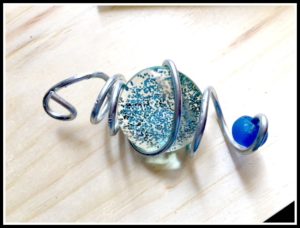
Using flat glass decorative stones will require you to flatten the wire slightly to hold it in place. If you are using marbles the twists will be nearly perfect for sliding the marble in and pinch the wire slightly to hold it in place.
 My first attempt at this was a bit frustrating. As I pulled one part of the wire the shape would change and the stone would fall out. But then I got the hang of things. Once you see how cool it looks as the spiral gets a bit crazy it feels like your making a real piece of wire art!
You may need to use a use both of your pliers to twist the wire how you want it. This will help to focus bending a particular section of the wire without affecting another part of it that you are already happy with.
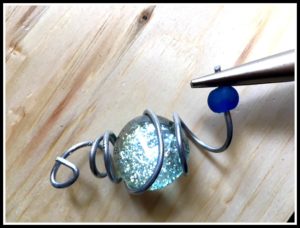
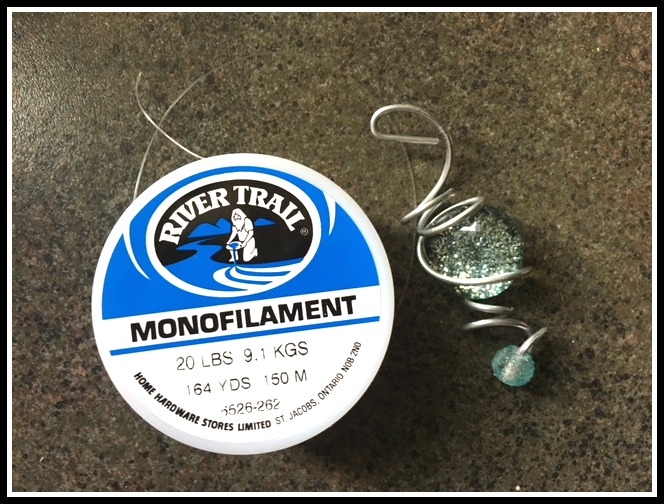
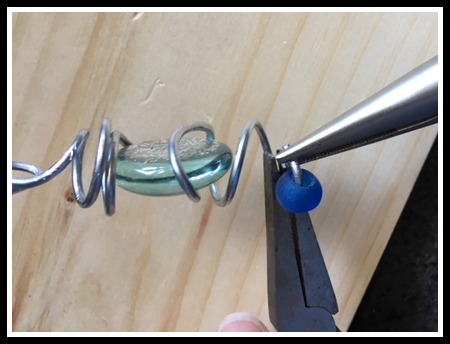
Cut a length of clear fishing line. This is a must have for your craft supplies if you don’t already have it. You can get fishing line from the hardware store, craft store and dollar store. It has many uses including bracelet making or hanging decorations from the ceiling when your having a party.
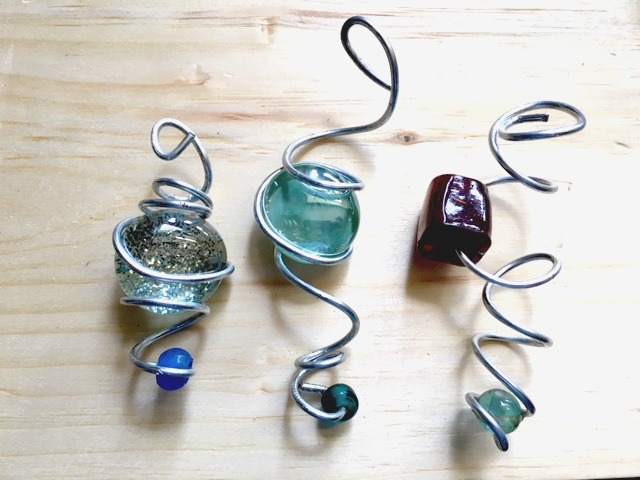
I like how each one turns out completely different. Shape the wire in a tight spiral or loose and whimsical. Add a bead on the end. Or several beads throughout the wire. Use a giant bead instead of a flat stone. Or use marbles!
These are dollar store marbles that you might put in the bottom of a vase. I need to locate some play marbles and see if we can find some cool ones.
These shiny beads are metallic pony beads and very inexpensive (around $3 from Walmart if I remember correctly)For this wire project the hole needs to be fairly wide. Choose beads with big holes if you are using glass beads. I had these left over from a previous bracelet making project. The nail polish used here is a speckled multi coloured one. It looks fantastic in the sun!
So there you have it! Every one of these turns into a unique bit of wire art. Hung from a branch with fishing line will have it spinning in the breeze.
I hope this inspires you to make some wire art suncatchers/wind spinners for yourself. I just made 10 and I’m so pleased with these I think I will keep on making them and try selling them at the craft table at work.
Don’t you love it when a craft exceeds your expectations! You really should try this!
…
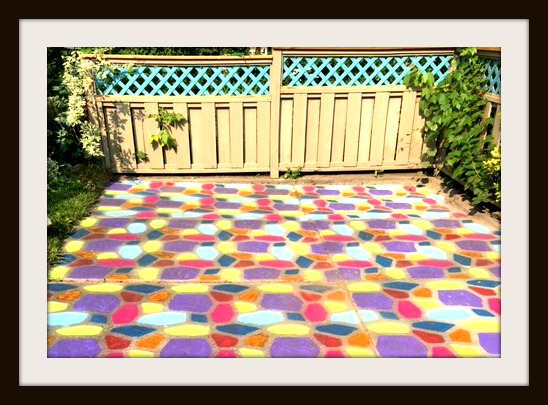
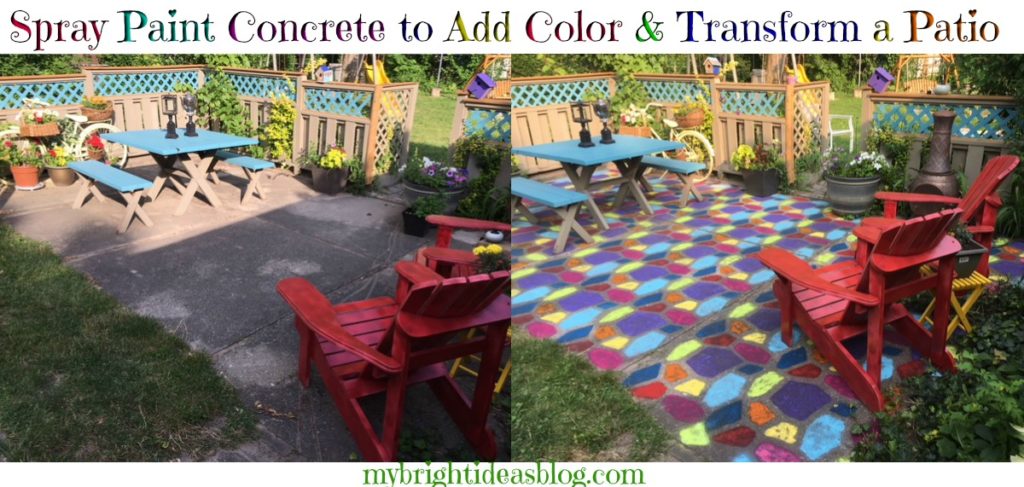
Paint Old Concrete for a Colorful Patio Makeover

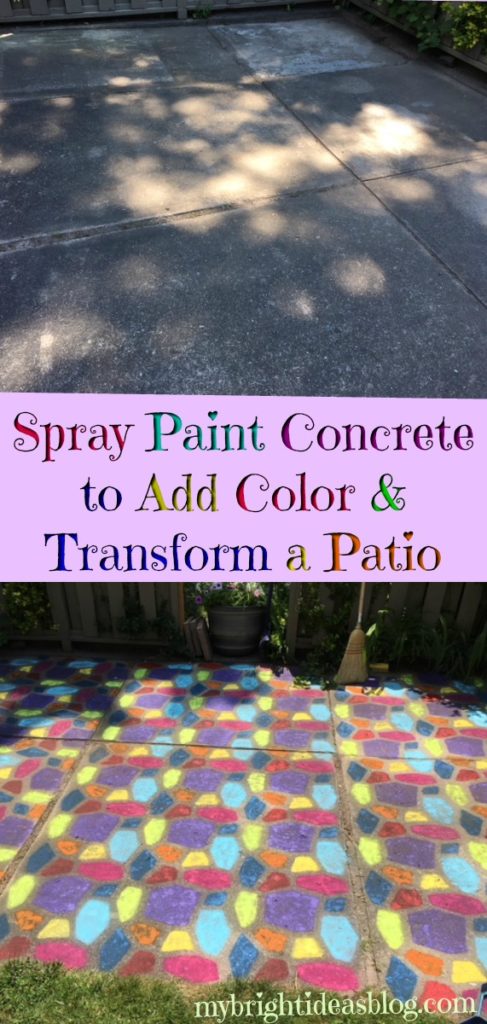
I may have taken things a little too far this time! I have been adding color to a very beige and grey backyard bit by bit. This weekend I went hog wild and I literally spray painted my tired old cement pad.
Our house is rather old built in the 1950’s. Its a mystery at what point they would have added this concrete pad and privacy fence but its safe to say it was a long, long time ago.
Our patio is approximately 232 inches by 135 inches or 3.5 meters by 5.9 meters.
It has 4 sections at various widths 51 inches 52 inches 67 inches 62 inches. I worked in sections. I was done three sections when the spray paints started running out.
You will need:
- brooms, dust pans
- power nozzle on your garden hose or power washer
- a concrete mold
- 9 or 10 colors of spray paint (expect to pay approx.$7.50 per can of paint)
- clear concrete sealer
Before you get started you need to clean every bit of your concrete…
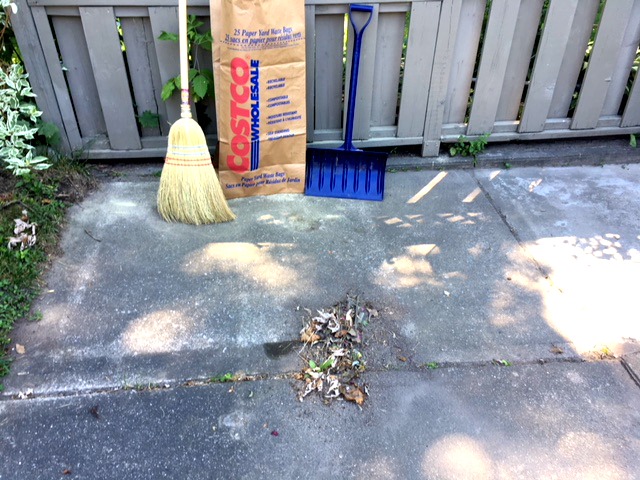
In order to successfully paint concrete you must clean and prep the area properly. This means going over the surface to remove all dirt and debris. Our patio had lots of that!
All the credit goes to my father in law for digging all the grass and weeds out from the cracks in the concrete slabs. New bits of nature are constantly blowing through the air so even during the process you may need to re-sweep. So keep a dust pan and broom or whisk handy through the entire process.
Plan on spending at least an hour on the clean up process. First I used the corn broom and a kids sized snow shovel for my dustpan. Then I used an old kitchen broom for finer bits of dirt. Then I used a flat broom for a final run over to see if I had gotten it all. To be thorough now consider if any areas need to be scrubbed. I had two areas where there were potted plants with thick mud caked onto the ground under the flower pots-it would not budge. Scrubbing with soapy water will tackle this…or use a power washer. Then you will need to wait for it to completely dry.
If you leave dirt on the concrete the paint will stick to it and likely wash away the next time it rains so don’t skip the cleaning stage.
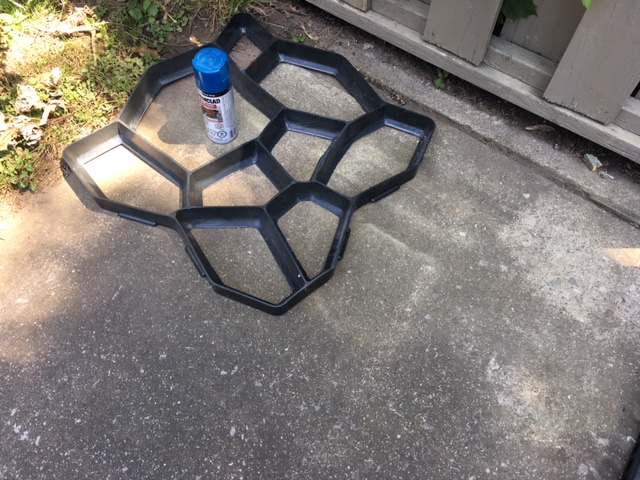
Gather the Supplies: Concrete Mold and Paint
What is a concrete mold?
A concrete mold is typically used with quick-setting concrete pre-mix to create cobblestone walkways or patios of any size.
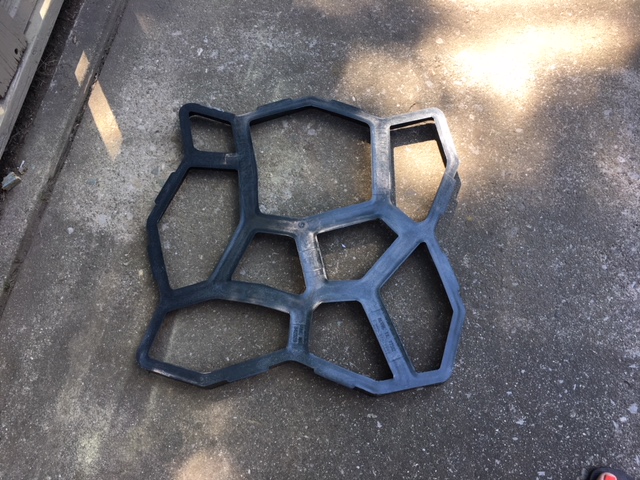
If you were pouring concrete into this mold you would want to have it as pictured above (wide edges upwards) but for spray painting we want to have the wide part on the bottom of the mold. This will create a tiled grout effect.
Where does one buy a concrete mold?
I have had this mold stored for the last 5 years! I bought it from Lee Valley with the idea of making a concrete path in a section of my backyard. However, I took one look at the bags of concrete that I would have to haul home and mix and thought it was best to put it off for a bit….lol. That sounds back breaking!
I have looked at the website and Lee Valley does still sell this mold for $34.50. Its 20×20 and very sturdy. Here is the link. http://www.leevalley.com/en/garden/page.aspx?p=10339&cat=2,2180,33222
If you aren’t near a Lee Valley store, you may need to investigate if your closest hardware store does carry it. It looks easy enough to purchase online but harder to find in actual stores.
Here is a similar one at Walmart.com. https://www.walmart.com/ip/17×17-Inch-Pavement-Mold-Irregular-Concrete-Stepping-Stone-Patio-Paver-Mold/163739522
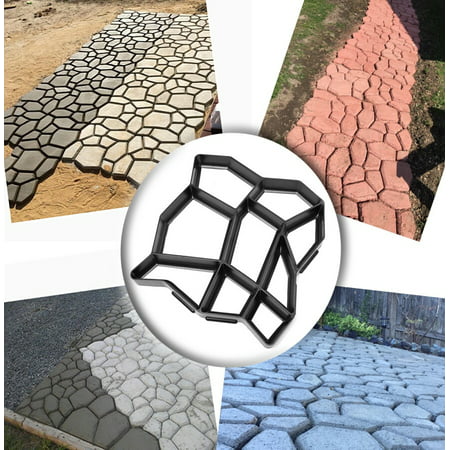
Possibly a cheaper alternative would be to take a piece of plastic and cut a pattern out with an exacto knife. This would be like creating a stencil. At my local dollar store they have thick pieces of sturdy plastic in the craft section that looks like a big placemat. This is meant for a work surface for crafting kids so they don’t wreck your table. I could see this being cut up as a stencil. Just a thought!
Next you’ll need to choose the paint!
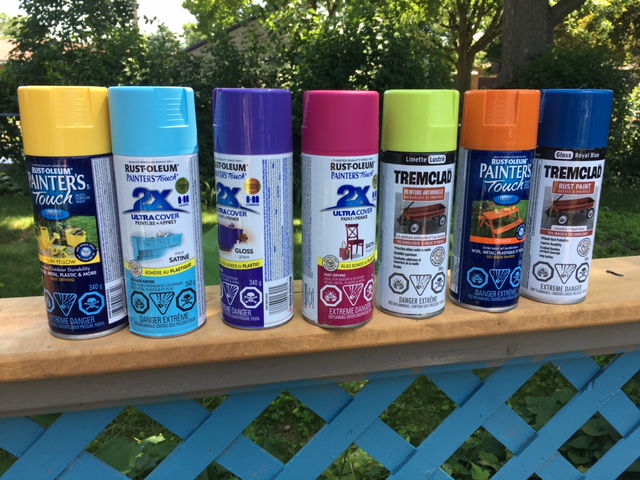
I started out with these 7 colors but after the first section decided to add a red spray paint that I recently used to paint my Muskoka chairs an awesome red.
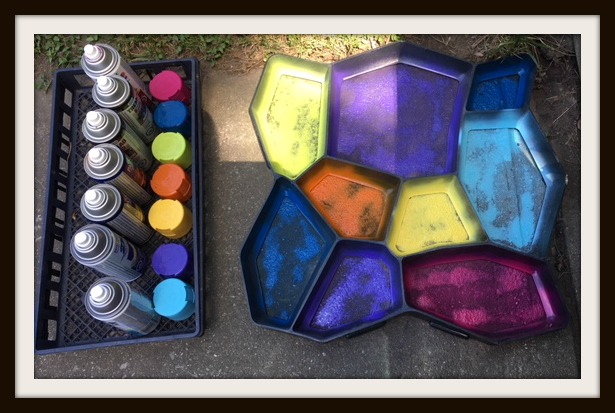
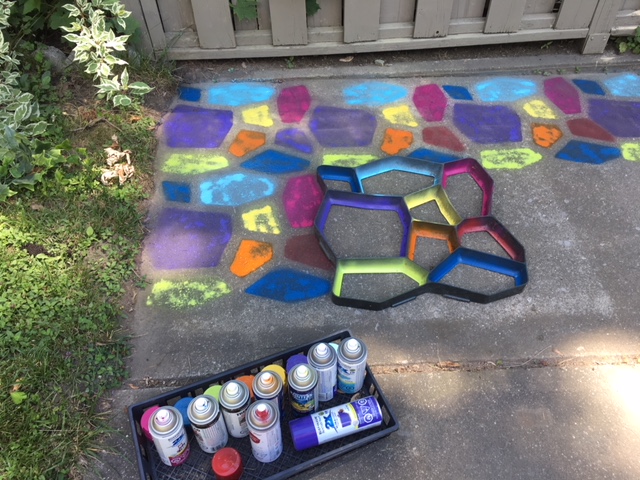
As you can see the lime green and sunshine yellow colors did not have the impact that awesome royal blue did. Lets give a shout out to Tremclad Royal Blue for its awesome job covering concrete on the first try. Yellow and lime did get a second coat once everything was dry. I didn’t actually mind the faded effect it had since colored tiles or bricks are not perfect. But then I wondered if it will fade with the sun and snow so I thought that I would want to make it darker by going over just the yellow and lime the following day.
Here I am at the 3/4’s done mark and very pleased with myself…but running out of some of my spray paints.
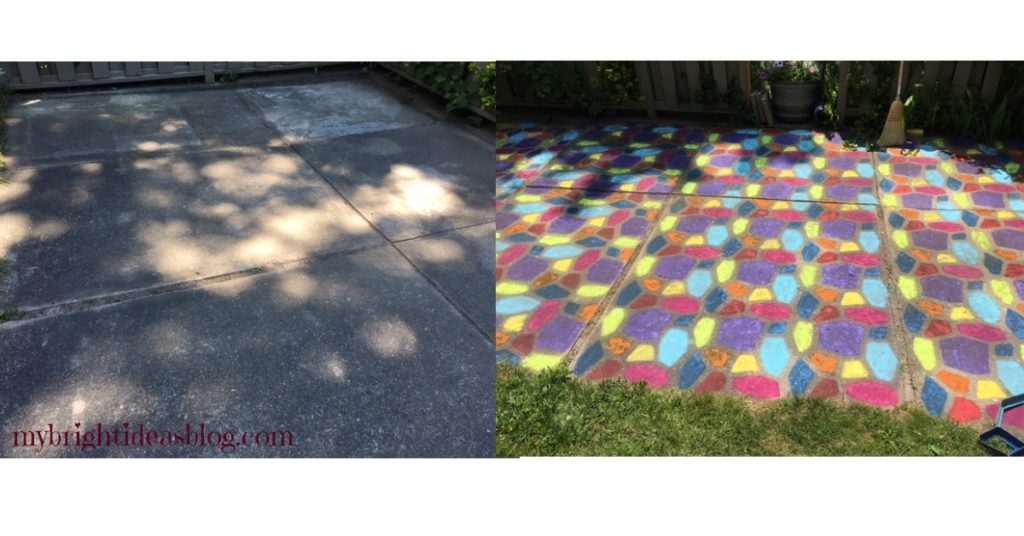 Here is a good picture from before and after the paint. Concrete doesn’t need to remain bland grey. The hardware store has several options for painting cement. If this is a bit too bright and busy for your space, you could do it in shades of green, brown, copper, charcoal etc. Pinterest also shows several techniques using a stencil effect. Or just painting a rectangle with a pattern on it so it looks like a carpet. So cool!
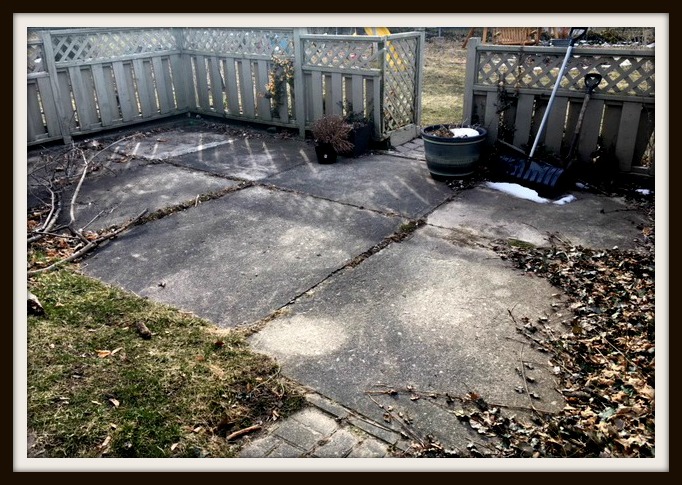
Here is the patio in the early spring with the last of snow melting. All the garden furniture packed away for the winter and the formerly-lush ivy looking creepy and brown.
In May and June I was having a lot of fun adding color by painting a few things, but the patio concrete was pretty ugly grey and not cleaned up since the spring.
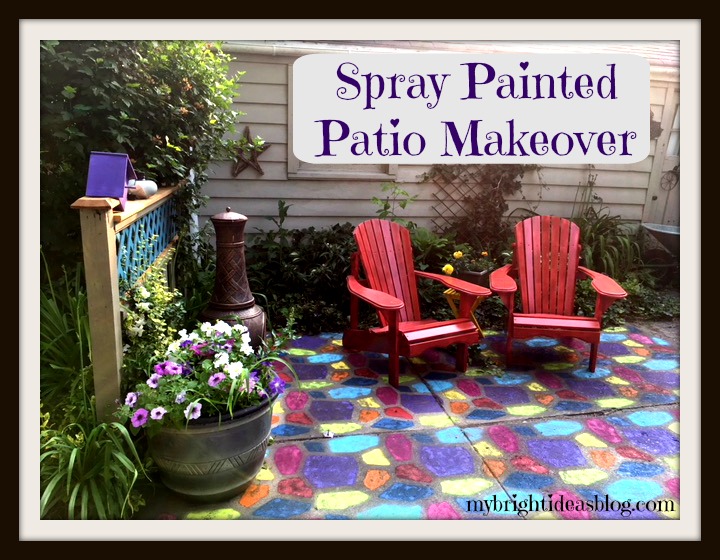
This is a cool angle from the deck! Now that I have put all the furniture in place….and I realized I forgot to put the clear sealer on top. Oh plumpers! I was so eager to see it all come together I completely forgot! Tomorrow is a holiday so…hubby is home to help me remove it all again. I will start early before the temperature gets too hot. I’m hoping that with the sealer on top this color will stay vibrant and last through the seasons. This is July 1st 2018. I’ll follow up with how it held up over the years.
…


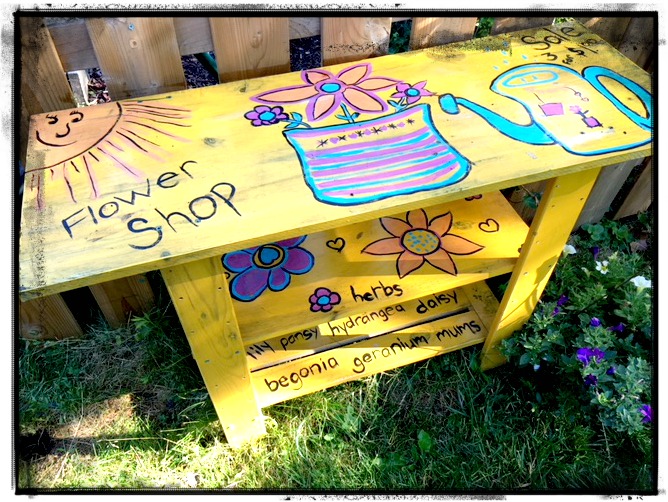
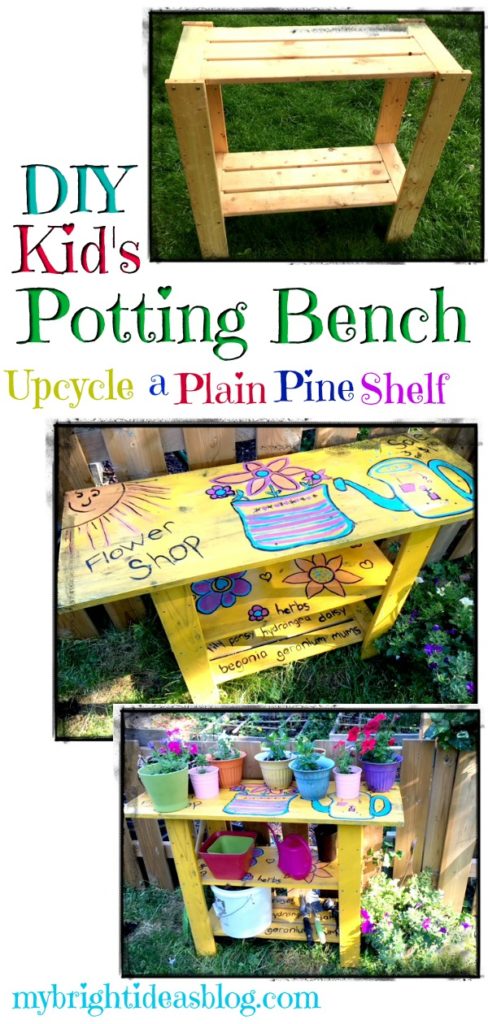
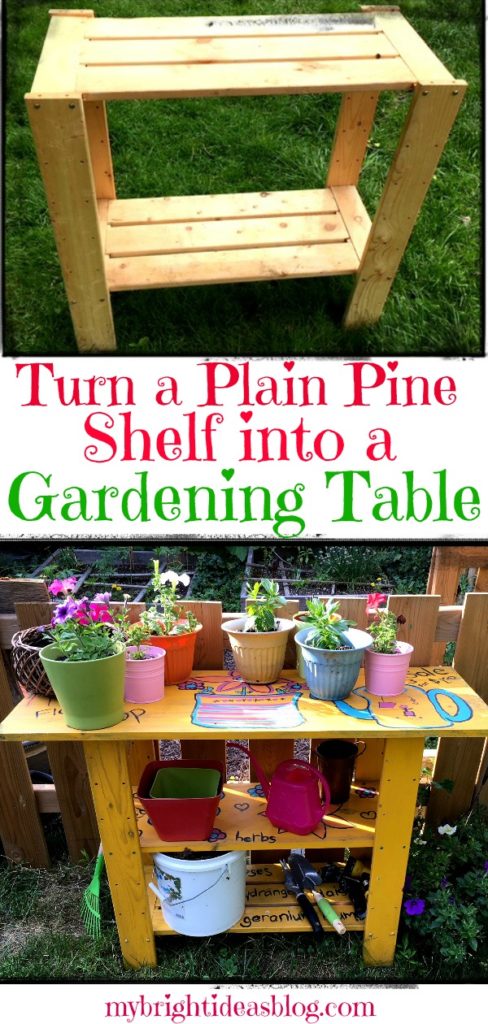
Make a Garden Work Bench / Potting Table

This is an easy DIY project for the inexpensive wooden pine shelves in the back of your closet that you’ve had for years. I was staring at mine thinking about getting rid of this plain old shelf and then I thought what if I added another shelf, made the top bigger and painted it a bright color and turn it into a garden potting station for the kids.
I have another one that I could turn into a lemonade stand using the same idea. I’ll let you know if that turns out!
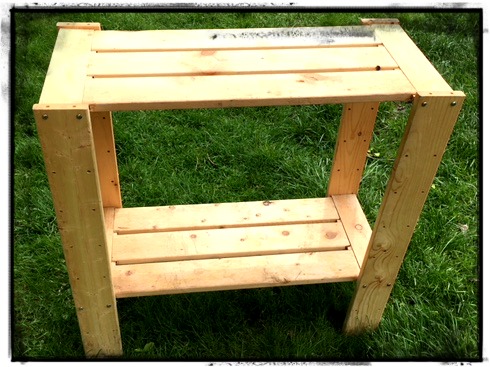
This is actually an old project I made years ago so some of the details are a bit foggy. This shelf was holding our camping gear. Its really only good to hold very large things on the bottom shelf because it doesn’t have a middle shelf. It turns out that its pretty easy to add a shelf by having a board cut to size.
You will need:
- a bare wood pine shelf
- pine cut down to 12 x 30 and 16 x 42
- 16 x 1 inch deck screws and a drill
- sandpaper
- outdoor paint
- paint brushes
As I said this project was done 3 years ago so I’m going by memory on the details.
The middle shelf on mine measured 12 by 30 inches (30 by 76 cm’s) …. Your shelf may not be exactly the same so measure yours before having the shelf piece cut.
The piece on top is 16 by 42 inches (40 by 107 cm’s). Hopefully you have some wood scraps you can use in your garage left over from another project. If not they will cut the boards for you at the hardware/lumber store.
The boards will need to be drilled in place. I used the pre-drilled holes and attached the middle shelf with 2 deck screws on each corner. I put 8 deck screws in the top of the table to attach it to the vertical boards of the shelf. The nice thing about a work bench is it can be a bit rough-so I didn’t sink the screws and fill the holes.
Next the entire shelf will need to be painted. Our shelf is outdoors all summer and is stored in the garage for the winter. I used left over paints in my basement that were meant for other projects. The bright yellow paint was a miss-tint that I bought for $8.00, several years ago. It needed a lot of stirring before I could get started. Follow the instructions on the paint tin.
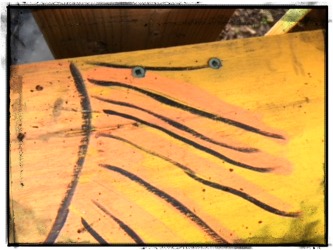
After I had done 2 coats of paint we were able to decorate it. The girls love to spend time playing flower store! When I purchase new flowers and vegetable plants at the garden centre they gather all the hand tools, seeds and the new plants and play at shop keepers for hours. I finally bought them some fake flowers from the dollarstore for their play store so I could get mine into the garden!
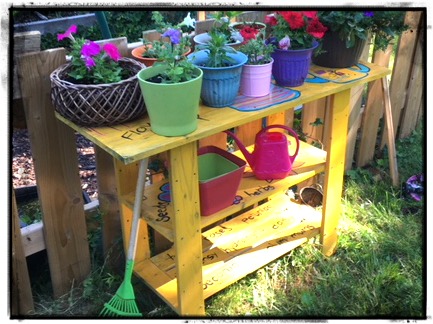
This year they were really involved in the planting of the newly purchased plants and not just pretending to sell them. Their planters are doing really well! We have to keep an eye on our potted plants since a few squirrels that are digging around
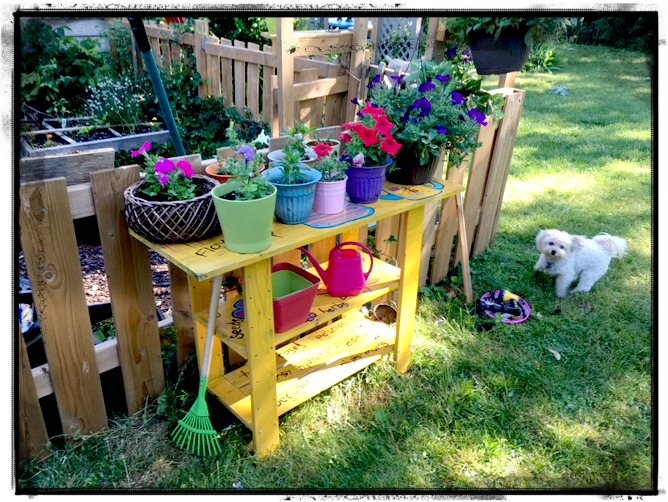
Gemma our Yorkie-Poo snuck into this photo. This photo shows the fence around our vegetable garden. This keeps the dogs from digging in the dirt. There are also some nice bunnies in there who nibble on the lettuce in the square foot gardens.


We have our own Floppsy, Mopsy and Cottontail!
Enjoy making yourselves a work bench. Come to think of there is lots we can do with these bare bones shelves. Next on my to do list might be a lemonade stand….
Enjoy your projects, til next time!
…
Plant Puns on Painted Potted Flower Pots – Adorable Gift Idea to Make Them Smile!

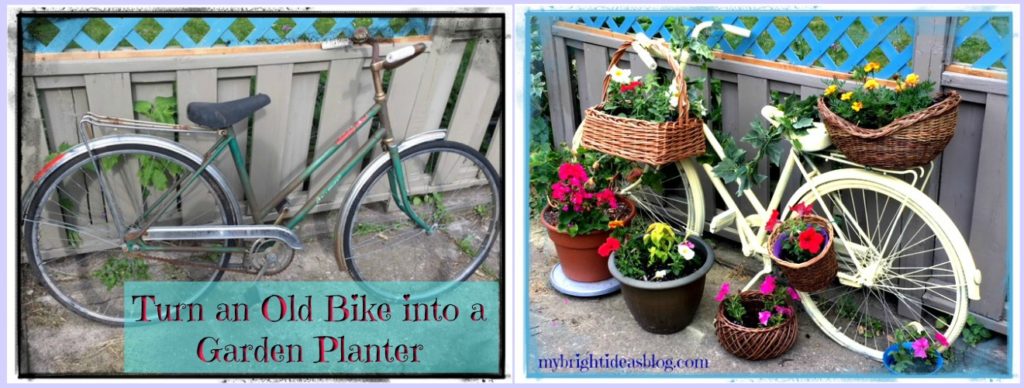
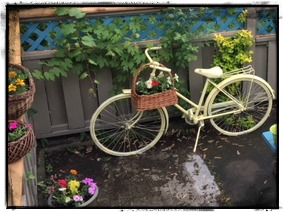
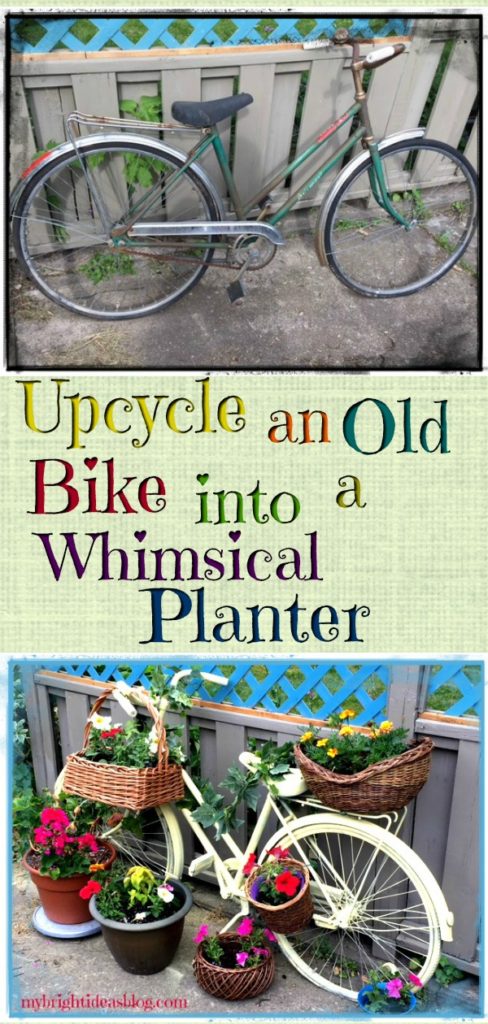
Turn An Old Bike Into a Garden Planter Feature!
Bicycle Planter Garden Feature
Have you seen painted bikes around town? I have seen a few-plus lots of pictures of painted, planted, garden bikes on Pinterest and at last I’ve made one for myself! Here it is!
We have really being trying to put an effort into our back garden this year. In return we will want to be out there visiting with friends and family. We are off to a good start with our effort to spend a bit of time nearly every day to pull weeds and water the gardens….and spray paint a few things along the way…let me tell you about that!
How to Upcycle a Bike into a Planter!
The first step to this project is to get a used old bike. I have found a few at the used sports store for $30 or more and I thought how sad is it to wreck a good working bike. So I waited to find a cheap one on Kijiji.ca which is a buying and selling website that is very popular in my area. I found this beauty for $15.
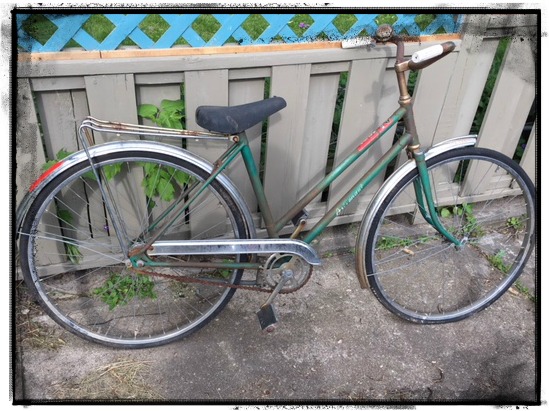
If you look closely you can see the rubber on the wheels is actually peeling apart. The bike doesn’t turn right or left so I felt okay about painting it and ending its time on the open roads to be part of my backyard.
Besides the old bike you will also need:
- safety glasses
- a damp rag
- fine sandpaper
- spray paint (2 or 3 cans)
- baskets
- plants
- plastic bag or coconut coir lining
- quality potting soil
To prepare the bike for painting the first thing to do is wipe it down. This bike was covered in dirt and cob webs from the previous owner. Next, using a fairly fine sand paper …100 grit maybe…sand lightly the surface of the metal. This removed some rust on the fender and frame of the bike. You don’t want that in your eyes so pop on a pair of safety glasses first. If you were painting a gorgeous looking bike or a bike you would want to ride around town – you should pay a lot more attention to detail. You would take the wheels off and make sure everything is smooth. However, this bike was already in rough shape so I just gave it another wipe with a damp rag to get the dust off and moved on to the spray paint.
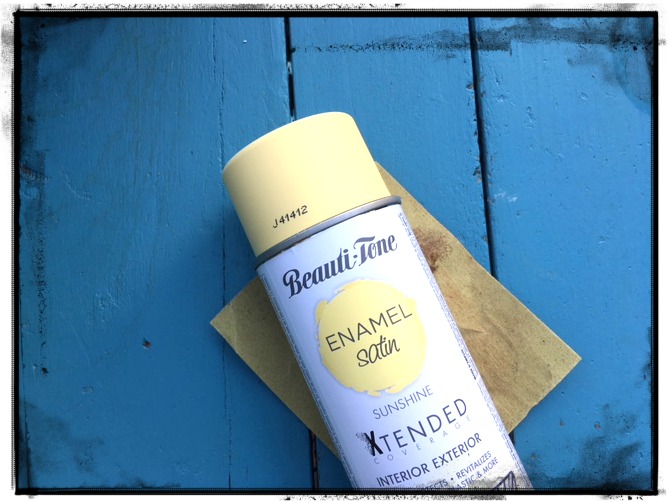
I had a hard time choosing what color to paint it. After much deliberation I decided on this brand “Beauti-Tone” of spray paint in red on some Muskoka chairs and loved how it sprays. I chose a satin “Sunshine” yellow.
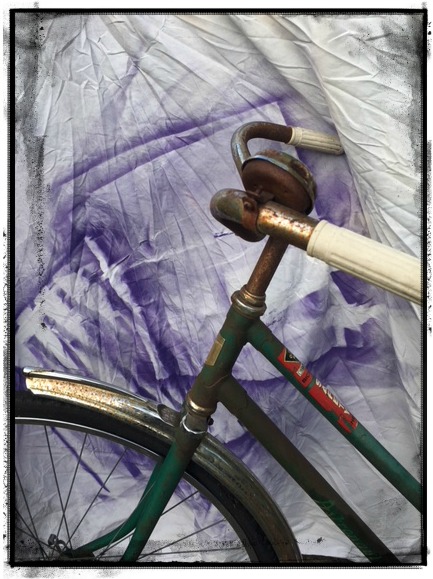 Spray paint is amazing for covering over all sorts of blemishes. I had thought that I would peel off the old stickers on it but then couldn’t be bothered and painted right on over it. I used an old sheet for a drop cloth and needed a can and a half of spray paint-so buy 2 cans!
Follow the instructions on your spray paint. Spray paint outdoors if possible on a non breezy day.
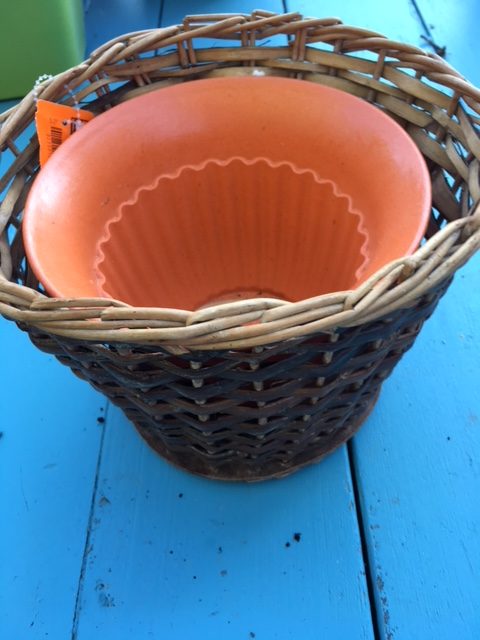
Recently I popped into the Goodwill charity shop. I was looking for bowling balls to paint into decorative gazing balls for the garden. (I’m so excited to do that project soon!) That day there was a slew of beautiful baskets and other odds and ends that looked perfect for some of my future projects.
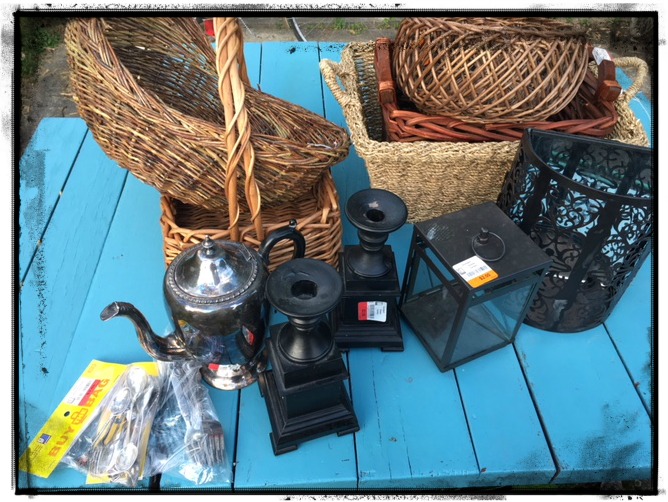
What great finds! Everything I got was around $3 each. These wicker baskets could have been painted to match the bike but I like the natural brown. I just LOVE baskets!
When I was a kid, my grandfather would pop around to our house with a basket whenever he found berries in season or a pie for desert. He would knock at the side door and my sisters and I would run around the house shouting Grampa is here! Such a favorite visitor. He was very generous with his love and baskets of berries. So thoughtful. I think that’s why I love baskets, I love Grampa gifts that come in the baskets!
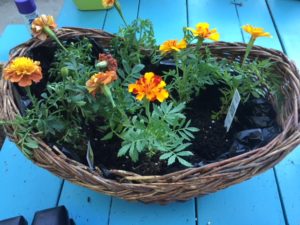
I thought this basket would be great zip tied to the handle bars or on the luggage rack at the back.
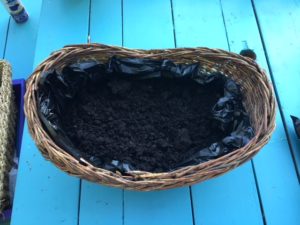
You can’t simply put dirt into the basket because every time it gets watered or rains it will seep through the cracks. Using a natural basket in the sun and rain is going to age it fairly quickly. Before adding the soil you might want to use a clear spray paint on the basket to help it last longer.
You can line the bottom of the basket with a plastic (garbage bag), newspaper or coconut coir liner. If you use plastic there won’t be any drainage allowed so you might want to poke some tiny holes in the plastic. Add some good quality soil and then the plants.
If you can find a pot that fits inside the basket that would be even better for packing things away at the end of the summer.
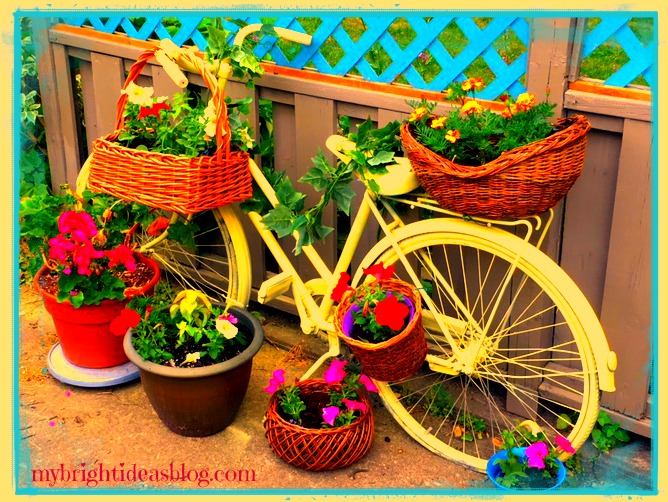
I was tweaking the photo above and turned the bike vibrant bright yellow. I really like it brighter so I might change it next year to a darker yellow or red. Ooh la la!
When your planters are ready you can you use plastic zip ties to attach each basket to the bike. I also used gigantic zip ties to attach the bike to the fence. I purchased my zip ties from the dollar store. Make sure it is fairly steady. The weight of the dirt in the baskets was surprisingly heavy. I would hate to see the bike topple over in a big wind storm-what a mess! I placed my bike planter right onto a concrete patio, but many put it in the flower gardens. In this case you could dig holes for the wheels and bury the bike a bit so its actually in the ground.
Wondering what I did with the other items on from the thrift store?
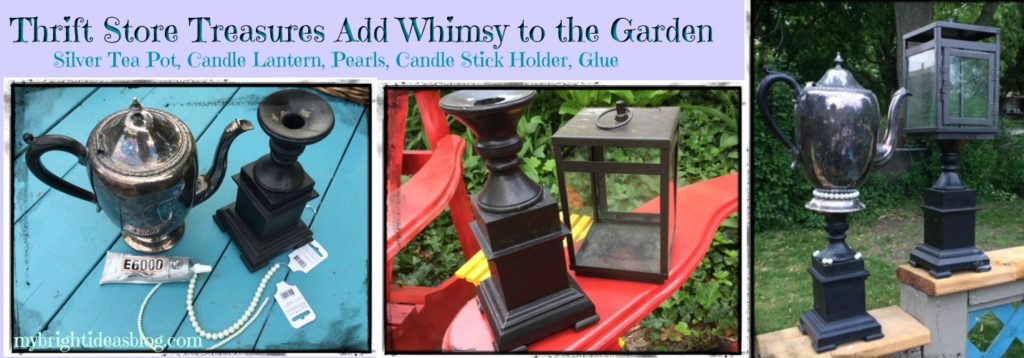
I simply glued the silver plated tea pot to a black candle stick with E6000 Glue. Then I took a string of pearls ($1.25 The Dollar Tree) and glued it to the base of the tea pot. Why not?! Express your whimsical self with color and fun items.
Next invite friends over for a backyard visit and root beer float! There are lots of conversation pieces decorating the garden this year. I’ll show you some other things I’ve been up to soon!


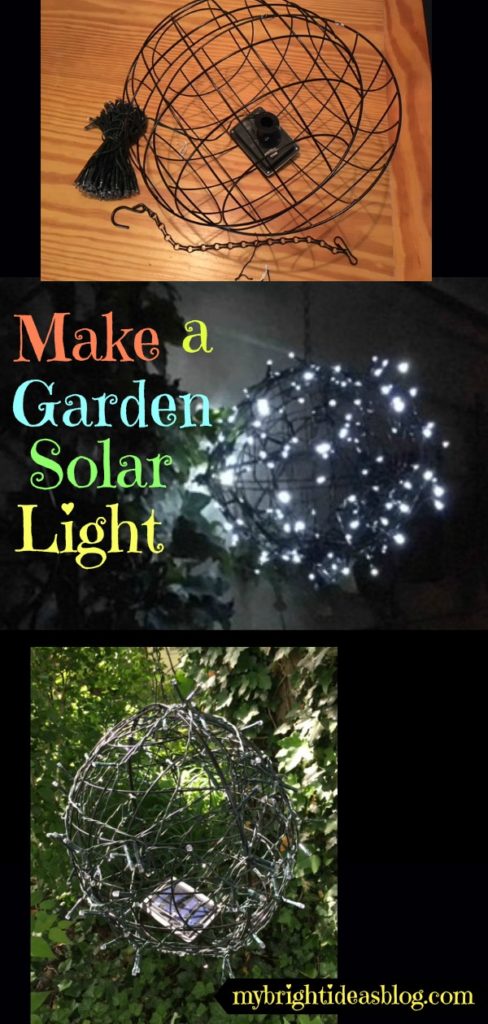
DIY Garden Solar Lights Using 2 Wire Planters
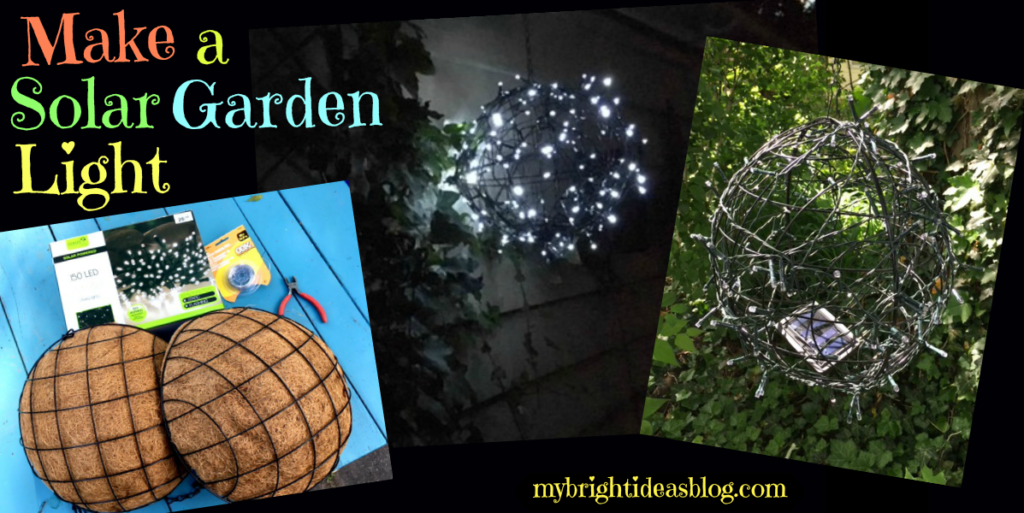
For this project I’m going to show you how to take 2 wire planters, attach them together and wrap LED solar twinkle lights around them to make a gorgeous night time garden light.
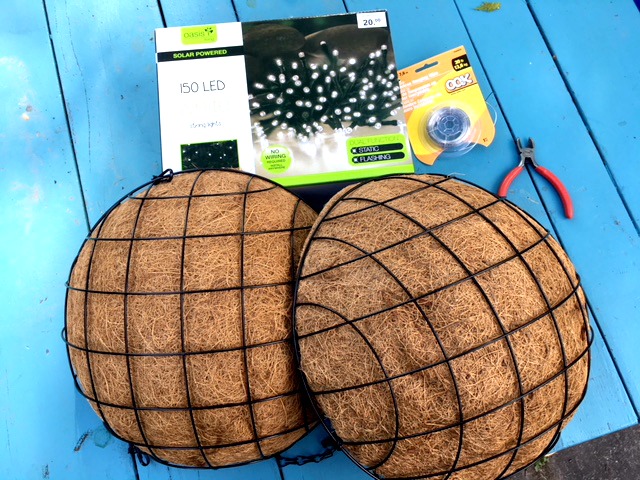
You will need:
- 2 wire plant baskets (dollar store $1-$4 each)
- pliers/wire cutters
- 10-15 black twist ties or fine wire cut to 3 inches long
- package of solar twinkle lights (I paid $20 but if I can find these cheaper I will let you know!)
 Before you start your project I would recommend that you test to make sure your solar lights are working as they should. My first project, I put all together and waited for the sun to set and then realized the light was defective and needed to go back to the store. Grrr…On my second go at the project I put them in a dark cupboard and peeked in. It worked perfectly so I started again.
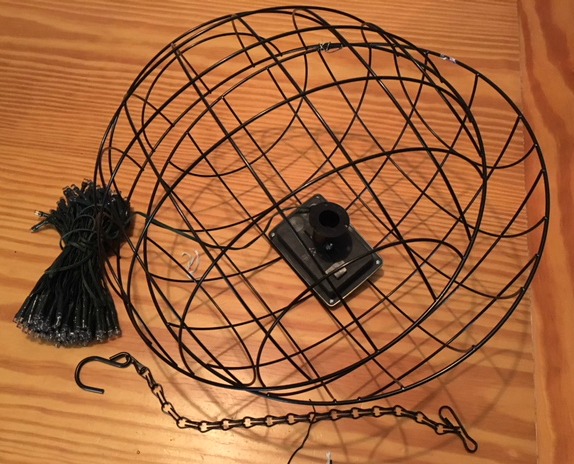
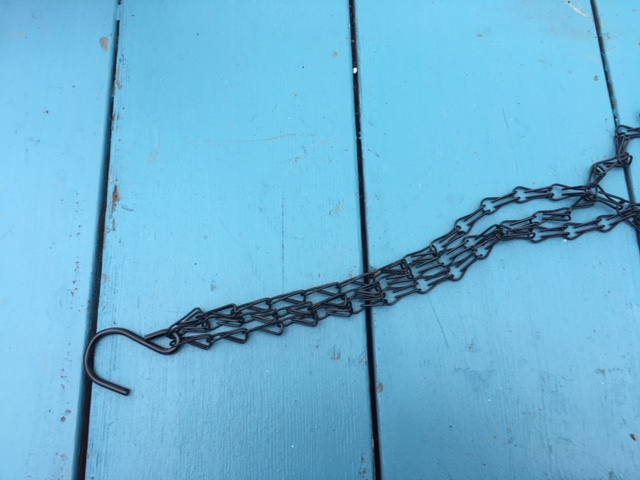 To easily remove the hook and chains, there is usually a clip on the wire hanger. Using your pliers remove two of the chains leaving just one hook and one strand of chains.
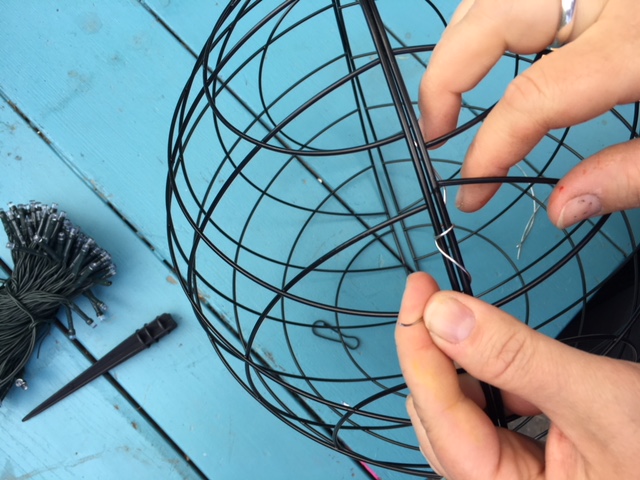 Match up the pattern of the wire basket and wrap a bit of wire around it. The above picture was my first try. I forgot to match up the wire basket and the wire punctured my skin. In the first 10 seconds I was bleeding. So my next try I used just twist ties. Black twist ties preferably so it isn’t obvious. If you are going to use wire, put on some work gloves.
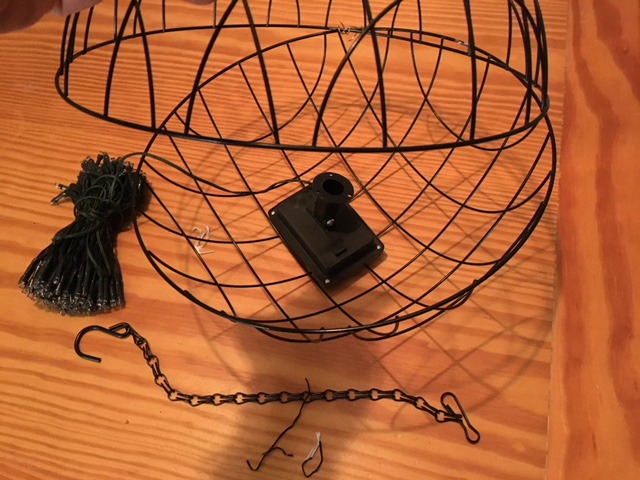 With one side secured-open it looks like a clam shell. Put the solar lamp inside the two planters and secured the other side closed.
 Starting from the other end of the twinkle lights, begin wrapping the lights around the sphere. Wrap the light with a twist tie to secure the lights snuggly around the ball. As you go around and around you can open up previously used twist ties and secure the newly wrapped lights into it.. Continue until the lights are completely attached.
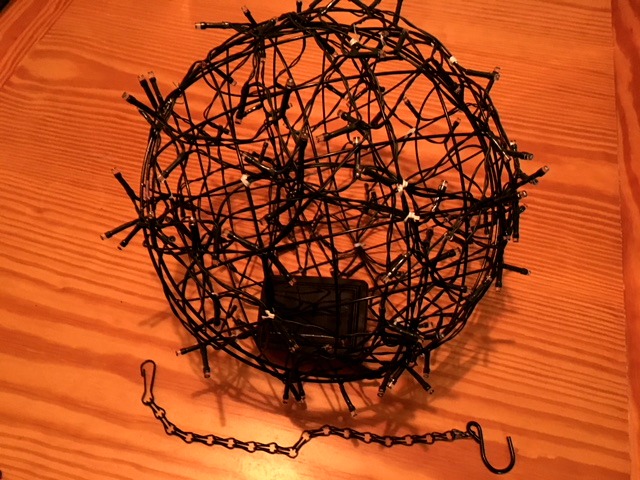
Attached the hook to the top of the sphere and its ready to hang up! As you can see I needed to use some white twist ties. If it bothers me to see those I could replace them later when I get more black twist ties.
 Next I need to decide where I should put it.
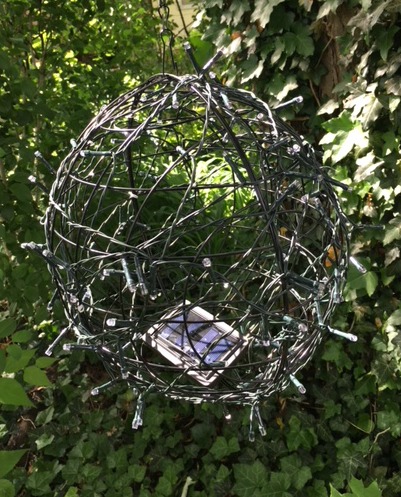 If I can find the solar lights a bit cheaper I would like to make 3 of these and hang it from a huge old tree in the backyard.
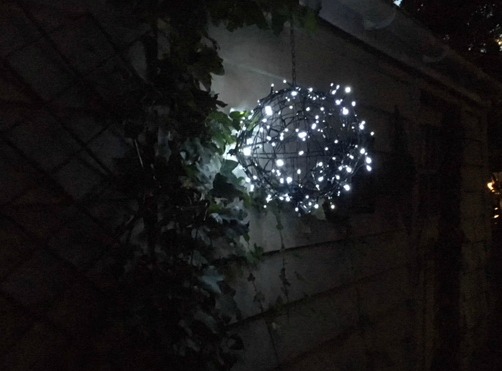
For now it is hanging on the side of the garage. I’m very pleased with the results!
…

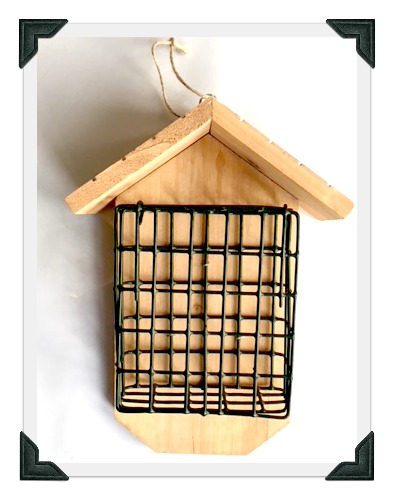
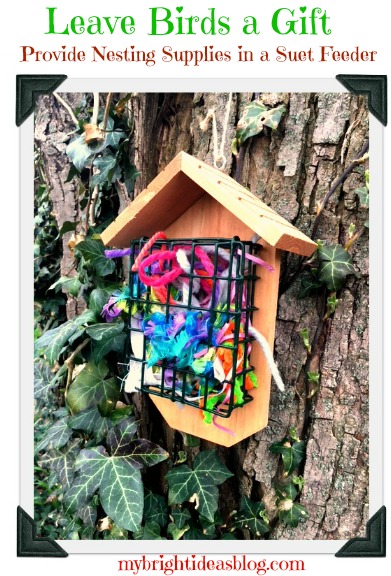
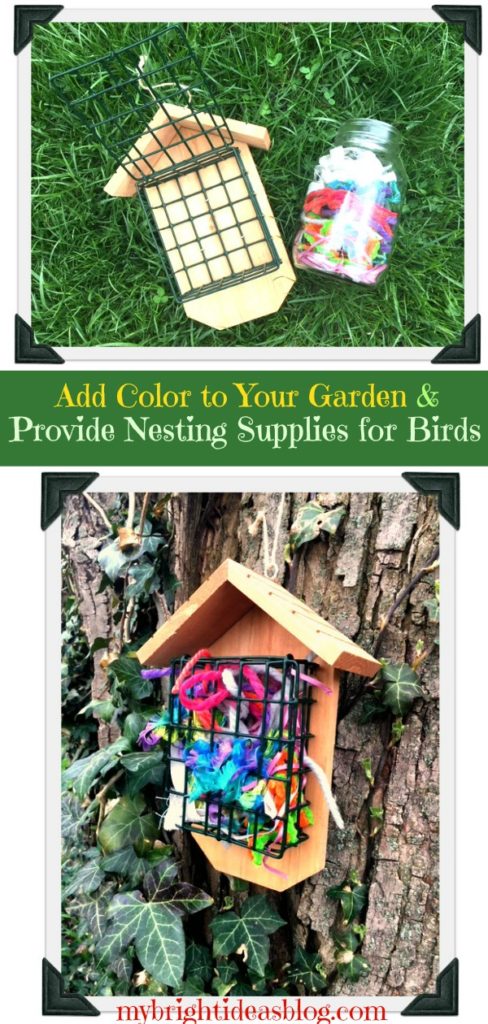
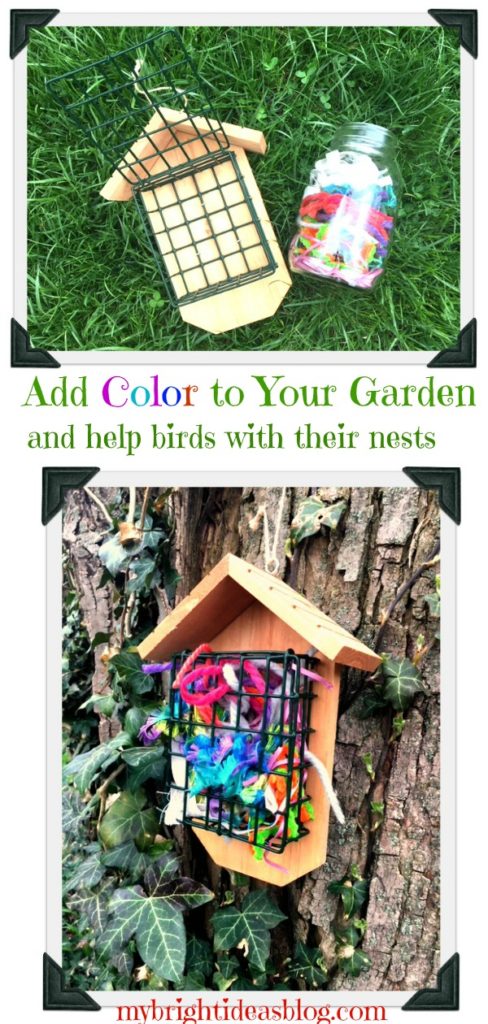
Add Color to the Garden and Provide Yarn for Bird’s Nests
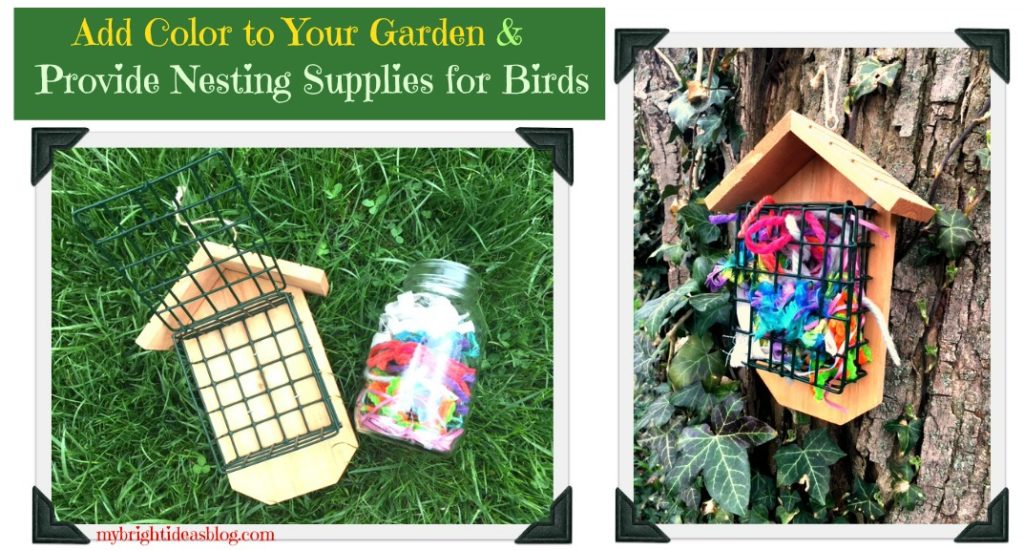
Suet Bird Feeder – For Bird Nest Supplies
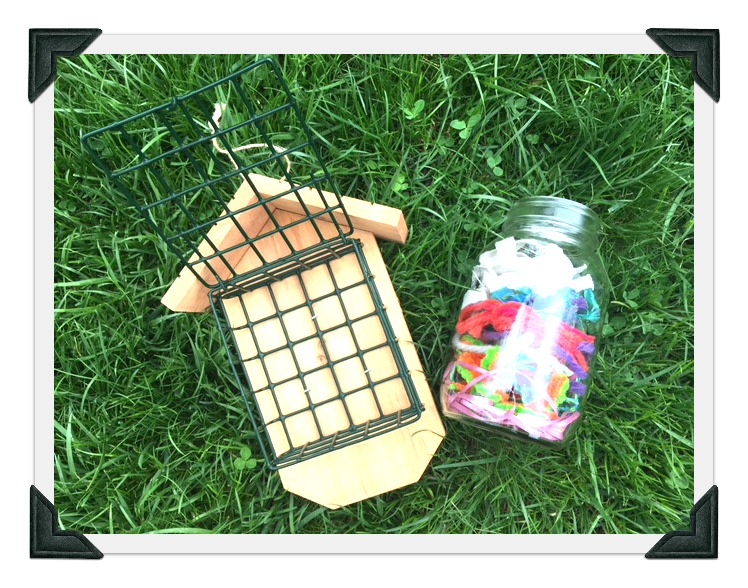
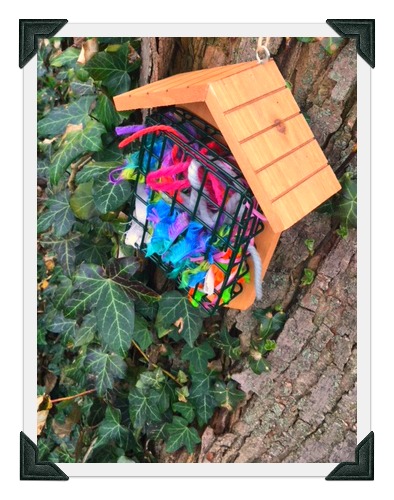
Looking to add a splash of color to your backyard? Wondering what to do with ends of yarn and fabric? Want to help out the lovely birds who wake you up with their sweet melody? Get a suet bird feeder from your dollar store…or maybe you already have one in your garden shed.
In case you aren’t familiar with this product here is a photo. A bird feeder suet cake is a square of bird seed in animal fat. It’s appealing to the home owner (no clean up) and to the birds (yummy food). The cage below is what you pop a suet cake into. We aren’t feeding the birds today though. Today we are using the suet cage to leave pretty supplies for their nests.
This is also a great way to give a purpose to bits of supplies too small for use in other projects. You could use bits of yarn or strips of fabric cut into 1/2 inch widths and 4 to 6 inches long. I suppose natural fibres would be best…cotton and wool …. Birds are in nature after all.
Years ago we had a lovely dog named Bronte that shed a lot. When we would brush her, my hubby would clean the dog hair out of the brush and put it in my shrubs. This seemed bizarre to me-after it rained there were gobs of soggy dog hair dangling in the bushes. Gross.
Apparently, he was doing this to help the birds build their nests. I guess it’s warm and soft – it could have some appeal, for a bird. It hadn’t really occurred to me that birds would need help making their nests since they have been doing this job on their own since their beginning…but wouldn’t it be cool to find a nest that had some of your yarn or ribbon or fabric in it?
 Can birds feel happy that they have found a splash of color for their nests? I love to bring home new cushions or wall hangings. Even if birds don’t get the same joy from re-decorating, I’m sure they will sing you a song of thanks for your bright and thoughtful gift. Tweet Tweet….Chirp Chirp.
Enjoy your day and have a wonderful weekend!
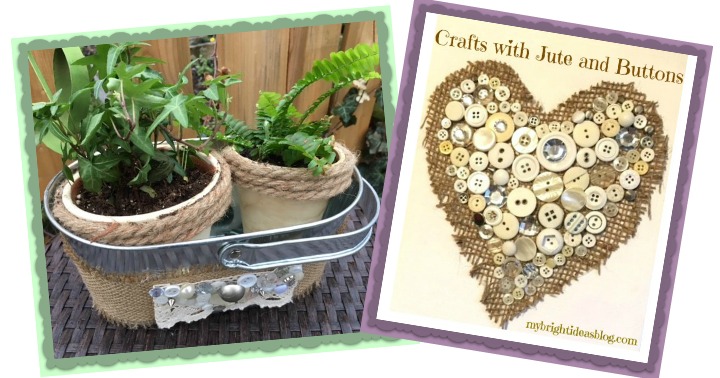
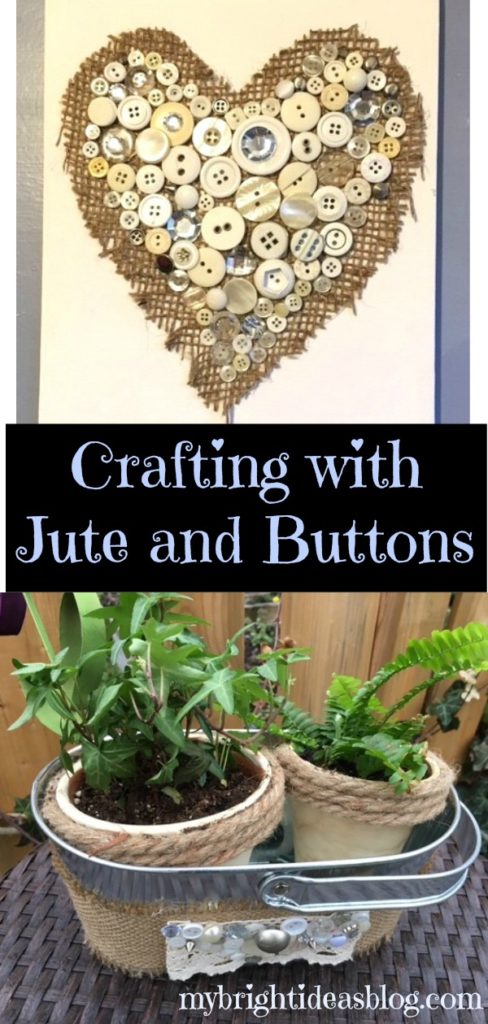
Crafts Using Burlap and Buttons – Easy Project that Looks Great!
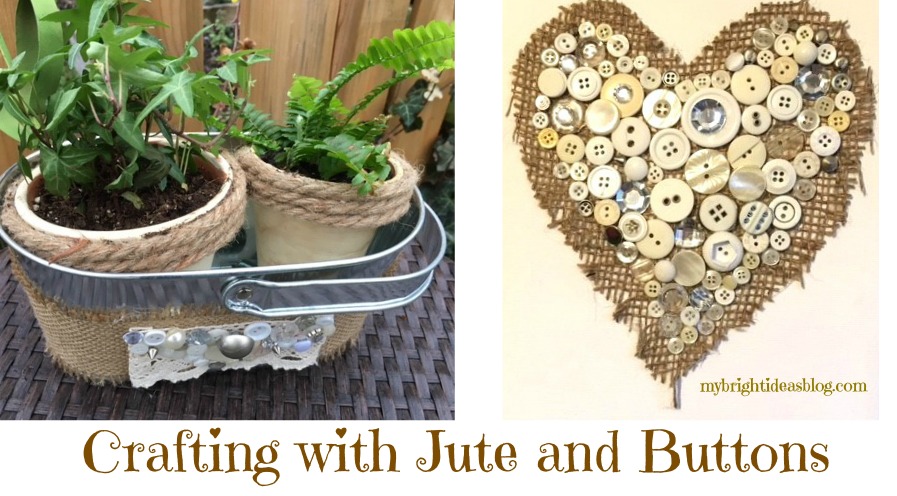
Is it a new trend that burlap and jute are in so many crafts? Maybe this has been around a while and I’m just noticing it. The crafts on Pinterest with both jute/burlap and buttons are really catching my eye. So I thought it was high time to get on this button-burlap-jute wave! :o)
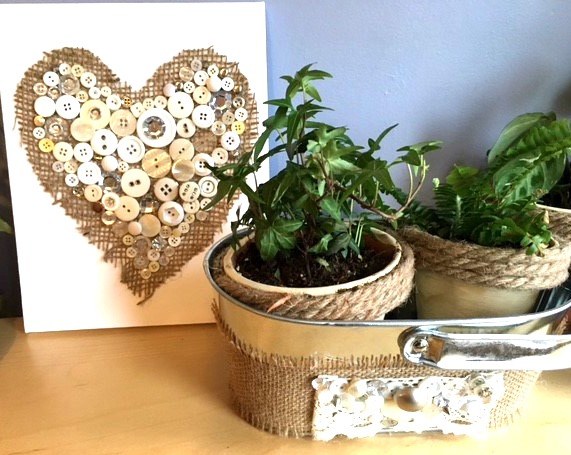
Project #1 – Jute and Button Wall Art
You will need: Burlap/Jute, Mixed Buttons, 8×10 Canvas, Hot Glue Gun or White Glue and Paper
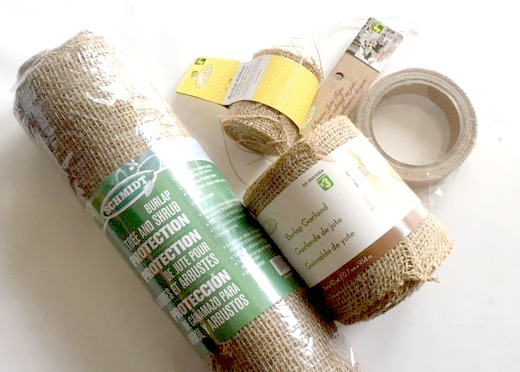 The local Dollar Store had several options…in both the garden area and the craft sections. For this project I cut up the big burlap bag that you would cover your shrubs with for the winter. There is still plenty of fabric left over I could still use it in the garden or other crafts.
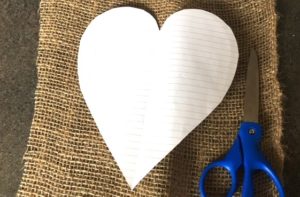
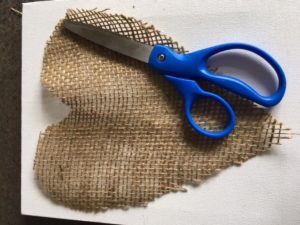
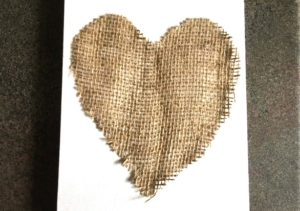
I cut a heart shape on paper first and then used it as a template for cutting out the burlap. Then I put a few dabs of hot glue on the 8×10 canvas to flatten the burlap into place.
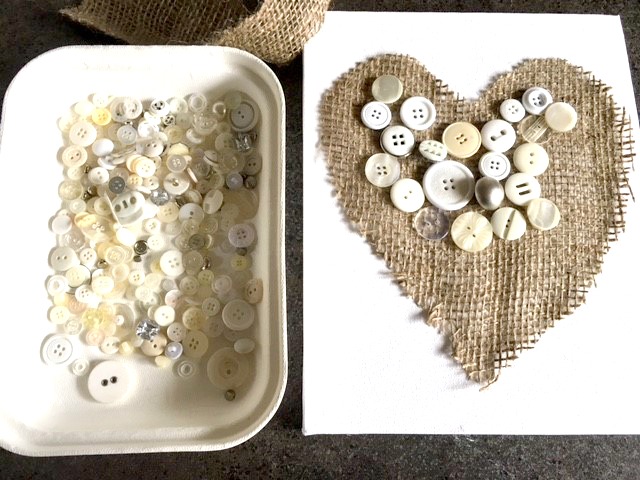
The buttons I used were all cream color or silver. They came as a bag of buttons from my Dollar Store for $1.50. There are some nice Pinterest posts with examples of art made with colorful mixture of buttons-I might try a colorful one next time. Start by gluing the biggest buttons in the centre and work outwards with the smallest buttons.
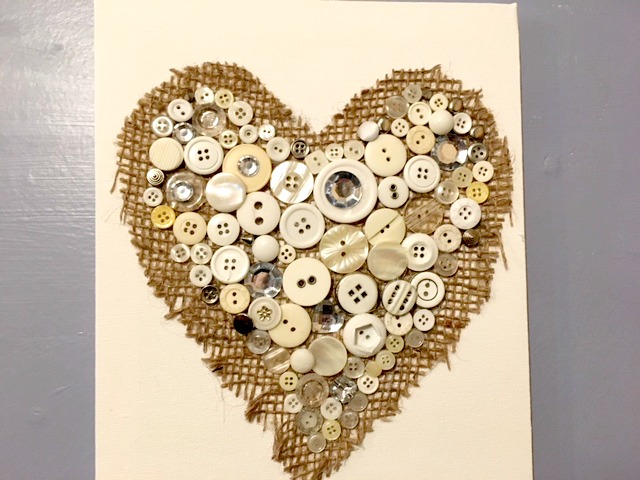 Watch your fingers while you glue the buttons on! Using the hot glue gun might be a bad idea for the small buttons. I like the speed of hot glue drying but since the project lies flat you could easily use regular white glue and spare your fingertips.
Project #2 – Jute Wrapped Tin Flower Pot
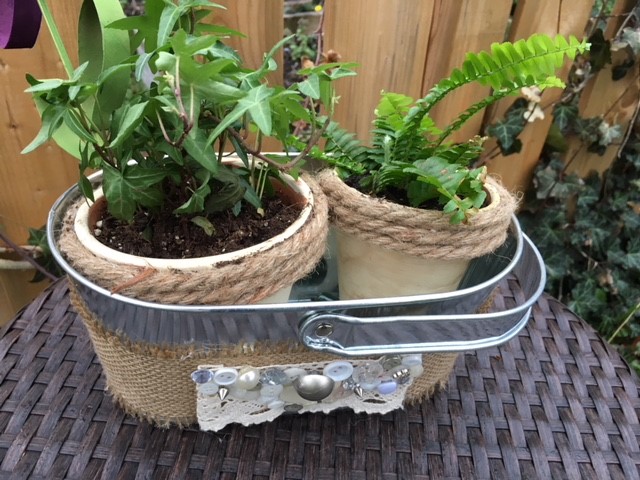 For this project you will need: Jute Ribbon 3 inches wide, a bit of lace, mixed buttons, flower pot (mine is a tin bucket style) and hot glue gun.
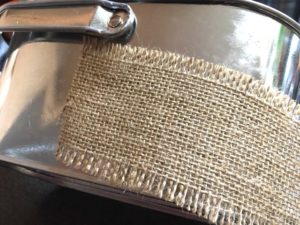
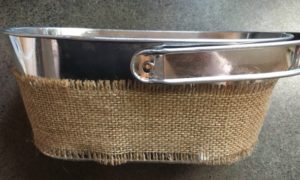
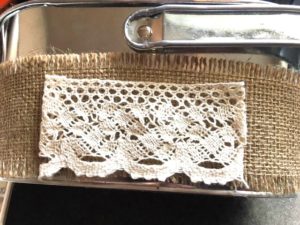
Using the hot glue gun attach the jute with a dab of hot glue on the back of the aluminum tin. Wrap it around the container and glue it flat. Mine puckered at the bottom so I pulled the jute snuggly and added more glue to secure it flat. I had a few inches of lace that was glued to the front of the container.
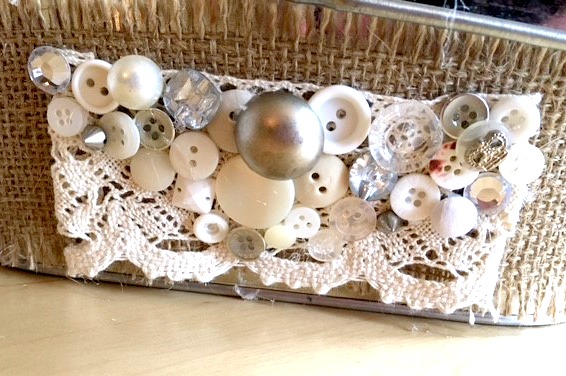 Then add on the buttons.
 I really like how these turned out and I think I might have some follow up projects with more glue and buttons. I would love to get a few bags of vintage buttons from a thrift store and mix it with broken jewelry to make a more sophisticated eclectic bit of art. On my to-do list are button bracelets and hairbands for the kids. I’ll let you know how that turns out later!
Have a super day!
….


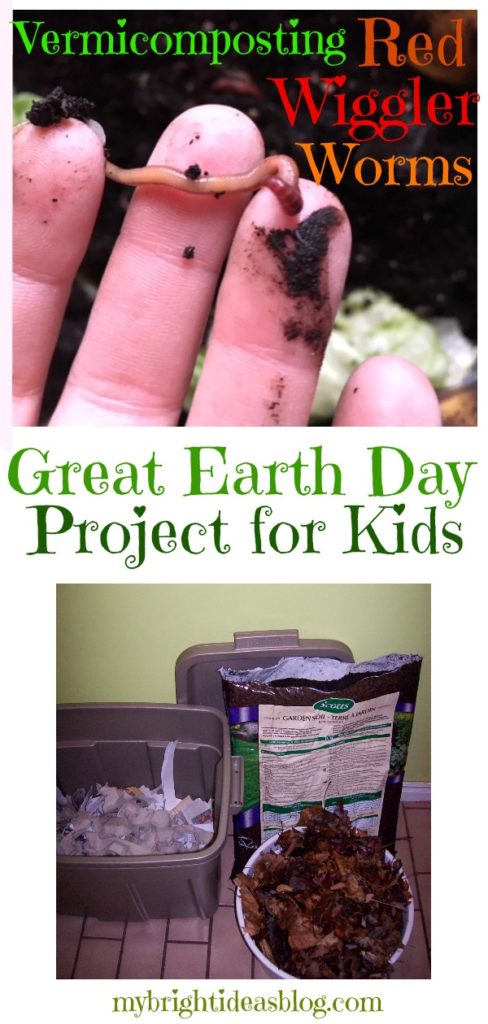
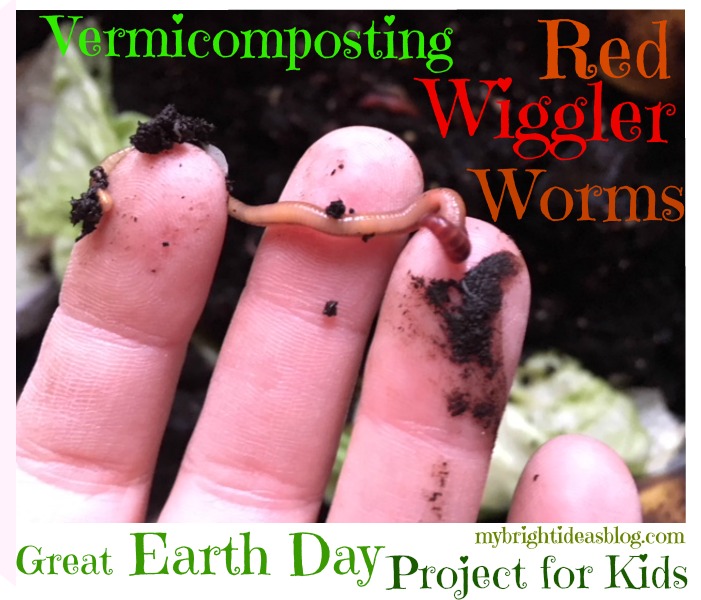
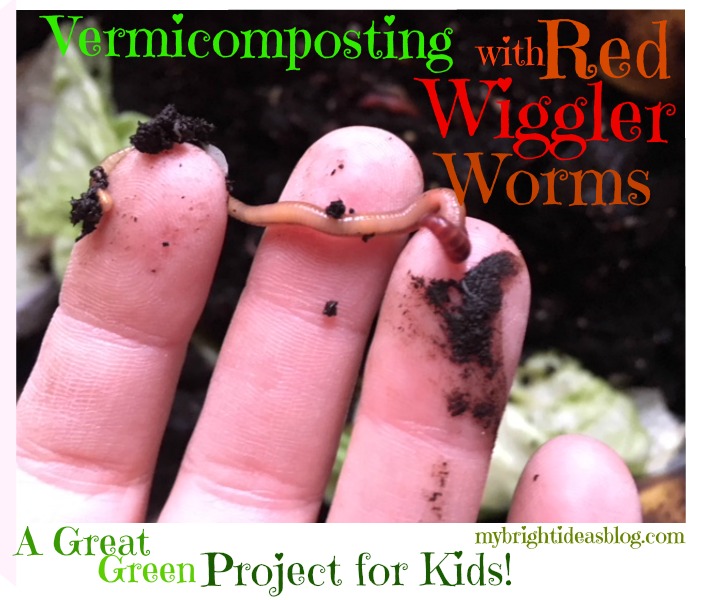
Easy Vermicomposting! How to start an indoor Worm Compost Bin!

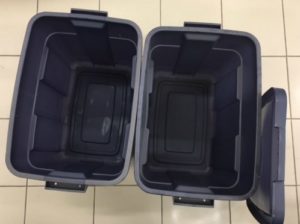
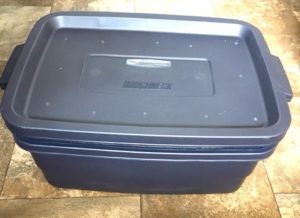
For the last 11 years I have been keeping a big secret! I have pet worms. I love indoor composting with red wiggler worms. At times I have had as many as 30 Worm Compost bins in my laundry room (that was a bit much but at the time I was vegan and had a home day care so I was really going through a lot of fruit and veggies). I’ve tried several different techniques and bins and in the end I prefer to use the easiest system to make with just 2 regular old Rubbermaid bins.
It all began when I was a stay at home mom using cloth diapers and wanting to be kind to the planet. I had a lot of time to research all sorts of ways to add less to the garbage. We had a compost bin in the backyard but that year it snowed so much that I couldn’t get through the knee-deep snow to the compost without shovelling myself a path and I had a toddler at the time. So, I started my first bin in 2008 by purchasing a jar of worms from a man on kijiji.ca (local website in Canada that we can buy and sell things…similar to Craigslist). The jar was small and seemed to only have dirt in it he assured me it was worth $10 and there were worm babies and eggs and soon I would have a thriving community of worms. He was right. One bin turned into 2 then 3 then I was posting on kijiji to sell containers of worms. Then I would sell completely finished bins with the community of worms well established. I still have my 3 outdoor compost bins but most of the food scraps go into my many indoor bins where the worms compost the food so much faster.
How you can do it too!
To set up a bin you can start with any quantity of worms. Some websites say to start with a pound or 500 worms but truthfully if you can get a friend to share even a small quantity, in the right environment, they will multiply to fill the space perfectly.
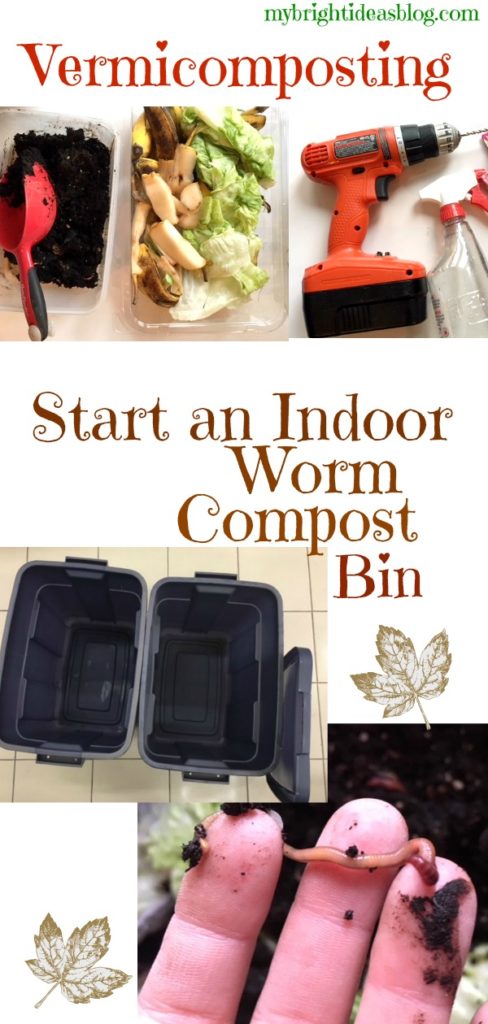
All you need to begin:
2 Rubbermaid bins 1 Lid (they prefer to be in the dark so avoid clear bins)
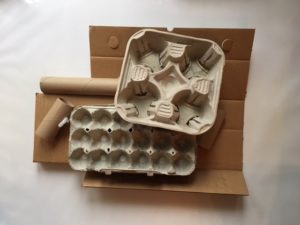
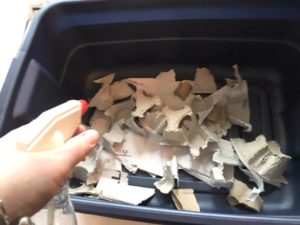
Paper products-shredded paper, cardboard, newspaper (toilet paper rolls, fast food drink holders, shredded bills)
Soil-garden soil from the backyard is fine. No fertilizer or additives.
Food scraps…fruit (not citrus) and veggie peelings (not tomatoes, garlic, onion or potatoes) tea bags, coffee filter with some coffee, crushed egg shells.
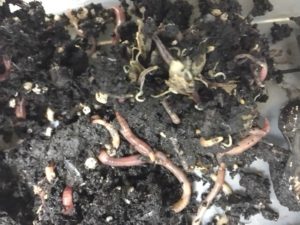
Red Wiggler Worms
Drill
Optional, coconut coir, dry leaves, rubber gloves and an old kitchen or garden utensil to move and dig in the bin
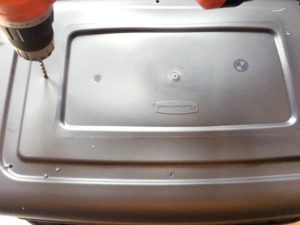
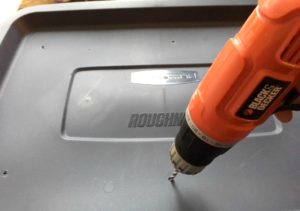


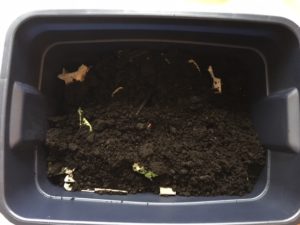
A simple bin is made of large Rubbermaid tote/bin with lid. Drill holes in the top for ventilation and in the bottom to allow drainage of liquids. Use a second bin underneath to catch any fluids that drain out the bottom. Prepare bedding before adding the worms. The bedding is made of soil, wet cardboard, shredded newspaper (nothing glossy or full color pages), shredded bills and envelopes (plastic windows removed), egg cartons, toilet paper rolls etc. Garden leaves and soil. Soil can be from the yard or a purchased bag but should not with chemical additives and fertilizers. The environment should be moist but not soaked. Excess moisture will drain into the bin below. If you put rocks or bricks in the bin below you won’t need to empty it very often. In time the liquid below will need to be emptied. Pour the liquid into a jug and dilute with water. Water your garden with this nutrient rich compost tea.
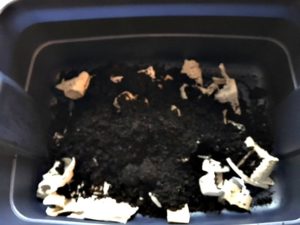
Ideally the bin should be moist- not soggy. If the dirt in the bin seems dry take a spray water bottle and mist it with water or turn the compost dirt to reveal wetter dirt at the base of the bin. If the bin seems too moist, add more dry items to the bedding such as paper, leaves or soil. The worms will travel through the dirt and stir it up.
Kitchen Compost
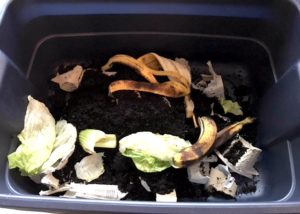
In a tub collect your family’s food scraps. You can add compost once per week. Remember worms are vegan. Don’t let anyone scrape their plates into our worm compost tub. No meat, dairy or oils. They love fruit-but not citrus. They adore vegetable peelings-but not tomatoes, garlic, onion or potatoes. In moderation tea bags, coffee filter with some coffee, crushed egg shells.
The most important tip to remember is to cover over the food compost with soil and bedding. If you are rushed and just dump the scraps on top of the bin you will get a lot of fruit flies and all the worms will come up to the top. EEK!
Will they try to escape?
Worms will only attempt to escape if there is no food or the environment is uncomfortably wet or acidic. Add kitchen waste once or twice weekly and then a layer of dirt or bedding to discourage fruit flies and mold. Digging a hole to bury the fresh food compost and covering it over is another alternative. Feed your worms any non-meat, non-dairy organic waste such as fruits, vegetables, rinsed-crushed egg shells, tea bags, coffee grounds, paper, coffee and filters, and shredded garden waste. Breaking or cutting food scraps into small pieces will help them to break down easier. If you find there is an odour cut back on the amount of food you add to your bin. I have had a bin get a bit sickly and the worms were all on the sides of the inside. This was because I was juicing pineapple and ginger and giving them the pulp from the ground up fruits and making it far too acidic and spicy for them. Not to worry I rescued my wiggly little friends and set their bin back to their best environment again.
The Best Environment
Your worms are best kept at room temperature. Exposure to hot sunny conditions or cold winters of temperatures below 10 degrees Celsius should be avoided. The worms can die in extreme temperatures. I live in London Ontario Canada-summer can be 35 degrees Celsius (95 Fahrenheit) and winter can be -35 degrees Celsius (-31 Fahrenheit). Outdoor worm bins would not work here. Keeping your worms indoors year round is likely your best option. If your vacation plans are for longer than 2 weeks you may want to consider asking a friend to add compost for them.
How to Harvest the finished compost?
After several months the paper products will have disappeared. Its a good time to add fresh bedding. I tend to move all the food to one side of the bin. The worms will begin to migrate over the fresh banana peels and avocado which are their favorite foods in my opinion. The worms will be busy and migrate to one side so you can scoop out the soil from the opposite side. Keep your eye open for eggs and the odd worm so they don’t leave the bin with the soil.
Some websites say to spread the contents of the bin onto a plastic tarp and place a bright light on them so they move away from the light. That seems messy and unkind to me. I prefer to just take out a bit at a time.
Vermicompost will provide nutrients to your plants and will help the soil hold moisture. It can be used in a number of different ways:
1) Sprinkle into a seed row when planting.
2) When transplanting, add a handful of soil to the hole you have dug for the plant.
3) Use as a top dressing, sprinkling the compost around the base of your plants.
4) Mix with potting soil (half and half) for house plants.
Remember to dilute the liquid that drains out and water your garden with it.
I really do enjoy talking about worm composting. I’ve even did demonstrations at the girls school for as young as kindergarten. Grade 3 has a soil part to their curriculum which the last 2 years we were able to teach the students about setting up the bins. As you can see by now, I do love my little worm farm, so send me your questions and comments!
…