
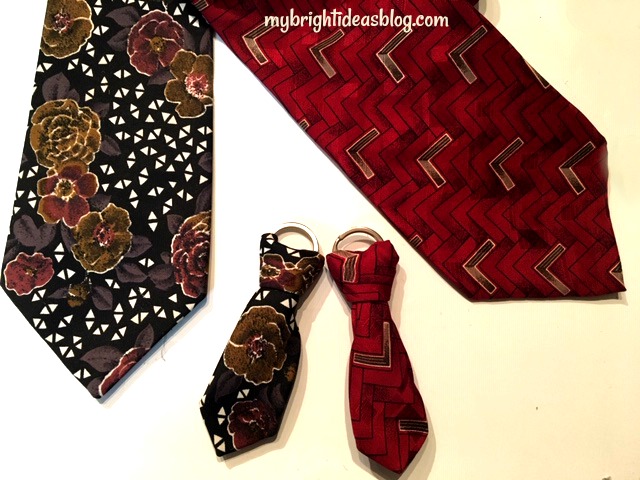
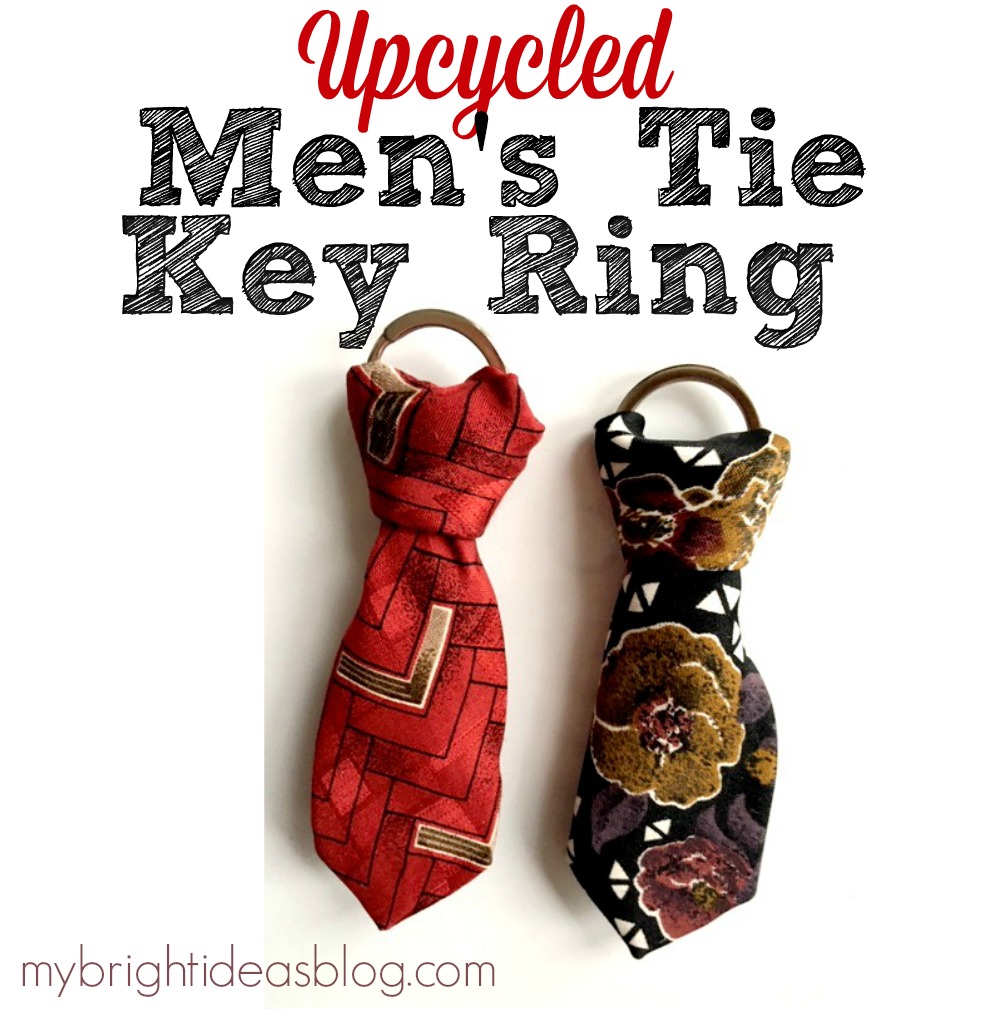
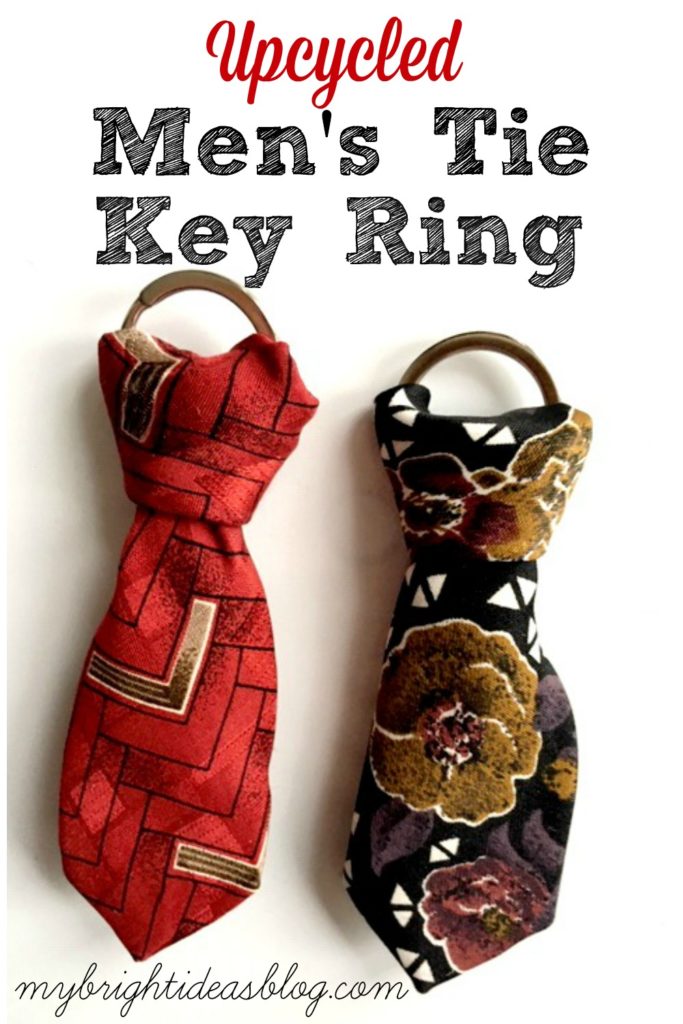
Looking for a fun way to upcycle a men’s tie? Here is an easy and super cute idea to turn it into a key ring.
You will need:
- an old tie
- a key ring
- scissors
- needle and thread (or glue)
- ruler
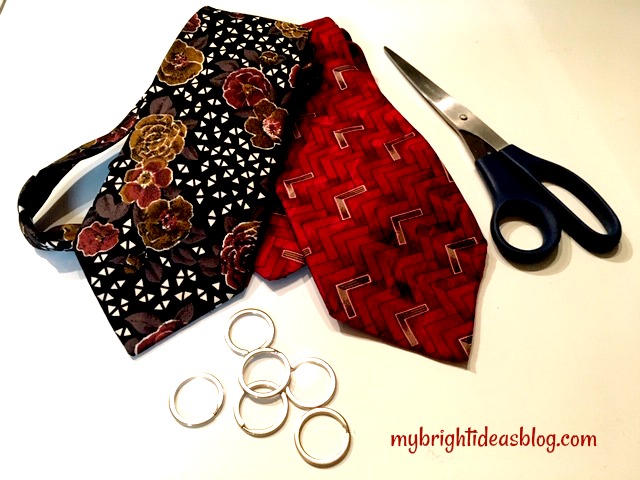
My hubby happens to have a lot of ties so he was willing to sacrifice these two ties for my project. Thanks dear!
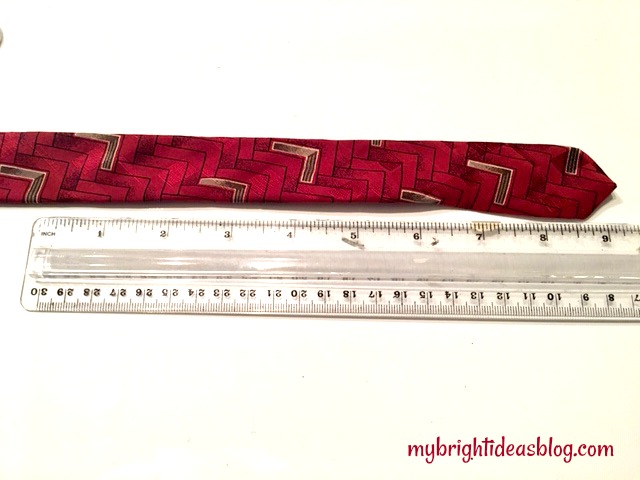
Cut the tie approximately 9 inches long.
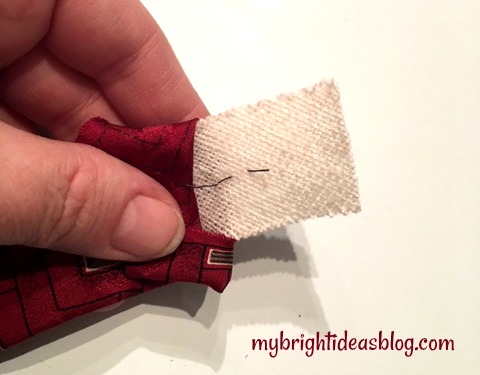
At the cut end, tuck the fabric out of the way and trim 1/2 inch (1cm) off interfacing that is inside.
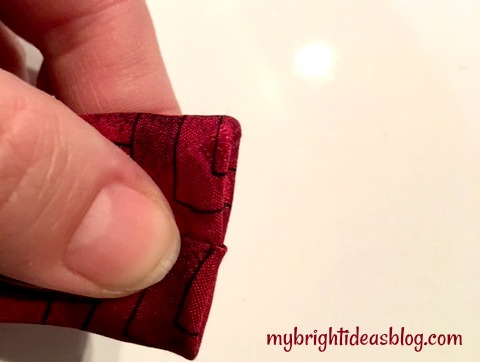
Fold inside and tuck the fabric inside. You could sew or glue this end to make a clean edge.
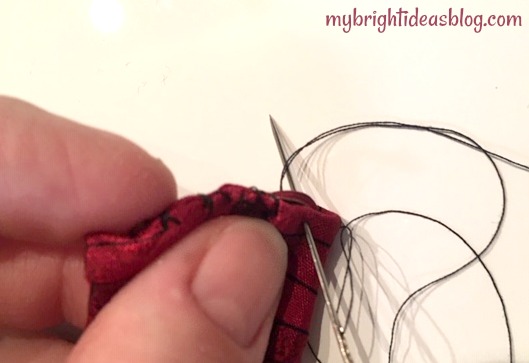
I sewed it with just a few stitches.
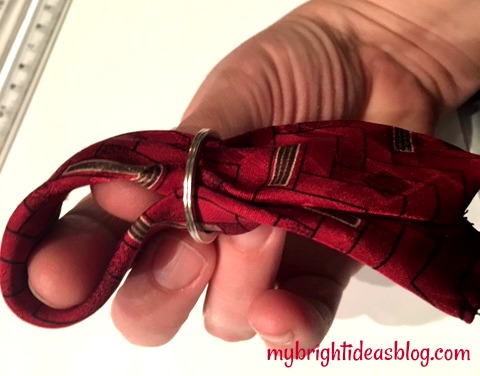
Next, fold the mini tie in half and slide it into the key ring.
Pull the ends through the loop to form a knot.
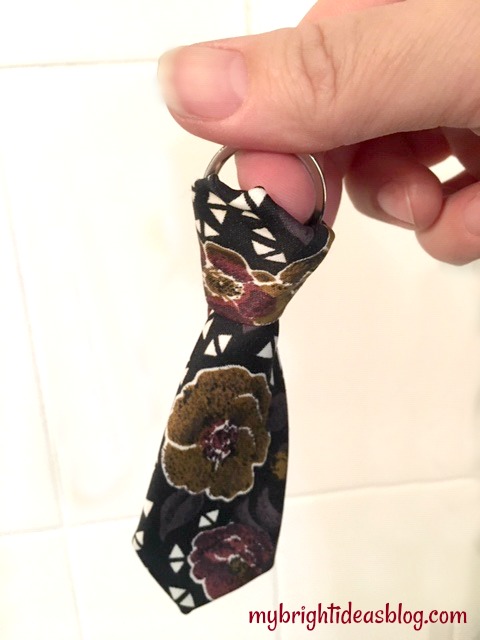
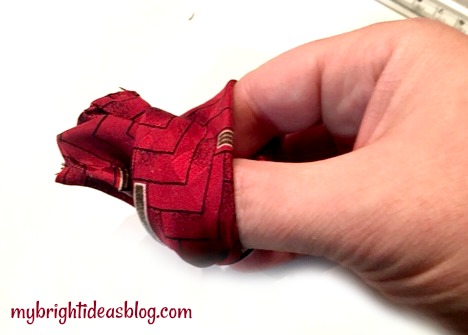
Pull the knot tight by tugging on the key ring. It looks like a proper tie knot without actually having to know how to tie it. The pointed end is perfect for the size of the key ring.
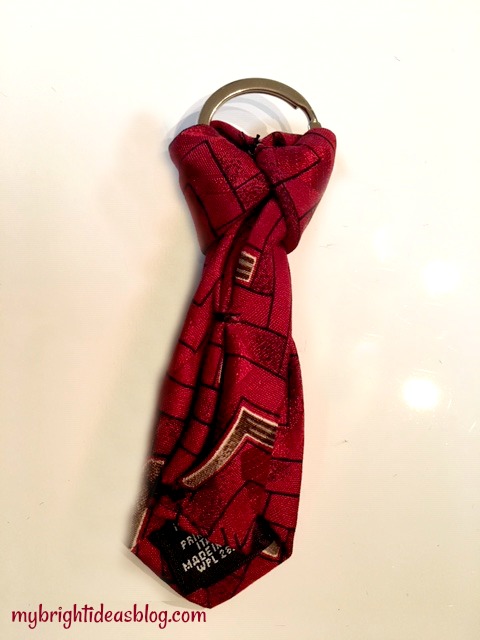
This is the back side of the tie. I added a few more stitches so the tie wouldn’t shift around, but that is optional.
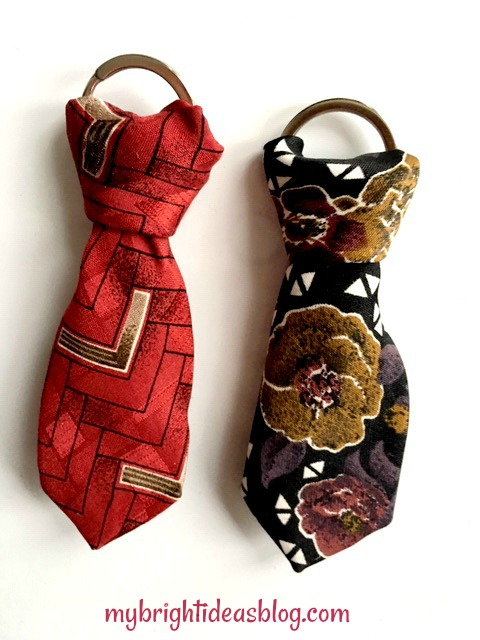
How cute is this?!?
Now there is still half of a tie left so I’m going back to Pinterest for some more ideas for tie upcycling. I will let you know how that goes!
…
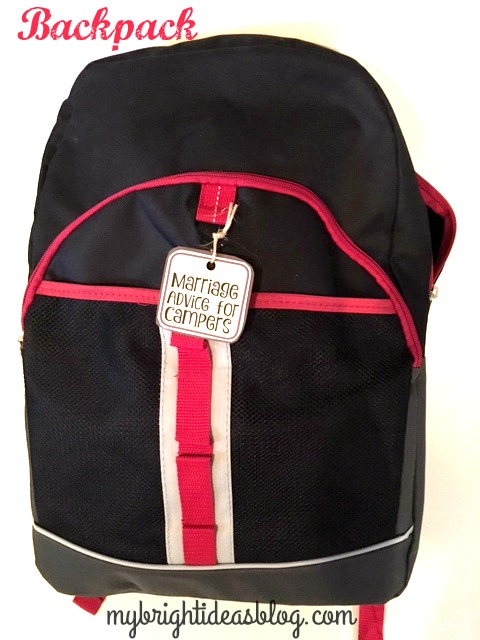
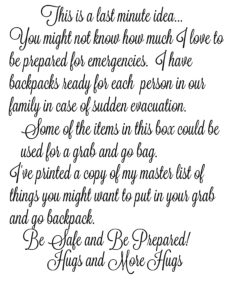
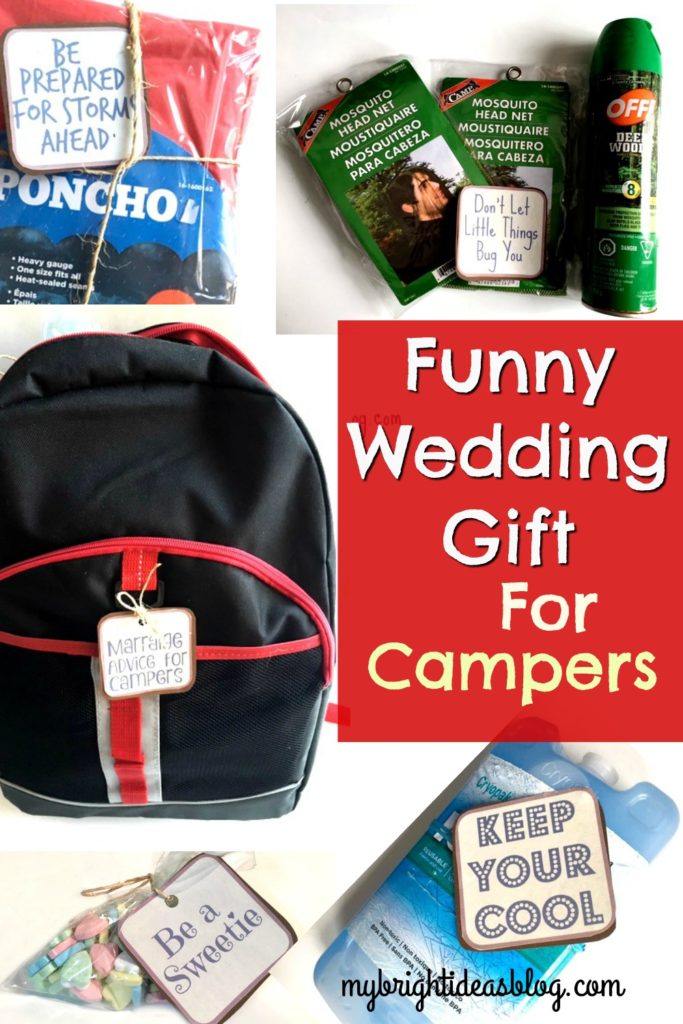
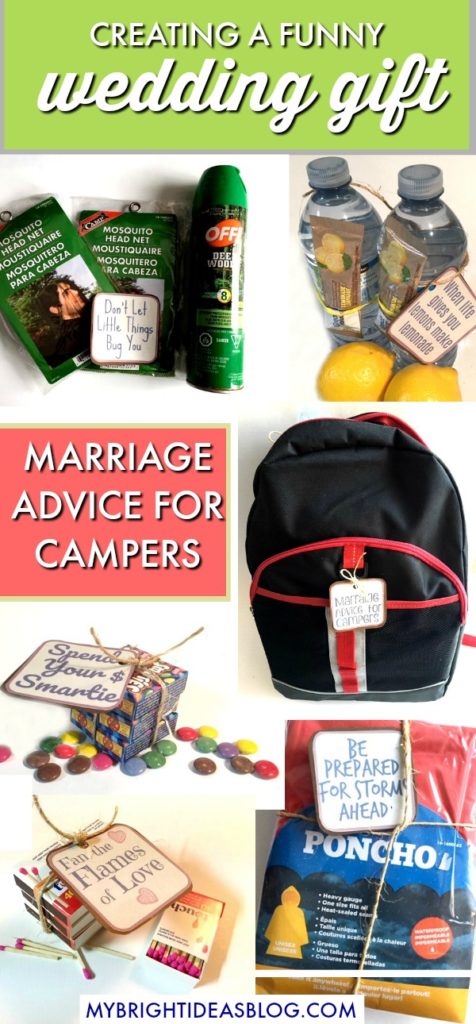
Funny Wedding Gift – Marriage Survival Kit!
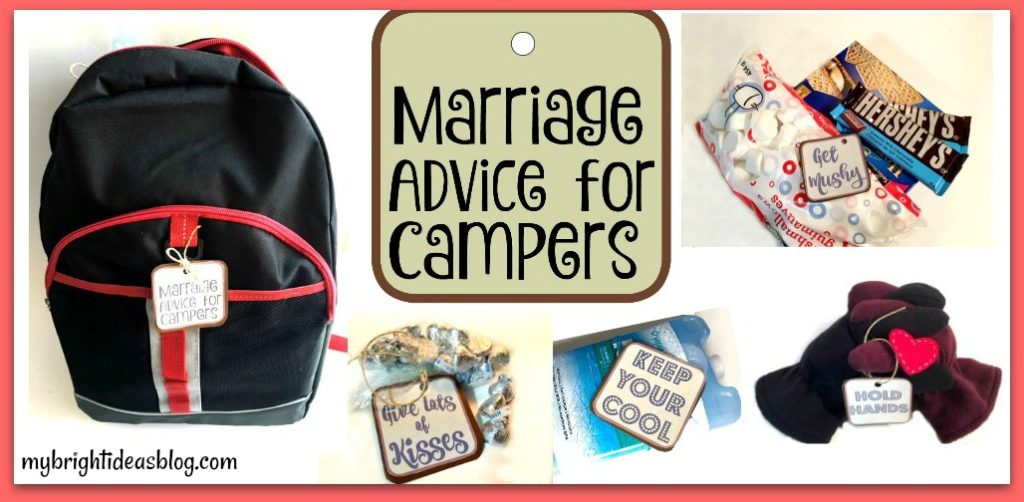
Are you looking for a funny, creative, imaginative wedding or shower present that won’t cost an arm and a leg? I was inspired to make something completely different for my niece’s wedding. Since I am the nutty aunt lets give them something unusual, something they will really remember.
First of all, I want to give credit to my inspiration….I had googled funny wedding gifts and this is what I found.
http://creativetryals.blogspot.com/2013/05/life-is-picnic-marriage-survival-kit.html Everybody loves picnics!
and
http://creativetryals.blogspot.com/2015/05/happy-camper-marriage-survival-kit.html We are campers and the happy couple had posted some camping trip photos so this happy camper marriage survival kit seemed like a good fit for us!
I will warn you right now that this shopping list will have you zigzagging all over the store. Many of these items came from the dollar store and Walmart. Pick and choose the items you wish to add. When we had everything together we could barely zip up the backpack. Don’t feel you need to use all of our suggestions.
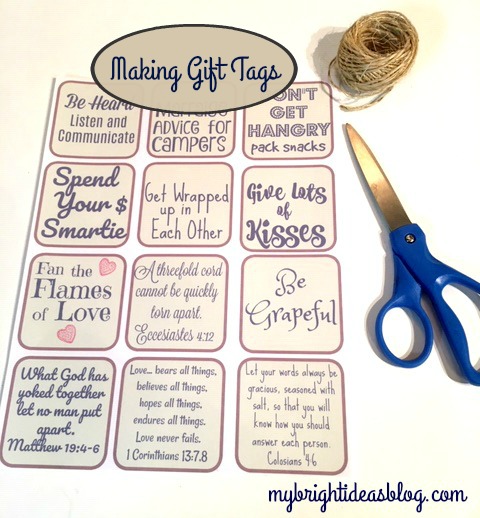
We are a religious family and so are the happy couple so we decided to include a few Bible verses in this light-hearted gift.
Wedding Gift Shopping List
- cooler or backpack
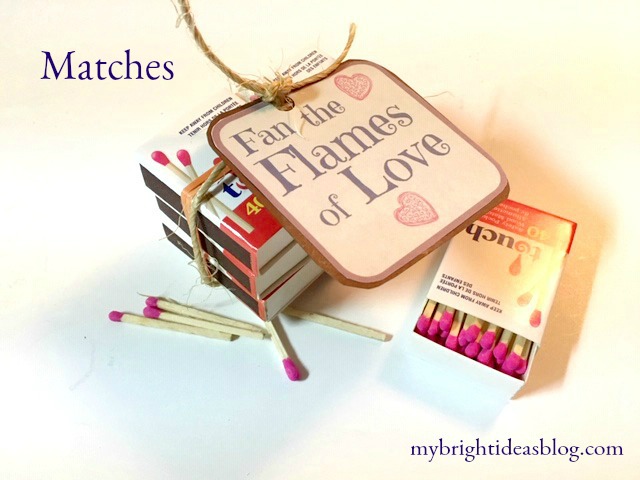
- matches
- gloves or mittens
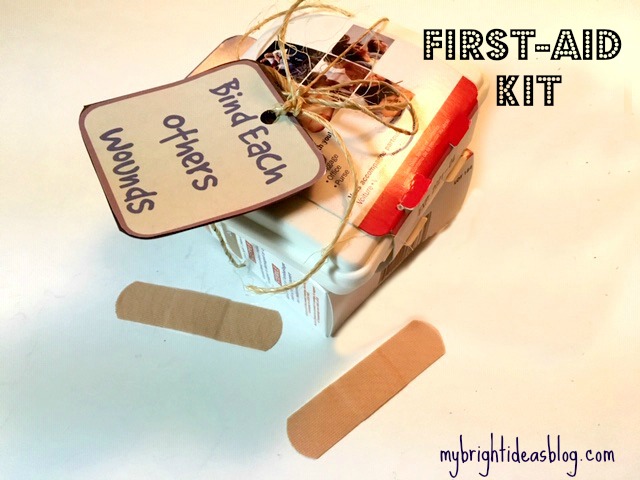
- band-aids or first-aid kit
- ice pack
- rain jackets
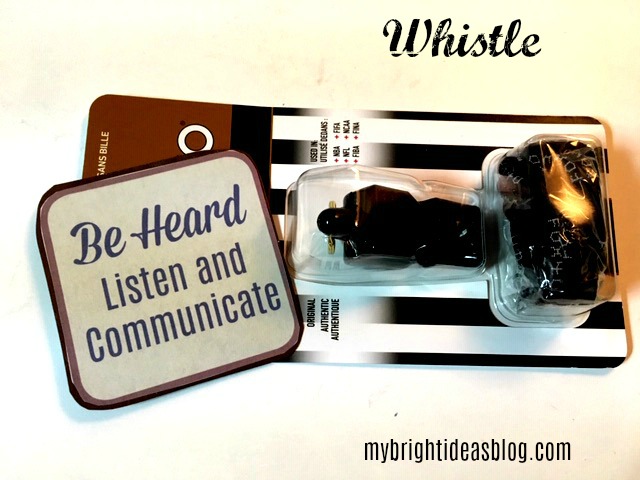
- whistle
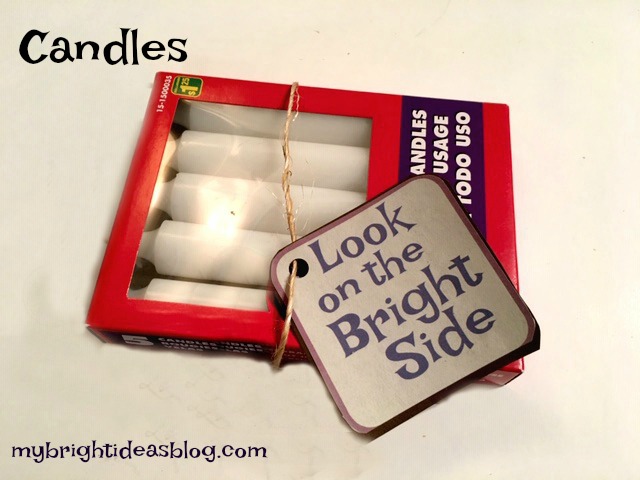
- flashlight or candles
- blanket
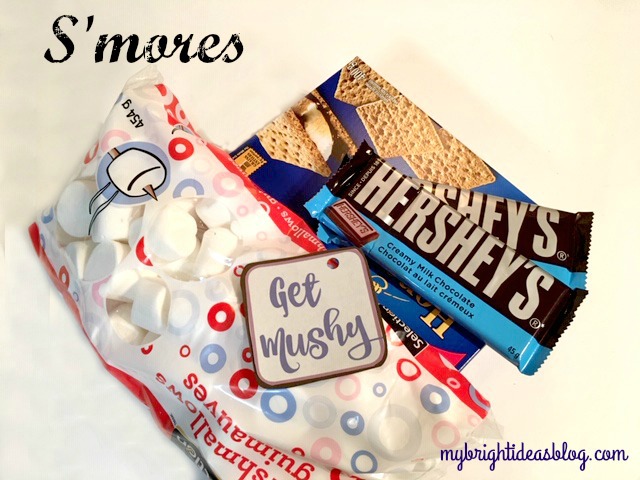
- smores supplies
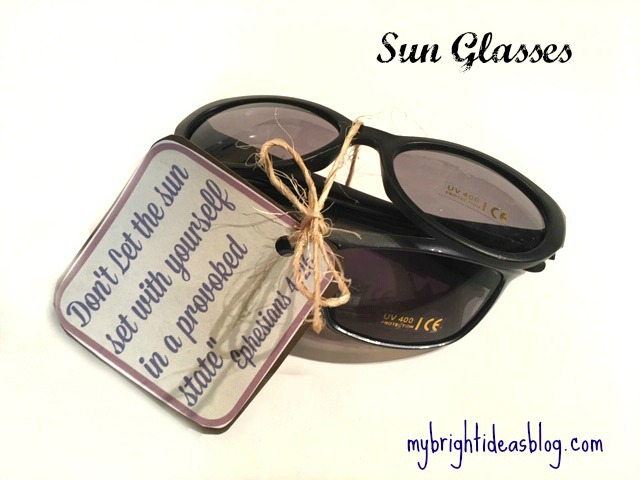
- sunglasses
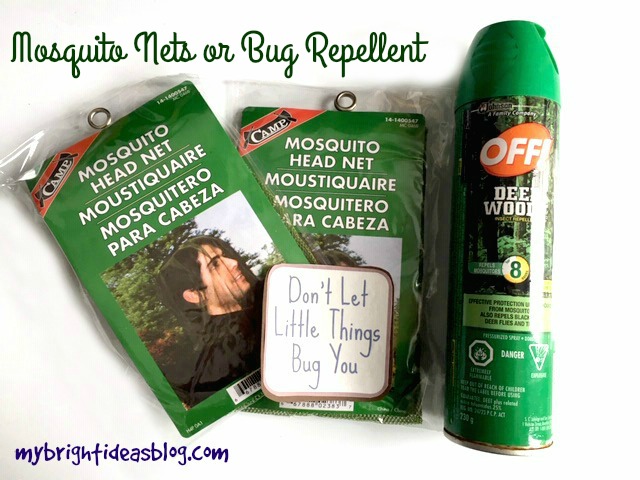
- mosquito netting and/or bug spray
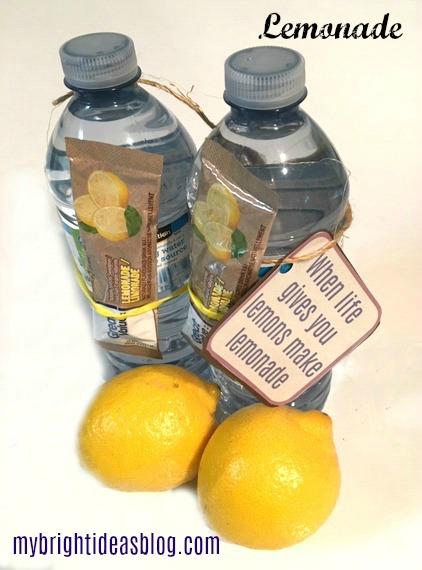
- water bottle and lemonade powder
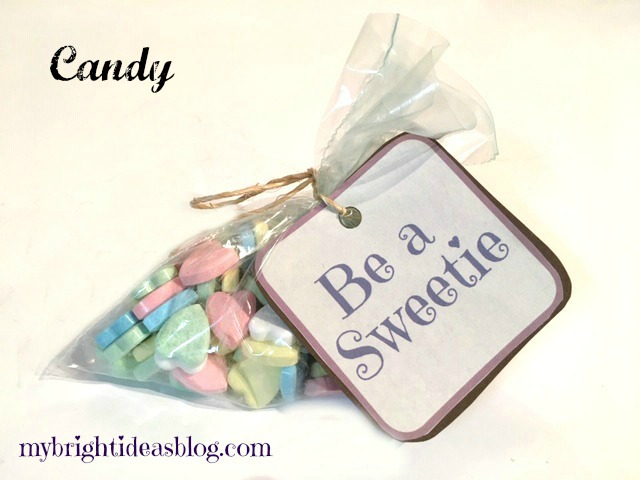
- candy
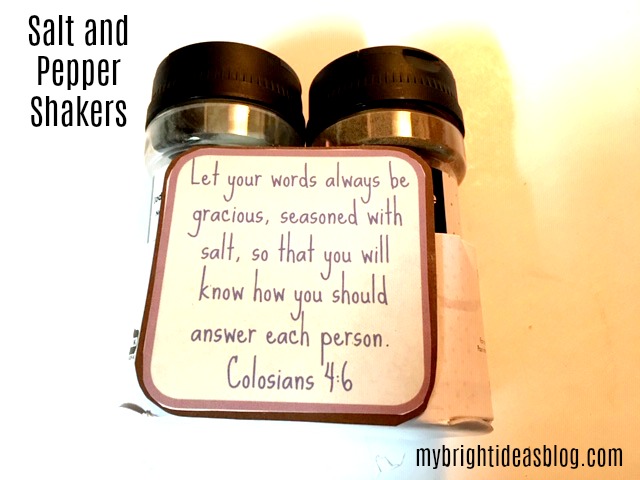
- salt and pepper
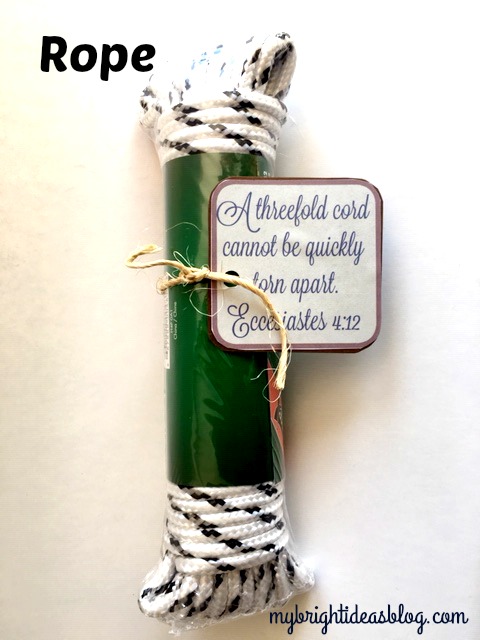
- rope
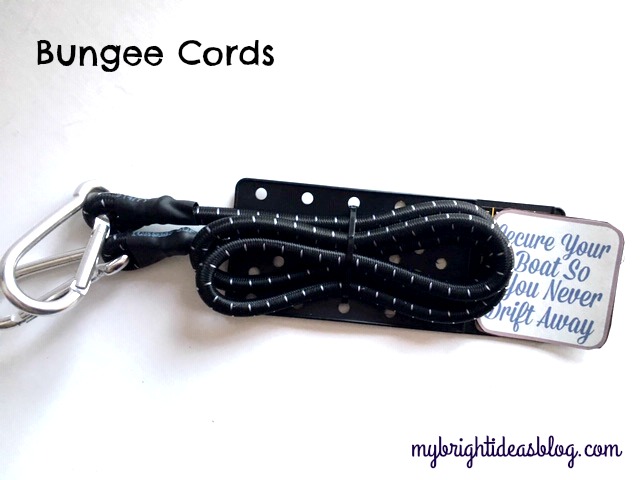
- bungee cord
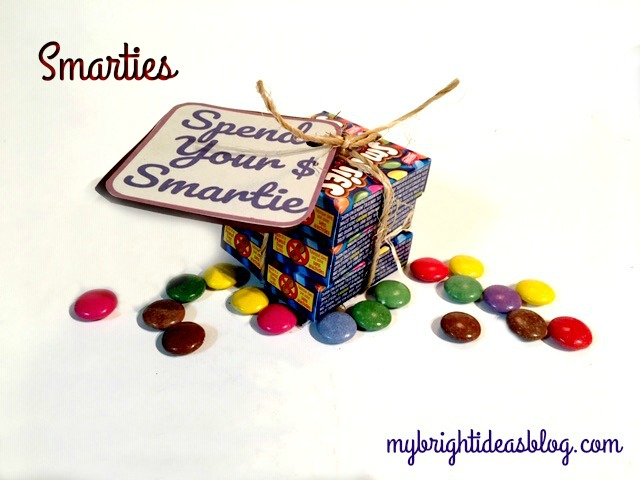
- smarties
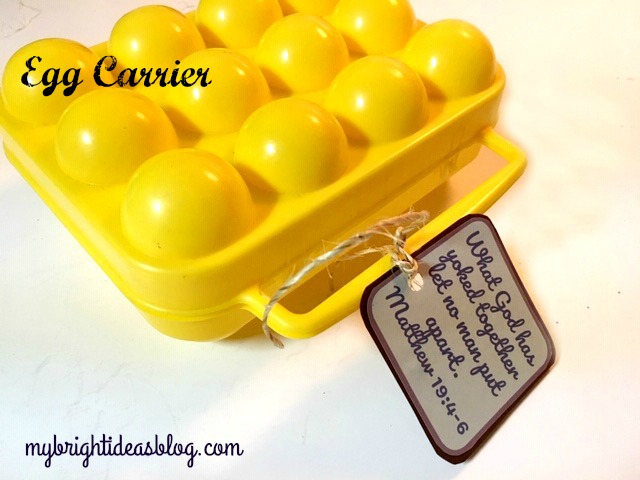
- egg holder
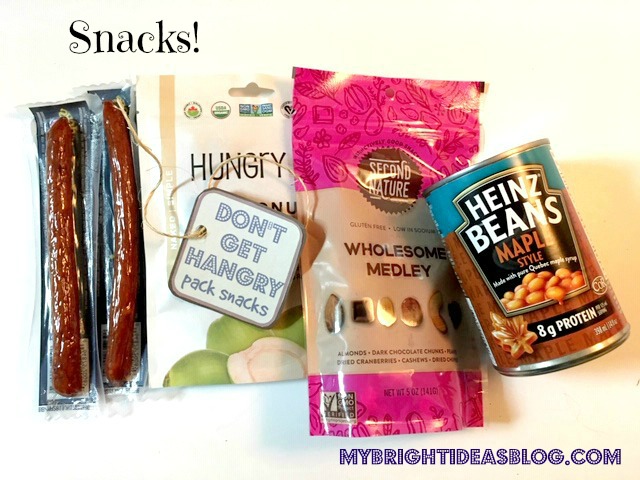
- snacks
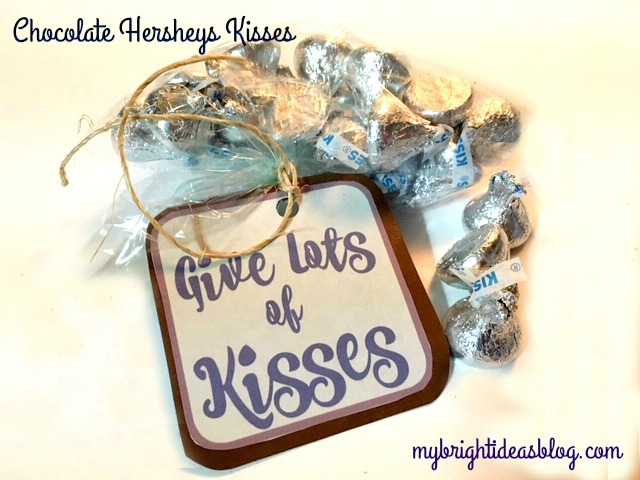
- Hershey’s kisses
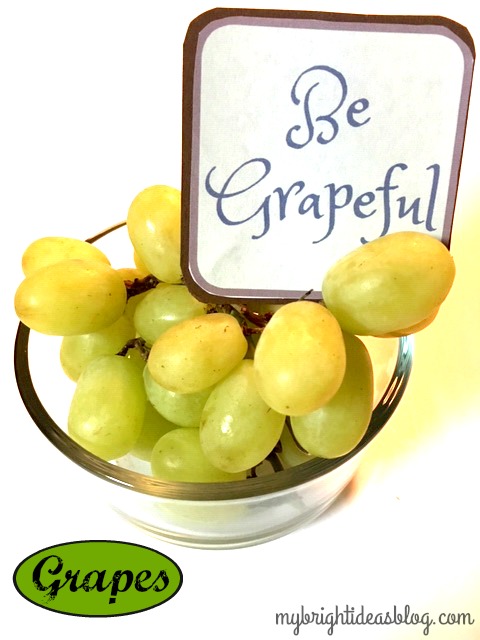
- grapes
So lets go through everything what is going into this gift.
Cooler or Backpack: You need to decide what it is all going to go into. Will this be a picnic theme, or camping or grab and go bag.
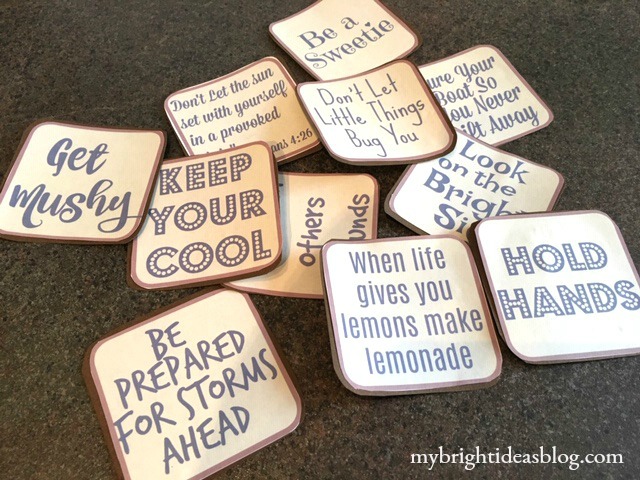
Matches: Fan the flames of Love
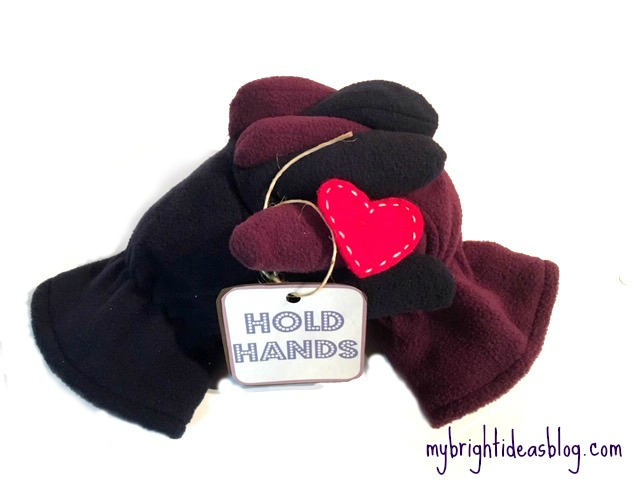
Gloves or Mittens: Keep holding hands for years to come.
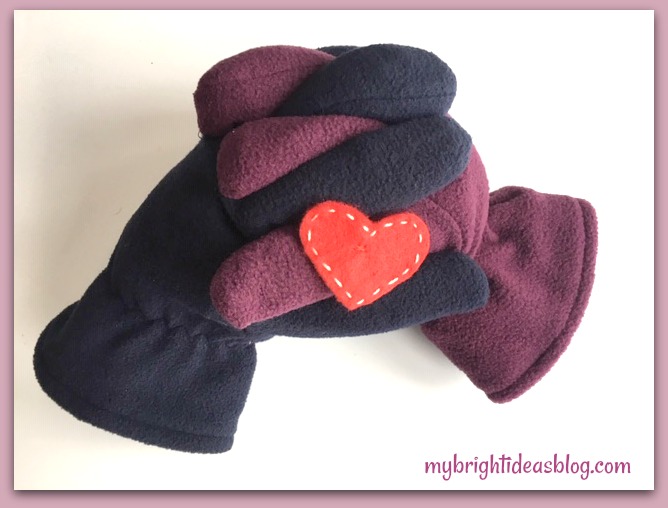
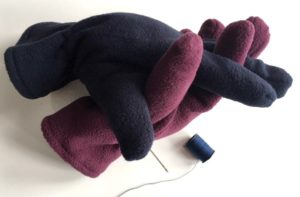
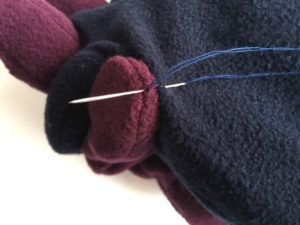
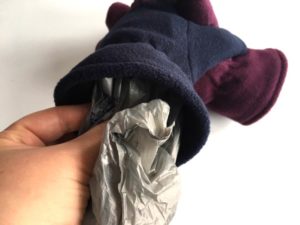
One pair of men’s gloves and one pair of women’s gloves, needle, thread, plastic bags or stuffing. Sew one men’s left glove to one right women’s glove. Stuff with plastic bags or pillow stuffing.
 Cut a piece of red felt into a heart and stick with white thread (or you could use cardstock thick red paper and a white pencil crayon).
Band-aids or First Aid Kit: Bind each others wounds.
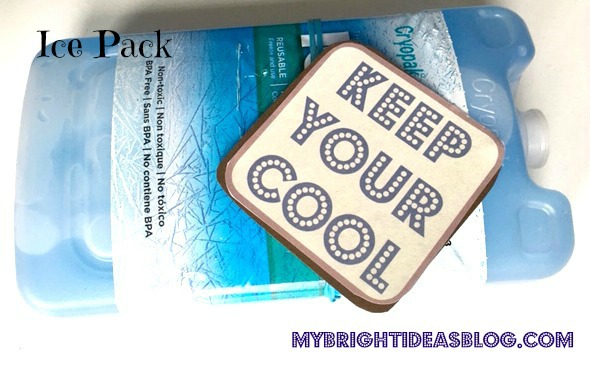
Ice Pack: Keep your cool.
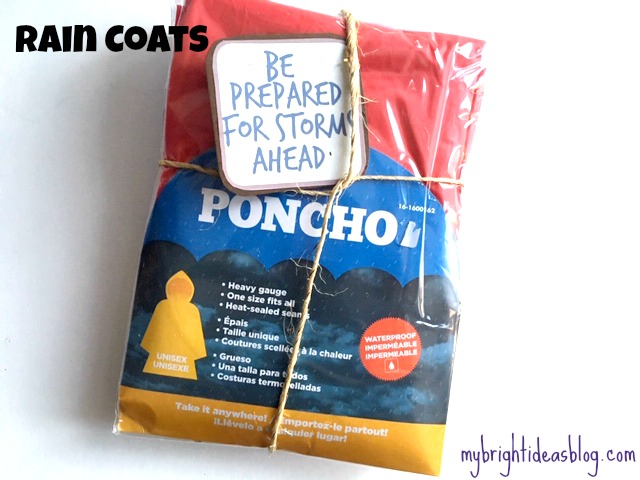
Rain Jackets: Be prepared for storms to ahead.
Flashlight or candles: Look on the bright side. Stay positive.
Whistle: Be heard. Listen and communicate.
Blanket: Get wrapped up in each other.
![]()
Smores Supplies: Get mushy!
Sunglasses: “Don’t let the sun set with yourself in a provoked state”. Ephesians 4:21. That verse simply means don’t go to bed mad.
Mosquito Netting: Don’t let little things bug you.
Water Bottles and Lemonade: We used water bottles and individual packets of lemonade flavor.
When life gives you lemons, make lemonade.
Candy: Be a sweetie!
Salt and Pepper Shakers: Thoughtful words and a kind voice is like seasoning your words with salt. “Let your utterance be always with graciousness, seasoned with salt, so as to know how you ought to give an answer..” Colosians 4:6
Rope: “A threefold cord cannot quickly be torn apart” Ecclesiastes 4:12. This verse is often read at wedding ceremonies. The three in the cord is husband, wife and God. Three cords together are stronger than one or two.
Bungee Cord: Secure your boat so you never drift away.
Smarties: Spend your money wisely…or smartie.
Egg Holder: “What God has yoked together, let no man put apart.” Matt 19:4-6. My hubby thought of this one! Yoked…I love a good egg joke… Tee He He.
Snacks: Don’t get hangry – pack snacks. Beans, trail mix, coconut chips, pepperettes….great non- perishables.
Hershey’s Kisses: Give lots of Kisses!
Grapes: Be Grapeful! Tip-If the gift isn’t going to be opened right away don’t include perishable foods.
Making the Gift’s Cards
The label’s are essential to making the gift funny. I printed them out on regular printer paper.
You will need:
- Printed labels
- Scissors
- Glue Stick
- Cardstock Paper
- Hole Punch
- Twine
Print the labels and cut them out.
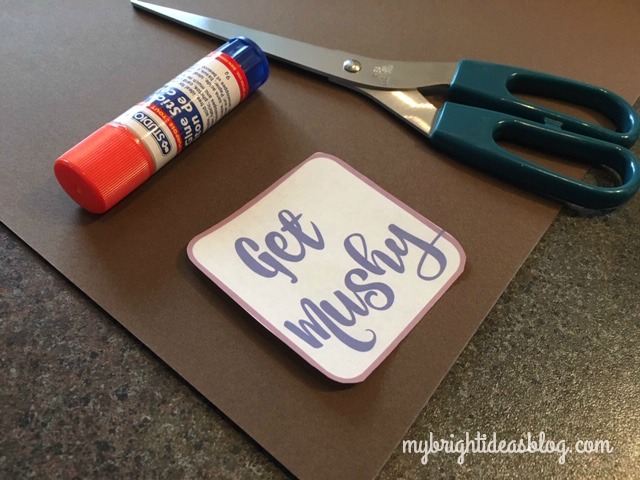
Cut the cardstock out to slightly bigger than the label.
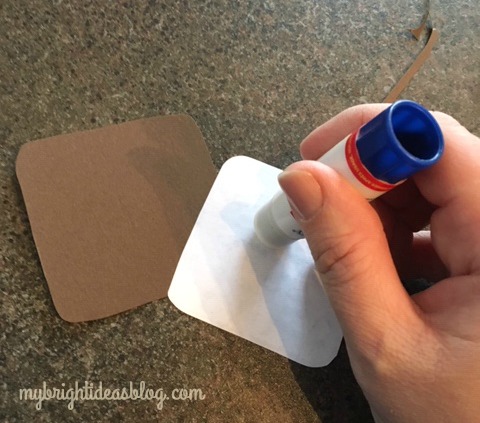
Glue the labels onto the cardstock.
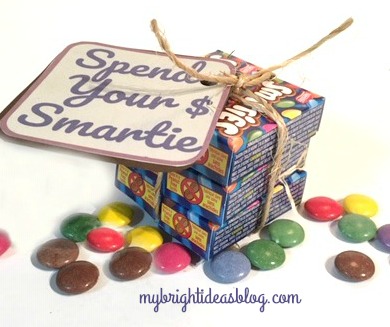
Use a hole punch to put a hole in the label for the twine. Tie the twine and label onto each item.
![]()
![]()
One final thought…The happy couple may not actually take these things on their camping trips. I’m not sure they would actually wear dollar store gloves or a plastic poncho and mosquito nets, much of this is meant as a joke. But the items here are useful for an emergency preparedness pack. I’m a big fan of having a “Grab and Go Bag” in case you need to evacuate your home with no notice. I am going to add a list of what many people recommend to put in your grab and go bag….clothes, toiletries, phone charger, phone number list, photocopies of your ID and your family members.
We packed everything into the backpack starting with the blanket on the bottom.
I included this note with my gift.
Have fun rolling with this idea! I would love to hear if you put a similar gift together.
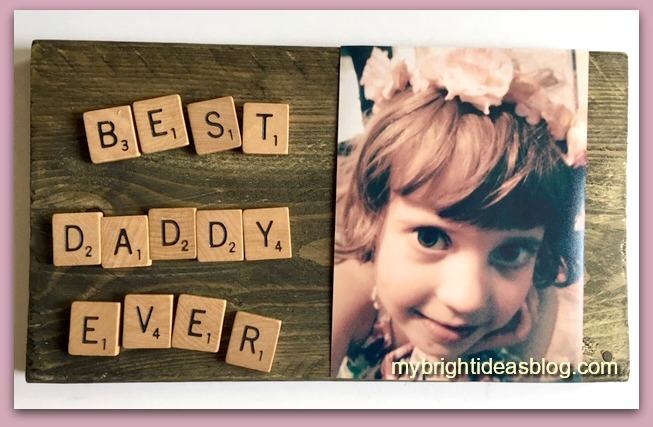
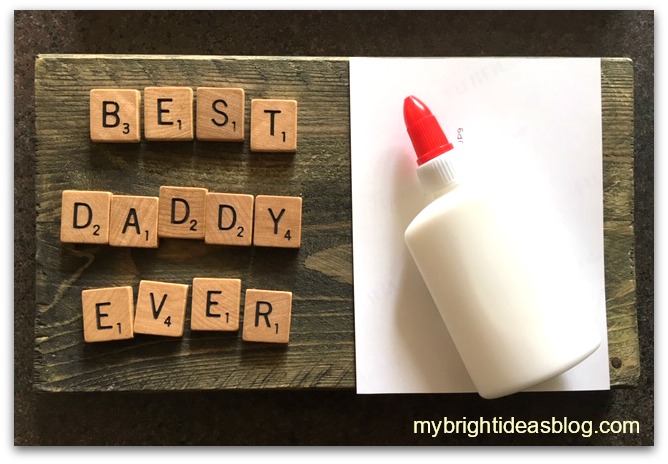
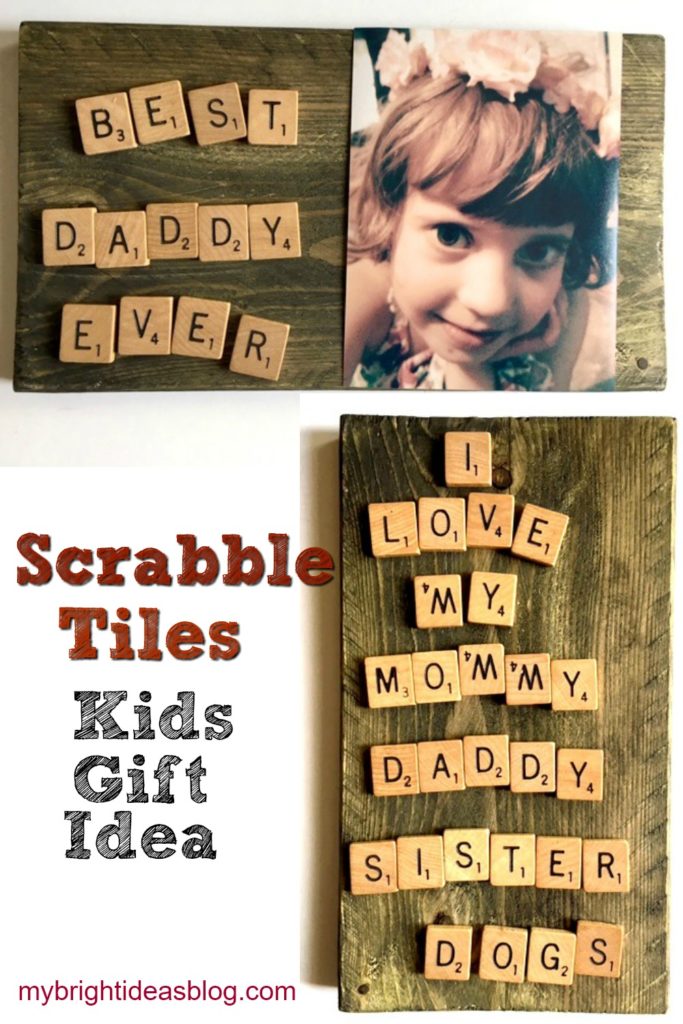
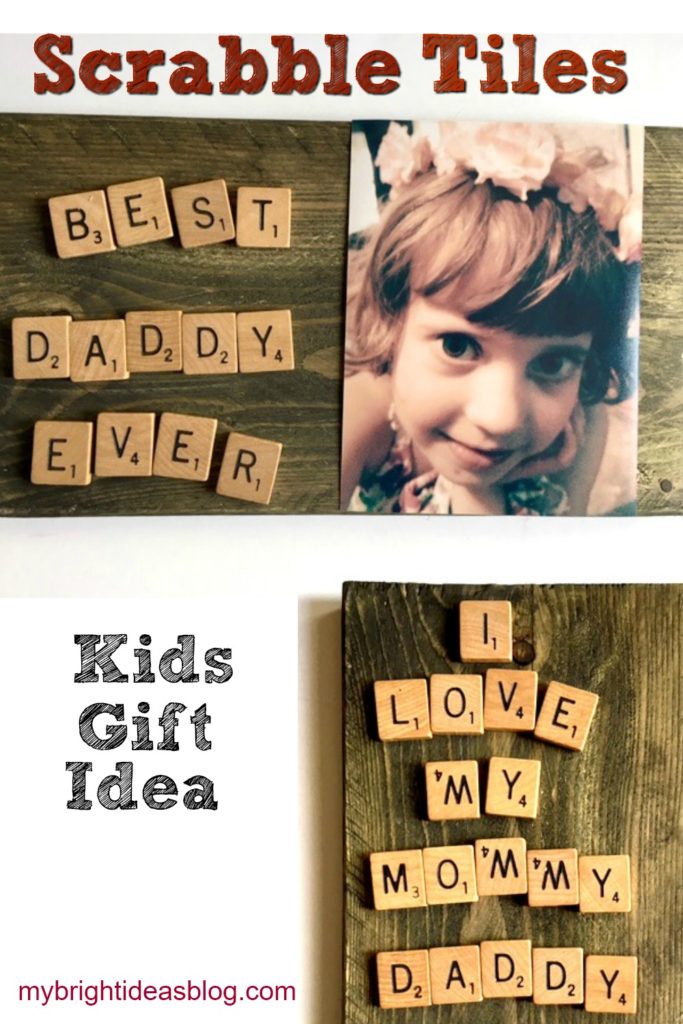
Scrabble Tiles Gift Idea for Kids
I have a sick kiddo at home (head cold, sneezy, wheezy) and she wants to use my craft supplies to make a gift for daddy’s desk at work. So here is what she came up with a love letter in Scrabble Tiles to Daddy and an old photo of herself.
Where can you get Scrabble tiles? From the board game of course silly! Or from a thrift store or online.
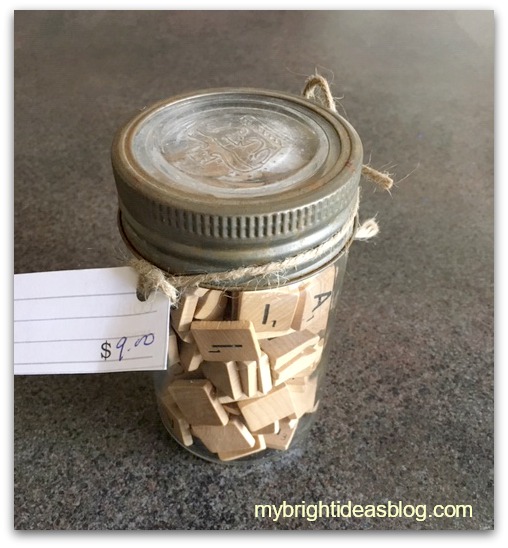
The other day I found myself parked next to an antique store I didn’t know existed. So I went in and found a gazillion things I would love to have and upcycle. The store was AMAZING! One of the items that I bought was a cool old mason jar filled with scrabble tiles.
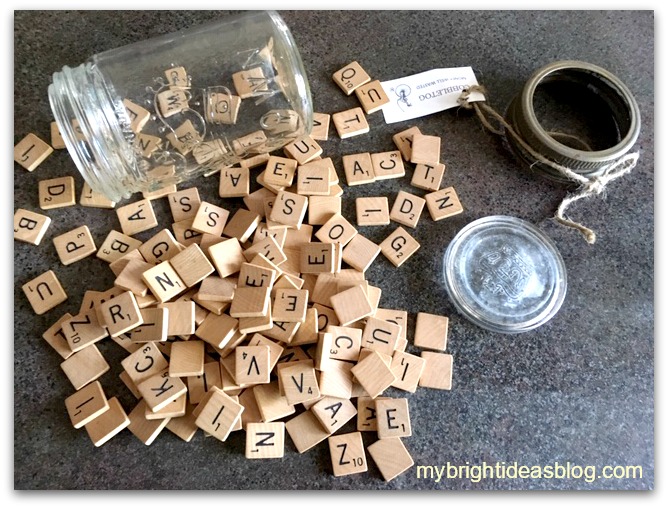
My sick little darling sorted out the letters into piles while I went rummaging for supplies.
You will need:
- scrabble tiles
- a piece of wood, picture frame or canvas
- white glue-for the photo (or to make it temporary use “sticky tack”)
- hot glue gun-for the tiles
- hanging hook (optional)
![]()
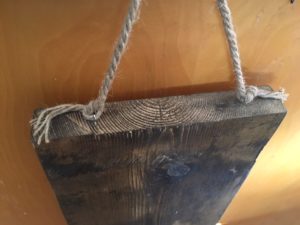
I have scraps of wood and often will stain or varnish a few extra pieces in case I want to make a wooden plaque in a hurry. We chose out of scrap options a piece approximately 9 1/2 by 5 1/2. It was already stained with “Forest” Behr Semi-Transparent stain-which has a subtle green tinge to it.
![]()
Another option would be to use a blank canvas from the dollar store. You could paint with inexpensive craft paint in his favorite color or leave it white.
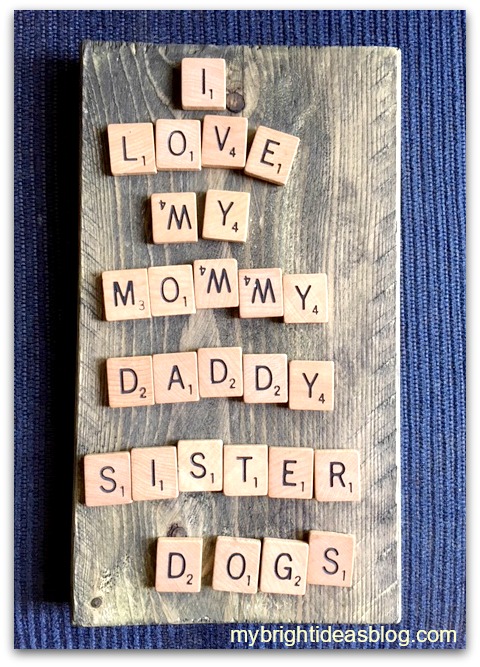
First she wrote out this…awe Mommy is at the top of the list!
I love that she is not bothered that 3 of her M’s are upside down W’s. When you see the letters are crooked its tempting to want to straighten them out but resist! It’s a child’s gift and adds character to the final product.
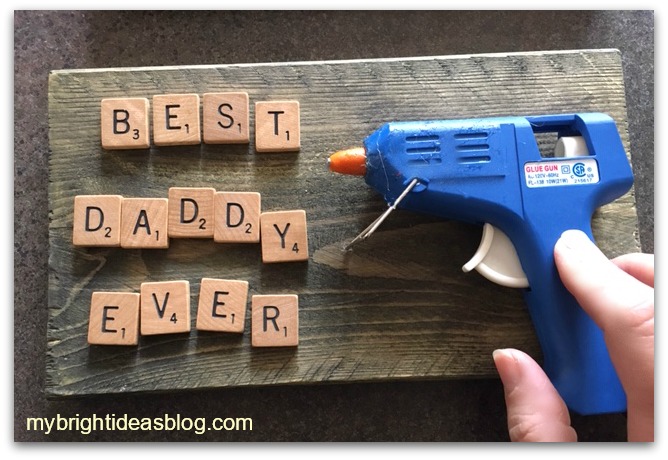
Arrange the letters and photo to your liking. Hot glue your scrabble letters to the wooden board.
Have your child put a thin coat of glue on the back of the photo. Or if you want to be able to take the photo off later and replace it you could use sticky tack instead!
Would you look at those gorgeous eyes! This gift will melt his heart!
Crafts Using Burlap and Buttons – Easy Project that Looks Great!
Mod Podge Clipboards! Great teacher gift idea!
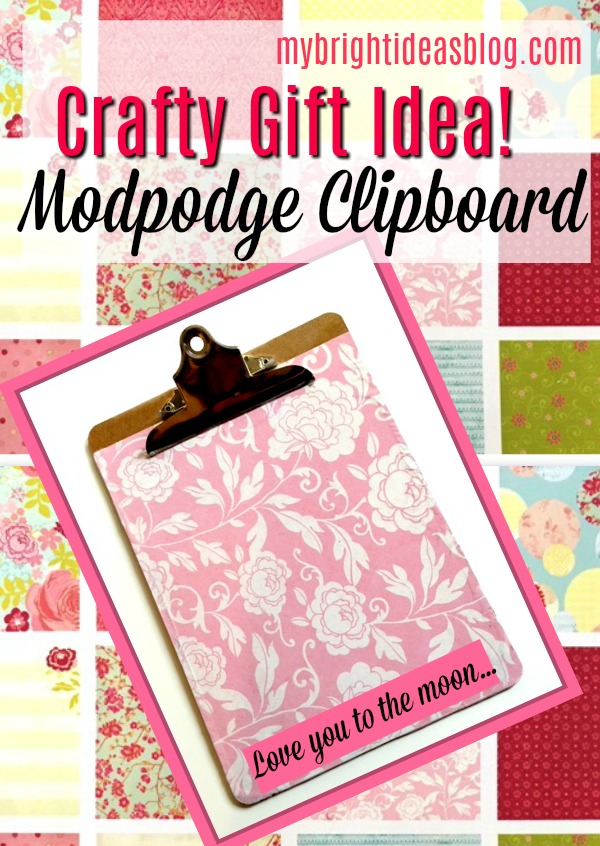

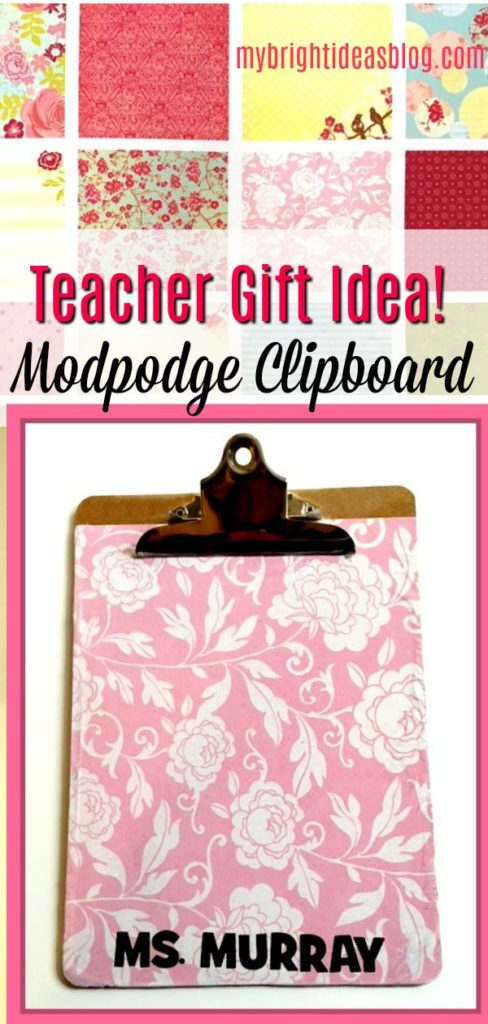
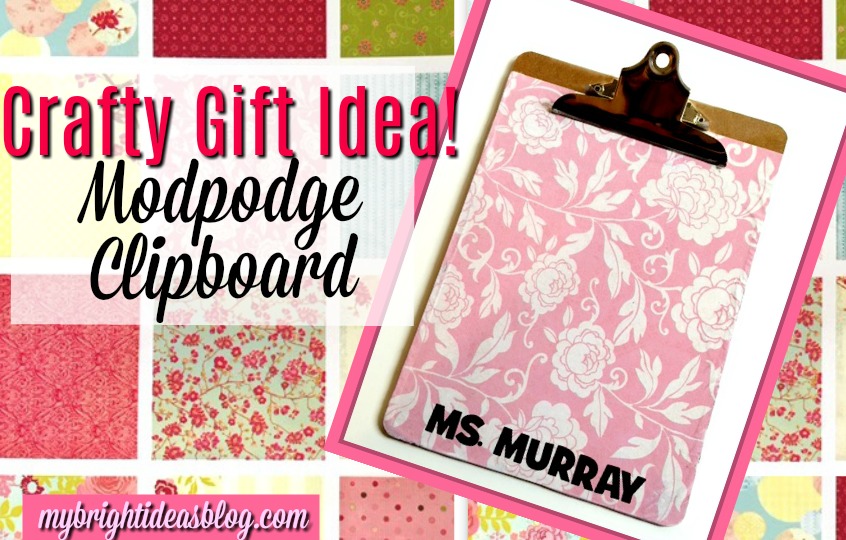
Upcycle a boring clipboard with Modpodge and Scrapbook Paper! Okay this is not my bright idea. Lot’s of people have done this so I got on “board” with the clip boards too. Tee hee hee!
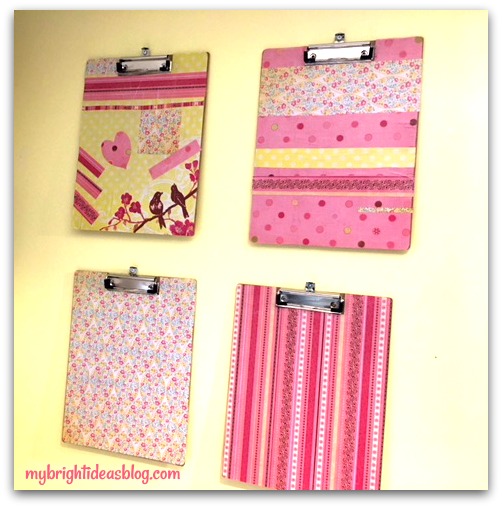 There are more than one style of clip on clipboards and you can do this with either style. I prefer the above style to hang on a nail with shopping and To Do: lists. If I’m going to add and take away pages frequently I would use the big solid clip style. Today we are jazzing up boring old clipboards!
You will need:
- a brown clipboard
- scrapbook paper
- pencil and scissors
- mod podge or craft glue
- 1 foam brush
- gift card or credit card (that you don’t want to use again)
- letter stickers (alphabet)
Size is important-use 12 x 12 sized scrapbook pages.
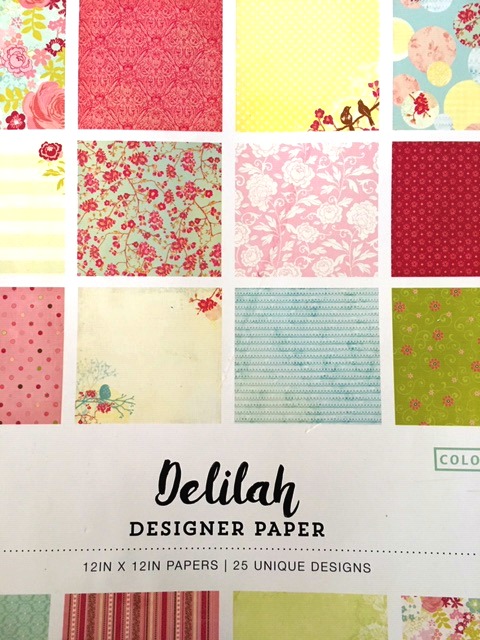
I found this book of scrapbook paper on at Walmart. The pages appealed to me because it looked like a spring country quilt. It has 50 sheets in the book and I think it cost $8.00. That is great value lots of left overs to make other items around my workbench to match!
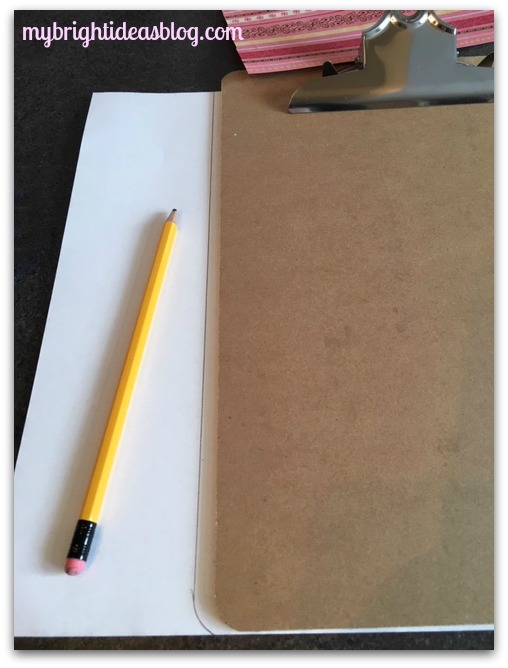
Trace the clipboard with pencil onto the back of the scrapbook paper. Carefully cut out the shape on your pencil line.
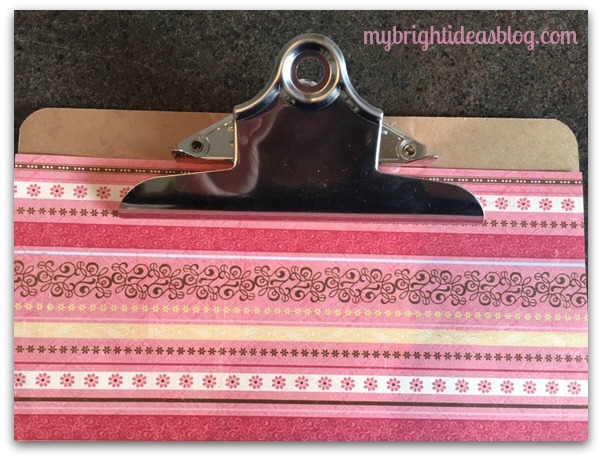
Before you add any Mod Podge test out the paper on the front. You can cut around the metal clips and/or add pieces to make it solid at the top. I was working with my daughters for their teacher’s gifts so I kept it simple and just pushed the page up to the clip. Trim any excess very close to the edges.

Spread Mod Podge on the front of the clipboard. It requires a lot because the clipboard will absorb a lot of the Mod Podge. You could probably prime the clipboard with paint to help this but it would add on an extra day for the paint to dry. We left this project to the last week of school and had to work quickly.
The next step is most important, so take it slowly. Have a helper hold the clip open for you. Sort of hover the page over the clipboard. When it looks perfectly lined up push it into the Mod Podge. It’s pretty impossible to move after this step so its a little nerve racking.
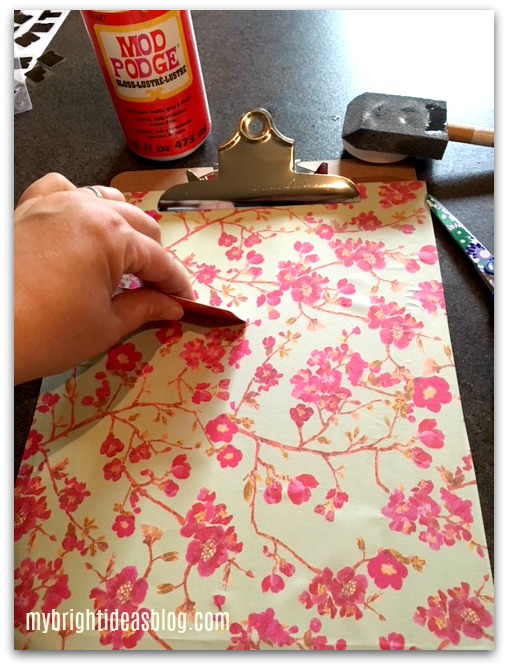
Use the gift card to smooth ripples and bubbles guiding them away from the centre and out towards the edges.
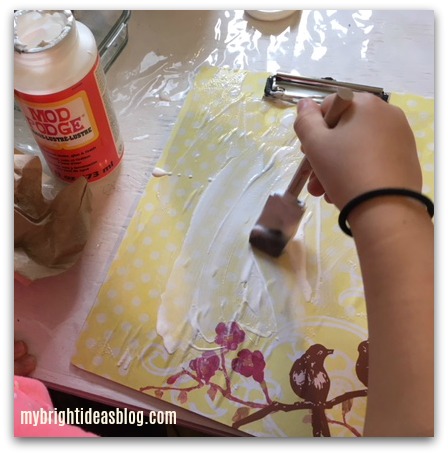
Apply a generous coat of Mod Podge, spreading it out and make it smooth and even. Avoid tiny bubbles. Allow it to dry thoroughly. This can take several hours. Apply another thin coat.
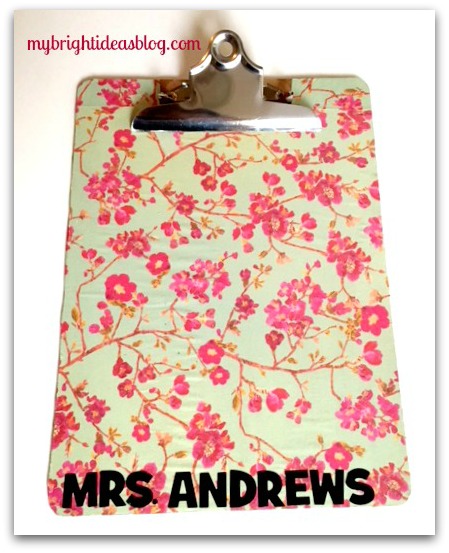 To personalize each clipboard we found some bold letter stickers in the craft department of the Dollar Tree. We bought several packs so we didn’t run out of letters. The girls had several teachers and school staff they wanted to make these gifts for. One teacher was leaving the school and getting married so instead of putting her married name on it…because we didn’t know it…we just put a message on it.
For the music teacher we put a page of music notes and the words to the song “The Lion Sleeps Tonight” on his clip board. She had noticed that was a favourite song of his. Nice touch right?!
The best teacher gifts are ones that are thoughtful, useful, original and a personal touch. My daughter was so delighted to see the music teacher carrying her gift on the first day of school in September.
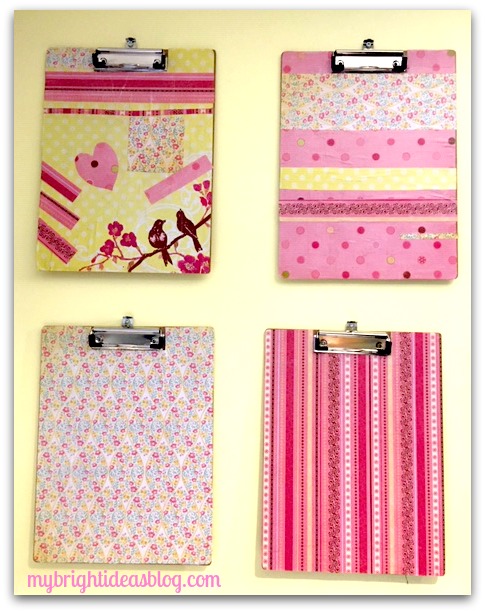 This collection of 4 clipboards are on my wall are next to my work bench. This is where I can post sticky notes, to do lists, clip my receipts.
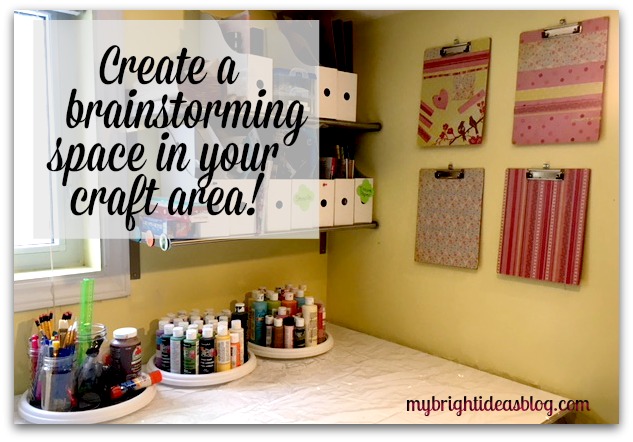 I love my lazy Susan’s for spinning around paint supplies. I won’t take a photo of the workbench today as it looks like a mad scientist’s lab (crafts more than science) has exploded. When you hop from Mod Podge to Rock Art to Sewing to Kids Crafts…the work tops gets a little nutso!
I hope you are inspired to make yourself a some clipboards for gifts or to use for yourself. The results are really cool!
Crafts Using Burlap and Buttons – Easy Project that Looks Great!
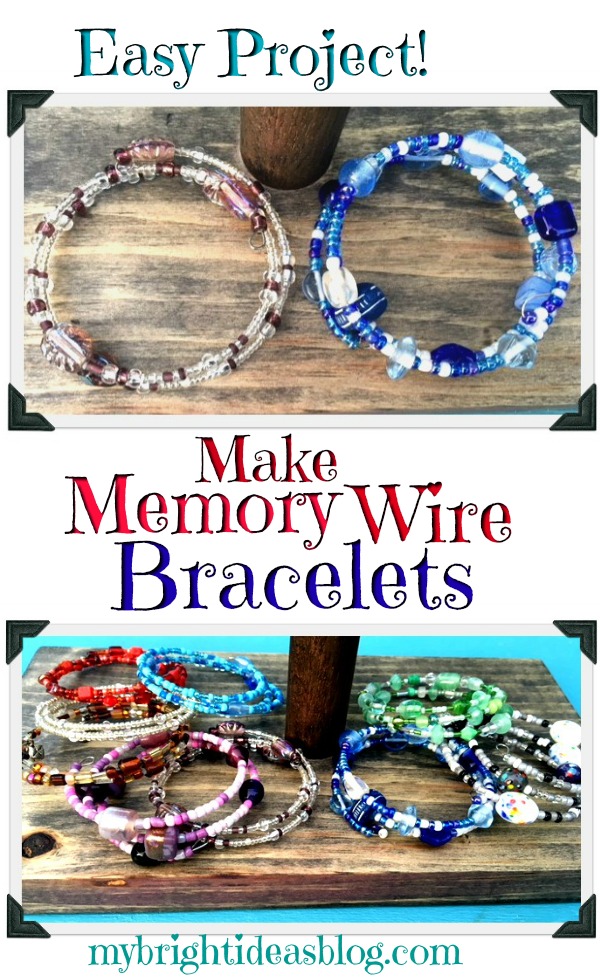
Make Memory Wire Bead Bracelets
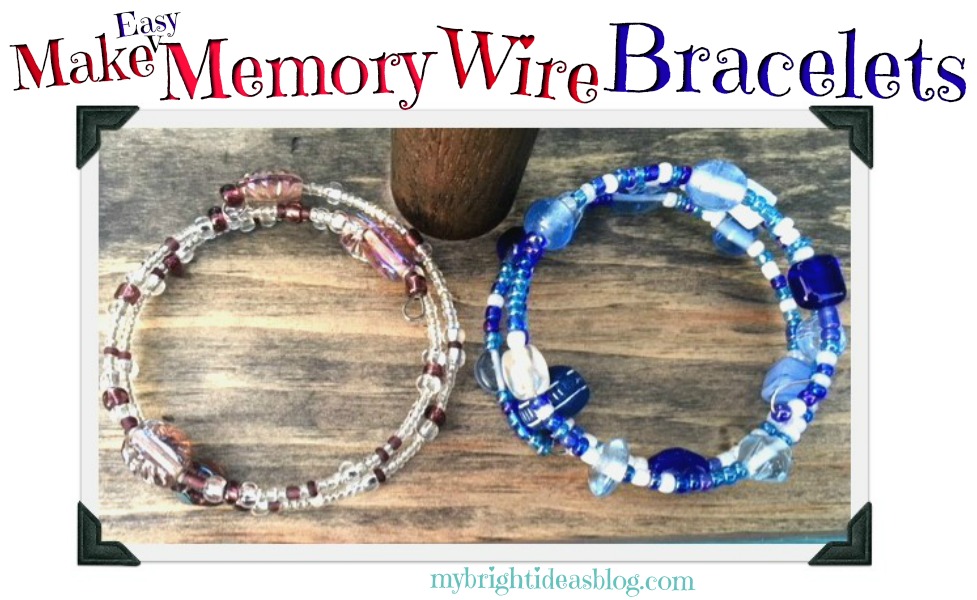 Making Memory Wire Bracelets
Do you need a GREAT gift idea that is easy enough for a child to make? Want to make a craft you could sell? This post is for you!
What got me started on this idea is the craft table at my work (I work in an office at a financial institution). We have a table that any staff member can put out crafty items and a price tag and see if anyone in the building wants to purchase it. For some reason everyone else has taken their stuff off the table and now its just things I have made. Its a little embarrassing. Seriously, besides a few crocheted baby items everything else is mine! So what can I do to make it less empty and pitiful? Hmmm think think think… Add more stuff silly!
Its summer so I have done is enlisted my kids to make a few items. I pay for the supplies and they get crafting and then they get added to the table. The kids will get a bit of money if things sell. I was thinking of asking $5.00 for these. Everybody loves bracelets right?!
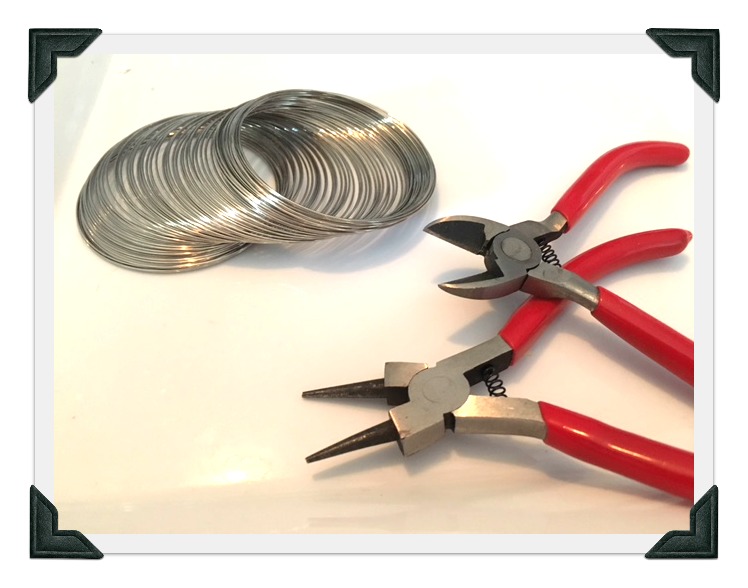
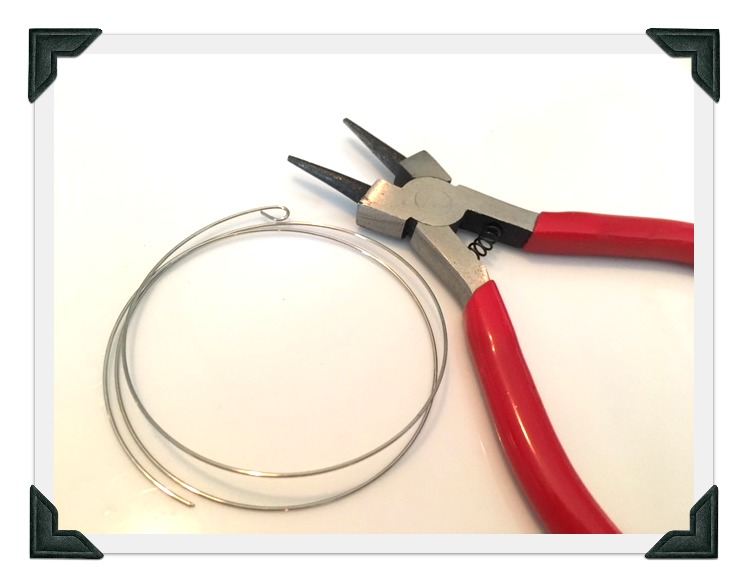
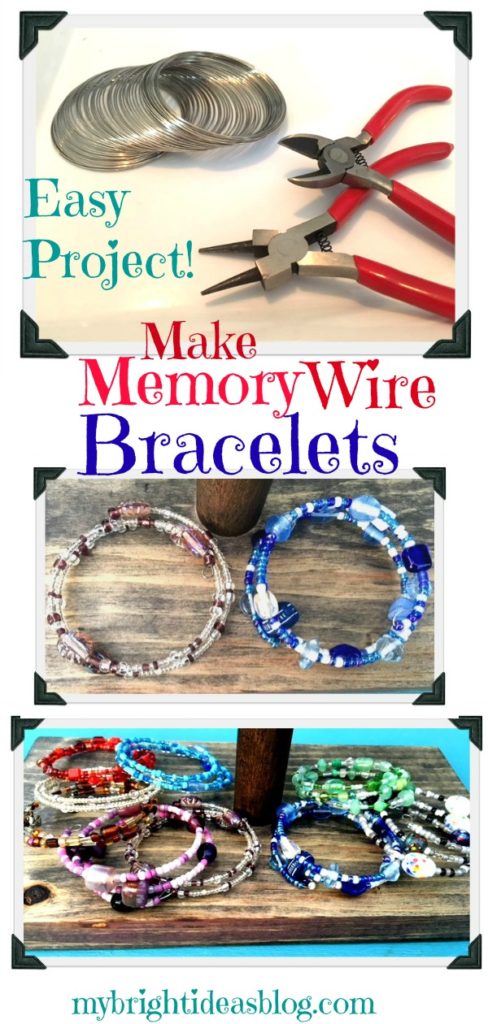
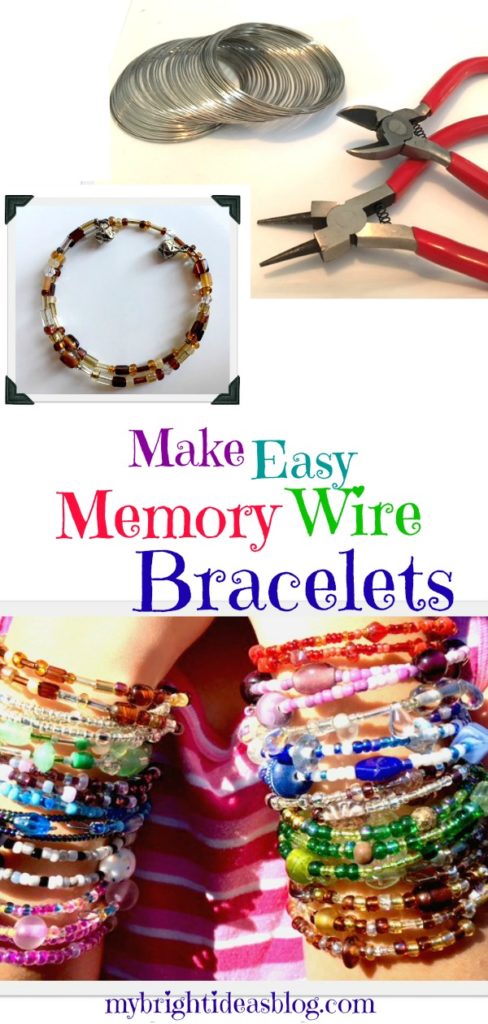
You will need:
- various small beads (check out the dollar store or upcycle old costume jewelry)
- memory wire (bracelet size)
- rounded pliers that twist the wire
- pliers that will cut the wire (if you only have a pair of needle nose pliers you can still do this project)
 What is Memory Wire?
Memory wire is coiled stainless steel wire. Do you remember the child’s toy SLINKY? Its just like that but meant for jewelry making. The fairly fine wire holds its coiled shape. This makes it, hands down, the easiest product to string beads onto.
For this project I would suggest two pairs of pliers. One to cut the wire and a round nose pair of pliers for a loop at the end. If all you have is a pair of needle nose pliers you will be able to make it work.
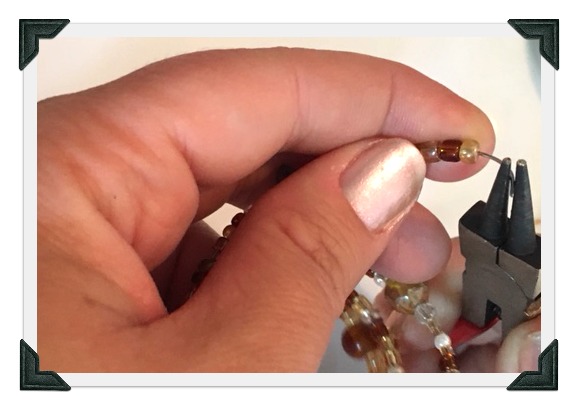
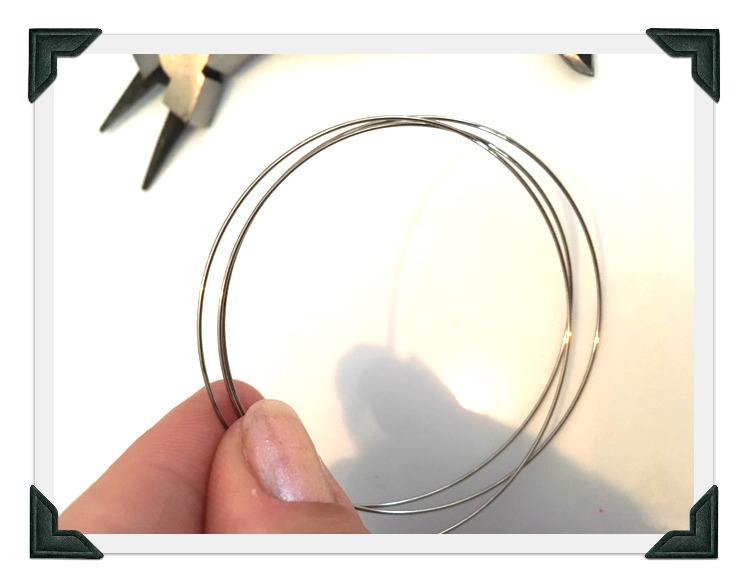 Measure 3 to 5 rings of memory wire and cut the wire.
 Use the round pliers to bend the end of the wire to make a small loop. This is so that the beads won’t fall off the other end. Now your are ready to begin adding beads!
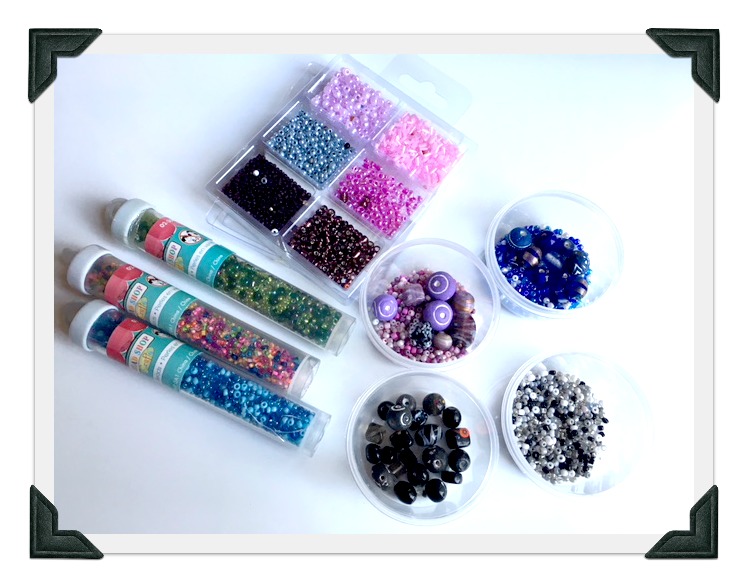 These beads were all $1.25 from the Dollar Tree. I was quite impressed with their glass bead options. Of course, the big craft stores will have a lot more…aisles and aisles of beads in fact. But they will cost more….so look for coupons.
Another option is to go to thrift stores (or your old jewelry drawer) and find old necklaces and bracelets that are wanting to be upcycled. I have lots of necklaces that I made years ago and I love the glass beads but I’m not into them as necklaces any more. Snip the wire or string and empty them into a bowl and reinvent it into a new memory wire bracelet.
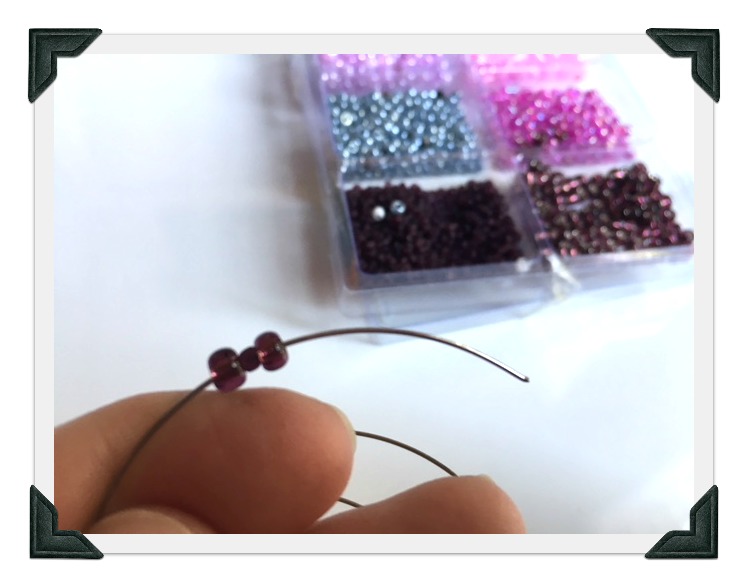 Start with a few beads and slide them around to the bottom. Double check that they are secure with the loop to stop them at the bottom of the coil.
 Use a pattern or just go freestyle and grab whatever beads come out of the jar.
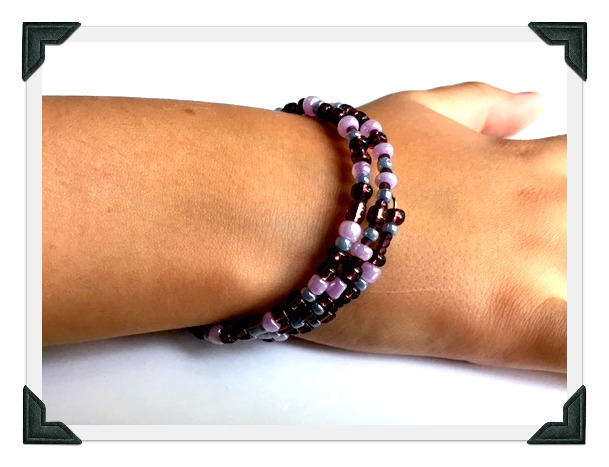 This one is was all small seed beads. It has a nice dainty look to it. These were from a Dollar Tree package so probably all in all this one cost about $.30 to make. We are going to bring it to a play date tomorrow for my 8 year old’s little friend Lilly. Cool gift made by a kid!
Is that one a little too dainty or boring?
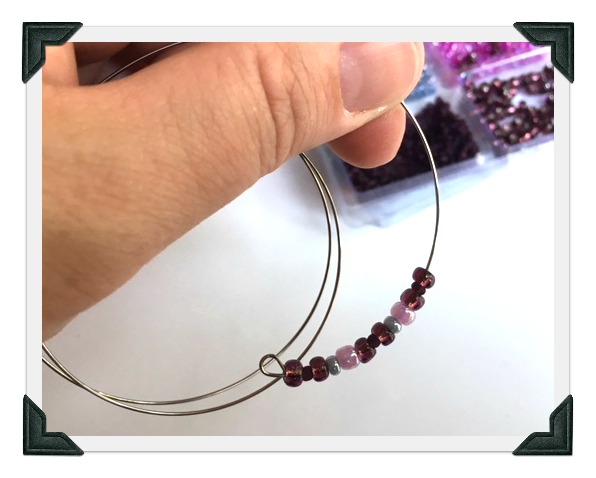
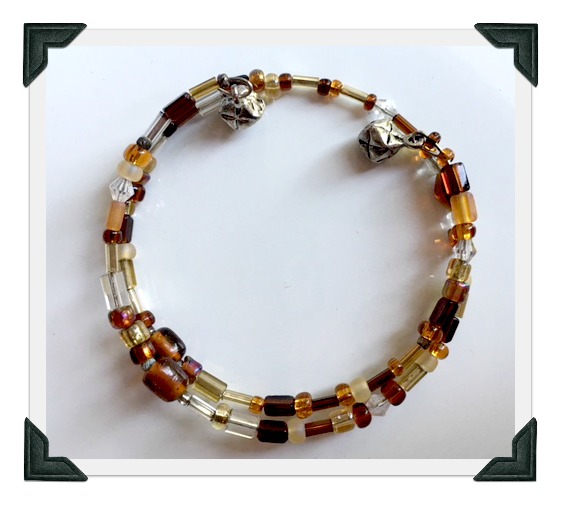 This one has a mixture of brown and clear glass beads all random and mixed up. Notice the dangle beads on the end?
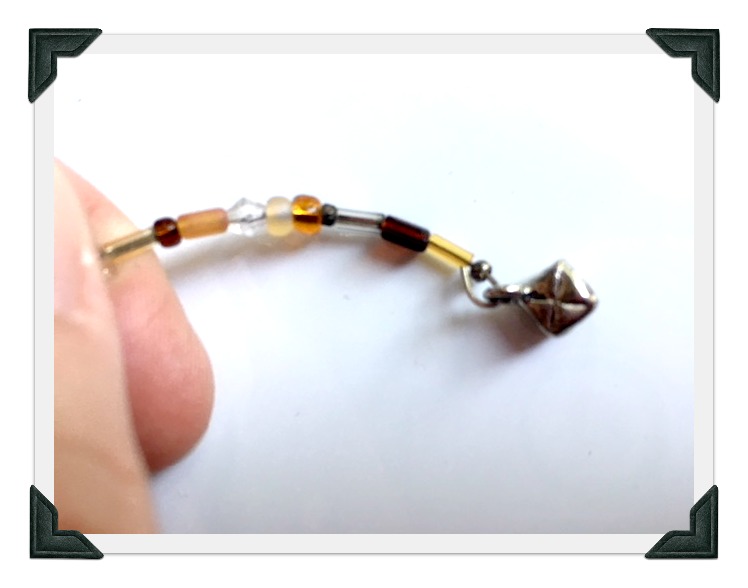 Its so easy to pop a charm or fancy bead on the end of the bracelet.
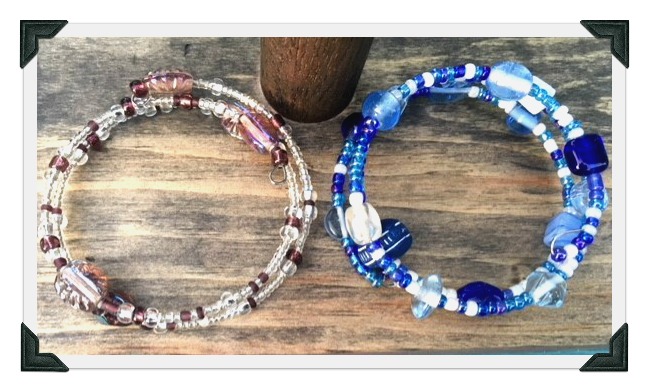
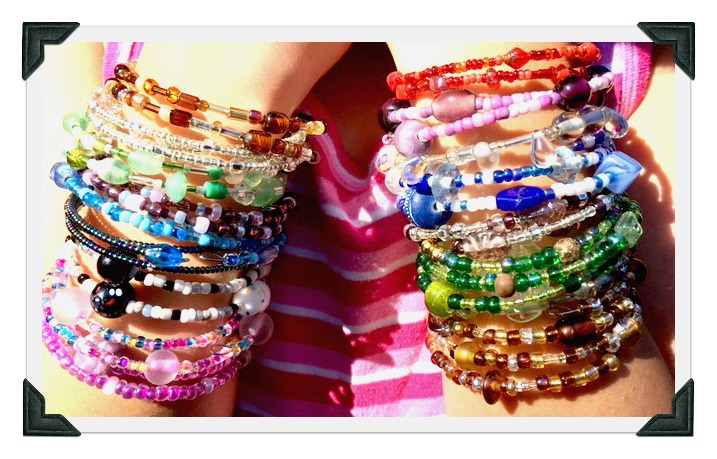
Every single bracelet will be different. You decide what size and shape. Glass beads, plastic beads, wood beads.
 As you can see from this picture of the completed bracelets….sometimes we used a pattern and sometimes we just pinched up a bunch of beads and just put them on the wire randomly.
 As you are nearing the end of the wire leave an 1/2 inch or 1 cm at the end.
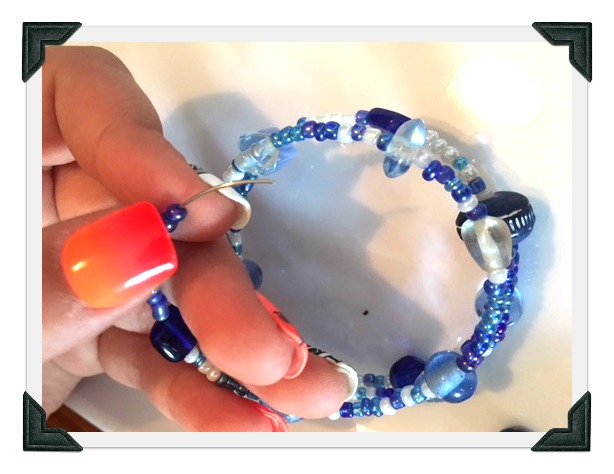
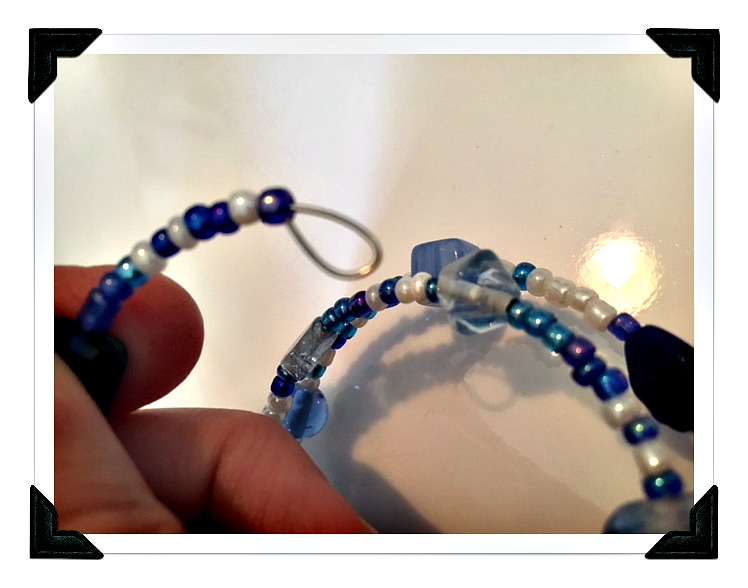
 Using the round-nose pliers pinch the end of the wire and bend it around to form a loop.
Bend it closed. The example below still shows a gap. Pinch it closed tightly-you may need to do the final squeeze with another style of pliers.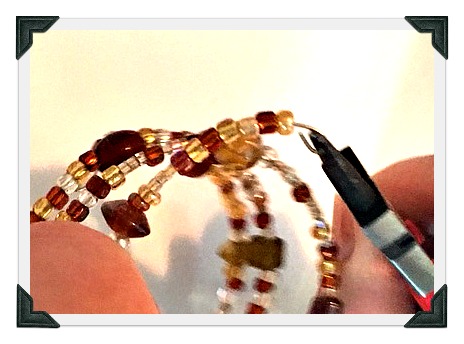 Here is a picture of my 11 year old working on a blue bracelet. I’m telling you this is a great gift project for kids to do.
 Summertime means stick-on fake nails. Try not be distracted by my daughter’s orange nails. My girls are obsessed with fake nails. But then they quickly want them off. This means they will leave scattered plastic nails on the coffee table or their bedside table. This makes their mother CRAZY-CRACKERS!
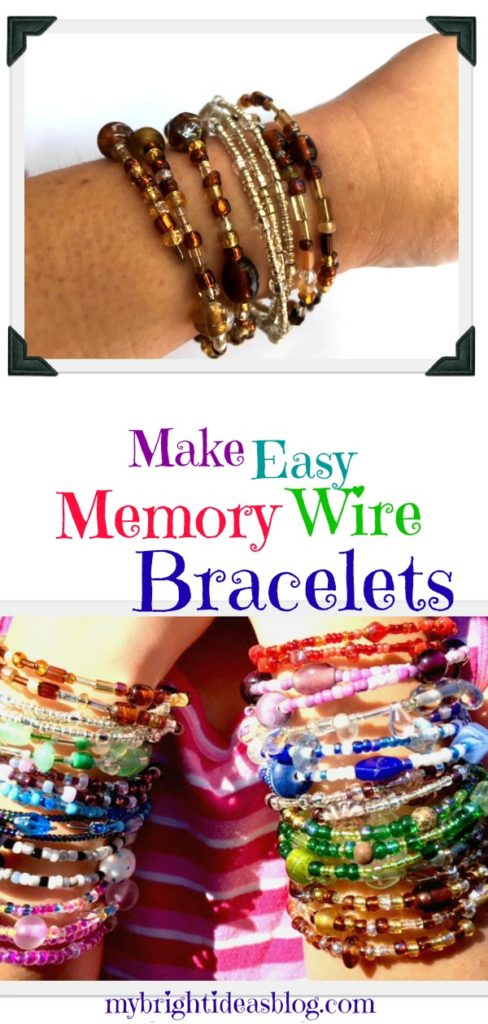
 Its that easy! Now the 8 and 11 year old’s can sell or gift their beautiful bracelets. Even younger children could do this if you help with bending the wire at the beginning and end of the project.
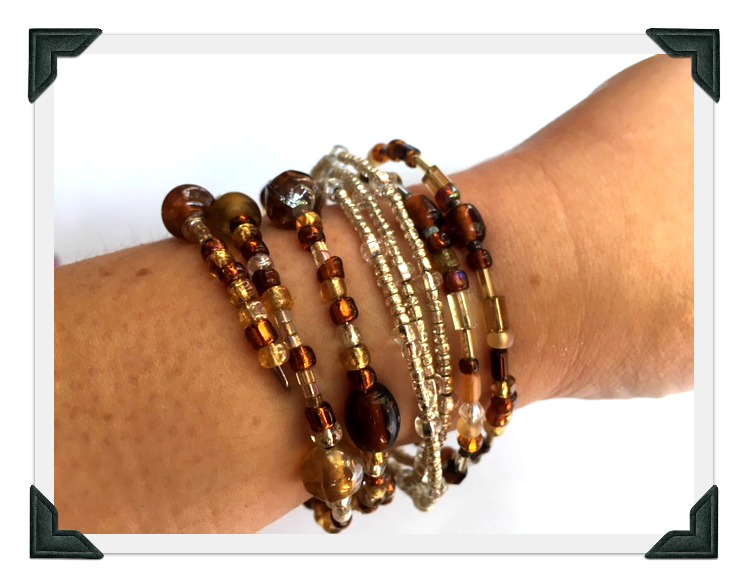
Forget about the kids I love making these! I put 3 together for this photo.
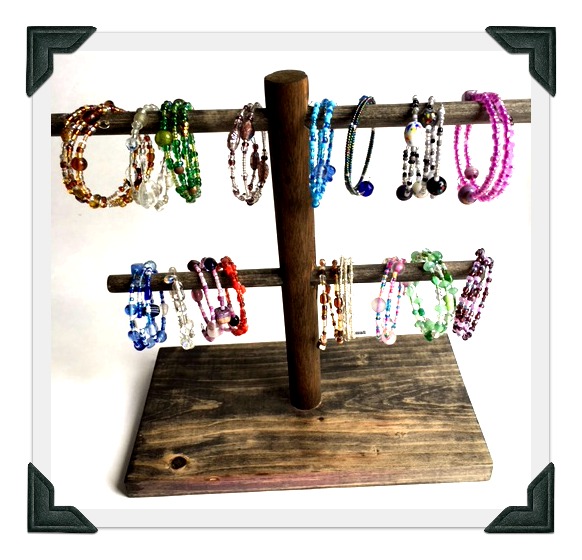
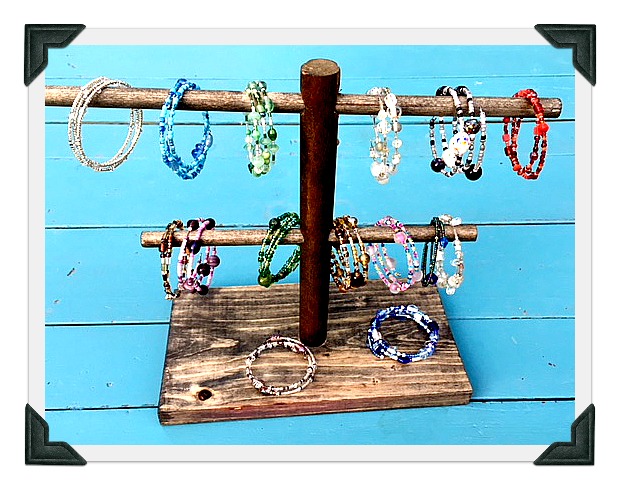 Check out the jewelry stand I made out of scraps of dowel and wood. Its perfect for displaying the finished bracelets on the craft table.
 I hope you enjoy making this super easy project. Its rather addictive!

…
…
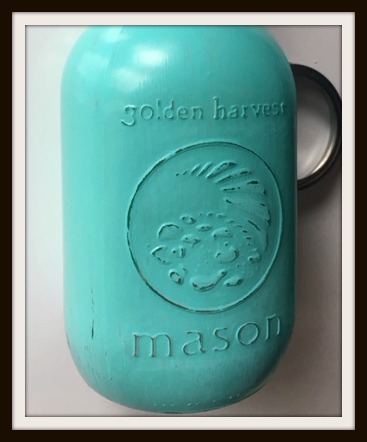
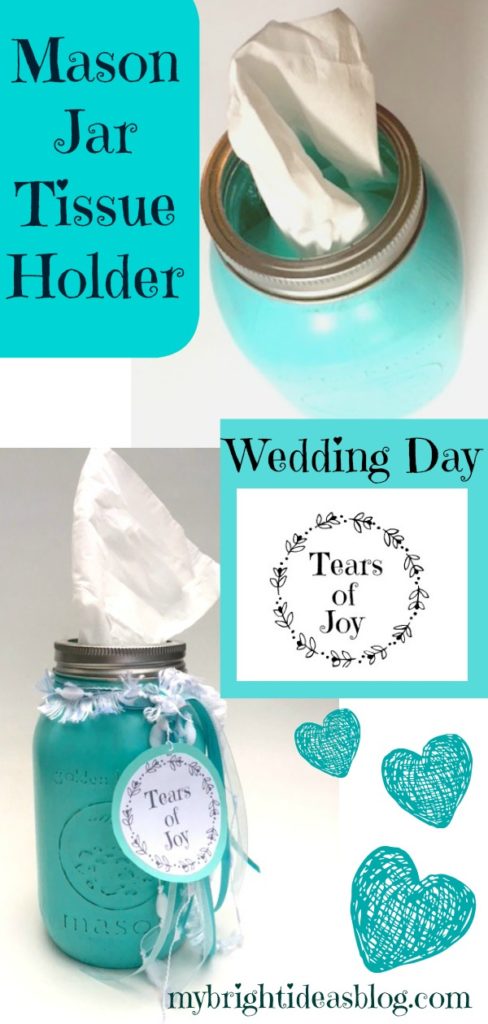
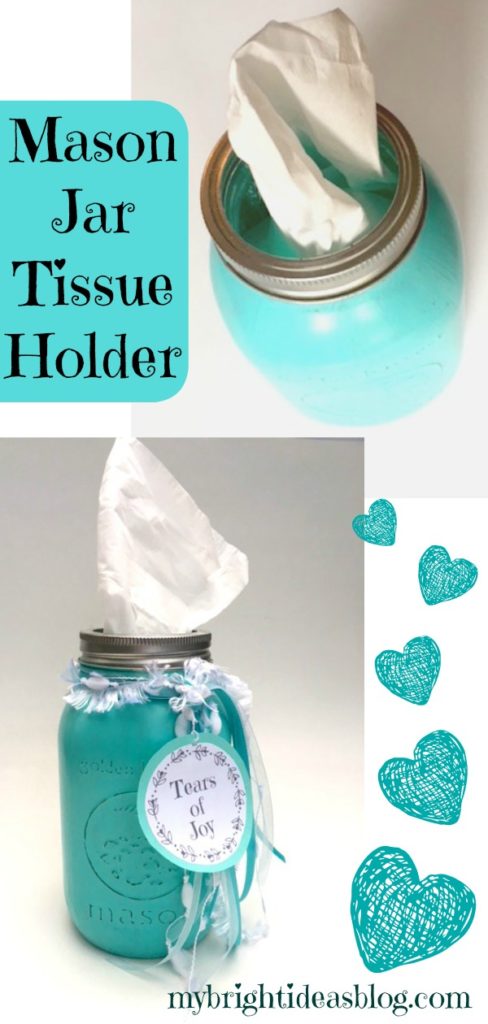
Mason Jar Tissue Holder

Tomorrow a friend’s daughter is getting married and I’m going to pop around to their house today to drop them of this mason jar tissue dispenser. Even for friends who aren’t prone to crying – weddings and daughters and stress and wedding parties and lack of sleep can bring out the tissues for anyone. Might as well be prepared with a jar of tissues that match the day!
You will need:
- goo gone or lift off if there is any sticky label residue
- rubbing alcohol
- a mason jar
- multi-surface paint (or glass paint)
- paint brush or sponge
- sand paper or emery board
- box of tissues
- wide mouth jar band
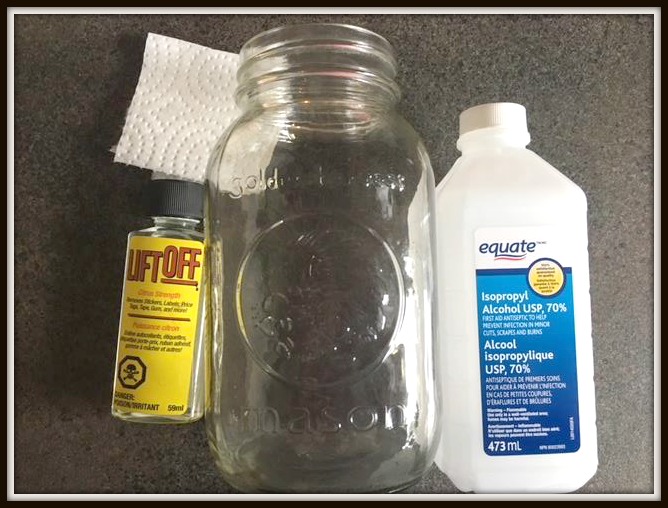
First of all, we need to clean and dry the mason jar. If there is any sticky residue from previous labels take if off with goo gone or lift off – then wash with soap and water. Wipe the outside of the jar with rubbing alcohol.
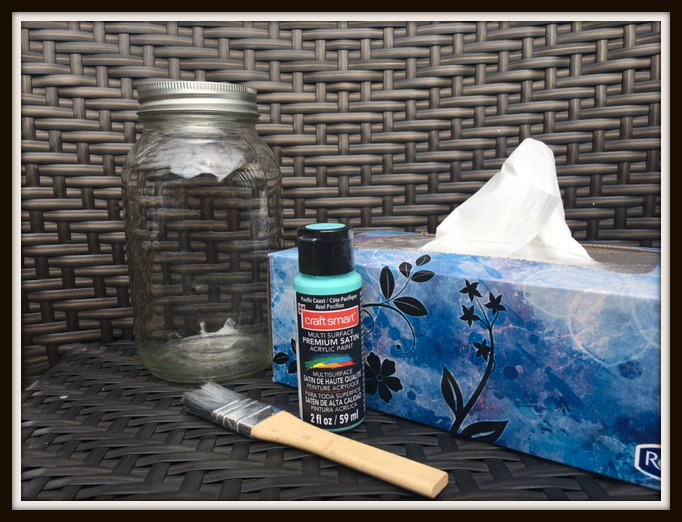
I used a multi-surface, acrylic craft paint from Michael’s-“Pacific Coast”. It was not expensive approx. $3.50. It can be used on fabric, glass, ceramics, wood, metal, plastic, terra cotta etc. 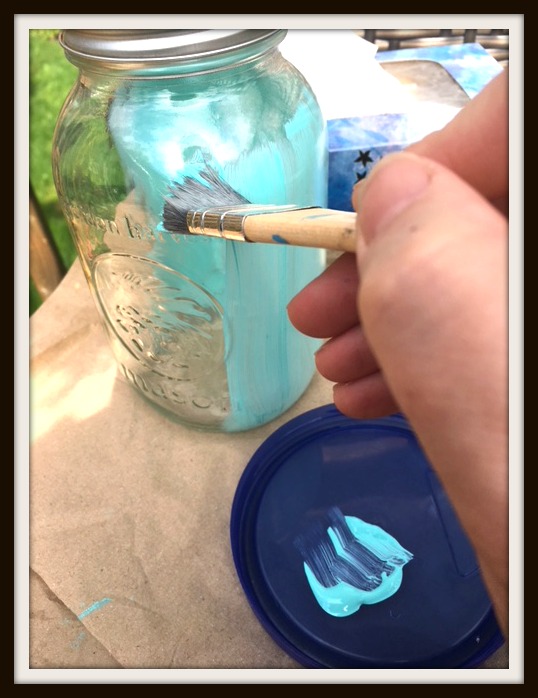
Using a paint brush or sponge, paint the jar and allow to dry. Most likely you will require another coat of paint. It dries fairly quickly. Leave over night to really allow the paint to dry thoroughly before moving on to the next step.
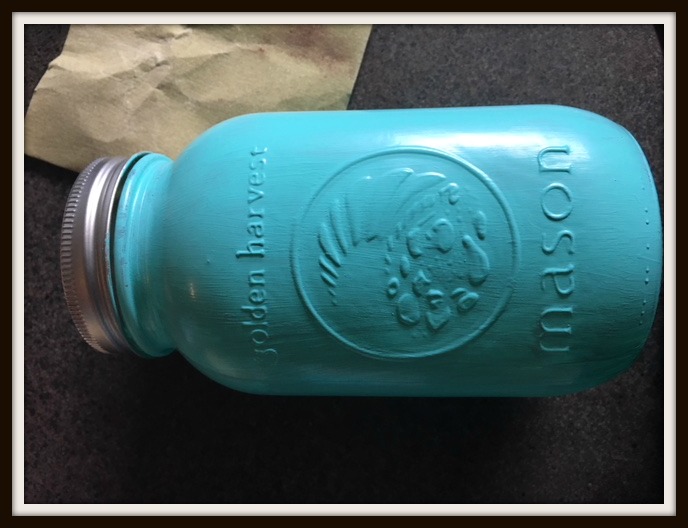
Using an emery board or sandpaper, gently rough up raised lettering.
Next we add the tissues!
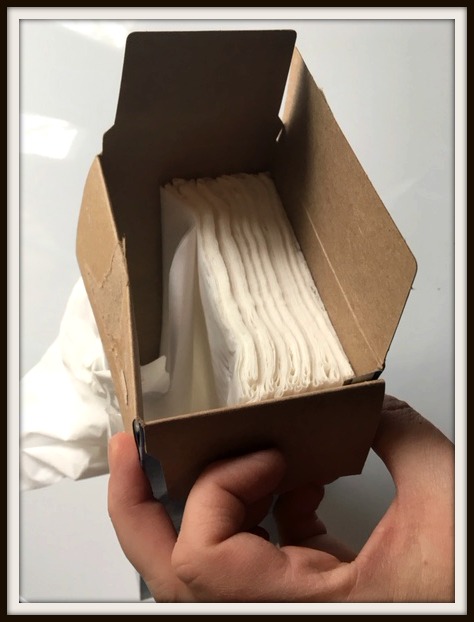
Open the box of tissues at one end. Remove half of the tissues, keeping them in a stack. Keep the top tissue slightly pulled up.
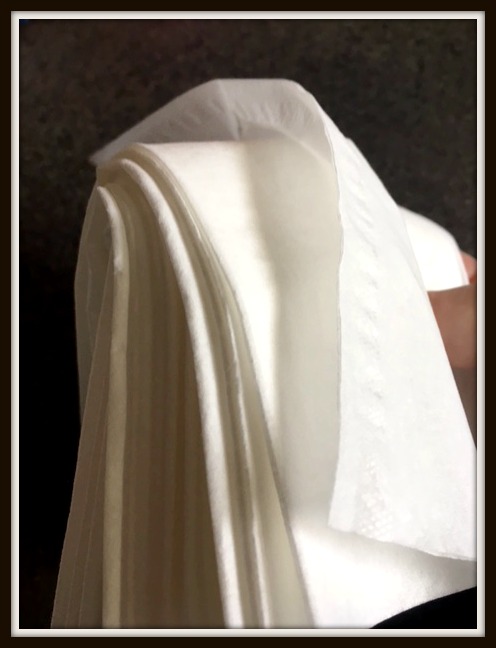
Fold the stack of tissues in half-keeping that top tissue easy to grab.
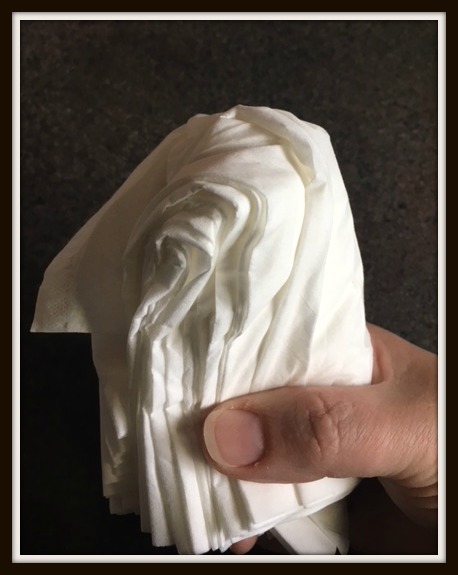
Fold it again so it will be slim enough to slide through the neck of your jar. Then gently wiggle the top tissue upwards. Test to see if the next one will follow.
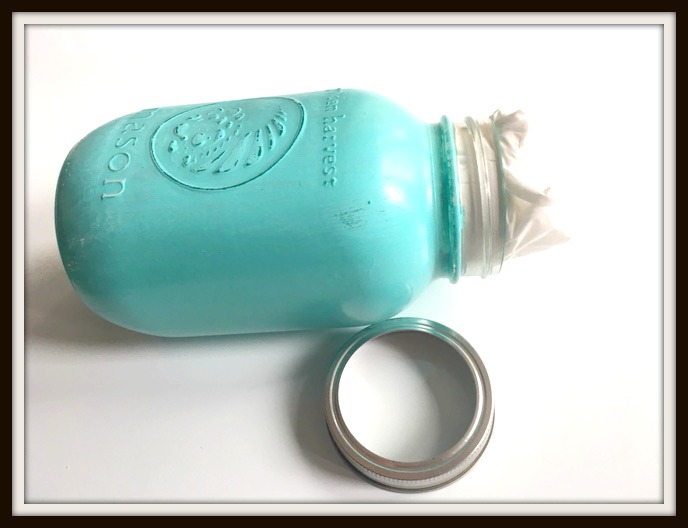
Screw the ring lid back onto the jar. I like the silver ring lids that come with new jars. If your ring is looking shabby or you want a dramatic look you could easily spray paint it black or soft white before screwing it back onto the jar.
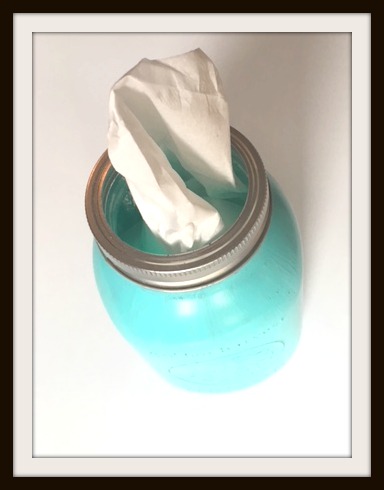
Looks good!

I added a little bit of random white and matching ribbons and simply tied a not around the neck of the jar. I also printed a little note that says “tears of joy”. Using a glue stick I pasted that onto a piece of coordinating cardstock. I punched a tiny hole in the papers and tied it into the ribbons.

Just a quick footnote!
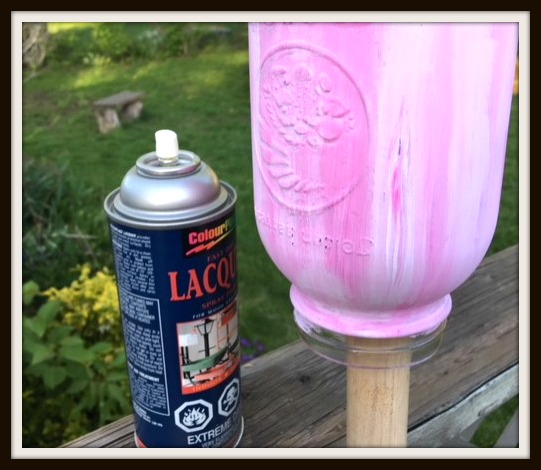
With this pink jar I tried painting with regular pink and white craft glue. It worked but it was a very mat finish so I put it on a broom handle and sprayed it with a clear topcoat. This had the desired finish and kept my hands free from the paint.
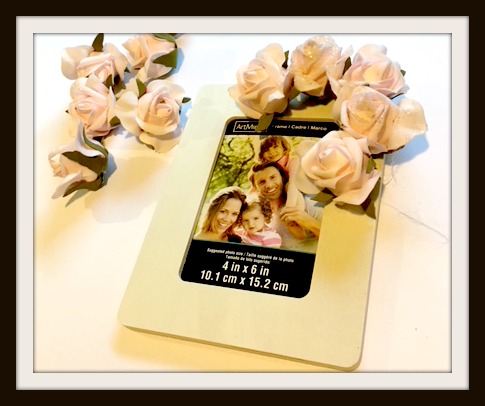
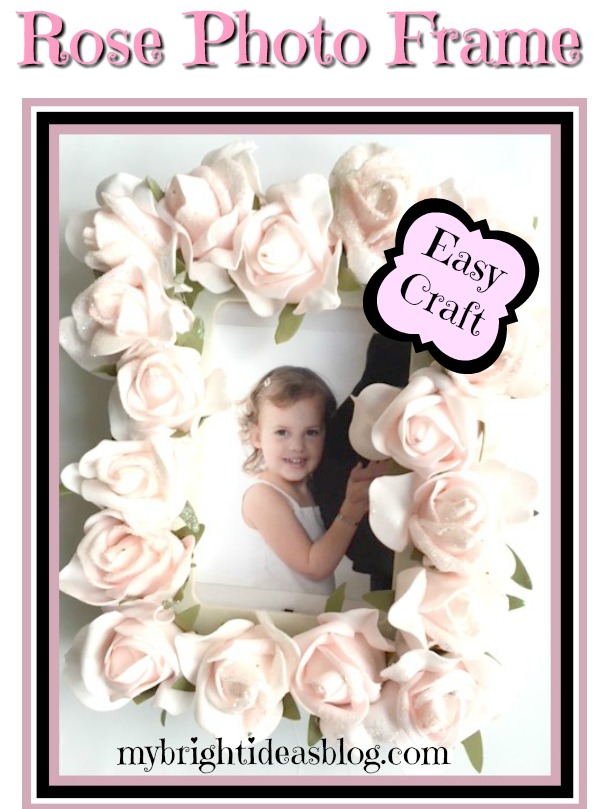
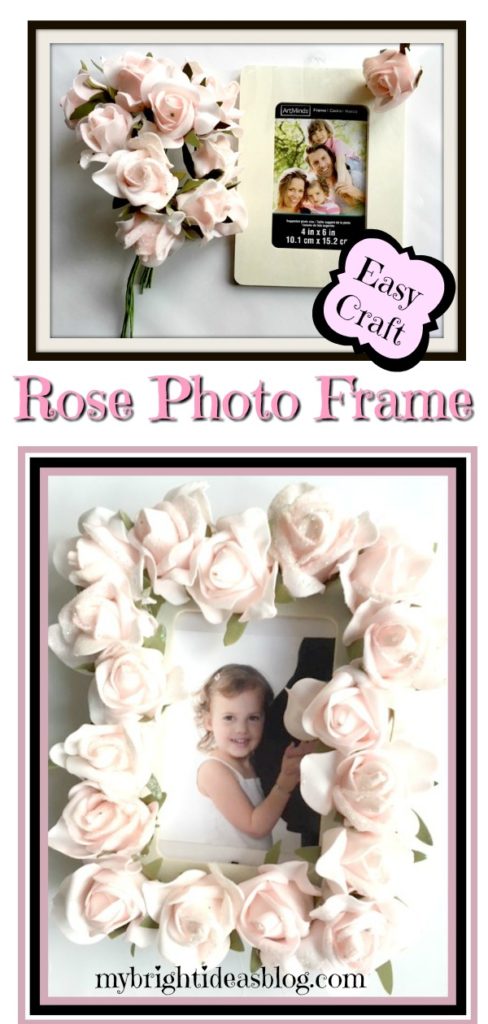
Make a Lovely Rose Picture Frame!

Hello there crafty darlings! Is it wedding season or baby season in your circle of friends? If you are looking for a lovely gift idea…I have just what you need! An easy craft that just requires a few dollars at the craft or dollar store and your trusty hot glue gun. Plug in the glue gun and lets get started!
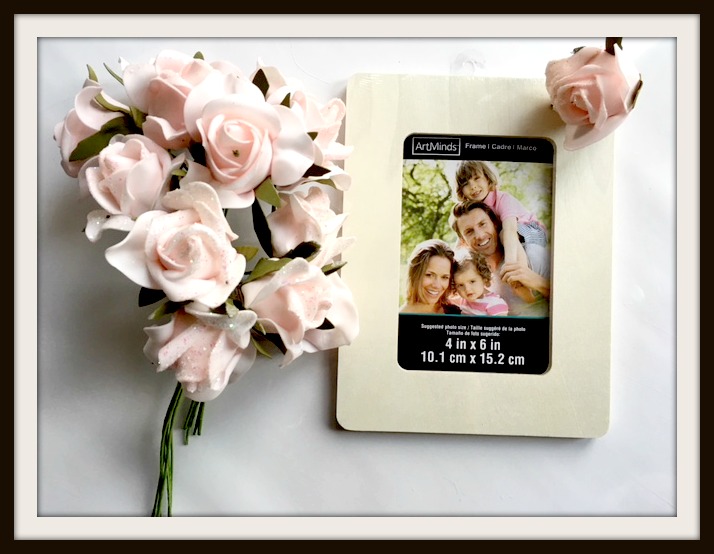
This project needs just 4 things.
- Roses ($3.75 Dollarama 3 bunches at $1.25 each)
- 4x 6 Wooden Picture Frame ($2.00 Michaels)
- Hot Glue Gun
- Wire Cutters
I discovered some pretty dainty pink roses at my dollarstore. Each bunch had 6 flowers and I used 18 flowers for this project.
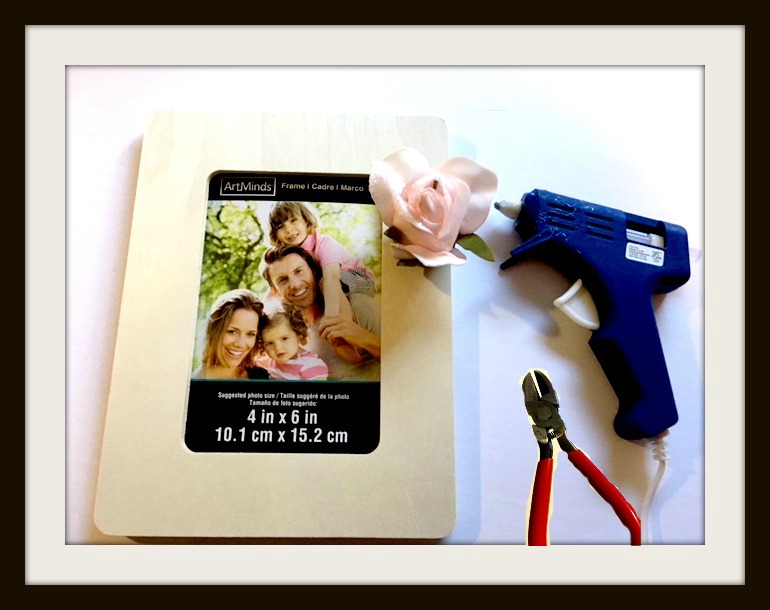
The first step is to trim the stem with wire cutters/pliers and bend the wire stem to the side. This style of flower sits very flat on the photo frame making it easy to glue. Wow this project is so easy!
I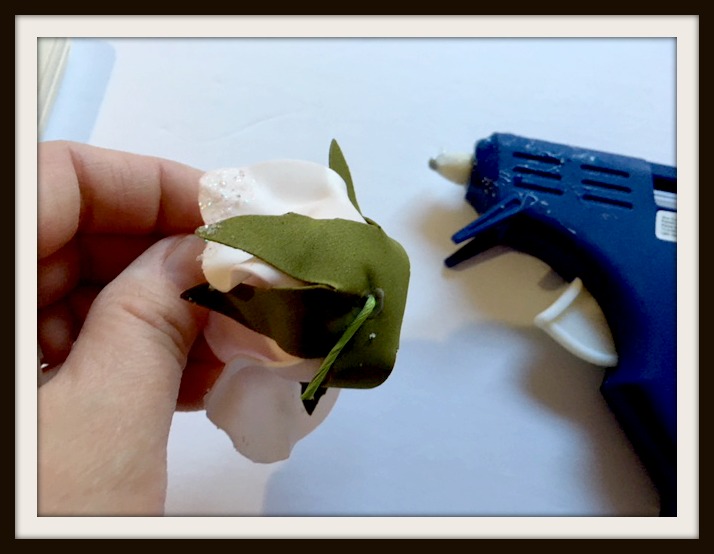
Next lay out your flowers and see how snuggly you want them to fit. Begin gluing the flowers on.
Now pause to admire the beauty and simplicity of this gift. Will you put a photo of the happy couple in the picture frame or their wedding invitation? Or will you put the birth announcement or leave it empty for the expecting parents? Or did you see my last post about putting gift cards or cash in photo frames to add to your thoughtful prezzie. http://mybrightideasblog.com/give-a-money-gift-in-a-picture-frame/
Voila! This project is done in 5 minutes and off you go to the baby shower with your gorgeous homemade picture frame.
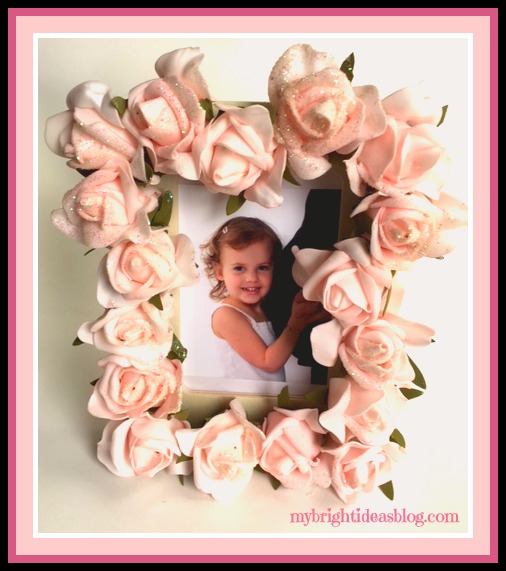
Did you see the tummy sticking out in the photo above? That is my belly growing my second daughter. In the end I’ve decided to give the rose photo frame to Miss B to put in her bedroom. She often remembers the happy times when she was an only child. LOL! This is a nice keepsake to remind her that she was very excited to be a big sister. This kiddo was soooo bald as a baby-not a stitch of hair but here she is a nearly 3 years old and it started to come in beautifully! It’s now 8 year later and her hair is long and luscious! Golly doesn’t time fly!
Wherever you are-I hope you have a super day! Thanks for stopping by!

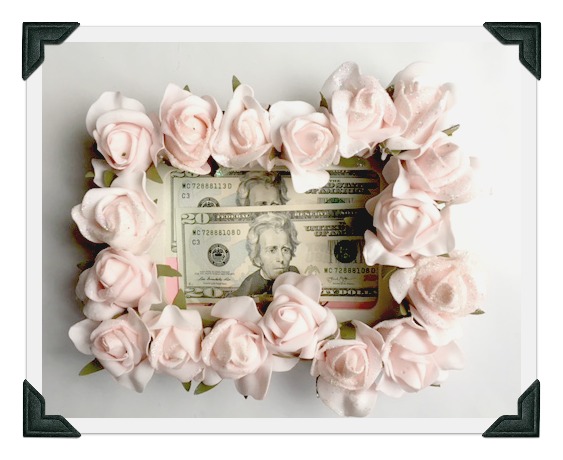
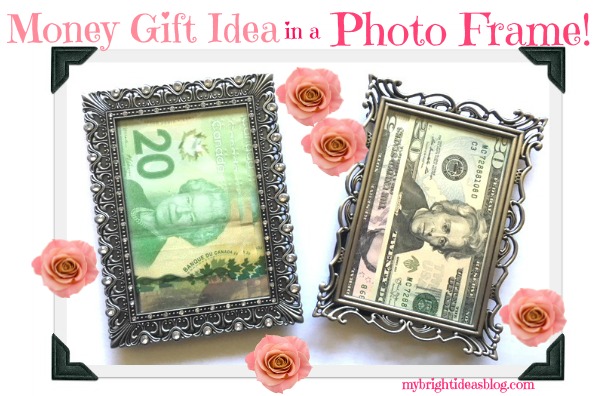
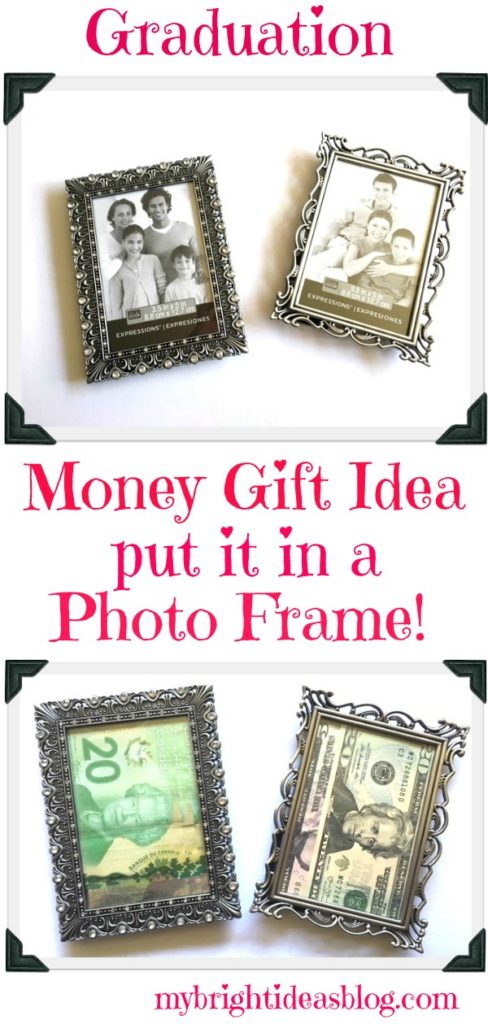
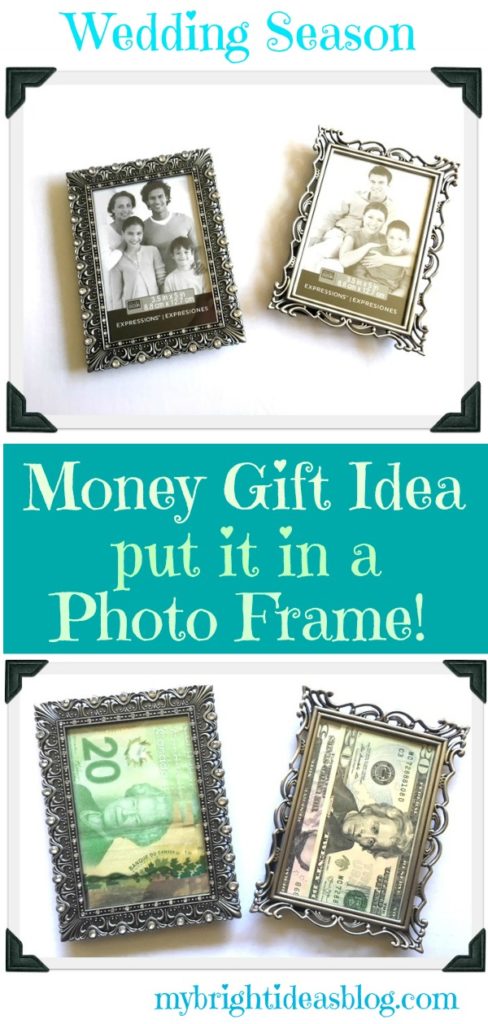
Give a Money Gift in a Picture Frame
 Its May and that means it’s wedding and graduation season. Have you been torn when you want to give a gift but can’t decide whether to give cash or a gift alone. Sometimes handing an envelope doesn’t seem like enough or a cute little gift doesn’t feel like its enough.
I like the idea of giving something a bit more memorable. If your budget is tight giving a picture frame with a photo of a special memory together is a nice idea. But if you can, cash is always appreciated.
Years ago, we would travel abroad to see my in-laws and while there, we would visit with family friends. There was the sweetest little old couple-they were so warm and lovely-they knew my hubby and his family his entire life. They aren’t alive now but not forgotten. During the visit, the dear old gentleman would corner my hubby and slip him some cash and say “take your girl out for an ice cream”. I can’t remember how much he gave but it was probably enough for 10 ice cream dates.
Meanwhile, his wife, would shuffle over to catch me and slip me some “lemonade money”. I don’t know if they realized they were both giving us cash gifts at the same time or not. Recently a young couple we are good friends with-were about to leave on a trip to Israel and we gave them a gift of shekels. It wasn’t very much but they were really touched not just for the extra spending money but also that we took the time to exchange the money into the right currency.
Of course, the card read….”take your girl out for an ice cream”.
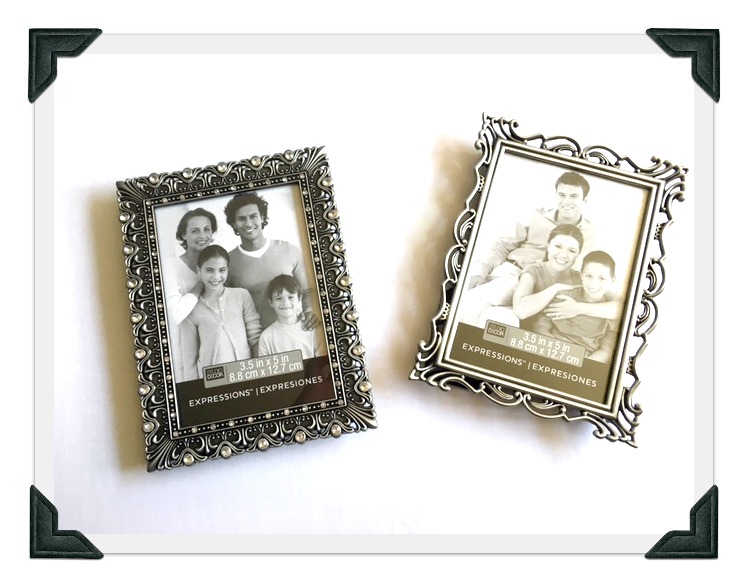
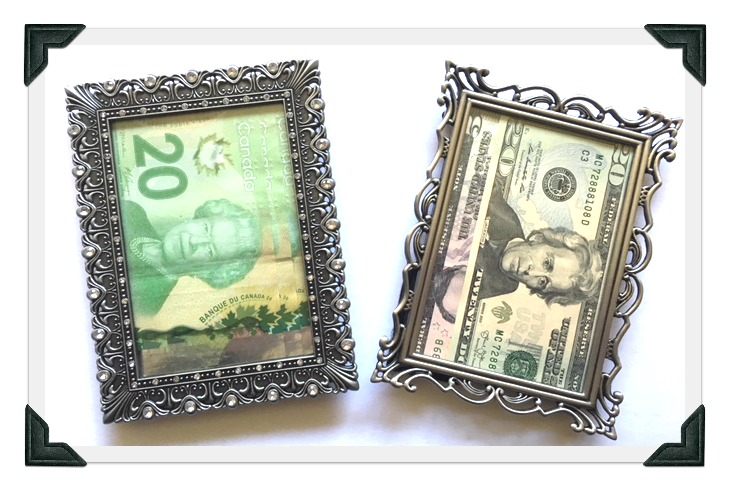
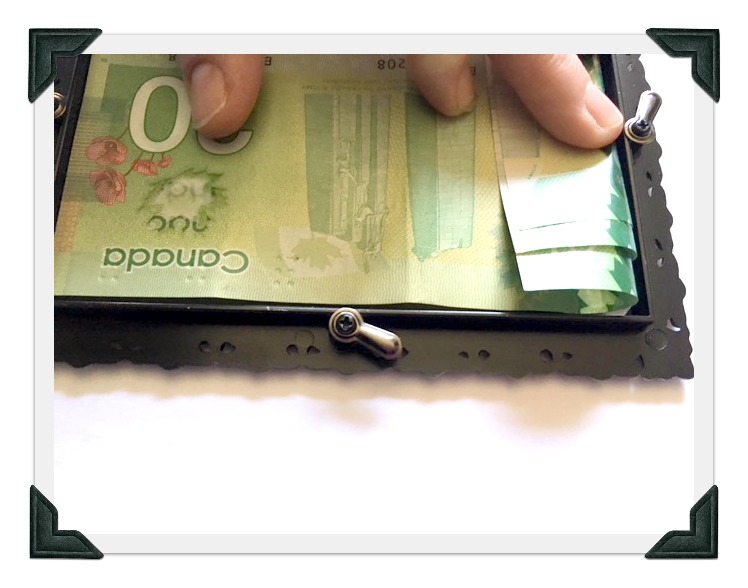 For these two metal frames I purchased 3 1/2 x 5 from Michaels. Home decorating stores have beautiful pearl frames if you want it to be really elegant. Just open the back and put the cash in so it fills the entire area. You will need to fold it over a bit. If you get a 4 x 6 frame you won’t need to fold the money.
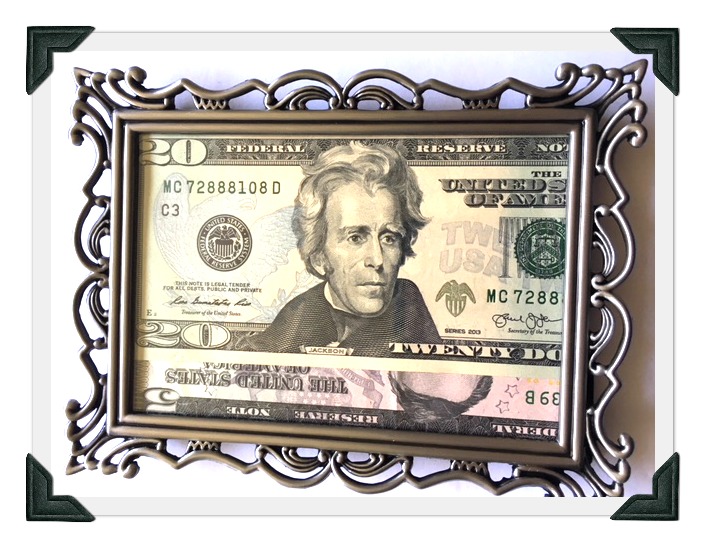 I like this frame for a graduation gift for a guy or someone who is just starting out in their own place.
This photo frame would be great for baby shower gift or a wedding present. Its just a $2 wooden frame with flowers hot glued onto it. I’ll show you how I did that later.
 Have you gotten a surprise cash gift of generosity from someone you didn’t expect it?
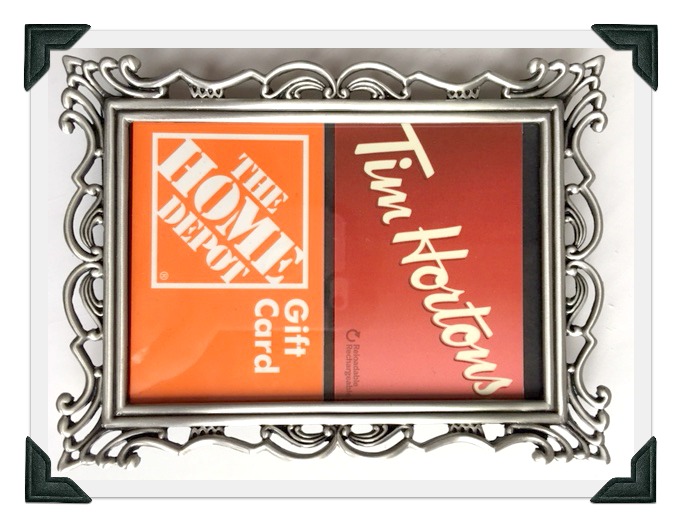
Gift cards are increasingly popular. How about a home depot gift card for someone who has just purchased their first home…or pizza gift cards for moving day. Two gift cards fit perfectly into the 3 1/2 x 5 frames!
 Whatever you choose to do to show someone you care… demonstrate the generosity you’ve been shown and teach the next generation to be thoughtful and big hearted givers too.
…

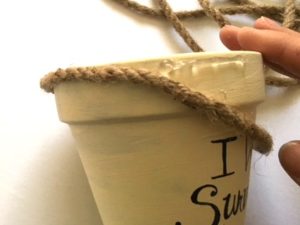
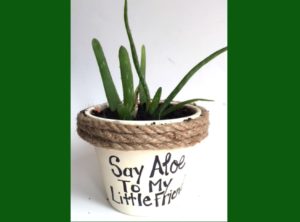
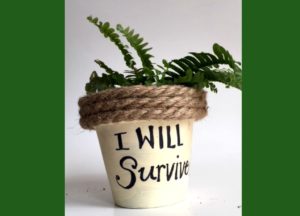
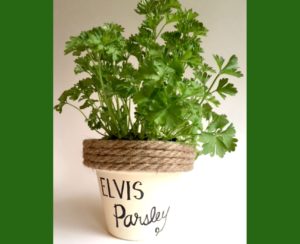
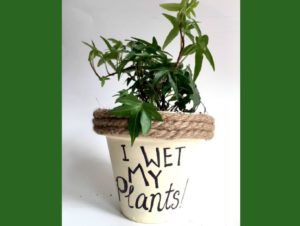
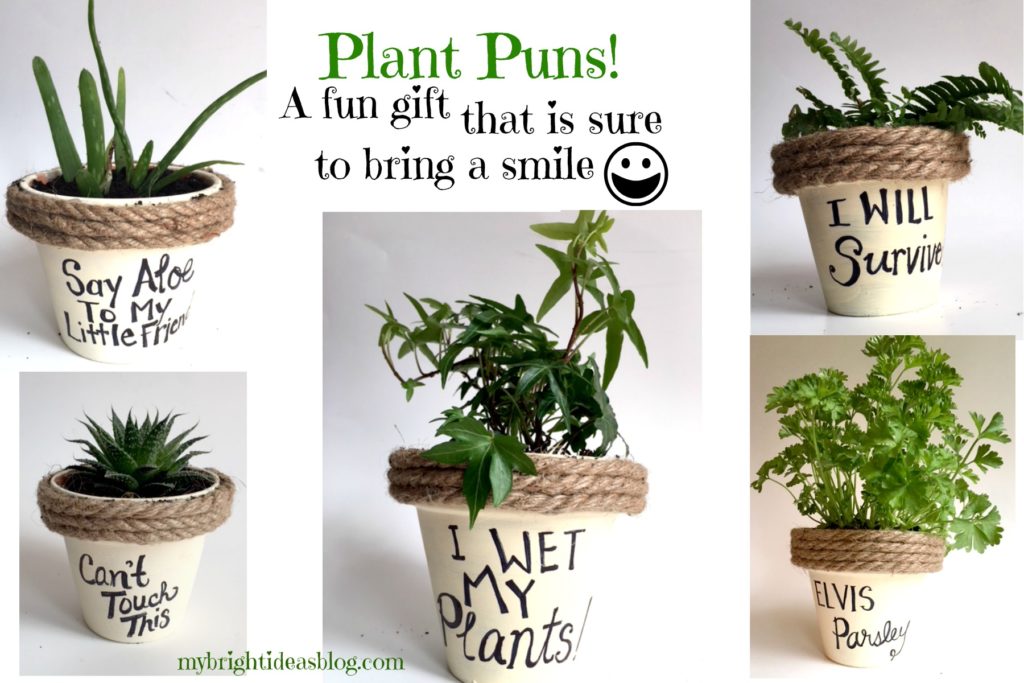
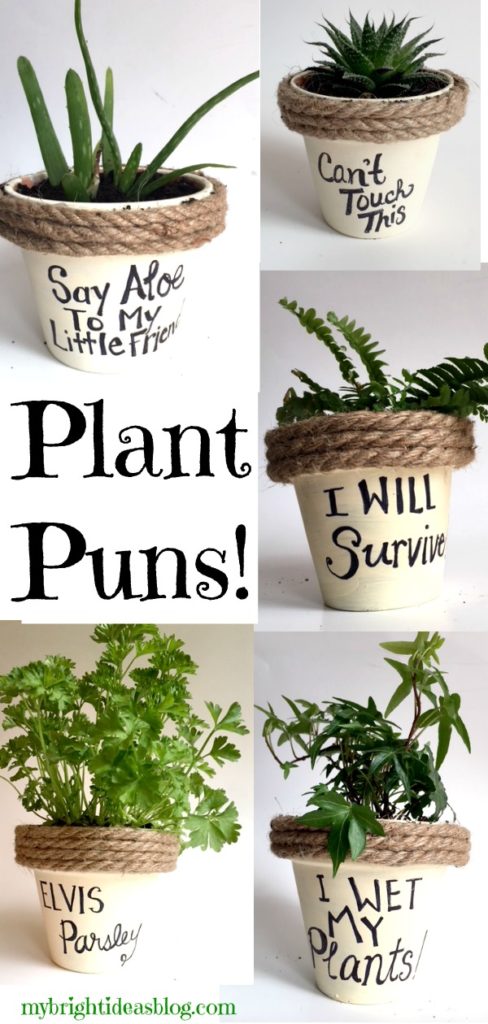
Plant Puns on Painted Potted Flower Pots – Adorable Gift Idea to Make Them Smile!
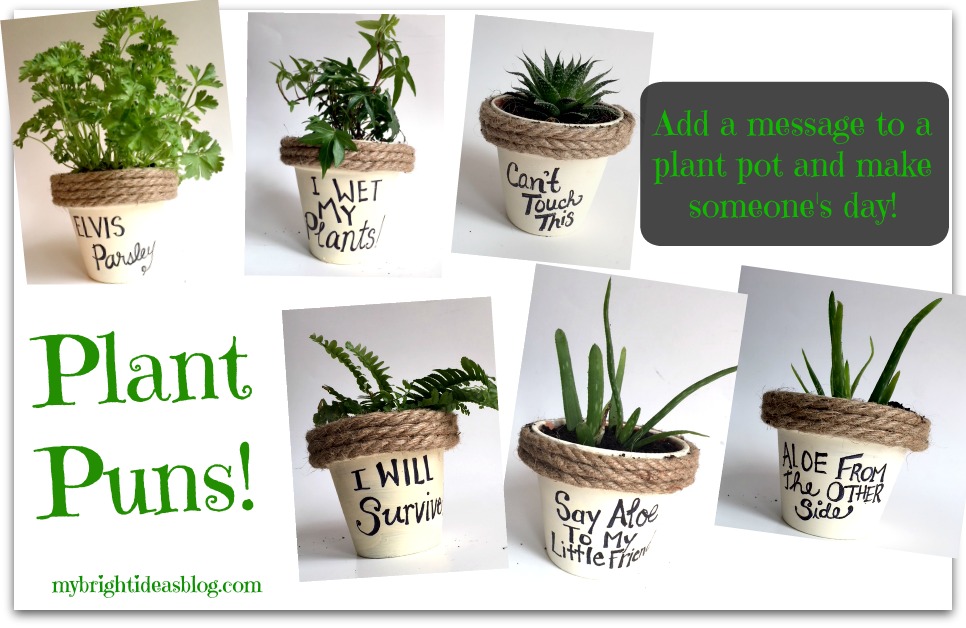
Say that title 4 times fast “Plant Puns on Painted Potted Planters”..now that is a tongue twister!
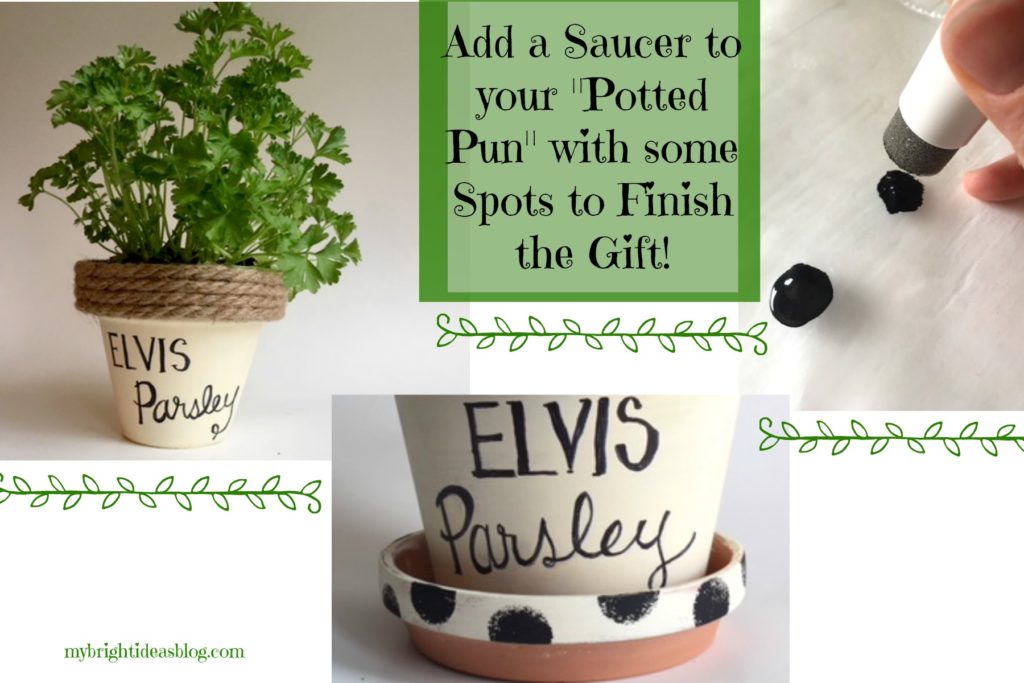
So I was talking crafts with a friend at the office and she showed me these painted terracotta plant pots. What a great gift for someone who is leaving the office or a friend who is down or recovering from illness. It’s an awesome gift that is guaranteed to put a smile on their face! :o) In fact that friend just had her final week at our office as she moves onto another part of the company and I surprised her with the Elvis Parsley flower pot. She loved it! Plus its edible so that is a gift that keeps on giving!
You will need:
Terracotta pots, white or cream paint and paint brush, natural jute rope, hot glue gun and 2 sticks of glue, pencil and Sharpie, a herb or plant and a catchy pun to write on it.
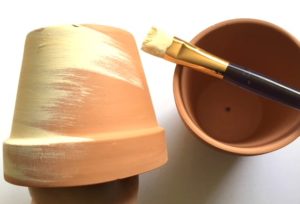
Start by painting the empty terracotta planter pot a white or cream color with a regular craft paint. Allow this to dry for several hours.
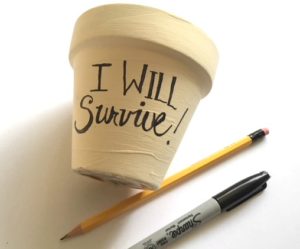
You can choose to write the message on now or after you hot glue the rope. Decide where you would like to write the message onto the pot. I recommend that you write it very lightly in pencil first. Also make sure that the ends of the rope don’t end up at the front of the planter. If you make a huge mistake-like miss a letter in a word. Try to save the project by painting over. If that doesn’t cover it you could change the colour to a dark blue, brown or black and use white paint for the lettering. Waste not!

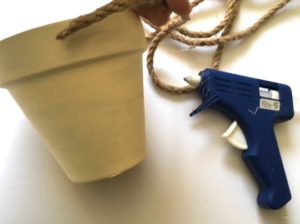
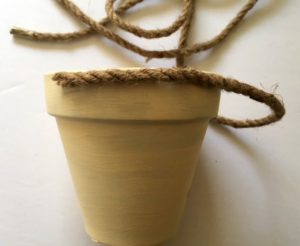
Trim the end of the rope on an angle. Begin by gluing the rope around the top of the flower pot. Since hot glue dries so quickly I would put a 2 inch line of glue and then press the rope into the glue for a few seconds. When this is cooled add another 2 inch line of hot glue and press the rope into the glue. Repeat all the way around the pot until you have filled the rim of the planter and the ends meet up. Trim the end of the rope on an angle and glue the ends down. Watch your fingers!


Lastly, you need to put your plant in the pot. Add a few pebbles in the bottom, then soil, then the plant and a bit more soil to fill the gaps. Awesome! Here are some more that I did this week.
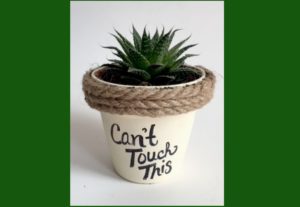
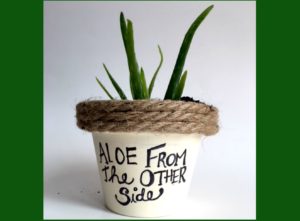
The planter that says “can’t touch this” is meant to be a cactus but there was wasn’t any available at the store so this succulent is acting as a stand in.
This has been a lot of fun. Last night we had a family dinner and I took an Elvis Parsley to my mom’s house. It got a laugh out of the group. If you are looking for a silly hostess gift or housewarming gift I highly recommend giving Elvis.
Have fun with your painted potted plants!
…
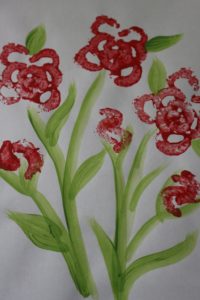
Celery Flower Painting – Easy Kids Craft
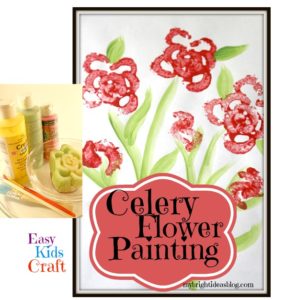
Do you remember doing potato paintings when you were a kid? I sure do and this is a new spin on it CELERY PAINTING! It creates a fun, flowery sort of painting. This craft is so easy a toddler could do it…and it will actually look quite nice in on the fridge.
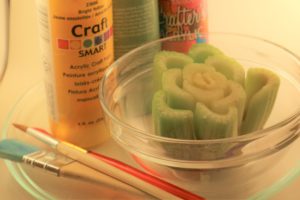
You will need paint, brushes, plain paper and celery cut off close to the bottom or if its another part of the bunch of celery put an elastic around it so it doesn’t all apart.
Start out by brushing some green flower stems onto the paper.
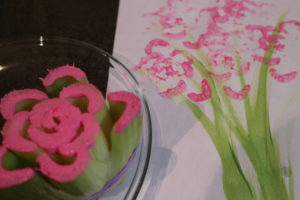
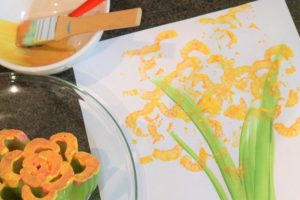
Paint the flat ends of the celery with your brush to make sure every end gets covered with a light coat of paint for a lighter effect like the yellow and pink roses above.
For a more defined flower use a sponge brush and a lot of paint and push hard on your celery to really put the imprint on. I pulled off two of the outer celery stalks and tried to make some rose buds also.
With a bit of help your toddler could have a lot of fun with this. An older child cold make something quite pretty for a gift to take to grandma’s house….you could even put some sparkle glue in the flowers after the paint has dried.