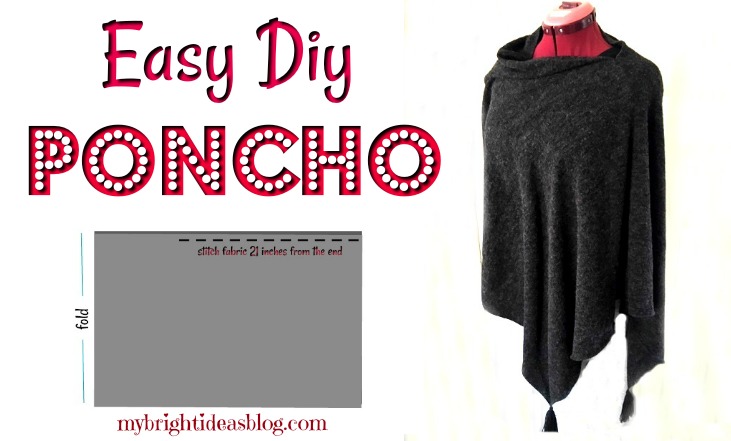
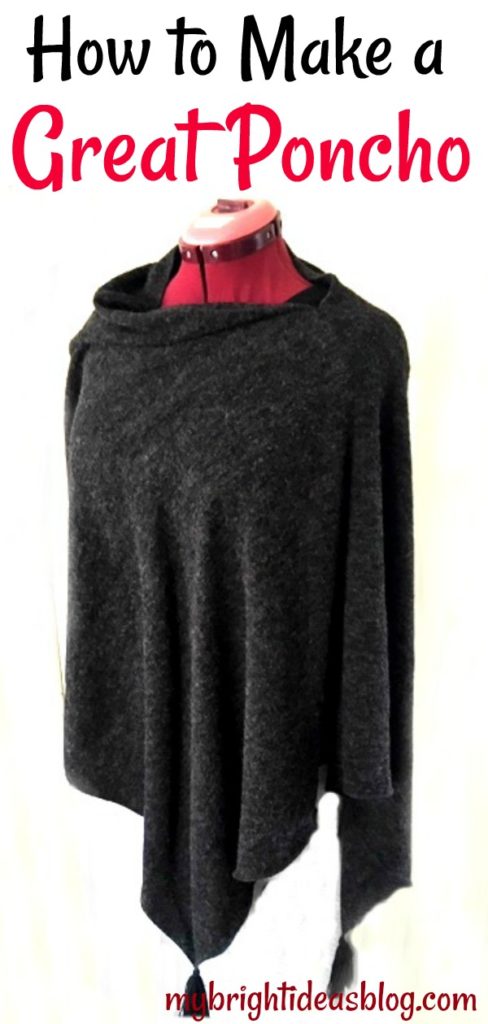
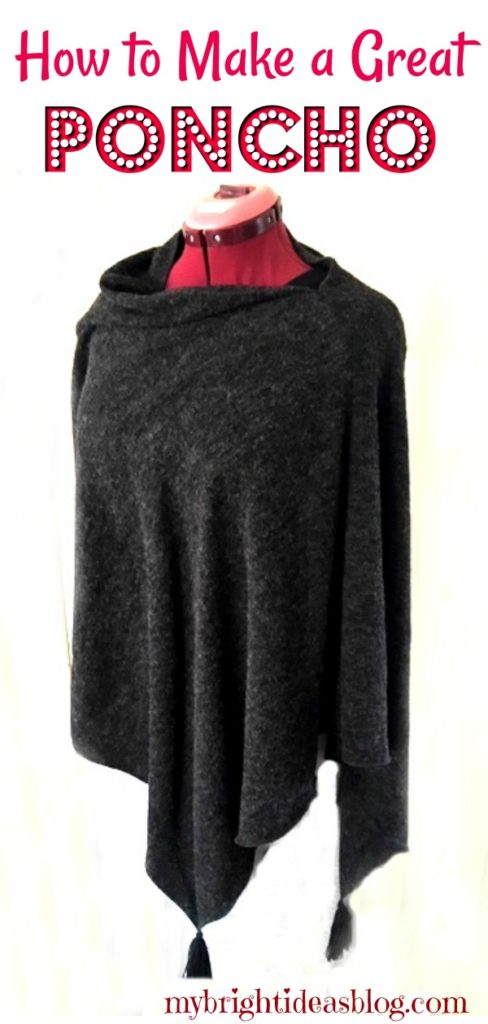
This has got to be the easiest poncho plans ever! Using fleece or another stretch fabric means that you don’t need to hem it. So all it takes is one simple seam and you have a gorgeous poncho you will love to wear!
You will need:
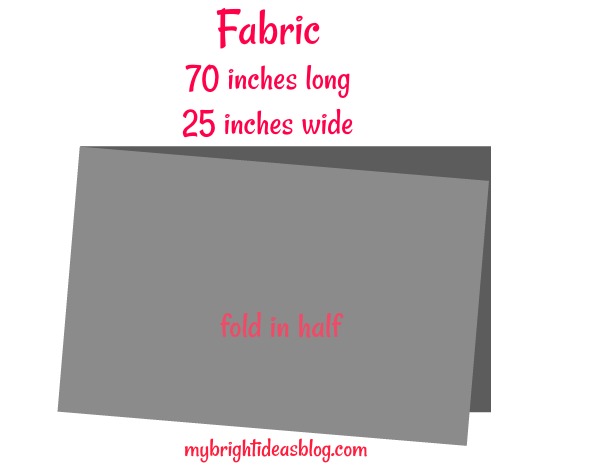
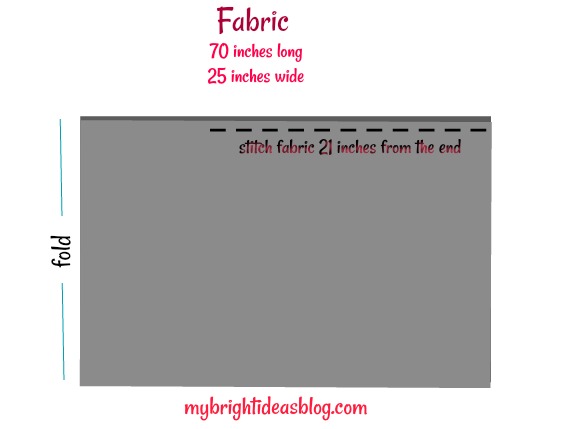
- t-shirt, sweatshirt or fleece fabric 25 inches wide by 70 inches long (64 cms x 178 cms long)
- sewing machine
- 2 purchased tassels (I’ll get working on a DIY for making a tassel soon)
- needle and co-ordinating thread
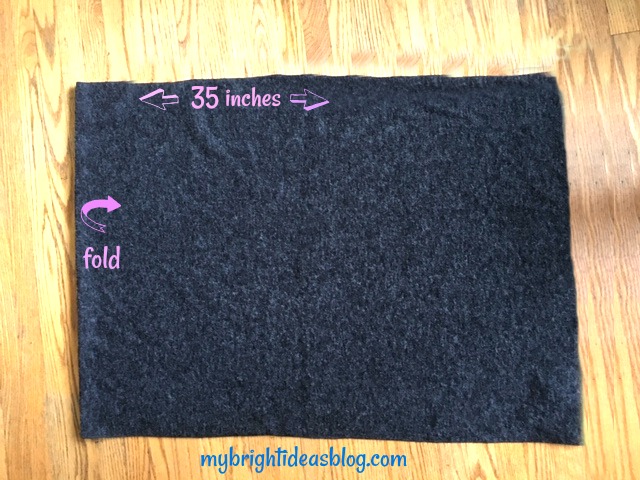
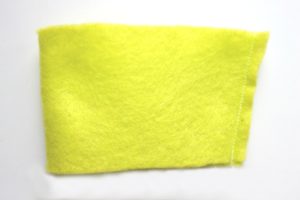
Start by cutting your fabric to size. Cut it carefully to be completely straight. We aren’t planning to hem the fabric so take your time to make the cut as perfect as possible.
Then fold it in half.
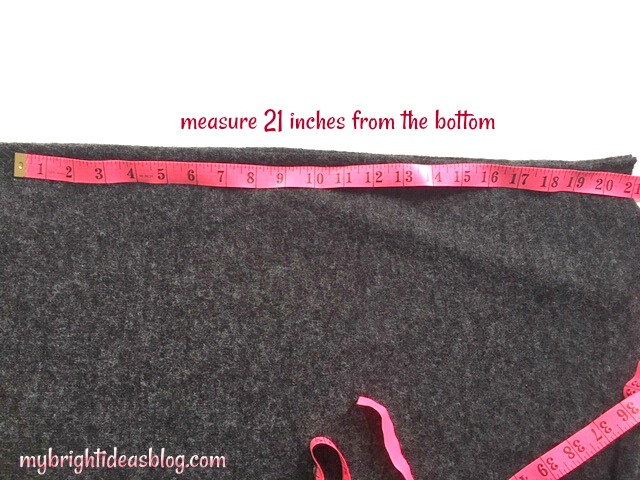
With the fold on the left, measure 21 inches from the right edge of the fabric and pin it together along the top edge.
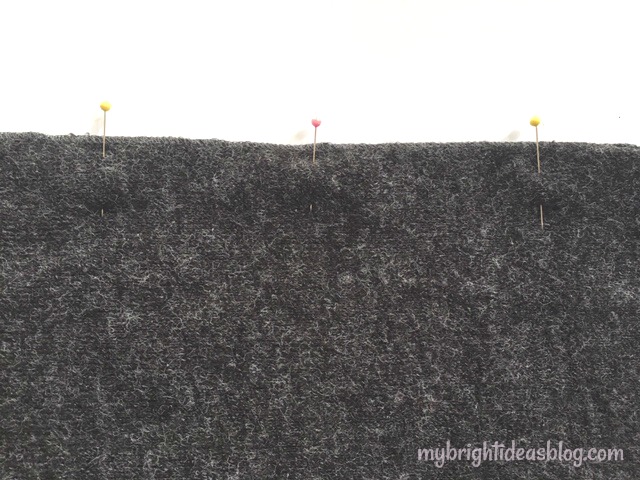
Leaving 14 inches for your neck hole, sew the remaining 21 inches. This is the one seam that you need to sew for this awesome poncho.
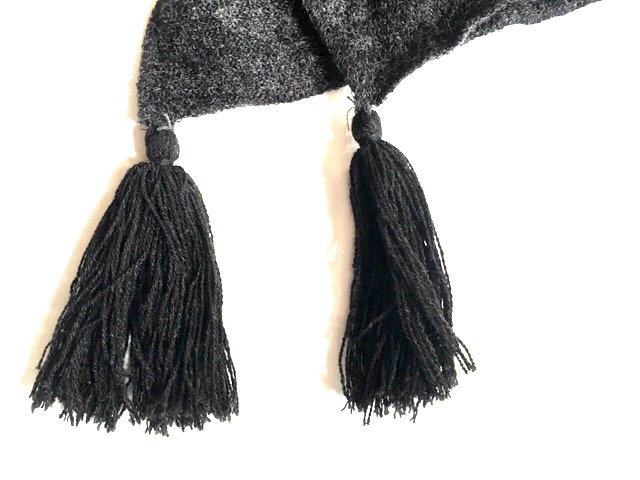
Now add on the tassels-by hand stitching them onto the bottom right corners. This is completely optional. If you don’t have purchased tassels you can skip it. I will make a post about making a tassel soon and link it to this post.
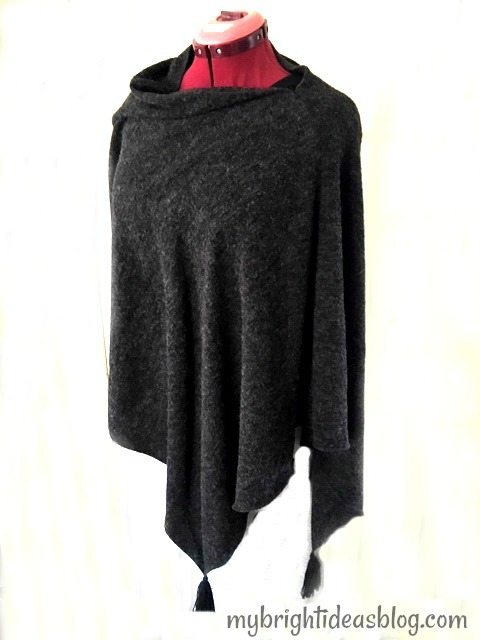
That is all there is to it! This poncho will look great with jeans and boots or dress it up for fancy occasions. If your office is chilly you could have one of these in your desk drawer. You should make a few!
Thanks for reading this post and I hope you will share it with your friends by social media or Pinterest.
Sew a Super Easy Fleece Poncho-Simple Starter Sewing Project

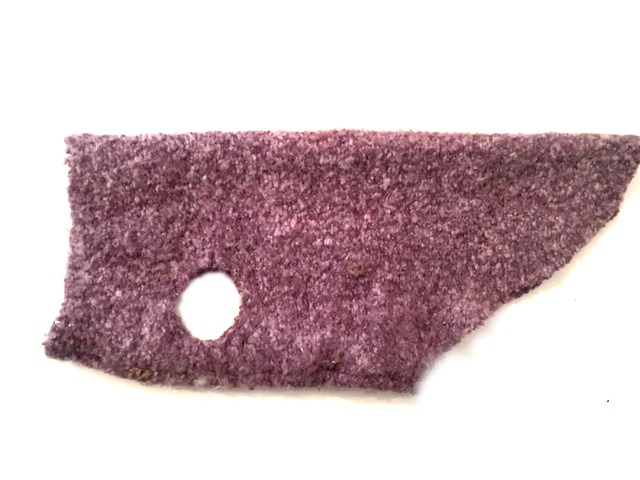
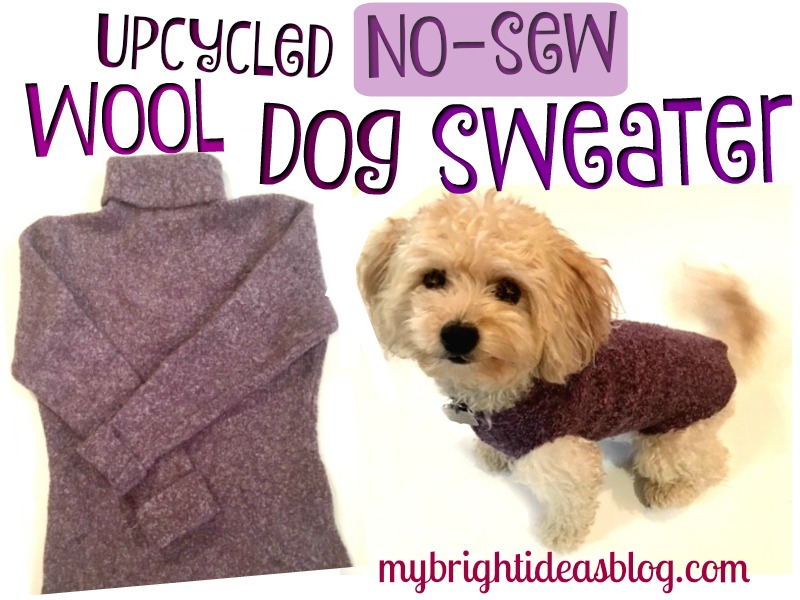
Easy Dog Coat from an Upcycled Sweater
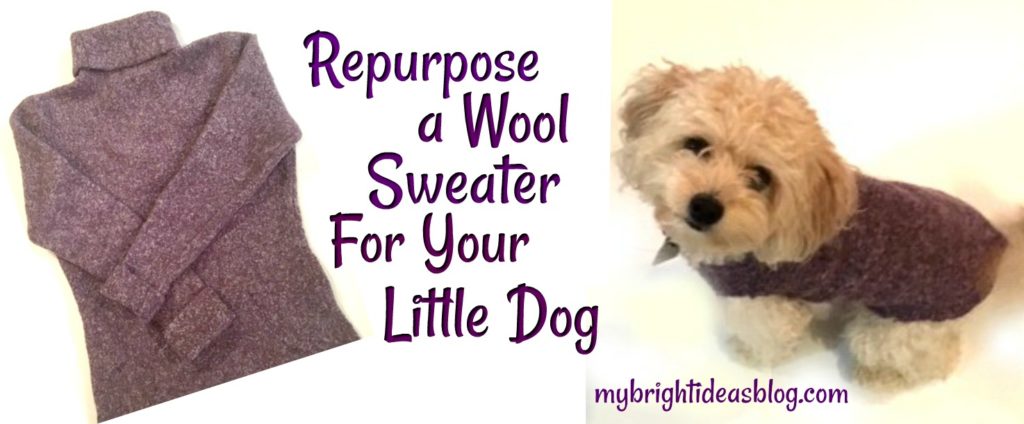
Make your little dog an easy winter sweater by repurposing one of your own!
You know how you should never, ever wash a wool sweater in hot water or put it in the dryer? Well that is exactly what you need to do today to make a little dog a wool coat.
We have a little girl named Gemma who is a Yorkie/Poodle mix. This is the perfect size for her. She is 9 lbs and loves to share your toast. She gets chilled easily so she loves it when her momma makes her a new coat or sweater.
You will need:
- a wool sweater (or wool blend with at least 50% wool)
- scissors
- tape measure or ruler

Start by washing your wool sweater in hot water and machine dry it. This will shrink the wool and “felt” the stitches of the sweater so that it will not unravel when we cut it. You could wash and dry the sweater a few times to further shrink it.
Lay the sweater on a flat surface and cut the sleeve off at the shoulder seam.
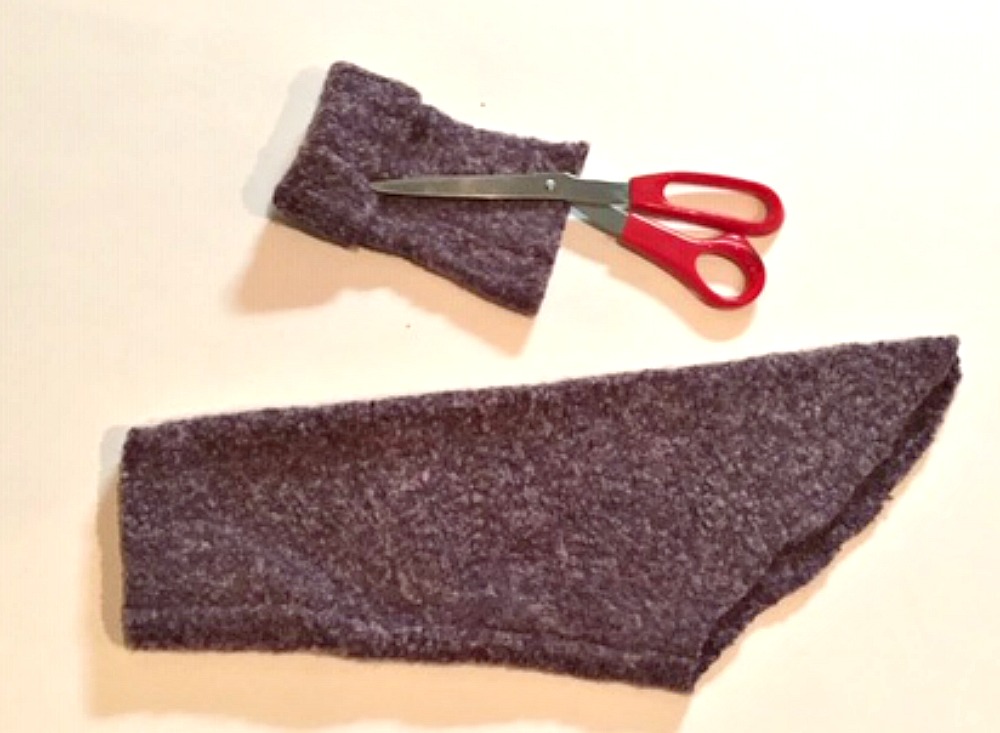
Also cut off the cuff.
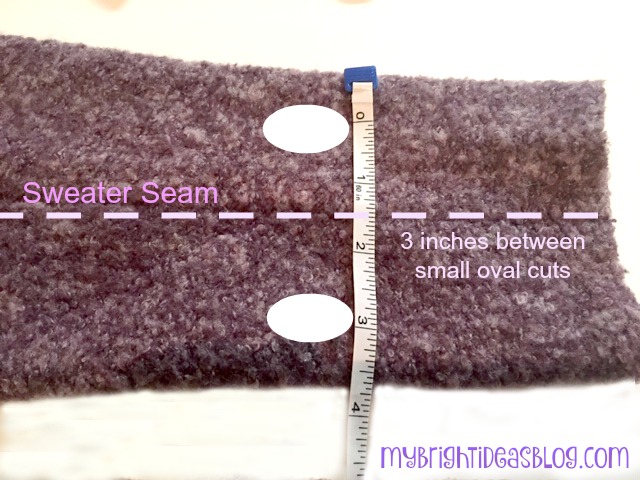
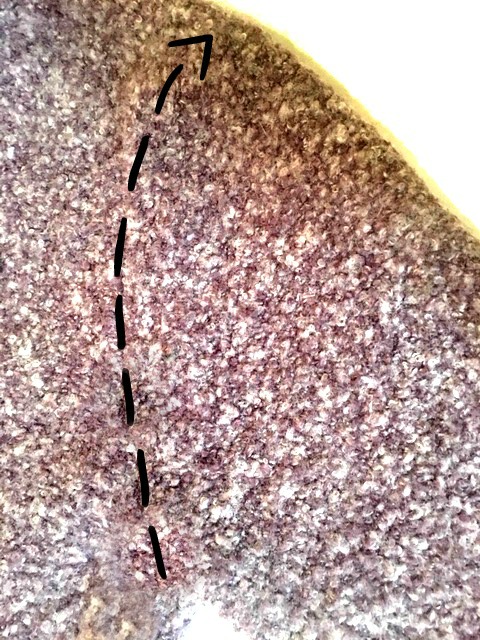
Lay the sleeve flat with the seam in the middle facing upwards. I cut 2 small leg holes 3 inches apart.
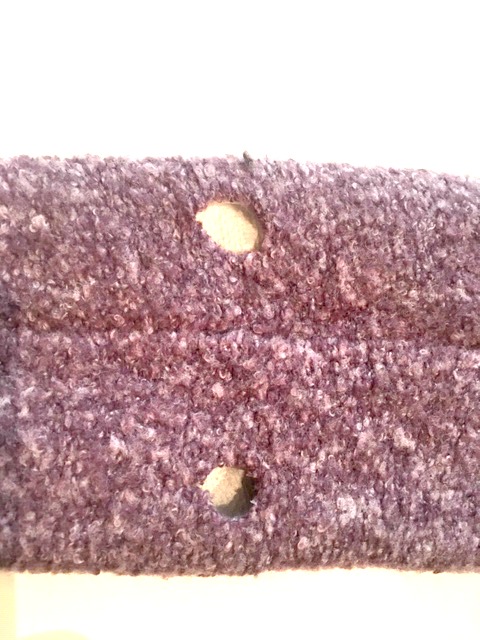
Cut the holes small because the sweater will stretch after a day or two of wearing it.
This photo shows a much bigger hole after Gemma wore it for 3 days. She gets cold with the weather changing so she sleeps in it at night too.
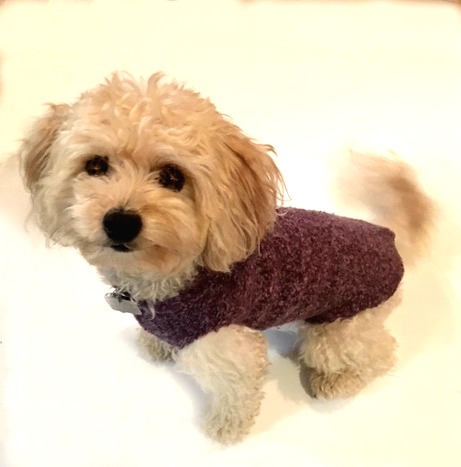 This photo shows her right after I made it. Her fur is very scruffy and adorable….but matted. So we took her to the groomer.


And here she is after grooming and smelling like cookie shampoo. She is so darling. The sweater size looks bigger because of her haircut and because of stretching. When we toss it into the washer and dryer it shrinks back to perfect size again.
That sweater had two arms, of course, so we can make a second one for her to wear on laundry day! Hurray!
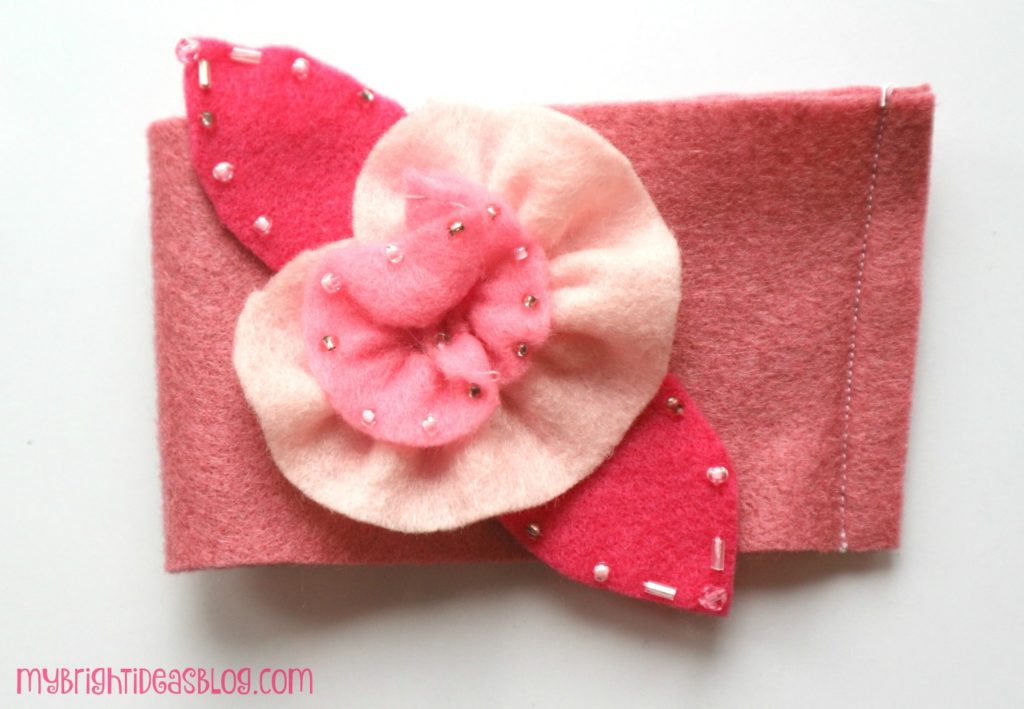
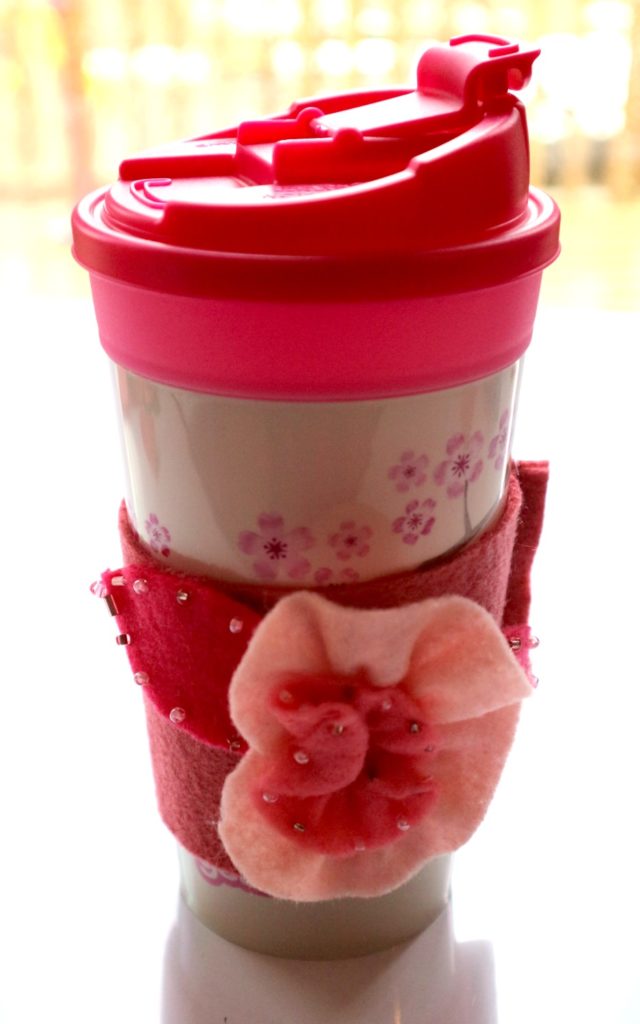
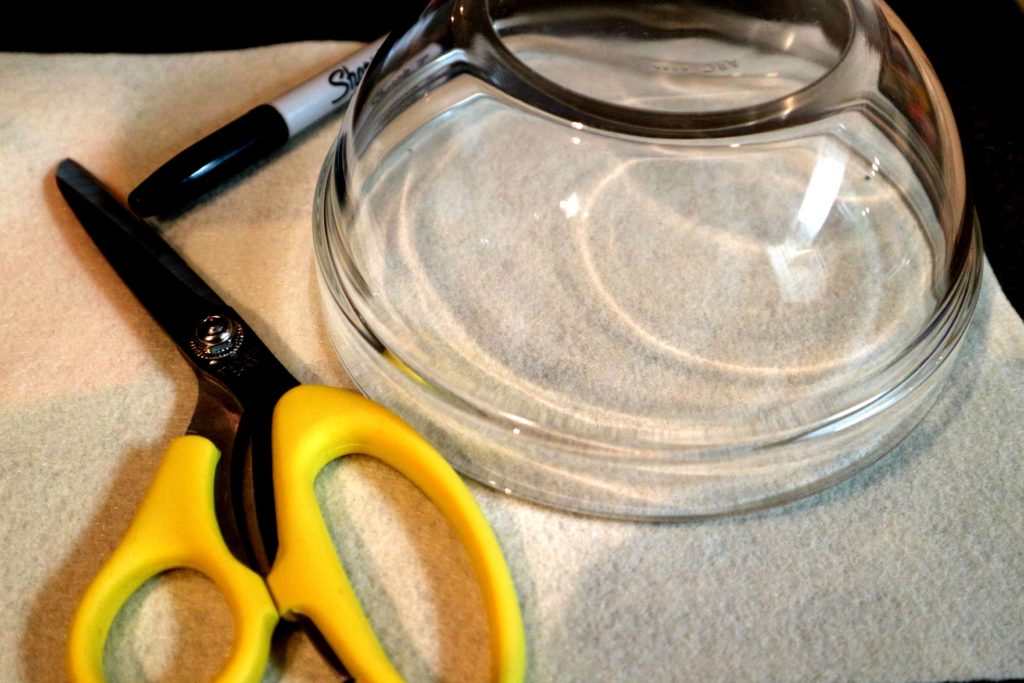
Easy to Make Felt Coffee Cup Cozy
Have you heard of a coffee cup cozy? It’s an adorable name for a glamorous coffee cup sleeve. Often used to protect your fingertips from the hot beverage take out cup.
Today I will show you how to make a felt coffee cozy for either cups from home or a take-out cup. As the weather gets chilly that means ice skating and winter sports (or standing still watching other people do winter sports tee hee…) that will have you warming up with a nice hot chocolate, tea or coffee. You need a coffee cozy to keep the hot inside and protect your hands. They look cute too!
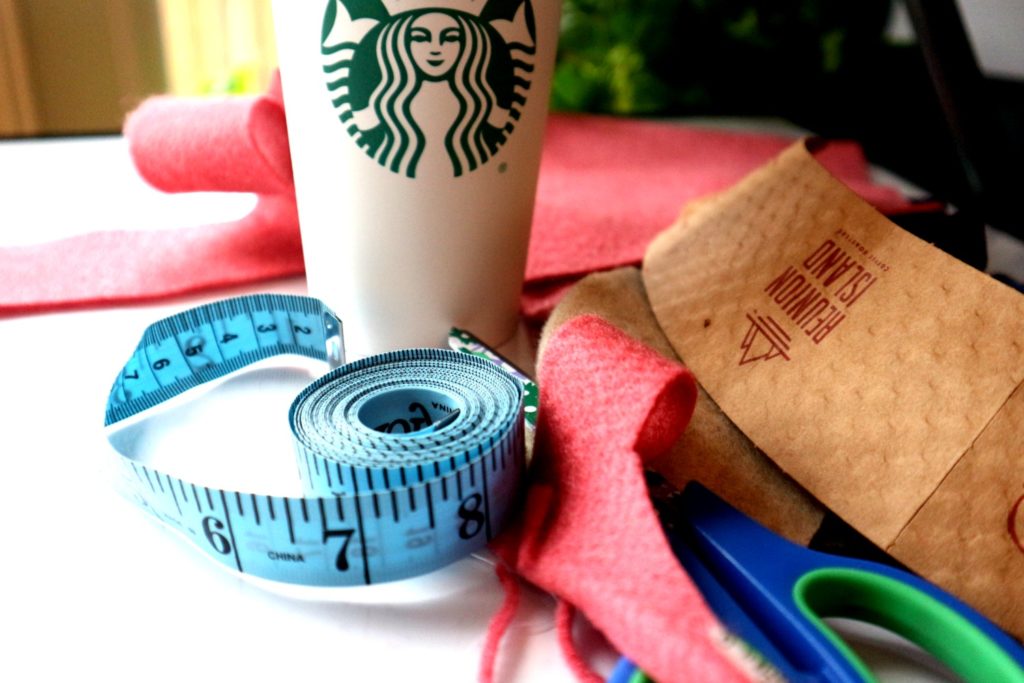
You will need:
- felt (3 inch strip plus scraps for the applique)
- scissors
- measuring tape or ruler
- take away coffee cup
- needle and thread or sewing machine
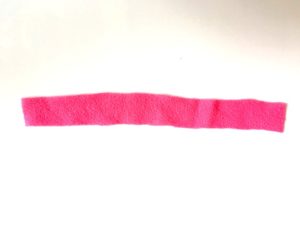
Every cup is different so I recommend that you start by cutting a strip of fleece 3 inches wide and wrap it around your cup. Pin your felt in place to gauge the size you will need.
My favorite take away cup is a Grande Decaf Coffee from Starbucks (with cream and sugar and cinnamon and chocolate sprinkled on top…mmmm). That is also the size of the cups that they made into reusable plastic cups. Yeah! For my friends who live near Tim Horton’s, it fits their medium cups.
Read on to see details to make it this size.
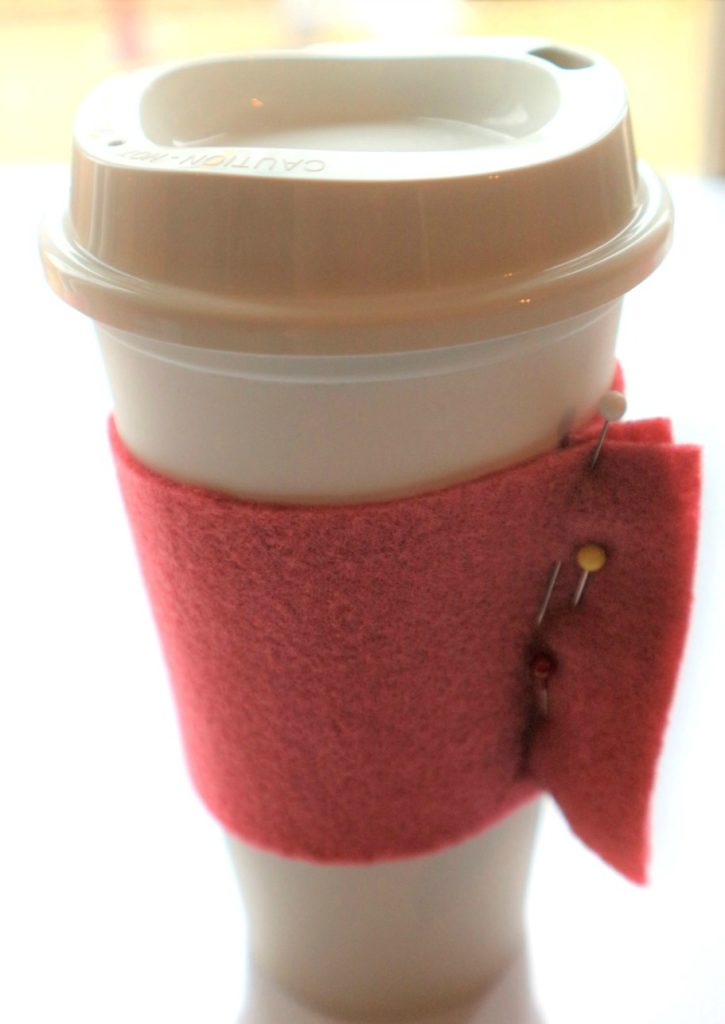
Measure your felt and cut a piece 9 inches long and 3 inches wide. (23cms by 7.5cms) Fold the strip of felt in half.
Wrap the strip of fabric around the cup to see how it fits. Trim a small amount of felt on an angle to adjust for the shape of the cup.
Hand sew or machine sew the edge. Stitch close to the edge…approx. 1/4 inch (or 1/2cm). Fortunately, felt does stretch a bit so if it fits snuggly at first, it will soon be fitting comfortably.
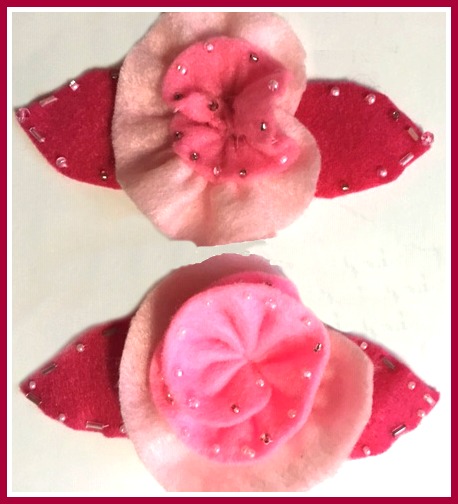
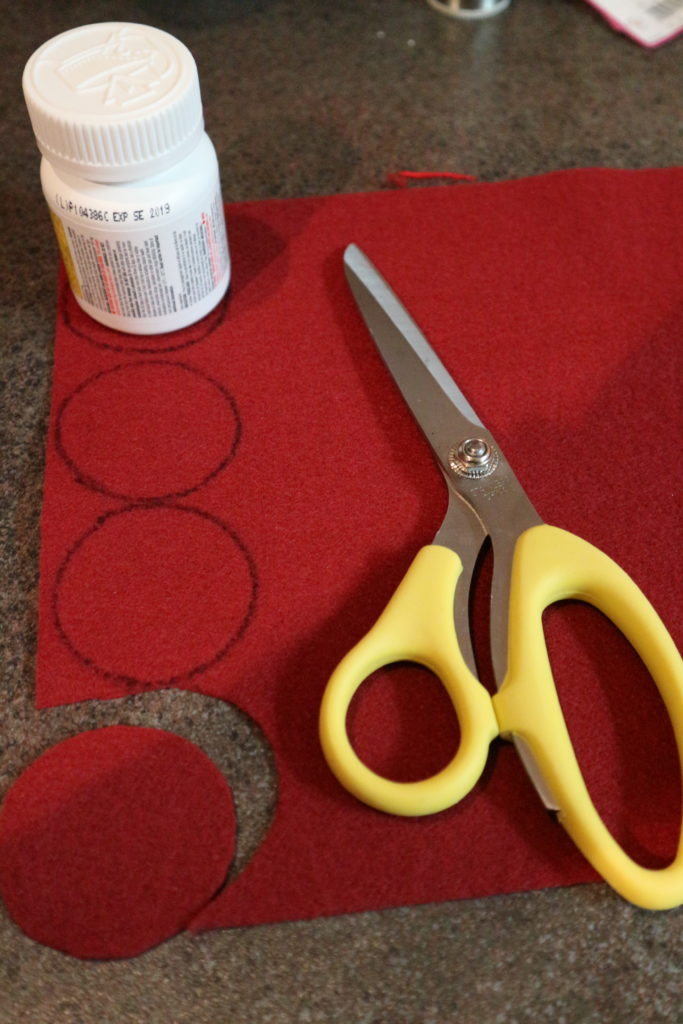
Making the Flower Applique
Sorry there is no pattern made for this. I “eyeball” most of the time instead of using patterns. Sometimes that makes my project a bit crooked but I don’t want it to look like its a perfect cookie cutter project that you can buy at Walmart.
So every project is an original!

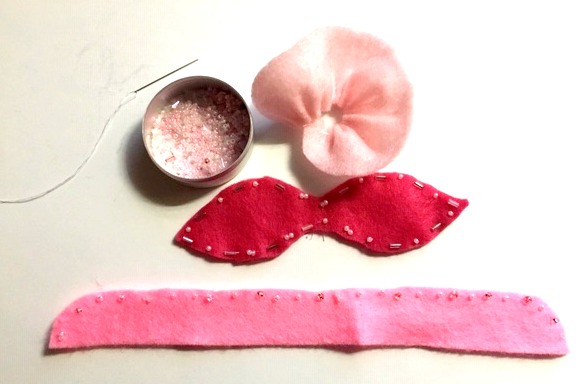
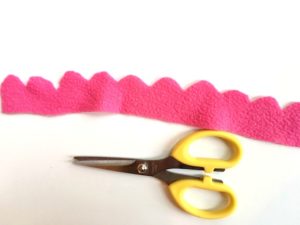
Cut 2 long strips with rounded corners. I used 3 shades of pink. The darkest is for behind the flower and cut into the shape of two leaves. The lightest pink is what I put for the middle of the flower. Cut 3/4 of an inch wide by 9 inches long. The centre pink was 1 1/4 inches by 8 inches. If you would like it to be fuller add another inch or two in the length to this piece.
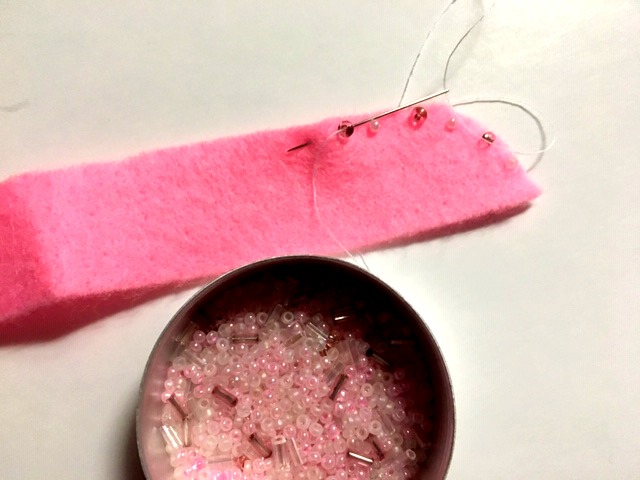
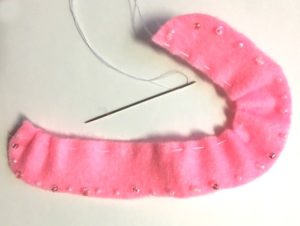
If you are going to add beads to the edges – do it first. Using seed beads add a bead to each stitch as the needle is up on the right side of the felt. Its so easy, we should sew beads onto everything! I added beads to the centre piece and the outside layer but left the middle layer without beads.
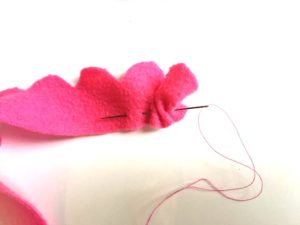
To begin putting the flower together. Slide the needle through the felt with a loose baste stitch. Gently pull the thread at the end to begin gathering.
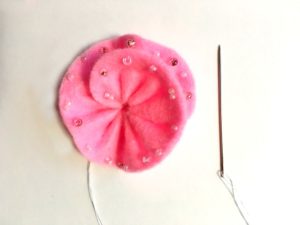
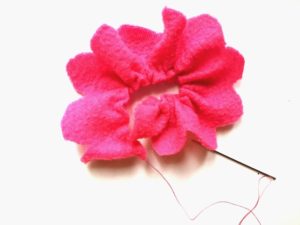
As the final step I put the flower together and sew them in pace. Then attached the entire flower to the sleeve.
 Here is the back side. Now I attached the flower to the cup sleeve.
OR
You could put the flower together by sewing the layers directly onto the sleeve. Which ever makes more sense to you.
TA DA! Don’t you just want to show it off.
Felt is so easy to work with it will get your creative juices flowing! Now that you see how easy it is you will be designing more for a friend who loves dogs and another flower one for the babysitter, the mailman, workmates….spreading them all over the kitchen table like me making more….and more….
…or is it just me who does this?
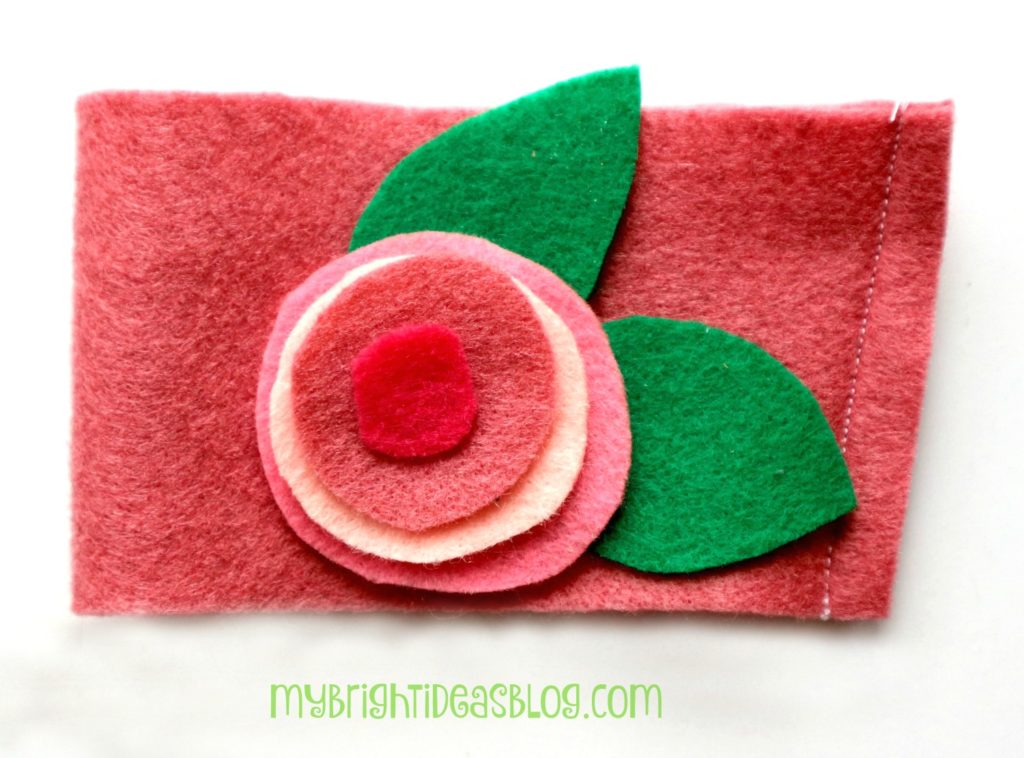
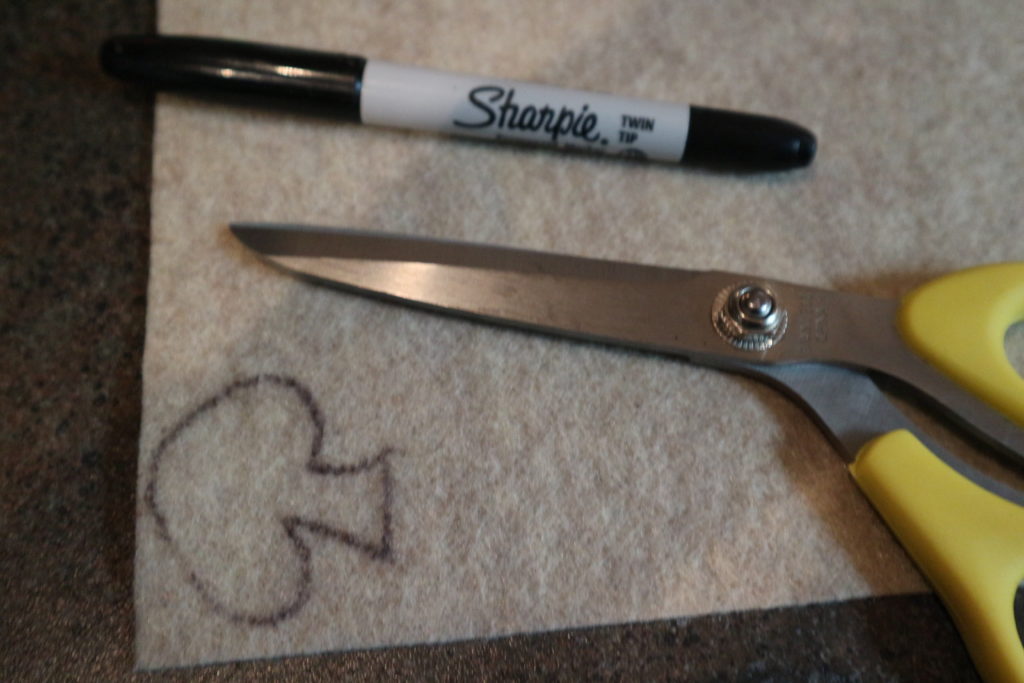
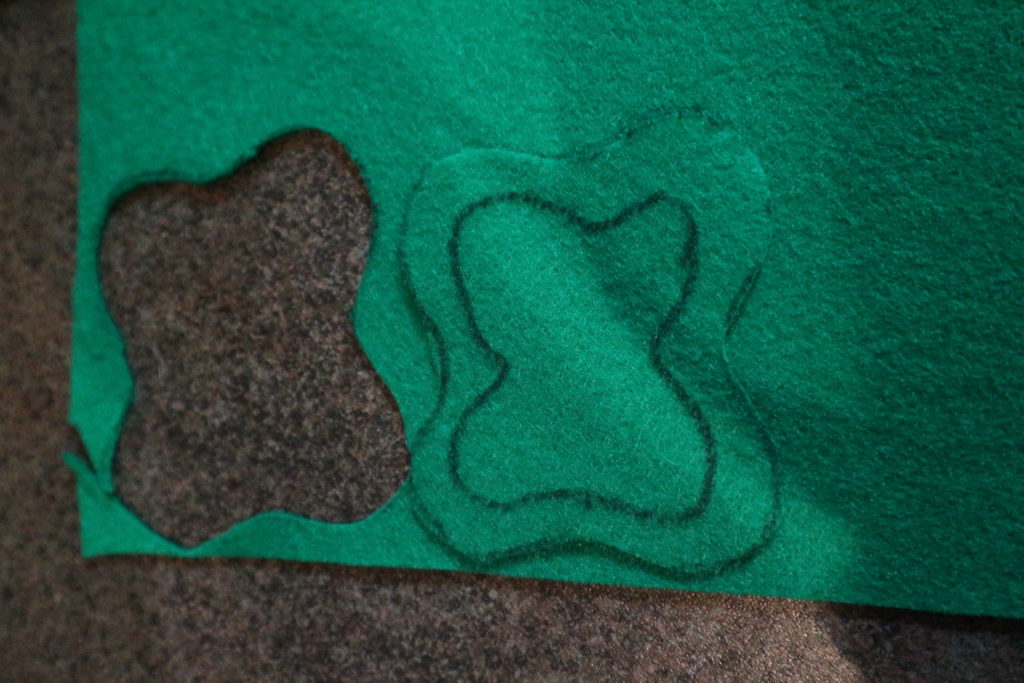
This flower is simply just stacking circles. If you don’t want to sew you could glue it on.
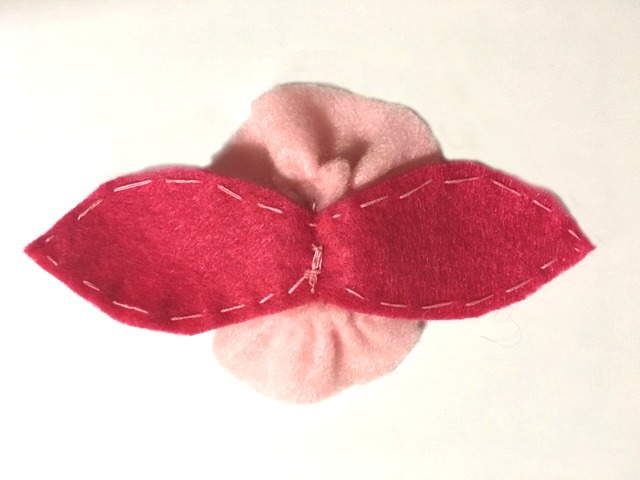
This one is nice for the autumn. I did a few stitches on this seam of this one in green and put a button on as the centre.
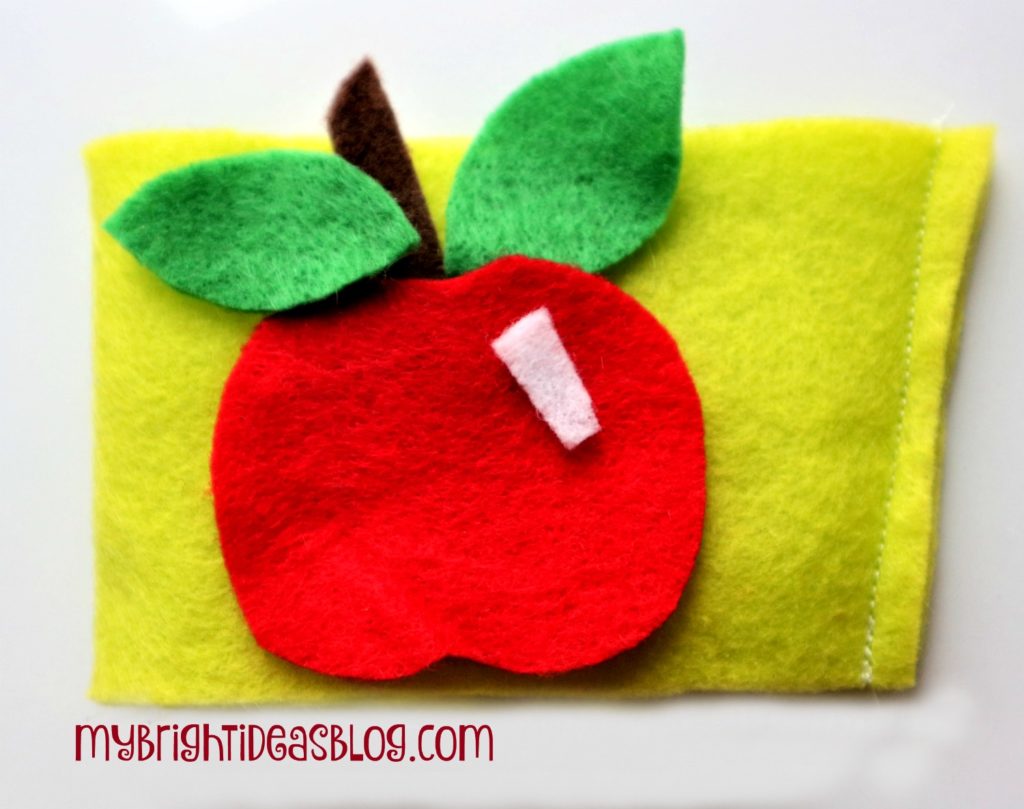
The apple coffee cozy would be great for a teacher gift! If the kids did their own hand sewing I think the teacher would love the personal touch of a child’s efforts to stitch it. Ask your kiddos if their teacher likes coffee and put a gift card with it. I read an article about giving teacher gifts and it is the hand written cards of thanks from the child that really touch their hearts.
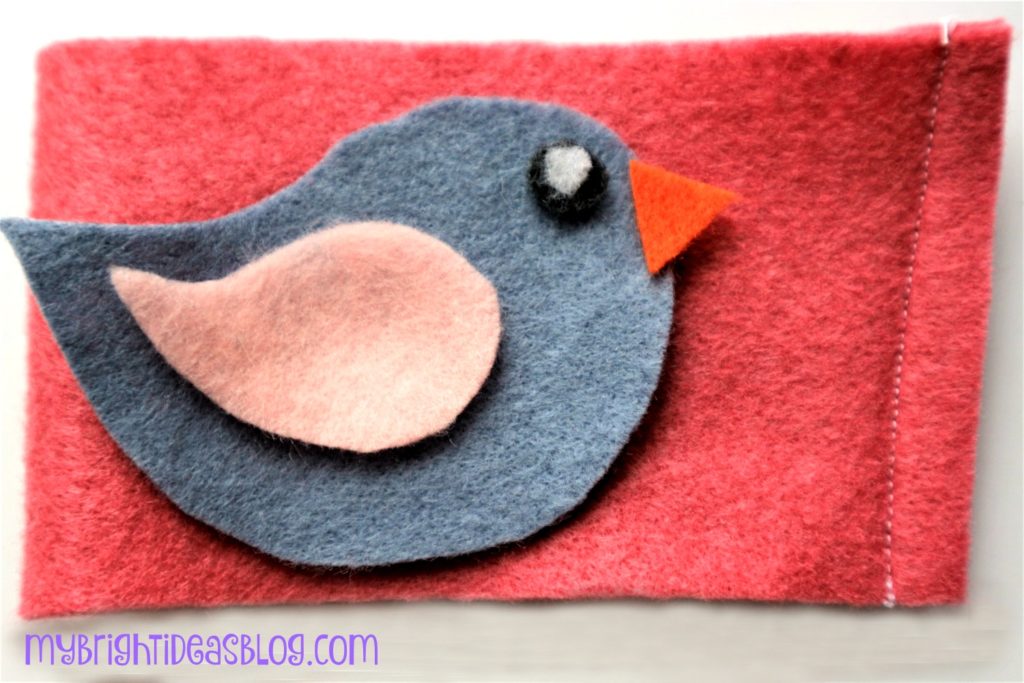
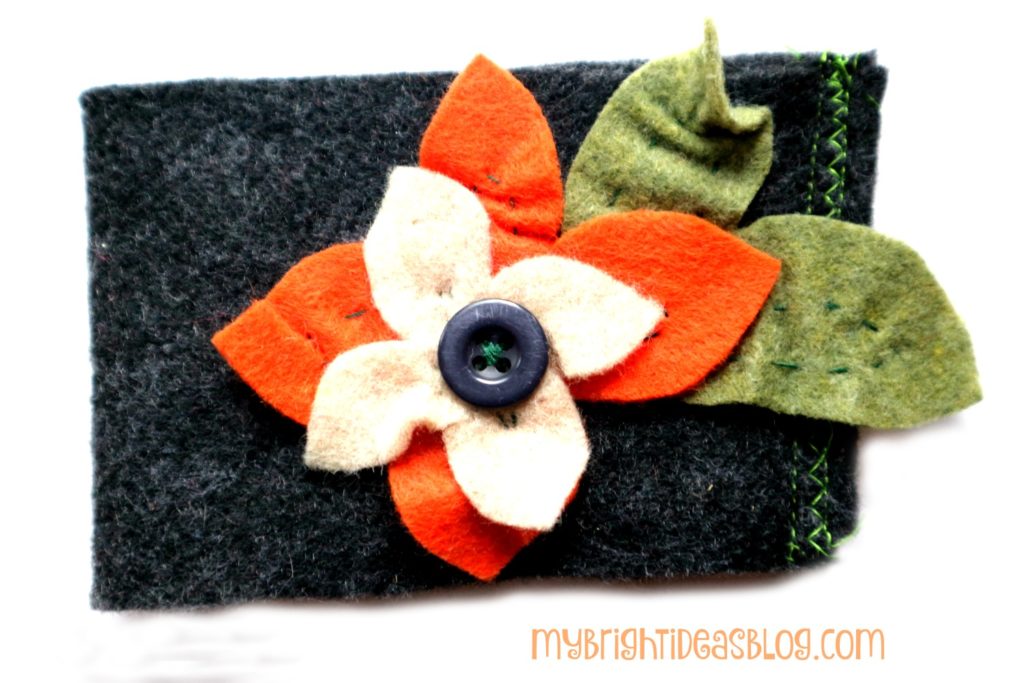
What about a sweet little bird. I had put some birds just like these on the knees of my daughters pants-to cover a hole. I’ll put the link below.
I hope you get a chance to make a coffee cozy! With felt costing around a dollar a piece you could make 3 from one piece and then personalize it with your scrap pieces. Now that is an inexpensive gift!
Felt is so easy to work with. Get your kids learning some hand sewing skills and give gifts they feel proud to give!
Here are a few more projects that we have tried to make with FELT!
Sew a Super Easy to Make Felt Crown – Add to your dress up clothes!
Make a Fleece Tied Blanket – Easy No Sewing
The No Sew Fleece Blanket

My daughter loves dogs so when I saw this fleece at Joann Fabrics-I grabbed it. It’s so cute wish I had gotten more to make a dog pillow or bed.
I prefer my fleece blankets to have a pattern on one side of the blanket and a co-ordinating color on the back. I chose a bright red to be the second color to match this awesome dog fabric.
To make this project you will need:
- fleece fabric in 2 co-ordinating colors. I had mine cut to 55 inches long
- scissors or rotary cutter and mat
- ruler or tape measure
![]()
Fleece fabric often has one side with writing and the other side will be curled. Start by trimming off these rough edges.
![]()
Lay the fabric on the floor-you need a huge workspace. Stack the two layers of fabric on top of each other and make sure it is a perfect match. If one piece is slightly longer, trim it.
When it’s as close to perfect as you can get it, trim off 4 inch squares off of each corner.
![]()
Without moving the fabric, cut the edge of the fleece into strips 1/2 wide, 3 inches long. Cut each strip through both layers of fabric.
![]()
Take the fabric strip from the top layer and the bottom layer and tie them together to make knots. Do this on every single strip. Make sure you match the top to the bottom to catch every single ribbon.
This is a slow process so turn on a movie if you get bored.
![]()
Cutting and knotting is a long and slow process but that is literally all there is to it. It’s so crazy easy to make, the kids could do it.
This girl loves her furry siblings so much! Look at these pooches, the feelings are definitely mutual!


Gemma is always up for a photo shoot for momma’s blog posts.
Now you have a cozy blanket to take in the car, campfire, couch, bed, deck chair or beach….you should have a few of these as the weather gets chilly.
![]()
Thanks for visiting my website! I’d love it if you would Pin this on Pinterest or share it with your Facebook friends or other social media.
See you again soon!
More cozy fleece projects below!
Easy to Make Fleece Hat with Flowers – Simple Sewing Project
Sew a Super Easy Fleece Poncho-Simple Starter Sewing Project
Easy to Make Fleece Hat with Flowers – Simple Sewing Project

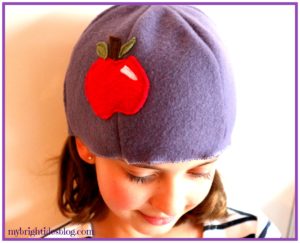
This fleece hat project is so easy and fast! You’ll have a new winter hat done in 20 minutes. Then I will show you how to make a simple flower applique. The weather is getting chilly now so this is just the thing to make for yourself or a gift for someone else.
You will need:
- a small amount of polar fleece fabric (10 x 26 inches )
- scraps of fleece from other projects in co-ordinating colors (1-2 inch wide x 12 inches long)
- sewing machine
- scissors
- needle and thread
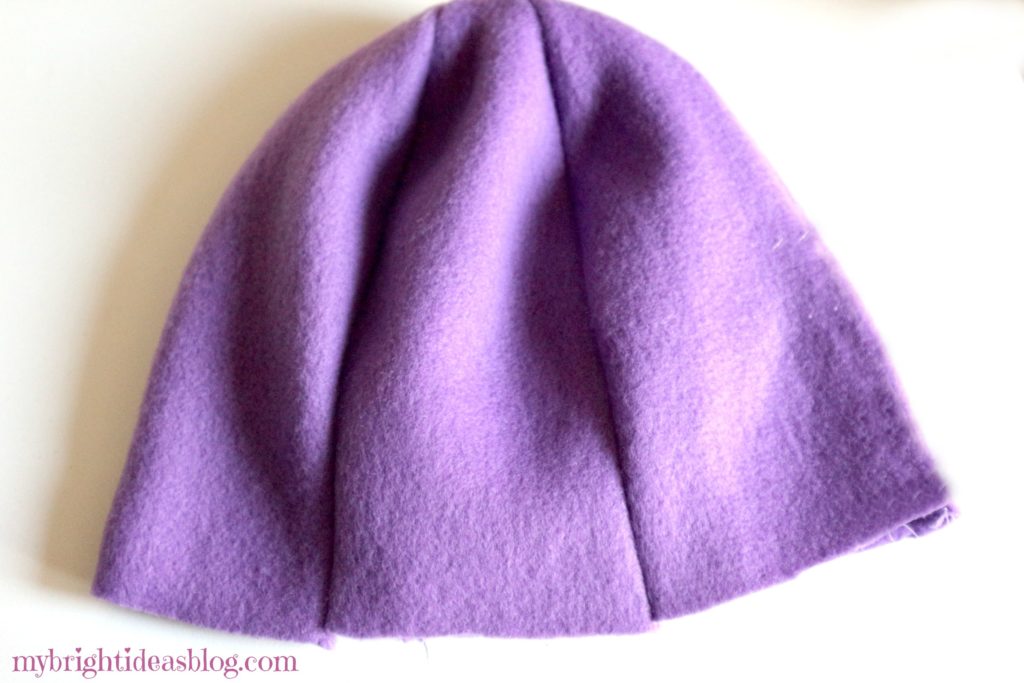
This hat is made up of 6 long triangle panels.
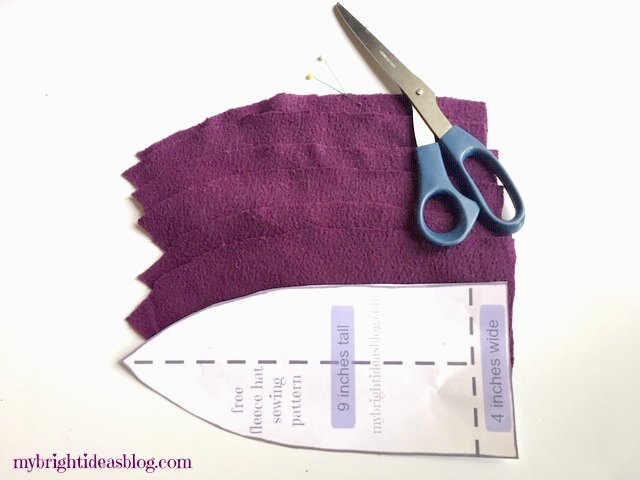
Cut 6 identical pieces from the template below out of fleece.
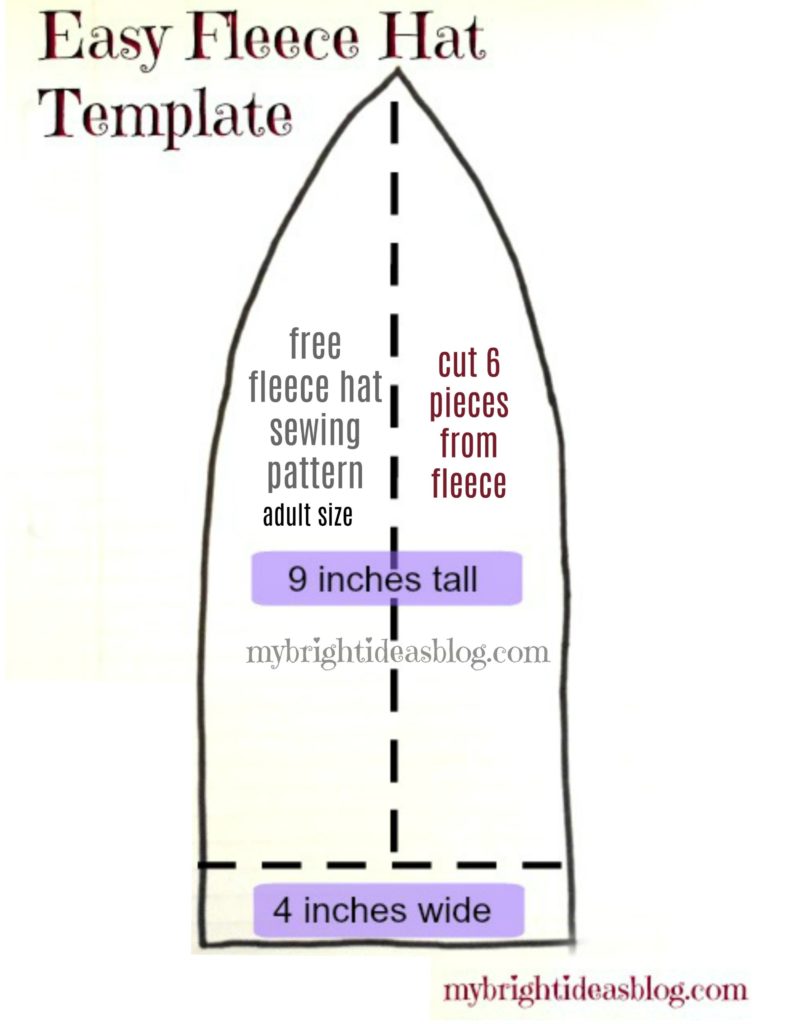
Right click on the photo above and save to your computer. This should print out to the right size on regular 8.5 x 11 computer paper.
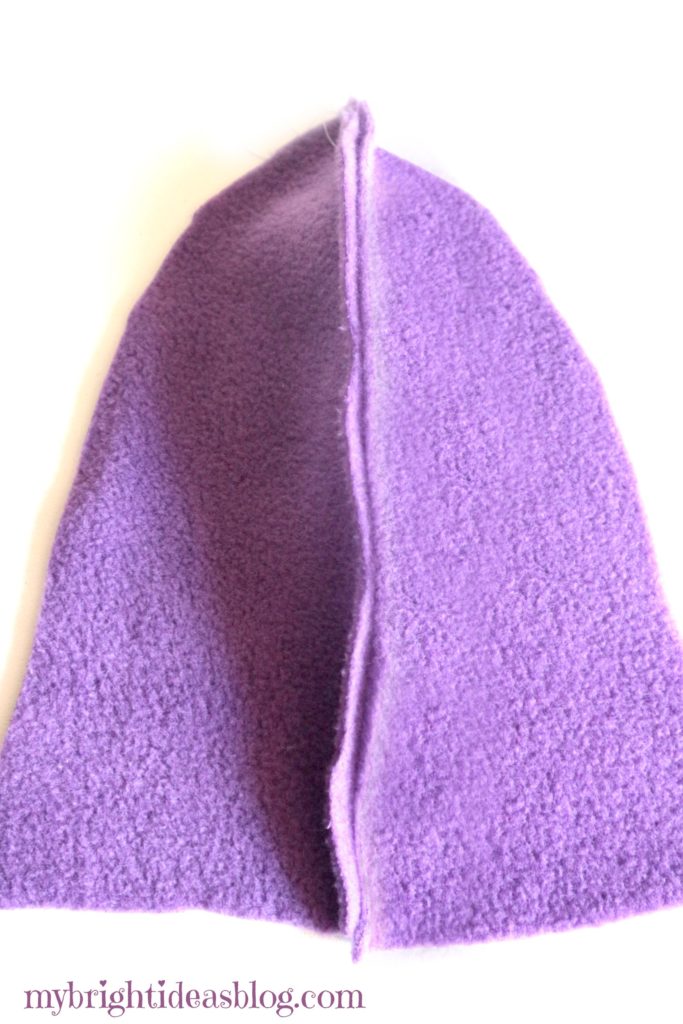
Sew the first 2 pieces together (with right sides together).
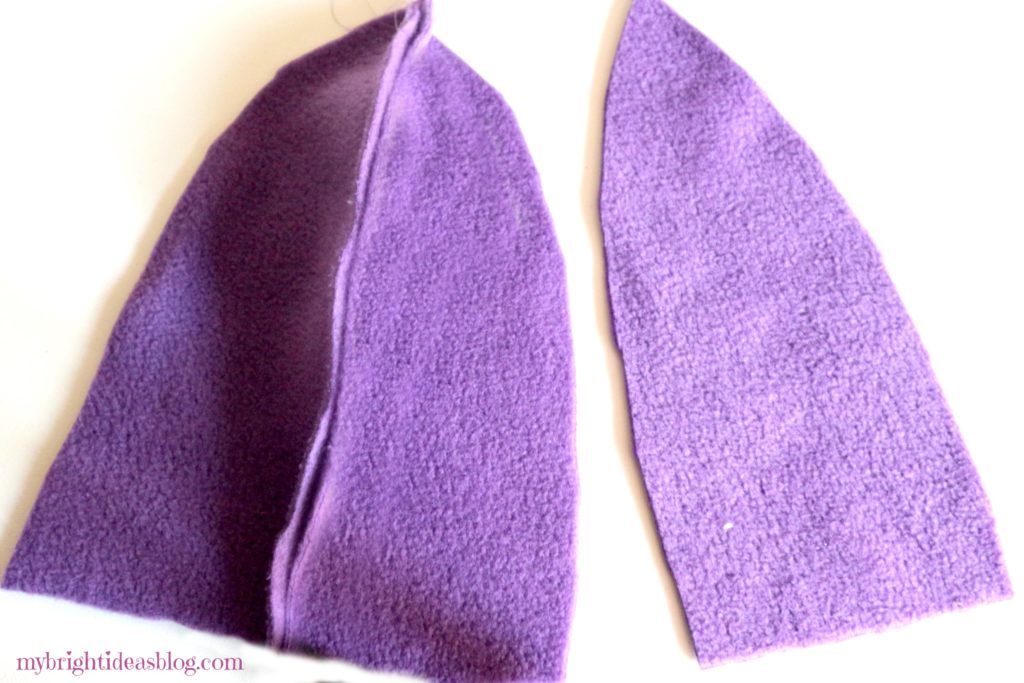
Pin the third section of the hat in place next to the first two pieces and sew it. After the three pieces are sewn together set this aside.
Repeat these steps with the other 3 sections.
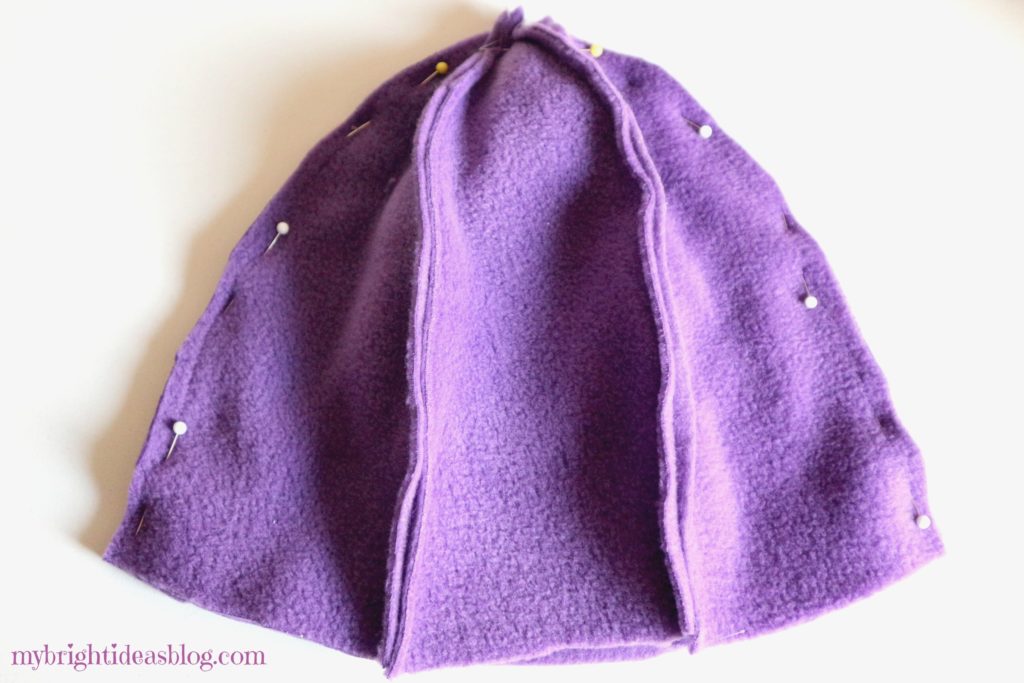
With the right sides together, pin these two halves together. Sew all the way around the top.
Turn the hat inside out and try it on. Determine how wide the hem should be. If the hat seems too long for you, simply cut 1/2 an inch off the hem and try it on again. Fold the bottom inwards to hem and pin in place.
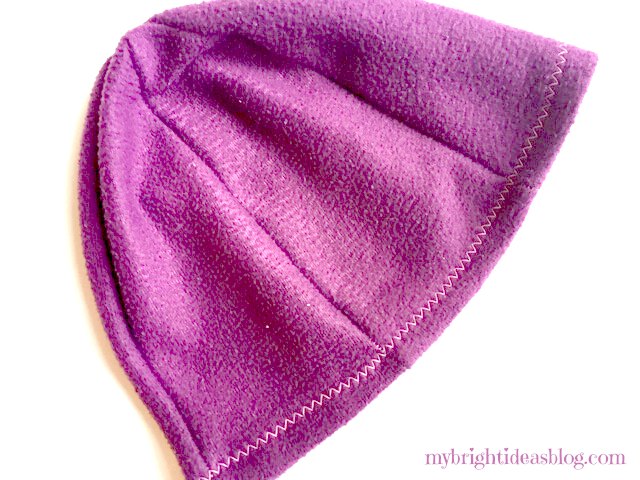
On this hat we folded the bottom over 1/2 inch and did a zig zag stitch all the way around. When your fold is wide, your zig zag hem lays flat. As the photo above shows.

On these three photos of my daughter wearing different hats – the hem was shorter so the zig zag stitch was closer to the edge and it did look quite wavy. I like both ways.
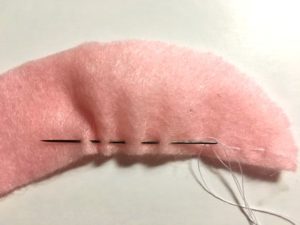
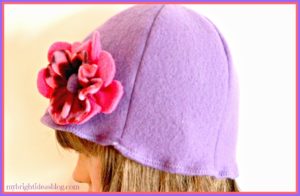
The Flower Applique
We cut a strip of fleece 1 and 1/2 inches wide by 12 inches long. Then carefully cut a rounded pattern to make the flower petals.
Thread a needle with a knotted length of thread and begin to do a loose baste stitch across the bottom of the petal strip of fleece.
Gently pull the thread to gather the pleats. Set this part of the flower aside for now.
Cut another length of fabric 1 inch by 12 inches long. This will be an inner layer of petals so its a bit shorter than the first. Baste this as we did with the previous flower petal section. Pull the thread to gather the fabric and set this aside too.

For the centre of the flower cut a circle 2 inches in diameter. I traced the vitamin bottle to make the circle. Baste around the circle and pull the thread to gather the edges. When it’s pull closed put a few stitches to keep it tight.
Adding the Flower Applique to the Hat
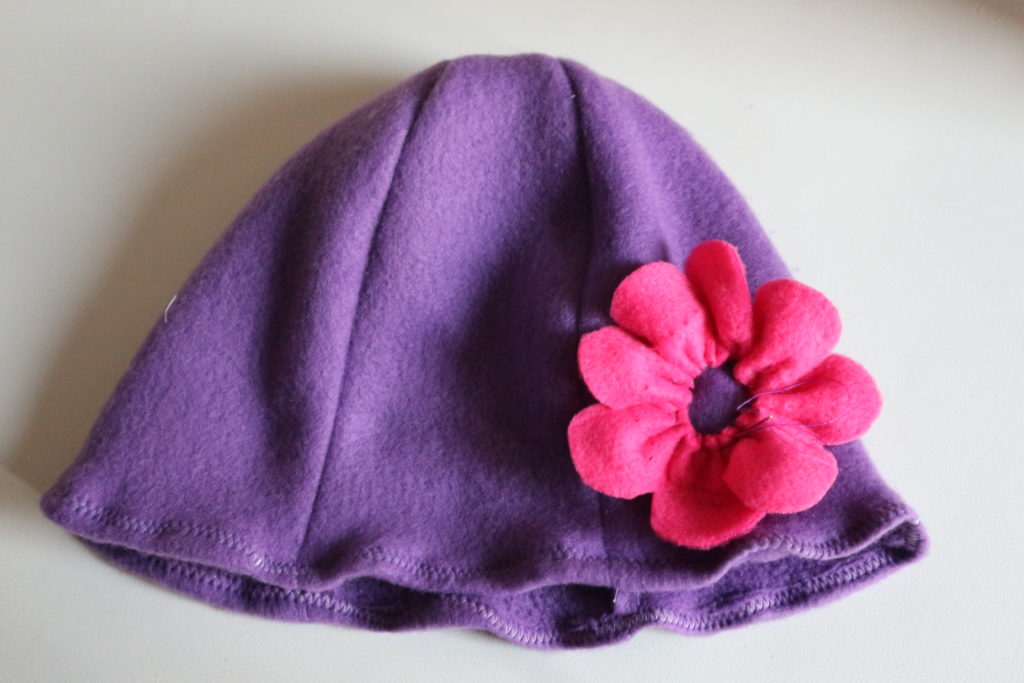
Attach the pink petals to the hat with a few stitches. As you sew this on you can adjust the petals to the desired size of the flower. Next add the inner layer of flower petals into place and stitch that into place. Lastly, sew in the centre piece, with the gathered part facing the hat. Secure this and your hat is done!
I hope you get a chance to try this easy sewing project. I’m working on making pattern sizes for children and babies. I hope to add these to the post too.
Pin or share this with your favorite social media!

Sew a Super Easy Fleece Poncho-Simple Starter Sewing Project

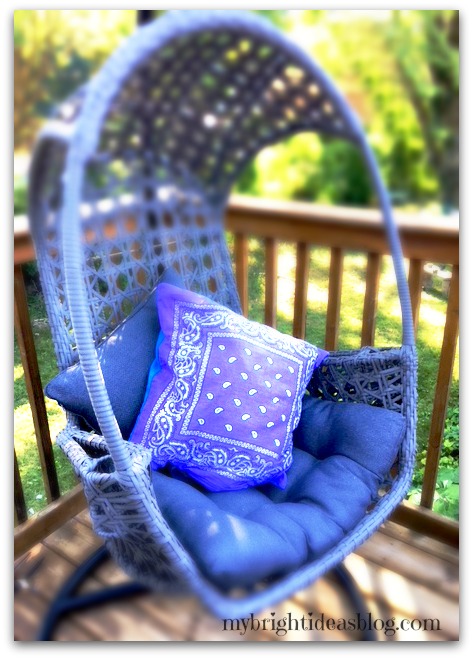
Make an Easy Bandana Pillow

So a month or two ago I purchased way too many bandanas. Since then I’ve been looking for ideas to use some of them in projects. Today I’ll show you how to use 2 more! Let’s make a pillow for the bed, couch, or dog.
This is the beautiful Gemma. She is our 2 year old Yorkiepoo (Yorkshire Terrier mixed with Poodle). She loves to share my chair when I’m using the computer. Gemma stays up as late as I do and then sleeps in behind the bend in my legs. She is quite yappy to the squirrels but she is a dream dog at home. One of her favorite places to nap is in her crate. So let’s make her a new pillow.
You will need:
- 2 bandanas/handkerchiefs the same color or complimentary colors
- sewing machine
- needle and thread
- pins
- pillow or stuffing
With right sides together, match up the corners and pin them. They don’t make handkerchief/bandanas all the exact same size. So don’t get frustrated. When you sew them together you will be able to correct their wonky sides.
See what I mean. The purple one is not cut straight or is slightly bigger, so it’s sticking out. Sewing them together with a straight line will disguise the mismatch.
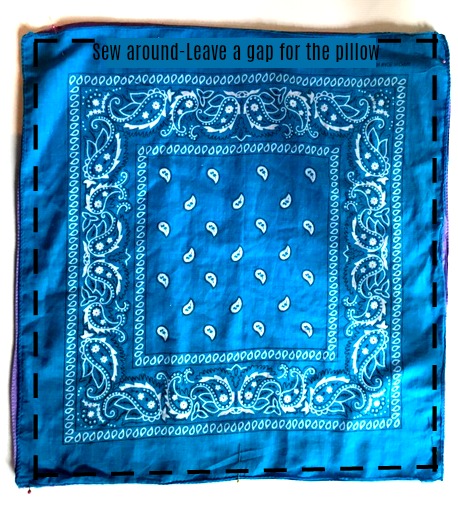
Sew almost all the way around leaving a wide gap on one side.
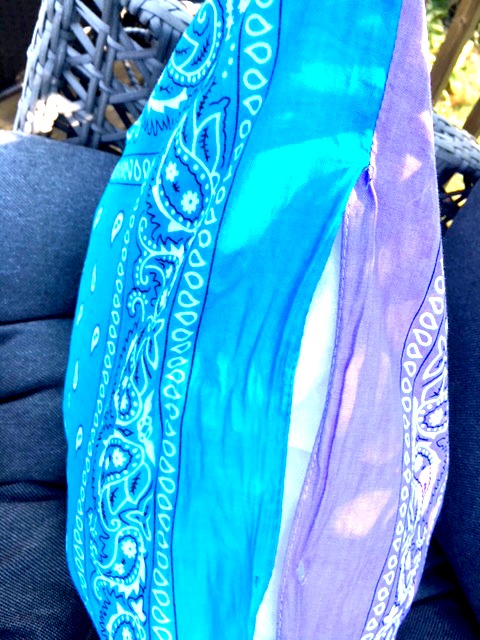
Turn the pillow case inside out and insert the pillow. Since this will be used for Gemma’s crate I didn’t buy a new pillow form. Instead, I used a cheap, old limp bedroom pillow that was wasn’t very fluffy anymore. It easily fit into this pillow case.
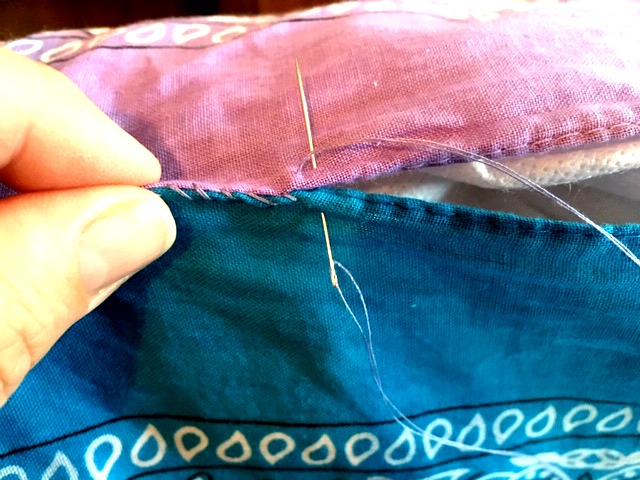
Next, take your needle and thread and hand sew this opening closed.
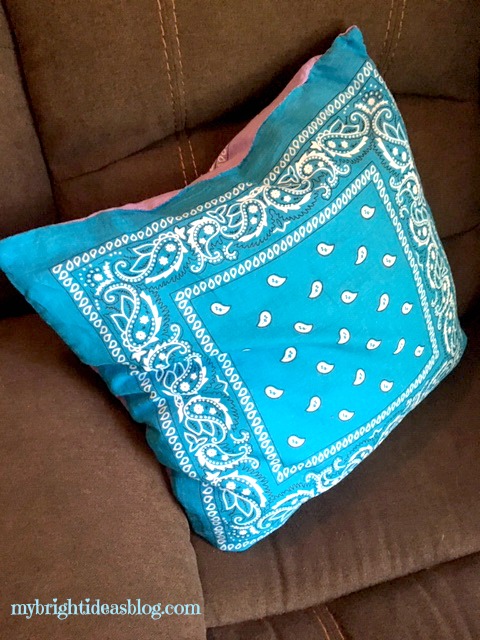
You could use this on the couch, on a bed, outdoor furniture, in the car or……
…..for your sweet puppy dog.

Thanks to Gemma for being a gorgeous model for this little photo shoot.
Feel free to comment with suggestions for what to do with the other 15 bandanas I still have left over. Did you see the Fall table cloth I made last month? Have a look.


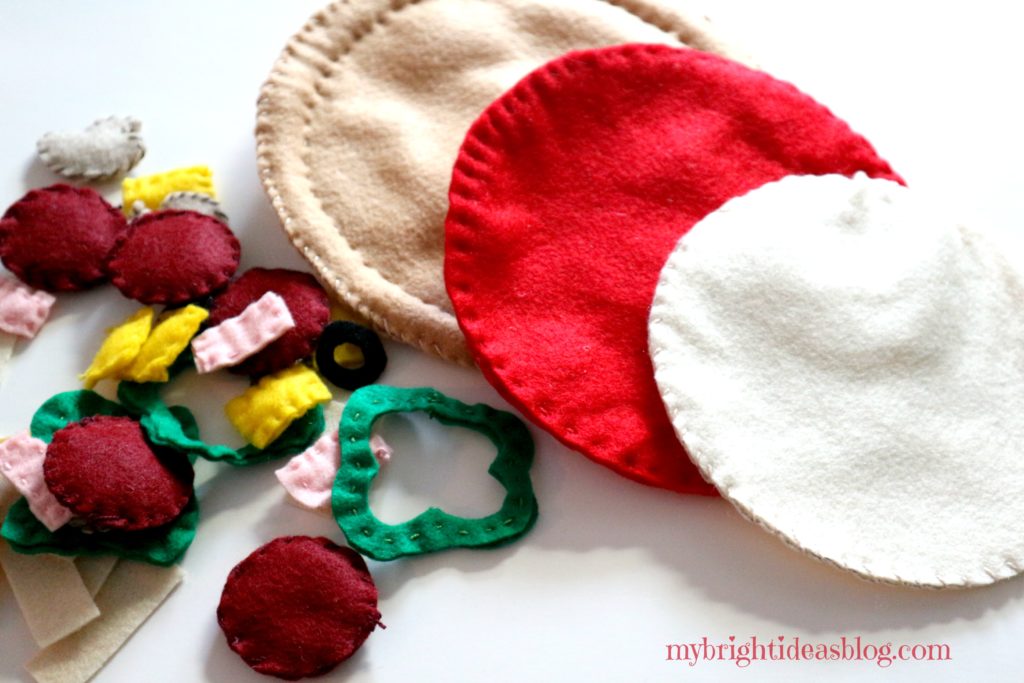
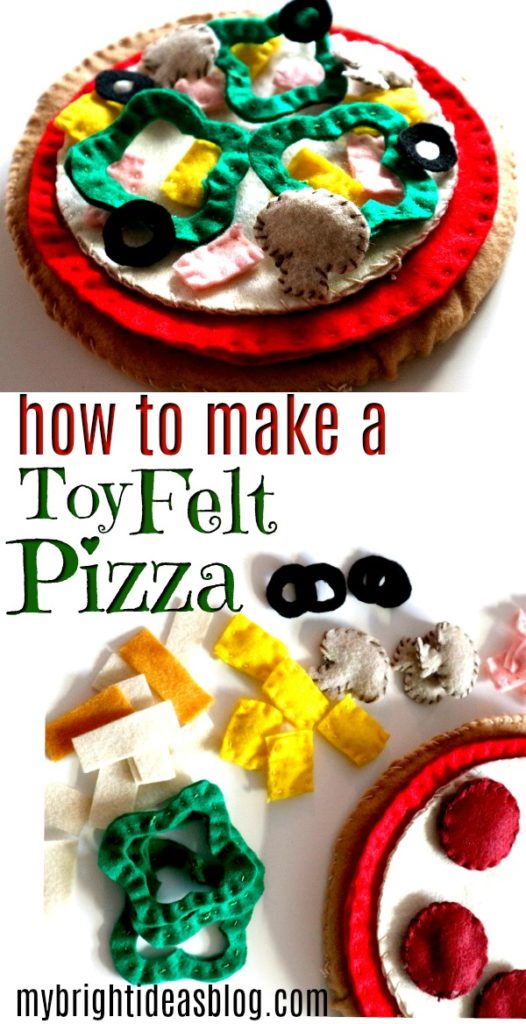
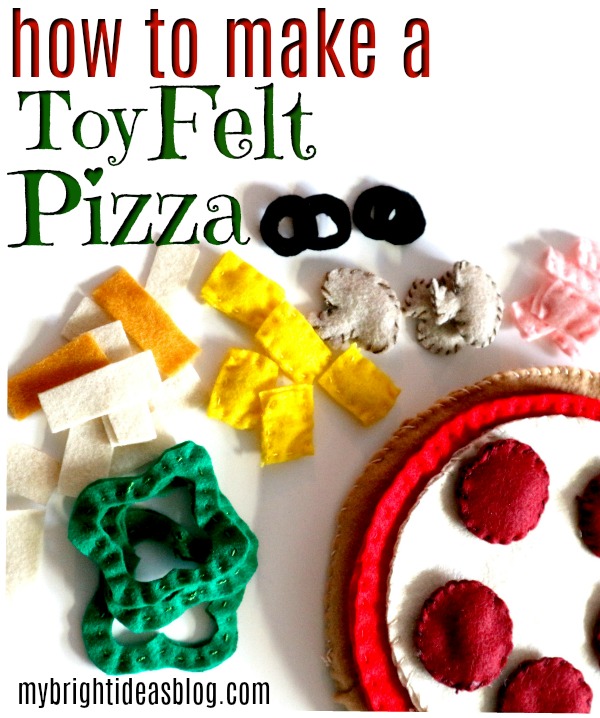
Cloth Pizza Toy Made From Felt
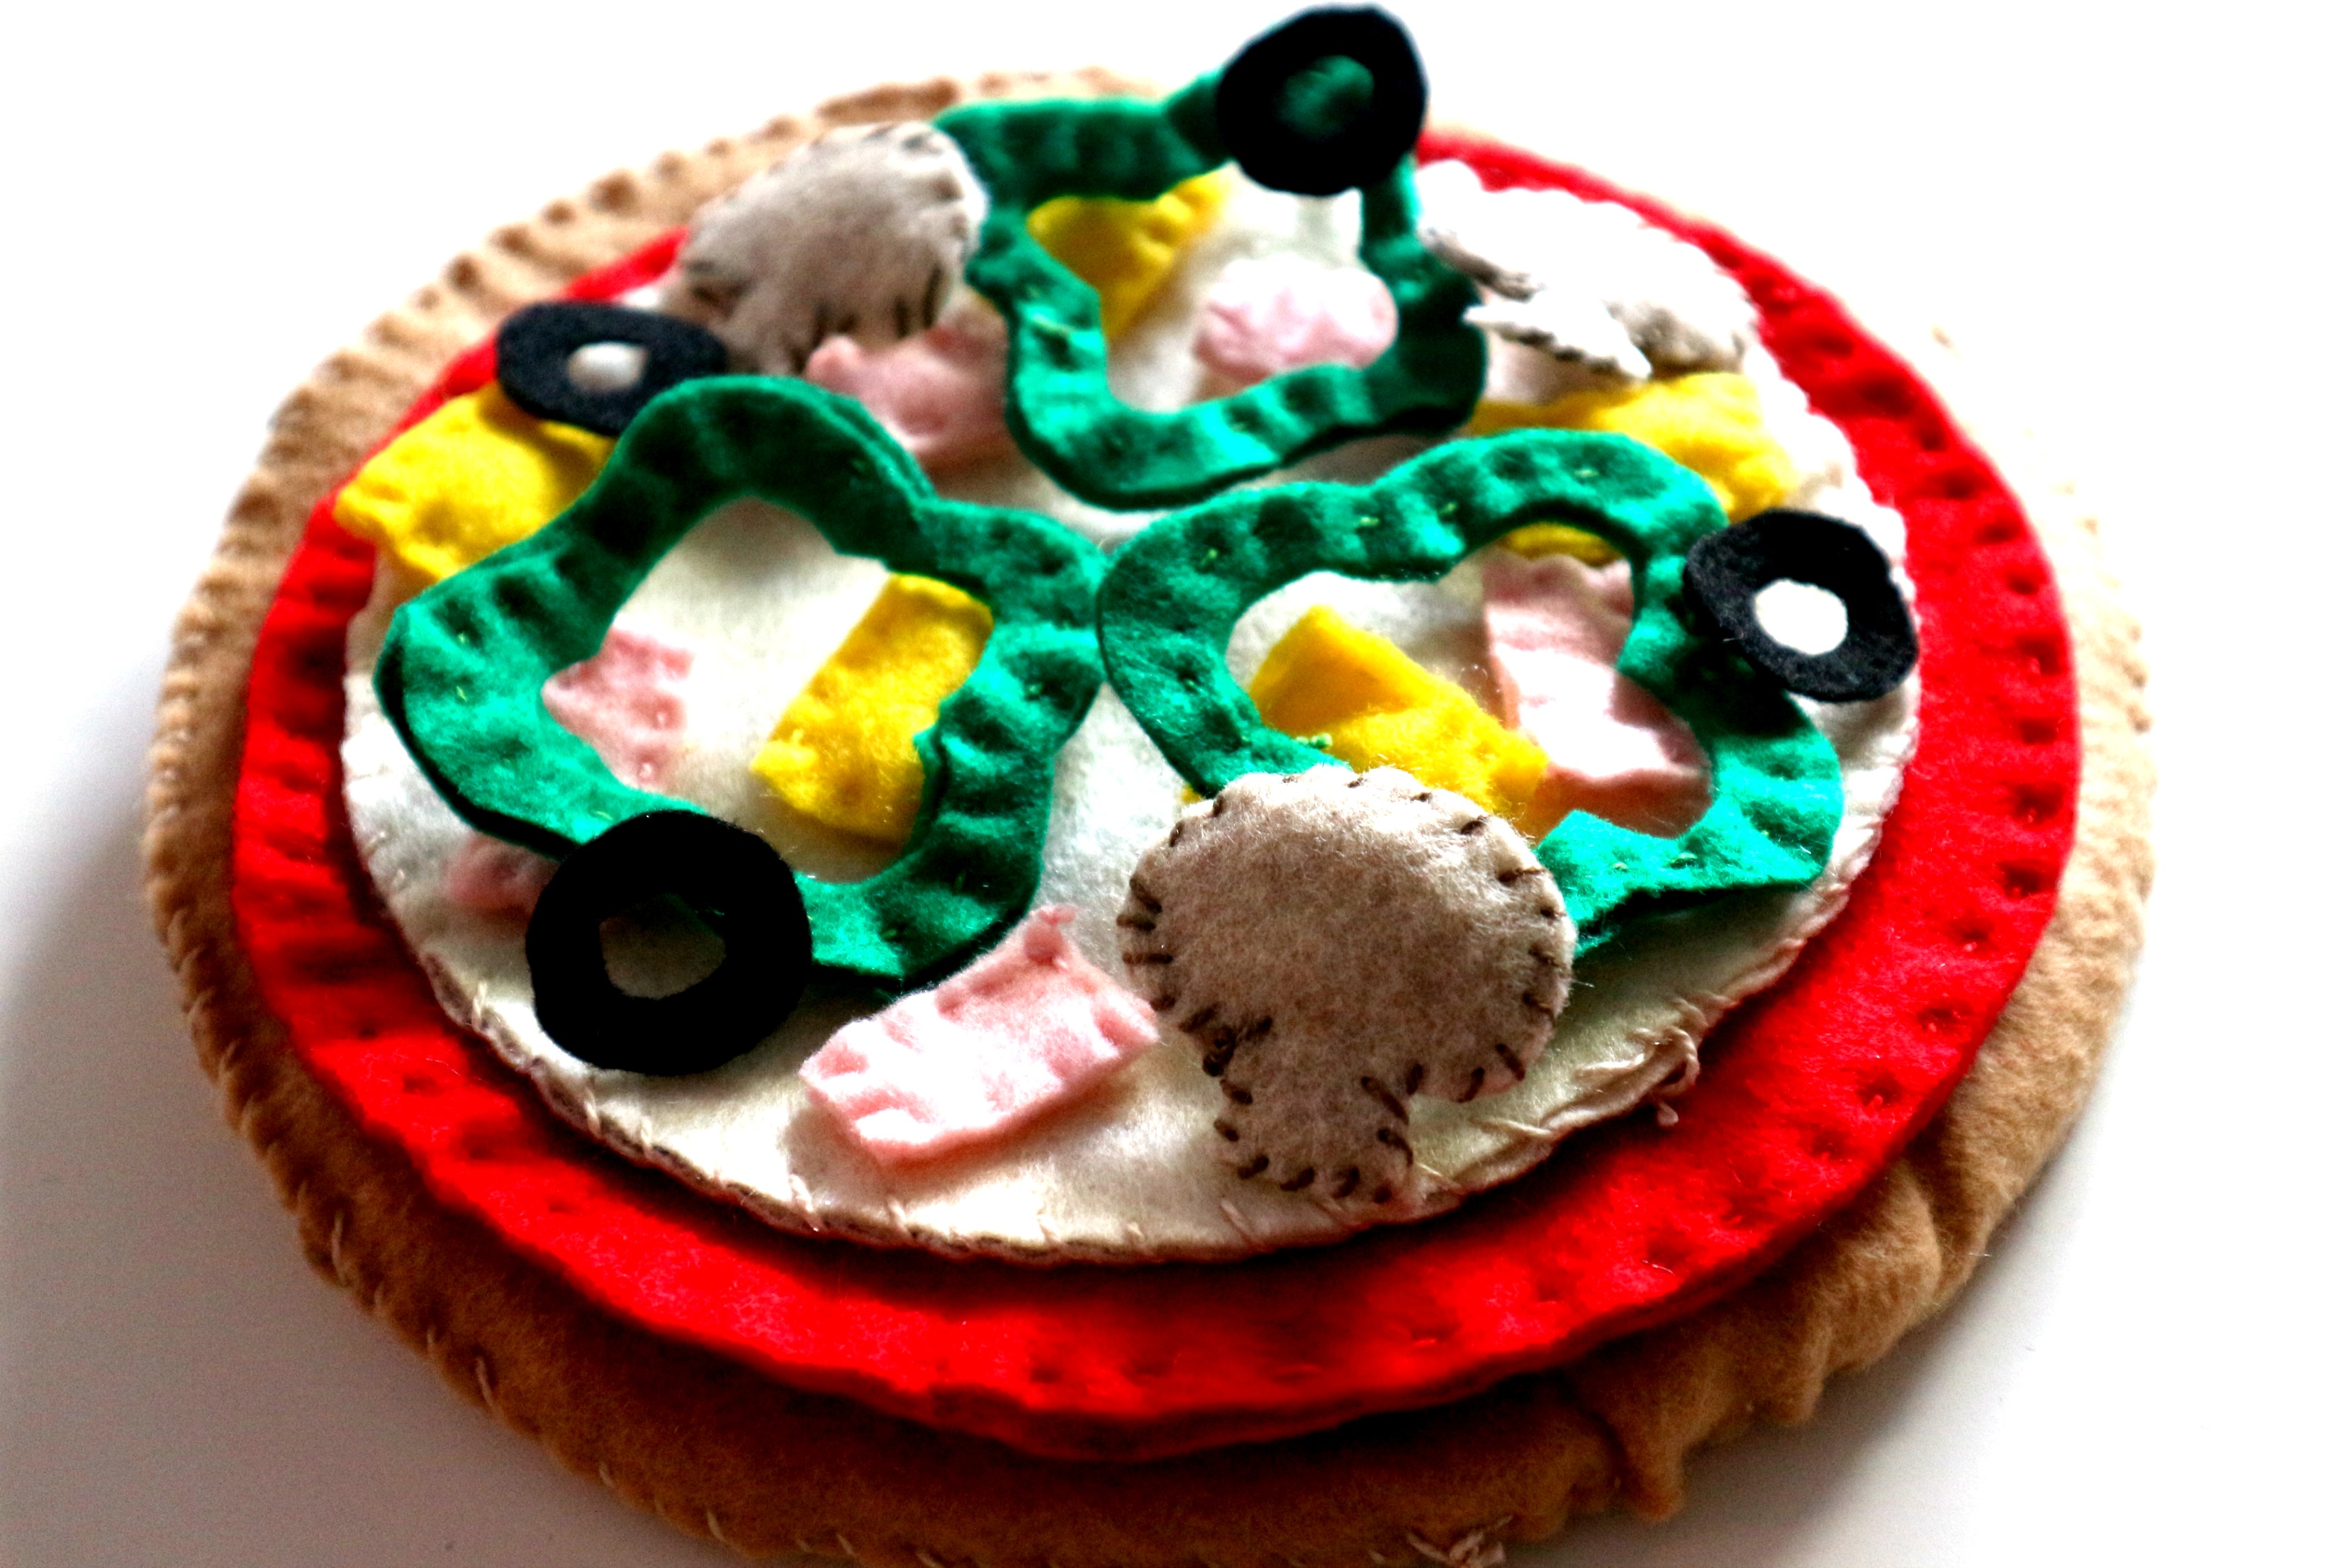
Kids love Pizza! Kids love to imitate their parents in the kitchen! Kids will love to play with this felt pizza.
This pizza toy/felt project can be made in 20 minutes with just scissors and felt or you can spend a few hours if you want to do a bit of hand sewing and add some stuffing.
You will need felt in the following colours:
- 2 tan/light brown for the crust
- 2 red for pizza sauce
- 2 white/cream for mozzarella cheese
- 1 dark red for pepperoni
- 1 green for peppers
- 1 grey for mushrooms
- 1 pink for ham
- 1 black for olives
- 1 yellow for pineapple
- 1 orange for extra cheese
You will also need:
- bowls and plates to trace for big circles
- sewing needle
- embroidery floss (or thread)
- quilt batting or stuffing
Let’s Get This Pizza Party Started!
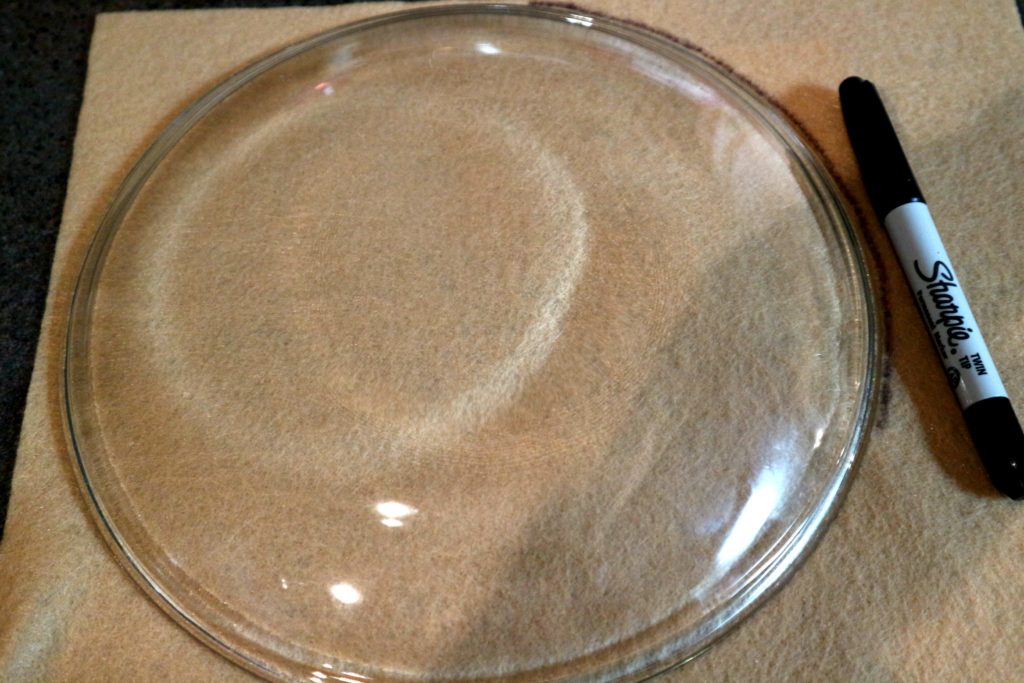
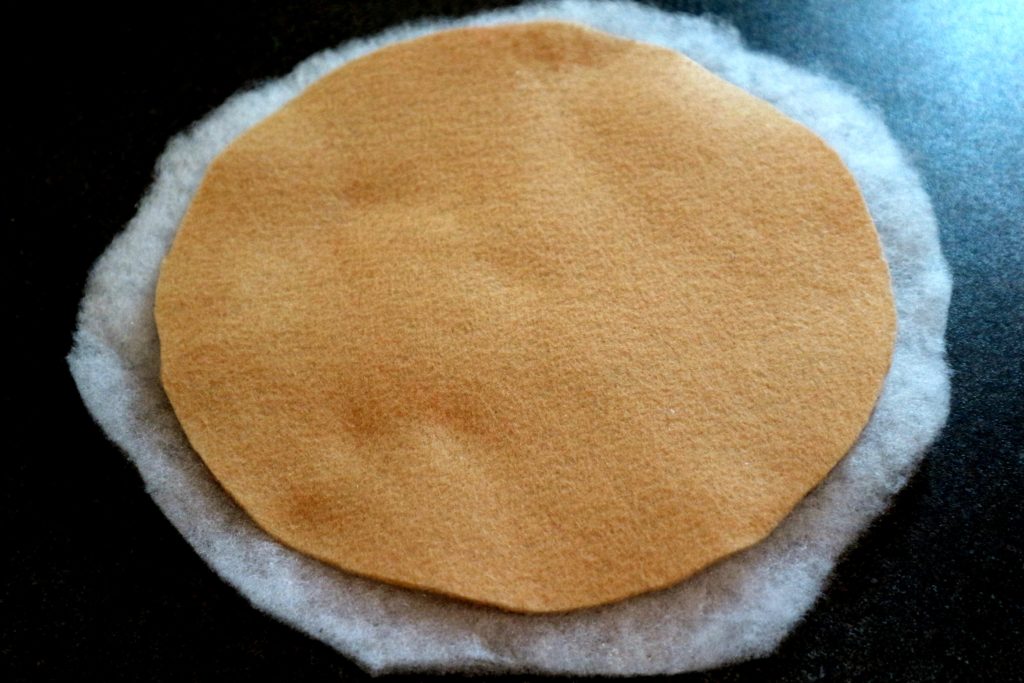
Beige Piece of Felt – Pizza Crust: Trace a large bowl or plate for your crust. Cut 2.
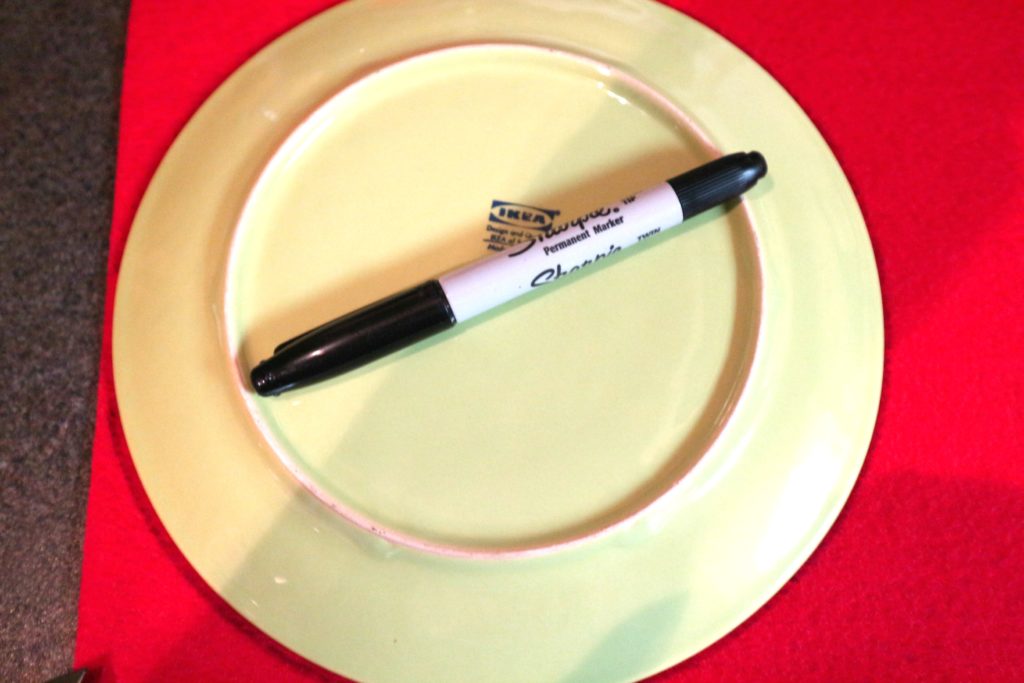
Piece of Bright Red Felt – Pizza Sauce: Using a plate or bowl slightly smaller than the last one, cut a slightly smaller circle than the crust pieces. Cut 2 red circles.
Cream or White Piece of Felt – Mozzerella Cheese: Cut the cheese…tee hee…out of a piece of white felt. Trace a slightly smaller plate or bowl than the piece of pizza sauce red felt. Cut 2 white circles.
Dark Red Piece of Felt – Pepperoni: Cut 12 circles tracing something small like a vitamin bottle.
Grey/Beige piece of Felt – Mushrooms: Draw a mushroom shape and cut it out. Cut 10 mushrooms.
Green Piece of Felt – Peppers – It looks like a wiggly square, then outline it again and cut it out. Cut 8 peppers.
The rest of the toppings are up to you….
Black Felt – Olives: Cut a small circle and trace it a second time. Cut 8 olives.
Orange and White Felt – Grated Cheese: Cut long rectangles for some shredded cheese on top. Cut 6 of each.
Pink Felt Squares – Ham: Cut into squares-10 pink ham squares will be enough.
Orange/Yellow – Pineapple: This begins a great debate about whether you should have pineapple on a pizza. I’m for it! Hawaiian Pizza is my favorite. If you feel the same cut 10 pineapple pieces.
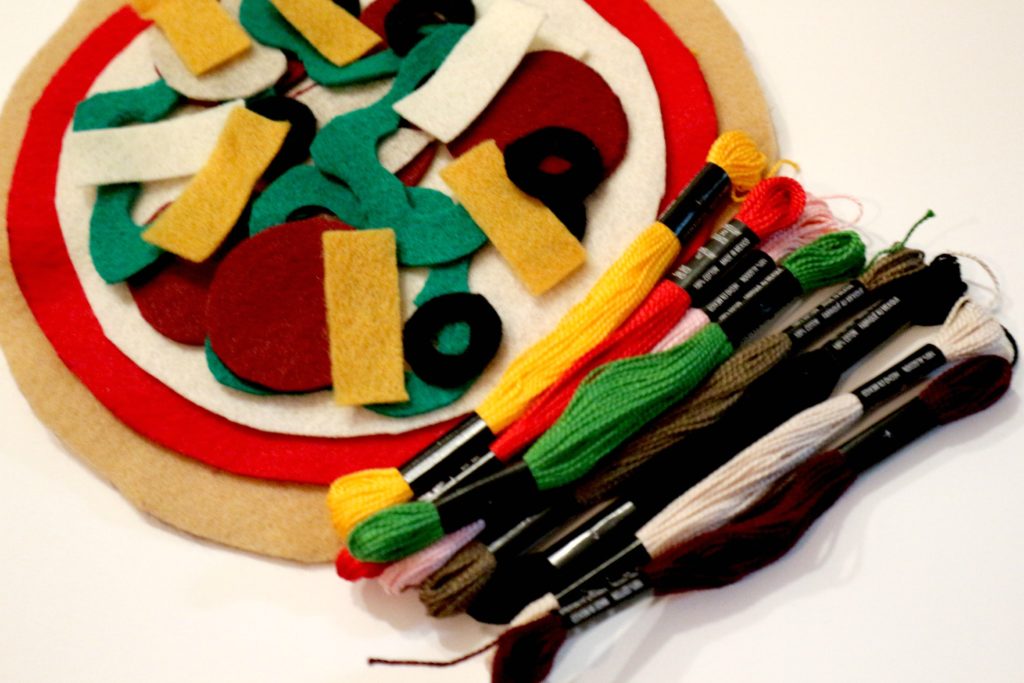
You aren’t a sewer? Then you could stop now and you can use this as a toy as it is. If you want to make it more 3 dimensional, find colors of embroidery floss that will closely match the colors of the felt.
Finishing the Pizza with Hand Sewing
Finish the pizza crust: Cut a piece of cotton batting an inch larger than the pieces of beige felt. Sandwich the batting between the two pieces of beige felt.
Hand sew around the outside folding and tucking the excess inside the pieces of fabric. I think I used a whip stitch but you could also do a blanket stitch for this part.
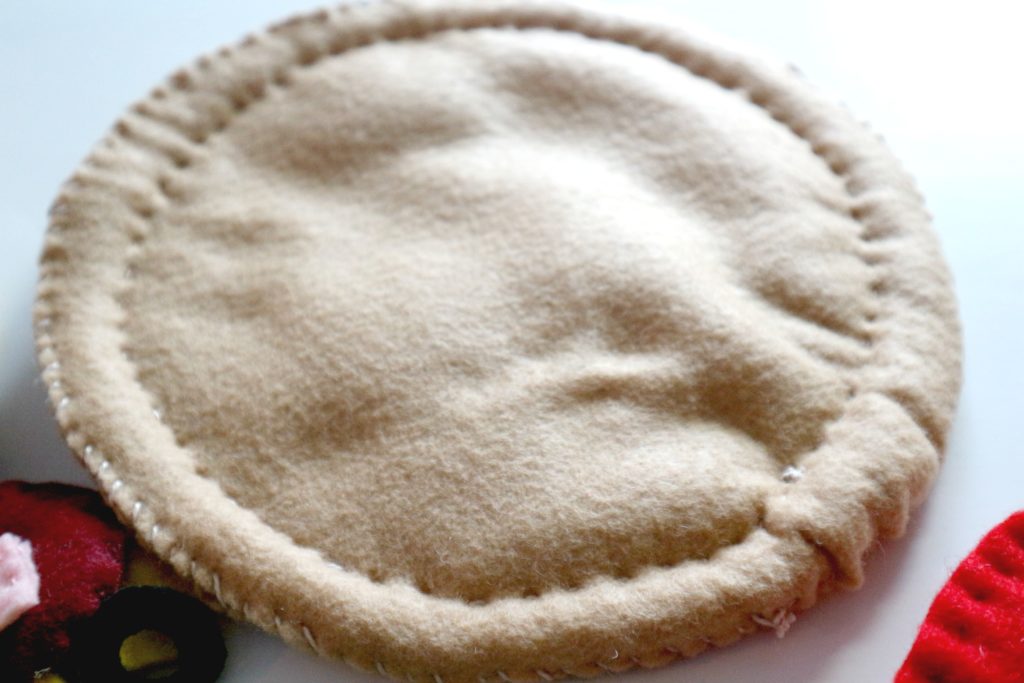
Sew around again an inch inside the seam to create the edge of the crust. For this I used a running stitch.
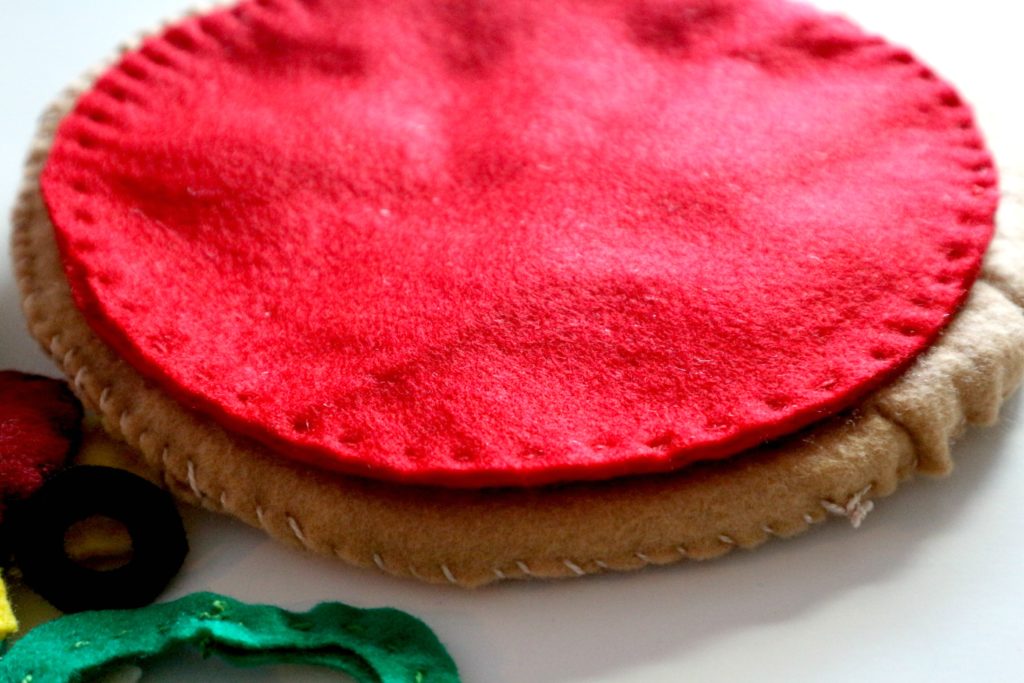
Stack the 2 pieces of red and sew around the edge with a running stich.
Next, put the two white pieces of mozzarella cheese pieces together and sew around the edge. Stitch each of the toppings together.
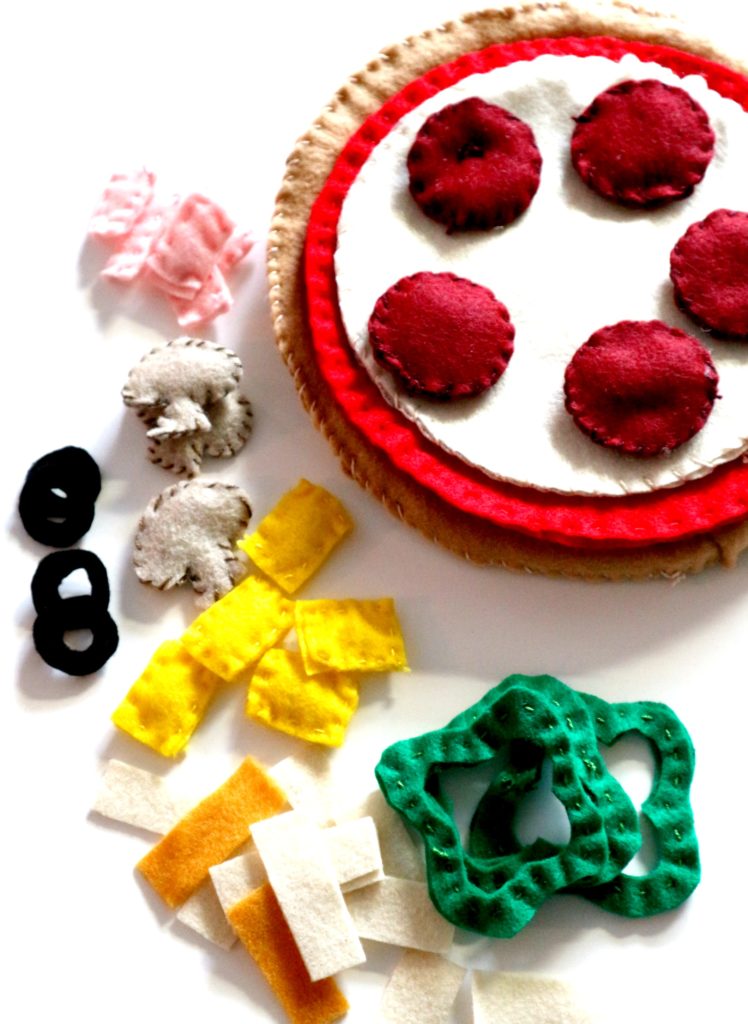
When sewing the pepperoni I added a little stuffing. The rest… mushrooms, ham, green peppers, pineapple were all sewn together….the olives and shredded cheese pieces I left as a single layer but you could double it and sew them together.
That’s all there is to it!
Store your pizza pieces in a large ziplock bag so you don’t lose the pieces. Have fun making this project for a little one in your life.
Here is the link to my previous post to make a no sew felt pizza.

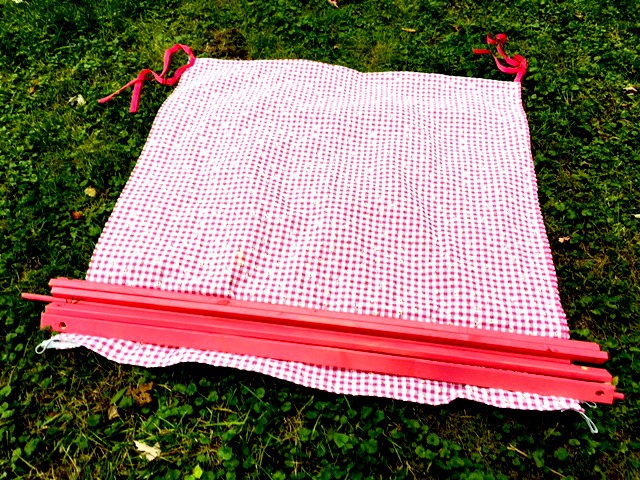
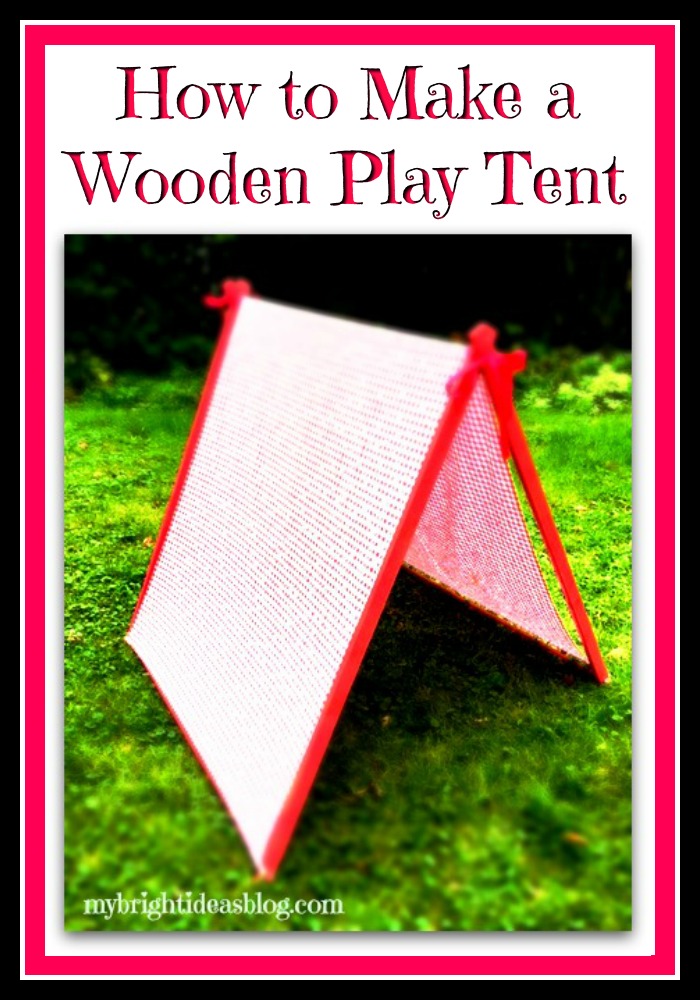
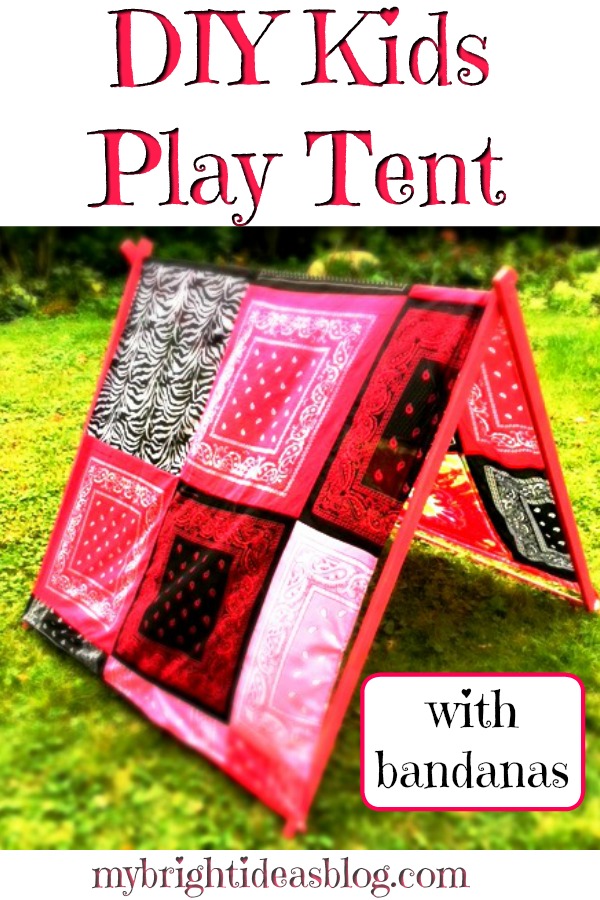
Make a Wooden Play Tent for the Kids!
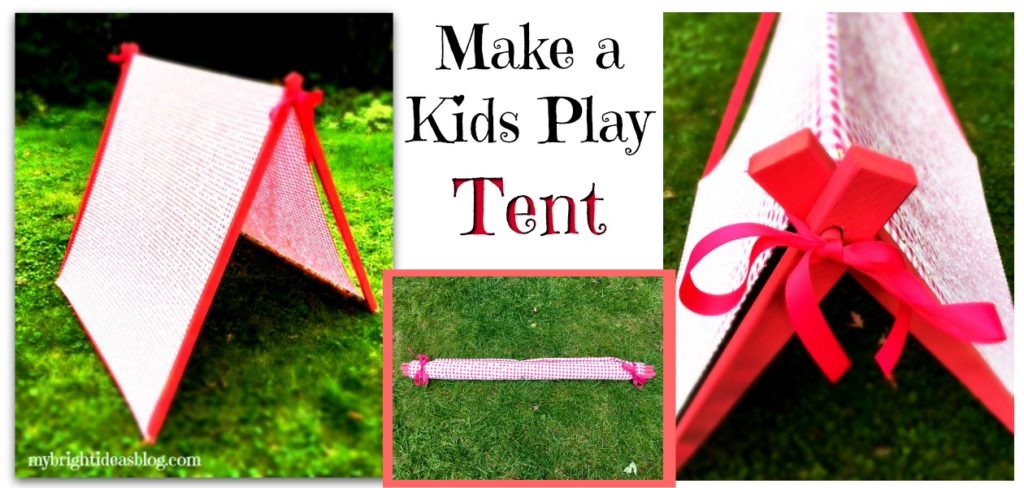
Here is a tutorial for a DIY Kids Play Tent! This won’t take much time or money to build. It would be an easy woodworking and sewing project for kids to help with. Why did I wait so long to make this!?!? The kids love it!
My daughters have always loved building tents. It’s fun for kids to steal the cushions and blankets and chairs to build a tent….sometimes even begging to fall asleep in it. I just wish they would put the cushions and blankets back when they are done….but that’s another story.
For the tent frame, you will need:
- 3 – 1/2 inch wide dowel (4 ft long) (approx. $8)
- 2 1x2x8 wood boards (cut in half) (approx. $5)
- power drill
- 1/2 inch drill bit
- tape measure
- pencil
- paint (optional)
For the tent fabric, you will need:
- fabric 45 inches wide x 90 inches long (115 cms wide by 230cms)
- scissors
- ribbon (2 pieces 30-40 inches/75-100cms long)
- thin elastic (4 pieces 5 inches/13cms long)
- safety pins (6)
- needle and thread or sewing machine (optional)
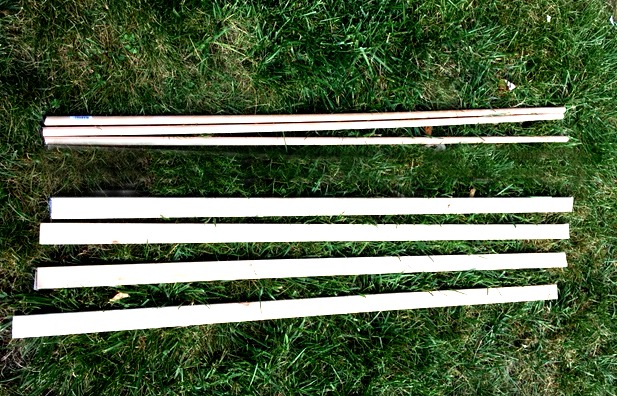
This is literally all you need, 3 x 1/2 inch dowels. They come from the store 4 feet long so there is no cutting here. Also, 2 boards 1×2 cut in half-so you have 4 pieces of 1×2. You can ask them to make this cut at the hardware store if you don’t have a handsaw or mitre saw.
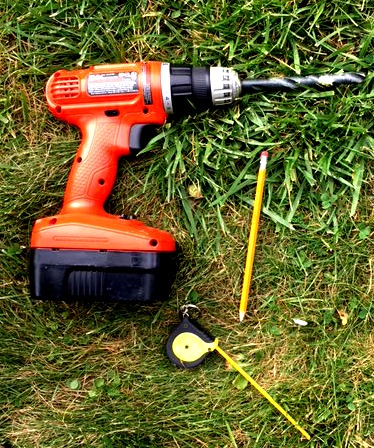
Gather your drill, tape measure and pencil.
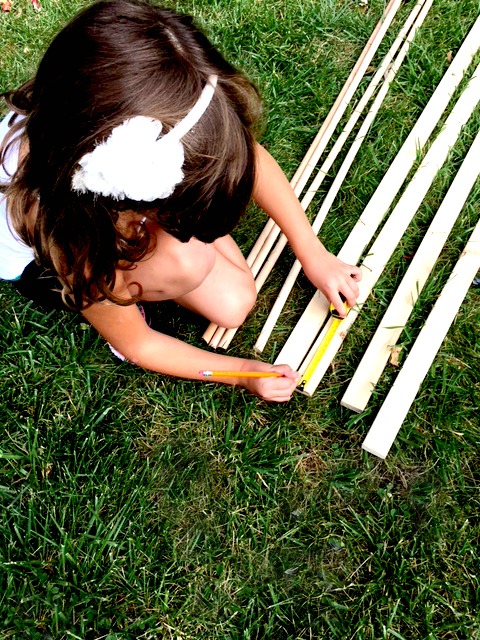
Measure and mark 2 inches from one end and 1 inch from the other end.
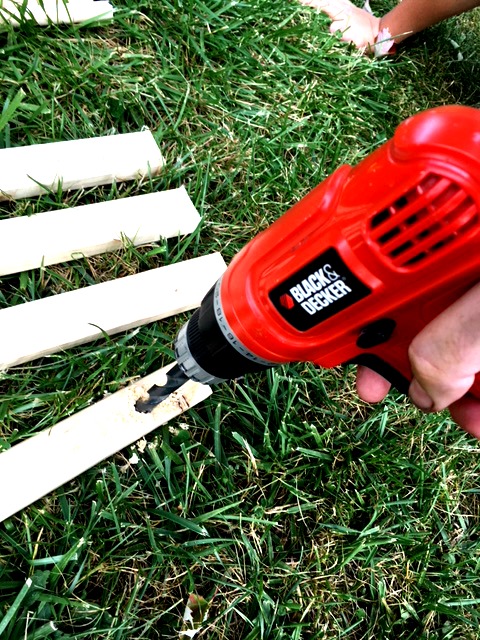
Drill the hole with a 1/2 inch drill bit. Test to see if your dowel will fit through the hole. You need it to be able to slide in fairly easily. I found it too tight and frustrating to put together when tight fitting so I ran the drill through the hole again in and out, in and out, to make it slightly bigger.
The top is the end that has a hole 2 inches from the top. The bottom has a hole 1 inch from the end.

Slide the first piece of dowel through the top holes of two of the 1×2’s The second piece of dowel can be inserted into the bottom holes.
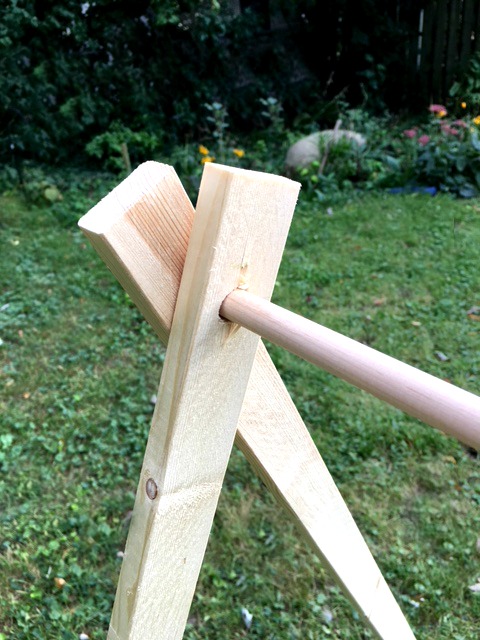
Add the next piece of 1×2 onto the top dowels to make an A.
Slide the third dowel into the bottom end of the 1×2’s.

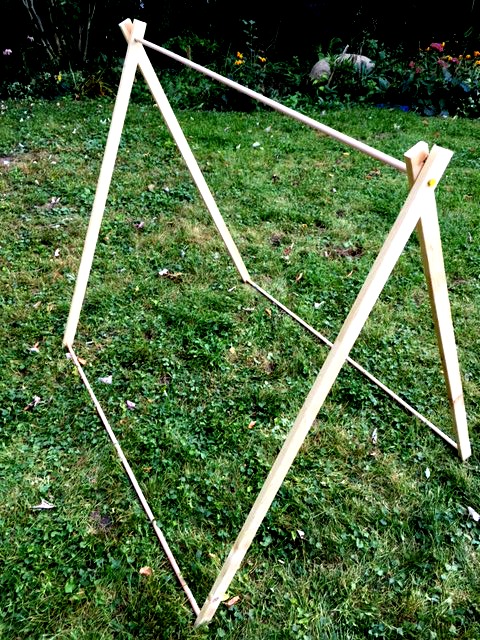
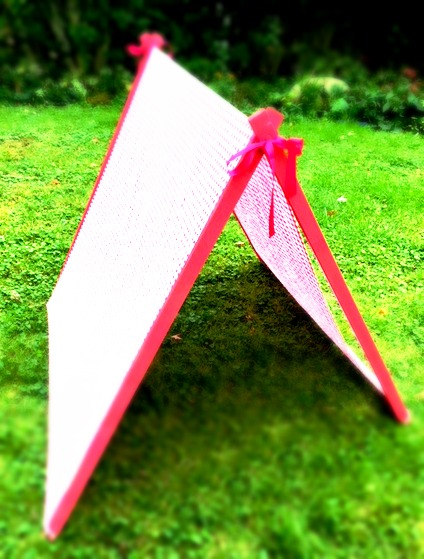
That’s it for the tent frame. Now for the tent fabric.…
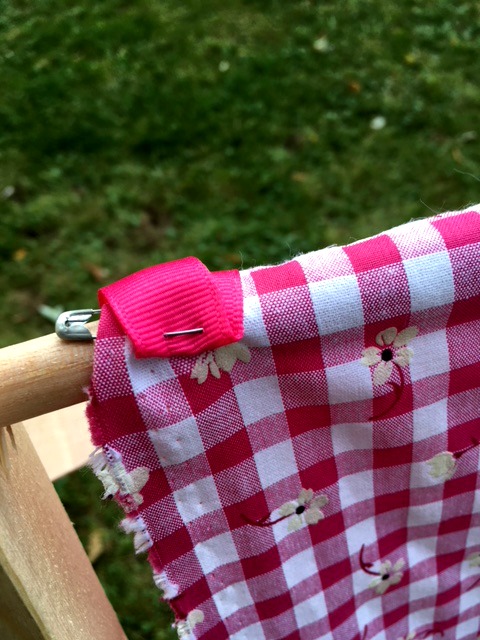
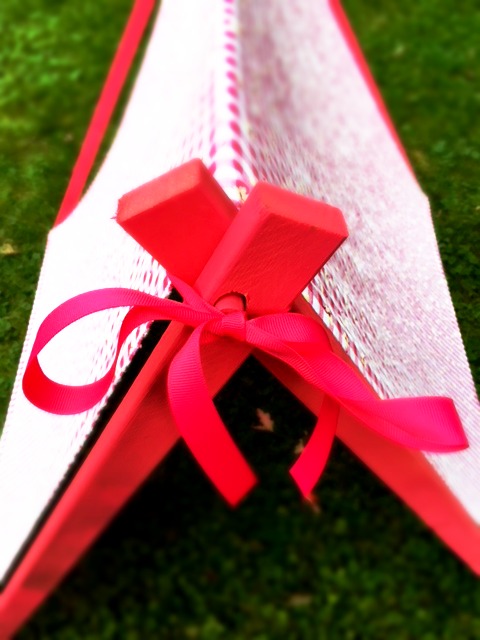
Slide your fabric over the top of the A frame. Pin a ribbon to the front and back ends.
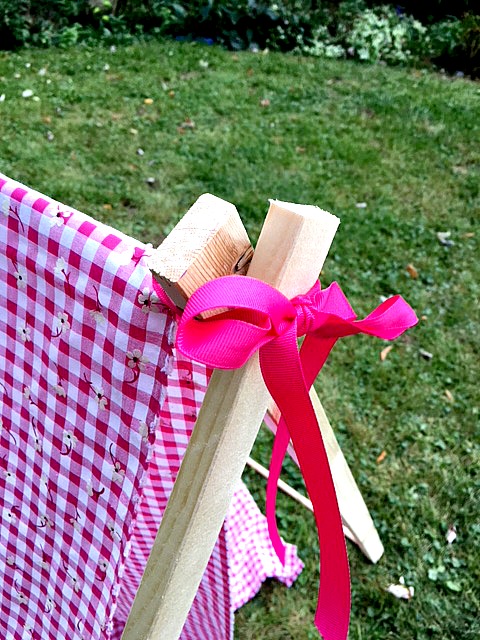
This ribbon isn’t essential but it does look nice and it will be helpful ties when you are storing the tent away.
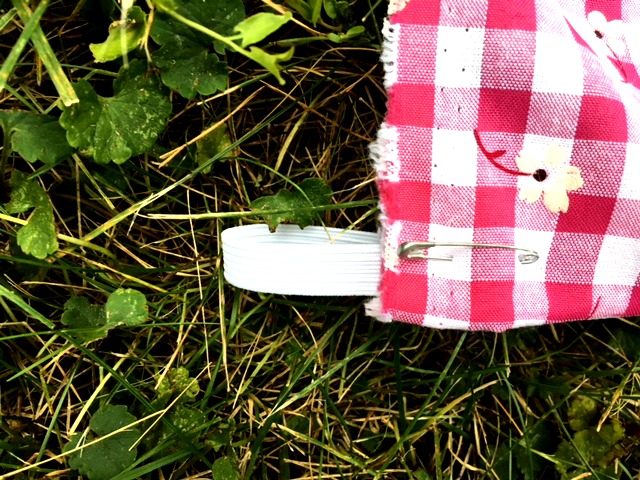
Pin a small piece of folded elastic onto all 4 of the bottom corners of the tent fabric.
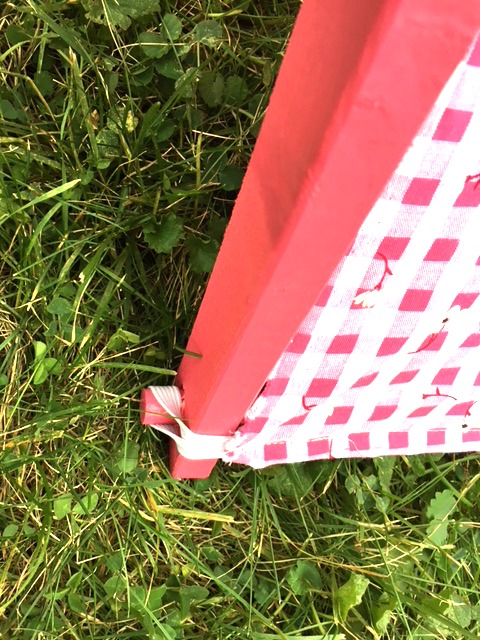
Hook the elastics over the ends of the bottom dowels.
It looks fine with just pins holding everything in place. You may want to hand or machine sew the ribbon and elastics in place. I did sew those in permanently and also hemmed the bottom of the fabric. It’s looking good enough to give away as a gift!
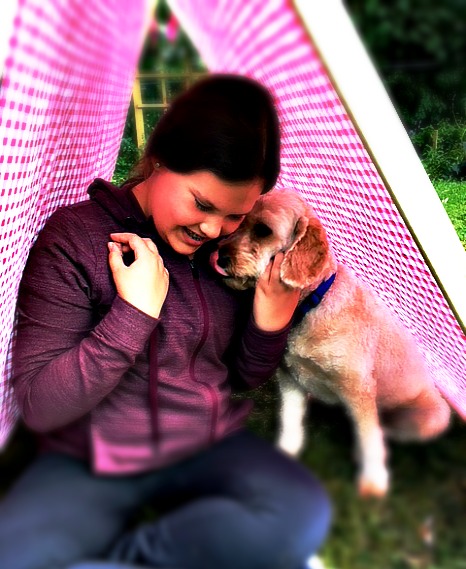
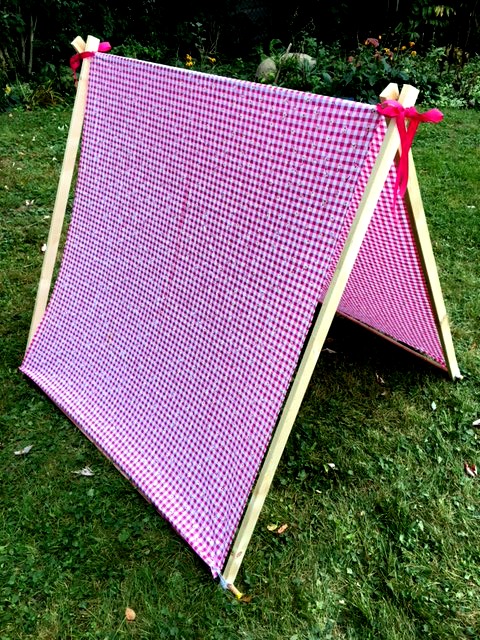
After this sweet picture was taken we decided the only thing to make it better is to paint it pink.
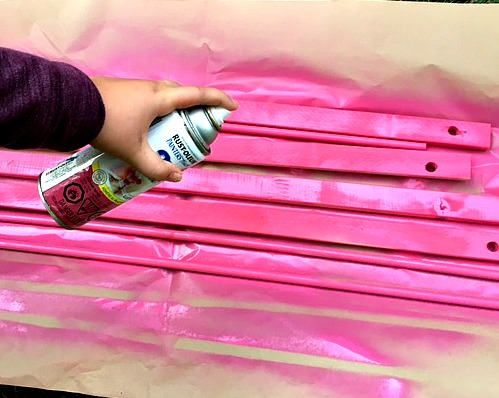
I already have loads of spray paint….because I love to change the color of things. See my previous posts and you will find I used a lot of spray paint this summer. This project doesn’t take much paint so its a great way to use up leftovers.
After allowing it to dry put it all together. Admire your handy work!
Did I mention that this is super easy to pack up?
Fold the tent fabric in half. Next, place all the wooden tent parts on the end of the fabric.
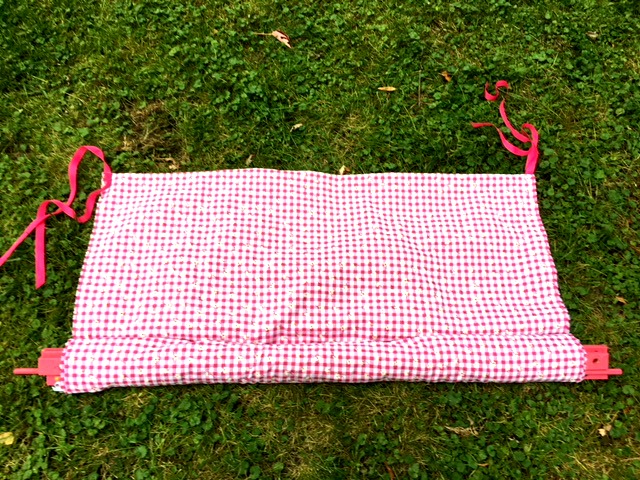
Roll up the fabric into a tube to hold the wood pieces together.
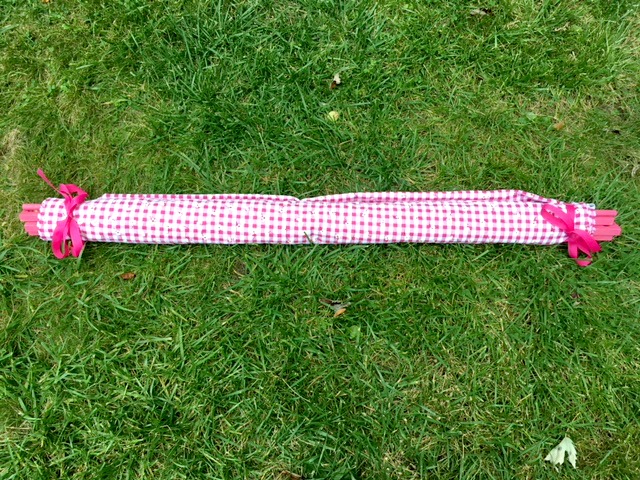
Lastly, tie the ribbons to keep it compact for storing or travelling. Remember when the babies were tiny and you wanted a place for them to nap that was in the shade at the park or beach? This would have solved the problem!
This was so easy to make. I can’t believe I didn’t do it when my kids were smaller.
Please pin or post this to facebook and share this easy DIY with your friends!
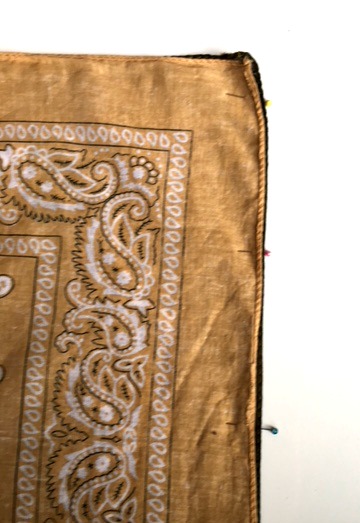
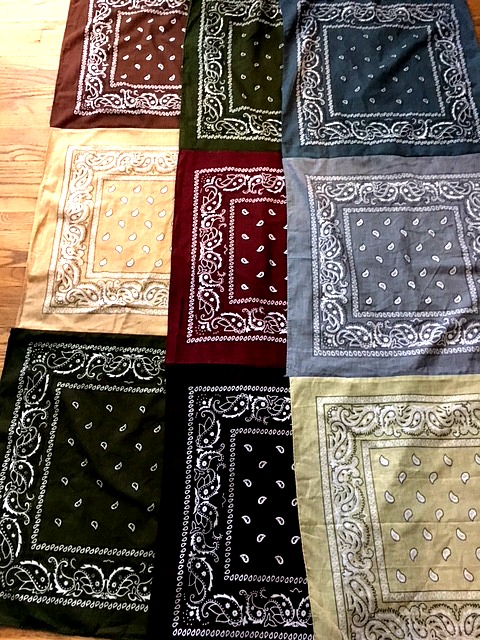
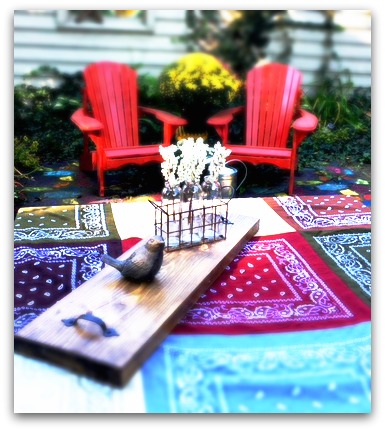
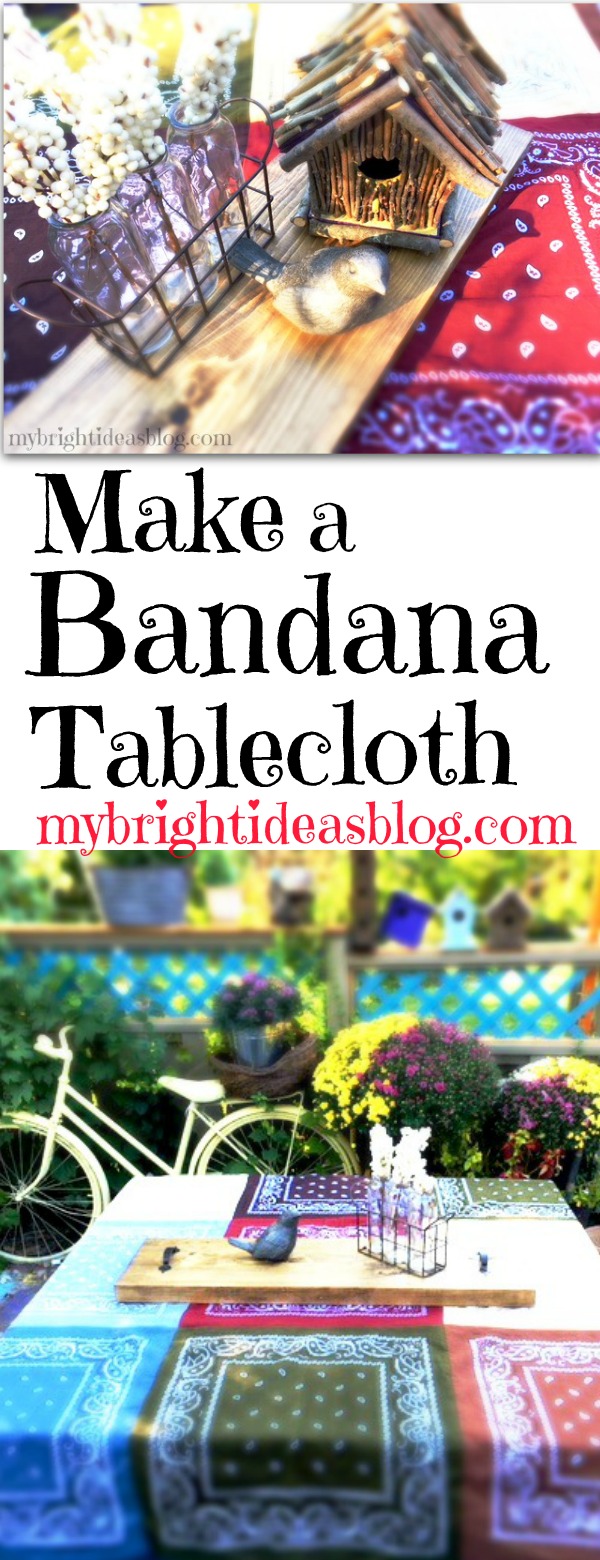
Make a Fall Table Cloth – From Bandanas

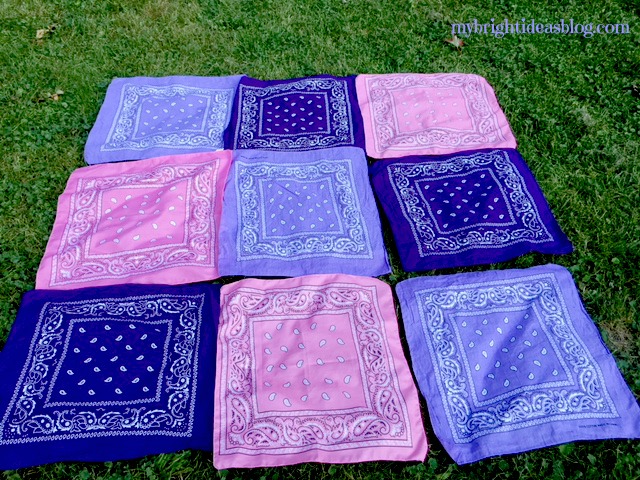
Signs of fall are everywhere. The flowers are scraggly and need to be pulled. Its all very sad to see the colour disappear. So my solution is to buy some bright mums and sew a bandana table cloth for the picnic table (or kitchen table).
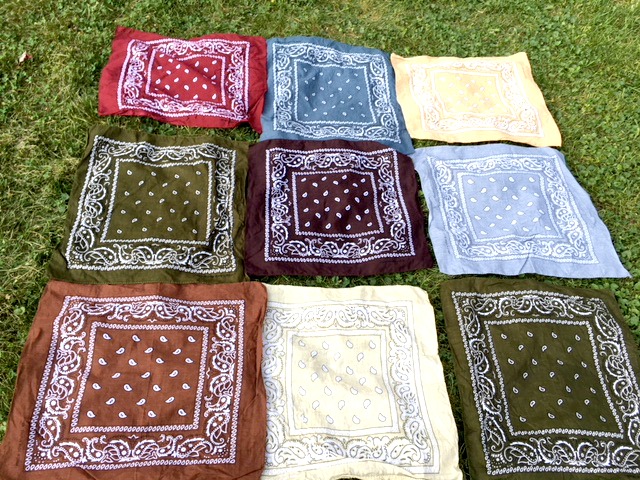 I was able to find an amazing collection of bandanas at “a Buck or Two”-its a sort of dollar store where things can cost several dollars. You can also buy bandanas (or search for hankerchief or handkerchief) online. I bought way too many so there will be several more projects to come!
I wanted an autumn theme so I chose greens, beiges, maroon, blue and brown. It might be a good idea to lay out the squares and take a photo if you want a specific layout. As you stack them up they can get a bit shuffled.
 They come folded and they are cotton so they really should be washed and dried before sewing to prevent shrinkage and bleeding colours.
You will need:
- 9 bandanas
- sewing machine
- pins
- scissors
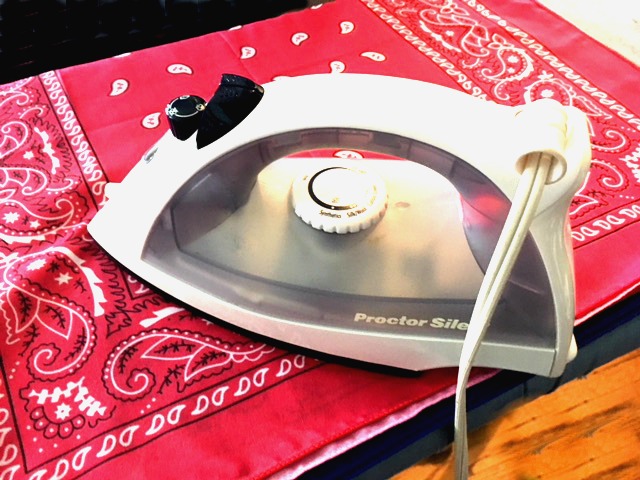
Get out the iron! Iron all the bandanas. Or find a kid who likes to iron….tee hee….
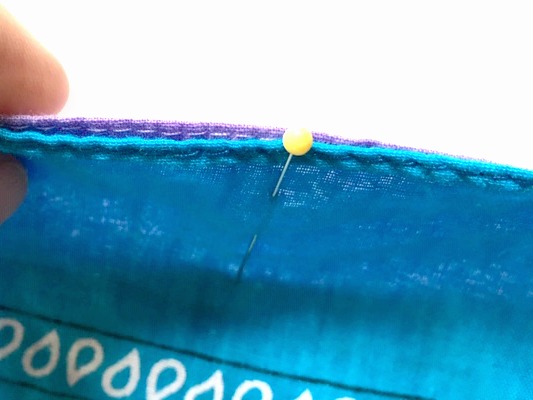
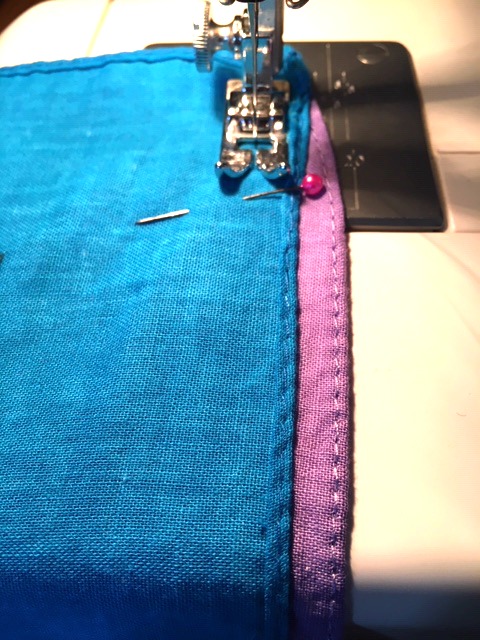
Start by pinning the first two bandanas, right sides together. Bandanas seem to have a slightly longer side. Mine were 20×21. Make sure they are all facing the same direction so are the same width. They are often not sewn straight or square. Fortunately, this project is very forgiving.
Hey who ironed this beige one!? Slacker!
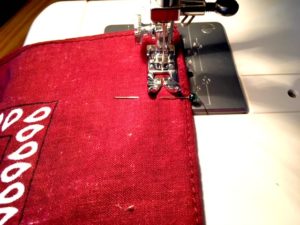
Sew along the edge.
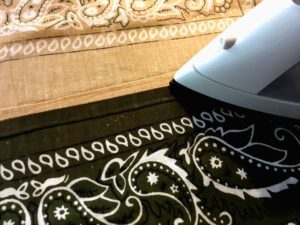 Iron the seems flat.
 I started by pinning the top sets of 2. (1/2)
 Next, I sewed the 3rd square onto the bottom of the pair (2/3).
 As you can see, now I have three strips of three bandanas.
Start by pinning the left line to the middle line. Match the centre seem/corners. Sew the strips together.
 Finally, line up the middle corners of the last line of squares to pin it to the last line of squares. Sew them in place to complete the tablecloth. Finish by ironing it.
Now your done! If you are detailed oriented you could fold over the edge of the tablecloth and sew a hem. But as you can tell I’m not that sort of gal and the bandanas are all finished so there is no edges to fray. If your squares didn’t line up hemming it could correct a jagged edge. Happily mine matched up this time!
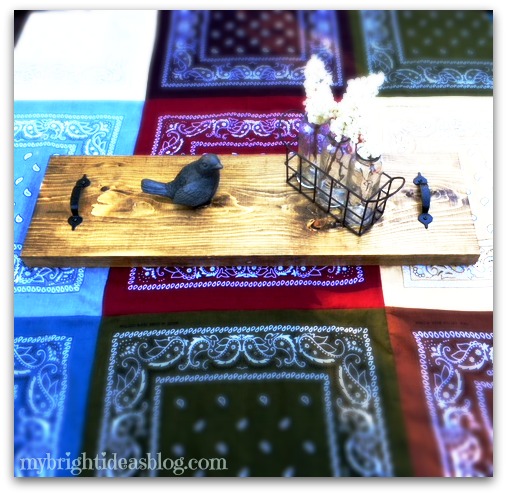
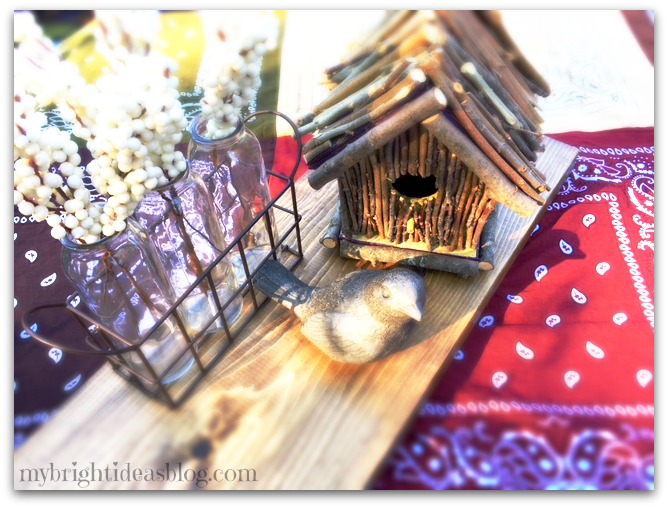 Isn’t this little bird adorable. I got it at Canadian Tire! Never overlook your local hardware store’s garden centre. You never know what you’ll find.
 Thank you for reading to the end! Please pin this on Pinterest and follow me on your favorite social media!
Below are a few more of my projects you might want to look at.
…


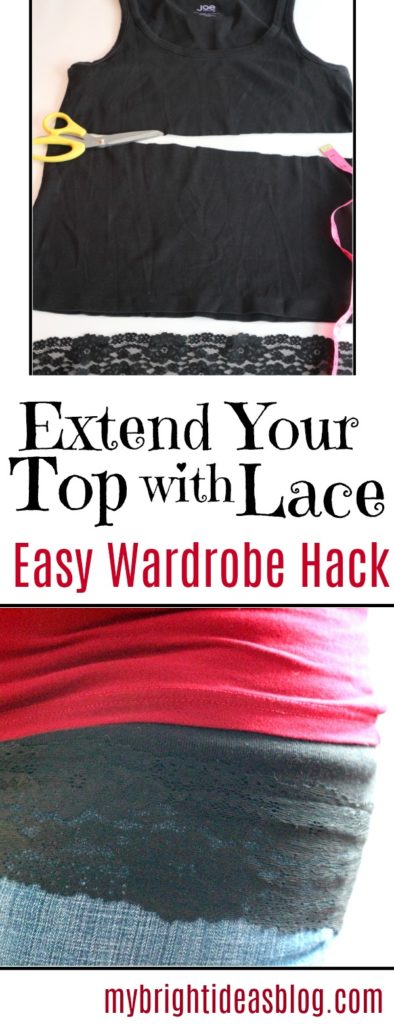
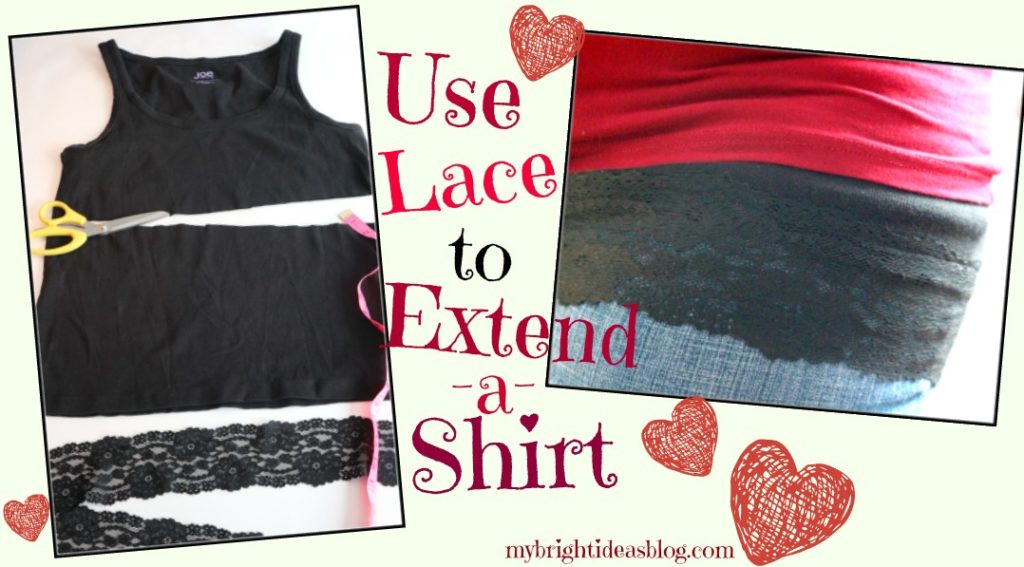
Extend a Short Shirt with Lace-Great Wardrobe Hack!
Add inches to the length of your short tops with a lace extender. This is worn around your waist with an elastic waistline and looks like you’re layering tops. This post will show you how to make a shirt-extender from an old shirt and a bit of stretchy lace and elastic.
This is a really easy project and a great item to have in your wardrobe.
When I was pregnant they called it a belly band. A tube of fabric that went under your shirt so your tummy didn’t hang out under a shirt that was getting shorter by the day.
At https://www.motherhood.com/ its called a “tummy sleeve” or “belly band”.
It occurred to me then that EVERYONE could you use a shirt extender. Sometimes your shirt can shrink leaving you with something you aren’t comfortable wearing anymore. Or maybe you like leggings or something to break up a plain shirt. So here is a tutorial about making a t-shirt extension out of an old top.
You will need:
- An old shirt
- Co-ordinating wide stretchy lace (3 inch wide)
- Elastic (1/2 inch or 1 cm wide)
- Safety Pin
- Pins
- Scissors
- Measuring tape
- Sewing machine
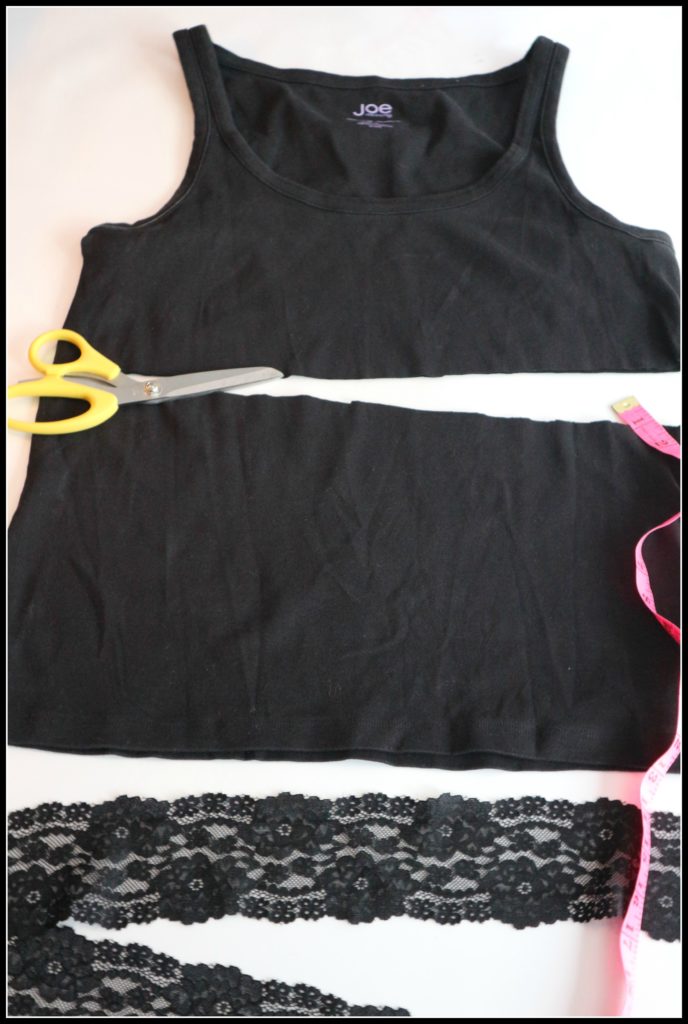
I had a tight fitting cotton tank top that had shrunken and was ready to be re-purposed.
Decide on the length that you would like the top extender to be by measuring your waist to hip with a tape measure. Add on an inch for the casing-plus the lace could add a few inches.
Measure the length and cut off the bottom of your old top. I cut mine 11 inches or 28 cms from the bottom hem. Leave the hem as it is. You can just sew the lace right on top of it.
The length of the lace piece should be a 1/4 inch longer than the width of the shirt hem.
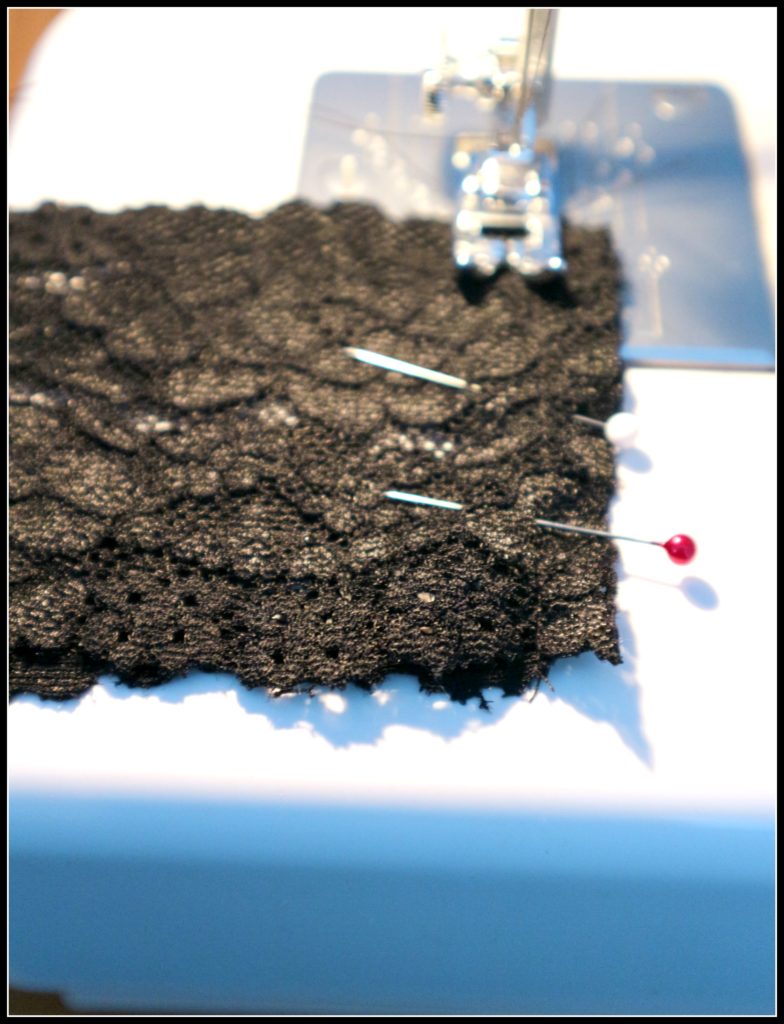
Pin the ends of the lace together and sew the end closed.
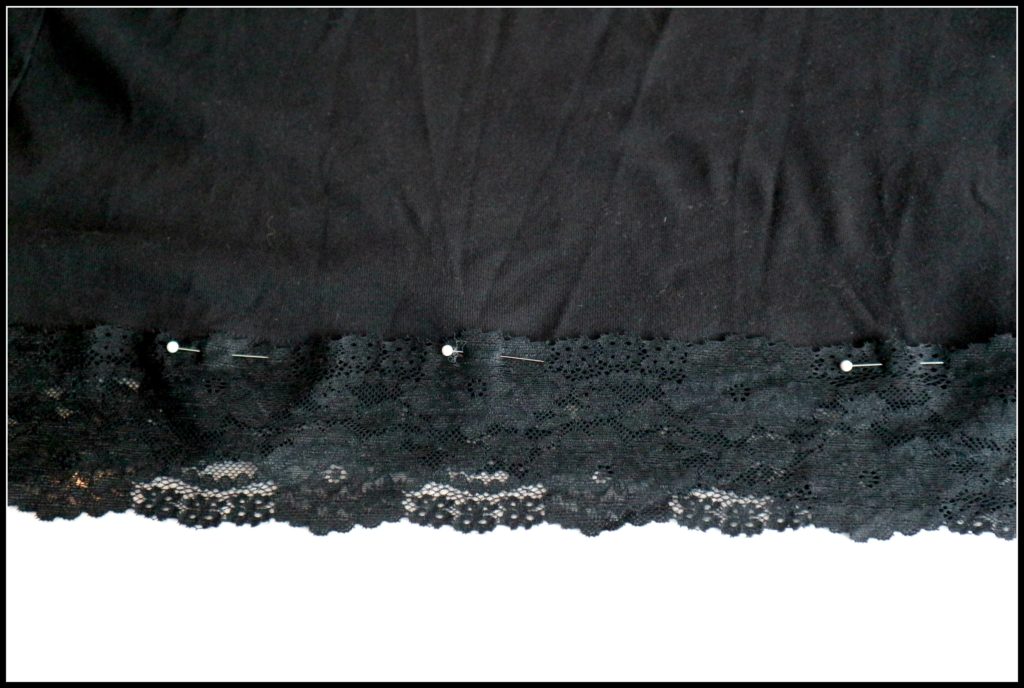
Pin the lace to the bottom of the cut shirt. Be sure that the seam you sewed to join the lace-lines up with the side seem of the top. I decided to sew my lace on top of the t-shirt material. But that was just my preference.

Attach the lace to the bottom edge by sewing all the way around it.
Then we will go up to the top part of the waist band.
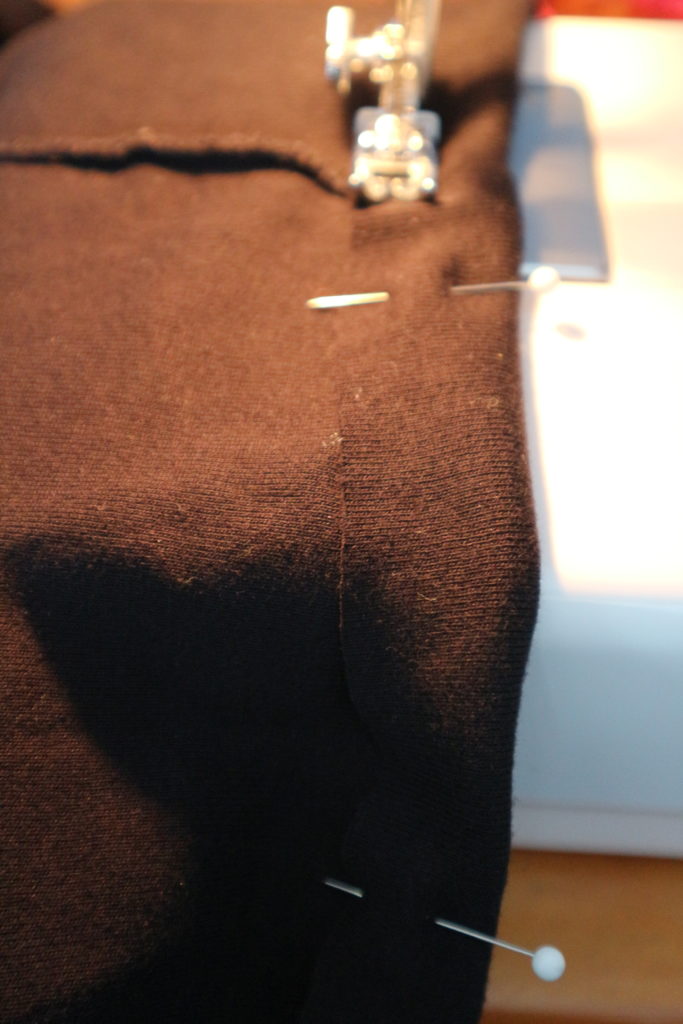
At the top of the fabric, fold over the edge 3/4 of an inch. Pin the edge all the way around to form the elastic casing. Sew in place leaving a 1-2 inch gap.
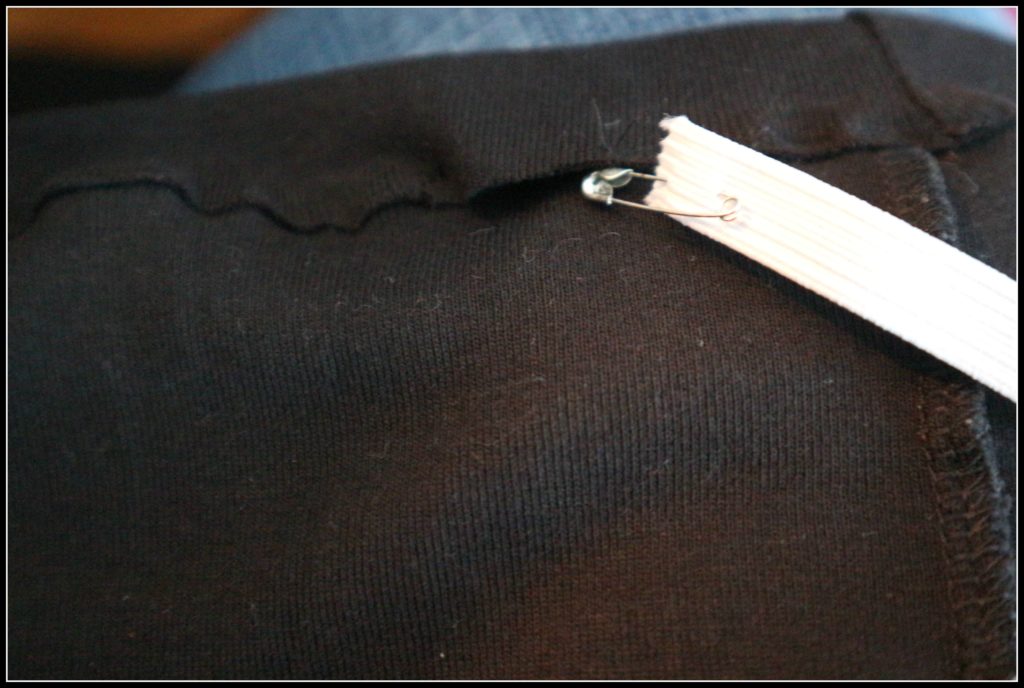
Place a safety pin on the end of your elastic and push it through one side of the 1 inch opening in the casing. Guide the elastic around the casing until you reach the other end of the casing hole. Pin the two ends of the elastic together.
Try on the shirt extender and see how the elastic feels on your tummy. Is it too tight? Or too lose? Or fits just right.
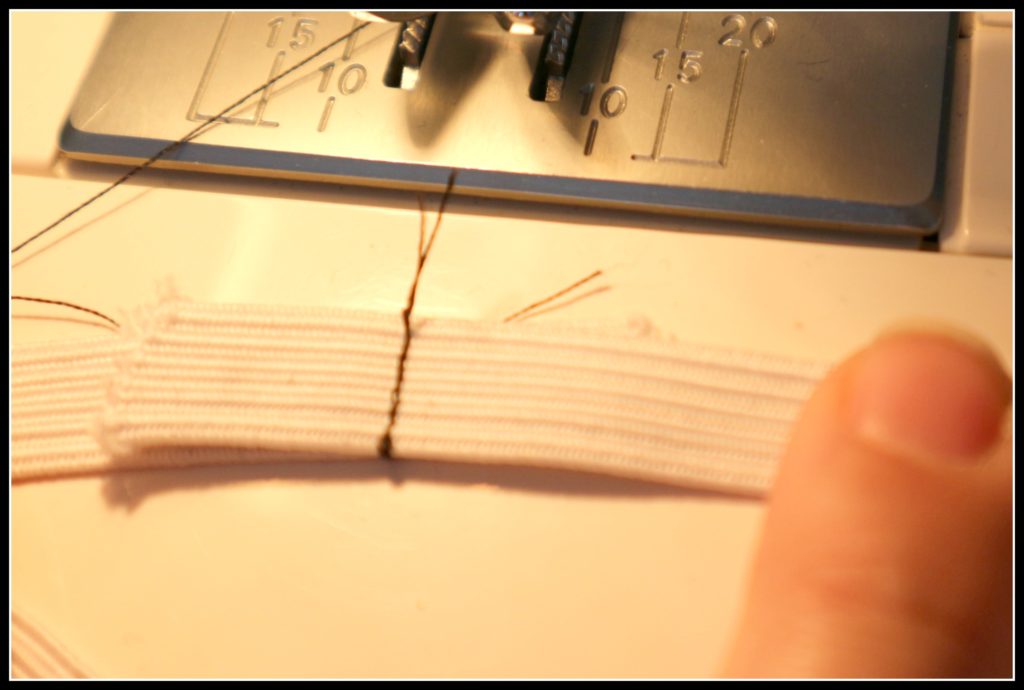
If you are happy with the feel of the elastic, permanently join the ends by sewing them together. I usually go forwards and backwards 2 or 3 times just to be sure.
One final step, finish sewing closed the 1 inch gap in the casing.
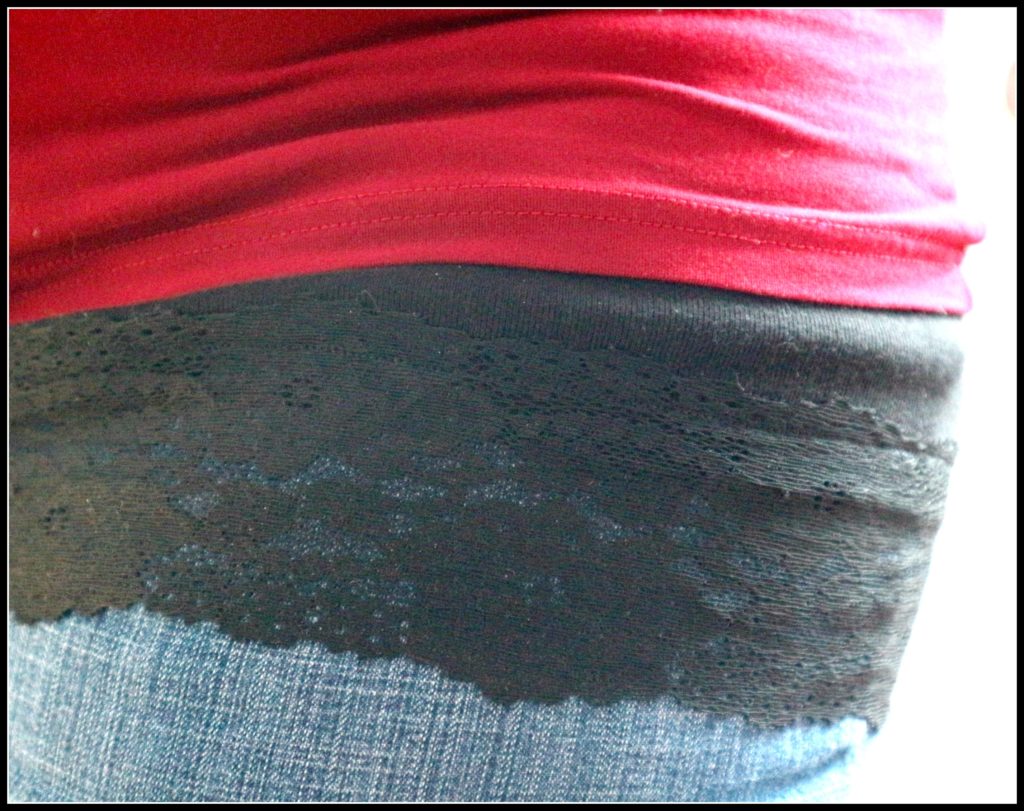
Voila Your Finished! That’s it! What did that take you…. 15 minutes max? Now you can wear it under any shirt for a layered look or just prevent people from seeing your knickers if you have a job that requires some bending over. Oh dear me!
The finished length after adding the lace, casing and elastic almost 12 inches or 30 cms long.
This was a super easy project and a great item to have in your wardrobe. Let me know if you need any further description.
Below is a link to a tutorial for adding lace right onto a favorite shirt that is getting too small. Check it out!
…