
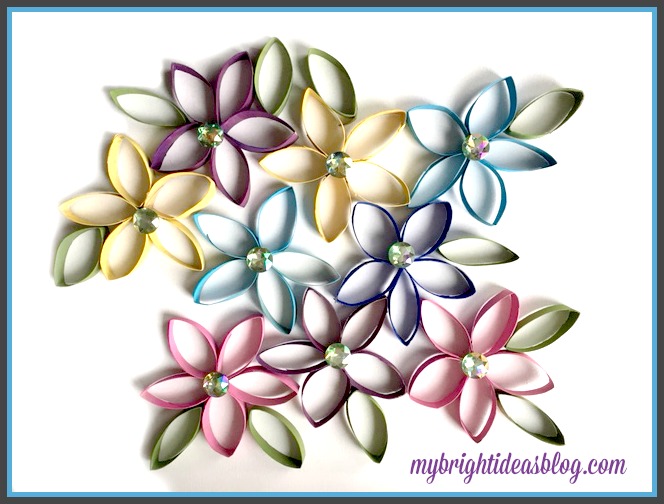
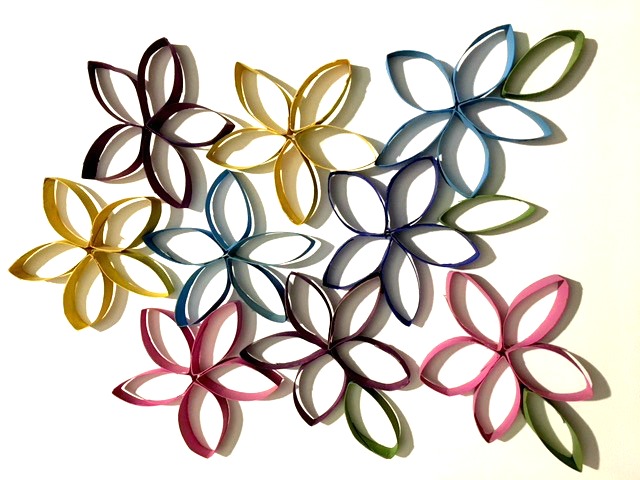
Last year I did a post on making daisy flowers out of toilet paper rolls. I do love to save my toilet paper rolls for crafts so I had plenty more to continue on with more flowers. So this time we are gluing the flowers to a canvas and making a picture to hang in a little girls bedroom.
You will need:
- large white canvas
- 9 toilet paper rolls
- hot glue gun and glue sticks
- craft paint and paint brush
- big gems
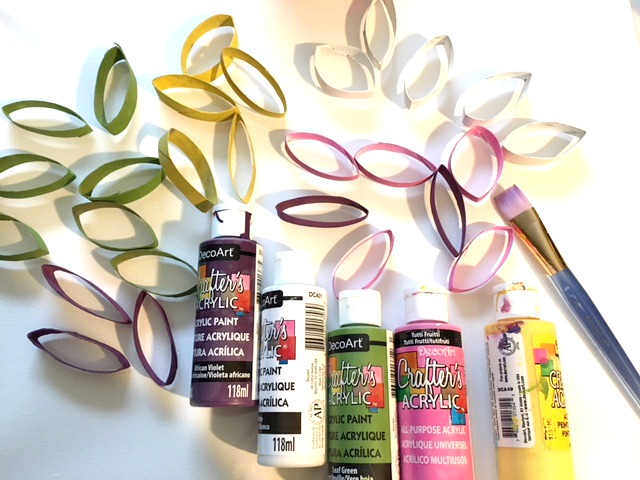
For this project you need a plain white canvas from the dollar store ($4). Everything else you likely have in your craft cupboards. I followed the same instructions from the previous daisy toilet paper project. Each daisy makes 1 flower plus 2 leaves.
To make this I used 9 toilet paper rolls. I painted: 2 purple, 2 pink, 2 yellow, 2 turquoise and 1 royal blue. I cut the rolls first and painted after. But you might think its more efficient to paint first and then cut and then touch up the edges afterward. Fortunately , the paint will dry quickly.
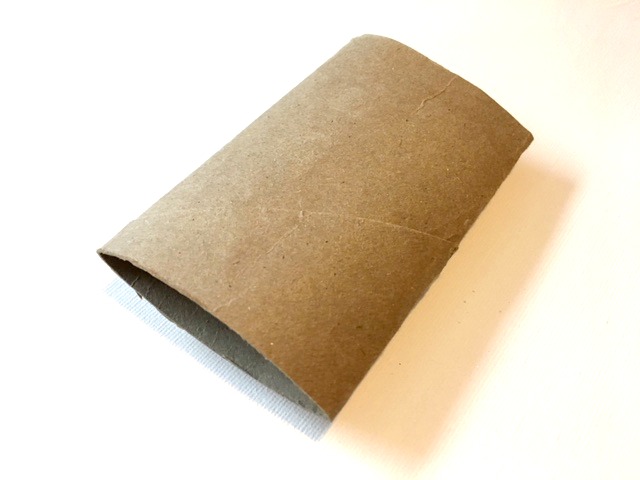 Flatten your toilet paper roll.
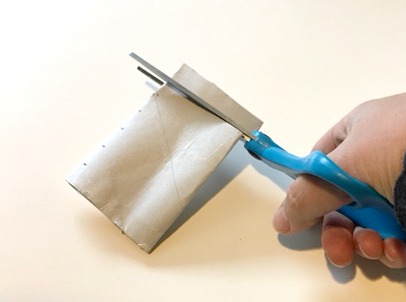
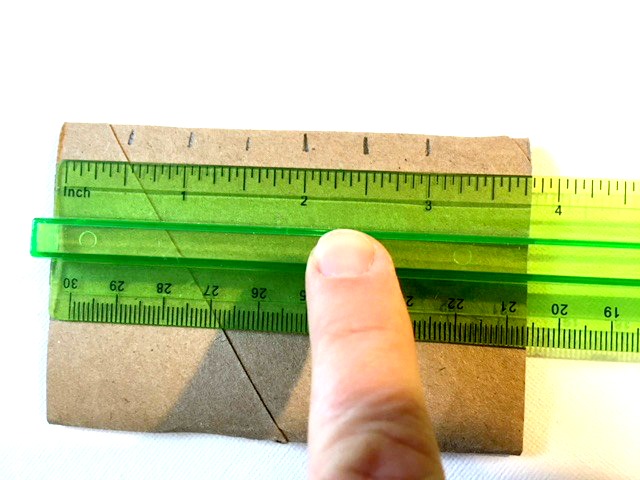 Mark cutting lines 1/2 inch apart.
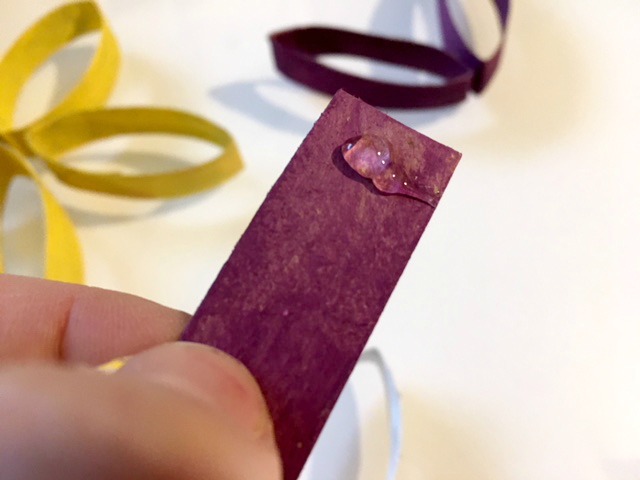
Pinch two petals together. Hold a few seconds while the hot glue dries.
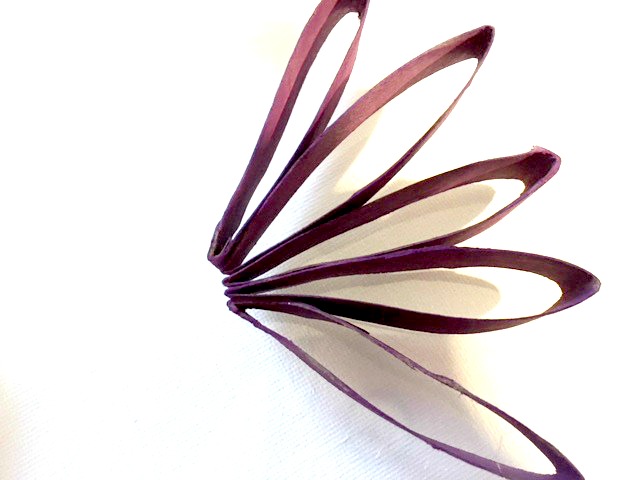
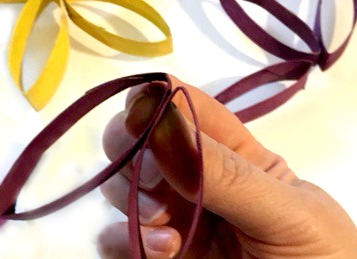
Glue and pinch all 5 petals together. Pull the two outside petals toward each other and glue them together.
 Lay out your flowers and leaves and add a dab of glue to attach them to your canvas.
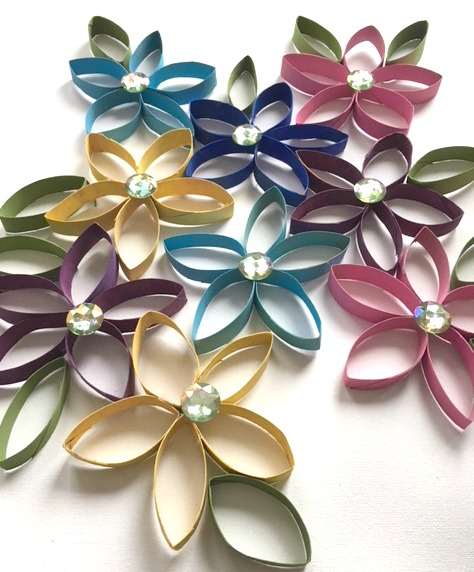
Add a big gem to the centre and attach with hot glue.
Hang your canvas on the wall. Super easy! If your young child is going to do this, please help with the hot glue gun or use white glue.
Look below for more toilet paper roll and Springtime craft ideas!
How to Make Spring Flowers Craft From Painted Toilet Paper Rolls
Toilet Paper Roll Crafts-Use your loo roll tube for easy Crafts!

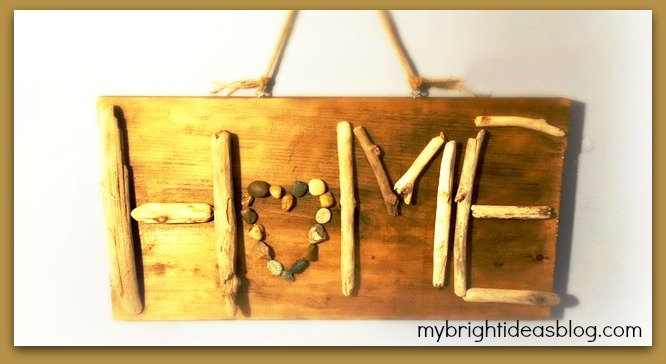
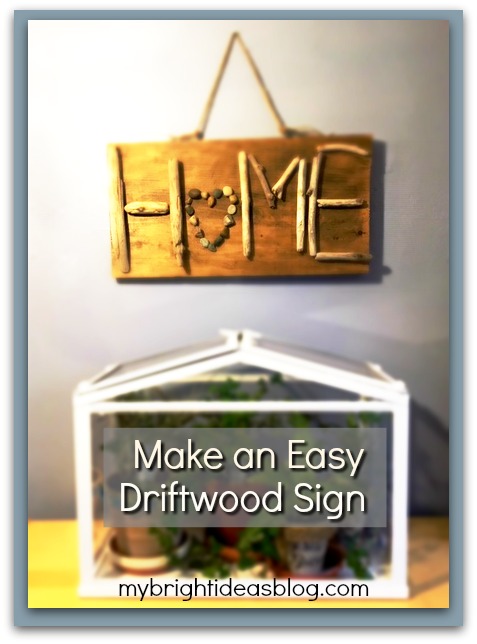
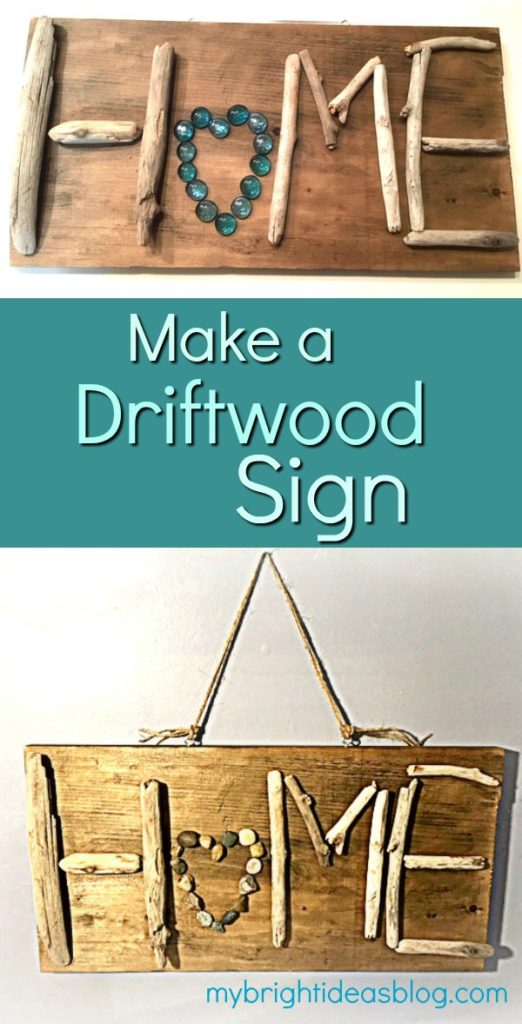
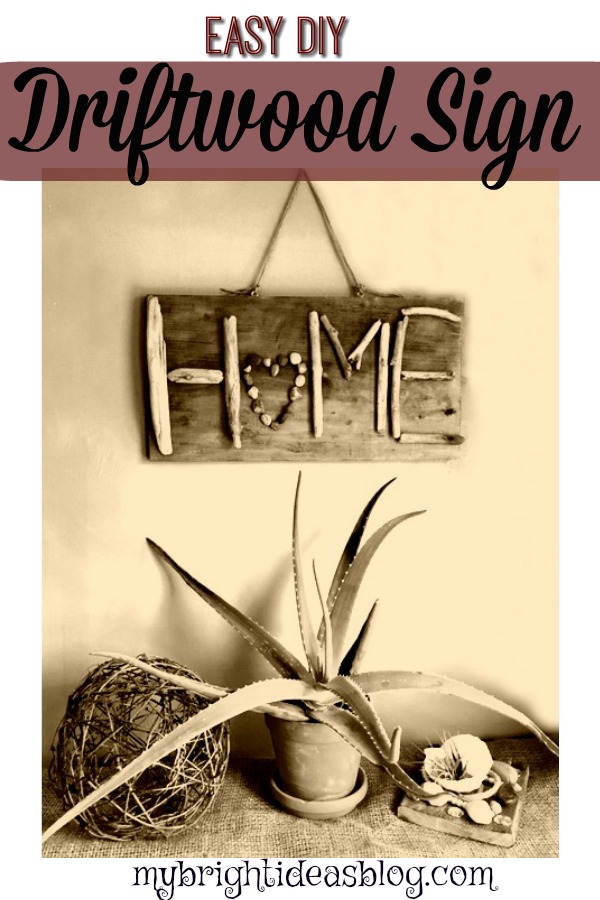
Make a Driftwood Sign – Home
I’m trying to be patient for spring to come but its just early March and it snowed all day….sigh.
Fortunately, I am hoarding craft supplies…including driftwood from trips to the shores last year. So let’s put it together for another rustic, nature craft.
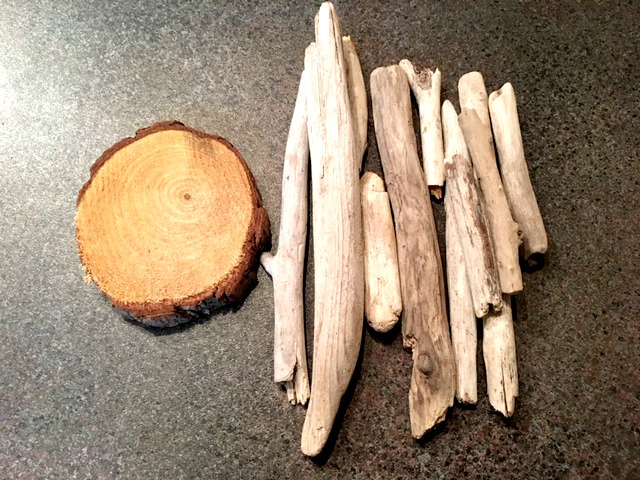
Gather your supplies.
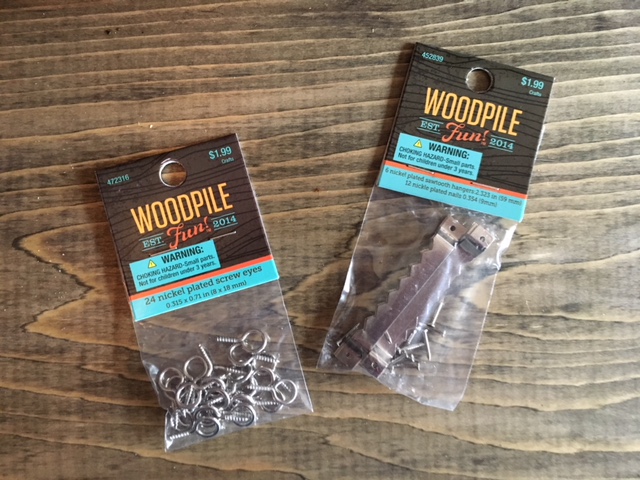
You will need:
- Driftwood
- Wood Slice or Stones
- Wood Scrap
- Wood Stain
- Rag and Gloves
- Eye Hooks
- Twine
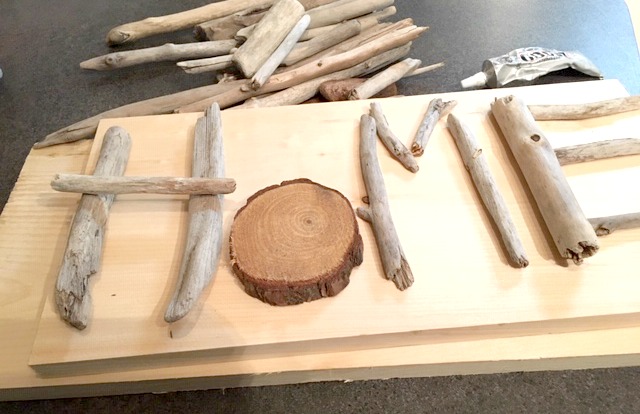
Start by finding a scrap piece of lumber that will match the size of your driftwood. Lay out your pieces of driftwood to arrange them and make sure they fit! My board is 9 x 18 inches (23 x 46 cms) and its a pretty good match for my driftwood pieces.
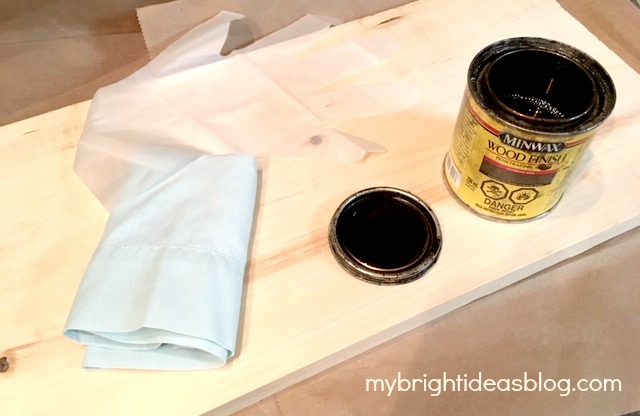
As always, I used my little pot of Miniwax Jacobean stain. I love this dark shade.
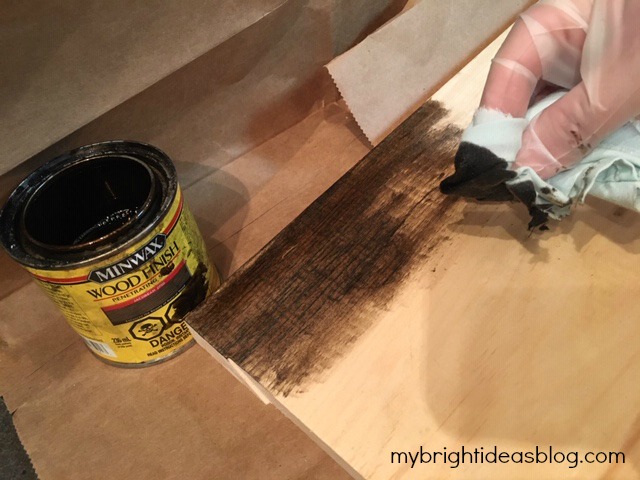
Apply with a rag or brush in the directions of the grain. Allow the wood to dry according to the instructions. My stain can says to wait 8 hours before applying a clear polyurethane. I didn’t add a clear coat because I like the mat finish.
Here I am playing with the driftwood while the stain dries. I’m so impatient.
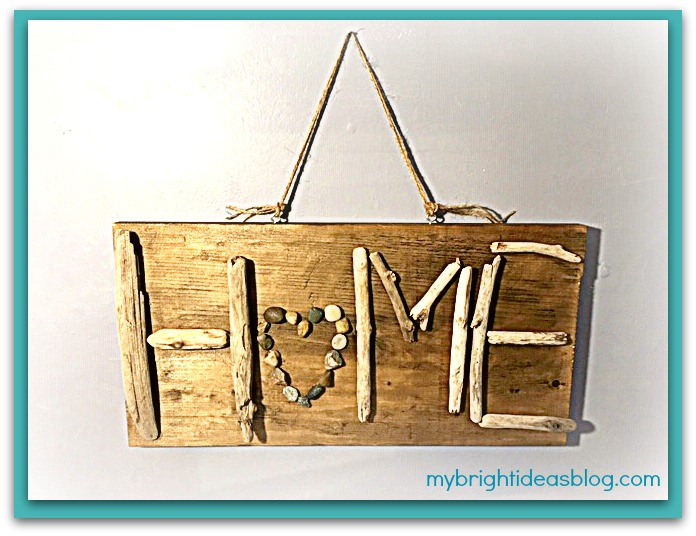
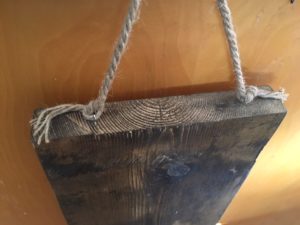
Now that its dry you should decide on how your going to hang the sign up.
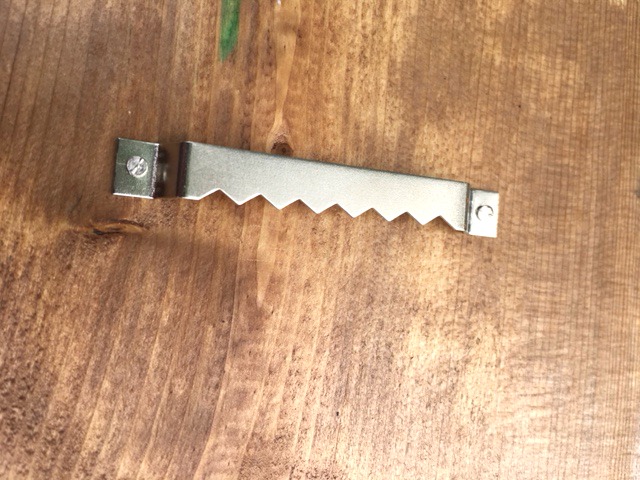
Hang it like a picture?
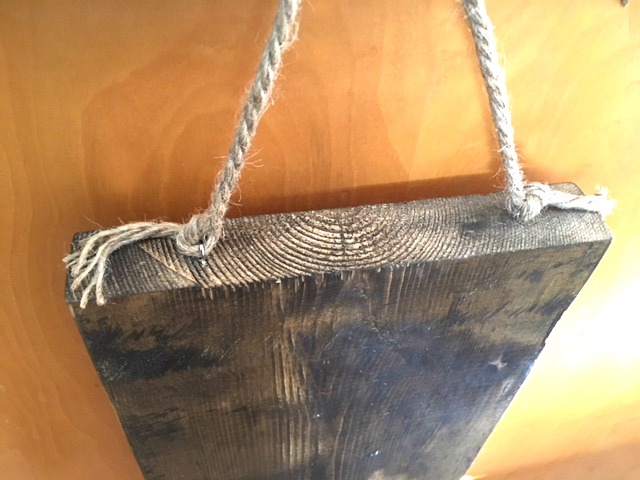
Or like a sign with screw eyes and a bit of twine or jute rope? I’ve used the above options on several projects.
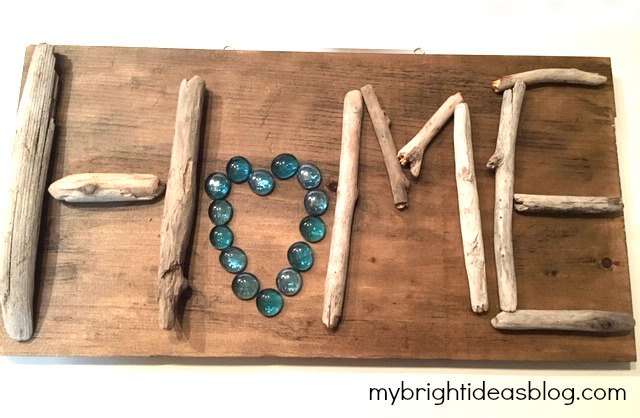
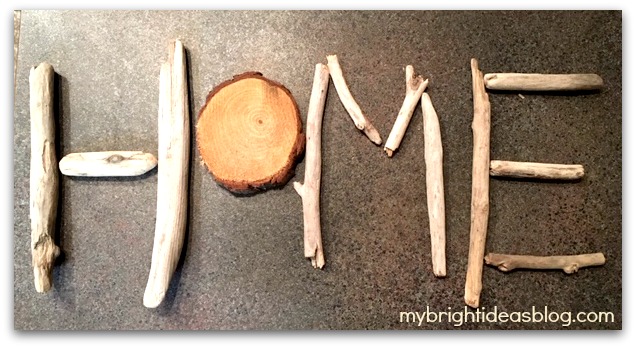
Now the stain is dry and I can pull it all together. I found some blue glass stones? Hmmmm. Tempting to use them but I wanted to have this look natural.
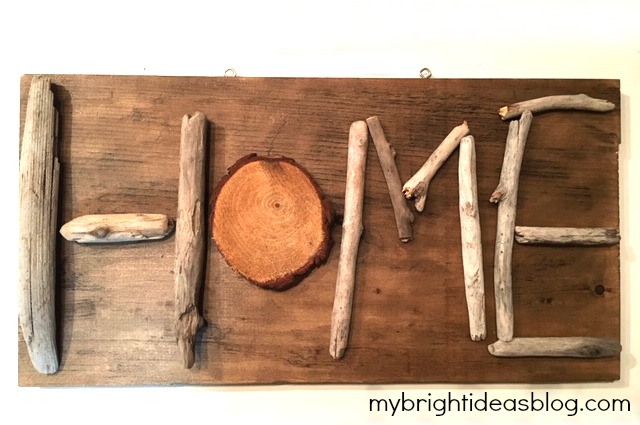
I also like the wood slice for the “O”. That is natural.
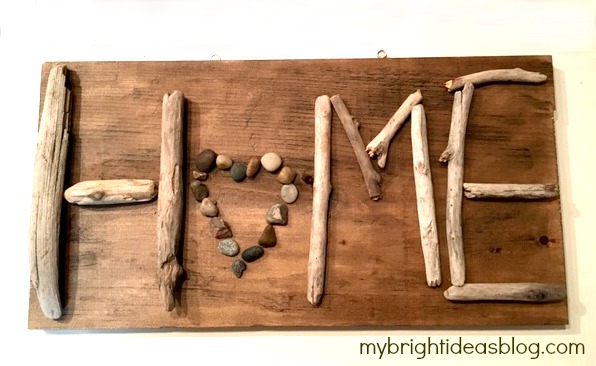
But after deliberations, I settled on small pebbles in the shape of a heart.
You can use your hot glue gun to attach the pieces to the wood. I might put this on the craft sale table at work so I used E6000 glue which is a very stinky permanent adhesive glue that will not pop off like hot glue can when it gets moved. Crack a window or work in your garage…it’s pretty strong smelling stuff.
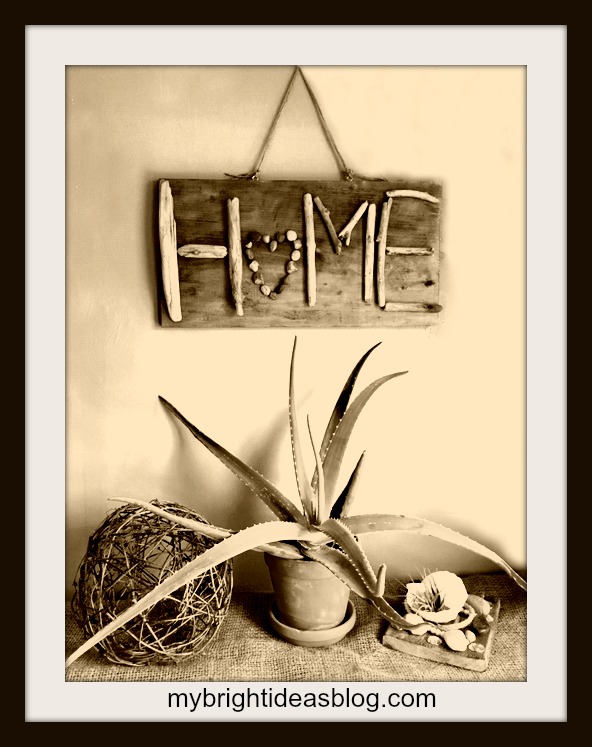
And that is all there is to it!
Here are some other similar projects I have posted you might like….
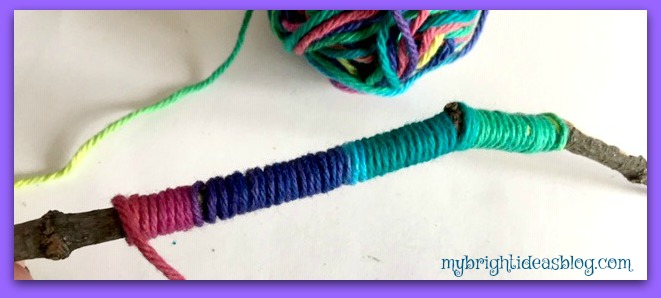
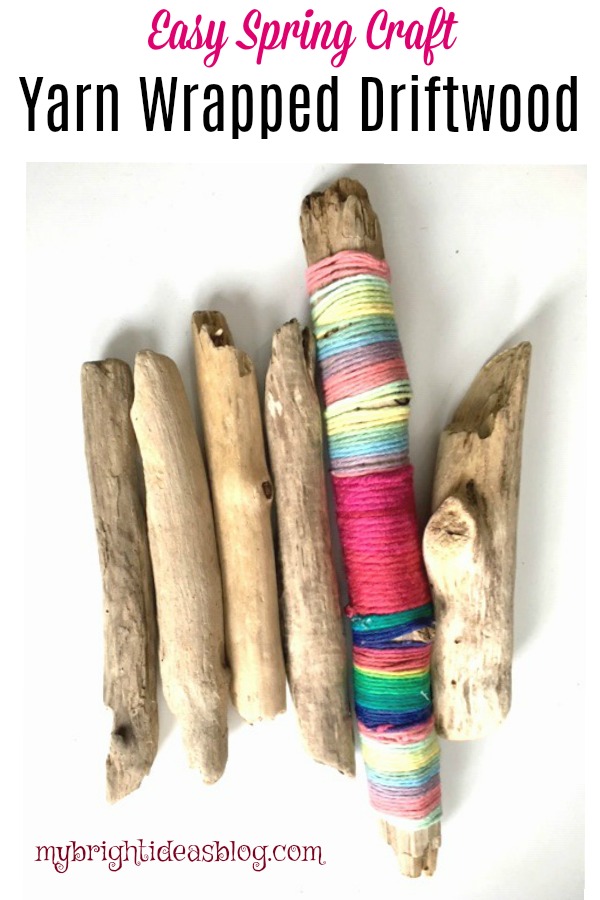
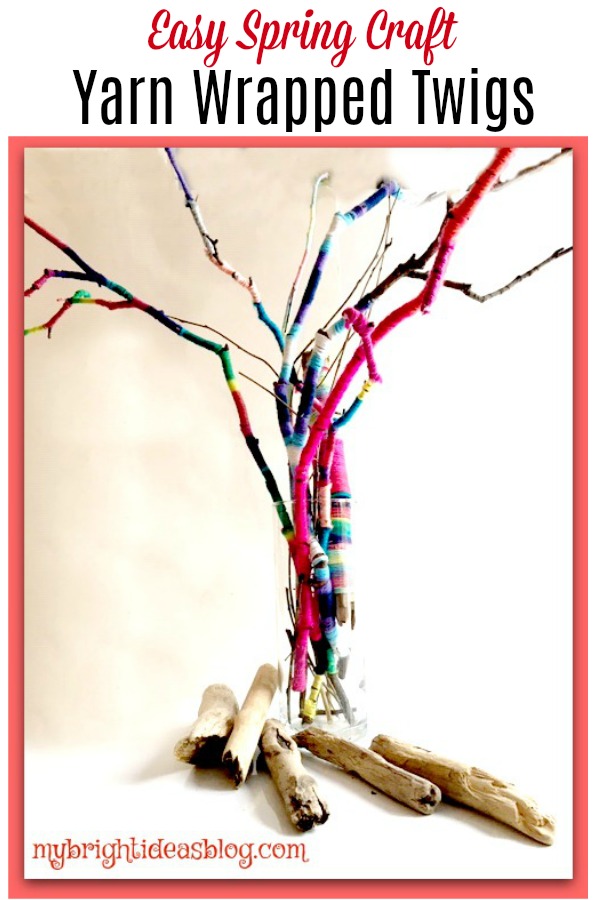
Yarn Wrapped Sticks – Easy Spring Craft
Want to add some spring colours to your home? Why not try wrapping yarn around some sticks?
Part of my inspiration:
Have you heard of yarn bombing? If you haven’t you really should google it. It’s hilariously amazing! People are knitting or crocheting a sort of non permanent graffiti. You might find a park bench, bike, phone booth or a tree that is literally wearing a perfectly fitting, bright coloured sweater! Sometimes the crafter that does it wants to make a point and sometimes it just adding color to something grey and sterile like a light post.
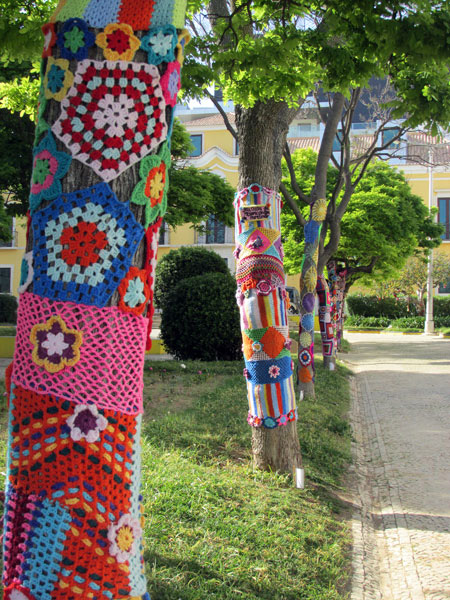
https://algarveblog.net/2014/05/05/yarn-bombing-in-portimao/
Here is just one cheery photo so you can see what I mean!
Anyhoo the photos people have posted make me so happy but I can’t knit or crochet ask my friends Lana and Gen who just attempted to teach me how-they were patient but it didn’t take I’m afraid. Someday I will give it another try but for now here is my happy alternative.
It’s so easy and cheerful you are going to love this craft idea!
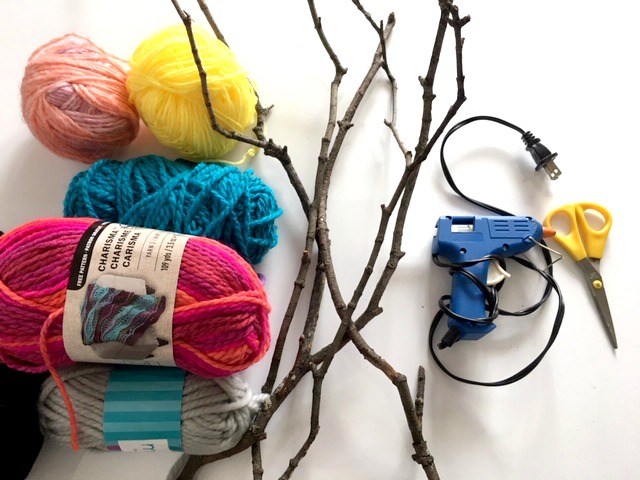
You will need:
- sticks
- yarn
- hot glue (optional)
- scissors
- vase
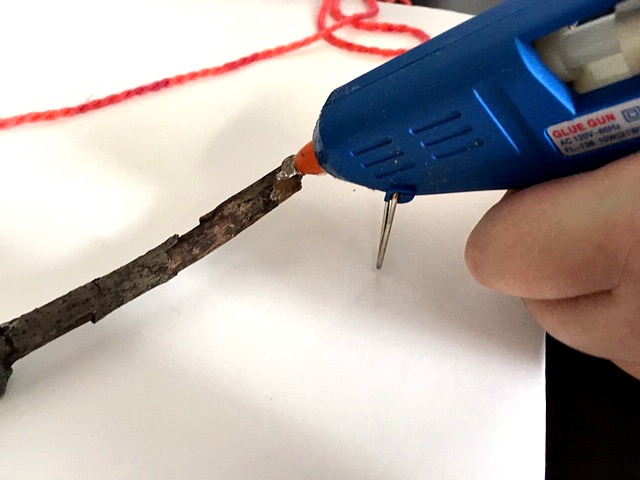
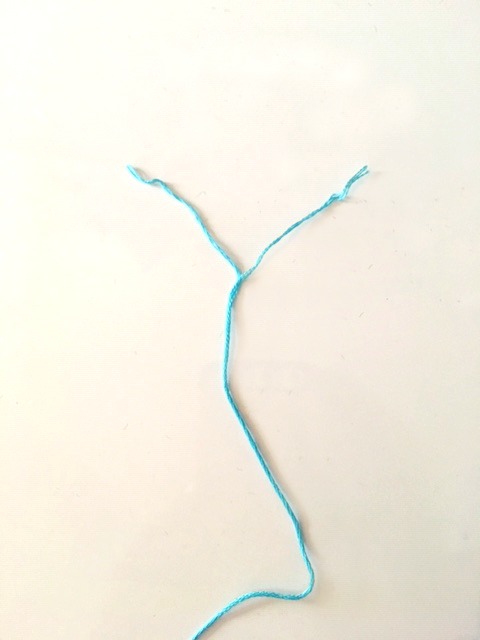
If you love your hot glue gun (as much as I do) start by adding a dab of glue to secure the end of the yarn.
If you don’t want to use hot glue then just tie a loop around the end of the stick and tuck the tail in-as you wind the yarn around the stick.
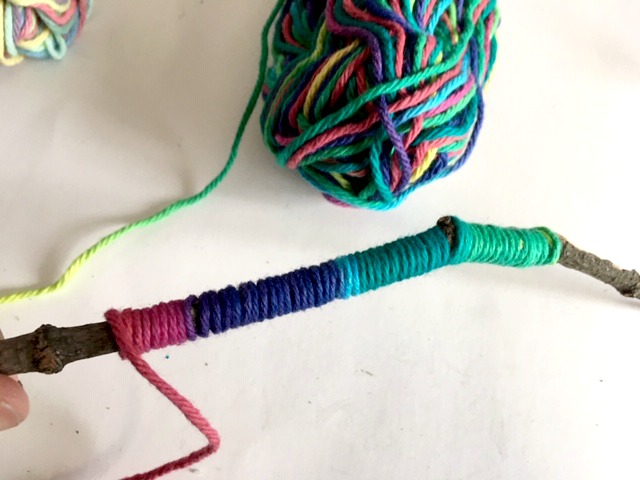
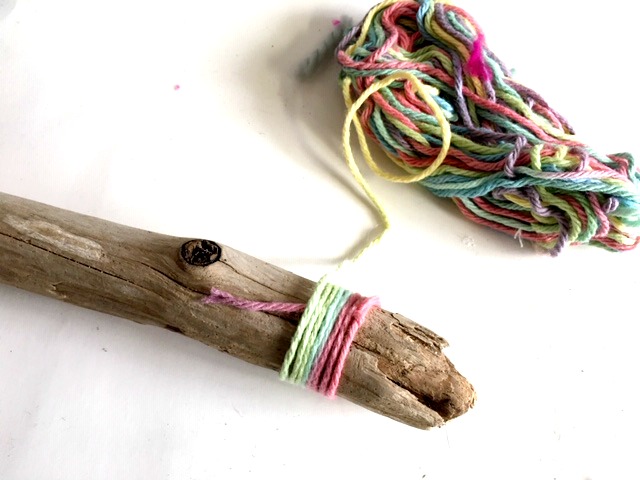
I really love the yarn that transitions the colours as you go. Its very smooth looking and only need to deal with the end at the beginning and the end.
If you don’t have yarn on hand that transitions you can use several colors and just change them as you get an inch down the branch.
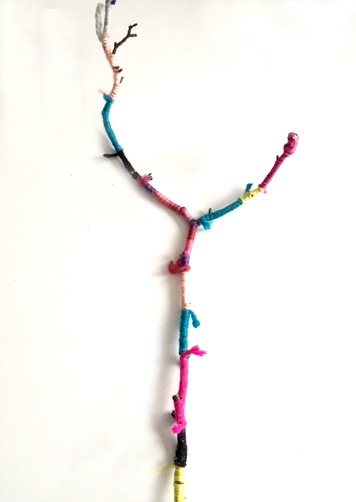
When you are done just snip the stray ends.
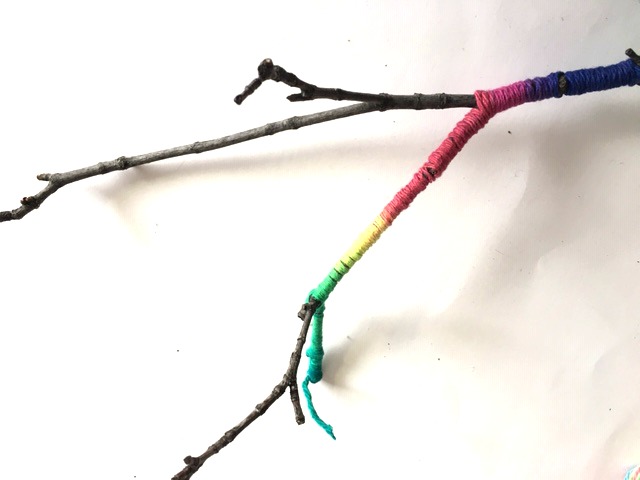
When you get to a split in the twig’s branches continue down one side and then go back to complete the other stems.
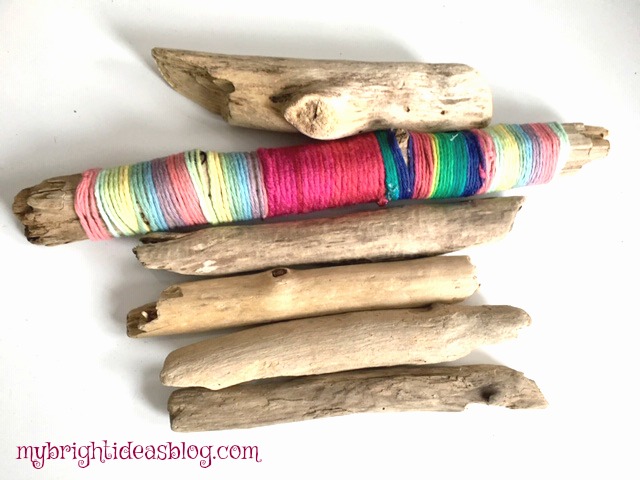
Using drift wood is even easier to manage.
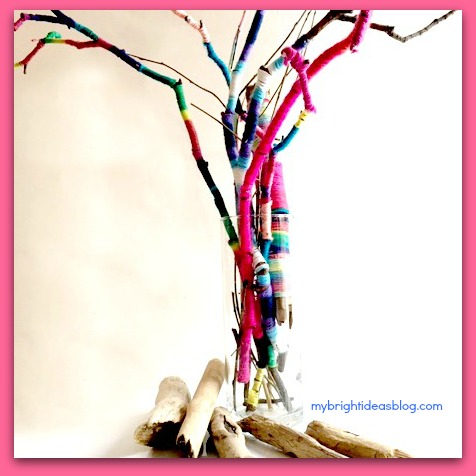
This took my 11 year old daughter and I an hour to do all of the sticks in the vase. We both enjoyed doing this. It was kind of an easy, soothing craft. It made a great mother daughter moment to stop and talk about things on our minds.
The results are very cheery decorative sticks with springtime colors that will go on a shelf or mantle.
Have a look at the other crafts linked below. I seem to enjoy the stick/twig projects. Mostly because they are free-out of the garden and something always need trimming.
Happy crafting!
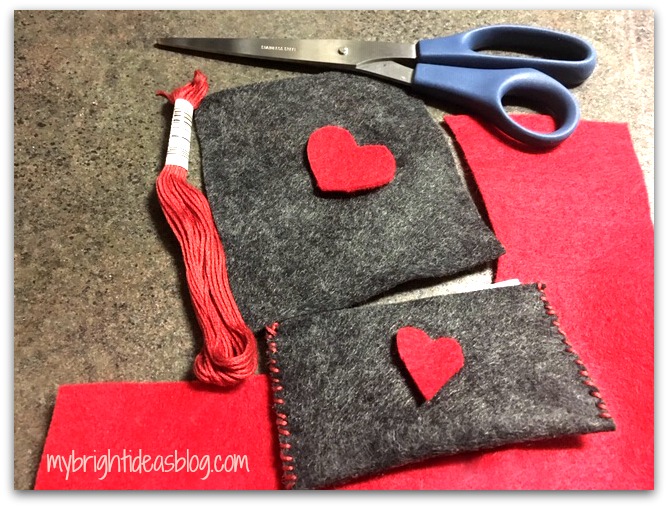
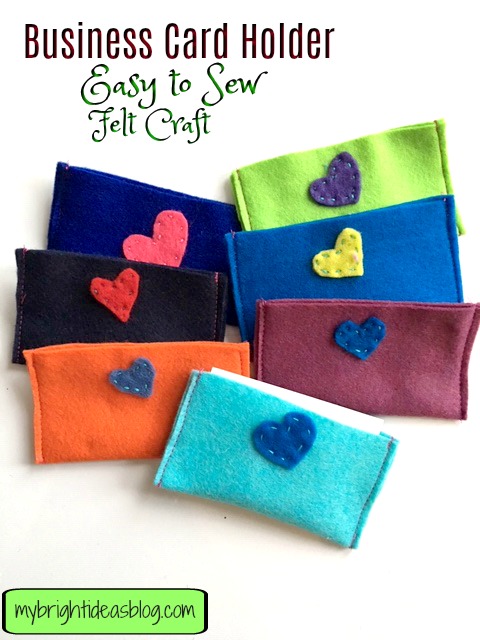
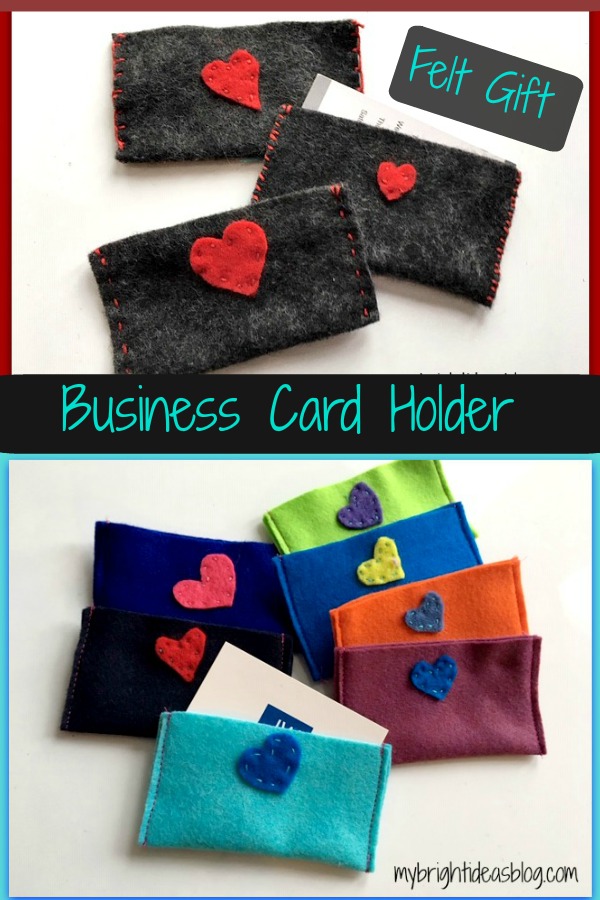
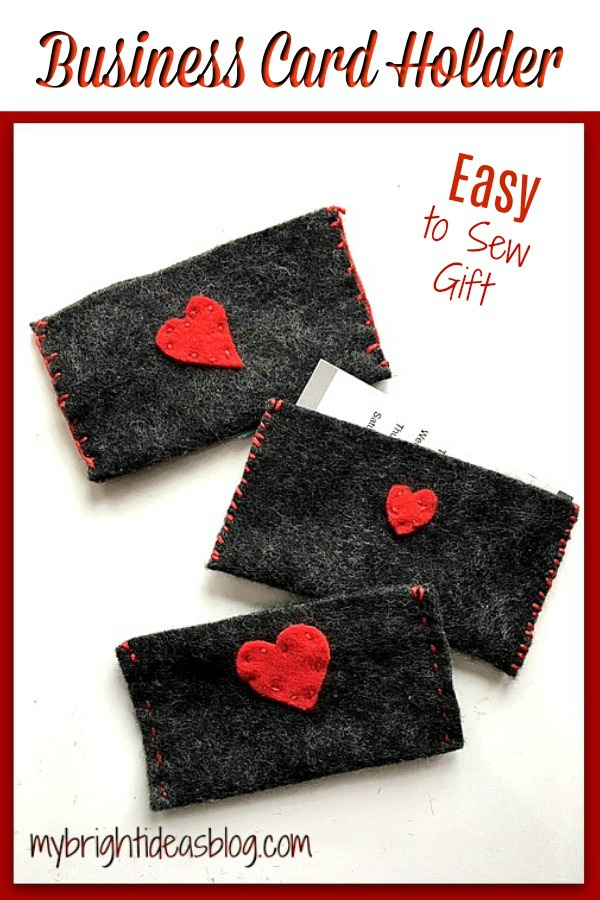
Felt Business Card Holder – Easy Kid’s Project!
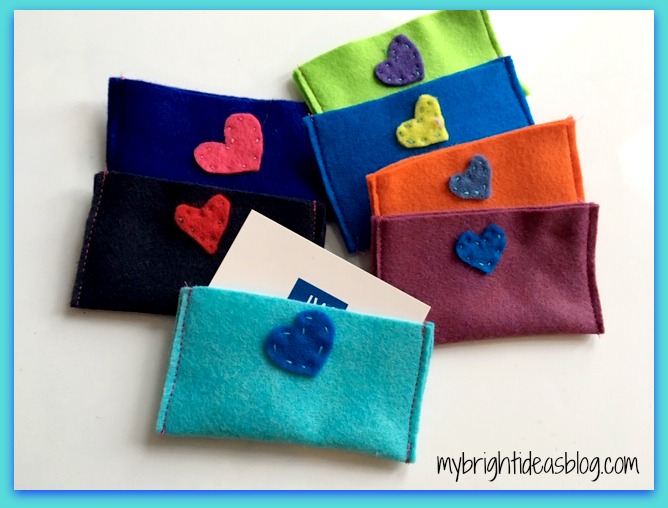
Learn how to make Business Card Holders out of Felt!
Looking for an Easy Sewing Project? Teach your child how to hand or machine sew with this quick gift idea. I’m going to show you how to make a felt business card holder with hearts or buttons for decoration and 3 ways to hand stitch.
We have a big event coming up where thousands of people from all over the world will be gathered and at the end swapping little gifts. So I have been searching for little homemade souvenirs for our family to give to the friends we meet. We might even get business cards printed-with our family email to put in the felt holder so we can become pen pals.
This seemed like an easy, fun, cute craft to make together. Plus teach some basic sewing skills…Brilliant!
You will need:
- 1 full piece of craft felt
- scrap pieces of felt for the heart
- scissors
- needle
- embroidery thread
- a business card
- sewing machine (optional)
- bright buttons (optional)
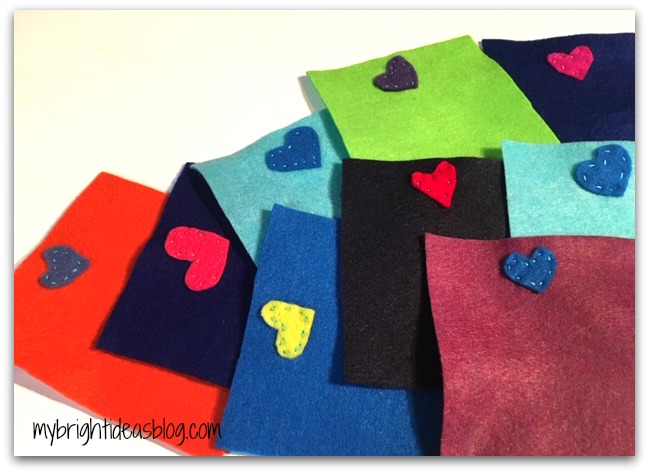
If you don’t already have felt and embroidery thread on hand you can get these from the dollar store, Walmart and craft stores.
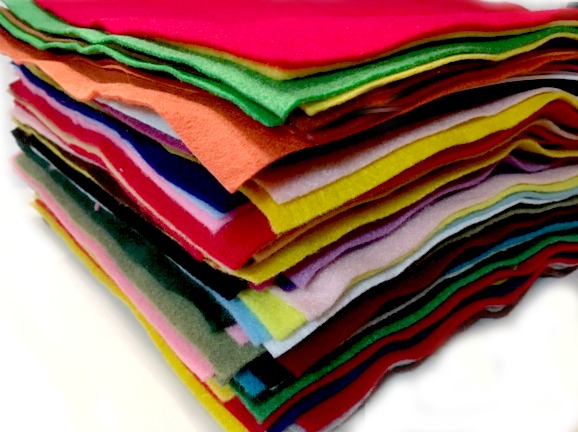
I must admit, I am a bit of a felt hoarder-so I have bought mine from several sources. I found the felt sold by Hobby Lobby for 33 cents was the best quality and value.
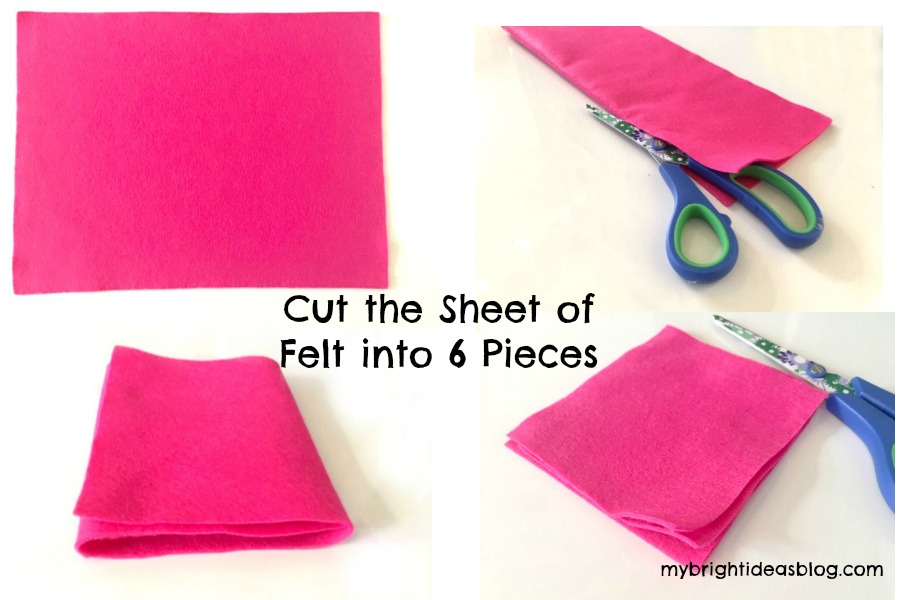
One sheet of felt is usually around 9 1/4 x 12 inches (24 x 30 cm). This is the perfect size to cut into 6 business card holders. Fold the sheet in half lengthwise and cut along the fold. Fold one of those pieces into thirds and cut on the fold. (bottom photos) In the end you should have 6 pieces 4 x 4 1/2 inches (10 x 12 cm).
Have a business card handy to make sure it fits.

To get started cut small love hearts to decorate the outside of the card holder.
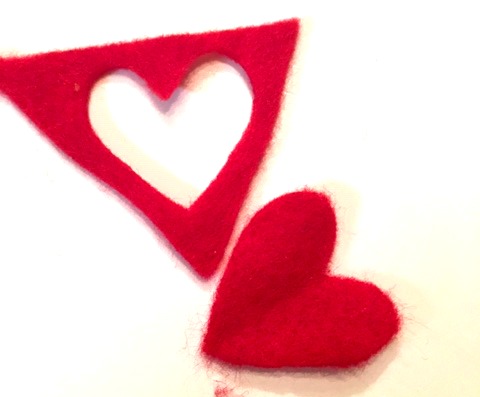
The easiest way to cut a heart is to fold the scrap of felt in half and then cut half the heart so both sides are the same.

Choose matching or contrast embroidery thread.
Divide regular embroidery thread into 2 sections of 3 strands each.
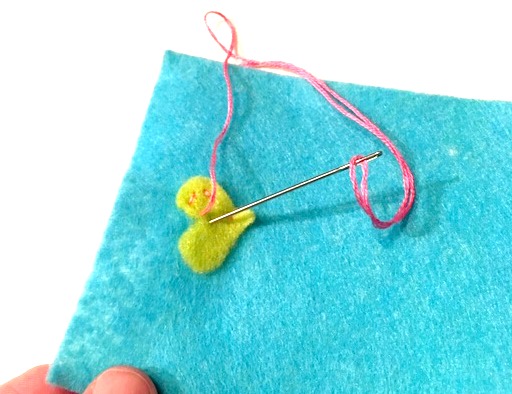
Knot the embroidery thread and begin sewing small stitches to attach the heart to the top of the felt.
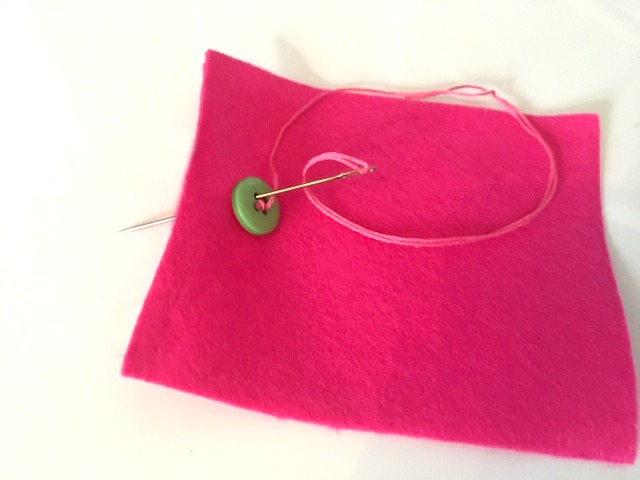
Another idea is just to sew a bright button on instead of a heart. Teaching your child how to sew a button on and a simple hand sewing could really be helpful later in life.
A side note: Would you believe that while I was proof reading this my hubby has handed me a pair of his work pants and a button that just fell off. That proves just my point-thanks dear!
Fold the felt in half to form the little folder to hold the business cards. Here are 3 options we tried for hand stitching.
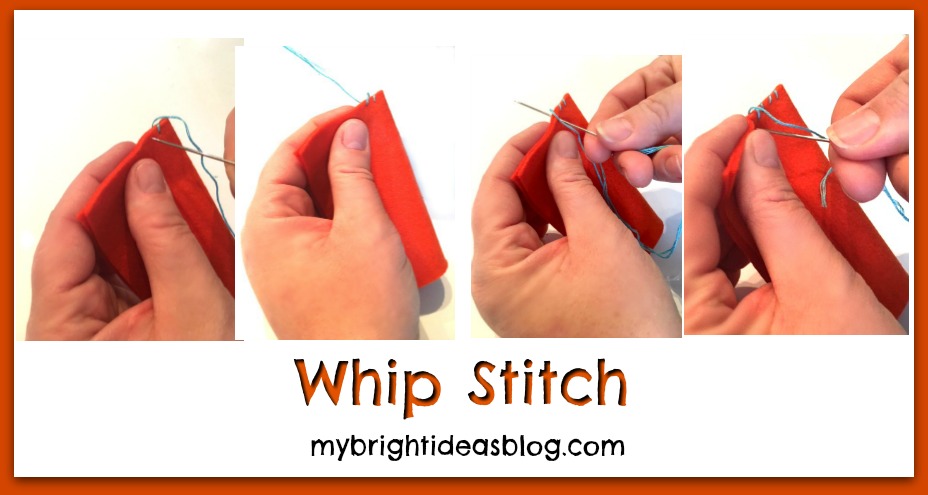
Whip Stitch: Knot the end of the thread and start on the inside of the fabric. Sewing in from the front and out the back and around. Back in the front a smidge to the left of the previous stitch.
![]()
Blanket Stitch: Start from the inside to hide the knotted end, then go through both layers. Stitches can be a bit further apart with the blanket stitch. Go in through the front of the fabric. As you pull the thread through, insert your needle through the loop and pull it securely to make your knot. Insert the needle into the front again the same distance from the previous stitches. At the final stitch go through a second time to make that knot and then insert your needle between the two layers of fabric and cut the thread.
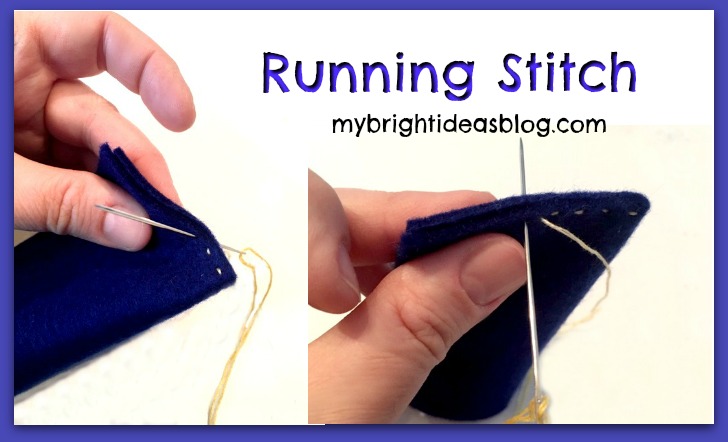
Running Stitch: Knot the embroidery floss and begin on the inside to hide the knotted end. Use a running stitch to go in and out all the way up both edges.
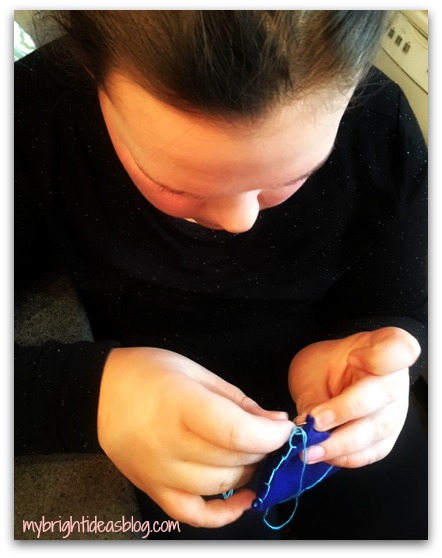
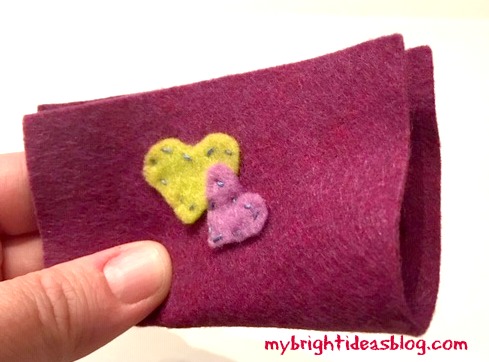
My 11 year old preferred the blanket stitch. Not bad for her first attempt.
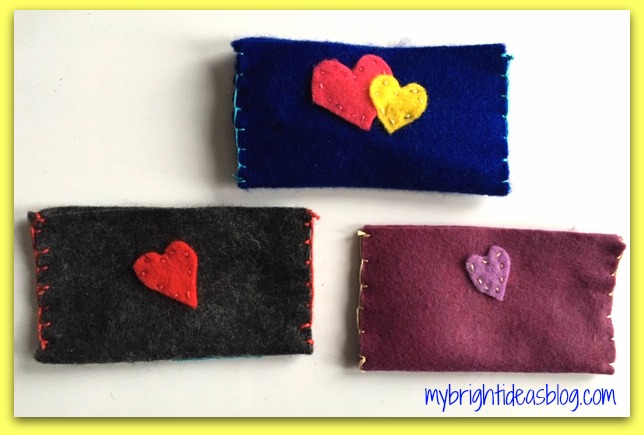
She also liked having one small heart over a larger heart.
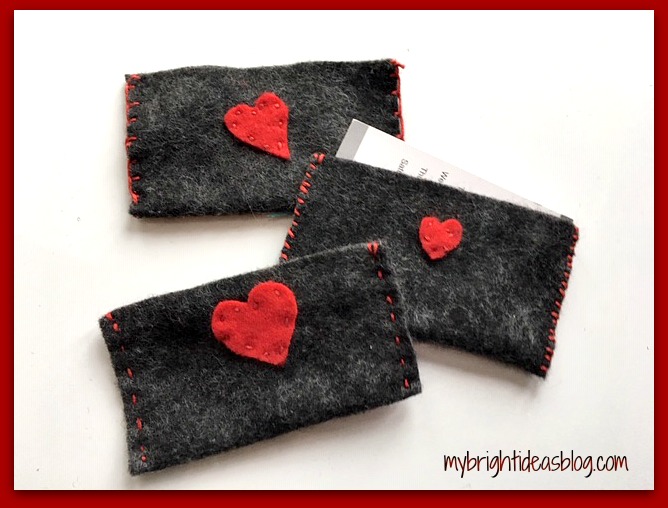
The grey felt with red hearts with red stitching looks pretty good!
Option 2
To make the process faster (as I mentioned we want to make a lot of them)…we sewed the hearts on first and got a little bit faster with each one.
We hand sewed 10 hearts onto squares of felt and ran them through the sewing machine to make a tidy edge.
Could this get any easier! What a great idea…I want to thank my friend Ashley for sparking this idea over dinner last week. Great food, lovely ladies and a bit of craft talk snuck into to the evening…my favorite!
On this blustery, winter day you might be inspired to work with felt too! I have added links to a few of my posts from last year for you skim through and see if an idea is sparked for you too.
Sew a Super Easy to Make Felt Crown – Add to your dress up clothes!
100th Day of School Celebration-Glue Buttons on a shirt for a Gumball Machine
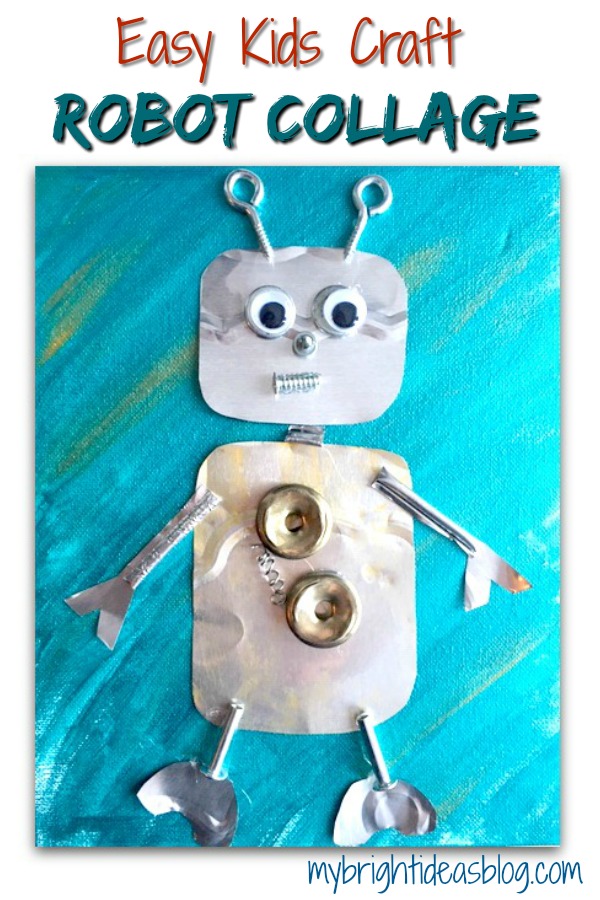
Easy Kids Craft – Foil, Nuts and Bolts Art
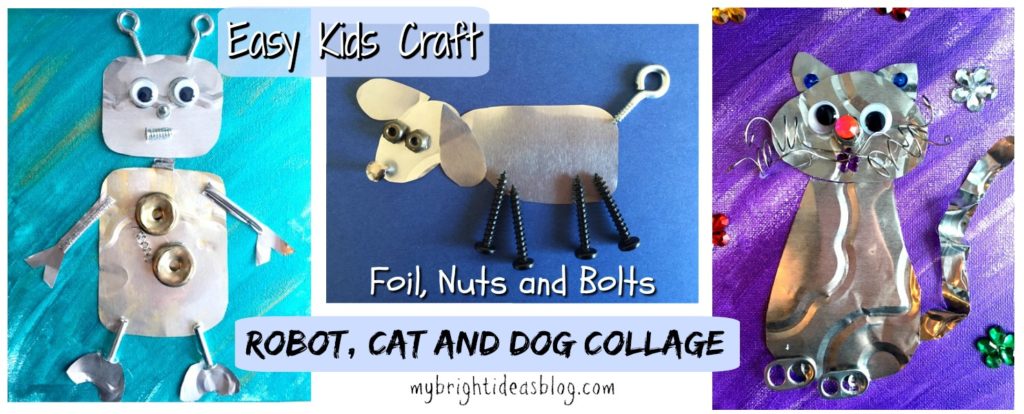
Today’s craft goal is create something fabulous but only use things you already have. Nuts, bolts, a foil cake pan… all of these things can be turned into a super cool craft and wall art for a kids room. We made a robot, a cat and a dog for our examples. But you feel free to let your imagination run wild.
You will need:
- an 8×10 canvas or piece of cardboard
- nuts and bolts and odds and ends
- a foil cake dish
- metallic craft paint and paint brush
- googly eyes (optional)
- scissors
- hot glue gun (or regular glue)
- a sharpie
Warning: This project is intended for older children not toddlers who might put these things in their mouths. Keep an eye on the little parts used for this. It could be sharp or a choking hazard for babies and pets.
Be safe lovely crafters!
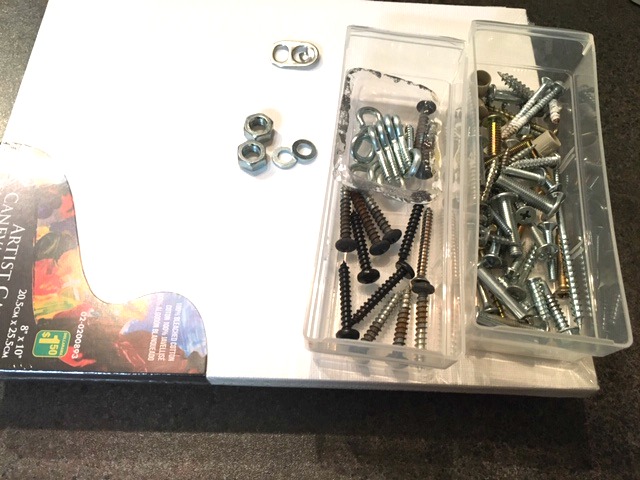
I’m just assuming that everyone out there has a few little miscellaneous drawers of screws from old projects and furniture that won’t be missed if we use them for a random craft project.
The canvas iwas a dollar store purchase. You can get the foil cake pan there too. Or you could just buy a cake or food in one of these pans and do the craft after you’ve licked it clean! :o)
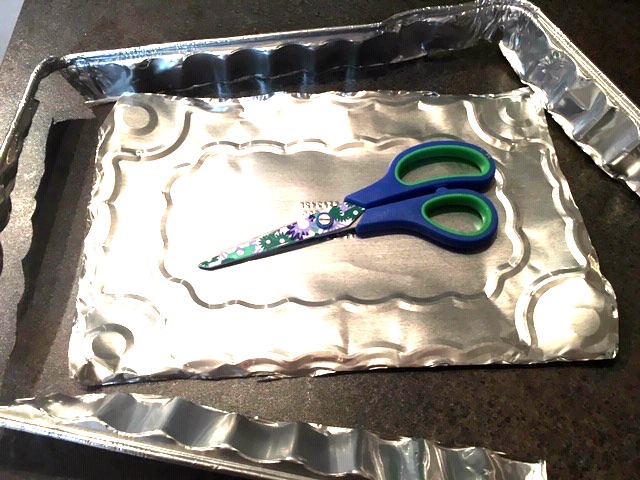
To prepare for this craft, cut out the bottom of the cake pan.
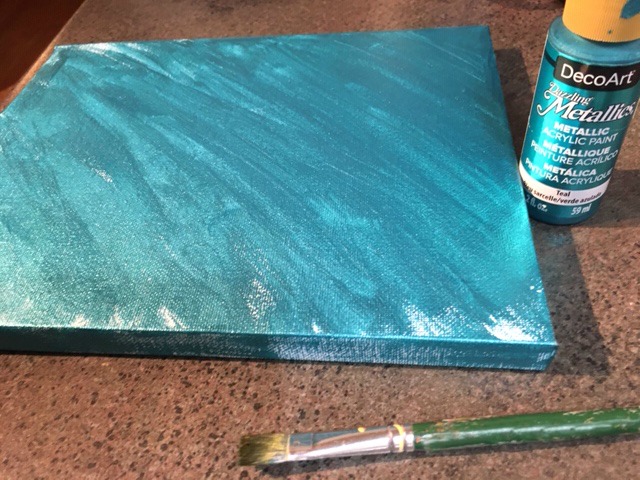
Paint your base canvas. I used metallic paint colours. If you don’t have a canvas just cut a piece of thick carboard to size and paint it.
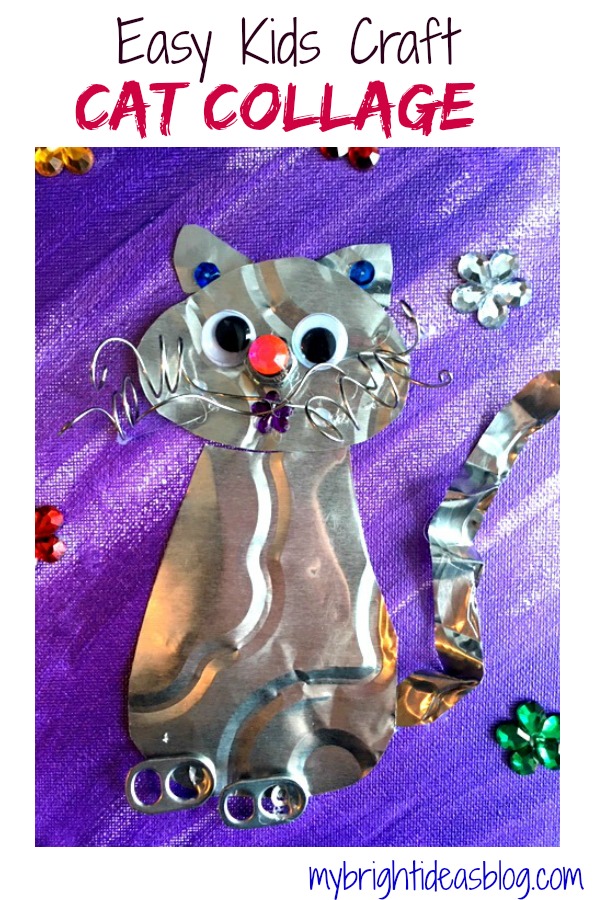
Cat
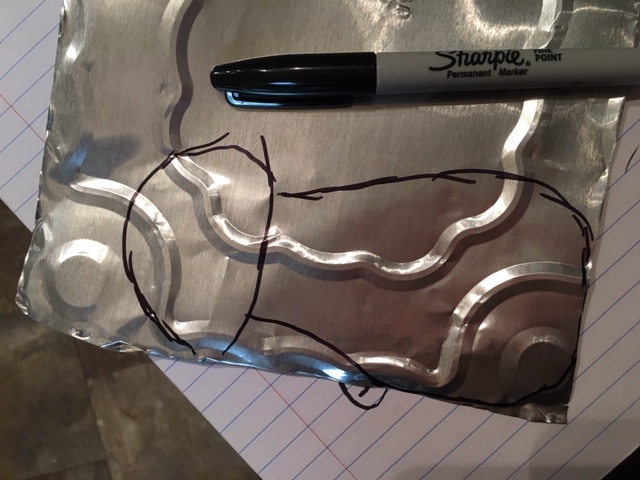
Draw the shape onto the foil with a sharpie. It doesn’t stay permanent on the cake pan foil right away so you can wipe it off if you make a mistake.
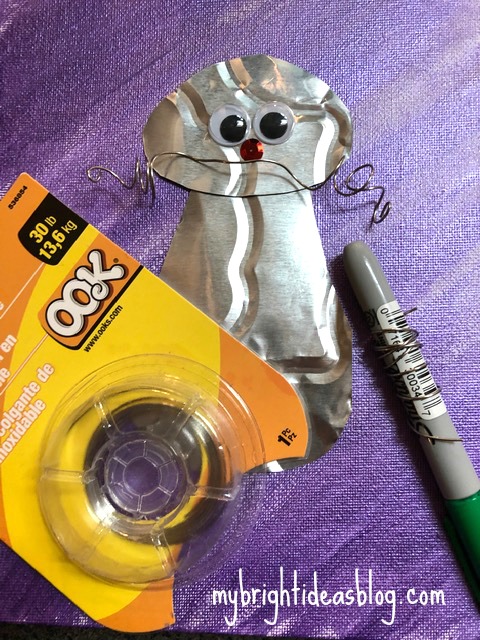
Lay out the pieces before you hot glue them to the canvas. To make the spiral for the cat’s whiskers I wrapped a wire around a pen. Then I stretched the wire out a bit so it looked a bit crazy. Wire is a bit hard to glue on. Find some points that will be touching the canvas and add a drop of hot glue to just those spots.
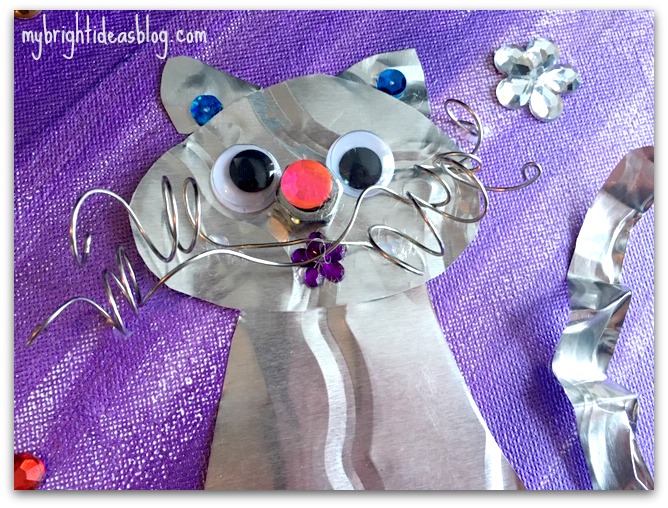
I used a bolt for the cat’s nose and then put a gem on top. For the tail I took a part of the edge of the pan and scrunched it a bit to give it extra wave. Secure it with a few dots of glue to the canvas.
The one gem on her nose looked so nice-I added one for the mouth, 2 for the ears and some big ones randomly around the cat.
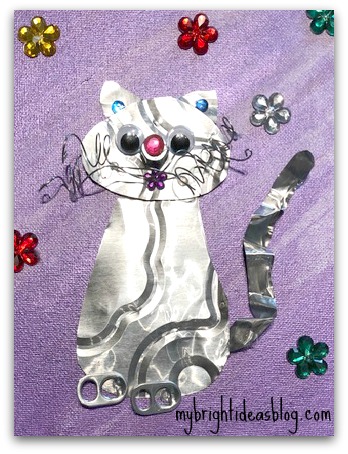
I almost forgot to mention the two pop can tabs were added for feet!
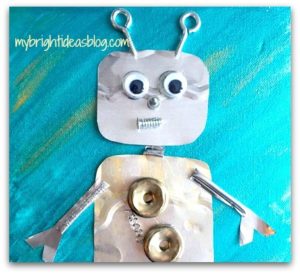
Robot
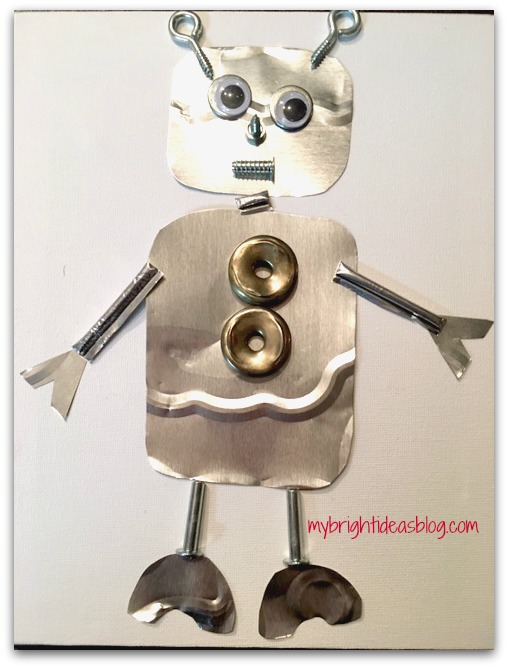
Again for the Robot, lay out your materials and arrange them together for the collage.
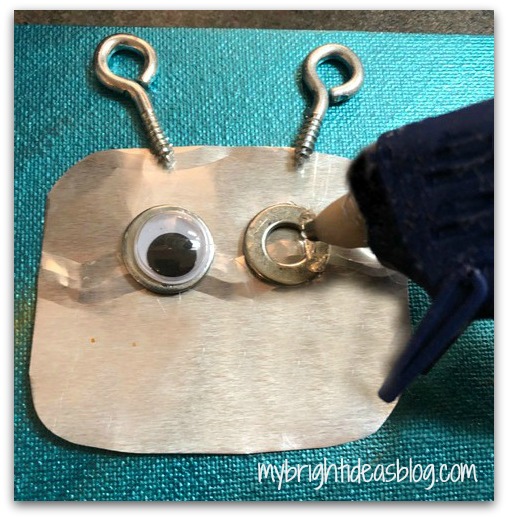
Secure each item with glue to the pre-painted canvas.
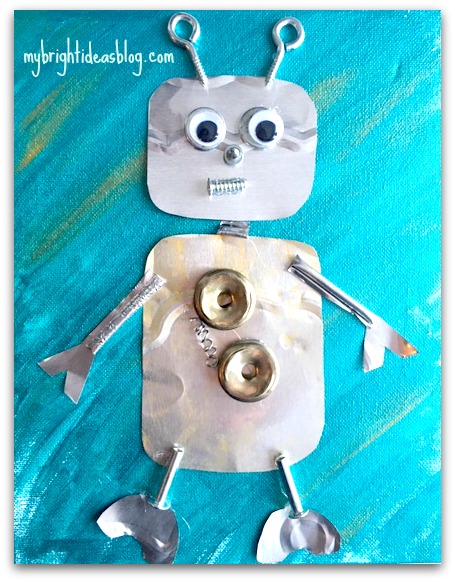
The robot is made of 2 squares with rounded corners. A few miscellaneous items from the junk drawer and cut up scraps from the foil cake pan. The wire on the middle of the robot is the same wire from the cat project but it looks smaller because I wound around a smaller object. If you have a spring from an old pen it would be similar.
This robot turned out great! You’ll love how the metal of the foil reflects the light.
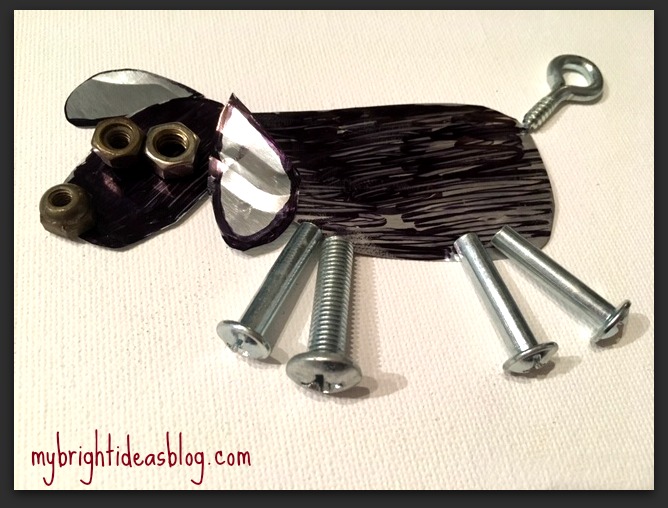
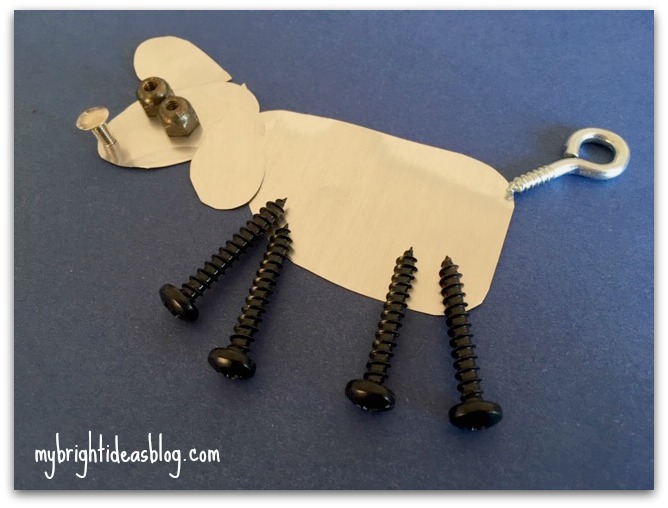
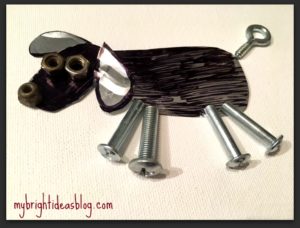
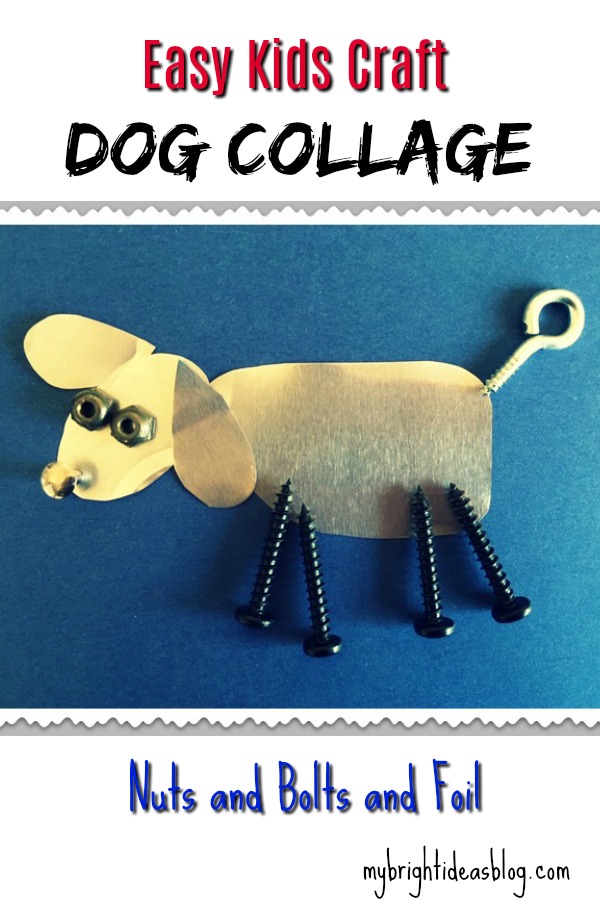
Dog
The dog is simply 4 pieces cut out of the cake pan.
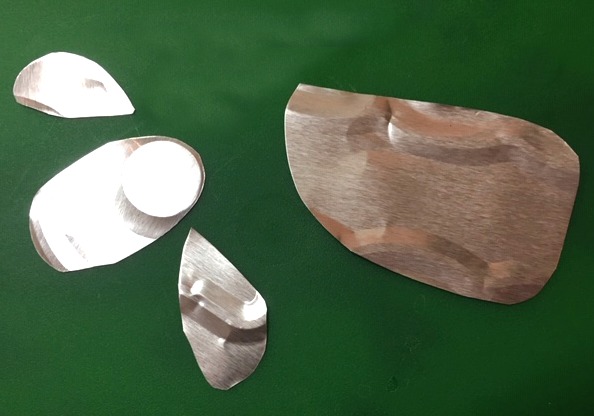
I made one on a white canvas so I colored it in with black sharpie.
I also make another one on a piece of dark blue cardstock. The foil cake pan looks white in this photo but its still metallic silver. I think it looks like a sheep! Bahhhhh.
This was a super easy and fun craft to make!

Here are some previous blog posts with simple fun projects for the kids!

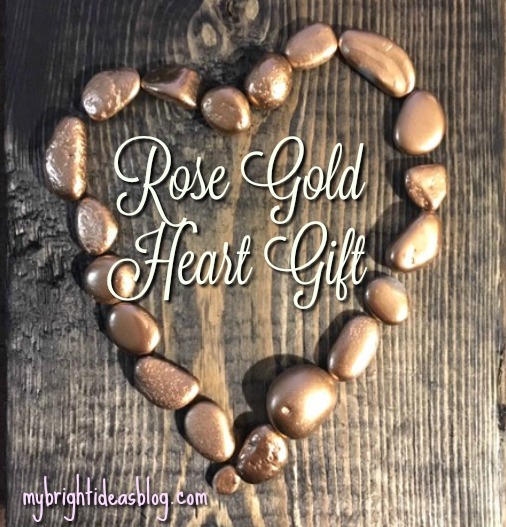
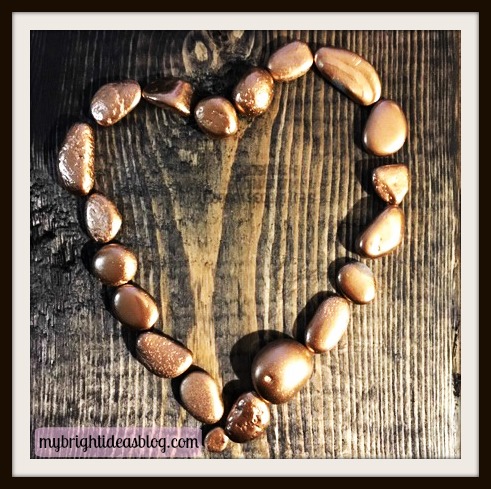
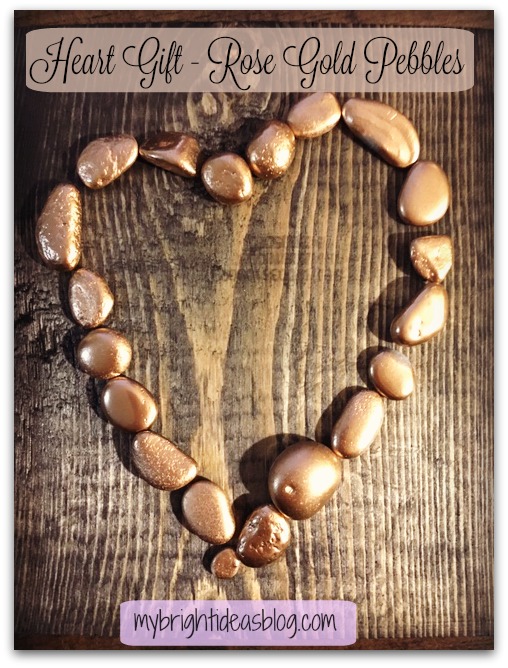
Rose Gold Spray Painted Stone Heart Gift Idea
Rose Gold Spray Painted Stone Heart Gift Idea!
Love is in the air this week! We had a family wedding yesterday and it’s inspired another heart gift.
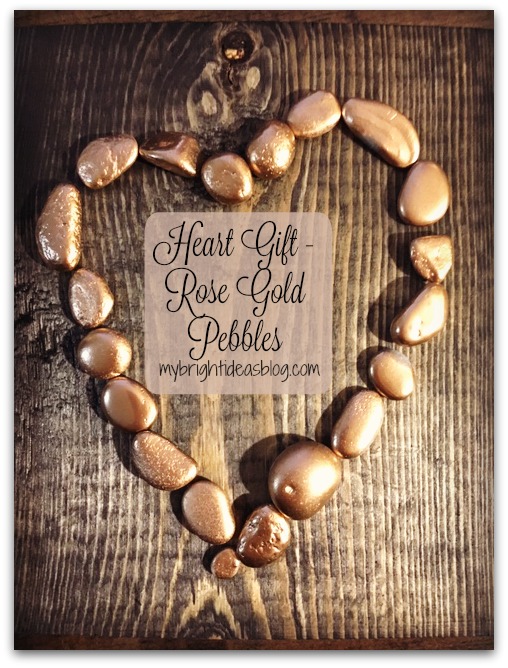
You may recall from previous posts that I have stack of cut wood scraps that I keep making into little plaques. Well, here is another one. This is so easy we could almost turn it into a kids gift if we used craft metallic paints instead of spray paint and white glue instead of the glue gun.
You will need:
- Krylon Foil Metalic Copper Spray Paint
- Pebbles
- Scrap of wood approx. 6 x 8 inches
- Dark wood stain and Rag
- Hot glue gun
- Picture hanger or eye screws and rope (optional)
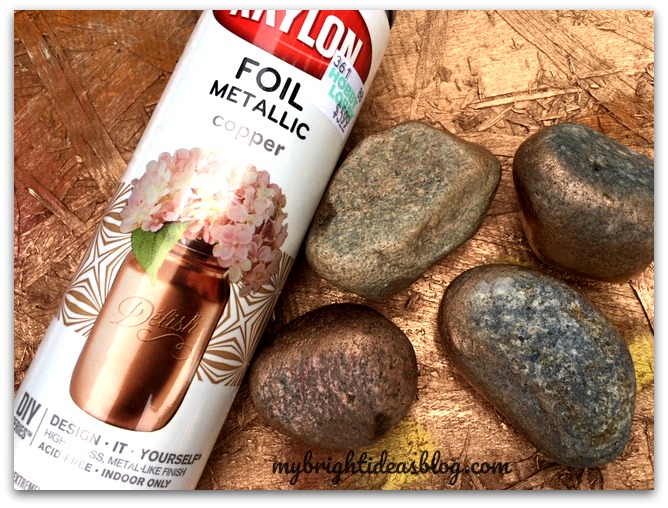
I picked up this pink gold Krylon paint from Hobby Lobby for $5.99. Rose Gold is such a pretty color. I love shoes and purses and cell phone covers in this color.
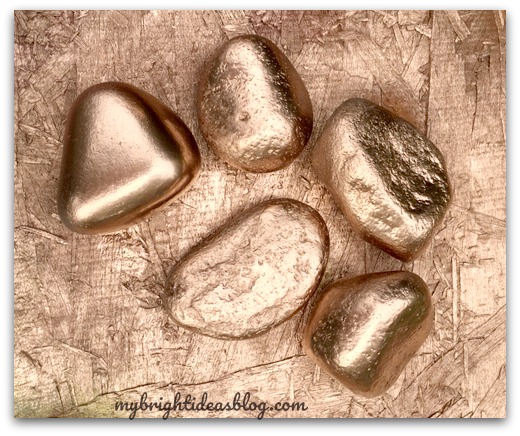
Spray paint the stones with pink metallic paint, allow to dry for 30 minutes and then check to make sure the sides are covered. Reapply to areas if needed.
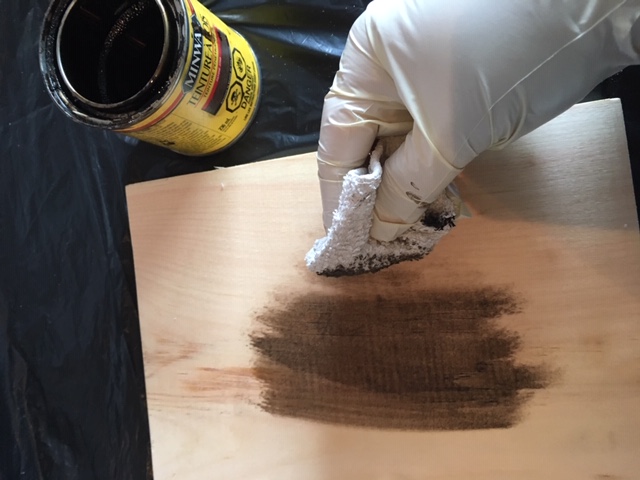
While the pebble are drying, grab a rag and your dark wood stain. I used Minwax Jacobean. If you have walnut on hand it will have a similar impact.
Before you go further you should consider if you want to hang this on a wall or just lean it on a shelf. If you decide to hang it you should put the hangers on now.
This option requires hammering tiny little nails into the back of the wood. Then it can hang on a nail.
For a rustic looking alternative you could screw eye hooks into the top and hang it up by a rope.
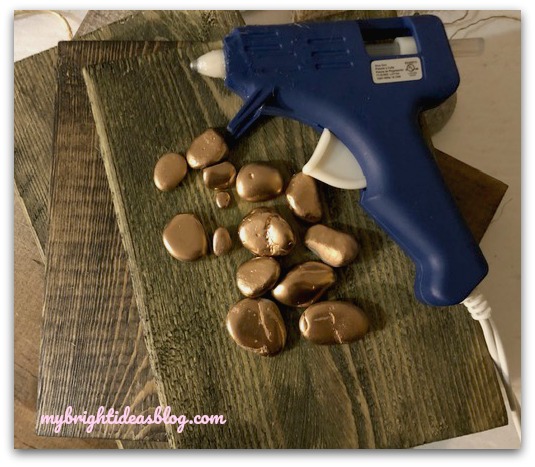
Lay out your pebbles in a heart shape and get your glue gun.
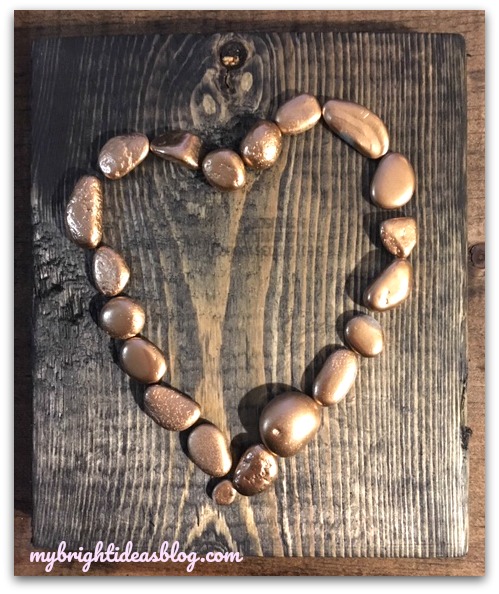
Using your hot glue gun, secure each pebble in place in a heart shape. That is all there is to it!
Scroll down to see some of my other wood and pebble art projects….
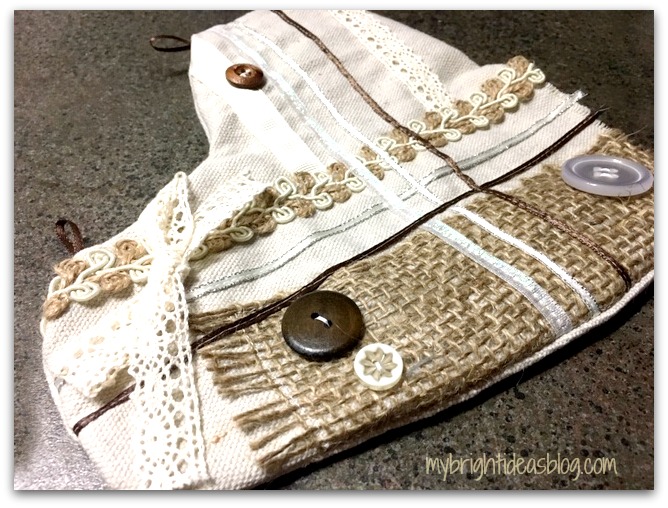
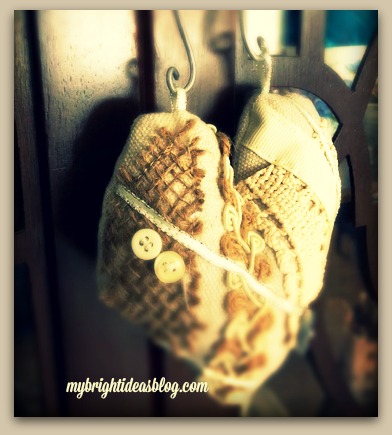
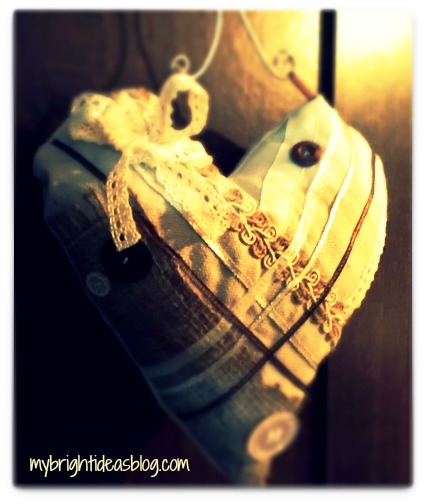
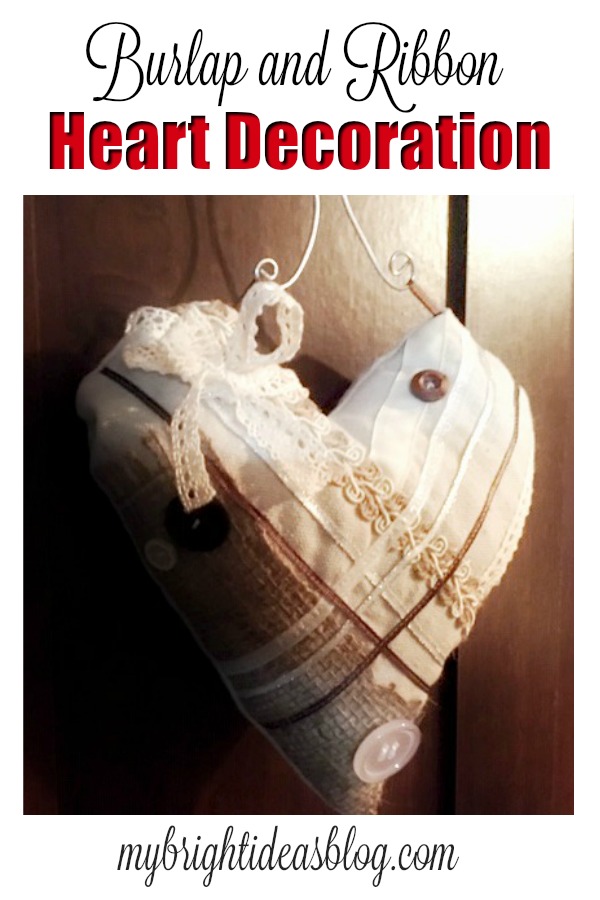
Burlap and Ribbons Heart Decorations
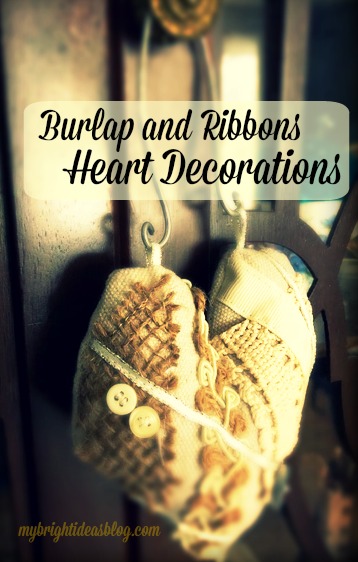
Love is in the air this week! There is a family wedding soon so its time for a beautiful, rustic, heart shaped craft with ribbons and lace!
This pretty little decoration uses up scraps of fabric and trims you already have.
You will need:
- scraps of fabric (I used a piece of drop cloth-it looks like linen)
- paper and pencil
- burlap
- ribbon
- lace
- pretty little buttons
- stuffing
- sewing machine
- scissors and pins
- wire and pliers to hang it up (use string or ribbon if you don’t have wire)
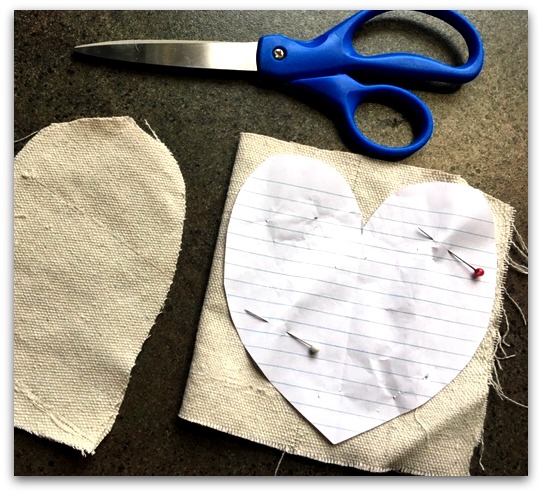
Use a piece of paper to decide what size of heart you would like. Cut the paper into a square. Fold it in half and draw a half heart. Open the page and pin it to your fabric.
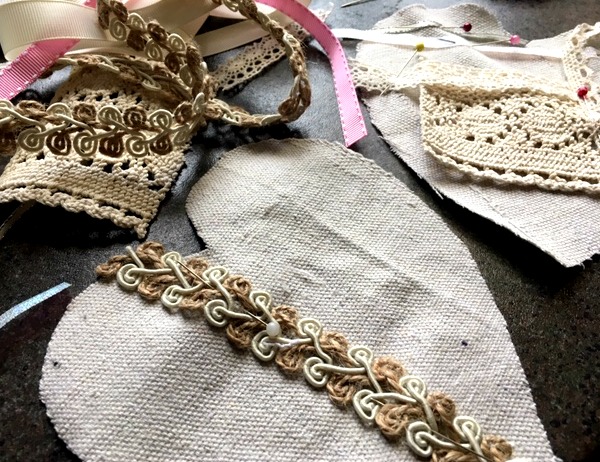
Lay out the ribbons and trims on your heart shaped fabric. My beige fabric looks like linen but its a scrap of a drop cloth from tote bags I have made in the past.
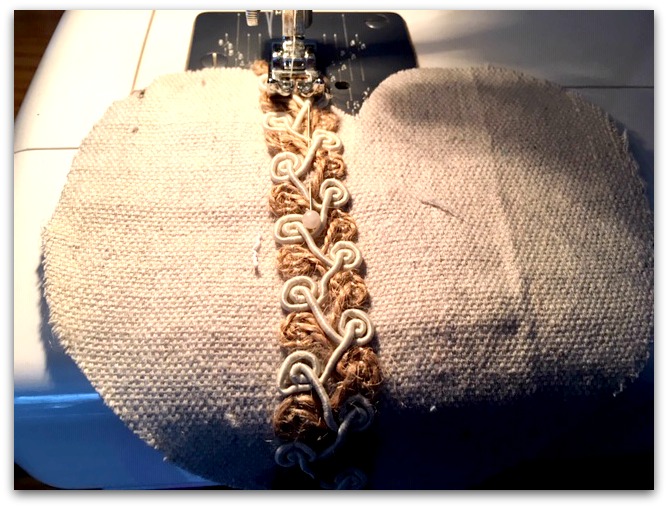
Using a sewing machine, sew each piece of trim, lace or ribbon into place.
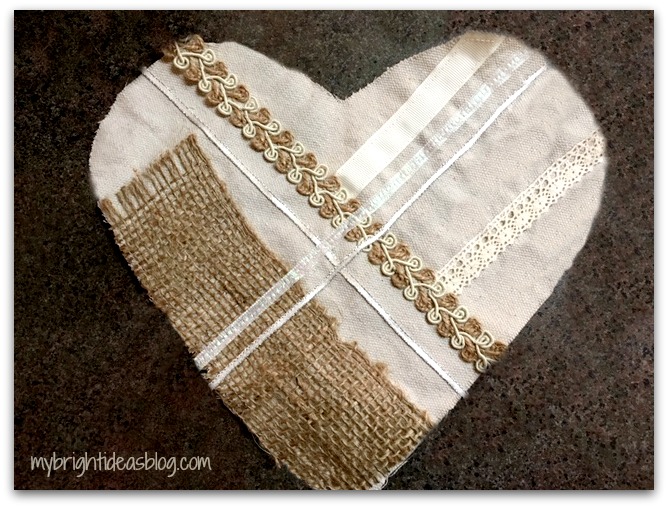
The trims look really nice crisscrossing each other. Try different random pieces. Burlap adds rustic texture to the project.
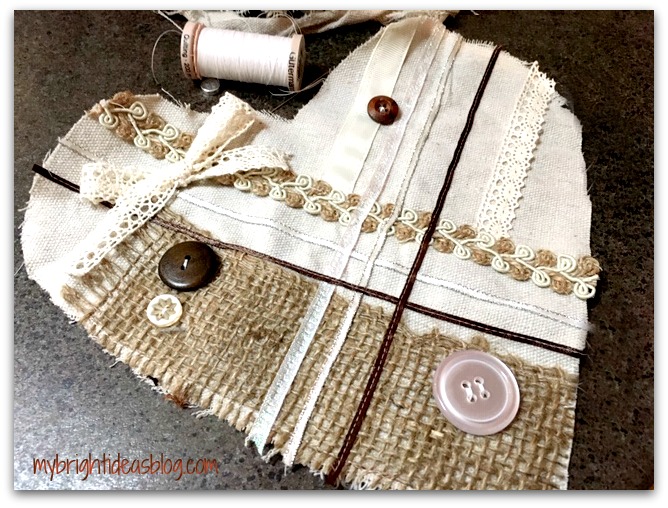
Add buttons and bows to the project. Remember not to place them too close to the edge because you need to sew around the edges.

Add 2 tiny loops of ribbon to the top edge and sew a few stiches to keep them in place.
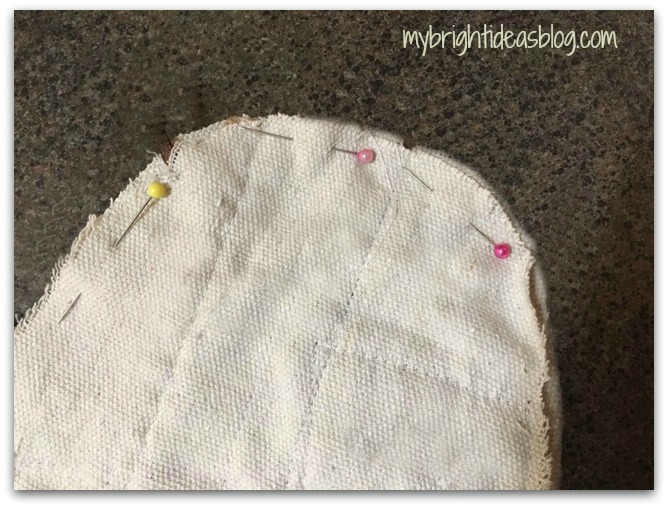
Pin the two heart shaped pieces of fabric together with right sides facing inwards. Sew around the edge leaving a 1 1/2 inch gap opening so you can later turn it inside out.
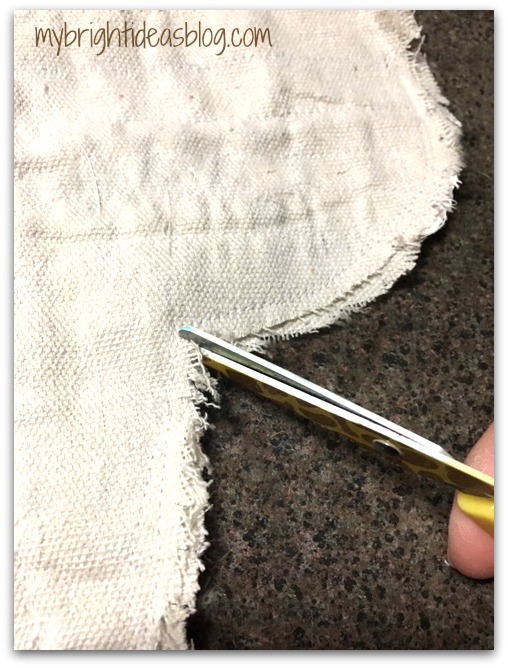
At the top of the heart snip a tiny cut and a few snips around the rounded parts of the top of the heart. Do not cut through the stitched areas.

Open the gap and pull the fabric through the hole to turn it inside out.
Add stuffing.
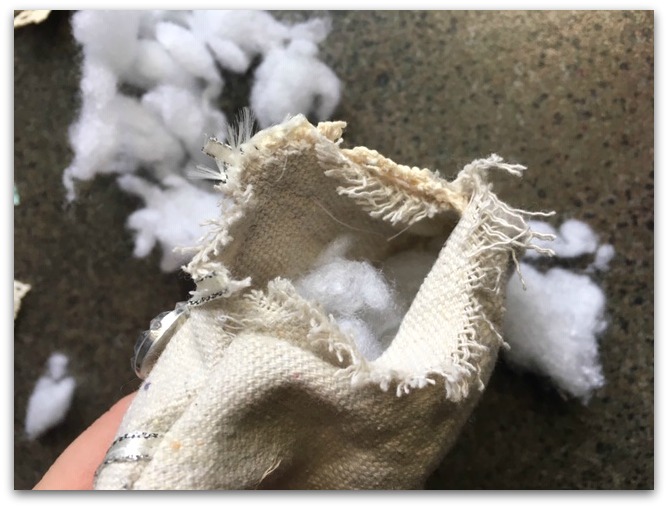
Fold over the edges at the opening, pin in place and hand sew the opening closed.
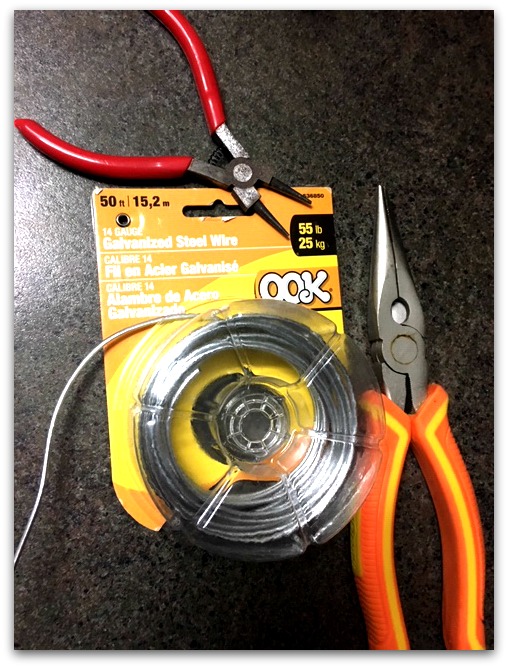
I love wire crafts so I had lots of left overs! For this project I used 14 gauge wire from the hardware store. Use big pliers to cut the wire approx. 8 inches long. Fold the wire in half. (if you don’t want to use wire just use ribbon or twine to hang it)
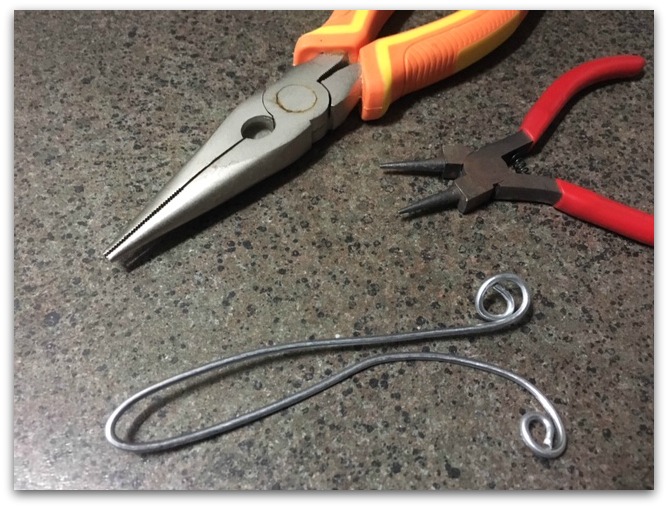
Using round plyers twist the ends into a bit of a spiral.

Hook the ribbon loop around the curled ends of the wire.
These turned out so pretty!
In the past year I’ve done a few heart shaped gifts and projects. Have a look below!
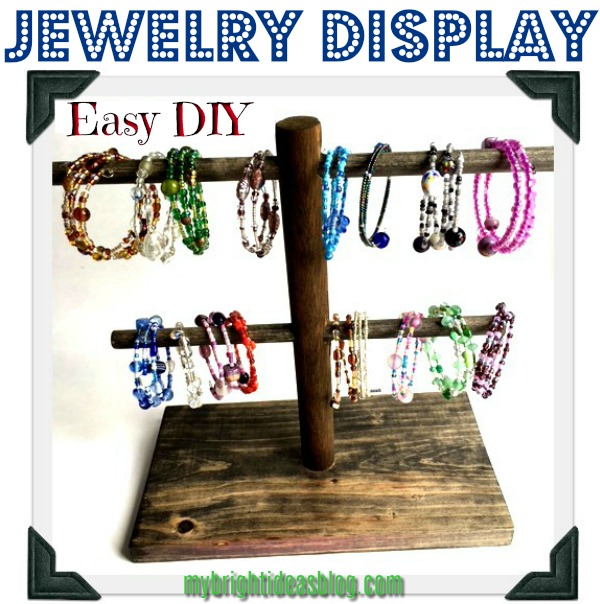
Make a Jewelry Display Stand- Easy Diy
How to Make an Wooden Jewelry Display
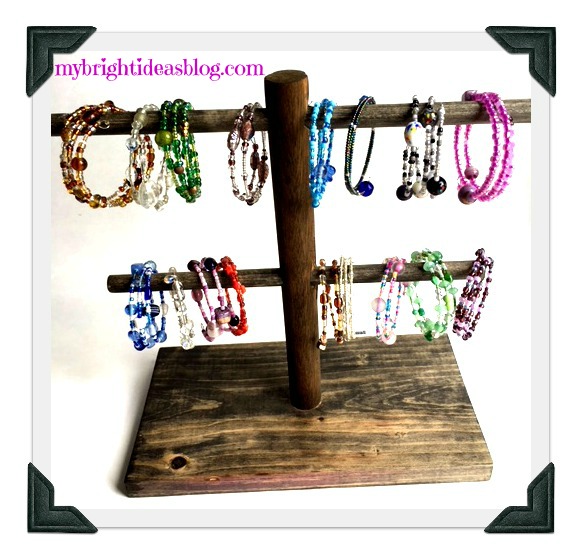 Here is an inexpensive solution for storing or displaying your jewelry. Make this wooden bracelet stand for either home or your craft sale display table or booth. As I have mentioned many times before…at the office where I work we have a craft table. Loads of my blog crafts or my daughter’s crafts end up on this table. When my eldest daughter and I were into making memory wire bracelets we needed a way to display them. They turned out great! Here is a link to that post!
If you have a few minutes and a few dollars you can make this fast and easy. Not surprisingly, I had all the supplies on hand from left over scraps from older projects. So this didn’t cost me a penny! (Fun fact…Canada doesn’t use pennies anymore..does that mean we can’t use the old cliches? Penny for your thoughts etc.)
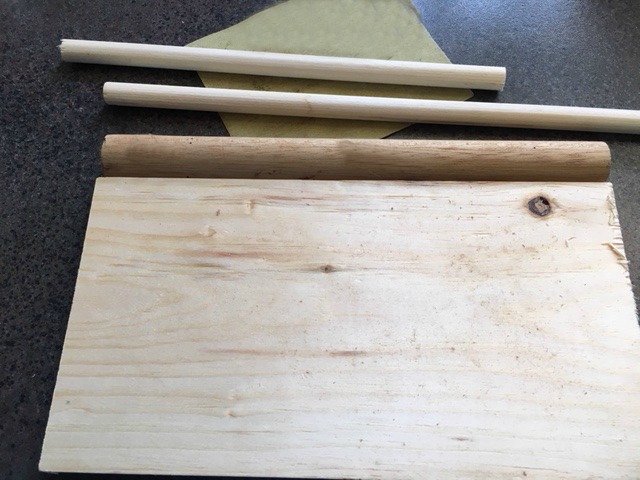
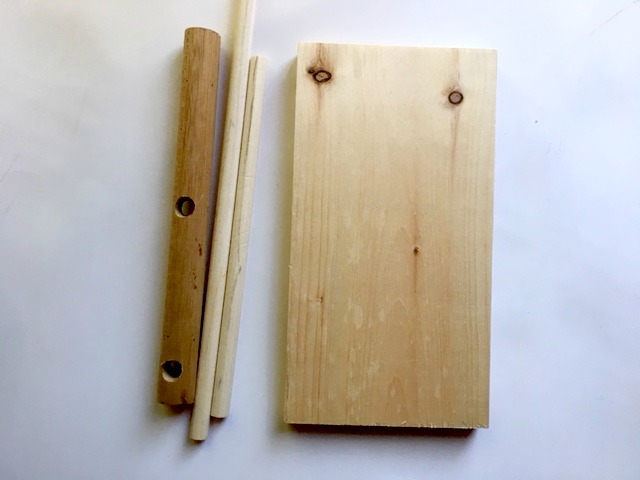
You will need:
- a board 5 1/2 inches by 10 inches (approx. size you can use a scrap that is close to this)
- 3/4 inch dowel (cut to 10 inches long)
- 1 inch dowel (cut a piece 10 inches and another 13 inches long)
- sandpaper
- 1 1/2 deck screw
- drill (to pre-drill the holes)
- 3/4 inch drill bit
- wood stain and rag (optional)
- sheet of cork for the base (optional)
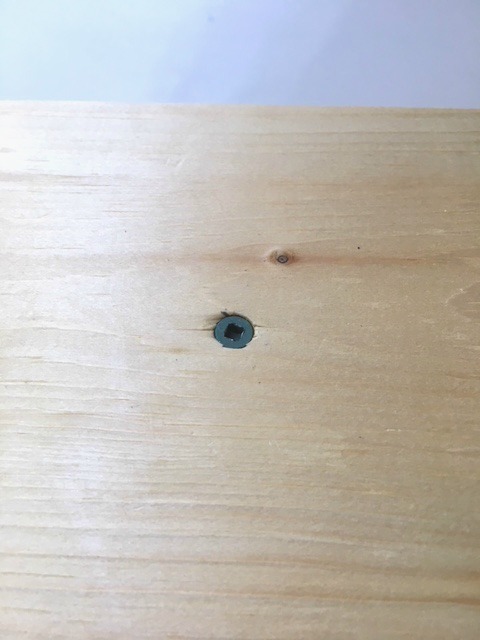
Choose which side of the board is going to be facing upwards. Smooth the splintered ends with sand paper.
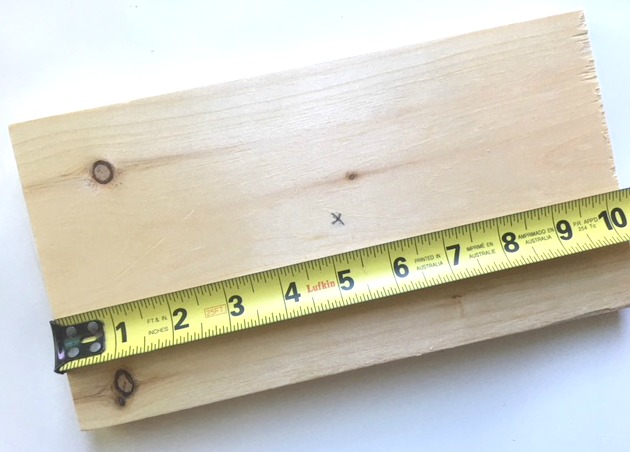
On the bottom side, measure the centre of the wood length-wise and width-wise.
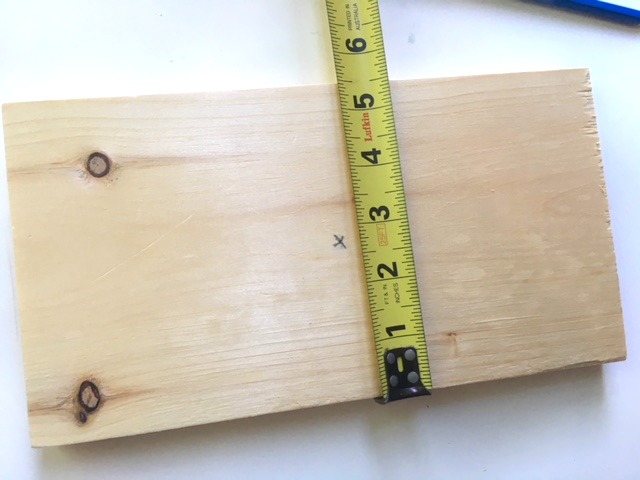
Mark an X in the centre.
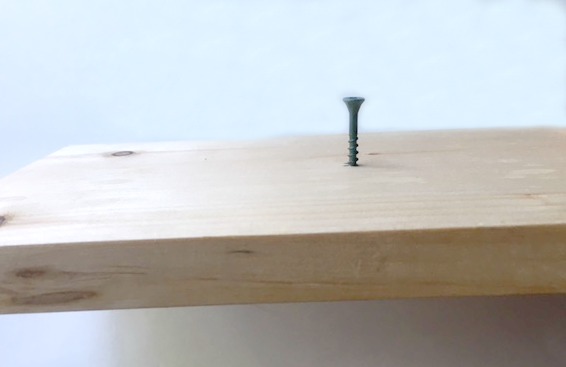
I predrilled the screw in a bit and set it aside for a moment.
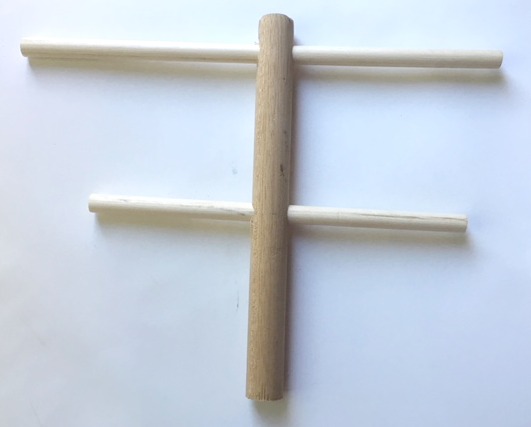
Now we need to get the big drill bit out and drill the holes in the dowel that will be vertical.
This piece of dowel was an old curtain rod. I just used a handsaw to cut this down to 10 inches long
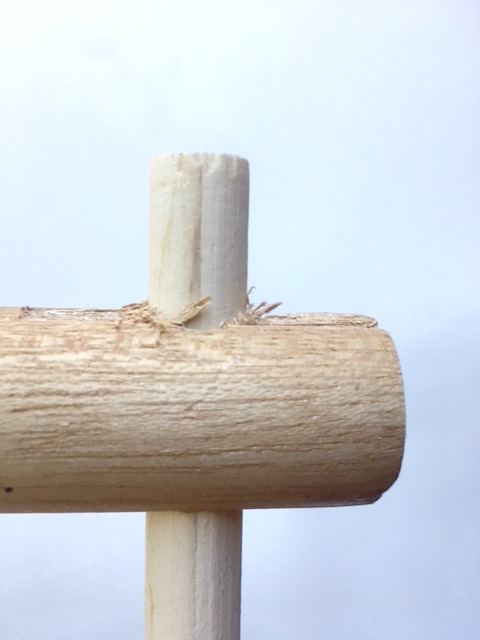
Drill the first hole about an inch from the top. I started by using a small drill bit to start the hole and then switched to the large drill bit to do the rest. Test it out to see if your dowel will slide in. If its snug twist it a bit. If it doesn’t go in drill the hole again moving the drill bit in and out to shave a bit more off the edges. Remember to sand off the slivery bits the drilling causes.

Drill the second hole about 4 or 5 inches from the top one. Before you drill you could use a bracelet to see if that looks like the right distance to have the next dowel added.
Now you can put it all together or you could stain it first while its all apart.
For some reason I put it together first and stained it after.
Oh! I should mention that I predrilled a hole in the bottom of the dowel so it would drill easily to the base.
Using a drill or a screwdriver attach the base to the upright dowel. Easy as pie!
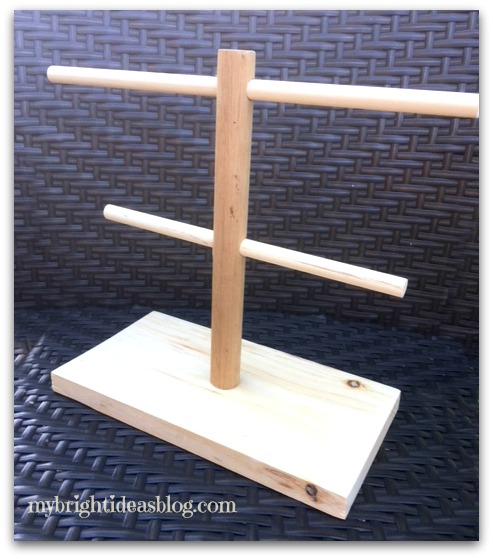
You could leave it plain or stain the wood. I used Minwax stain “Jacobean” to finish mine.
Once the project is all together and the stain is dry you may want to put cork on the bottom side so it slides nicely on your furniture.
Have fun creating something new with your scraps of wood and dowel. Below are a few of my other projects using scrap wood.
Thanks for stopping by!
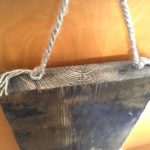
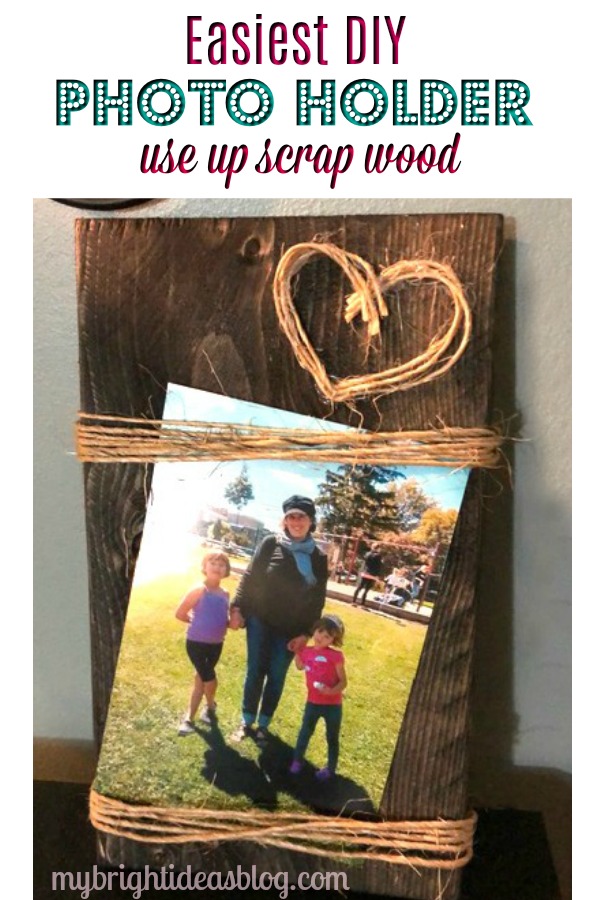
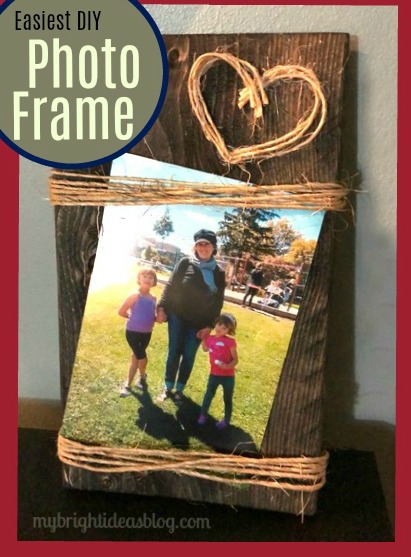
Easy Wood Photo Frame Idea
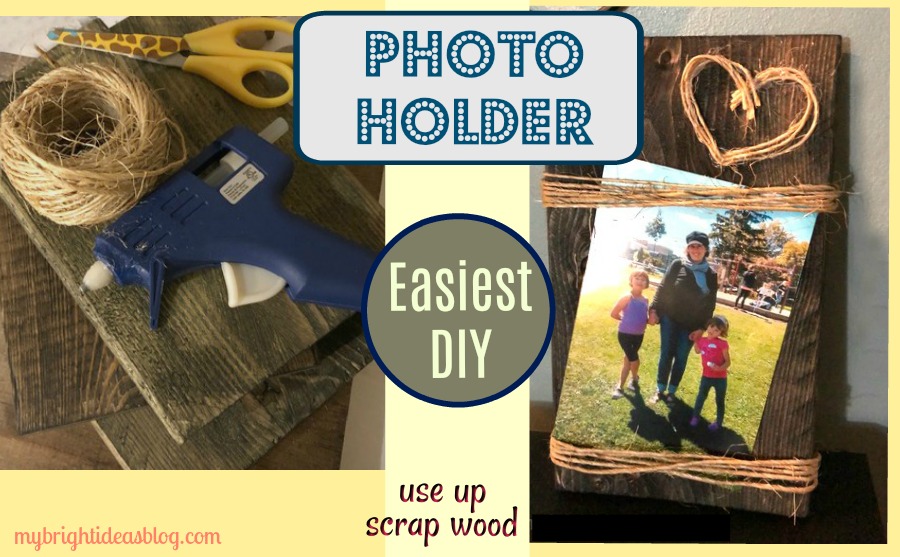
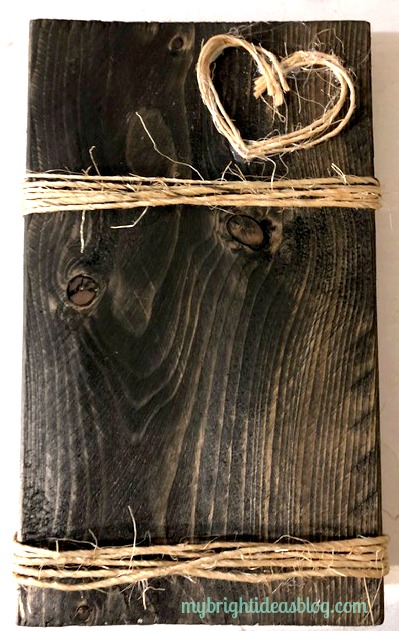
Let’s make a 5 minute craft that looks great-a rustic picture frame that holds a typical 4×6 photo.
Before the winter weather came in our direction I planned ahead for winter crafts by cutting up scraps of lumber and coating it with a bit of dark wood stain. You never know what sort of crafts could use a bit wood and hot glue gun. I’ll post some other wood scrap ideas at the bottom of the post.
Rustic Wood Photo Holder
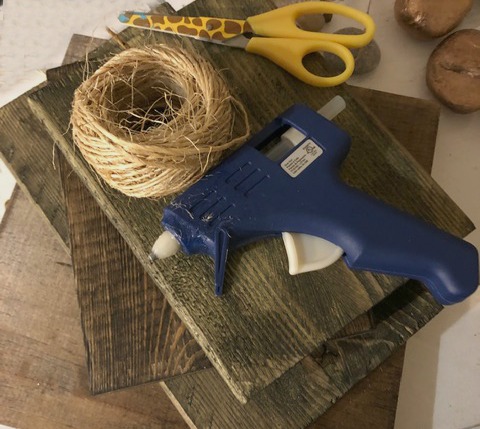
You will need:
-
- a scrap of wood approx. 5 inches by 9 inches
- walnut wood stain
- rag
- basic twine
- hot glue gun
- ruler
- picture hook or eye screws
- 4×6 photo
The piece of wood I used was a 1×6 board originally. In actuality its more like 5 1/4 inches wide and 9 1/4 inches long (13cm x 24cm). Use what ever you have this doesn’t need to be exactly the way I did it.
Stain the wood with a rag dipped into a dark brown stain such as Minwax Walnut or Jacobean.
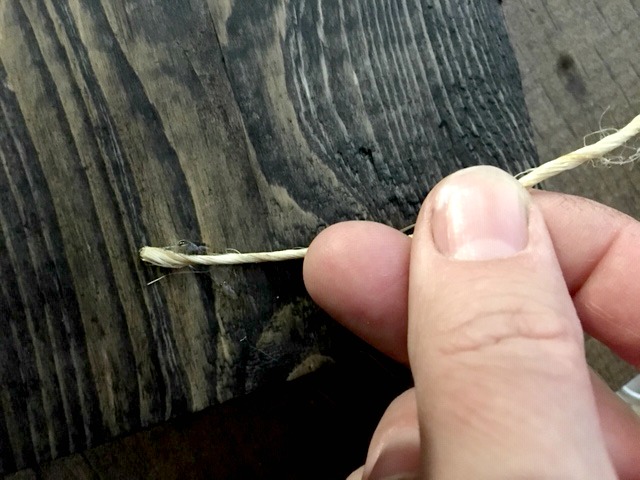
After the stain is dry, choose the better looking side to be the front. Turn it over and using a hot glue gun, glue the end of the twine to the back of the wooden board approx. 1 inch from the bottom.
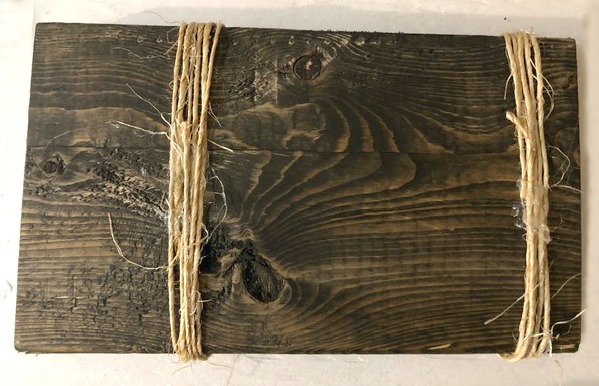
Wrap the twine around the board approximately 5 times keeping it fairly tight and adding more hot glue to secure each line of twine.
Repeat again 5 and 1/2 inches away from the first twine wrapped section. Have a 4×6 photo handy to test out the distance you would like the top and bottom of the photo.
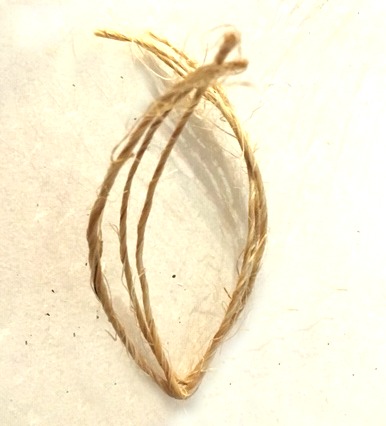
Take 2 or 3 strands of twine and cut to 7 inches long.
Bend the twine in half so there is a point for the bottom of your heart.
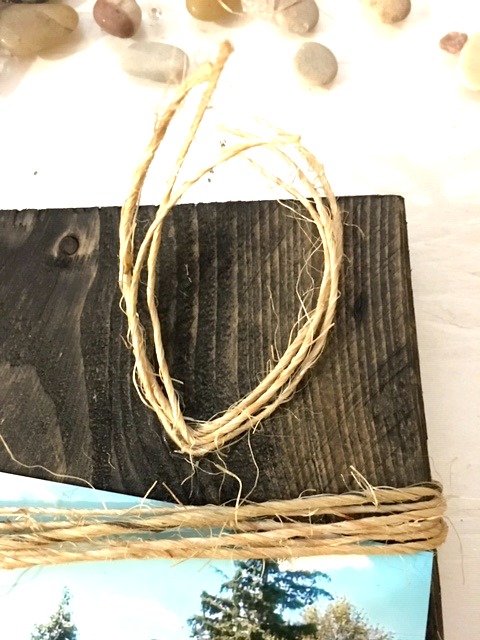
Add a dab of glue to the bent area of the twine and secure it onto the board. I added to the top right.
Add more small dabs of glue at the top of the heart. Use very little here because we don’t want it to dribble and show on the finished side.
If you would like it to be able to hang up on the wall you could hammer in a picture hook. Another option is the screw in eye hooks and tie more twine or jute rope to hang it up.
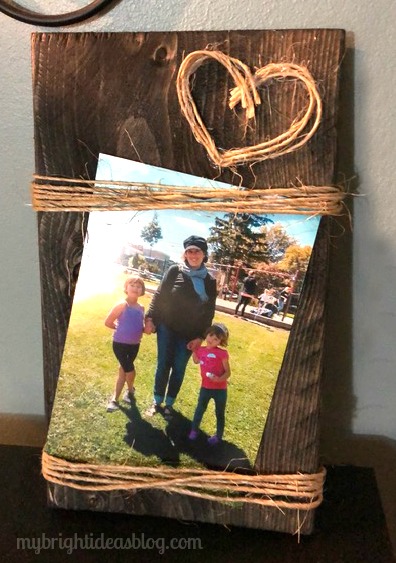
Add a special photo and give it as a gift.
I put this on the craft table at work and it sold right away! Fortunately, I have a stack of wood ready for more crafting. See the links below for more ideas for how to use up the little pieces of wood you have in your cut off scrap pile.
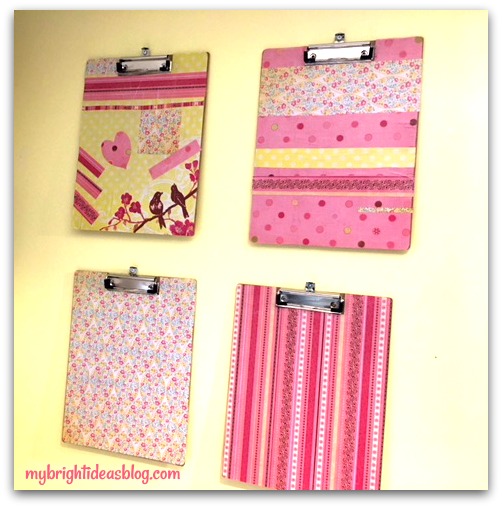
Mod Podge Clipboards! Great teacher gift idea!
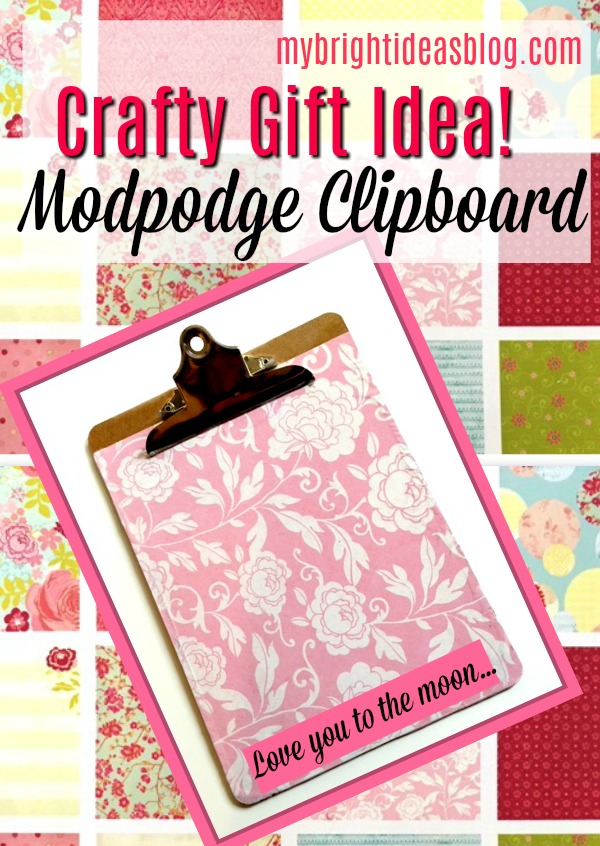

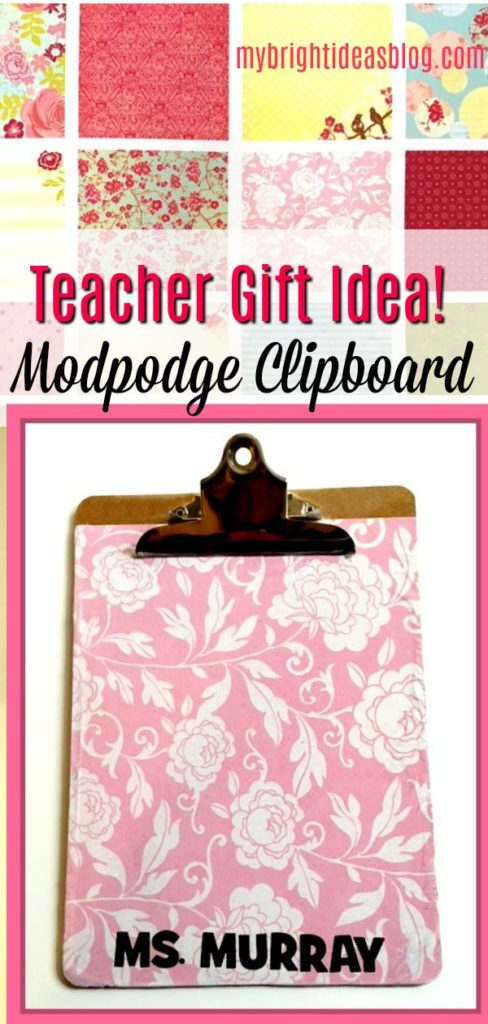
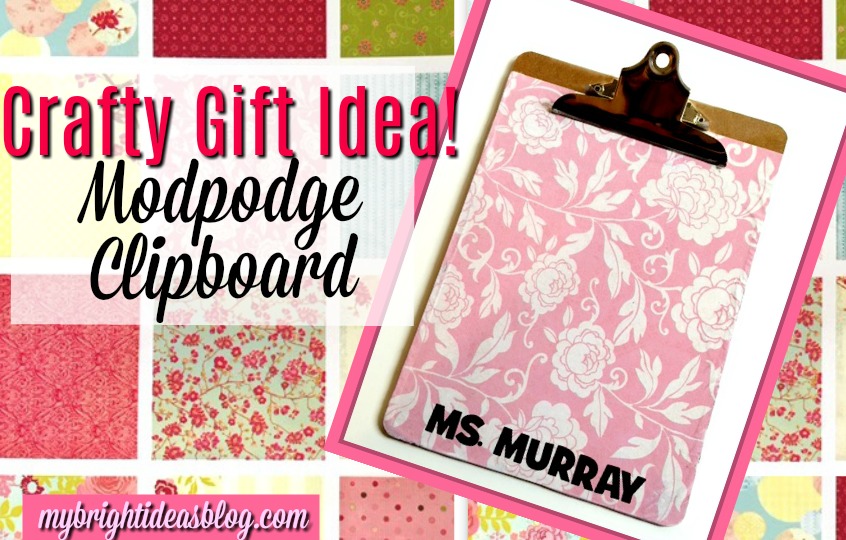
Upcycle a boring clipboard with Modpodge and Scrapbook Paper! Okay this is not my bright idea. Lot’s of people have done this so I got on “board” with the clip boards too. Tee hee hee!
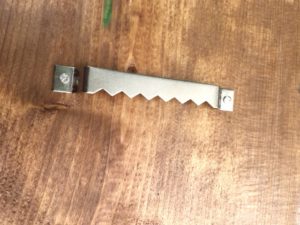
 There are more than one style of clip on clipboards and you can do this with either style. I prefer the above style to hang on a nail with shopping and To Do: lists. If I’m going to add and take away pages frequently I would use the big solid clip style. Today we are jazzing up boring old clipboards!
You will need:
- a brown clipboard
- scrapbook paper
- pencil and scissors
- mod podge or craft glue
- 1 foam brush
- gift card or credit card (that you don’t want to use again)
- letter stickers (alphabet)
Size is important-use 12 x 12 sized scrapbook pages.
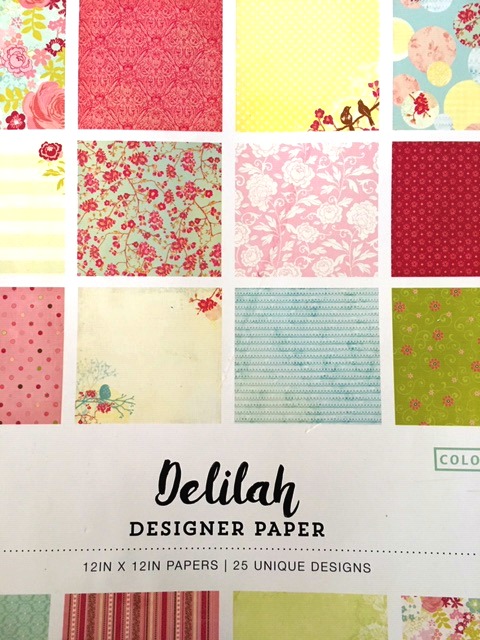
I found this book of scrapbook paper on at Walmart. The pages appealed to me because it looked like a spring country quilt. It has 50 sheets in the book and I think it cost $8.00. That is great value lots of left overs to make other items around my workbench to match!
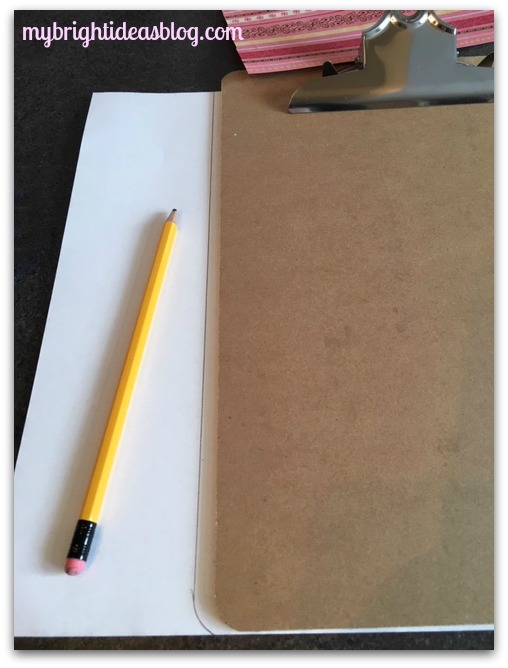
Trace the clipboard with pencil onto the back of the scrapbook paper. Carefully cut out the shape on your pencil line.
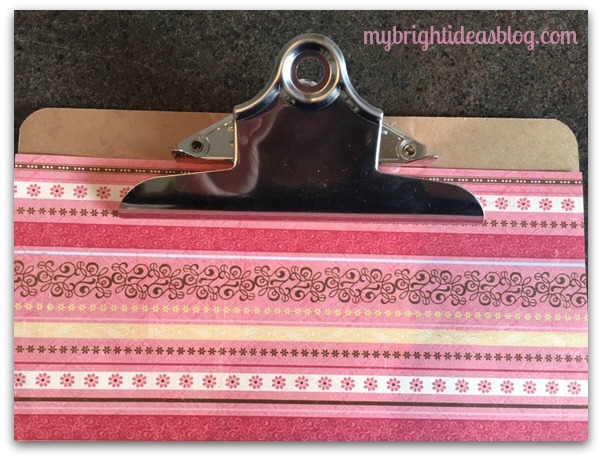
Before you add any Mod Podge test out the paper on the front. You can cut around the metal clips and/or add pieces to make it solid at the top. I was working with my daughters for their teacher’s gifts so I kept it simple and just pushed the page up to the clip. Trim any excess very close to the edges.

Spread Mod Podge on the front of the clipboard. It requires a lot because the clipboard will absorb a lot of the Mod Podge. You could probably prime the clipboard with paint to help this but it would add on an extra day for the paint to dry. We left this project to the last week of school and had to work quickly.
The next step is most important, so take it slowly. Have a helper hold the clip open for you. Sort of hover the page over the clipboard. When it looks perfectly lined up push it into the Mod Podge. It’s pretty impossible to move after this step so its a little nerve racking.
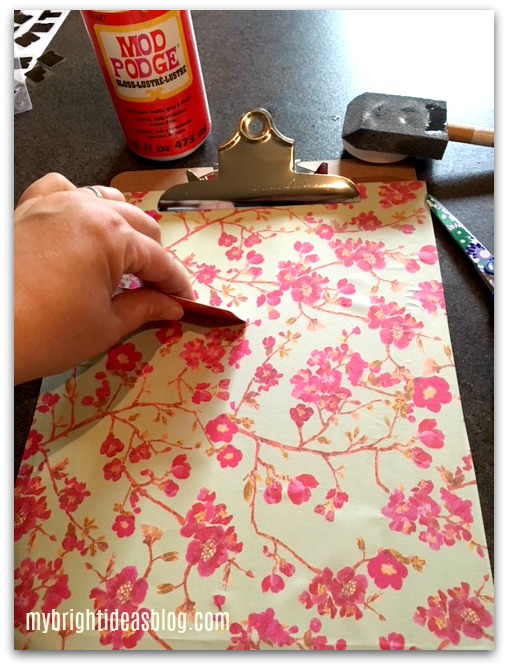
Use the gift card to smooth ripples and bubbles guiding them away from the centre and out towards the edges.
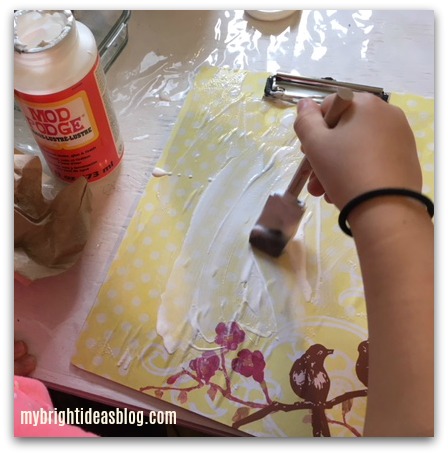
Apply a generous coat of Mod Podge, spreading it out and make it smooth and even. Avoid tiny bubbles. Allow it to dry thoroughly. This can take several hours. Apply another thin coat.
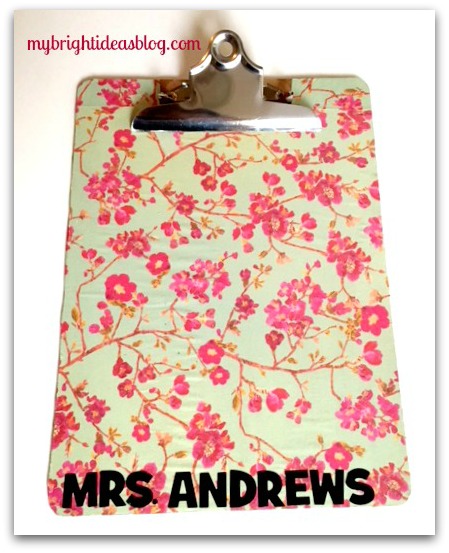 To personalize each clipboard we found some bold letter stickers in the craft department of the Dollar Tree. We bought several packs so we didn’t run out of letters. The girls had several teachers and school staff they wanted to make these gifts for. One teacher was leaving the school and getting married so instead of putting her married name on it…because we didn’t know it…we just put a message on it.
For the music teacher we put a page of music notes and the words to the song “The Lion Sleeps Tonight” on his clip board. She had noticed that was a favourite song of his. Nice touch right?!
The best teacher gifts are ones that are thoughtful, useful, original and a personal touch. My daughter was so delighted to see the music teacher carrying her gift on the first day of school in September.
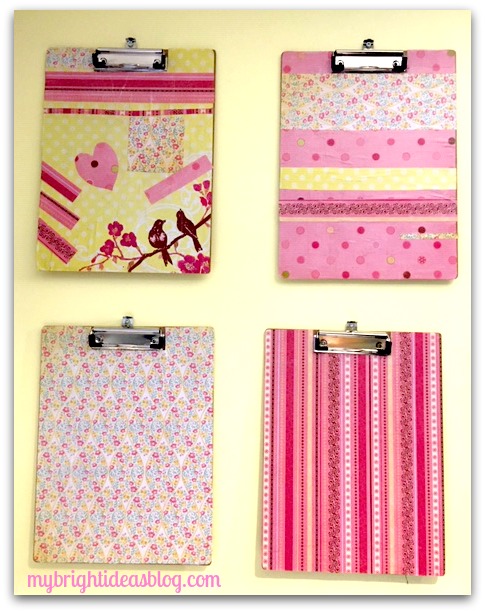 This collection of 4 clipboards are on my wall are next to my work bench. This is where I can post sticky notes, to do lists, clip my receipts.
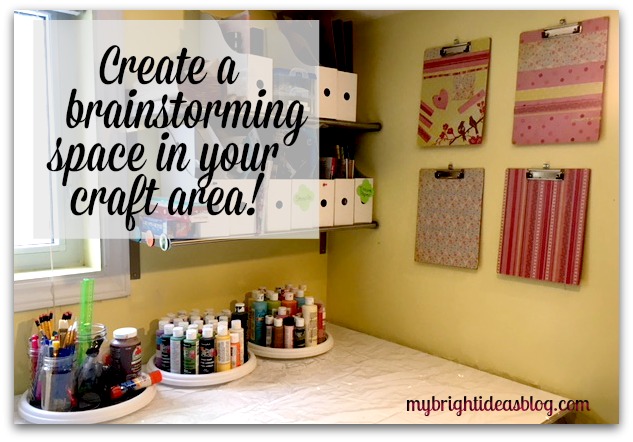 I love my lazy Susan’s for spinning around paint supplies. I won’t take a photo of the workbench today as it looks like a mad scientist’s lab (crafts more than science) has exploded. When you hop from Mod Podge to Rock Art to Sewing to Kids Crafts…the work tops gets a little nutso!
I hope you are inspired to make yourself a some clipboards for gifts or to use for yourself. The results are really cool!
Crafts Using Burlap and Buttons – Easy Project that Looks Great!